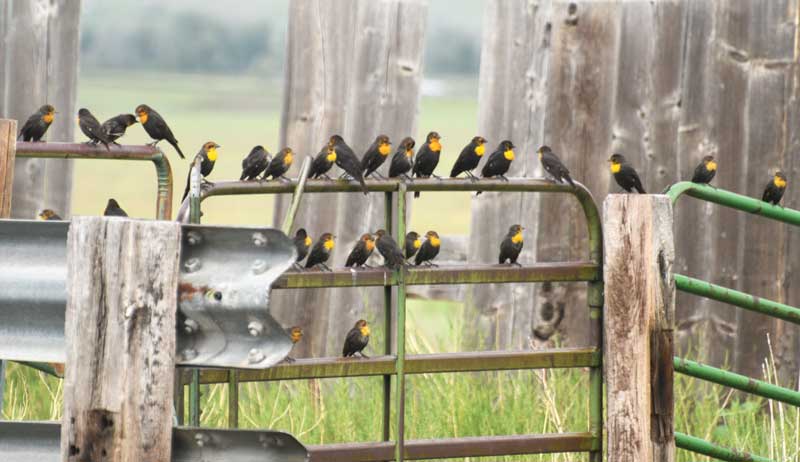
The editors of Hobby Farms magazine are always on the hunt for great photos of livestock looking good while they say cheese.
In a recent print issue, we ran the best photos submitted by readers. Each one includes the name and city of residence of the person who submitted it.
Upload the very best digital images of your small- farm livestock toHobbyFarms.com/say_cheeseor email them directly tohobbyfarms@hobbyfarms.com, with “Say Cheese!” in the subject line. Include your name and address in the body of the email.
We hope to see your photos in an upcoming issue and on our Instagram account!
Bonnie Hovey / Aiken, South Carolina
Huumala Family / Battle Ground, Washington
Jaclyn Johnson / Allegan, Michigan
Jennifer Groover / Rockwood, Tennessee
Kallie Sizemore / Hurricane, Utah
Katherine Powgnas / Milan, Missouri
Leah Moffitt / Canada
Megan Haddock / Smithville, Texas
Rachel Dickey / Salisbury, North Carolina
Ronnie Gilbert / Jamestown, Tennessee
Verna Thietje / Ava, Illinois
This article originally appeared in the January/February 2023 issue of Hobby Farms magazine.
When I was in Hawaii almost five years ago, we often went to a made-from-scratch burrito shop for lunch on days I had class. The eatery put a pineapple coleslaw on the burrito I’d order, and it took things to whole new level. It was great! My husband had the delicious idea that I should develop a sauerkraut inspired by the tasty slaw.
This Hawaiian sauerkraut recipe is an endearing ode to one of our favorite places to visit, the Big Island. We also add this kraut to our kalua pork bowls (our Minnesotan version of it, at least); it’s the perfect accompaniment, along with some kimchi and nori furikake.
This recipe is published in my cookbook, WECK Home Preserving. But considering I’m in Hawaii once again as I type this, I decided to share the Hawaiian sauerkraut recipe here.
Yield: 1 quart jar
Ingredients
1 head of green cabbage (2 to 2.5 pounds)
1/2 cup (1 to 2) carrots, grated
1/2 cup fresh pineapple, grated
1/2 cup yellow onion, thinly sliced
1/4 cup fresh cilantro, chopped
1/4 tsp. ground black pepper
1.5 tbsp. kosher salt
Remove the outer leaves from the cabbage and discard. Wash the cabbage. Cut the cabbage in half lengthwise and remove the core from each half.
Shred the cabbage into thin shreds, 1/8 inch or so. You can also use a mandolin or cabbage shredder for this step if you have one. Try to keep the shreds uniform in size so that it ferments evenly. Collect the cabbage shreds in a large nonreactive bowl.
Sprinkle salt over the cabbage and mix together. Massage the salt into cabbage until you are able to squeeze a fistful and liquid drips out. This process could take a few minutes or many—it just depends how fresh cabbage is. The liquid we create in this step is the natural brine that the sauerkraut will ferment in.
Once you can squeeze out brine, add in the remaining ingredients and mix well. Transfer the mixture into a clean quart canning jar, using your fist to pack down the mixture as you fill the jar. You can also use a wooden tamping tool for this process, but be intentional about not over-mashing the shreds or it will turn into a mushy ferment.
Leave 1 to 2 inches of headspace (room from the produce/brine to the rim of the jar). Pour any leftover brine into the jar to cover the mixture as well.
Once the jar is filled, there should be enough brine to cover the shreds. If there is not enough liquid, check again in the morning. More often than not, there will be enough.
You will need some sort of weight to keep the cabbage pushed under the brine. Keeping the shreds submerged under the brine is the key to a successful ferment. There are weights specifically made to fit jars, but you can also get creative. See the Notes section below for alternative options.
Wipe off the rim of the jar with a clean dampened towel and add the canning jar lid. Tightly screw on the ring.
Making Hawaiian sauerkraut takes a 10 to 14 day ferment. The temperature in the space where you are fermenting in will determine how long it takes. The warmer a room, the faster it will ferment. Ideally, you’ll ferment between 60 to 75 degrees F (15-23 degrees C) out of direct sunlight.
Burp the jar daily, especially at first when the ferment is very active. Just unscrew the lid briefly and tighten it back on to allow any built-up gas to release. At least once per day, you’ll have to use a clean utensil to push down the weight and submerge the cabbage again.
Scoop away any pieces of food floating on top of the brine to avoid mold.
Taste test the ferment after one week to 10 days. If it still tastes of raw cabbage, allow it to ferment another week and taste again. Once fermentation is complete to your taste, transfer the jar into the refrigerator, with the brine and all.
Fermentation does not stop once the ferment is transferred to the refrigerator, however it does slow the process way down. The taste and texture will continue to change, therefore it’s best enjoyed ideally within six months.
Notes
If you do not have a glass jar weight, you can improvise by using an easily removable small food-grade glass dish that fits inside the jar to hold down the Hawaiian sauerkraut. Or, if you have a smaller glass canning jar that can fit into the mouth of the jar you are fermenting with, you can use that to keep the produce pushed under the brine.
You may substitute fine sea salt instead of coarse kosher salt if you prefer. Consult a salt conversion chart.
Expect foam-like bubbling, at least in the first week of this ferment. It’s completely normal.
Makayla Winsterman grew up as an animal lover and always felt that farming was in her heart. But it wasn’t until she became a mom in 2019 that her instincts became a reality.
“I think that’s when the food side of farming clicked for me,” recalls Winsterman, who now runs the Winsterman Family Farm in central Nebraska alongside her husband, Andrew. “I found myself researching ways to grow our own food and live more sustainably. As parents we want what’s best for our children and we found that in farm-to-table foods.”
Winsterman adds that while the farm is on “a small acreage,” they’ve managed to build things up little by little. “My husband, Andrew, grew up on a farm, so he’s taught me a lot and has been my voice of reasoning,” she says. “He’s my rock and none of this would be possible without him.”
Taking a break from farm duties, we spoke to Winsterman about how to craft a repurposed chicken coop and the humorous nature of goats. We also got to know the farm’s resident feline.
Repurposing and embracing a do-it-yourself state of mind has become a key part of running Winsterman Family Farm.
“We have an old grain bin that we weren’t using. My husband had the idea to turn that into our chicken coop instead of buying one,” explains Winsterman. “We cleaned it out, bought some posts and built a run around it. The fencing we got secondhand, and we even used old wood from a barn that used to be on our property!”
“It has served as the best coop for our chickens,” she says. “Since it’s so large, we were able to expand our flock very easily this year.”
After looking into adding a dairy element to the farm, Winsterman ultimately settled on Nigerian Dwarf goats.
“We started with two does, Jade and Juno, then added our buck Dobby in January of this year,” she says. “I have to admit, goats weren’t my first choice for a dairy source. I really had my heart set on a family dairy cow for a long time. [But] after talking it through, we decided that goats fit into our farm a little better with where we are at. However, a dairy cow isn’t out of the question for the future of our farm.”
“Goats are humorous creatures,” says Winsterman. “They get the zoomies. Oftentimes we will look outside and see them jumping on trees and almost having what looks like a competition to see who can do the best trick when jumping off.”
Among the current herd, Winsterman describes Jade as “our goofy girl” and characterizes Juno as “our sassy independent doe.”
Recently, the farm welcomed a paddling of Indian Runner Ducks to the ranks. “This is our first year with ducks on our farm and, man, are we excited!” says Winsterman. “We had a pretty drawn out battle with pests in the garden last year, so we are really leaning into our ducks to help in that department.”
Following some research into various duck breeds, the Winstermans settled on Indian Runner Ducks. “Though they are still pretty young, they have been absolutely wonderful,” she says. “They are super sweet and not very loud at all. We will say, however, that they are way stinkier and messier than chickens by far.”
Winsterman Family Farm is guarded by a resident feline named Cookie Monster.
“We adopted him in January of this year,” says Winsterman. “We were pretty nervous of how he would be around our chickens at first, as we were told he was a hunter. The first couple times he was around the chickens he would sort of lurk around them. There was one time he got in his hunting stance and he tried sneaking up on a hen. I put myself between them and firmly said, ‘No.’ He instantly sat up and just meowed at me.
“It was like he understood at that very moment that the chickens would be off limits.”
Now that Cookie Monster is firmly embedded into the farm, he likes to spend his days patrolling the property for rodents and stopping by to greet the goats and chickens.
“He truly is the best farm cat that we could have asked for,” says Winsterman. “He is low maintenance and very sweet. We are so thankful that he came into our lives.”
Starting (and saving) seeds tie us back to tending nature in ways both empowering and humbling. On a more practical level, growing your garden from seed provides a major cost savings. A packet of seeds is usually less than the cost of a single, small-potted vegetable or herb start. Add perpetual savings if you can save the seeds that you grow. However, seed-starting equipment can add up fast. Like all things gardening, we recommend starting small!
Timing
There are countless varieties of seeds to choose from compared to the limited variety of plants available to purchase in nurseries. You can select seed for differences such as cold tolerance, days to maturity and colors (to name a few).
A common mistake new seed starters encounter is starting them too soon, myself included! Many companies suggest a number of days or weeks prior to your average last frost date for starting seeds. For my growing zone, 4b, the typical last frost date is generally mid-May, but this date is changing due to climate chaos. You can also start seeds a little earlier if you plan to transplant them out into the garden under cover.
A typical seed-starting schedule for different seed packets will have you starting seeds as early as 10 to 12 weeks prior to the last spring frost, to just two to four weeks prior.
Seed-Starting Setup
Grow Lights
There are endless options out there for indoor grow lights and, like with most things, you get what you pay for. You can get regular fluorescent “shop lights” which are less expensive up-front, but there are specific benefits to different kinds of lights, including light quality (the wavelength or color) that mimics natural sunlight’s full spectrum and intensity.
For the general homesteader starting most plants, a full spectrum light of around 240 watts, or 5,000 Kelvin should do well. We use T5 LEDs and have been happy with the results. Keep in mind that a more efficient light bulb will produce more light with less watts of energy.
A common complaint with seed starting is ending up with leggy plants. Placing the lights as close as possible to the seedlings helps keep them strong. Setting a timer so your lights can stay on between 16 to 18 hours per day is a good idea, too. Plan for enough space under your lights as your plants grow taller.
Trays+Pots
Before you get planting, sanitize the pots and trays you’ll be using for seed starting by washing in hot soapy water and scrubbing off dirt, then soak in a bleach solution for a few hours (for an 8 percent bleach, use around 1 tablespoon per 1 gallon of water). Rinse well and let air dry. This is an important step to fight the problem of seedlings damping off, which is when seedlings die back at the soil level due to fungus and bacteria in the soil.
The industry standard size for seed-starting trays is called a “1020” which is roughly 10-by-20 inches. Please stay away from the super flimsy plastic trays. Think about how heavy pots will be with ready-to-transplant seedlings before your purchase. You can repurpose plastic containers or buy new pots.
Soil Blocking
Soil blocking has been around for years but is gaining popularity because it grows great seedlings. Using a soil-blocking press, you pack soil into squares and press out a firm block of soil, removing the need for a pot. You then plant seeds directly into this block of soil. It holds itself together, creating the perfect environment for seedling roots to “air prune” and eliminating the problem of root-bound seedlings. This process reduces transplant shock and makes it nearly impossible to overwater.
seed starting soil blocks
I use a solid 1020 tray with a mesh 1020 tray nestled inside for my soil block seedlings. There is still plastic involved, but the process is more sustainable overall.
Heat Mats
There is no single best temperature for seed germination, as it depends on the seed. There is a huge variation, with peas germinating in 45-degrees-Fahrenheit soil and beans preferring around 70 degrees, but in general, you’ll get a higher germination rate and quicker germination with the use of a heat mat, especially for many of the plants we typically start early: tomatoes, peppers and eggplant. Heat mats are simple waterproof plug-in units that fit under a regular 1020 tray.
Seed-Starting Mix
Always start seeds with a sterile seed-starting mix. Don’t use regular garden soil or previously used potting mix, as these can harbor bacteria and fungus that can kill seedlings. There are many brands of seed-starting blends available, but I like to mix up my own blend.
I get compressed bricks of coco coir which yield roughly 2 1⁄2 to 3 gallons from one compressed brick after soaking it in water and letting it expand for a few hours. Be aware that perlite dust isn’t great to breathe in so mixing this outside or dampening the perlite before mixing is advised. See my recipe for soil blocking and seed starting in “DIY Seed-Starting Mix ” below.
Planting Seeds
Seeds require air, water and the right temperature to germinate. In general, seeds give you clues on how deep to plant them from their size. The bigger the seed, the deeper to plant. Tiny lettuce seeds get pressed into the top layer of soil, while bean seeds get pushed much further down into the soil. A general rule of thumb is to plant twice the depth or width of the seed size. Keep in mind some seeds need light to germinate, while others require darkness. Your seed packet should state any specific instructions. I like planting into already dampened soil and watering them in with a gentle sprinkle of water.
Cover
After sowing and watering seeds in, you’ll want to keep them warm and damp to help germination. The simplest way to do this is to cover them. We’ve all seen the clear plastic domes to help keep in the humidity but reusing a piece of plastic wrap works just as well. Remember to remove any cover as soon as you see green popping up! Keeping the soil and emerging seedlings covered too long invites mold—a seedling’s worst enemy.
Watering
Just like watering plants in the garden, you’re going to want to water the soil, not the leaves. And since we’ve got them in trays, we can even water from below.
Watering from below helps water evenly and fully, so you’ll also water less often, which is better for root development. Watering from below also decreases “splash-up,” the chance for fungal and mold (damping off) problems.
There are systems you can set up for this, but I still prefer to hand water because it gives me a chance to check on each tray. Let the top layer of soil dry out a bit, and keep in mind that more seedlings suffer from being overwatered than drying out!
The most important part of seed starting is simply paying attention to them daily. Luckily, this is also the part that brings gardeners the most joy: Tending to their babies, watching the daily growth, and responding quickly.
Tips for Keeping Seedlings Growing Well
Adding a fan will both help air flow, which will keep pests and diseases down, and strengthen plant stems. If you don’t have a fan, gently run your hands over the plant tops to mimic the movement.
When fertilizing seedlings, use a diluted (50 percent strength) form of organic fertilizer once a few sets of true leaves are present, and only every four-plus weeks after that, if you haven’t transplanted them out by then.
Pinching off top growth and/or buds will help some seedlings (such as flowers and peppers) grow stronger and produce more buds.
Seed-Starting Troubleshooting
If your seedlings get pests (such as aphids), try spraying them off with the stream setting on a spray bottle or take them outside and use a gentle hose setting. Make sure to set a fan in front of the seedlings to help them dry off as well. Air flow in general is helpful in seed starting.
Fungus gnats are becoming more and more prevalent in our seed-starting mixes. To combat, water with a diluted hydrogen peroxide mix (2 to 3 tablespoons per 1 gallon of water), top pots with vermiculite, use yellow sticky traps, and if they continue to get worse, consider watering or spraying the soil surface with a Bt (Bacillus thuringiensis) product. Bt is a naturally occurring bacteria that, once ingested, kills targeted insects.
You can also bake soil to kill any adults or immature fungus gnats. It’s sort of stinky, baking soil, but it works. Set the oven temperature between 175 and 200 degrees Fahrenheit (no hotter than that), spread your soil in a thin layer on a cookie sheet, and bake for about an hour.
Moldy soil is another growing problem. I don’t usually have this problem, maybe because I don’t tend to overwater. I do know that mold likes warm, damp environments so removing heat mats and letting the soil dry out a bit will help. You can scrape off the soil with the mold on it, and then water with a diluted hydrogen peroxide mix.
Hardening off is an essential part of growing healthy vegetable plants from seed. You’ll need to slowly acclimate your seedlings to the full power of sunlight, wind, and changing temperatures. Find a partially shaded spot that’s not too prone to wind gusts and start by bringing the plants out for fifteen to thirty minutes the first day, increasing from thirty to sixty minutes per day for at least a full week. Try to avoid the noon hour for the first few days as well. Not giving them enough time to acclimate can give them “sun scald” and set the plant’s growth back by days or weeks.
Transplanting
Once fully acclimated to the outdoors, you can transplant when the soil is warm enough for the crop; as this varies depending on the crop, refer to the seed packet. Both soil and air temps need to be warm enough. Now is the time to check out that garden plan you worked so hard on!
I often transplant my tomatoes, peppers and other heat-loving plants out under cover, giving them a little warmer soil and air and added protection against lower overnight temperatures. The best transplant day is a cloudy one, but putting up a shade cloth helps lessen transplant shock. I fertilize at time of transplant with a slow-release fertilizer, or a balanced mix containing N-P-K (nitrogen, phosphorus and potassium/potash) ratios like 3-3-3 or 4-4-4.
When you transplant plants that looked so big in your seed-starting area into the garden, they tend to look tiny. They’ll also take a day or two to bounce back from transplant shock. Try to give them (and yourself) some grace and appreciation. Remember that this plant was a tiny seed not that long ago. And trust in nature, knowing that your tiny tomato plant will end up taking up all the square footage you let it.
More Information
Best Seed Starting Tips
Best to start indoors because they take a long time to get established: celery, eggplant, leeks, onions, peppers and tomatoes.
Best to start indoors if you want an early jump (especially northern gardeners): broccoli, cabbages, cauliflower, chard, cucumbers, melons, kale, kohlrabi, lettuce and squash.
Best to direct sow: beans, corn, carrots, peas, potatoes and radishes.
Best vegetables for winter sowing: beets, broccoli, cabbage, cauliflower, chard, kale, kohlrabi, lettuce and spinach.
Stephanie Thurow (minnesotafromscratch.com) and Michelle Bruhn are (forksinthedirt.com) are Minnesota moms who fell in love with homesteading in very different ways but found friendship through their shared passions for real, local food and their DIY hearts. Find out more about them on their websites.
In our 50th episode of Hobby Farms Presents: Growing Good, Maseualkualli Farms’ Pantaleon Florez pays the podcast another visit to update listeners on what he’s been up to since episode 16. Listen as the Lawrence, Kansas, farmer and food-systems thinker shares changes to the priorities he’s working toward and much more.
Listen in as Panta discusses the important work he’s doing with the local Farm2School and Work-based Learning programs as an experiential learning specialist with Lawrence County Schools. In addition to bringing locally grown food into school cafeterias, the Farm2School program seeks to make garden education systemic within the education system and already has 22 school gardens up and going in the Kansas county.
Hear what Panta means when he talks about “the death of the farm” (spoiler alert: He’s not quitting farming) and how traditional beliefs led him to pivot his approach to agriculture. And as a new father, Panta talks about how the arrival of a child into his busy life prompted him to move toward a seed breeding program and other initiatives.
Panta shares his struggles with permanency, experience with no-till techniques, his favorite fruits to grow and much more.
Spring doesn’t just bring sunshine, flowers and baby chicks. It also brings an increase in brand (and relatively) new poultry owners seeking advice as to how they can best provide for their fledgling flocks. One of the questions I receive at this time every year is one that frankly makes my husband cringe. He can tell just by the way I gaze through the kitchen window at our coops that someone has emailed or messaged me the question.
And this year, I’ve received the question twice … and it’s only just spring. What is the perfect coop?
There Is No Short Answer
Those eager for my answer to this question are occasionally disappointed to discover that there is no short answer. Too many factors play a part in determining what constitutes a perfect coop for each person who asks.
My immediate response to “What is the perfect coop?” is “Where in the U.S. are you?” Each region’s particular climate—snowy, rainy, hot—will influence the design of the coop. Hotter climates require a more open layout with more ventilation openings, while colder, wetter climates call for an enclosed design.
Another important regional factor to consider is the predator population: “What kind of predators frequent your area?” With a few exceptions, this question has always taken advice seekers by surprise.
For those who live near wilderness parks—inhabited by raccoons, foxes, weasels, opossum, coyotes and other carnivores—having a contained run (covered, with fencing continuing at least 12 inches underground) and a secure coop is crucial. Even in urban and suburban areas, backyard chicken owners need to evaluate the potential for predator attack … even if that predator is the neighbor’s dog or cat.
There also exists the threat of an aerial attack by hawks, falcons, vultures, owls and other birds of prey.
Size of flock also plays a vital part in coop design. Those living in communities with restrictions regarding how many chickens can be kept have it easy. A coop that accommodates a maximum of four hens does not need to be large. Those living in an agricultural or rural zone have a little more thinking to do, especially if breeding will be part of the program. The coop will need to accommodate the size of the future flock, not just the current one.
Then there’s the nestbox issue. My “don’t forget your nestboxes!” typically gets me the “oh, yeah!” realization. But yes, if you’re going to have hens, they’re going to need a place to lay their eggs, one that you can easily access but is still predator proof.
The rule of thumb is one nestbox per four hens. But adding an extra one never hurts, especially if the chickens of choice tend to go broody.
The Human Factor
It’s not just the animals that need to be taken into account when considering the perfect coop. Local laws, ordinances and home owner association regulations will all affect any additional structures built on your property, whether it’s a coop or a garden shed.
These rules can dictate the color of your coop, the square footage of the structure, the distance of the coop from your home and from property lines, and whether you can run electrical and water out to the building. Some municipalities even dictate who can build your coop—e.g. a licensed contractor—and the hours construction can take place … and even go so far as to require a review of blueprints prior to approval.
“Have you checked your local laws?” has never failed to surprise the hopeful flock owner.
The other human to consider is yourself. “How will you make the coop easy for you?” tends to get the response of “What do you mean?”
Your coop design has to be one that makes it easy for you to care for your birds. In addition to nestboxes that can be easily accessed, you will want a large, human-access door that allows you to easily sweep out the soiled litter and refill feeders and waterers. And speaking of feeders and waterers, give some thought as to whether you want traditional ones or built in, gravity-fed feeders and waterers.
Another consideration is storage. Do you want to store feed, supplements and bedding in a special area in your coop, or will you be fine going back and forth between your coop and your garage, pole barn or shed? Would you like the pop door automated or are you fine opening and closing it manually?
Finally, don’t forget head space. I’ve lost count of how many times I’ve whacked my head entering our original coop’s run because my husband built the entrance without taking our height into account.
Over the years my family has kept poultry—not just chickens but ducks, turkeys and guineas—we have had nine different coops (and three indoor brooders). My dreams for a new coop would be for a facility that would house all our poultry in separate sections, each with its own fully accessible nestbox and fully enclosed run, with storage and egg cleaning/packing areas inside.
There’s much more to it, but that’s where my mind goes when I look out my kitchen window each spring.
If I were building my dream coop for just one flock, however, I’d want it just like our current main coop—the head-bonking one—with just a handful of changes. For starters, I’d redo the run to make it larger, taller and covered. I’d definitely have plumbing and electricity installed (by contractors, as my township ordinances require). I’d install solar panels on the roof and downspouts with rain-collection barrels.
But that’s about it for changes. It looks like we pretty much already have our dream coop.
With Lomi, Pela created a kitchen countertop composter to, in the company’s words, “turn your food scraps, organic waste, certified compostable packaging and certified home bioplastics into compost at the touch of a button.” The notion of turning all food waste into nutrient-rich compost for your garden is appealing to any hobby farmer, especially those spending a lot of time and/or money on compost each year.
But is it worth $500? And does the product actually live up to all the claims? Several skeptics have fired shots at the product, dragging the company’s name through the dirt.
We dug into the dirt around this issue to learn more about Lomi.
Lomi Origin
In 2021, Pela (Lomi’s parent company) began a Kickstarter campaign earning $7,228,029 USD by 19,422 backers. In a company press release, Daanvir Dhir, a materials scientist with Pela, introduced Lomi by saying, “Lomi speeds up the breakdown of organic waste into smaller fragments, similar to how earthworms break down and mix plant tissue into soil, except Lomi does this without the smell and mess! Fragmented waste provides more surface area for microbes to accelerate the composting process. The end result is a natural source of soil nutrients that increase the organic content of the soil, helping boost plant growth and soil enrichment.”
The campaign also claimed, “Lomi produces ready-to-use, nutrient-rich compost that can be made for all your indoor and outdoor plants and flowers.”
Skeptics have criticized the validity of these statements, saying Lomi doesn’t make actual dirt and there is no way it can produce the type of compost that takes months to build in a few hours.
Pela has responded to scrutiny with reclaims, written statements, slight (unadvertised) model adjustments and lots of rewording replacing words like “dirt,” “composter” and “compost” with “fragmented waste,” “earth” and “nutrient booster.”
The best definition of what Lomi produces was described by their CEO Matthew Bertulli in an interview with Kevin Espiritu on Epic Gardening.
Bertulli defines the product’s output as “pre-compost” (although you won’t find much of that verbiage on their advertisements). Espiritu refers to the texture Lomi produces as a nice add-in to soil mixes, equivalent to a peat or a core. This statement is more or less in line with criticism that nutrients in the Lomi’s output are not as beneficial or equivalent to compost—though the end product is still very beneficial in other ways.
Is the Output Beneficial?
The product Lomi produces is now being referred to as “Lomi Earth”—no longer “Lomi Soil.” According to Pela’s test garden, Helen Acres, studies show applying Lomi Earth to soil increased crop yield on average by 26 percent and crop size by 17 percent.
One application of Lomi Earth can help boost levels of eight essential nutrients. So, while the company has shifted away from the “compost” term, the product does, in fact, produce a nutrient-rich amendment for soil.
Ideally, we should all do our part to eliminate food waste. To that end, Lomi can help. One cycle of the machine reduces food waste by as much as 80 percent. That is major shrinkage. Sending less to the landfills is a win for literally everyone in the world. Lomi definitely beats landfills—hands down.
The argument, then, is around if the byproduct is as beneficial as Lomi claims, not if it is better than throwing food and bioplastics away.
Lomi does make a lot of sense for apartment dwellers or suburban families who do not compost. Since this system does not replace or equal the benefits of actual compost piles, it should not be directed toward people who already compost.
Lomi does have other benefits over green bins, too. The system won’t attract pests, is free of smells and doesn’t leak. It’s a sleek and attractive countertop appliance, and the Lomi does create a usable product for houseplants, landscapes and garden beds.
How to Use Lomi
It’s important to understand your intention and purpose before selecting a mode.
Grow Mode is the longest cycle, taking between 16 to 20 hours to break down organic waste. It also operates at the lowest heat setting to preserve as many nutrients as possible. Grow Mode is the only mode advertised to create a product that can go straight into soil.
The Eco-Express mode is the shortest composting cycle and uses the least amount of energy. It takes three to five hours to complete. According to the company, the final product from the Eco-Express mode can be tossed into your compost pile, green bin or waste bin. It does, however, seem counterproductive to use a countertop composter to create something that needs to then be composted. But I can see how this option would be convenient for those with limited trash space who don’t have plants.
The Lomi-Approved setting is for select bioplastics in addition to compostable food waste. This setting takes five to eight hours and is the only mode that can handle things other than food waste.
How to Use Lomi Earth
Pela recommends adding Lomi materials to the soil at no more than a 1:10 ratio. When using it as a fertilizer for plants, remove a bit of soil around the base of your plants, add the Lomi Earth, then cover back up with soil.
Because it’s dried and powdered food waste, you don’t want to leave Lomi Earth exposed directly to air and moisture, to avoid mold on the surface of your garden beds. By burying it just under the surface, you’re allowing it to decay in place around your plants and provide its nutrition to the soil microbes and avoid mold.
What Goes in the Lomi?
There are a wide array of things you can put into the Lomi to start the composting process. I would not put some of these items in my compost pile because they would attract pests and rodents. So the options are broader for this type of composting.
Here are some items to put in the Lomi:
Fruit and vegetable waste like avocado skins, watermelon rinds, banana peels, etc.
Leftover cooked food
Meat products like fish, beef, pork or chicken
Dairy products like cheese
Grain products like bread, pasta or oatmeal
Soft bones (like fish bones) or shells (eggshells)
Tofu, eggs and other miscellaneous proteins like beans and legumes
Coffee and tea, along with paper filters/paper tea bags
Plant trimmings, flowers or weeds
Items you should not put in the Lomi:
Liquids (in large quantities—do not dump glasses of cooked juices)
Hard bones or hard pits (i.e. avocado, peaches)
Cooking oils or very greasy food
Pet wastes
Soaps or shampoos
Waste products from allelopathic plants
Non-compostable items like plastic bags, aluminum foil, diapers or other things that obviously should not be added to a compost pile.
Conclusion
Lomi has a benefit to every user. For people already composting, it provides an outlet to reduce waste and lessen the amount going to landfills. Several types of food allowed in a Lomi would not be thrown into a compost pile because it would attract unwanted pests and rodents—it is good for waste that a compost pile can’t reduce.
In addition to food waste, bioplastics cannot go in your compost pile either, so the Lomi meets this need as well. For people not composting, this added benefit makes a far better option than green bins or garbage disposals.
Lomi Earth provides an irrefutable benefit to your soil—not more beneficial than the material created in a six-month compost pile, but still beneficial. Pela is continually working to improve the product to enhance the amount of nutrients the Lomi adds to soil and how quickly supplement pods helps trash become compost in the machine’s cycles.
Spring is officially here! If you’re like me, you’re itching to fire up your machinery, haul out your hand tools, and get started on another year of farm projects once spring weather takes hold.
In celebration of spring—and to excite you with all the possibilities of the new season—here are 10 tips and ideas to help you get the most productivity out of the season.
At the end of winter, before trees leaf out and grass starts growing, it’s easy to see the lay of the land and find areas that need attention. The rocks in that overgrown, grassy field will be more apparent. You’ll be able to see deeper into forestland and take stock of your trees.
There’s a lot of value to be gained from scouting your farm during the short transition between winter and spring.
You might be thinking, the ground is probably maybe sort of dry enough to move heavy farm machines around. Except if the ground isn’t dry, you risk creating ruts, which can increase erosion and make fieldwork difficult. Worse, you can get machines stuck.
It’s wise to tackle machinery maintenance in late winter or early spring, before equipment is needed for time-sensitive projects. There are many steps to properly prepare an ATV or UTV for another year of work. The same goes for your tractor(s).
Once the ground is dry and you’ve tackled spring machinery maintenance, put your tractor to good use on spring projects like adding compost to garden beds and cleaning up tree branches blown down during winter storms. It’s best to get these projects out of the way early. Waiting too long can give you headaches down the road.
6. Consider painting farm buildings.
Spring is the perfect time to examine farm buildings and determine if they need new paint. Paint seals out moisture and blocks ultraviolet rays, helping wooden buildings last longer. Spring (and summer) are good times of year to paint, so aim to get an early start on your painting game plan.
You might know that spring is the ideal time of year to prune fruit trees. But did you know many other plants and trees are suited to spring pruning as well? Make some time to give your plants the pruning attention they need.
8. Tackle fence repairs.
Depending on the severity of the winters you experience, you may find that your farm fencing comes out of winter a little worse for wear. Walk your fence lines first thing in the spring and make any necessary repairs.
9. Prepare row covers for spring plantings.
Row covers protect garden plants from cold weather and extend your growing season. If you have row covers ready for use first thing in the spring, you can plant your garden early and enjoy harvests sooner. So what are you waiting for? Get those row covers ready!
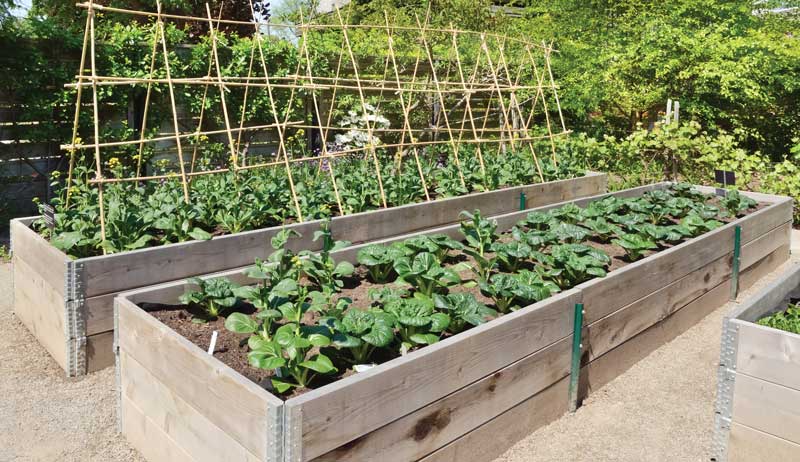
Raised beds offer many benefits, such as maximized growing space, improved drainage and a longer growing season. Though a simple technique, raised beds can increase the health and productivity of any garden and offer a perfect solution for problems with limited space, poor or rocky soils, and persistent weeds.
The higher soil level makes them easier to maintain, while the loose soil resulting from less foot traffic and the nutrient-rich growing medium used in raised beds help support healthier, more vigorous plants with a better root system. This makes building raised beds a very important task for any starting gardener.
The question, though, is: How does one start? From choosing materials to construction and design, this article will explain all you’ll need to know about building the ideal raised beds for your gardens.
Site Selecting & Planning
Before constructing a raised bed and choosing materials, carefully select and plan a site for your garden. Generally, any sunny spot will suffice for placing a raised bed. Most flowers and vegetables require at least six hours of sunlight daily.
If necessary, remove lower limbs on nearby trees for additional sunlight.
Choose a location that is most convenient for you. Being able to easily visit and monitor the raised beds daily will ensure well-watered and healthy plants. Choosing an easily visible site is ideal. Make sure there is also an accessible and convenient water source nearby.
Plan the beds to be 3 to 4 feet wide to be easily worked from either side. If one side isn’t accessible because of a wall or fence, stay under 2 1⁄2 feet, which will ensure you can reach the farthest plants.
You can make the beds as long as you desire. However, if you intend to use wood as a building material, aiming for multiples of four (4, 8 or 12 feet) would be most convenient. The pathways between beds should also be wide enough for easy access. For comfortable planting, watering and harvesting from the paths, plan for 3- to 4-foot walkways.
The height of the beds is also important, and 12- to 18-inch-tall beds will allow for lots of root growth for a wide range of vegetables. If you are planning on growing only greens,
6 inches tall is enough. Locate beds so they receive maximum sunlight and don’t shade each other. Also, line the beds north-south or east-west rather than on a diagonal.
Material No. 1: Wood
Wood is probably the most popular and commonly used material for raised beds. And there certainly is a reason for it. Wood is readily accessible and easy to work with. Using wooden boards, almost anyone can quite simply make an excellent raised-bed garden. It’s also naturally beautiful and can be a very affordable material for raised beds.
If you live in a dry climate, wood might be a great choice as it’ll most likely last much longer in your garden. The downside of wood is that it won’t last forever. All wooden raised beds will eventually rot and have to be replaced. Sometimes, this is even desired if you lease the land or don’t want to make a permanent alteration to your garden.
Don’t use pressure-treated wood because of toxicity issues. Instead, buy naturally rot-resistant wood such as cedar or redwood. These woods, which include black locust, black walnut, cypress, Osage orange, red cedar, redwood and white oak, have natural oils in them which resist insects and decay and can make them last up to 25 years or even more.
You should try to find the darker, denser heartwood of these woods for true rot-resistance.
The downfall of these wood types is that they could be very expensive. So, if you would like to start raised beds without the investment, untreated pine, spruce or fir can be better options. These woods are cheap, easier to work with and will make a nice bed that will last for three to five years.
The dimensions of the wood are also an important factor. When buying wood, choose the thickest and widest lumber you can afford. Thicker lumber will be less likely to bow or crack under the pressure of the soil. Two-inch-thick boards, though more costly, will last much longer than 1-inch-thick boards. The same applies to the width of the lumber.
Raised beds are more prone to rot in the seams between the boards. By using wider lumber, the resulting raised bed will have fewer seams and will resist rot longer.
wood raised garden beds
At a Glance: Wood
Many gardeners use wood for their raised bed frames. This material has many advantages.
PROS
can be very affordable
when untreated, is very safe and nontoxic
easy to work with
naturally attractive
CONS
isn’t permanent and will eventually have to be replaced
can be expensive
Tip
An interesting idea is to buy green or unseasoned lumber. If you don’t mind the visual appeal, the rough edges of unseasoned lumber resist rotting better and are much cheaper.
Building Advice
Measure and mark the length of the walls and cut the boards. Drill pilot holes slightly thinner than the screws you’ll be using. Assemble the boards using screws. (Nails won’t hold over time.)
One end of each board should overlap the end of the next. You can add corner posts for extra strength. For longer and taller beds, add more posts along the walls to support the extra pressure of the soil. When ready, continue to treat or fill the bed with soil.
Natural Wood Treatment
Though commercially treated wood isn’t recommended due to toxicity issues, numerous other natural ways exist in which you can treat wood to extend the life of your raised bed. Linseed oil and tung oil are popular options. Make sure you buy them raw without any toxic additives that are commonly added to wood treatments. Other interesting ideas to try are beeswax mixed with oil and milk paint.
Milk paint is a great nontoxic alternative to latex paint that was used for thousands of years before paint was available commercially. Barns painted red with milk paint can still be seen standing today as proof of its durability.
Milk paint can be bought or made at home from simple ingredients. It’s a great way to safely increase the life of your raised beds and can be used to add a wide range of colors. After applying milk paint, you can add a layer of linseed oil or another sealer for additional beauty and durability.
Cheap and long-lasting, concrete blocks can be a great material for building raised beds. They can simply be stacked for a quick and simple raised bed that will last a lifetime. The process can be completed in an afternoon, though it’s important to note that it’ll be a lot of exercise.
When building raised beds this way, you can always restack the blocks to change, move or simply take away your raised beds anytime. On the other hand, some gardeners prefer to use mortar when building with concrete blocks.
These beds will take a little longer to build, though the effort can be worth it.
When using mortar, the beds can be made at any height, and you can paint, plaster and create a wide range of decorative finishes. For example, they can be clad on the outside with flat pieces of stone for a beautiful appearance for a fraction of the cost of a real stone raised bed.
Don’t confuse concrete blocks and cinder blocks when building raised beds. Cinder blocks are lighter and contain fly ash, a byproduct of burning coal, which can leach heavy metals into the soil. Concrete blocks on the other hand are much heavier and made from a mixture of sand, stone and Portland cement, all of which are known to be safe. The problem is that the two are similar and can sometimes be used interchangeably.
To make sure that the concrete blocks you use don’t contain any fly ash, contact the manufacturer, or even better, buy the blocks right from the concrete company. Don’t use old blocks for your garden as you can’t be completely sure what’s in them.
For safety’s sake, some people use concrete block sealer to paint the blocks or line a protective layer between the blocks and the soil.
Michael Feldman
At a Glance: Concrete Blocks
This material is also popular for some but has a few drawbacks.
PROS
cheap
simple to stack
can be used to build raised beds in many shapes
very long lasting
when built without mortar can easily be restacked to change, move or remove the raised beds anytime
warm the soil in cold climates, increasing the growing season
CONS
though simple, building can be an exercise
heats up in warm climates
may contain toxic fly ash
Tip
An interesting idea is to make concrete blocks yourself. You can make a mold or get one online. The benefit is that you can control what goes into the mixture and can make ideally shaped blocks to best fit your needs.
Building Advice
Use marking paint, chalk or string to plan and mark out the space for your raised bed. Concrete blocks come in uniform sizes, so it’s easy to calculate how many blocks you’ll need. Dig and level out the surface of the ground or add a layer of sand or gravel.
Lay the blocks with the holes facing up. One layer will be deep enough for growing greens. Add a second layer if you are planning on growing root crops and other deep-rooted vegetables.
Wear gloves and good shoes to protect your hands and feet. If you are planning on more than one layer high, stack them like bricks, with the joints between the blocks on the second layer sitting on the middle of the blocks in the first layer. When ready, fill the holes in the blocks with soil or dirt for added stability. For even more strength, pound rebar into the holes in each corner of the raised bed.
Lay out the bottom of the raised bed with several layers of newspaper or cardboard. Your raised bed is ready to be filled with soil.
Note
Concrete blocks, like all masonry materials, will heat up under the sun and warm the soil throughout the day. This is very beneficial for those in cold climates and will effectively increase the growing season and allow them to grow more warm-loving crops.
On the other hand, those in the south may have problems in the midsummer heat.
If you want a quick, temporary raised bed garden and don’t want to bother with materials, straw bales can be a great choice. They are cheap and easily accessible and will make an excellent raised bed for a season or two. Just lay the bales end to end and you have a great raised bed ready to be filled with soil.
The straw will slowly decompose, adding additional nutrients to the soil. After one or two growing seasons, it can be used as mulch or added to compost. A new bed can be started the same way.
Unfortunately, not all straw is good for your garden. Some straw may contain the leftovers of herbicides that have been used on the crop. Try to source straw from farmers that don’t use these herbicides.
Since tracking the straw bales to the grower is not always possible, there is a simple test to determine the presence of these toxic chemicals.
Cut some of the straw into small pieces and mix them into a potting mix. Use the potting mix to plant several containers of legumes. Then plant several containers of legumes with the same potting mix but without the straw. As the legumes sprout and grow, observe the difference between the two groups. If the legumes in the containers with the straw are stunted or misshapen, then the straw bale most likely has herbicides.
On the other hand, if the two groups both look the same and healthy, the straw is probably safe to use. Of course, this is only probably, and it’s best to try to get straw from an organic grower. You can look on your state’s department of agriculture website for a list of organic farmers, the crops they grow and how to contact them.
Don’t confuse straw and hay when making raised-bed gardens. Straw is cheaper and makes a great raised bed material. On the other hand, hay breaks down much more quickly and contains seeds that will germinate and be a constant weed problem. Hay also more likely contains herbicides that may harm your plants.
At a Glance: Straw Bales
This material doesn’t last but can be used in your compost heap after the season.
PROS
cheap
fast and easy to make
adds nutrients to the soil
CONS
will last only one or two years
can contain herbicides
contain a few seeds which will sprout and be a weed problem
can be heavy
Building Advice
Use straw bales tightly bound with twine to form the frame of your raised bed. It’s best to work on a dry day as the bales will be heavier when moist.
Place the bales in the desired shape, usually a square or rectangle, and fill the inside with a growing mix. To make the beds last longer and reduce weeds, place several layers of newspaper or cardboard on the ground before placing down the bales.
Tip
An interesting idea to try is straw bale gardening. A new technique, straw bale gardening uses a curing process to turn the center of a straw bale into a nutrient-rich growing medium. The result is a neat bed complete with a growing medium perfect for growing many flowers and vegetables.
This article originally appeared in the January/February 2023 issue of Hobby Farms magazine.
Investing in a bull is a big decision, and buying one is not a choice to be made hastily. Bulls require thorough research and generally a large initial investment in order to reduce the risks of getting a poor quality or ineffective animal.
Unfortunately, even good research and pre-planning don’t mean that you will find a bull that lasts for many years. This uncertainty makes owning them a rather risky proposition. (If you’d like to skip ahead, towards the end of this article, we discuss a few of the pros and cons of owning a service bull as opposed to artificial insemination.)
The criteria that you use when looking for a new bull will depend on what your long-term plan for the herd is, as well as the animals’ intended role on the farm.
For example, cattlemen looking for a bull to go with a herd of Black Angus heifers would likely want a Black Angus bull that will produce smaller calves. As heifers haven’t given birth before, it will be more challenging (and risky) to breed them with a bull that produces large calves. Calving Ease Direct (CED) is the abbreviation to watch for in the bull catalogs.
What Should I Look for in a New Bull?
Be careful not to rush into the decision of buying a bull. Know what traits you’re looking for and study the catalogs to get a better idea of which ones would suit your needs best.
Fourth-generation cattleman (and my brother-in-law) Kordell Krispense, who raises Black Angus cattle here in Central Kansas, shared with me the main traits (in order of priority) that he looks for in a potential new bull:
Calving ease: This indicates a bull that produces lower weight calves by throwing a slightly premature calf (by about a week or two).
Docility: The temperament and calmness of the animal. Kordell looks for bulls that measure in the top 25 percent of the Angus breed for docility.
Carcass traits: This would indicate the marbling of the meat and the size of the ribeye area.
Heifer pregnancy: This indicates how easily his daughters will breed.
While looking through a catalog of bulls for sale, he circles the ones that meet his criteria. Once the sale arrives, he then walks through and looks at them in person. In person, he can examine the animals for other important characteristics, such as their temperament and confirmation (i.e. feet health, as a bad foot can lead to lameness).
You can buy a bull from a variety of places, but use caution and wise judgement before agreeing to purchase one. From an individual simply parting ways with an animal (in which case, you should ask why), to a professional breeder that raises cattle with high-quality genetics, or even a local sale barn— you have options on where to purchase a bull.
Problems can arise, however, if you simply choose and purchase without any idea of the bull’s history, prior health, current fertility, etc. Good breeding stock is usually not going to be sold through a sale barn, although there are some exceptions.
If a bull is at a general livestock sale, there is a decent chance that something could be wrong with him and he is likely headed for slaughter. With this large of an investment, don’t play games and risk buying a no-good bull. For these reasons, it’s a good idea to pursue buying one from a trusted breeder.
How Long Will My Bull Last?
A bull’s usefulness will vary from animal to animal. Some bulls can breed for many years, while others can go bad in their first year (although it’s not likely).
Kordell shared that bulls should probably be tested each time before they are turned in with the cows to make sure they’re still viable. Veterinarians will test them and have a cutoff of about 70 percent, meaning that the bull has to have 70 percent or more of the sampled cells (semen) be alive.
Should I Buy a Bull or AI (Artificially Inseminate) My Cows?
While it might seem like a large investment to purchase a bull, artificially inseminating your entire herd also comes at a price. Furthermore, AI generally carries only about a 60 percent success rate. Even if you go the route of AI, you’ll still need a clean-up bull to make sure your cows get bred.
With a service bull, Kordell has seen around a 93 to 94 percent success rate.
One perk of using artificial insemination? You can improve herd genetics, as you won’t be limited to only using the bull in your pasture. When purchasing semen for AI, you’ll have a chance to introduce higher-quality genetics into your herd without the huge investment of purchasing a more expensive bull.
Purchasing a bull can be an exciting step in the process toward furthering your own herd. Take some time to study traits and narrow down what your highest priorities are to find in a bull.
Make a plan for how you would like your herd to grow in the future years. Having this game plan in mind will help as you continue to make decisions and grow your operation.