Categories
Recipes

Ginger-glazed Carrots

Ginger-glazed CarrotsIngredients

  • 1 pound carrots, peeled and sliced diagonally into 1⁄4-inch thick rounds
  • 1/2 cup freshly squeezed orange juice
  • 2 T. butter
  • 1½ T. brown sugar
  • 1 T. fresh ginger, peeled and minced
  • Salt and freshly ground black pepper to taste 
  • 1 T. chopped fresh parsley

Preparation
In a large, heavy-bottomed skillet or Dutch oven, combine carrots, orange juice, butter, sugar and ginger. Bring to a boil over medium-high heat. Reduce heat to medium, cover and cook five minutes. Reduce heat to medium-low, uncover and simmer about 15 to 20 minutes or as needed until carrots are tender. The liquid will reduce and glaze the carrots. Season to taste with salt and pepper, and stir in parsley just before serving. Makes 4 servings.

More Root Vegetable Recipes

Categories
Recipes

Mom & Dad’s Pear Butter

Pear butter

Ingredients

  • 12 cups pear pulp
  • 6 cups maple sugar, evaporated cane juice, brown, or granulated sugar, depending on your taste
  • 1/2 cup orange juice
  • 1 tsp. grated orange peel
  • 1/2p. nutmeg

Preparation
Cook washed, sliced pears until soft, adding just enough water (if any) to prevent sticking. Press through sieve or food mill.

Measure 12 cups, and mix in sweetener, orange juice, peel and nutmeg.

Pour, hot, into Ball Jars (pints or quarts) and process according to your own canning traditions and instructions.

Categories
Recipes

Italian Vegetables and Cheese Pizza

Italian Vegetables and Cheese PizzaWhen you live in the country, you get pretty handy at satisfying your cravings for your favorite restaurant food with home-cooked versions–after all, you can’t call for pizza delivery or run down to the corner for Thai food.

But, you’ll probably find that doing it yourself makes it even better.

Pizzas are an easy introduction to reproducing restaurant favorites at home, but they also lend themselves to all kinds of creativity, so don’t stop with the recipes below.

Experiment with toppings, and you’ll soon find a personal favorite that beats delivery hands-down!

Ingredients

  • 12- to 14-inch pizza crust, unbaked
  • 1 small or one-half large eggplant
  • 1 small Italian squash or zucchini
  • ½ cup red bell pepper, chopped
  • ½ cup white onion, chopped
  • 2 T. olive oil
  • 3 to 4 medium tomatoes, sliced 1/8-inch thick
  • 1 T. chopped fresh garlic
  • 4 T. combined chopped fresh oregano, basil and rosemary
  • ½ tsp. salt
  • 2 oz. goat cheese
  • 4 oz. feta cheese, crumbled

Preparation
Preheat the oven to 450 degrees F.

Peel and remove ends from eggplant. Cut into 1-inch-square cubes. Toss with 1 tablespoon salt, and set aside to let the salt draw out the liquid. After 30 minutes, drain off liquid and squeeze eggplant chunks dry.

Meanwhile, prepare the remaining ingredients. For the Italian squash, remove ends, slice in half lengthwise, then slice halves in 1/8-inch slices.

Heat the olive oil over medium-high heat in a heavy-bottomed skillet. Add eggplant, Italian squash, pepper and onion; sauté just until vegetables begin to soften. Set aside.

Arrange the sliced tomatoes in a single layer on the crust. Sprinkle with garlic, herbs, and salt. Bake for 10 to 12 minutes until tomatoes are soft. Lightly mash tomatoes with a fork, then top with sautéed vegetables and goat and feta cheeses. Bake until cheese is lightly browned, about 20 to 25 minutes.

More Main Dish Recipes

Categories
Homesteading Recipes

Ice Cream Making Activities

Ice Cream Making Activities
Ice Cream Sales Enhancements

Showcase the playful, special-occasion side of ice cream. Long ago, farm families and their children often enjoyed the feeling of contributing to a common goal.

Large projects like the making of ice cream and soda pop can help re-create this bonding and sense of contribution that far outweigh simply being “served” by the hostess.

Ice Cream Assignments and Field Trips

With adults and mixed age groups gathering together, have everyone participate in the making of the ice cream or soda pop when it’s a one-day event.

Break up jobs into separating the eggs, measuring the cream, pouring the ice and salt, cranking the churn, chopping the strawberries, crushing the nuts, scooping and serving the finished product.

When time permits, choreograph groups to go out onto the farm and harvest the petals, feed the dairy cows, goat or sheep and fetch that morning’s fresh milk from the cooler, gather the walnuts or retrieve them from storage in the barn and shell them.

If not many ingredients are produced on your farm, make a group outing to other local farms for the main ingredients, such as a u-pick pear orchard or blueberry farm, then return and set up the group soda pop or ice cream home factory.

Who’s Bringing Ice Cream Labels

It may also be appropriate to engage others by having them contribute something from their own homes for a gathering further in the future, such as next year’s family reunion.

For example, if you’re having an ice cream, grape soda pop or root beer making project where everyone will take home a quart of their own, have someone in the group design container labels ahead of time, have everyone save recycled containers, have one grow the chocolate mint, one harvest and dry the wintergreen leaves, and another plant and grow the anise.

Plan Ice Cream Ingredient Gardens

Kids can grow special gardens that specifically contribute to a home hobby or cottage industry of making soda pop or ice cream.

A small mint garden, edged to protect from its rampant spreading, is very fun and easy to grow. You might include chocolate mint, banana mint and orange mint, and start with just one plant in late winter, then the kids can root more and more starts in jars of water to plant in the early, first garden.

Kids can nurture a hibiscus shrub for a fruity-tea soda pop (very fun, because hummingbirds love the flowers), or plant and eventually harvest anise seed for root beer.

Ice Cream Recipe Experimentation

Let kids observe and participate in the spirit of experimentation with your recipes. While we know success can bring confidence and a sense of accomplishment, the thrill of experimentation seems lost to many today. Meaning, it doesn’t have to “succeed” the first time, which teaches the joy of innovation, invention, brainstorming, seeking and trying solutions, and gaining “bounce-back-ability” when one idea doesn’t turn out as planned.

Simply experiment once a week or once a month as your end goal without plans to feed a crowd. Any good results get entered into the family cookbook.

Ice Cream and Special Events

Birthday parties, sleepovers, and living history and natural science lessons, can revolve around a soda and ice cream event using tested, successful recipes.

Everyone participates and has something they made themselves to take home and share instead of a store bought party favor trinket.

Read Part 2 of this article ….

Categories
Crops & Gardening Farm Management Homesteading

Root Cellars

You stroll out into the garden, picking ripe fruits and vegetables, knowing that come February you’ll still be enjoying their freshness. For those of us attracted to the romantic aspects of small-farm life, this is an appealing scenario.

Root cellars, the ancient technology that makes such scenes possible, are currently experiencing a rediscovery, but not merely because of the pleasures of eating self-grown food, but also because of the actual possibility of reducing expenses and providing for significant food storage in times of potential trouble.

History

Native Australians were the first people to take advantage of the cooling and insulative properties of buried foodstuffs in the earth. Records indicate that over 40,000 years ago they grew large amounts of yams and developed the technique of burying their produce in order to preserve it for future use. In the process, they also discovered the phenomenon of fermentation, and ever since, alcoholic beverages have been a large portion of those products stored in underground repositories.

Underground storage facilities from the Iron Age have been discovered, and the Etruscans commonly buried their immature wine, but the actual use of walk-in root cellars as a means to prolong the freshness of fruit and vegetable crops was probably an invention that occurred in 17th century England. It might seem surprising that the great civilizations of China and Egypt did not develop root cellars, but the Chinese were the masters of food preservation via salting, pickling and the additions of spices; the Egyptians, residents of an arid environment, were the masters at drying food. It took the right combination of cool winters and hungry Englishmen to finally invent the concept of root cellars.

Certainly the most notable practitioners of root-cellar arts were the early colonists that arrived in North America from the United Kingdom. The eastern halves of America and Canada contain thousands of old root cellars, and the small Newfoundland town of Elliston actually claims the title of “Root Cellar Capital of the World,” and boasts of over 135 root cellars, some dating back 200 years.

Temperature

The basis of all root cellars is their ability to keep food cool. They were, essentially, the first refrigerators. A well-insulated root cellar can keep the food inside 40 degrees cooler than the summertime temperatures outside. This coolness also has benefits during the winter, as maintaining food at a temperature just slightly above freezing has the effect of slowing deterioration and rot. Temperatures inside the home, even in basements, are noticeably warmer, so food stored inside the house has a tendency to spoil much more rapidly than food stored in a cooler root cellar. Temperatures above 45 degrees F cause toughness in most stored vegetables, and encourage undesirable sprouting and considerably more rapid spoilage.

The temperature in a root cellar is never uniform. The temperature near the ceiling is usually 10 degrees warmer than elsewhere in the cellar, so the ceiling area is therefore appropriate for placement of produce that tolerates warmer temperatures well, such as onions, garlic and shallots.

Storing Food

What can you plan on storing in your root cellar once you build it? Certainly, many of us probably have visions of root cellars in the 19th century, packed with bushels of apples and sacks full of potatoes. Today’s root cellars are really not much different, and potatoes and apples are two eminently storable farm products. But the problem with that pair is that they don’t really go well together. Apples have a tendency to emit ethylene gas, which causes problems for potatoes stored nearby, and will also make any exposed carrots or other root crops bitter. As a matter of fact, many fruits, including plums, pears and peaches, and some vegetables, such as tomatoescabbage and Chinese cabbage, are also notorious ethylene producers.

So, what is a dedicated food saver to do? Luckily, there are ways around this problem. A good root cellar has a variety of shelves, some higher than others, and some closer to the air vents. Placing the ethylene producers up high and nearer the exit vents has a tendency to move harmful gases away from produce stored on the floor below. Many root crops are also regularly stored in boxes of loose soil or sawdust, further insulating them from their neighbors’ emissions. Some produce, like cabbages and onions, often emit odors that can taint the flavors of other vegetables, as well as fruits, so finding high, remote corners for these pungent items is a good idea too.

In addition to raw produce, root cellars are excellent locations for a number of other foodstuffs as well. The previously mentioned beverages, like wine, cider and beer, all enjoy the cool, dark environment of a root cellar. Cured meats, like ham, bacon and other smoked meats store very well in temperatures below 40 degrees F. Milk, cream, butter and cheese all appreciate the environment of root cellars. Grains and nuts store very well in root cellars, but require extra precautions against insects, and must be sealed tightly to be secure. Dried and canned foods also keep well, provided they are kept either in less humid cellars, or in separate, drier compartments.

Fresh vegetables and fruits last different lengths of time when stored in a root cellar, but potatoes probably last the longest among vegetables; apples among fruit. Other good keepers include cabbage, beets, kohlrabi, onions, sweet potatoes, winter squashespumpkins and turnips. Beans, nuts and dried peppers are very long keepers.

Humidity

After temperature, humidity is the next most important feature of a typical root cellar. It is a good idea to equip your root cellar with a humidity gauge called a hygrometer. Most fresh fruits and vegetables require high humidity to avoid shriveling. A typical underground root cellar will naturally maintain a high humidity if it has an earthen floor, but depending on your particular environment and intended cellar use, you may wish to adjust the humidity level up or down by your management practices. Coolness is generally a desirable characteristic regardless of what you’re storing, but if you are storing a lot of canned goods, nuts or dried fruit, humidity can be your enemy because dried fruit can easily rot and metal canning lids can rust in humid environments. Once you make a list of the products you would like to store, the value of a root cellar with one humid chamber and another dry chamber might become more evident.

Humidity can be increased with an exposed dirt floor, sprinkling water on gravel floors and packing vegetables in wet sawdust. Humidity can be lowered by using concrete floors, barrels of rock salt or by allowing for more ventilation entering from drier air outside.

One problem with high-humidity environments is that sometimes the air will condense as it cools, and that condensation can be a problem if it drips off the ceiling structures onto produce stored below. Avoid placing storage barrels below potential drips. Pre-treating the ceiling with disinfectants like chlorine can also slow the potential spread of dripping diseases.

Hot And Cold Places

Root cellars serve different purposes depending on their locations, and cellars in regions with excessively hot or cold temperatures are modified to suit their purpose. If winters are mild, as in Arizona or Florida, low temperatures can be difficult to obtain, no matter how deeply a root cellar is buried. But even in these warm areas, root cellars can help keep produce as cool as possible, and some builders are particularly inventive in designing methods whereby water dripping across burlap sacks cools the air near the root cellar’s intake vents. Other warm-weather residents content themselves, like the Egyptians, with storing nuts, grains and dried foodstuffs in warmer, low-humidity cellars. Arizona is a particularly good environment for producing sun-dried fruits, and those products will keep for many months without preservatives if kept dry and a bit cooler than the normal environment.

In very cold areas, the purpose of a root cellar is generally to prevent the stored food from freezing. Toward this end, such cellars are usually constructed to be extra heavily insulated, and with vents that allow some sun-warmed air to be conducted inside. Large barrels of water inside the cellars can act as thermal buffers; some builders even go so far as to build covered manure pits because the slow decomposition gives off a bit of heat. Other people use the more modern solution of hanging a light bulb from the ceiling, taking care to shield any potatoes, onions or other root crops from the light.

Air Circulation

One of the key control features of a root cellar is the set of air vents that allow air to enter and exit the cellar. These vents not only allow a greater amount of temperature adjustment than available to a static space, but the air circulation can also be a valuable tool to deal with the ethylene gases and odors produced by a mixed assortment of fruits and vegetables.

The minimum arrangement is one inlet vent and one outlet vent, although there are a variety of situations in which multiple vents would be appropriate. In general, inlet vents should be placed low, and exit vents placed high. This is conducive to a nice, passive air flow through the root cellar.

The outsides of the vents should all be sealed where they enter the structure with packed cloth, expanding foam or tight rubber gaskets. The vents themselves should be equipped with closing and opening valves, and it is convenient to make these valves operable from outside the root cellar. Closing vents in freezing weather and during summer heat spells will help keep the temperature inside the cellar more uniform. Vent pipes that can be twisted depending on the season to catch cooler or warmer winds are also a good idea. In the spring and the fall, cooling can be encouraged by opening the vents and possibly even the door at night when the temperature outside is dropping below the current temperature in the cellar.

Inside the cellar, the arrangement of shelves should allow for generous distances between them. The shelves should also be kept a few inches away from the walls to encourage greater air circulation. Materials placed on the floor should be raised a few inches by small blocks or racks.

Pests And Diseases

Rodents are the single most common pest problem for food stored in root cellars. Installing metal wire mesh in common entry points, such as open vents, is a good idea, as is a frequent trapping program. Poison baits placed away from stored food are fairly effective, and even some of the battery-powered sonic repellers can do a good job.

The next most vexing problem for stored food is plain old rot. The saying that “one rotten apple will spoil the lot” is quite true in this situation, so care should be taken to remove any spoiling produce or other foodstuff. In general though the lower temperatures will combat the mold and bacteria problems that are common in warm, wet conditions.

If there are nuts or grains stored in the cellar, insects may become a problem, but still, it is not a good idea to use insecticides, as they may contaminate the stored foodstuffs. It is better to seal susceptible foods in tight containers.

Legalities

There is much ambiguity about root cellars when it comes to building permits. Although not usually listed among typical projects, they are nonetheless usually required to have building permits.

However, in some rural areas they are considered “agricultural sheds,” and therefore not subject to building-permit requirements.

  • Any addition of utilities, such as electricity or water, is likely to change any building-department nonchalance and cause the local agency to insist upon permits and inspections.
  • Renovating an already existing root cellar can usually be accomplished without a building permit, provided no extreme expansion is planned.
  • Hiring a contractor to build a root cellar will certainly necessitate building permits and periodic inspections of the work.
  • Digging a root cellar into the exposed soil in a basement may allow for an unobserved and therefore un-permitted construction, but such illegal additions to a house can become problematic when it undergoes inspections prior to being sold.

For you and your family’s safety, always consult knowledgeable professionals for sound building advice.

Building A Root Cellar

There are a number of different basic root cellar designs.

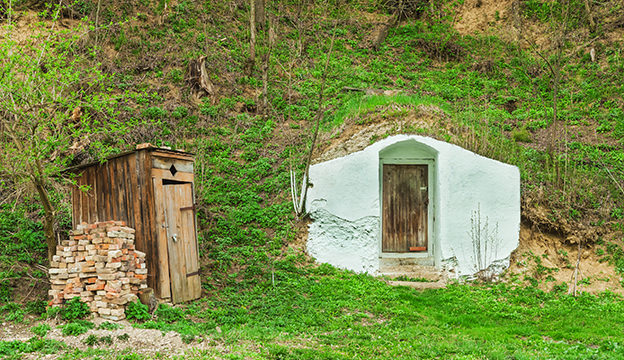
Certainly the most classic is that which is dug into the side of a hill. But many modern root cellars are dug down into flat ground, and feature a set of stairs that lead down to the door. Read more about one design.

In very cold areas, there may also be a second door at ground level to further insulate the cellar. Modern survivalists have been particularly inventive about constructing root cellars, and have made enormous root cellars from sections of metal culvert (these serving also in some cases as potential underground shelters in which people could live for long periods of time). In other cases, simple root cellars constructed from barrels, pallets or packing crates serve the purpose of creating an underground storage area for a quantity of emergency food.

Regardless of the specific style, the basis of any root cellar is the insulative value of the soil into which the cellar is dug. With only as little as one foot of earth above it, a root cellar dug into flat ground can create a temperature of 20 degrees less than the summertime temperatures above. Several feet of soil, optimally at least three or four, will suffice in most cases, but one must have a full 10 feet of soil above and alongside to ensure the maximum possible insulation and temperature stability.

An obvious rule of construction is to keep the doorway and any exposed parts of the structure in the shade during the day. Building on the north side of a hill or digging in the shade of your home or other building is one mandatory design principle.

The next consideration should be to design a structure that does not suffer from leaks or drainage problems during times of rain. This may require sloped doors, creating drainage ditches outside or positioning the floor level above the base level of the surrounding terrain.

As mentioned previously, the most flexible root-cellar design will include two chambers, one colder and more humid than the other. This complexity certainly makes construction doubly difficult, but will also double the variety of foodstuffs that can reasonably be preserved in the cellar. Making the drier section essentially the foyer that leads to the entrance of the innermost area is the usual method of dividing the two sections of a root cellar.

When planning the size of your cellar, general wisdom holds that an 8-foot by 8-foot area should provide plenty of storage space for the average family. Larger structures are certainly more luxurious, but also may be more difficult to insulate and maintain at an even temperature.

It is a good idea to use waterproofed wood in any construction, but be cautious of the chemicals in pressure-treated lumber. Treating wood with waterproofing materials can result in an environment in which stored food picks up the undesirable odors of the treated wood. If you can use bricks or concrete blocks for some parts of the construction, you may avoid some of those problems.

Remember to design and install a good ventilation system, and run a few smoke tests to make sure the intake and outflow vents create a siphon between them that moves air automatically through the cellar.

Finish your new root cellar with a thermometer and a humidity gauge, and from there observe and adjust until conditions produce the desired results.

This article first appeared in the June/July 2003 issue of Hobby Farms magazine.

Categories
Recipes

Maple-Cinnamon Glazed Nuts

Maple Cinnamon Glazed NutsMarch is maple month!  Try this simple twist with salmon and learn more about how New England celebrates the maple harvest>>

Ingredients
2 cups mixed, raw or roasted, unsalted nuts of your choice, such as almonds, peanuts, hazelnuts, walnut or pecan halves and Brazil nuts
3 T. butter
2/3 cup brown sugar
2 tsp. maple extract
1/2 cup white sugar
2 tsp. cinnamon

Preparation
Line a baking sheet with foil. Butter the foil; set aside. In a large, heavy-bottomed skillet, combine nuts, butter, brown sugar and maple extract. Cook over medium-high heat, shaking skillet occasionally to combine ingredients and coat nuts, until sugar begins to dissolve. Do not stir. Reduce heat to low and cook for 5 minutes, stirring occasionally. Pour nuts onto prepared baking sheet and let cool completely.

Combine white sugar and cinnamon in a sturdy plastic bag; shake to combine. Break nuts into small clusters. Working in four batches, shake nuts in bag to coat with cinnamon sugar. Store tightly covered. Makes 2 cups.

Categories
Recipes

Farmhouse Cornbread with Fresh Corn Kernels

Farmhouse cornbread is a way to include the harvest

Get more autumn-themed treats here

Ingredients

  • 1 2/3 cups unbleached organic flour
  • 1 1/4 cups stone ground organic cornmeal
  • 2 1/2 teaspoons baking soda
  • 1 1/2 teaspoons baking powder
  • 1 teaspoon seasalt
  • 3 large or 4 medium freerange eggs
  • 1 cup organic buttermilk
  • 1/3 cup melted organic butter, cooled slightly
  • 1/3 cup local and/or organic honey
  • 2/3 cup fresh sweet corn kernels

Preparation
Heat oven to 425°. Grease a 9-inch square baking pan with butter.
In a large bowl, mix together the dry ingredients: flour, cornmeal, baking soda, baking powder, and seasalt.

In a separate bowl, whisk together the eggs, buttermilk, butter, corn kernels and honey. Pour this wet mixture into the dry mixture, stirring only until blended. Pour into greased baking pan and bake until a toothpick inserted in the center comes out clean, approximately 20 to 25 minutes. Check after 15 minutes to assess whether you need to cover with foil for the rest of the baking time because top has gotten very brown. Serves well warm from the oven with butter and honey.

More Breads and Baked Item Recipes 

Categories
Recipes

Ham-biscuit Spirals

Ham-biscuit SpiralsOne key to light, flaky biscuits is baking them quickly at a high temperature. Give your oven plenty of time to preheat.

Ingredients

  • 2 cups all-purpose baking mix, such as Bisquick
  • 2⁄3 cup milk
  • Enough boiled, country-style ham, thinly sliced (not shaved or deli-style), to cover an 8- by 10-inch area
  • 2 T. Dijon mustard

Preparation
Preheat oven to 450 degrees F. Stir milk into biscuit mix until just combined; do not overmix. Let dough sit for five to 10 minutes to firm slightly. On a well-floured surface, knead dough gently for about 30 seconds. Dough will be very soft. (If it’s too soft to work with, you can add up to a 1⁄2-cup more biscuit mix; again, wait a few minutes after adding mix because dough will firm up as it sits.) Press and then roll dough to form an 8- by 10-inch rectangle.

Spread mustard evenly over dough, not quite to the edges. Lay ham slices over mustard, overlapping them slightly if necessary to cover the area. Starting with an 8-inch edge, roll dough up as you would a jellyroll or pinwheel cookie dough. Moisten the edge and pinch to seal. Slice rolled dough into 8 equal portions. Bake on an ungreased cookie sheet for 10 to 14 minutes or until biscuits are set and lightly browned. Makes 8 biscuits. 

Categories
Crops & Gardening

Heirloom Farm & Garden

Hobby Farms' Heirloom Farm & Garden
 
An Heirloom Tradition

Before the advent of hybrid technology, farmers saved seeds for the next year’s garden. These seeds sprouted new plants each season that were similar in appearance and taste to their parents. Seeds saved from generation to generation, known as “heirlooms,” are said to be seeds that have been saved for at least 50 years and grow true to their parents.

Unlike heirlooms, hybrid seeds can’t be saved in the same manner because they are cross-pollinations of plants and upon reseeding do not grow similar to their parent plant. Hybrids gained popularity among commercial farmers and backyard gardeners alike because of their disease resistance, uniform appearance and their ability to withstand travel and handling.

People today are becoming more concerned with what types of food they eat as well as how it is grown, which has also led them to seek more flavorful and healthy produce—heirlooms provide just that. Popular Gardening™ Series: Heirloom Farm & Garden has everything you need to know about saving seeds and growing heirloom produce and flowers. With beautiful photos and in-depth articles, Heirloom Farm & Garden is a must-have for every garden and food enthusiast.

What You’ll Find
The Popular Gardening™ Series is a collection of magabooks™ that covers farming topics of interest to small farmers with more editorial pages and fewer advertisements. The series is designed to provide valuable information to both those who already have a small farm as well as those who are pondering the big move to the country.

As an all-encompassing guide to raising heirlooms, you’ll find helpful and interesting information about all aspects of growing heirloom crops: what types of heirloom seeds are available, histories of rare varieties, how to control pests and boost soil fertility, how to preserve the harvest, how to save and start seeds, and ideas for cooking with heirlooms.

“The history of seeds is pretty straightforward, as you might expect. Man collects seeds from plants, man plants seeds the following year, man continues pattern in perpetuity …. In recent years, however, that circle has been fraught with controversy, one that pits 10,000 years of survival tradition against high technology. As heirloom gardeners and farmers around the world continue saving seed, propagating the best into next year’s plantings, multi-national agribusiness companies are introducing an increasing number of new technologies to challenge those age-old habits.” –Gretchen Heim Olson

Heirloom Farm & Garden has all the information you need to begin growing your garden produce and harvesting the seeds for future planting; all while enjoying the vivid colors, flavors and histories of these old-time varieties.

Start with Seeds
Saving seeds year after year may seem like daunting task at first, but the savings to your pocketbook and the delight to your tastebuds will reward you time and again. However, this is not the only reward for saving seeds. The process of saving seeds is also one of weaning out the weakest among a variety—saving only the best seed for the next planting season. This ensures genetic diversity and food security as well as stronger varieties that are less susceptible to disease and more tolerant of environmental conditions.

“Seed savers cite several reasons for preserving the garden’s offspring: assuring genetic diversity and thereby ensuring food security; breeding stronger heirloom and hybrid vegetable varieties for more nutrition, flavor, color, shelf-life, hardiness and disease resistance; and developing old varieties to be adaptable to a specific place and environment.” –Tom Meade

If you are looking for even more information on how to find, grow and save heirloom seeds, check out the Resources section for more references on all aspects of planting, saving and buying heirlooms.

How To…
From starting seeds to managing garden pests to harvesting seeds for the following year, there’s a lot to know about growing heirlooms. Popular Gardening’s Heirloom Farm & Garden can offer help. Get detailed, do-it-yourself plans for freezing, drying and canning your heirlooms, as well as hints from expert gardeners on how to create your own cloches and warming lamps. Also get food historian William Woys Weaver’s advice on how to select an heirloom variety and how to uncover its history in “A Scholar with Mud on His Boots.”

“Preserving heirloom plants by saving seed entails more than knowing how to prevent cross-pollination or how to properly gather, store and dry the seeds. It requires careful attention to selection as well.” –Cherie Langlois

Beyond the Seed
Popular Gardening’s Heirloom Farm & Garden brings you more than seed-saving tips. From transplanting seedlings to planning your garden layout to preserving your harvest to sharing your heirlooms as gifts, this is an adventure steeped in dazzling colors, Old World traditions and delectable flavors. The joy in growing your own food is the joy in savoring its delicious flavor and in providing good food for others to enjoy.

Discover how to build your garden with heirlooms that can be enjoyed year-round. Heirloom Farm & Garden has the tools and information to help you add a little history to your garden. It’s the essential resource for every heirloom gardener and farmer.

Back to All Popular Gardening Series Publications

Contents

History Sown in Seeds
Seed saving is an act necessary for human survival. Learn why it’s our duty to carry on tradition. 
By Cherie Langlois

A Taste of Yesterday
Heirloom varieties have their own unique histories. Find out what makes these top 10 crops worth growing.  
By Andy Tomolonis

Sprouting Seeds
Starting your own seeds, rather than buying seedlings, can free you from a pre-ordained gardening schedule.
By Andy Tomolonis

Planting the Heirloom Garden
Choose varieties and plan the arrangement of your heirloom garden to reduce pests and boost soil fertility.
By Jessica Walliser

12 Tasty Tomatoes
When it comes to flavor, heirloom tomatoes rule! Pick a few to entice your tastebuds.
By Sue Weaver

Our Edible Heritage
Cooking with heirlooms is a taste adventure. Try these recipes to discover the unique tastes and textures these prizes provide.
By Roger Yepsen

Gifts from the Heirloom Larder
Say “thank you” with a gift of goodies straight from your kitchen.
By Cheryl Morrison

Preserving the Heirloom Harvest
Learn to safely dry, can and freeze your heirloom harvest for year-round enjoyment.
By Cheryl Morrison 

Blooming Heirlooms
Vegetables aren’t the only plants with colorful pasts—think of heirloom flowers to add a bit of history and fragrance to your garden.
By Linda Tagliaferro

A History of Seeds in America
The business of selling seeds has a rather short but illustrious history. Learn where it’s been and where it’s going.
By Gretchen Heim Olson

Saving Seeds for Survival
Learn exactly how to save the seeds of some common garden crops. 
By Tom Meade

A Scholar with Mud on His Boots
Discover what inspires internationally known and respected food historian, professor, plant breeder and seed saver, William Woys Weaver.
By Cherie Langlois

Slow Down with Slow Food
Preserving dying culinary traditions is the mission of the eco-gastronomic association, Slow Food USA.
By Sue Weaver

Resources
Heirloom seed sources, planting guides, organizations and books.

Glossary
Heirloom and garden jargon defined.

Why We Love Them
Heirlooms are the original “local food.”

All Current Popular Gardening Issues

All Publications

 
Categories
Crops & Gardening Farm Management

Organic Farm & Garden

Organic Farm and Garden

An Organic Overview
These days, more of us almost seem obsessed with knowing exactly what we put into our bodies, and that contributes to the appeal of organic farming. Instead of overspraying plants with pesticides and adding synthetic fertilizers to the soil, organic gardeners use natural products to encourage growth and thwart pests and diseases. The results speak for themselves: delicious, nutritious vegetables, fruits and herbs to eat and enjoy.

Then there’s the fact that organic gardening is a lot of fun! It offers a great way to stay in touch with the seasons, enjoy the outdoors and get some exercise. When we select the vegetables, fruits, herbs and flowers best suited to our climates and soil types, we help our gardens reach their greatest productivity.

Whether you have an experienced green thumb or need a few tips, the second edition of Organic Farm & Garden™, part of the Popular Gardening Series™, can help you reap the benefits of your plot of land.

What You’ll Find
The Basics: One of the most important elements in a successful organic system is diversity. Learn about some of the most popular and easy-to-grow classic crops, including cabbage, carrots, potatoes, tomatoes, squash, corn, rhubarb, strawberries, blueberries and apples. Each profile includes expert-provided tips and techniques as well as growing instructions.

Soil Solutions: Healthy, productive soil naturally leads to an increase in plant vigor, pest tolerance, production outputs and animal health. Every organic farm begins with proper soil management, and we can help you achieve just that with recommendations for soil amendments, composting instructions and more.

Pest Control: Even the healthiest of organic gardens might be struck by pests and weeds. Find out how to rid your farm of these unwanted visitors the organic way.

Recipes: Once it’s been harvested, what’s a gardener to do with all that organic produce? Enjoy it, of course! That’s why you’ll find more than 50 recipes for salads, entrees, side dishes, desserts and beverages. These healthy, delicious recipes will help you savor the results of all your efforts.

Organic Farm & Garden™ will help you plant, grow, sustain and cook your very own harvest. Get out there and discover what organic gardening can do for your health and happiness.

All Current Popular Gardening Issues

All Publications

Contents

Go Green!
Make your farm or garden organic by following these simple tips.
By Linda Tagliaferro

Classic Crops
Use our expert advice to grow your favorite fruits and veggies.
By Andy Tomolonis

Sum Up the Soil
Set your garden’s foundation with these tips and techniques.
By Jessica Walliser

Designing Do’s
Our expert advice will help you plant your ideal organic garden.
By Deb Buehler

Compost, Naturally
Put bacteria to work in your garden.
By Jessica Walliser

Weed it Out
Rid your garden of invasive plants the organic way.
By Susan Brackney

Say Goodbye to Unwanted Visitors
Rid your garden of pests with these organic methods.
By Jessica Walliser

Basic Herbs
Learn about some of the most commonly grown herbs.
By Susan Brackney

Beautiful Blossoms
Adorn your garden with six of the most commonly grown types of flowers.
By Lindsay Evans

Throughout the Four Seasons
Extend the growing season to go green year-round.
By Andy Tomolonis

Canning Basics

Small Space, Big Yield
Learn how to grow bushels of organic fruits and veggies in space-saving container gardens.
By Wendy Bedwell-Wilson

Salads
Recipes for berry medley; spicy potato salad; tomato, cucumber and feta salad; carrot ginger salad; and harvest salad
By Rhoda Peacher

Entrees
Recipes for tomato pie, winter squash bisque, chicken-veggie kabobs, bibimbap, and summer cornucopia pasta
By Lisa Kivirist

Side Dishes
Recipes for cheesy zucchini potato pie, carrots and edamame with ginger-lime dressing, hot and spicy potato wedges, sugar snap peas with honey-teriyaki glaze, eggplant and red pepper medley, baked tomatoes and radicchio, and navy bean salad with lemon-garlic dressing
By Fiona Green

Desserts
Recipes for maple-pecan apple crisp, black cherry ice cream, summer berry tarts, crepes with honey-baked figs and cream, and strawberry-rhubarb pie
By Lindsay Evans

Beverages
Recipes for rhubarb ginger cordial, honeyed fig smoothie, cherry-watermelon vanilla froster, blueberry-basil mojito, and carrot-apple juice
By Jennifer MacKenzie

Glossary

Garden Wisdom

All Current Popular Gardening Issues

All Publications