Categories
Beekeeping

Get to Know the Basics of Bees & Beekeeping

Basic beekeeping doesn’t require huge amounts of money, time or space, and you can keep bees just about any place where flowers bloom. If like to drizzle amber honey on your morning toast or into green tea, you might want to try out beekeeping—also called apiculture.

Our country could certainly use some new beekeepers. According to Troy Fore, executive director of the American Beekeeping Federation, there are an estimated 100,000 hobby beekeepers in the United States, down from 200,000 in the 1970s.

Urbanization has played a role in this decline, along with the spread of parasitic mites that have decreased production and increased beekeeping costs.

“The possibility of being stung, problems with mites, and the labor involved puts potential beekeepers off,” says Jack Robertson, a beekeeper with 25 years experience who keeps 250 hives near Olympia, Wash., with his wife, Virginia.

But small-scale beekeeping doesn’t require huge amounts of money, time or space, and it can be done just about any place where flowers bloom, maintains Howland Blackiston, a Connecticut beekeeper with over 20 years of experience and author of Beekeeping for Dummies. (Here’s a list of beekeeping equipment.)

A few healthy hives will reward you with pounds of surplus honey to savor yourself, bestow on neighbors or sell at your local farmer’s market. As they forage in your garden, the bees will also perform the essential job of pollination—the transfer of pollen that allows plants to reproduce.

“I’ve witnessed the miracle in my own garden: more and bigger flowers, fruits and vegetables,” says Blackiston, adding that many gardeners report seeing fewer honeybees these days.

“Millions of colonies of feral honeybees have been wiped out by urbanization, pesticides and parasitic mites. Backyard beekeeping has become vital in our efforts to establish lost colonies and offset the natural decrease in pollination by wild bees.”

The Hard-Working Honeybee

dandelions bees pollinators
Kioshike/Flickr

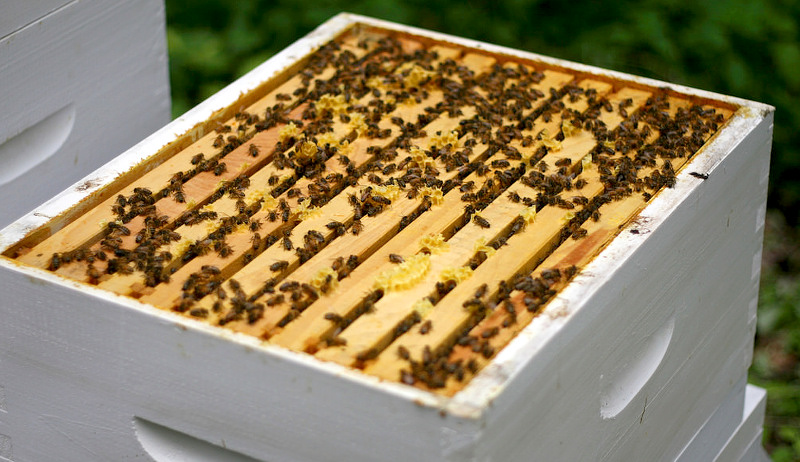
The honeybee, Apis mellifera, is an amazing creature and—except for the drones—the ultimate workaholic. A native of Europe, Asia and Africa, this insect lives in a complex, three-caste society composed of thousands of bustling individuals.

Although their lives are fleeting by human standards, queens, workers and drones cooperate to keep the colony going from year to year and form new colonies by swarming.

Workers nurture their egg-laying queen, keep the hive cleaner than our own homes, protect the colony from raiders, and fly thousands of miles to gather food.

Miraculously, they manage to do all this without cell-phones or e-mail, communicating instead through the emission of chemical substances called pheromones and by performing dances in specific patterns.

Unlike that bad-tempered yellow jacket buzzing around your hamburger, honeybees are vegetarians that obtain their protein from pollen and their carbohydrates from flower nectar.

After the worker bee industriously gathers these provisions, she hands them off to a younger worker to deposit in hexagonal wax cells. The bees add enzymes to the nectar, then fan this concoction with their wings to evaporate the water, and gradually it turns to thick, sweet honey.

Come winter, the clustering bees will use these food stores to generate heat, contracting their wing muscles to keep the hive a toasty 92 degrees F.

History of Bees and Honey

bees beehive hive inspection
Ana Tiana/Flickr

Primitive societies apparently appreciated the sweetness of honey as much as we modern humans. Cave drawings found in Spain from around the year 6000 B.C. depict human figures scaling a cliff to snatch honey from a wild hive.

Later, ancient peoples of the Middle East, the Mediterranean and Northern Europe learned to exploit the bees’ propensity for settling within dark spaces after swarming.

They build hives out of logs, pottery vessels, and straw or wicker containers called keps. Unfortunately for the bees, early beekeepers usually couldn’t remove honeycomb unless they killed the colony with burning sulfur or boiling water.

In 1622, the first hives of European honeybees made the journey from England to the Colony of Virginia. But it wasn’t until 1851, when pastor Lorenzo Langstroth of Philadelphia created a wooden hive with movable frames, that beekeepers were able to effectively—and benignly—manage their colonies.

honeybees soon reached North America’s West Coast and colonized most of the rest of the world as well. Today the Langstroth hive is the most commonly used hive around the globe.

Tips for Beekeepers

beekeeping equipment beekeepers bees
Zach Frailey/Flickr

The very first thing a beginning beekeeper should do is get a good book on the subject, one that’s up-to-date and easy to follow,” advises Blackiston.

He suggests beginners look for a book with good illustrations and photos (check Amazon online) and surf the web for bee resources. “Join a bee club,” he adds. “That’s a great way to meet other beekeepers and latch onto a mentor.”

Before you officially start keeping bees, however, find out if your community prohibits or restricts beekeeping, or requires registration of your hives. And try following a season through to see what blooms in your area, says Jack Robertson.

Near the Robertsons’ home in western Washington, for instance, honeybees gather nectar and pollen from a variety of sources that include alder, skunk cabbage, scotch broom, camas, dandelion, poppies and blackberries—basically anything that flowers.

“Bees will fly up to three miles for nectar, but the farther away they have to fly the shorter their life span [due to wing damage and predation],” he says.

In choosing a spot for your new apiary, look for a site that receives plenty of sunshine throughout the day (some shade is necessary in hot climates) and has good air circulation and drainage. Picking a secluded area behind a fence or screen of trees will help prevent vandalism and conflicts with bee-wary neighbors.

Workers tend to zoom up as they exit the colony, so if you avoid putting the hive too close to places frequented by children, pets, pedestrians or traffic—and aim the entrance away from these areas—your bees will be unlikely to cause problems. Make sure the bees have access to a nearby natural or artificial water source so they won’t make a beeline for your neighbor’s leaky water spigot. honeybees use large amounts of water to regulate temperature and moisture levels in the hive during summer.

Winter is a good time to order your bees and beekeeping paraphernalia so you can get started in the spring. You can purchase equipment used, new, or even make it yourself, but many experts recommend that beginners opt for new, since second-hand supplies may harbor disease.

Prices vary; expect to spend about $200 to $400 on a hive, equipment, tools and medication, Blackiston says. You can order your first package of disease-free bees through a reputable supplier (yes, shipped via UPS or U.S. mail) for around $50-$70—one package equals about 11,000 bees.

Keep in mind that honeybees come in a variety of types and hybrid strains. For beginners, Blackiston favors the popular, productive Italian race, while the Robertsons recommend the mellow Carniolan.

Start with one hive until you get the hang of things, then consider expanding to two during your second year, Blackiston says.

“Recognizing normal and abnormal situations is easier when you have two colonies to compare, and a second hive enables you to borrow frames from a stronger colony to supplement the one that needs a little help.”

Keeping a Healthy Hive

bees hive split
Susy Morris/Flickr

Beekeeping chores change throughout the year and the yearly “to-do” calendar will vary as to where a beekeeper lives. “When the bees are actively foraging nectar and pollen, you inspect your hives several times during the season,” says Blackiston. “The busiest times are at the start and end of the season, when you get them going for the year (spring) or put them to bed for the winter (autumn).”

A beekeeper conducts inspections to determine the health and productivity of the colony, Blackiston explains. When you examine frames, you’ll be looking for signs that the queen is alive and laying eggs like she should: capped brood in a compact pattern, tiny white eggs at the bottom of cells. Depending on the time of year, you’ll also assess whether the colony needs additional food stores, more nectar storage space, increased ventilation, medication, swarm control measures, a new queen and more.

Your colony will also require protection from parasites, diseases, pesticides and predators. Varroa mites, a pest from Asia that arrived in the United States during the 1980s, can destroy a colony within a few seasons. Foulbrood, a bacterial disease, kills larvae and pupae, while the protozoan disease Nosema targets the adults’ intestinal tracts. To combat these and other health problems, the Robertsons medicate their colonies with miticides and antibiotics in the fall and spring. They run hot-wire around their apiaries to protect the hives from honey-hungry black bears. Other pesky predators includeants, rodents and raccoons.

About Bee Stings

bee sting bees stung
Matt Battaglia/Flickr

honeybees are basically harmless insects when not actively defending their hive from an intruder. But for a beekeeper who works with thousands of bees per hive, an occasional sting comes with the territory. The bad news? Bee stings hurt (expect some swelling, itching and redness), and for a small number of people can lead to life-threatening allergic reactions. When stung often enough during the season, however, beekeepers like Robertson and Blackiston report that they build up a tolerance and experience little in the way of side effects.

Still, you can do plenty to reduce the chances of being stung while working your bees. “The main thing is to have your bee gear on and have it on correctly,” says Robertson, who recently received a sting on the ear when he neglected to zip his veil completely. “Start your smoker up and before you do anything to the bees, puff once or twice into the bottom of the hive. Then, before you completely open the hive, puff them again in the top. But don’t over-smoke them.”

Blackiston offers these additional tips to keep you from irritating the bees and crying ouch: Try to inspect your hive during pleasant daytime weather, when most of the bees are out foraging. Take your time and keep your movements gentle and calm—no swatting! Get a good grip on the frames so you don’t drop them and avoid causing other bee-disturbing vibrations. Wear clean, light-colored clothing; bees seem to dislike strong body odor and dark colors. Finally, don’t excite the bees into a feeding frenzy by leaving sugar syrup or honey in open containers near the hive.

If you do get zapped, remove the stinger by scraping it out with your fingernail so you avoid squeezing more venom into your skin. Puff smoke on the site to cover the alarm pheromone thatmay attract other bees (workers only sting once and the one that got you will soon die). Wash and dry the area and apply an ice pack. Antihistamines can help ease swelling and itching. If you’re stung on the mouth or throat, experience swelling in these areas, difficulty breathing, or signs of shock, call 911. To be on the safe side, Blackiston keeps an EpiPen emergency sting kit—available by prescription—on hand in case a guest has a severe allergic reaction.

Harvesting Honey and Honey Types

pop up shop honey
Peter/Flickr

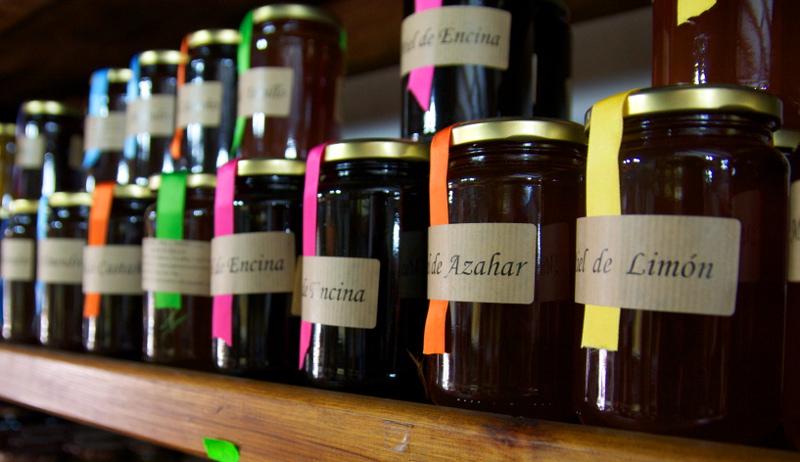
It’s no wonder the Greek and Roman gods favored offerings of honey. Ranging in shade from pale gold to amber to rich brown, this viscous fluid is as lovely and fragrant as it is sweet. Honey, used as a sweetener long before white cane sugar, is a pure and natural food that needs no processing to make it fit for human consumption. Valued as a folk medicine since ancient times, honey has antimicrobial and wound-healing properties and also contains healthful antioxidants. Last year Americans consumed over 381 million pounds of this sticky ambrosia.

Beekeepers can harvest honey in several forms, including comb—which requires special hive equipment—and extracted, the most popular type here in the States. After the first season, a healthy hive can produce anywhere from 45 to 100 pounds or more of extracted honey each year, depending on where you live, the weather and other factors. To harvest this treasure trove, you’ll need an uncapping knife to cut open the wax combs, an extractor to spin the honey out, and a strainer to filter out bits of wax and other debris. A five-gallon plastic bucket with a spigot is useful for bottling the strained honey. Extractors aren’t cheap ($250 and up), but beekeepers with only a few hives can check into renting or borrowing one from their local beekeeping association.

If the only honey you’ve tried is commercial clover, you’ll be surprised to discover that honeys made from different nectar sources have varied tastes, colors and aromas. Sweet-scented lavender, delicately flavored fireweed, dark buckwheat: these honeys acquire their names from the dominant flowers visited by the bees. Beekeepers place their hives within large tracts of the specific source and harvest honey immediately after the bloom finishes. When bees gather nectar from a wide variety of nectar plants—as they do for most hobby beekeepers—the resulting harvest is called wildflower honey.

The Robertsons’ hives yield wildflower, raspberry, fireweed, blackberry and cooking honey. They sell these natural products from home and from their booth at the Olympia Farmer’s Market. For every 100 pounds of honey harvested, the beekeepers glean one or two pounds of beeswax, which Virginia Robertson transforms into long-burning, dripless candles and honey-scented figurines. “I also sell a lot of wax to customers who make salve, soap and ointments,” she says.

Another product valued by beekeepers is propolis, the sticky, plant-derived substance bees use for hive improvements. “Propolis has remarkable antimicrobial qualities; the Chinese have used it in medicine for thousands of years,” explains Blackiston.

Many beekeepers also obtain income by renting their bees out to pollinate crops. With their bodies coated in branched, pollen-snagging hairs, honeybees can efficiently pollinate hundreds of different plants as they collect nectar and pollen for the colony’s use. About 90 crops in our country depend, at least to some extent, on bees for pollination, including apples, alfalfa, blueberries, cotton and cucumbers. The increased agricultural production connected to honeybee pollination is estimated to exceed a whopping $14 billion a year.

If the art of beekeeping seems a bit complicated—especially after you start dipping into bee books and buzzing about the net—don’t despair. “Get in touch with local beekeepers. They’re more than happy to share the information they have,” says Virginia Robertson, who wryly notes that her husband sometimes overlooks customers when he’s discussing beekeeping with someone. “Beekeepers love to talk bees.”

This article first appeared in the October/November 2003 issue of Hobby Farms magazine.

Categories
Homesteading

Make Cheese at Home … Overnight

By Tom Meade

About the Author
Tom Meade is a writer, beekeeper and vegetable gardener in Rhode Island.

Making delicious cheese is so easy you can do it with your eyes closed.

After some simple heating and blending, milk ferments into scrumptious cheese overnight.

Making Cheese Overnight
© Tom Meade
Store-bought kefir is smoother and takes longer to thicken, resulting in a more sour cream-like cheese. With homemade kefir, four hours of draining produces cheese the texture of fromage blanc.

Whey good
Whey, the liquid by-product of cheese making is a healthy drink for you and your animals, even chickens. Whey also adds character to bread and soup when you use it in place of plain water.

Got milk?
Many varieties abound
Pasteurized cow milk makes the most consistent cheese from batch to batch, but it’s not as exciting as raw cow milk or the milk from goats and sheep, which varies from season to season. In other countries, cheese makers swear by the milk of water buffalo and horses.

Top

In the morning, simply drain off the liquid and you’ve got such treats as fromage blanc, ricotta, mascarpone and many others.

What’s Cheese Anyway?
Basically, cheese is what’s left when milk meets carefully cultured bacteria.

The bacteria eat the milk’s sugar (lactose) and the milk separates into solid curds and liquid whey – Little Miss Muffet’s lunch before the spider sat down beside her. Drain off the whey – but don’t discard it – and you have cheese.

Top

Yogurt and Kefir Cheeses
Yogurt cheese and kefir cheese are the easiest to make if you buy the basic ingredients already made in the supermarket or your local dairy farm. (If you prefer to make your own yogurt, try these easy-to-follow instructions!)

Kefir is a fermented-milk beverage, purported to have beneficial effects on health, beauty and weight-loss. Some of the most popular commercial brands are available in the healthy foods area or dairy section of many supermarkets.

Using store-bought plain yogurt or plain kefir, the process is the same:

  • Line a plastic or stainless-steel colander with two layers of cheesecloth (finely woven butter muslin works, too).
  • Put the colander in a large bowl.
  • Pour or spoon the yogurt into the lined colander.
  • Place the colander and the bowl in the fridge for three to eight hours. The longer it drains, the drier the resulting cheese will be.

Top

A Few Pointers

  • Kefir Differs
    Making kefir cheese with store-bought kefir takes longer and produces a more soupy cheese than homemade kefir. Store-bought kefir is smoother than homemade.
    Basic tools
    • An accurate kitchen thermometer that goes to 200 degrees (F)
    • Stainless steel spoons and ladle
    • Measuring cups and spoons
    • A colander
    • Cheese cloth or butter muslin
    • Bungee cord or strong twine

    Sources for ingredients, tools and books:

    New England Cheesemaking Supply

    The Cheesemaker

    Top

    With homemade kefir, four hours of draining produces cheese the texture of fromage blanc, because the liquid whey flows right through the cheese cloth.

    In contrast, after 12 hours of draining store-bought kefir, the resulting cheese is like thick sour cream. After 16 hours of draining, the store-bought kefir cheese is thicker than sour cream and thinner than fromage blanc. With chives and powdered garlic mixed in, it makes a substantial dip, and it’s great as a milk substitute in mashed potatoes.

  • Adding Flavors
    If you plan to blend chives, dill or other herbs into the cheese for a spread, don’t drain the whey for very long.
  • Try Different Dairies
    Many regional dairies now produce their own yogurt, and each has a distinctive flavor and tang. Try all the yogurts made in your region.

Top

Add a Step for Other Soft Cheeses
Other soft, “fresh” cheeses are almost as easy to make overnight, with one additional step: After the milk is curdled, pour everything into the cloth-lined colander.

Then do this:

  • Tie the opposite corners of the cloth together like a pouch
  • Hang the pouch over a bowl that will catch the whey.
  • When all the liquid drains away, the cheese is ready. (Tip: A bungee cord hanging over the kitchen sink works well, unless there’s a cat in the house.)

Make It from Scratch
To make soft cheese, you can start with a powdered culture that generally comes in a small packet. Some cultures, like those from New England Cheesemaking Supply, have all the instructions you need on the package.

Here are the instructions that came with a package of culture for fromage blanc:
“Heat 1 gallon pasteurized milk to 86 degrees F. Add and mix in 1 packet. Let sit at room temperature for 12 hours or until thickened (as in yogurt). Ladle curd gently into a butter muslin lined colander, hang and drain 6-12 hours. Refrigerate and enjoy!”

It’s really that easy.

Top

Categories
Homesteading

How to Freeze Sweet Corn

Freeze your summer sweet corn on the cob or off for enjoyment throughout the year. Photo courtesy iStockphoto/Thinkstock (HobbyFarms.com)
Courtesy iStockphoto/Thinkstock
Freeze your summer sweet corn on the cob or off for enjoyment throughout the year.

If you discovered some particularly tasty sweet corn this season, either in your own garden or at a farmers’ market, you might consider gathering more of it to preserve for those long, winter months ahead. It’s easy to freeze corn—on the cob or off—and tastes far better than any frozen corn trucked in from distant corners of the world.

To prepare sweet corn for freezing:

  • Shuck corn, and clean off all the silk.
  • Bring a large pot of water to a boil.
  • Blanch the corn by dropping the whole cobs in the boiling water for five minutes, then remove corn and plunge into a pot of cold water.
  • Pat the ears dry with an absorbent towel.

To freeze corn on the cob:

  • Place corn cobs in freezer-proof, resealable bags in a single layer.
  • Label bags with source of corn and the date, and place them in the freezer.

To freeze corn off the cob:

  • Once the blanched corn cob cools, cut the kernels off the cob with a sharp knife or a corn-cob cutter. (You can find these handy gadgets in kitchen stores and online for about $4.)
  • Place corn kernels in freezer-proof, resealable bags.    
  • Label bags with source of corn and the date and place in freezer, flattened as much as possible to reserve freezer space.

To reheat frozen corn—on or off the cob: Place corn in boiling water for two to three minutes.

Freezer Alternative
If you want to preserve your sweet corn for later use, but are running low on freezer space, dehydrating is always an option. Dehydrating is a great way to savor the flavors of corn and other fruits and vegetables, like beans, peasapples and apricots, throughout the year, whether you decide to add them to soups and stews or munch on them as snacks. Foods can be dehydrated in the oven, outside in the sunshine or in an electric food dehydrator.

A number of electric food dehydrators are available on the market today, with prices starting at around $100. These units consist of four to eight shallow, stacked trays and come with recipes on drying a variety of foods. Some units come with timers and accessories such as “fruit leather sheets,” for use in making homemade “fruit roll-ups.”

You can also make your own dehydrator using solar energy! The most basic design is a “hot box,” in which food is enclosed and protected in a box with a clear cover. Screened holes in the bottom and sides help ensure the air circulation needed for drying. Eben Fodor details instructions for building solar dryers in his book, The Solar Food Dryer: How to Make and Use Your Own High-Performance, Sun-Powered Food Dehydrator (New Society Publishers, 2006).


Categories
Animals Crops & Gardening

Heirloom Pears


Heirloom Pears
© Barbara Bearst Adams
Ready to grow your own pear trees? Pick up a copy of Popular Farming Series: Orcharding online or in farm store near you.

More About Pears

Hardy, adaptable heirloom pears are best bets for hobby-farm orchards in the regions where modern pears grow.

However, keep these things in mind:

  • Most European pear trees, new and old alike, are hardy to 25 degrees F below zero and require 800 to 1,000 hours of chilling below 45 degrees F; they thrive in zones 4 through 9.
  • Pears bloom one to three weeks earlier than apple trees; late spring frosts can damage buds and flowers.
  • Most pears are self-sterile and need another variety planted within 40 feet to cross-pollinate, so don’t plan to grow just one pear tree.
  • Many pears are extremely susceptible to fire blight, a serious bacterial disease that destroys blossoms, shoots, limbs, rootstock and even entire trees. Find more information here>> To avoid it, choose cultivars with known resistance.

Flemish Beauty Heirloom PearsThe Basics:

Pears grow best in deep, well-draining loam with a pH between 6 and 7, but they adapt to heavy soils better than most fruit trees. Avoid waterlogged locations and plant in full sunlight whenever you can.

Space standard trees 25 feet apart; plant trees grafted on quince roots at 15-foot intervals. Dig a hole deep and wide enough to spread the roots without crowding.

Madeleine Heirloom PearsInstall hardware cloth or plastic tubes around the trunks of younger trees to discourage predation by rabbits and bury it 2 inches into the ground to discourage voles.

Learn to judiciously prune young pear trees. Ask your county extension agent to show you how.

When your trees begin to bear, practice early summer thinning to produce larger fruit and to prevent branches from breaking.

Seckel Heirloom PearsLeave one pear per cluster. Pick European pears when they’re firm-mature; don’t let them ripen on the tree. Tree-ripened pears mature from the inside out and get mushy before the outside is “done.” Plus, the full flavor of pears develops through ripening off the tree.

As pears mature, they’re easy to detach from the tree. Pick them when they snap off the tree when twisted upward. If you have to tug to pick a pear, it’s probably not ready to harvest; if it falls off the tree, it’s over mature.

Store pears in a refrigerator or cold cellar at just above freezing. To ripen for eating, allow them to sit at room temperature for several days. Check by pressing the stem end of a likely pear. When it yields readily, take a big bite and enjoy!?

Top

Picture this: It’s a blustery day in late October; outside the world is wet and dreary gray. You walk to the kitchen counter where you’re ripening pears. Will you choose a sweet, juicy, homegrown Clapp’s Favorite or a buttery-smooth White Doyenné?

You press each pear’s stem end and the white Doyenné yields to pressure just so. You close your eyes and bite into its
luscious flesh; a stream of juice dribbles down your chin. Ahhhh.

Aren’t you glad you grow heirloom pears?

Even if you don’t grow heirloom pears, you’ve almost certainly eaten some. Unlike apples, which nowadays are mostly upstart 20th-century clones, the familiar faces in the pear bins at your favorite supermarket are very likely heirlooms.

Bosc? Anjou? Comice? Bartlett? Seckle? If you’ve tasted them, you’ve eaten heirloom pears.

  • Beautiful, buttery, brown-russeted Beurré Bosc (Bosc) originated in Belgium in 1807;
  • Beurré d’Anjou (Anjou) followed in 1819; and
  • Doyenné du Comice (Comice) is French, circa 1848.
  • Bartlett, an English pear, has been cultivated since 1765; and
  • Seckel, that tiny, all-American morsel of succulent goodness, oldest of all, was discovered in 1759.

Still, there are hundreds, maybe thousands, more tantalizing vintage pears still grown around the globe, many of them as close as the garden nurseries listed in “Get Your Hands on Heirloom Pears.”

Heirloom dessert pears, cooking pears, perry pears and crunchy, vintage Asian pears—they’re out there, waiting for you.

Top

In the Beginning
According to Nicolai Vavilov, a renowned Russian botanist who identified the centers of origin of hundreds of cultivated plants, Pyrus communis, the European pear, originated in southwest Asia, where it was grown some 4,000 years ago. It was cultivated in Europe by 1000 B.C.

The ancient Greeks adored the pear, a fruit the poet Homer (850 B.C.) called “a gift from the gods.”

Aristotle’s successor, Theophrastus, discussed Greek pear culture circa 300 B.C.

The pear was sacred to two Greek goddesses, Hera and Aphrodite; according to Pausanias, writing in the second century A.D., one of the oldest statues of Hera was carved of wild-pear wood.

When Roman author Pliny the Elder penned Natural History about 79 A.D., he described 41 varieties of pear; Pliny also claimed that pears were harmful eaten raw, but were good when boiled with honey.

Bigger, tastier pears traveled to the far-flung corners of the Roman Empire, where they flourished as far north as Great Britain and Gaul (better known as France).

Time passed and pear connoisseurs developed more and more cultivars.

In 1597, British herbalist John Gerard claimed a friend grew 60 varieties of dessert pears and 60 perry and livestock-feed cultivars in his English orchard.

In Tuscany, Grand Duke Cosimo II de’Medici (1590-1621) charmed dinner guests with 209 varieties of table pears.
Pears arrived in America on two fronts. The Massachusetts Company provided the new American Colonies with seeds in 1629.

Later, pears rounded Cape Horn with Franciscan padres who established a chain of 21 missions in California between 1769 and 1823; a tree at Mission San Juan Batista that was planted in 1810 is still bearing fruit.

Meanwhile, back in Europe, French and Belgian horticulturists developed many of the scrumptious dessert pears we love today.

Thomas Jefferson, acting as America’s foreign minister to France, fell so in love with delicious French pears that he planted 17 varieties at his Virginia plantation, Monticello.

Dr. Jean-Baptiste Van Mons (1765-1842), a Belgian pharmacist and physician, developed 40 new dessert cultivars, including Bosc and (some say) Anjou pears.

In 1831, at the height of the Western world’s love affair with pears, the British Royal Horticultural Society grew 627
distinct varieties in their gardens. Where did they go? Therein lies a tale.

Top

Not All Pears Are Bartletts
When most of us think of a pear, we visualize the clear skin and sinuous lines of a Bartlett. Discovered as seedlings growing wild in Berkshire, England, it was distributed as Williams Bon Chrétien.

Get Your Hands on Heirloom Pears

Cummins Nursery
www.cumminsnursery.com
607-227-6147

Fedco Seeds
www.fedcoseeds.com
207-873-7333

Greenmantle Nursery
www.greenmantlenursery.com
707-986-7504

Jung Quality Seeds
www.jungseed.com
800-297-3123

Henry Leuthardt Nurseries, Inc.
www.henryleuthardtnurseries.com
631-878-1387

One Green World
www.onegreenworld.com
877-353-4028

Raintree Nursery
www.raintreenursery.com
360-496-6400

Southmeadow Fruit Gardens
www.southmeadowfruitgardens.com
269-422-2411

Trees of Antiquity
www.treesofantiquity.com
805-467-9909

Vintage Virginia Apples
https://vintagevirginiaapples.com
434-297-2326

Perry

Old Scrump’s Cider House
Everything you need to know about perry pears and making them into fine-tasting perry

Other

The Pears of New York (full text online), by U.P. Hedrick (New York Agricultural Experiment Station; 1921)

Top

Thomas Brewer of Roxbury, Mass., imported it in 1799. The Brewer property passed to Enoch Bartlett in 1817 and, not knowing the tree’s true identity, he renamed the pear and distributed it as Bartlett. To this day it’s known as Bartlett in North America and as Williams Bon Chrétien (or simply Williams) to the rest of the world.

Bartlett is the world’s most popular pear, for many good reasons: It’s big and delicious, it holds for months in cold storage, it ships well, and it’s beautiful to behold. Not so with most other old pears.

Consider the Madeleine, cultivated as the Citron des Carmes in France as early as 1628. Compared to modern pears, it’s tiny, subject to core breakdown if left on the tree too long and it’s far too tender to ship. But oh, the flavor! Its fine-grained flesh is sweet, rich and ultra-juicy.

Named by the Carmelite monks who first grew this luscious fruit, it’s at its succulent best at the Feast of St. Madeleine in France and mid- to late July in North America.

At the other end of the scale is a late-season monster: the Pound pear.

Also known as Belle Angevine and Uvedale’s St. Germaine, it originated sometime prior to 1690 and may date to Roman days. This pear is enormous!

Most weigh two or more pounds and gigantic four-pound pears are fairly common. In olde England, Pound pears were baked whole, wrapped in pastry crusts. The keyword is baked; these tough, coarse pears aren’t meant to be eaten out of hand. However, cooking makes their firm, red flesh yummy and smooth. Pound pears keep in storage until spring, making them top-of-the-line winter fare.

Have you ever sampled a Madeleine or sliced into a fine, baked Pound? Or perhaps you’d prefer American heirlooms? Two that spring to mind are Seckel and Tyson.

Around 1760, the original Seckel tree was discovered growing wild on the outskirts of Pennsylvania by Dutch Jacobs, a well-known sportsman and cattle dealer, who distributed its spicy, wee fruits to his friends, but kept its location secret for many years. Later a man named Seckel bought the land and named the tree after himself.

Of this sweet, aromatic, spicy fruit, horticulturist W. Coxe wrote in 1817, “[it is] the finest pear of this or any country.” Thomas Jefferson concurred; though he grew French pears in his fruitery at Monticello, he said of Seckel, “they exceed anything I have tasted since I left France.”

Tyson won the same rave reviews. Discovered growing in a hedgerow in 1794 on land belonging to Jonathan Tyson of Jenkintown, Pa., it became a major pear cultivar in its day.

U.P. Hedrick, who wrote The Pears of New York, the quintessential book on pears, wrote in 1921 that “Tyson is the best pear of its season for the home orchard” and “No other variety offers so many good starting points for the pear-breeder.”

Though not as large or pretty as its rival, Bartlett, Tyson pears are extra-juicy, sweet and aromatic—and they grow on ultra-hardy trees.

Top

Meanwhile, Back in the Orient
No discussion of heirloom pears is complete without mentioning luscious Asian pears. At the same time the ancient Greeks were cultivating new and exciting varieties of European pears, the Chinese and Japanese were perfecting their own delectable cultivars of Pyrus pyrifolia: the crisp and juicy Asian pear.

The Asian pear, known as “li” in China and “nashi” in Japan, originated in China about 4,000 years ago. Cultivated varieties were mentioned in Chinese writings dating to 1134 B.C. From China they spread to Japan, Korea and Taiwan, and finally to our West Coast along with Asian immigrants coming to America.

The sweet-tart, apple-shaped Okusankichi pear (also called Nihon Nashi) is an heirloom dating to the 1890s. Now obsolete in Japan, it’s one of the oldest varieties still cultivated in California. Another from the same era, the ultra-
aromatic Chojuro, is readily available from nurseries that sell Asian pear trees.

If you’ve ever celebrated Chinese New Year in a Chinese community, you’ve probably sampled China’s favorite ancient fruit. The two li cultivars sold in North America and served at traditional Chinese New Year festivities (Ya Li and Tsu Li) are at least 1,000 years old. More pear- than apple-shaped, li are not as juicy as nashi pears, but they’re crisp and very tasty all the same.

Top

And Then There’s Perry
If you’ve ever sampled traditional cider—curl-your-toes, real, hard cider, not sweet, apple juice; think cider made with pears—you’ve had perry.

Perry, once consumed by the barrelful in England, France, and parts of Switzerland and Austria, is staging a dramatic comeback thanks in part to Three Counties Perry, a Slow Food presidium made up of perry producers in the West Midlands region of England.

As artisan perry becomes more readily available in North America (and it is), legions of Americans are climbing aboard the perry bandwagon. If you’re looking for a farm-based business, maybe you should make heritage perry, too.

Pliny the Elder was the first of the ancients to write about alcoholic beverages made from pears; he recommended Falernian pears for making tasty wine. Palladius, another Roman writing in the fourth century A.D., left instructions for making fermented pear juice into perry called Castomoniale.

Perry was a first-rate drink in France, where growing conditions make pears the prince of fruits. Charlemagne loved it and perry was Napoleon’s favorite beverage, but perry didn’t cross the channel into England until the time of the Norman Conquest.

The Warden pear, popular during the reign of Henry the VIII (1509-1547), was used to make perry and as a preservative; those who drank Warden perry praised its “austere” flavor.

In 1597, herbalist John Gerard glorified the popular drink, saying, “Wine made of the juice of Peares, called in English Perry, is soluble, purgeth those that are not accustomed to drink thereof; notwithstanding it is as wholesome a drinke being taken in small quantities as wine; it comforteth and warmeth the stomacke, and causeth a good digestion.”

Botanist John Parkinson, a contemporary of Gerard wrote that, “Perry made of Choke Pears, notwithstanding the harshness and evill taste, both of the fruit and juice, after a few months, becomes as milde and pleasante as wine.”

Harsh? Evil? Yes, indeed. Perry pears are not for casual munching, although some were eaten and used for cooking in days gone by. Small, hard and packed with tannins, they were bred for centuries for one reason only: to make the world’s best-tasting perry.

Ancient perry pear trees were long-lived and immense; so long-lived, in fact, that many are still alive today. Some are as many as 300 years old and still bear fruit. And they’re huge—immense—sometimes 80 feet tall and 8 feet or more in trunk circumference. Picture an ancient oak tree that grows pears: Those are the surviving perry trees of England’s West Midlands.

Yet, you can plant some of the ancient varieties in your own backyard if you’d like to make perry at home. Botanist John Worlidge, writing in 1691, praised Bosbery and Bareland pears as perry making’s best of the best.

Bareland, now called Barland, is listed on Dr. Robert Hogg’s list of best perry pears (penned in 1884) and is available from three American nurseries. However, Barland pears, much planted in Herefordshire and the surrounding counties, were described by English gentleman botanist John Evelyn (1620-1706) as, “of such insufferable taste, that hungry swine will not smell to it, or if hunger tempts them to taste, they shake it out of their mouths.”

So if you grow it, don’t sample it raw!

Another cultivar, Hendre Huffcap—long grown in the Haresfield and Bromsberrow districts of Gloucester—makes perry so strong it can lift one’s cap; it’s available from American nurseries.

Top

Pear It Is
These are just the tiniest fraction of the hundreds of varieties of heritage pears available to hobby-farm growers. Why settle for supermarket fruit when these cultivars need conservators to preserve them for future generations?

Many historic varieties are available from American garden nurseries with just this thought in mind (Southmeadow Fruit Gardens alone carries 28 cultivars of historic European Pears; Cummins Nursery offers 17 perry pears).

If you’re an experienced orchardist, researchers at the National Clonal Germplasm Repository in Corvallis, Ore., are willing to provide scionwood from the 979 types and varieties of pears in their pear collection to growers willing to chronicle and share their experiences growing heritage trees.

So think pears. Heritage pears.

Once you’ve sunk your teeth into a Rousselet de Reims, favorite fruit of Louis XIV, or sampled perry made with Red Pears, a variety beloved by British perry drinkers since 1500, you’ll never turn back. And why should you? Heritage pears are simply the best!

Top


Categories
Beginning Farmers Farm Management

Become a Farm Intern, Learn Sustainable Farming

By Arie McFarlan

Offering a farm internship to people interested in farming can prove beneficial in many ways.

In addition to the ability to pass on knowledge and possibly your farming operation, farms hosting interns enjoy assistance with day-to-day labor.

Farm interns typically assist in planting, harvesting, animal husbandry, farmer’s market sales and general upkeep of the farm. Many come with the potential of becoming farm partners or long-term employees.

Most farm interns are expected to perform manual labor as part of their training.

Keep in mind, though, that the interns are on your farm primarily to learn new skills, and to equip themselves with the know how to eventually start their own farming operation or take over an existing one.

Offering an internship will require a commitment on the part of the farmer to spend time teaching his methods, principles and skills.

learning on the farm A Few Pointers for On-farm Interns
Although some farms accept interns as a means to meet their labor needs, others offer internships that are long term and educationally oriented.

Ask your potential host farm questions to find out:

  • What would be expected of you
  • The number of hours you must work each week
  • The stipend that will be offered (if any)
  • The length of the internship and what skills you might be able to learn.

Clearly express your preferences. Before accepting an internship, be prepared to evaluate your financial situation and personal needs.

If you have a large amount of debt, an intern’s stipend may not be enough to sustain you during your program.

Also, interns typically are placed on farms during the peak production season when personal time and recreation are at a minimum. Many interns feel like their personal lives are “put on hold” during their internships, so be prepared for this aspect of the training.

Not all farms are the same.

Some farms expect interns to integrate into the existing family and staff on the farm, and will treat interns as part of the family.

Others offer groceries and housing, but don’t expect the interns to participate in any of the social aspects of the family. If you have a preference, you should ask.

Top

Asking Questions is Part of Learning
While working as an intern or apprentice, be open to learning new skills. Ask questions.

If you don’t understand a task or don’t understand why you’re doing something, ask.

Most host farm owners have years of experience and have learned through trial and error.

By asking the “Why’s” of an operation, you’ll gain valuable knowledge that may prevent you from making some of the same mistakes.

Be Respectful
Keep in mind that your host farm has probably invested everything they have in maintaining their farm.

Most farmers have a personal relationship with their animals and want them to be cared for in the best possible manner. Likewise, when growing food crops, care and attention to detail is necessary to insure proper yield and safety in the product.

By learning the proper way to tend to animals and crops, you’ll be able to leave your internship with experience and know-how that you would never have gleaned without the hands-on experience.

If your host farm is a place that’s appealing to you on a long-term basis, consider approaching your host about extending your internship or coming on as an employee or partner.

Many farmers don’t have heirs to pass their farm to, and would appreciate having a young, dedicated employee or partner to work with.

Top

A great deal of patience, energy and time will be required to train your interns and prepare them for a future in agriculture.

Choosing an Intern (and a Sample Application)
Choosing an intern should be done with as much care as you would give to hiring an employee.

  • Interns should be screened for aptitude and attitude, and for a match to the assistance you will need on the farm and the skills you can pass along (see screening checklist on this page).
  • If you will be offering housing, you should clearly discuss the housing arrangement with your intern.
  • Monthly stipend, meals and any other provisions should be clearly discussed and agreed upon.
  • Lifestyle issues should be made clear up front. For example, if your facility cannot accommodate a vegetarian or if you do not allow smoking on your farm, convey this information prior to accepting an applicant.
  • A formal application must be filled out by all potential candidates. An invaluable resource about offering on-farm internships and how to select the best candidates is the New England Small Farm Institute’s workbook Cultivating a New Crop of Farmers – Is On-Farm Mentoring Right for You and Your Farm?

Here’s a sample internship application from Maveric Heritage Ranch Co., which has been offering internships for more than 3 years.

Top

Legal Issues
All legal aspects of offering internships should be researched by the host farm prior to accepting interns.

For example, some states require additional insurance to cover the farm if there’s an accident or a Worker’s Compensation policy if the intern works more than a certain number of hours per week.

Your state’s department of labor can provide the necessary information. Many states offer an exemption from additional insurance on farm labor.

Top

Finding an Intern for Your Farm
There are several ways to find interns and apprentices.

Many agriculture colleges allow you to post your position free; many also host career workshops where farmers can meet potential interns. If you’re willing to assist an intern in receiving college credit for an internship, include this information in your listing.

Many organizations specialize in bringing experienced farmers and beginning farmers together, and can serve as a valuable resource in setting up your on-farm internship program. Here are some of the best places to find interns and host farms.

Submit your listings to these organizations to maximize your visibility to potential candidates.

Whether you’re a young farmer looking for additional help or future partners, or an older farmer looking to pass on your agriculture legacy, interns and apprentices may be the answer to your needs.

Become an Intern, Learn Sustainable Farming
Why consider an internship in farming—and a few pointers for applicants

Becoming an on-farm intern is the best way to expand your knowledge about sustainable farming practices, gain experience and set yourself up for a future in agriculture.

Internship Opportunity Resources
To post an internship opportunity or to find a farm on which to train, contact the following organizations.

ATTRA
Directory of on-the-job learning opportunities in sustainable and organic agriculture in the United States

WWOOF
Willing Workers on Organic Farms
Occidental, CA; 831-425-3276
An organization that connects interns and farms in several countries

CA Exchange Program
Communicating for Agriculture
Fergus Falls, MN; 800-432-3276
International organization that connects farmers and interns

IFTN
International Farm Transition Network
A program designed to connect beginning and transitioning (retiring) farmers

Land Stewardship Project
Farm Beginnings Training Program
Connects existing farmers in a teaching environment to help beginners establish their operations

Alternative Farming Systems Information Center (AFSIC)
National Agricultural Library
U.S. Department of Agriculture
Beltsville, MD; Request free copy of “Educational and Training Opportunities in Sustainable Agriculture.”

Liberal Arts Career Network
Intern Center; Brunswick, ME
Maintains nationwide database of internship and summer job opportunities. Collaborative effort of 25 U.S. colleges and universities.

Multinational Exchange for Sustainable Agriculture (MESA)
Oakland, CA
MESA sponsors annual 8-12 month, on-the-farm training programs for global farmers, matching them with U.S. host farms practicing organic and/or sustainable agriculture.

Local Harvest
An online farmer resource that also lists individual farm internship opportunities

Top

Internships offer a wide variety of experiences including hands-on animal husbandry, vegetable production, carpentry, marketing, soils, food processing, legalities of food production and more.

Interns can find leads on internship programs, as well as health insurance and assistance with work visas through several agencies.

Other not-for-profit groups offer listing services that connect farmers and interns.

Many colleges work with local farms to create programs that allow the students to receive college credit for their internship.

A person interested in becoming an intern or apprentice should review these organizations and sign up with as many as possible to maximize their chances of locating the farm that offers the program best suited to their needs.

Top

Yet Another Resource
Land Link and Farm Link programs offer another resource for people interested in getting started in farming.

Over 20 states now offer linking programs that connect existing or retiring farmers with beginning farmers for transitioning the farm to the new farmer in the future.

Some of these arrangements offer an apprenticeship or partnership program whereby the beginner learns how to manage the existing farming business.

Financial arrangements are then made to allow the beginner to purchase the farm when the elder is ready to retire.

Becoming an intern can open up many doors to you by allowing you to learn skills, make connections to people with the same lifestyle and career goals, teach you different cultures and techniques, and provide opportunities to fulfill your dreams in agriculture.

About the Author: Arie McFarlan is owner and operator of the Maveric Heritage Ranch Co. in Dell Rapids, S.D. She raises Mulefoot hogs and Guinea hogs, among other heritage livestock.

Top

Categories
News

Goat Meat Demand on the Rise

Meat Goats
Courtesy Sara’s Boer Goats Ranch
Boer goats are a breed you can keep if you plan on raising goats for meat.

When you think of biting into a big, juicy steak, the last thing that comes to mind is probably a goat. Goat meat can be served in the form of steaks, chops, roasts and other similar mutton or lamb cuts. While it’s highly unlikely that goat meat will take the place of beef on most Americans’ dinner plates, the USDA is seeing an increased demand and a potential for goats to replace sheep and lambs in the meat industry.

Check the Figures
The USDA monitors the number of meat goats slaughtered in federally inspected facilities. If there is any suspicion surrounding the health, safety or handling of the goat meat, these facilities test it for antibiotics, sulfonamides and pesticide residues. Imported meat is also analyzed at ports of entry. Based on this surveillance, the USDA has come up with the following numbers for goats slaughtered each year:

YearMeat Goats (approx.)
198162,000
1994350,000
2002500,000+

The USDA also compiles data on the import and export of meat goats in America. According to its numbers, the United States quickly switched from being an exporter to importer: The United States was a net exporter of goat meat until 1990, but by 1994 exports had nearly ceased due to increased domestic demand. Then goat meat imports jumped nearly 151 percent from 3.36 million tons in 1999 to 18 million tons in 2003. Export data show that, even with an increased production, demand is still far greater than the domestic supply. Australia and New Zealand are the only exporters of goat meat to the United States—92.5 percent of which comes from Australia.
 
Refer to the Source
There are many factors that seem to be contributing to the growth of the goat-meat industry. Goat meat is often prepared in specialty dishes centered on holidays and religious celebrations when the consumption increases three- to four-fold. The United States immigrant population swelled by 57 percent from 1990 to 2000, shifting the demographics and potentially increasing the demand for goat meat.

Ethnic- and Faith-based Population Increases
in the United States
(United States Census 2000)
Muslims1+ million
Buddhists 1+ million
Asians  10+ million
Hispanics 35+ million

The phase-out of the Wool Act of 1954, which took place from 1993 to 1995, is said to have stimulated the demand for goat meat by cutting financial support of sheep and Angora goats grown for wool. It’s possible that this loss of support had a negative impact on the supply of sheep, therefore driving up the cost of lamb and mutton enough to make goat meat a more popular and affordable alternative. The supply of affordable goat meat also received a boost from South African Boer goat imports in the early 1990s.

Another factor affecting the popularity of goat meat is a conscious effort on the part of Americans to learn about the food they eat, the impact it has on their bodies and the processes used to produce it. Poultry has always been touted as the leaner, healthier alternative to beef and pork, but in comparison to poultry and other meats, goat outshines them all. It is leaner, has less fat waste, and is high in iron and low in cholesterol.

Taking all of these factors into consideration, the popularity of raising, selling and slaughtering goats for meat is projected to rise.

Categories
Animals

Shipping Fever in Horses

By Dr. Aaron Tangeman 

Q: I bought a quarter horse and will be trailering him from Texas to Ohio in July. My equine friends said to make sure he’s had a strangles vaccine to prevent shipping fever. What other precautions should I take?

A: Your friends are mistaken that strangles, caused by Streptococcus equi, is the sole cause of shipping fever.

It is impossible to pinpoint only one specific culprit bacterium, since both aerobic and anaerobic bacteria are capable of causing upper and lower respiratory infections in equines. Viruses also pose a threat.

Nearly all animals are stressed during long-distance transport, particularly in hot and humid conditions, and prone to develop the symptoms associated with the term “shipping fever,” or transport fever.

Other concerns:

  • Opening trailer windows for ventilation exposes animals to drafts.
  • Horses may experience increased anxiety from confinement or separation from herd mates.
  • Equines are more likely to develop respiratory infections when they are placed in close proximity with large numbers of horses who are strange to them, such as at auctions or while following a show circuit.
  • Risk is compounded because the other horses may be inadequately immunized—if at all—and vaccination protocols do not guarantee your horse will not become ill.

You should have the animal’s attending veterinarian in Texas thoroughly examine your horse shortly before beginning his journey.
 
Delaying transport may be recommended if the horse has suffered a recent respiratory infection.

Vaccines should be administered on a timely schedule. Consider the following for appropriateness as need varies according to geographic location:

  • Equine herpes virus 1,4
  • Influenza
  • Eastern/Western +/- Venezuelan – equine encephalitis
  • West Nile Virus
  • Strangles
  • Tetanus
  • Rabies
  • Potomac Horse Fever

Transport stress can cause the horse to eat poorly or become dehydrated.

Weight loss is common. To encourage the horse to eat and drink well, you may need to haul water the horse is accustomed to drinking and provide its usual food. Soaking the hay with water may help decrease inhaled dust.
 
Stopping to walk the horse can decrease tension and ease leg discomfort from road vibration.

Upon arrival, quarantine the horse and allow him enough time to rest.

Depressed affective behavior may indicate impending sickness. You should remain alert for signs of respiratory distress, including nasal discharge and cough. The nature and frequency of manure and urine production are good indicators of your horse’s health. A temperature above 102 degrees Fareignheight may indicate overheating or infection and requires veterinary attention.

Diagnosis will be based upon physical examination. Decreased breath sounds, wheezing, or gurgling may be heard in the lungs. Lab work may show elevated white blood cell counts.

Other symptoms can include:

  • Lethargy
  • Reluctance to move or lie down
  • Showing facial signs of anxiety
  • Groaning in response to thoracic examination

Fever, difficult or shallow respirations, and cough may require the administration of NSAIDs, analgesics, broad-spectrum antibiotics, and other supportive care to treat the respiratory infection.

By anticipating potential complications of transport, you can identify and implement the necessary precautions that will provide the safest possible transportation for your horse.

Top

Dr. Aaron Tangeman received his Doctorate of Veterinary Medicine from the Ohio State University in 1998 and practices in Northeast Ohio.

Categories
Farm Management

Organic Farming

By Cherie Langlois

Organic farmers have to follow the USDA's National Organic Program

© Mameframe Photo/Maureen Blaney Flietner

Farmers planning to label their crops “organic” must adhere to the USDA’s National Organic Program.

At Terry’s Berries organic community-supported agriculture (CSA) farm in Tacoma, Wash., diversity rules.

 Visiting her organic farm on a mid-September day, tall sunflowers bow their golden heads, sweet cherry tomatoes dangle, a few pumpkins glow orange and tempting red-green apples are almost ready to pick.

What captivates me the most, however, are several lush and festive rows of salad greens: red kale, arugula, endive, chard and more.

Wandering inside Terry Ann Carkner’s farm store, I find a big bowl brimming with mixed greens fresh from the field for about $7 a pound. Money is no option: I want a salad made from bright, healthy fixings that don’t come in a bag (and grow slime several days later) and I want it now.

I savor crisp, organic salad every day for nearly a week, sure that my body and the Earth are just a bit healthier for it.


 The faith in organic farms helps organic farmers keep up business

© Mameframe Photo/Maureen Blaney Flietner

Many people believe organic farming cannot be done on a large scale and prefer to buy their organic food from the farm down the road rather than from the factory farm.

Apparently, I’m not alone in my cravings for organically farmed produce. According to the Organic Trade Association’s (OTA) Web site, organic food sales grew 16.2 percent in 2005, reaching $13.8 billion in consumer sales.

Fruit and vegetables accounted for 39 percent of this total, the largest portion of any food category. And judging from past growth, the future of organic foods looks bright: Since 1997, organic food sales have shown annual growth rates of around 15 to 21 percent.

Of course, this trend hasn’t gone unnoticed by the supermarkets and club stores. Where once only natural food stores and farmer’s markets carried organic, now everybody wants in on the act.

In fact, reports the OTA, about 46 percent of the total organic food dollar volume was sold through mass-market channels during 2005.

So what’s the deal with organic crops? Are they truly better for consumers, for the environment and for small farmers? As a hobby farmer, should you jump aboard the certified organic wagon?

Before you make that leap, here’s some (organic) food for thought.

Going Organic: Rewards & Challenges
With maximum production of monoculture crops as its goal, conventional commercial farming relies heavily on purchased “inputs” of synthetic pesticides, herbicides and fertilizers.

From the Pages of Hobby FarmsOrganic farmers shun these toxic and potentially carcinogenic inputs in favor of enhancing the soil with compost, manure, crop rotation and cover crops. They combat weeds with good, old-fashioned tilling rather than by applying herbicides, and they nurture diverse crops to reduce the need for pesticides. While these eco-friendly tactics take time and hard work, the organic farmer usually has fewer outside expenses to recover.

Certified Organic:
Standards & Regulations

Anyone who wants to label and represent their agricultural products as “certified organic” must abide by uniform standards and regulations laid out by the USDA National Organic Program.

Here’s a sampling of requirements. For lots more, head to www.ams.usda.gov/nop and click on “NOP regulations.”

205.103: A certified operation must maintain records concerning production, harvesting and handling of agriculture products that are to be sold, labeled or represented as “100% organic,” “organic” or “made with organic.”

205.202: The farm must be free of prohibited substances for a period of three years preceding harvest (check out the National List of Allowed and Prohibited Substances in this same document).

205.203: The producer must manage plant and animal materials to maintain organic matter content in a manner that doesn’t contribute to contamination of crops, soil and water … Raw manure must be composted unless it’s applied to land used for a crop not intended for human consumption, or incorporated into the soil not less than 120 days prior to harvest of a product whose edible portion has direct contact with the soil (90 days prior to harvest if the edible portion does not have direct contact with the soil).

According to Bob Scowcroft, the Executive Director of the Organic Farming Research Foundation in Santa Cruz, Calif., farmers making the switch to organic receive a premium for certified organic products.

“The challenge is how to get there,” he says. “A farmer with 1,000 acres of beans and corn says ‘I want to go organic and sell to a grain buyer or wholesaler’ and the challenges get complex almost immediately.

He or she has to check the organic certification requirements and wade through 400 to 500 pages of organic regulations. In this country, you have very little information on how to make the transition to organic farming; it’s almost always farmer passing knowledge to farmer. A lot of organic growers are very open and willing to share with other growers—that’s unusual.”

Consider farmers Terry Ann Carkner and Diane Andersen, who are more than willing to share their experiences with organic farming, both the good and the bad.

When Carkner and her husband, Dick, bought their 20-acre property 22 years ago, the farm had been a conventional raspberry monoculture since the 1940s. Divided on the issue of going organic, the Carkners continued growing raspberries conventionally, finding it easy to employ synthetic chemicals and grow one crop, until organic foods became more popular about five years later.

“Cascadia Farms said they could use our berries for their organic jam if they were certified organic,” says Carkner. “Then the market for organic grew—that’s what nudged us over. Boy, I would never go back now. We’re into it philosophically and 90 percent of what we eat is organic. I think what’s good for the environment is good for us; we also think the flavor is better.”

For Carkner, growing organic meant diversifying; first by growing other types of berries, then, instead of letting the land lie fallow between berry rotations, planting a wide and colorful variety of vegetables.


Organic FYI

National Sustainable Agriculture Information Service
(800) 346-9140
The Appropriate Technology Transfer for Rural Areas (ATTRA) site features excellent information and articles on sustainable farming, the National Organic Program and organic certification.

Organic Farming Research Foundation
(831) 426-6606
This national public interest organization works to improve organic farming practices, sponsor research and educate the public about important organic farming issues. Visit their site to learn about projects they fund, see research results, and find information about organic production and marketing.

Organic Trade Association
(413) 774-7511
This membership-based business association promotes and protects the growth of organic trade. You’ll find organic news and facts, information on organic standards, and more.

The National Organic Program
The official USDA National Organic Program site is packed with intimidating but essential information for farmers planning to become certified. You’ll find a list of USDA-accredited certification agents, organic production and handling standards, the National List of Allowed and Prohibited Substances, and a question-and-answer section.

“We grow about every veggie you can grow,” Carkner says. She also added a flock of laying chickens and began raising broilers. Now her fresh, certified-organic crops feed a successful CSA business with over 270 customers.

The biggest disadvantage to organic farming, in Carkner’s opinion is the weeding (remember, no conventional herbicides are allowed).

But her favorite pay-off is worth the extra work: “When my grandkids visit, we can eat berries right off the vine and pull carrots out, give them a rinse and eat them, too,” she says happily.

“I don’t have to post signs that say ‘Poison.’ My CSA customers can come out to the farm and wander around with their kids, and I don’t have to worry.”

Halfway across the country, Diane and Dave Andersen’s desire to raise their 12 children in the country led them to buy a 200-acre organic farm in Ottertail, Minn., 10 years ago.

They discovered the farmland needed “fixing up” as much as the house and outbuildings; they soon learned to replenish the soil with natural practices like manure application and summer fallowing of specific pieces of ground.

Today, the family’s diversified organic operation encompasses crops such as wheat, rye, barley, corn, clover, flax and oats. A bountiful family garden yields peppers, tomatoes, broccoli and other treasures. Rounding out the farm operation, the Andersens’ sell organic milk from their herd of Jersey cows, and organic brown eggs courtesy of their hens.

“We promote [organic farming] with our whole hearts,” says Diane Andersen. “Psychologically, knowing that we aren’t contributing to the chemical input and pollution of those around us gives us confidence. Environmentally, we enjoy the good life, the wildlife around us and knowing that those weeds flourishing out there provide homes for species who couldn’t survive otherwise.

Being able to survive on these 200 acres without a lot of outside sourcing saves revenue and creates a strong work ethic in the minds and hearts of our children.”

To Andersen, marketing their crops and products is the only downside to organic farming. “While that can be enjoyable in the social aspect, it can also be very challenging as you step into a world that understands little about the benefits of organic. The prevalent mindset is still ‘spend as little as we can for as much as we can get.’”

Organic Certification & Maintenance
Farmers planning to label their crops “organic” must adhere to standards outlined in the USDA’s National Organic Program.

If you sell more than $5,000 worth of organic agricultural products a year, you must be certified by a USDA-accredited certification agency.

“Anyone who sells less than $5,000 of products [each year] does not have to become certified—it’s voluntary,” stresses Scowcroft. “However, you’ve got to keep records and follow the rules to use the term ‘organically grown.’”

The road to organic certification begins with choosing a private or governmental USDA-accredited certifier and obtaining an application packet.

You’ll submit an application, fee and an Organic System Plan packed with information about your property’s agricultural history and your planned organic management practices. For example, how will you improve the soil and control pests? Where will you obtain seeds? How will you handle your harvest?

After your plan’s review and assessment by the certifier, the next step involves an on-site inspection of your farm. An organic inspector reviews all aspects of your operation in order to determine whether your management plan complies with the National Organic Program standards.

Once the certifier reviews the inspector’s report and determines your farm fits the bill, you’ll be issued a certificate. The entire process usually takes around eight to 10 weeks.

At last you’re free to sell—and label—your crops as certified organic.

That is, until the following year when you’ll have to pretty much repeat the same process to maintain your certification. Feel overwhelmed yet?

When running a business, however, detailed planning and record-keeping can mean the difference between success and failure.

“Each year you have to make a farm plan as part of the certification process,” explains Carkner. “The plan describes what your major weeds, pest problems and diseases are, and what you’ll do to handle them. You have to keep a list of what you buy and put on your crops, and know where your compost comes from. I probably keep too detailed of records, but it’s helped me grow my business.”

“Becoming certified is not as big a deal as people seem to think,” Andersen adds. “Our farm was organic when we bought it, so it was only a matter of researching and deciding on which certifier we wanted to go with. At that point, we needed to be sure we had a paper trail proving that our ground was organic, that the seed we bought to plant was organic, and that no chemicals or unapproved products were being used on our farm. We achieved organic certification with little problem, and only have to continue farming and living our lives organically to maintain this certification.”

Why Certify?
Given the expense of certification (it varies considerably from certifier to certifier) and its challenges, why would a farmer who makes less than $5,000 a year from his or her crops want to go the certified organic route?

For one, only with certification can you market your agricultural products under a USDA-certified organic seal. In a world where the chain of supply has grown ever longer, this seal assures customers that you’ve been inspected by a third-party certifier and that your growing methods comply with the organic standards outlined in the USDA’s National Organic Program. Otherwise, they have only your word to go on that your product is truly organic.

There is a significant expense to being certified, Scowcroft admits.

He thinks certification is worth it, however: It shows you’ve made the commitment and provides security as part of your marketing.

“Your buyers can get your paperwork—the consumer’s right to know how you grew something is codified in the audit trail.”

The Giants Go Organic
To me, knowing how my luscious, eco-friendly salad was nurtured is only part of the allure of organic. I like that my salad came fresh from a farm a mere 15 miles away, so it didn’t have to be transported across three states by a gas-guzzling truck. I like using my purchasing power to support an endangered species—small family farms like Terry’s Berries. I don’t mind paying more for quality organic produce that’s priced to reflect the real costs of farming.

And that’s why you won’t see me shopping for organic produce at Wal-Mart.

According to a report released by Cornucopia Institute (www.cornucopia.org), an organic watchdog that promotes economic justice for family-scale farming, Wal-Mart sources organic products from what are essentially factory farms, as well as from Third World countries. Small, organic farmers worry that this could lead to lower organic food quality and loosened standards. What’s more, as giant corporations like Wal-Mart drive down organic food prices, small farmers could find their businesses threatened.

All this begs the question: Can a huge factory farm really be organic?

Carkner and Andersen don’t think so.

“Organic farming cannot be done on a large scale,” says Andersen, who feels optimistic that factory farms won’t prevail.

“Educated people know and understand that foods grown in the outdoors and on the farm down the road is just what it is promoted to be. Who could trust the factory farm to provide a healthy product or for that product to be what they say it is? Integrity means so much. The factory farms may make an impact for a short while, but in the long run the small producers will still be there.”


Is Organic Better …

 … for the environment and farm workers? Yes. “When you farm organically, you’re not applying over 8,000 different chemicals to your crops,” says Bob Scowcroft, Executive Director of the Organic Farming Research Foundation. “You’re not exposing farm workers to chemicals or contaminating ground water.” Other environmental benefits: Organic practices build soil instead of eroding it, they save energy (in the manufacture of synthetic pesticides)and reduce water-polluting nitrogen run-off caused by the application of synthetic fertilizers.

Is organic better for our health and the health of our children? Probably, but more research–and funding—is needed. “I don’t feel comfortable saying organic is healthier for you—yet,” says Scowcroft. “But there is some intriguing research out there.” Research has revealed lower pesticide residues in organic foods.

In one study, published in the February 2006 Environmental Health Perspectives, researchers substituted organic food for conventional in the diets of elementary school children for five days. Concentrations of organophosphorous pesticide metabolites in the childrens’ urine decreased to nondetect levels immediately and stayed that way until they resumed a conventional diet.

Another study in 2003 by researchers at U.C. Davis found more natural antioxidants in organically grown berries and corn than in conventionally grown.


About the Author: Cherie Langlois is an HF contributing editor who runs a 5-acre hobby farm in Washington.

This article first appeared in the Jan/Feb 2007 issue of Hobby Farms magazine. Pick up a copy at your local bookstore or tack and feed store. Click Here to subscribe to HF.

Categories
Equipment

Buyer’s Guide To Small Farm Utility Vehicles

Farm utility vehicles, also known as cargo all-terrain vehicles (CATV), or simply, “utes,” are the latest “must have” item for family farmers, ranchers and growers.

I once co-managed a polo club in a resort community that enjoyed an inexhaustible supply of used golf carts. The grooms and exercise riders came up with some inventive modifications for those light-duty vehicles.

They converted them to flatbeds, fed the horses off of them, installed electrical plugs for running herbicide sprayers and clippers, mounted spindles on the back for stretching wire and even used them for leading strings of polo ponies back and forth from the barns to the paddocks.

Little did I know that those souped-up golf carts were the forerunners of the modern day farm utility vehicle.

Utility Vehicle Benefits

Depending on the make, model and options, utility vehicles combine the versatility of a small tractor, the maneuverability of an ATV and the utility of a Jeep.

They can reach speeds of up to 25 mph, roll over muddy stream banks or wet grass without leaving a track, and take the place of a pack string on a weekend camping trip.

At the risk of invoking images of late night TV commercials advertising blenders that double as helicopters, it is entirely possible to purchase a utility vehicle that mows grass, plows snow, hauls up to a ton of feed or material, dumps dirt, scrapes snow, tows, accommodates spray attachments and negotiates 4-wheel-drive terrain all with same driver comfort as a small pickup truck.

Hard to believe? Utility vehicles have caught the attention of fire crews, search-and-rescue teams, municipalities and the National Park Service. Hunters who haven’t got the patience to wrangle livestock appreciate the ease with which they can pack in their gear and pack out an elk without ever having to throw a diamond hitch.

For backcountry users, the appeal of a multi-use vehicle is its versatility, functionality and ease of use. Larry Williams is a spokesman for Pug Inc., one of the first manufacturers of utility vehicles.

He works at the Pug factory in Jackson, Miss., and says utility vehicle sales have surged in recent years, partly because they are catching on as work/play vehicles. Pug has a 6-wheel model that is articulated in the middle, to bend around trees and other obstacles.

“They can go places you thought you could only get to with a mule, and carry 10 times as much,” says Williams. “And you can also make them street-legal and drive them to the mall. I’ve seen one parked down at the Wal-Mart with blinkers and tags and a walker in the back.”

Diverse Uses on Small Farms

The needs of small-scale farmers and ranchers are as diverse as their operations. Tractors can perform a variety of functions, but they are big and slow, and thus overkill for many jobs.

Pickup trucks can’t get in and out of tight places. ATVs are quick and maneuverable, but limited in terms of how much they can carry. Mike Henline, spokesman for Bobcat, says their new “Toolcat” work machine is based on feedback from people who wanted a single machine with a multitude of abilities. The result is sort of like the “Swiss Army Knife” of utility vehicles.

“Equipment users told us they were looking for a good-steering machine that would work well on all surfaces, and versatile enough to handle several applications,” says Henline. “This includes grounds maintenance, mowing, snow removal, ground leveling, lifting pallets, planting trees and shrubs as well as fencing and decorative landscaping. The customers were also looking for a machine that had 4-wheel drive and could travel quickly from jobsite to jobsite, with the ability to carry supplies and a co-worker.”

UTEs are Comfortable

In addition to its capacity for work, utes are almost as comfortable to drive and ride as a traditional automobile. Independent suspension and rack-and-pinion steering provide a remarkably driver-friendly feel.

For those that offer more than just “forward and back” options, hydrostatic transmissions allow for shifting on the fly. The meatier models can hit speeds of up to 25 mph, making the addition of a windshield or a full cab a welcome option.

Manual or hydraulic dump beds are standard on most models, and tow hitches can be added for greater versatility.

In fact, there are so many accessory opportunities, the greatest challenge in customizing a utility vehicle may be narrowing your choices to the features you really need.

But before adding the bells and whistles, buyers would be wise to make more basic choices about the vehicle itself, like the size and type of engine, payload capacity, and whether 4-wheel drive is a necessity.

Engines

  • Gas:
    Gasoline engines have an advantage over diesel for most owners when it comes to economy, convenience and noise. Gasoline is readily available, the engines are relatively easy to repair, not to mention quieter to run than a diesel. The units are typically less expensive than diesel varieties, and simple oil changes and routine maintenance can be done at home. While it’s true that gasoline is slightly more expensive than diesel, and gas engines are less fuel efficient, the margin will hardly be noticed in the four- to five-gallon gas tanks.
  • Diesel:
    Diesel units are more expensive than gas-powered engines, for both purchase and repair, but the additional cost is offset by increased power, longevity and reduced maintenance. Diesel engines have more torque, which translates into more load-carrying capacity and greater pulling power. The diesel engine’s fuel injection system eliminates the need for tune-ups and spark plugs, and the unit generally enjoys a longer lifetime. “When they break down, repairs can be expensive,” says Mark Jensen, a sales representative for Kawasaki and New Holland in Brenham, Texas. “But that’s only if they break down, and they are generally very dependable machines.” Diesel vehicles of all types hold their value better than gasoline-powered vehicles, and thus it can be argued that they are a better investment. But that will only benefit those who decide to sell at some point in the future.
  • Electric:
    One of the latest innovations in utility vehicles is the advent of the electric engine. Long popular in golf carts for their quietness, electric engines also have other advantages, such as increased responsiveness and zero emissions. Plus, as long as you have access to a power outlet, they never run out of fuel. Properly charged and maintained (you will need to check the water level in the batteries regularly), an electric vehicle should be able to run for a full day. Overall engine maintenance is generally low, but when the time comes to replace the batteries, expect to pay in the neighborhood of $500, as all will need to be replaced.

Steve Reed owns a John Deere dealership in Stockton, Calif. The gasoline- and diesel-powered Gators have been popular with farmers, ranchers and commercial growers for years, but Reed says the electric E-Gator is a popular choice for applications where noise is an issue. “When you’ve got golf courses, vineyards and orchards that you have to get to work in before dawn, people appreciate the electric engine,” says Reed. “Agricultural operators on small acreage and golf courses ringed by houses have to be considerate of their neighbors.”

Drive Train

Washington County Tractors in Brenham, Texas, was one of the first Kawasaki dealers to sell the Kawasaki Mule back in 1989. Mark Jensen still remembers the first one he ever saw, on the back of the sales rep’s truck. “I recall thinking, ‘I know a lot of customers that this will solve a lot of problems for.’”

He was right. Jensen says that today, with so many makes and models on the market, many of his customers have more than one utility vehicle in their garage. But for those who have to choose just one, it’s a good idea to make a realistic assessment of the kind of work you expect to be performing before choosing 2- or 4-wheel drive, or 4-wheel drive with two extra wheels.

  • 2-Wheel Drive:
    Two-wheel drive makes sense for light work in undemanding circumstances. “If you are mainly concerned with transportation on flat ground, and carrying a little bit of cargo like a bale of hay or a few sacks of feed, then 2-wheel drive is probably a good way to go,” says Jensen. “They are smaller, lighter machines, which is good if you aren’t going to be doing a lot of heavy work.” A 2-wheel-drive machine is less expensive than 4-wheel drive, gets slightly better gas mileage, and some can fit in the back of a pickup truck, making for easy transport.
  • 4-Wheel Drive:
    For work on rough, steep or muddy ground, or jobs that require lots of material or heavy equipment, a 4-wheel-drive machine is in order. Getting stuck in the mud or in the bottom of a ravine will bring a premature end to any job. Four-wheel-drive units must have stronger engines with a lower gear ratio to engage all four wheels. As a result, they can also haul heavier loads and tow more easily. Their heavier frames are built to withstand more abuse. “The larger machines get worked harder,” explains Jensen. “But they still handle well and don’t leave a track. In the mud, your footprint will be deeper than the tire track.” This is important for applications where it is crucial not to leave a mark on turf, or to protect sensitive areas around creeks and streams.
  • 6 Wheels:
    Six-wheel vehicles have the best traction of all, with 4-wheel drive and two extra wheels to distribute the weight. They can handle the biggest payload, up to a ton in some models, and are the vehicle of choice for farmers who work in vineyards and orchards, or ranchers who carry lots of gear and materials. Because the weight is distributed over six tires, they leave almost no trace of their passage, making them popular vehicles for golf courses and estate landscape maintenance. Of course, with six tires, you have a 50 percent higher chance of getting a flat tire, and two extra tires to replace when they go bald.

Horsepower

Utility vehicle engines run the gamut from 8 horsepower to 18 horsepower. Generally speaking, the more you intend to do with your ute, the more horsepower you’ll need. If you plan to use attachments, or tow a trailer, you’ll need a bigger engine. Likewise, 4-wheel-drive vehicles will, by definition, have more horsepower.

But horsepower can be deceptive, so you have to evaluate the size of the engine with the payload capacity. If you are comparing brands, and one model has more horsepower but the payload is the same, the bigger engine will just cost you more money and burn more fuel.

Optional Accessories

Once you’ve decided on the basics, it’s time to customize your ute. This is where the fun begins. It’s easy to get carried away with the extras, but the reality is you’ll probably use every feature you pick over the life of the vehicle.

Of course not all models offer all options, so you may have to decide between brand, and bells and whistles. Selecting your options can feel a little like a trip to the power-tool buffet.

  • Dump Bed:
    Manual or hydraulic, dump beds come in handy for cleaning stalls, hauling dirt, bedding and mulch, and a variety of landscape and small construction projects.
  • Windshield:
    It won’t keep you dry in the rain, but it will keep your hat from blowing off at 25 mph, and improve your visibility in thick fog or light rain.
  • Cab:
    Hard side or soft side, a cab adds comfort and protection from sun, wind, rain and snow. If you intend to use your ute year-round, a cab will pay for itself in a single season.
  • Snow Blade:
    An obvious improvement over a snow shovel, with less investment than a full-size snowplow. A blade can do double duty pushing dirt or leveling driveways in the dry season.
  • Sprayer:
    With a pump that draws off the engine, power sprayers anchored in the bed of a ute can spray herbicides, liquid fertilizer, or other agricultural chemicals much more quickly and evenly than a backpack sprayer.
  • Vacuum Cleaner:
    This attachment doubles as a street sweeper, and is a useful choice for estates or livestock facilities that must keep their public or work areas spotless.
  • Ball Field Finisher:
    Schools, golf courses and athletic fields have a need to groom their turf surfaces to a high gloss. The rubber nubbed fingers “comb” the grass to uniform perfection.
  • Rumble Seat:
    A new accessory not yet widely available in the industry, a detachable backseat can increase seating capacity to a total of five.
  • Tow Ball:
    Welded to the frame, a tow ball gives you the ability to tow a small flatbed trailer, chipper, splitter, arena drag or other implement weighing up to 1,200 lbs.

Utility vehicles will never replace full-size tractors or pickup trucks on the homestead, but they can provide transportation options for farmers, ranchers, commercial growers and landscapers.

Their application to a wide range of farm tasks, not to mention their ability to get off the farm and out into the woods, make them an attractive choice for those who are looking for the quickest way to get a job done.

Fast without being dangerous, strong without being overpowering, the new generation of work vehicles has an established place in the well-equipped agricultural operation for a wide variety of light, medium and heavy-duty assignments.

This article first appeared in the October/November 2003 issue of Hobby Farms magazine. 

Categories
Recipes

Egg Dish Recipes … English Style

Egg Recipes

In this article …

About the Author
Jo Stewart is a native Brit who, along with her husband, Adrian, owns and manages Mulberry Alpacas in Ashland, Ore.; www.mulberry-alpacas.com

By Jo Stewart

Here, we celebrate eggs.

Although, to the casual eye, these recipes may not be “eggy” (I have not, for sure, selected anything as predictable as an omelet or coddled eggs), each and every dish featured here depends upon eggs.

In most cases, the other ingredients can be substituted–sugar can be replaced with a corn syrup, flour can be replaced by a rice or soy substitute, butter can be replaced by oil, but … eggs dominate.

There’s nothing in the chef’s repretoire that can replace eggs and the inclusion of a yolk or a white into a recipe brings the cook’s attention to the importance of temperature, which can make or break egg cooking.

Top

My Life with Chickens
Over the course of my life, I can count on one hand the years when my garden has not contained chickens.

I have lived and journeyed through three continents and many homes, but somehow there’s always been room for my favorite Buff Orpingtons.

I have a passion for feeding my family from my garden, and with an orchard, a vegetable garden (which we Brits call a “kitchen garden”), beehives, goats and chickens, we do just fine.

Our supermarket shelves are lined with eggs produced by factory farms.
 
As a girl I spent long summers visiting my aunt and her husband—they had a large pig farm and countless long sheds full of what we called “battery hens”;  I remember to this day the horror of seeing all those chickens in such misery. They were crammed into cages, row upon row, stretching floor to ceiling as far as the eye could see. The bright lights kept them awake and laying all day, all night, all year.

I didn’t understand at the time; I didn’t know there was an alternative way to raise chickens, but I learned in time and personally I would sooner manage without eggs than spend my money on anything other than humanely raised, farm-fresh eggs.

I am including here some of my very favorite creations—none of which are of value without the inclusion of eggs. I really hope that they inspire you as they do me.

Top

Raspberry Pavlova

Ingredients

  • 3 egg whites
  • 3⁄4 cup granulated sugar
  • 1⁄2 tsp. distilled white vinegar
  • 2 tsp. cornstarch
  • 1 cup heavy whipping cream
  • A generous punnet (about a pint) of raspberries (this recipe works just as well out of season with canned pineapple chunks and/or kiwi fruit, peeled and sliced)

Preparation
Take parchment paper and draw around a dinner plate to form a circle of about 8 inches diameter. Place this on a baking sheet. Put the granulated sugar in the blender and pulse briefly to make it finer than it is straight out of the package. (In England this is called “caster sugar” and is widely used wherever a dessert calls for sugar, but the crunchy crystal effect should be avoided.)

Beat the egg whites until very stiff, then beat in the fine sugar, one half at a time. Beat in the vinegar and the cornstarch. Spread the meringue over your drawn circle, piling it up around the edges to form a “case.”

Bake at 300 degrees F for about one hour, until it’s firm on the outside (it’s like marshmallow inside) and light golden in color. Leave it to cool, then carefully remove the paper from underneath. Put the pavlova onto a large plate, whip the cream and pile it in a beautiful ocean over the meringue, arranging the fruit on top. Serves 4 to 6.

Top

Gorgonzola Favors
Here is a recipe for a dessert that is a constant delight. Although the egg is only a small part of the ingredient list, it would seem hard to write an article on eggs and not include “choux” pastry (although I don’t call it that, it is indeed choux pastry that you’re making in this recipe—and you won’t believe how easy it is!). The egg is the essential ingredient that turns this pastry into a veritable batter.

Ingredients

  • 1 T. butter
  • 1⁄4 cup all-purpose flour
  • pinch of salt
  • 1 egg, beaten
  • 1⁄4 cup strong cheese, grated (like mature cheddar)
  • 1 1⁄4 cup Gorgonzola cheese (any other blue-veined cheese can be used)
  • 2 T. half and half

Preparation
Sift flour and salt. Put the butter into a small saucepan with just a teaspoonful of water (2 fl. oz. if you have an accurate measuring spoon). Heat gently until the butter has melted, then bring to a boil; take the pan from the heat and add the sifted flour and salt. Return pan to heat and beat well until the mix leaves the sides of the pan to form a smooth ball. Cool for 10 minutes.

Beat in egg, a little at a time, to form a shiny paste. Beat in the grated cheese. Turn the mixture into a piping bag fitted with a plain nozzle and pipe 24 small balls onto a non-stick baking tray, leaving space for each one to grow.
 
Bake in a pre-heated oven at 350 degrees F for 15 minutes until firm and golden.

Cut a small slit in the side of each “favor” as near to the base as possible and pop back into the oven for 2 minutes to dry out the inside. Remove from oven and leave to cool. (At this stage the favors freeze beautifully, so feel free to do so if you’re planning ahead).

When you’re ready to serve, bring the favors to room temperature, mix the grated Gorgonzola cheese with the light cream to form a light paste and fill the favors carefully. Serve with a sharp cranberry sauce or salsa. Makes 24 favors.

Top

Easy Hollandaise Sauce
When I was a child, I lived with a grandmother for whom food, and its preparation, was the very reason for living. She taught me (when most grandmothers were telling fairy tales and teaching their grandchildren to knit) to make a hollandaise sauce that could bring tears to an adult’s eyes—it took over two hours to make, and involved glazed reductions and constant hand-beating of egg yolks—and was, if I’m honest, far, far more trouble than it was worth. She would turn in her grave at my current favorite hollandaise recipe, but I’d challenge her to taste the difference!

Ingredients

  • 6 egg yolks
  • large pinch of salt
  • 1 T. lemon juice
  • 1 1⁄2 sticks butter, melted in the microwave until it bubbles

Preparation
In a blender, combine the egg yolks, salt and lemon juice. At the very last minute, as you’re taking the steamed asparagus (or garlic prawns or poached eggs … whatever you like your hollandaise sauce served with) to the table, make sure the butter is melted and bubbling hot and tip it into the blender where the egg mixture is still sitting, ideally pouring the melted butter through the neck while the blender is pulsing.

The sauce will be ready to serve at once.

Tip: If ever your hollandaise sauce threatens to curdle (this happens if the combined temperature of the hot butter, cold eggs and lemon juice is a little too high), there’s a piece of magic you can use: Throw in an ice cube! It instantly brings down the temperature, stops the eggs from curdling and thins out the curdled lumps all in one go. Makes enough for 6.

Since the hollandaise uses so many egg yolks, look  for a recipe to use up the egg whites, which, with foresight, you’ll have put quietly to the side.

Top

Yorkshire Pudding
Yorkshire pudding is the ultimate English dish—it’s served as an appetizer (with the English version of onion gravy) or as the compulsory attendant to roast beef or even—and you have to suspend disbelief with this one—as a dessert, served with golden syrup (more of that in another issue).

Ingredients
n 1⁄2 cup all-purpose flour
n pinch of salt
n 1 egg
n 11⁄4 cups milk

Preparation
Mix the flour and salt, make a well in the center and break in the egg. Add half the milk and beat the mixture until it’s smooth. Tip in the remaining milk gradually and beat until well mixed. Leave to rest for at least 30 minutes and beat vigorously before cooking.
Take a muffin tray (if you can find one that’s fairly shallow, even
better!) and put just a drop (no more than a 1⁄2-teaspoon) of a light oil (canola or sunflower is good) in each. Place in a very hot oven (385 degrees F). Once the oil is hot (it just takes a few minutes if your oven was pre-
heated), remove from oven and very carefully fill each muffin indentation with the batter until it is two-thirds full (or half full if your tray is very deep). Replace and leave in the oven for 30 to 40 minutes until the Yorkshire puddings are risen, light and golden. If you can avoid opening the oven door, at least for the first 15 minutes, then the “puddings” will be very happy—they don’t cope well with sudden drops in temperature.
Serve hot, with anything you like, but ideally with roasted meat and onions, with a sauce or gravy poured over the top. Makes 12 puddings.

Top

Sauce Anglaise
This is known as “custard” in England. 

Ingredients

  • 4 egg yolks
  • 1 T. granulated sugar
  • 1 T. cornstarch
  • 1 pint milk
  • 1 vanilla pod (optional)

Preparation
If you choose to use the vanilla pod, take a short, sharp knife, score the pod down the center to expose the seeds and drop the pod into the milk in a heavy-bottomed saucepan. Bring the milk almost to a boil and do this ideally at least an hour ahead of making the sauce to let the vanilla flavor infuse; we all know how often mealtimes creep up on us and you won’t lose any friends if there’s no time for this part!

The shortcut is to forget the luxury of the vanilla and simply bring the milk almost (but not quite) to a boil. Do not be tempted to “make do” with artificial vanilla extract—it may only be my personal view, but I think the bottled essence can be overwhelming and this is a very delicate sauce.

While the boiled milk is cooling a little, take a mixing bowl and break in the egg yolks. With a hand blender, blend the granulated sugar for no more than 20 seconds—you don’t want anything as fine as a powder, but you do want to break down the sugar crystals into a fine blend. Stir the fine sugar and the cornstarch into the egg yolks and stir to mix well—it should form a smooth, yellow, runny paste. Pour on the milk and stir.

Sauce Anglaise is supposed to be of a coating consistency (if you’re not sure what that means, dip a wooden spoon in and withdraw it—the back of the spoon should be lightly coated with the sauce). If your sauce is not thick enough, return it to a very low heat and warm it through.

It’s vital at this stage not to subject it to intense heat or you’ll end up with scrambled eggs! A low, slow heat should thicken the sauce nicely. Serve hot on apple pie or fruit cobbler—or on any dessert you think will benefit from a delicate, warm, delicious sauce. Serves 4 to 6.

Top