Categories
News

Tree-debris and Emerald Ash Borers make for cautious cleanup

Take care when cleaning up ash and other tree debris
Blue Ash Tree Leaf

help slow the spread of the emerald ash borer
Emerald Ash Borer

Photos courtesy Ohio Department of Agriculture and the www.emeraldashborer.info

Careless windstorm tree debris clean-up and the Emerald Ash Borer don’t mix.

To make sure the dangerous insect doesn’t spread further in the state, the Ohio Departments of Agriculture and Natural Resources have asked Ohio residents to take care when clearing debris caused by the recent windstorm.

The Emerald Ash Borer or EAB, as it’s commonly known, was first seen in the United States about 10 to 15 years ago. It’s a wood-boring beetle from Asia that can kill ash trees in 3 to 5 years.

Adult beetles eat ash foliage, causing little damage–but the EAB larvae feed on the inner bark of ash trees, disrupting the tree’s ability to transport water and nutrients.

The agriculture department has placed 43 Ohio counties under quarantine to help slow and prevent the spread, including: Allen, Auglaize, Butler, Champaign, Crawford, Cuyahoga, Darke, Delaware, Defiance, Erie, Fairfield, Franklin, Fulton, Hamilton, Hancock, Hardin, Henry, Huron, Licking, Logan, Lorain, Lucas, Mahoning, Marion, Medina, Mercer, Miami, Montgomery, Ottawa, Paulding, Portage, Preble, Putnam, Sandusky, Seneca, Shelby, Union, Van Wert, Warren, Wayne, Williams, Wood and Wyandot counties.

The most up-to-date quarantine map is found at the Ohio Department of Agriculture website.

Other states battling the Emerald Ash Borer include Michigan, Illinois, Indiana, Maryland, Ohio, Pennsylvania and Wisconsin. More information

Under the quarentine, it’s illegal to move ash trees and parts of an ash tree, as well as all hardwood firewood out of Ohio’s quarantined areas.

The state fines violators up to $4,000; additional federal fines may also apply.

How Do I Safely Clean Up My Debris?
Here are the guidelines you must follow when cleaning up tree debris, according to the Ohio Department of Agriculture:

  1. All ash wood debris must stay inside the limits of the quarantine unless chipped to a size of less than 1 inch in diameter and length. 
  2. There are several locations, including yard waste recycling facilities and firewood dealers, within quarantined areas where hardwood firewood may be disposed. 
  3. All hardwood debris chips, smaller than 1 inch in diameter and length, and non-ash hardwood logs, longer than 4 feet, may travel outside the quarantined area for disposal. Ash logs may be moved with a compliance agreement in the EAB non-flight season, Oct. 1 – April 1. 
  4. Businesses and industries using hardwood materials must first apply for a compliance agreement through the Ohio Department of Agriculture to move or accept ash trees, parts of an ash tree, or hardwood firewood from quarantined areas. Here is a list of compliant companies.

For more information, contact the Ohio Department of Agriculture’s EAB office or call 888-OHIO-EAB.

Categories
Crops & Gardening

Plant and Grow Lavender

By Audrey Pavia

About the Author:

Audrey Pavia is a freelance writer based in Norco, Calif.

Imagine a sea of pale gray-green plants crowned with a powdery purple hue, growing on a small California hillside.  Stretching out in well-manicured rows, the plants wave softly in the dry, warm breeze. Beyond them are hills covered with chaparral in some places, fruited orange groves in others. As you breathe in, you smell an exotic, sweet and tangy scent that lingers in the air, giving you the sensation of being in a place that is both serene and stimulating at the same time.

Welcome. You are at The Lavender Fields.

BEGINNINGS
When Ellen Sullivan and Paul Bernhardy started The Lavender Fields in 1998, they had a vision of a peaceful place where lavender grew and was harvested for its beautiful flowers, essential oils and therapeutic floral water. The couple loved the herb’s appearance and fragrance, but also its hardiness and suitability for the Southern California climate.

After purchasing a nine-acre farm in the hilly region of northern San Diego County, the husband-and-wife team started their crop from cuttings taken from neighbors’ lavender plants. Six years later, the couple’s organic hobby farm has grown to include a viable business that employs Ellen full time. The Lavender Fields now sells products made from lavender online, hosts an annual lavender festival, and offers classes on cooking and crafts-making using lavender.

Ellen and Paul started propagating lavender in 1999 after building a potting shed. Using cuttings from one-year-old plants, the couple soon found themselves with 3,000 starter plants.

In no hurry to put the young, vulnerable plants into the ground, Ellen and Paul constructed a small shade house designed to help “harden off” the baby plants. The starter plants moved from the potting shed to the shade house and stayed for four weeks. In May of 2000, the young plants were ready to go into the ground and were carefully planted. By fall, the new lavender was blooming. The flowers were then cut by hand, dried and hand stripped. This fall harvest reaped enough buds to make a number of dried products, such as sachets, wreaths and dried floral arrangements. The remaining flowers were processed in a small copper distiller for their oil and floral water, to be used in lotions and body mists.

Ellen and Paul found success with their new product line, which inspired them to expand the business. The Lavender Fields now features three fields of lavender, a 600-square-foot greenhouse and a 100-gallon distiller. A gift shop sells the farm’s products to visitors during the months of May and June when The Lavender Fields is open to the public. The products are available on the farm’s website all year long. Paul (who is employed full time as an executive) and Ellen do all the work on the farm with the assistance of only one full-time employee, who also helps care for the couple’s livestock.

GROWING LAVENDER

Did you know?

  • Lavender played an important role in World Wars I and II. The oil from lavender plants was used widely as an antiseptic because of a shortage of medical supplies. Private growers in England provided the lavender from their farms, and citizens collected the plant in the wild as part of the war effort.
  • Before the advent of modern medicine, people kept lavender as a medicinal staple. It was used to relieve muscle aches and pains, nervousness and to promote the appetite.
  • Testing has shown that lavender oil has antibiotic properties and can kill Pneumonococcus and Streptococcus, along with other bacteria.
  • Although lavender is most commonly found in the wild in areas bordering the Mediterranean Sea, lavender species also grow on Atlantic islands.

When you look at the properties of lavender, it’s not hard to understand why Ellen and Paul were so drawn to this hardy herb.

The history of lavender use begins 2,000 years ago with the Greeks and Romans, who used this native Mediterranean plant to scent soaps and bath water. Long recognized for its therapeutic properties, lavender has been used through the centuries to treat headaches, sore throats, wounds and anxiety.

This fragrant plant is also treasured for its beauty. The hundreds of species of lavender growing in the world come in various shades of green foliage, most with soft purple flower stalks that reach toward the sun.

Ellen and Paul’s method of cultivating and harvesting lavender is based on the farm’s organic principles as well as the couple’s own personal preferences on how to handle their crop. All of The Lavender Fields’ plants are propagated from cuttings taken from mother plants. These cuttings are kept in a frost-free, well-ventilated area for about eight weeks in a slightly damp sand/perlite mixture. After the cuttings take root and frost danger has passed, the plants are taken to the shade house for further growth. The plants are moved to the ground a month later and are irrigated to keep the roots damp—a vital step in preserving the life of the plant within its first year. The fast-growing plants bloom soon after planting, and Ellen and Paul prune throughout the summer to keep the root systems strong.

One reason Ellen and Paul’s lavender grows so well is the Southern California climate. A plant that thrives on nearly constant sun, lavender needs at least six hours of sunlight per day to bloom at its best. Good soil drainage is also a priority, since root rot is one of the few problems that can affect the lavender plant. Soil from 6.5 to 8 pH is best for lavender, and Ellen and Paul have found that few soil amendments are needed at this pH range.

Mature lavender plants don’t need much water, so Ellen and Paul drip-irrigate the fields only about every 10 days during the hottest and driest period of the Southern California summer.

Because The Lavender Fields is an organic operation, all weeding is done by hand and hoe. Bees pollinate the plants, and ladybugs and birds keep pests at bay.

In France, where lavender is grown in vast amounts, scything is the method of choice for harvest. Because The Lavender Fields has a much smaller crop each year, the flowers are instead harvested with Japanese sickles and by hand. Harvest takes place in the summertime when the plants are at full bloom. A second harvest crop is ready for the taking in the fall.

Because The Lavender Fields produces a number of different products, the processing of the lavender varies depending on its intended use. Among the items offered by The Lavender Fields are bottled floral water, lavender-heat pillows, bottled essential oils, body mist, herbal face cream, body lotion, soaps, powders, bath oil, bath tea, a variety of baby products, beaded and closet sachets, honey-lavender candles and bulk lavender buds.

When harvesting buds to use in products calling for dried lavender, Ellen and Paul wait until the lower third of the flower has bloomed. They cut the flower during the day, after the dew has dried, to avoid moisture inside the plant bundle. Bundles consist of approximately 100 stems banded together in the field. They hang in the potting shed for weeks to dry, and are then sold as bundles or stripped for the buds.

The Lavender Fields creams, lotions and body mists and other liquid-based products require harvesting for oil and floral water, and so a different harvesting method is used; the flowers are taken later in the summer to allow the oil to gather within the maturing flowering heads. Ellen and Paul do their own distillation on the property, using unique methods developed to get both oil and floral water from the plants.

The distillation process is an important part of the work at The Lavender Fields, and involves extracting oil from the flowers using steam distillation. The farm’s steam distillation system generates steam in a separate boiler, which is piped into the bottom of a stainless steel distillation vessel that contains the lavender. The steam rises up through the lavender that has been compressed into the retort, extracting oil from the plant as it rises. The temperature of the steam is well controlled so it is just enough to force the plant material to produce the essential oil but is not so hot that it burns the plant material or the oil. Steam then exits through a hole in the lid of the retort, and is forced into the cooling condenser, where it cools and returns to liquid. The oil and water are then separated after they flow through a Florentine flask. After the oil and water are separated, oil is kept in an amber glass bottle to age for several months before being used. The floral water is sealed in white buckets out of direct sunlight until used for The Lavender Fields products.

Lavender Cheesecake Cookies

Ingredients:
1/3 cup butter or margarine
1/3 cup golden brown sugar, packed
1 cup all-purpose flour
½ cup finely chopped pecans
1 Tablespoon dried lavender
1/3 cup granulated sugar
1 egg
2 Tablespoons milk
1 teaspoon lemon juice
½ teaspoon vanilla extract
8 ounces cream cheese, at room temperature

Preparation:
Preheat oven to 350 degrees F. Cream butter and brown sugar together and add the flour, nuts and lavender. Reserve one cup for the topping. Press remaining mixture evenly over the bottom of an ungreased 8” square pan and bake for 15 minutes. While crust bakes, prepare the filling: Beat together the granulated sugar and cream cheese, and beat in the egg and liquids until smooth. Pour over the baked crust and sprinkle evenly with the reserved topping. Return to the oven and bake 25 minutes. Cool on rack for a few minutes and cut into squares and cool completely. Store covered in the refrigerator for two days or freeze for longer storage.

Source: 2002 Lavender Festival Cooking With Lavender booklet by Karen England, available through The Lavender Fields.

TEACHING OTHERS
At The Lavender Fields, Ellen and Paul do more than just cultivate lavender for their products. They also educate the public about this special herb in a variety of ways.

The Lavender Fields Annual Lavender Festival is one of the ways people can discover the magic of this plant. Visitors can tour the fields, gather flowers by hand and learn the various ways of using lavender in cooking and crafts. They can listen to live music, seedemonstrations of lavender essential oil distillation and purchase plants on site.

Classes on crafting with lavender are available throughout the summer. Students pick their own materials for making baskets, wreaths and other items.

Lavender can also be used for cooking, and classes on how to use the herb in a variety of culinary delights are offered at the Fields. Students discover which lavender varieties are best for cooking, how to make infusions and teas, and how to use dried lavender on everything from meat to desserts.

Both the crafts and cooking classes are held on the wrap-around porch of Ellen and Paul’s home, which features views of the hills surrounding the farm. Ocean breezes from the west cool students in the hot summer months as they overlook the fields below.

For groups wishing to visit The Lavender Fields at various times of the year, guided tours are available. The 90-minute tour includes the history of The Lavender Fields, an explanation of the planting process and growing cycle, a description of the varieties of lavender grown on the farm, a tour of essential oil distillery and a chance to shop at the farm market for handcrafted lavender gifts.

One of the most recent additions to the farm’s offerings is a labyrinth—a spiritual walking path, formed from English Munstead lavender. The seven-ring labyrinth is 50 feet in diameter, and offers visitors to the farm the chance to walk through the sweet-scented plants.

MORE THAN LAVENDER
Although lavender is obviously Ellen and Paul’s primary focus, The Lavender Fields is also home to the production of sheep’s wool for weaving. Ellen, a dedicated weaver, weaves museum-quality Navajo-style rugs in a small workshop adjacent to the couple’s home. The wool comes from their flock of seven Navajo-Churro sheep. A rare breed that once numbered in the thousands on Navajo land in Utah and Arizona, Navajo-Churro were destroyed in vast numbers in the 1860s by the U.S. Army in an effort to subjugate the Navajos. The breed now exists in small, scattered flocks around the country.

Each year, Ellen and Paul’s small flock is sheered and the wool is spun and dyed by hand. Ellen then weaves the wool using a 72-inch wide, eight-harness Cranbrook loom.

Because The Lavender Fields is located in a rural area frequented by coyotes, Ellen and Paul use a guardian llama for the sheep. Five other llamas reside nearby and provide fiber for Ellen’s artwork.

When paying a visit to The Lavender Fields, one can’t help but feel serene. The beautiful California scenery, along with the fragrance, and the soothing powers of the purple-flowered plant that make up much of the landscape are intoxicating. It’s no wonder The Lavender Fields is a place on the map for lavender lovers everywhere.

This article first appeared in the May/June 2004 issue of Hobby Farms magazine. Pick up a copy at your local newsstand or tack and feed store. Click Here to subscribe to HF.

Categories
Recipes

French Country Salad

French country saladIngredients

Chicken:

  • 1/3 cup freshly squeezed lemon juice
  • 2 T. olive oil
  • 2 T. soy sauce
  • 2 tsp. herbs de provence
  • Freshly ground mixed peppercorns to taste
  • 2 large chicken breasts, bones and excess fat removed

Vegetables:

  • 1/2 lb. fresh asparagus, trimmed
  • 3 to 4 medium beets, scrubbed and trimmed
  • olive oil

Salad:

  • 6 cups mixed salad greens, such as mesclun and spinach
  • 1/4 cup whole fresh basil leaves
  • 1/3 cup crumbled gorgonzola cheese
  • 1/3 cup walnut pieces
  • 1/4 cup balsamic vinegar
  • 2 T. olive oil

Preparation
To prepare the chicken, whisk together first five ingredients and pour over chicken breasts in a shallow glass pan.

Cover tightly and marinade for a minimum of two hours or up to 24 hours. Cook over a medium-high grill until juices run clear. Let cool for 15 minutes, then slice into ¼-inch thick slices.

To prepare the vegetables, slice beets crosswise in 1-inch thick slices. Brush beet slices and asparagus with olive oil and grill over medium heat until tender. When beets are cool, chop into 1-inch pieces. Keep at room temperature until assembling salad.

To assemble the salad, place greens, basil, gorgonzola and walnuts in a large bowl. Whisk together balsamic vinegar and olive oil; drizzle over greens mixture and toss to coat. Place desired serving sizes of greens mixture onto individual serving plates. Top with asparagus spears and chopped beets; arrange chicken slices on top.

Categories
Recipes

Steamed Mussels

Mussels

If you live near the ocean, steamed mussels are a great “last hurrah” of the summer season and offer a way to flavor winter chowders.

Ingredients

  • 1 lb. mussels
  • 1 stick of butter
  • 1/3 cup onions, finely chopped
  • 1 head of garlic
  • 1/2 cup dry white wine
  • 1/2 cup chicken broth
  • 1 bay leaf
  • 1/4 tsp. pepper, freshly ground
  • 1 to 2 sprigs fresh thyme (or 1/4 tsp. dried; fresh is preferred)
  • 1/4 cup fresh parsley, chopped
  • 1/8 cup fresh basil, chopped
  • 4 quarts cold water
  • 1/3 cup salt

Preparation
Scrub mussels well; remove “beards.” Combine 4 quarts cold water and 1/3 cup salt in large pan. Add mussels; soak about 15 minutes.

Melt butter in large skillet over medium heat. Add onion and garlic; stir for 4 minutes. Add wine, broth and seasonings; bring to boil. Add mussels; cover. Reduce heat and simmer about 5 minutes more or until all are open. Serve in bowls with plenty of broth and crusty bread. Save any extra broth by freezing for later use as chowder base. Serves four as an appetizer or two as a meal.

Categories
Recipes

Strawberry Spinach Salad

Try this strawberry spinach salad this springIngredients

  • 6 cups fresh baby spinach, washed, dried and stems removed
  • 4 ounces goat cheese
  • 1-1/2 cups sliced fresh strawberries
  • 1/2 cup sliced almonds

For the vinaigrette:

  • 1/2 cup extra virgin olive oil
  • 1/2 cup balsamic vinegar
  • 1 clove garlic, finely minced or put through a garlic press
  • 1 tsp. Dijon mustard
  • 1 tsp. sugar
  • pinch salt
  • freshly ground black pepper to taste

Preparation
Divide spinach among four plates, tearing any large pieces so that they are bite-sized. While cold, cut the goat cheese into small chunks and divide among the plates. Top with strawberries, and then almonds. Whisk or shake all dressing ingredients together until well combined and thickened. Makes 1 cup.

Drizzle salads with the dressing before serving or pass it at the table. Serves 4.

Categories
Recipes

Sweet Potato Oven Fries

Bake up some Sweet Potato Fries from Hobby Farms

A good guideline for heart-healthy eating is to choose naturally colorful foods, which pack more vitamins and antioxidants than paler foods.

Think hearty brown pasta, emerald spinach, glowing red peppers, deep orange winter squash, crimson cranberries, purple cabbage, vivid blueberries … make your plate an artist’s palette!

Ingredients

  • 3 lbs. sweet potatoes, peeled and cut into 1-inch chunks
  • 2 T. olive oil 
  • 3 large or 4 medium cloves garlic, minced 
  • 3 T. chopped fresh rosemary
  • Coarse sea salt and black pepper to taste

Preparation
In a large bowl, toss diced sweet potatoes with olive oil, garlic, rosemary, salt and pepper.
Spread evenly onto two large, heavy baking pans.
Roast in a 400-degree F oven, stirring frequently with a long-handled spoon, until potatoes are tender (about 25 minutes). Serve immediately.

Categories
News

Make Plans for Earth Day

Earth Day preparations
As hobby farmers, we’re used to forming new habits and making changes in our lives.

Tell us!
Have you done something new in your life to help protect the Earth today?
What can you add to these lists?
Tell us about it today!

  • We cope with interruptions due to an animal birth or illness
  • We manage through the impact of weather and/or pests on our crops
  • We’ve addressed our desire to connect with our agricultural roots
  • We’ve committed to healthier living

As Earth Day arrives this month, maybe it’s time to connect the dots from the changes we’ve already made to changes we can make to better care for the earth.

More than ever, Earth Dayand its goal to “spark a revolution against environmental abuse”—must not pass us by with just a simple nod of acknowledgment.

We’ve come to understand that environmental damage like global warming is real and that we can become part of the solution.

The list of ways we can help is endless. Here are our suggestions for things we can do in our lives and around our farms, homes and communitiesevery dayto help make a difference:

Around the Farm

  • Start a compost pile.
  • Put up birdfeeders, birdhouses, and birdbaths.
  • Pull weeds manually instead of using herbicides.
  • Use only organic fertilizers. 
  • Compost your leaves and yard debris, or take them to a yard debris recycler.
  • Return extra plastic and rubber pots back to the nursery.
  • Plant short, dense shrubs close to your home’s foundation to help insulate your home against cold.
  • Use mulch to conserve water in your garden.

Around the House

  • Replace frequently used light bulbs with compact fluorescent bulbs.
  • Recycle everything: plastic sandwich bags, newspapers, bottles and cans, aluminum foil, etc.
  • Use cold water in the washer whenever possible. 
  • Reuse brown paper bags to line your trash can instead of plastic bags. Reuse bread bags and produce bags.
  • Store food in re-usable containers. 
  • Donate used items to a charitable organization or thrift shop. 
  • Don’t leave water running needlessly. If you have a leaky faucet, fix the drips!
  • Turn your heat down, and wear a sweater.
  • Open windows instead of using air conditioning.
  • Turn off lights and electrical appliances when you are out of a room.
  • Turn down the heat and turn off the water heater before you leave for vacation.
  • Weatherize and insulate your home, and consider installing double pane windows.
  • Buy energy efficient appliances.
  • Buy products with less packaging.
  • Use both sides of paper.
  • Run your dishwasher only when it’s full.
  • Take shorter showers and use a low-flow showerhead.

In Our Lives and Our Communities

  • Buy recycled products.
  • “Recycle” your clothes.
  • Carpool, use public transportation or drive a fuel efficient car.
  • Keep your tires properly inflated and get better gas mileage.
  • Make sure your printer paper is 100% post consumer recycled.
  • Buy locally; it reduces the amount of energy required to transport your products to your store.
  • Donate money or time to an ecological organization.
  • Use rechargable batteries.
  • Plant a tree.
  • Buy organically grown foods.
  • Spread the word about conservation!
Categories
Animals Large Animals

Alpacas: Dollars And Sense

Just a few decades ago there were but a handful of farmers and ranchers importing and breeding alpacas in the United States.

Now, thanks to a number of factors, alpacas are considered a lucrative and relatively easy livestock investment, with their numbers climbing to about 50,000 in this country.

Still, this is a drop in the bucket when compared to about 3.5 million alpacas in South America, their continent of origin.

What does this mean for the alpaca in North America and its breeders and owners? How long can the growth of the alpaca market in this country be sustained? And dollars and cents aside, just what makes the alpaca so lovable?

Alpaca History

Alpacas are modified ruminants, part of the camelid family, which also includes llamas and camels. They are smaller than their cousins, standing at about 36 inches at the withers and weighing in at about 150 to 200 pounds.

While their smaller size and quizzical faces do in fact give them a high cuteness factor, whether or not they are huggable is debatable.

Many ads and websites for alpacas feature the ubiquitous picture of an adorable child hugging an adorable alpaca, but at the end of the day these are livestock creatures.

You may find the occasional alpaca that enjoys his hugs, but for the most part, they’re happy enough to mingle amongst their own and come to humans for treats and a good scratch.

Regardless of its predisposition toward being hugged, the alpaca is significantly easier to handle than most other livestock. They are smaller and therefore less intimidating than horses or cattle, don’t challenge fences the way goats do, and are hardy and easy keepers. Alpacas are certainly “user-friendly” livestock, which helps explain both their attractiveness as a livestock investment and their reputation for huggability.

Alpaca history accounts for their resilient nature … Alpacas are originally from South America where the Incas bred them for thousands of years the Incas’ lives were intertwined with those of alpacas, using the animals for fleece, food and transportation. During the Spanish colonization of South America, alpaca and llama numbers dwindled and the Inca and their livestock fled mostly to the higher, harsher climates of the Andes Mountains. As a result, the alpacas became extremely efficient grazers.

In 1984, several alpacas were imported to the United States from Bolivia, Chile and Peru. But in 1998 the U.S.-based Alpaca Registry Inc. was closed to any newly imported animals in an effort to improve the breed in this country. As word spread about the ease of care and keep of alpacas, the number of breeders and enthusiasts has grown.

Care and Feeding

Just how easy are alpacas to keep? Here are some basics:

Alpacas are extremely efficient grazers so they require little pasture and, with their padded feet, they are very easy on the land. Many breeders supplement alpaca diets with orchard grass hay and add a small ration of pelleted grain.

Those who keep alpacas for breeding and for fleece production (as opposed to just pasture pets) may want to adopt a more specialized feeding program. For instance, pregnant females may require more nutrition than what is readily available in pasture and hay, so an owner may consider additional nutritional supplements. Free-choice mineral blocks can also be provided. And for the very particular breeder, agricultural extension agents can be brought in to test the nutritional value of available pasture and hay.

The cost of feed is a small factor to consider. Alpacas only eat 1 to 1.5 percent of their body weight per day. In terms of cost, this works out to about 50 cents per alpaca per day.

Providing fresh water is critical for all animals. For alpaca owners in northern climes this means making sure water containers haven’t frozen. Automatic heated waterers help keep water chores to a minimum.

As with all livestock, alpacas warrant careful attention to their health. Annual vaccinations and regular deworming are necessary. Routine procedures, such as deworming, can be handled by an owner, which goes a long way toward saving on veterinary bills. In fact, finding a vet knowledgeable in alpaca care becomes one of the first chores of an alpaca owner. While more vets are becoming acquainted with the breed, their numbers are still few and far between.

The largest concern for alpaca breeders is healthcare for pregnant females and, of course, their babies, known as crias. Some owners prefer to send their pregnant females out to farms that have more experience at birthing, but in reality alpaca births tend to be fairly easy. Most likely due to the fact that they hail from a cold climate, alpaca births occur during the day and are typically uncomplicated. Regardless, a responsible alpaca owner will want to be present at the birth should any trouble occur. Amongst the many skills new owners should study up on before venturing into breeding is how to deal with troubled births.

Teeth and toenails must be routinely trimmed. Again, most owners will choose to do this on their own once receiving instruction from a competent teacher. Many new alpaca owners will find that the breeder they buy their stock from can be a tremendous source of knowledge when it comes to care and maintenance information.

Fencing and Housing

Since alpacas rarely challenge fencing, the strength and type of fence should be more about keeping predators out than keeping alpacas in. After a recent hurricane, breeder Chris Lewis of Alpaca Advantage in Delaplane, Va., discovered that a few trees had come down in his paddocks, crushing fence lines and leaving wide-open gaps toward the roads. His alpacas, however, thought better of leaving their safe enclosure and none had made any attempt at escape.

Predators are a big concern to alpaca owners, so in order to keep coyotes, feral dogs and others out, many breeders use no-climb fencing in combination with standard oak-board fencing.

A three-sided shelter is generally sufficient for alpacas. Since they hail from cold, windy mountainous areas and are well equipped for such weather. Heat and humidity are of more concern for alpaca owners. Protection from the sun is critical; when heat and humidity combine, additional measures must be taken. Some farms incorporate fans and misting systems, others just spray down their herds with water.

Shelters need to be large enough or number enough to accommodate all members of the herd. Since females need to be kept separate from the males (both studs and geldings), separate sheds need to be provided, or, if barns are used, they must be sectioned off.

Alpaca Herds

There are two types of alpacas—Huacaya and Suri. Ninety percent of alpacas in this country (and worldwide) are Huacaya. They are distinguishable from each other mainly by their fleece: The Huacaya fleece is wooly and the Suri fleece falls like pencil-thin dreadlocks.

The majority of alpaca owners and breeders have less than 10 animals, so in this case herd management is straightforward. Females are kept separate from the males, and females with young cria at their sides should be further isolated (though, as herd animals they should never be kept entirely separate from the rest of the herd as this will cause more stress than necessary).

The herd typically shares a communal manure pile making alpaca easy to clean up after. Their manure is rich and small, similar to sheep manure, and is welcome to gardeners even before composting.

Alpaca Economics

The first question potential alpaca owners usually ask is whether or not money can be made from alpacas. If a buyer forms a plan, sets goals, properly prepares his or her farm (or an agistment arrangement with another farm), cares for the herd and carefully plans breeding, then the answer is almost a definite “yes.” Presently there is still strong demand for well-bred breeding stock, and this is keeping prices high.

When Amy Makrosky, current president of the Alpaca Owners and Breeders Association (AOBA) bought her first four alpacas eight years ago, she asked herself the question “What if prices fall?” Since she had already fallen in love with the creatures, her bottom line was, “if the market drops out, I’ll still have them and I’ll still love them.” Fortunately for Makrosky, the market has not fallen and for now, shows no sign of abating. Her original herd of four has since grown to about 100, which she keeps on her farm in Texas.

Still, at a minimum of about $12,000 for a female alpaca, many buyers will want more from their investment than a lovely, but expensive pet. The question of whether a return can be made on an investment in alpacas lies not only in the apparent strength of the current market, or on one’s ability to care for livestock, but also how adept and inclined one is at marketing. Presently, approximately 85 percent of alpaca breeders are making their income through the sale of breeding livestock alone, with no concern for the sale of fleece. This means ranchers must become proficient at the art of selling and marketing their livestock.

According to Chris Lewis, while nothing is guaranteed, an investor in alpacas will meet with financial success if he or she makes an educated effort. “The biggest mistake new owners of alpacas make is spending all their investment dollars on breeding stock alone,” says Lewis. It might be wiser, he suggests, if an investor, for example, has $60,000 to spend, devote $40,000 to breeding stock, $10,000 on marketing and sales, and set aside the final $10,000 for breeding fees, unexpected vet bills and other miscellany.

The question of profitability also concerns what is considered “well-bred stock.” Since there are no set guidelines for conformation, what presently wins in the show-ring is what’s the nicest looking animal on any given day in the ring. In other words, breeders have been breeding for “pretty,” with a focus on color and some popular conformation points.

Many in the alpaca industry, however, are starting to breed with an eye toward what they see as the only true future for alpacas: fleece production. Some breeders are now more carefully considering the very technical aspects of fleece quality and incorporating breeding practices to improve it.

Alpaca fleece, a highly coveted luxurious product, is five times warmer than sheep’s wool and seven times stronger. In South America, alpacas are bred specifically for their fleece. Here in the United States, however, there are so few alpacas that, up until now, no economic incentive existed to market fleece beyond the niche markets of hand-spinners and weavers. The entire national clip (all the fleece collected in a year in this country) is now about 50 tons, compared to Peru’s 4,000 tons. A commercial mill could process that amount in three days. As a result, there is little motivation for American large mills geared for sheep’s wool to modify in any way to accommodate this new product.

Two things need to happen to change the minds of American large mill owners. The number of alpacas in the United States has to increase dramatically (which it is on track for) and breeders must start to breed their stock with an eye toward fleece quality.

The Alpaca Fiber Cooperative of North America (AFCNA) was established in 1998 to assist its members in collecting, processing and distributing their alpaca fiber. While it’s not yet running at a profit, the Cooperative hopes that increased awareness of its goals, along with increased numbers of alpaca breeders interested in working the fiber angle of their industry, will mean profits for all involved soon enough.

Fiber aside, money can certainly be made in the market for breeding livestock since that market is far from saturated and enjoys a strong demand. As of this writing, a well-bred female can easily fetch $20,000 and a superb herd-sire was recently auctioned for a record-breaking $250,000!

A number of factors assure future market growth. As of 1998, imported alpacas can no longer be registered with the Alpaca Registry Inc. While ostensibly one can still import alpacas, concerns over foot-and-mouth disease have, for the most part, closed off the United States from new imports. Also, investors in the alpaca market are strongly encouraged to work strictly with registered animals only. All of this, combined with the fact that alpacas have just one cria per year, means that the growth rate is set.

Entering the Market

A typical entry into the business of alpaca breeding goes something like this: A breeder new to the industry prepares his farm (fencing, shelters, feed, et cetera) and purchases his herd of alpacas—usually concentrating his initial investment on bred females. Let’s say he invests $90,000 on five females. Each bred female produces a cria within a year. About half of the offspring will be female, half males. Some of the female offspring will be sold, the rest kept to augment the breeding herd. In five years, the starter herd of five bred females can grow to 30 animals, now leaving the breeder with $500,000 (potential) worth in alpacas. Even before an actual return is realized, alpaca owners enjoy several tax advantages, from depreciation to real-estate tax reductions.

Those unable to pony up the initial cash needed to make such an investment can take advantage of financing options provided by many alpaca breeding farms. Another option for those unable to make a large initial outlay of cash is to join an alpaca investing syndicate where members each invest a certain percentage toward the purchase and care of alpacas.

Whichever entry route is taken, the potential significant return on investment within four or five years is part of what is driving this market. But many individuals seem to be attracted to alpacas for lifestyle advantages as well. With such small land requirements (depending on geography and pasture management, between five and 10 alpacas can be kept per acre), and ease of care and breeding, many novice and hobby farmers see alpacas as an easy gateway into livestock ranching.

Lewis believes that many individuals, including a significantnumber of retirees, in the post-September 11 world have been drawn to a more simplified rural lifestyle. And alpacas are an easy and welcome fit with that “back to the country” inclination. “After September 11th, there was a big surge of interest [in alpacas],” notes Lewis. “People were leaning toward a different set of values, a more old-fashioned way of doing things, where security and quality of life are more important.”

As Lewis points out, alpacas blend in nicely with those new inclinations. “They’re just a pleasure to be around.”

Where to Find Alpacas

Alpaca breeders and owners are very plugged in to 21st century technologies and communication methods.

Finding out more about alpacas on the Internet is fun and easy. Additionally, many sites have search functions that make it simple to find alpaca breeders near you. Alpaca industry insiders often encourage farm visits for those even just considering investing in alpacas.

Most likely because they know any time spent with alpacas is ultimately an addicting experience.

  • Alpaca Owners and Breeders Association (AOBA): www.alpacainfo.com. On AOBA’s official website you can locate breeders, check out the extensive calendar of events, order print and video information on alpacas (and their breeding and care), or just peruse their pages for loads of information on getting started with alpacas.
  • Alpaca Registry Inc. (ARI): www.alpacaregistry.net. This database housing the genealogy, blood typing and ownership records of alpacas in North America contains information regarding membership requirements and benefits. Since its inception in late 1988, the Registry has mandated blood typing as a requisite for registration and accepts only offspring of registered alpacas that qualify by blood typing.
  • Alpaca Nation (www.alpacanation.com) is an independent website where individual alpaca farms can advertise their services and livestock sales. The site is well organized, easy to navigate and a great place to start “virtual” alpaca shopping.
  • ILoveAlpacas.com: www.ilovealpacas.com. You’ve seen the commercials, now enjoy the site. This ad campaign was financed and created by a group of about 100 alpaca breeders. Many of these breeders had valuable marketing and communications experience from their previous professional careers and this combined knowledge is now being applied to their alpaca marketing efforts. The site, while containing some basic introductory information on the alpaca industry, is fundamentally designed to direct potential investors to alpaca farms near them.

This article first appeared in the July/August 2004 issue of Hobby Farms magazine. 

Categories
Animals Homesteading

Bread-based Therapy: Homemade Bread Making

By Cherie Langlois / photos by Jean M. Fogle

This step shows final rising, glazing and slashing of loaf before baking
In the final rising, glazing and slashing stage (shown here), your bread is ready for the oven.
 
In this article
 
More Recipes
Get a and more bread and baked good recipes. Click to continue>>

In my quest to de-stress from life’s inevitable anxieties, I’ve dabbled in various relaxation techniques, from meditation to yoga. I sniff lavender, try to avoid overdosing on caffeine and stroke my purring cats each day.

I unwind by taking long country walks with my dogs and work out my aggressions by attacking weeds in the garden.

But on sullen winter days, when the garden slumbers under mulch and the rain dampens my motivation to exercise outdoors and only multiple cups of coffee stand between me and hibernation, it’s cozy, creative, repetitive activities that soothe me like nothing else.

Maybe I’ll rug hook as the wood stove casts its flickering glow or knit a scarf while listening to the sweet strains of holiday music.

Or perhaps I’ll warm up the day with one of my favorite wintertime activities: making bread the old-fashioned way, by hand.

For me, nearly every part of this sensuous process serves as a cheap form of relaxation therapy:

  • Mixing the simple ingredients together;
  • Kneading and pummeling the dough until it becomes smooth and pliable;
  • Watching the yeast work magic on a lump of flour and water;
  • Inhaling the heady perfume of baking loaves;
  • and then, at long last, biting into a crusty, light, warm slice of bread—the ultimate, and probably the original, comfort food.

I’m suddenly transported to Paris, savoring fresh bread in a boulangerie without a care in the world.

dry yeast in warm water begins to bubble and froth.
After you sprinkle dry yeast over warm water, leave it for 5 to 10 minutes; you’ll know the yeast cells are alive when the mixture begins to bubble and froth.

Top

I know. You’re a busy person encumbered with too many responsibilities: a job, a farm, kids, pets, a ringing cell phone and e-mails to answer. You don’t have time to waste baking bread, especially when you can snatch a factory loaf at the store.

Sounds to me like you could use some bread-based therapy, too.

Top

Basic Bread Ingredients
Our world is full of a staggering and mouth-watering variety of breads, thanks to the Earth’s wonderful diversity of cultures.

  • Mexico flaunts its tortillas and
  • Britain bakes up English muffins;
  • Turkey brought us air-filled pitas and
  • Greece, egg-topped tsoureki.
  • Olive oil-drizzled focaccias from Italy,
  • flaky croissants out of France,
  • tender Indian naan

The list stretches longer than a baguette.

keep stirring untl the mix becomes doughy
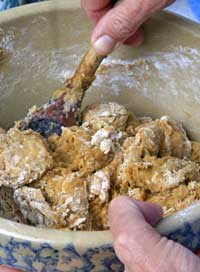
After you stir in the flour a half cup at a time, keep stirring untl the mix becomes doughy and pulls aways from the side of the bowl.

Top

To produce their distinct flavors and textures, the myriad breads of the world incorporate many different ingredients, including butter, honey, raisins and nuts.

However, all breads that use yeast as a leavening or rising agent share a foundation of four, down-to-earth ingredients (check the lengthier list on store-bought, bagged bread and see if you can even identify every component).

Top

Flour

Flour, created by milling cereal grains (usually wheat) through a succession of grinders, forms the bulk of a bread recipe. In the realm of bread-baking, though, not all grains and flours are created equal.

Wheat, first cultivated some 10,000 years ago in Asia, contains higher concentrations of a protein known as gluten than grains like rye, corn and barley.

Gluten gives dough its elasticity, allowing it to trap gasses released by the yeast and create a light, springy loaf.

To knead, press the heels of your hands into the dough, fold the dough over itself, turn slightly and repeat.
To knead, press the heels of your hands firmly into the dough, push down and away from you, fold the dough over itself, turn slightly and repeat.

Top

Bread made solely from low-gluten grains won’t rise well, if at all. Gluten content also varies according to wheat type and the area where the wheat grew.

Different wheat flours will affect the nature of your bread, too. Regular, all-purpose, white flour has had most of the nutritious bran and wheat germ removed. It’s been bleached with chlorine gas to give it a bright-white color, while more eco-friendly, unbleached all-purpose flour has a creamier cast and—I think—a better taste.

According to Maggie Glezer’s in-depth bread book, Artisan Baking (Artisan, 2003), all-purpose flours contain about 10.5 percent protein. Bread flours, on the other hand, have around 12.5 percent protein, which translates to a higher gluten content and more elastic bread dough.

Unlike white flour, whole-wheat flour retains all parts of the wheat kernel, including the healthy bran and wheat germ; however, its protein/gluten content can vary.

This light-brown flour imparts a hearty taste and rustic look to bread, but using it as the only flour will make for a stickier dough and denser loaf, so many recipes call for combining it with unbleached white flour.

The dough prepares to rise in an oiled bown, covered with a damp cloth.
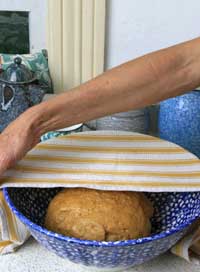
Set dough ball into an oiled bowl and cover with a damp towel.

Top

Finally, if you prefer that your bread come from sustainable sources, look for organic flours milled from wheat grown without conventional synthetic fertilizers, pesticides or genetically modified seeds.

Top

Salt

While it’s possible to concoct bread without salt, adding a little salt to the flour has several important functions: It enhances flavor, controls the yeast’s action so the dough rises evenly, and helps postpone that inevitable time when the bread turns hard and stale.

Yeast

Yeasts are miniscule, one-celled fungi that live all around and within us: on plant surfaces, on our skin, inside our intestines and in salt water.

Wild yeasts, of which many species and strains exist, also float in the air; in fact, a warm mixture of flour and water left to sit for several hours will begin fermenting, thanks to the floating yeast it snares (this is one way to create
sourdough-type breads).

After the first rising, punch the down down with your first and give a quick kneading.

Top

Thousands of years ago, humankind may have accidentally discovered yeast’s leavening super-powers in this way.

Introduce yeast into warm water and then to flour, and this living organism immediately starts fermenting the sugars present in the dough (some recipes call for added sugar to “feed” the yeast).

Fermentation produces ethanol along with carbon dioxide gas, and the gases create tiny bubbles that become trapped in the dough’s stretchy gluten, making it expand in size, or rise. Without yeast—or another leavening agent, like baking soda—the resulting bread would turn out as flat as a tortilla.

The fermentation begun by the yeast imparts the loaf with a spongy texture, delicious aroma and real-bread taste. Most home bread bakers use commercially made, regular, dry yeast available from grocery stores in small packets or more economical bulk amounts at health-food markets and warehouse stores, like Costco.

Top

Water

The addition of water to flour causes the gluten to form, creating a protein network to capture carbon dioxide produced by the yeast.

Voila, a dry mix of flour and salt becomes dough. Any safe drinking water will do.

How to Make Bread
Many people seem to think making bread from scratch is a difficult, complicated affair that requires either hours of hard work or an expensive bread machine to get the job done.

Beginner’s Bread

This easy recipe makes two small, tasty loaves while introducing you to the joys of baking bread. Try it once, and then feel free to experiment with different flours (such as substituting whole wheat for half of the bread flour), herb toppings, and texture- or flavor-improving additives like honey and milk.
Yield: 2 loaves

Ingredients

  • 1 1⁄2 cups warm water
  • 3 tsp. dry yeast
  • 1 tsp. salt
  • About 3 to 4 cups unbleached bread flour
  • 1 egg
  • 1 tsp. water

Preparation
Pour the warm water into a large mixing bowl and sprinkle with yeast. Set aside to proof for 5 to 10 minutes.

Whisk the yeast/water mixture and add salt. Stir in the first two cups of bread flour 1/2 cup at a time.

Continue adding flour until a dough forms and it becomes too difficult to stir.

Place dough on a lightly floured cutting board and knead in more flour until it loses its stickiness. Knead for about 10 minutes until smooth and elastic.

Place dough in an oiled bowl and turn to coat, cover with a damp towel, and let rise in a warm, draft-free area for about one hour or until doubled in size.

Punch down the dough, knead for several minutes, divide and shape into logs to fit two oiled or buttered rectangular bread pans (9” x 5” x 3”).

Cover with a damp towel and let rise for another 30 minutes or until doubled in size.

Preheat oven to 400 degrees F.

In a small bowl, whisk together the egg and water. Brush just the top of the loaf with glaze.

Place pans on the center rack of heated oven and bake for approximately 30 minutes, until the crust looks golden and the loaf sounds hollow when tapped on the bottom.

Remove loaves from pan and set on wire rack to cool. Bon appetit!

Top

Not so. If the pioneers with their bare-bones kitchen utensils, wood stoves and dawn-to-dusk work schedules could make bread, so can you. Just follow these basic steps.

Top

Mix the Ingredients

Many recipes, including our Beginner’s Bread recipe, call for sprinkling dry yeast over warm water (about 110 to 115 degrees F) and leaving it for five or 10 minutes to ensure it’s still active, a process known as “proofing.”

You’ll know the yeast cells are still alive and kicking when the mixture begins to bubble and froth.

If it doesn’t, the yeast may be past its expiration date—in a word, dead.

You’ll also find recipes that instruct cooks to add yeast directly to the dry ingredients, then mix in water of a slightly warmer temperature (around 120 to 130 degrees F).

Still others use the “sponge” method which involves mixing up a batter of water, yeast and flour first. Whatever technique you use, be careful not to kill your yeast by overheating it. 

After the yeast proofs, whisk the mixture and add the salt. Then stir in the flour about 1/2 cup at a time until the mixture becomes doughy and pulls away from the side of the bowl, becoming too difficult to stir.

Knead the Dough

Next to devouring bread fresh from the oven, kneading dough is the part of bread-baking I enjoy the most.

For some years, I used a standing mixer for kneading, and for people with arthritis, carpal tunnel or other issues making it difficult to knead dough, this makes a great tool.

Then along came my daughter, and the search for entertaining activities we could share together began. Not only did I have as much fun playing with dough as she did, but I loved the soothing motions, the quiet and the workout it gave my hands and arms. I never went back to my mixer.

Top

Bread dough needs plenty of kneading to stretch and warm the gluten.

Again, stretchy gluten strands help capture carbon dioxide produced by fermentation, making the dough rise and yielding an airy loaf with a moist, sponge-like crumb. Too little kneading can result in a flat, dense, chewy bread loaf.

To begin:

  • Deposit the dough onto a lightly floured bread board or another clean surface
  • Knead in more flour until the dough loses its sticky feel
  • Press the heels of your hands firmly into the dough (don’t be wimpy!)
  • Push it down and away from you
  • Fold the dough over on itself, turn it slightly and repeat

I like to give the dough a punch once and awhile for good measure. Keep kneading until the dough feels smooth and elastic, about 10 minutes (or as specified in the recipe).

Let It Rise

Set your fragrant dough ball into an oiled bowl and cover with a damp towel to keep a dry crust from forming on top.

Find a draft-free spot to place the bowl so the yeast can make the dough rise. A temperature of 75 to 85 degrees F works well for most breads; cooler temperatures won’t hurt the yeast, but will slow the rising process.

During winter, I turn the oven onto its lowest setting for about 15 minutes, switch it off and put the dough inside to rise with the door ajar (remember not to prematurely cook your yeast!).

Depending on room temperature, the rising time will run one to two hours, leaving you free to do other chores.

Allow the rising dough to double in size, but no more—letting it balloon out of control can cause the poor yeast to suffocate.

Top

Punch and Shape

After the first rising, punch the dough down with your fist and give it a quick kneading to redistribute gasses formed during fermentation.

Now the dough is ready to shape.

Visit a European bakery or pour over a beautifully photographed book like Bread: The Breads of the World and How to Bake Them at Home by Christine Ingram and Jennie Shapter (Hermes House, 2003), and you’ll encounter a delightful variety of bread shapes, from simple round boules to braided challahs.

For starters, try fashioning an easy rectangular loaf by molding or rolling your dough into a log-like shape to fit the size of your pan. Place the dough in the greased pan with any seams on the bottom.

Top

Rise Again, Glaze and Slash

Cover your loaves with a moist towel and allow the dough to rise again for 30 minutes to an hour until no more than doubled in bulk. Before you bake, bread recipes often suggest brushing on a glaze of some kind, such as egg white, yolk or milk, to give the loaf a shiny, golden crust and seal in moisture.

Slashing or cutting the loaf with a sharp knife lends a rustic touch and also helps the bread retain its shape during baking.

Bake, Cool and Eat!

Preheat your oven to the recommended temperature and when it’s hot and ready, carefully slip your pans onto a center rack.

Start out cooking your loaves for the amount of time suggested by the recipe, but keep in mind these times may vary.

Spritzing some water inside the oven once or twice while the bread cooks can help mimic the steamier conditions found in professional bakers’ ovens.

To test for doneness in the time-honored manner, remove the loaf from its pan with oven mitts and tap the bottom with your finger. If the loaf sounds hollow, it’s done. Remove your bread to a rack to cool, but don’t forget to sample a slice while it’s still warm (not a problem for my family!).

Top

Bread-making is a skill that anyone can learn, but it does take practice and patience.

Resist feeling too disappointed if, after following a specific recipe to the letter, your bread looks different from the perfect loaf pictured in the cookbook.

Baking bread is an imprecise science, with many variables affecting the outcome and plenty of room for error. For example, while baking today, my daughter and I accidentally dripped egg glaze between the dough and pan; as it cooked, the glaze glued the bread to the pan.

While we managed to pry one loaf out intact, the other stuck fast and came out minus the bottom crust. But you know what? It still tasted divine.

So put on your favorite music, relax into the moment and savor every part of the bread-making experience—even your mistakes. They’ll teach you to be a better baker and, best of all, they’re edible.

About the Author Cherie Langlois is a hobby farmer and freelance writer whose bread-baking habit helps her
survive winter in western Washington. She wishes to thank daughter Kelsey and French exchange student Clemence for their expert assistance in testing—and eating—the bread recipes.

Top