Categories
Beginning Farmers Equipment Farm & Garden Homesteading Projects

Video: Building A New Farm Garden Shed (Pt. 2)

It’s time for me to get back to building my new garden shed. In a previous video, I chose the site for the small outbuilding and squared things up in relation to nearby structures. Now it’s time to get the site ready. First things first, I need to prepare a level foundation for the garden shed.

When it comes to foundations, you have a number of options available, from a poured concrete pad to gravel to simple footings. Because my garden shed is a smaller structure, I’ve opted to use concrete brick footings for the building.

Note that, as I’m not a professional builder who puts up outbuildings every day, I have to think my way through each step. I think this is good for a step-by-step instructional such as this, but it also makes for a more thoughtful project (and hopefully more durable end product).

Building Blocks

So to get started, I simply place my first concrete block on the ground, tamping it down slightly to ensure it has steady placement. Upon setting the second block, though, I check for level and see that, as we’re running slightly downhill, I’ll need to add some dirt to bring it up a bit.

When you bring in dirt like this, it’s important to be generous. I built a fairly large dirt pad around and under the block in order to bring it up to level. This will ensure my shed foundation stays steady no matter what.


Read more: In part 1 of this video series, we look at planning and prepping our building site.


Keep Things Square

With two blocks laid for the shed foundation, I then set a post across them. Then I checked this line against the outbuilding I’m squaring it against.

Squaring these buildings is a matter of aesthetics for me—it doesn’t serve a practical purpose. But a tidy homestead is always worth a little extra effort as far as I’m concerned.

To do this, I grabbed my tape to measure off the outbuilding I’m trying to stay perpendicular with. Check out the video above to see what this looks like, and stay tuned for future build videos as I construct this garden shed.


Categories
Farm & Garden Food Recipes

Recipe: Easy Homemade Peppercorn Ranch Dressing 

Salads are one of my favorite things to eat. They come in many different shapes and sizes. Ingredients range from sweet fruit to hot peppers, and even proteins. Almost anything can become part of a salad. But, in my opinion, what really seems to level up a salad is homemade salad dressing.  

My husband makes a delicious dressing with blended garlic, apple cider vinegar, oil, salt and herbs. I personally love my grandma’s blue cheese dressing. It’s highly addictive.

But my aunt makes a peppercorn ranch dressing that everyone agrees is fantastic. (The kids especially love it.) This dressing is not only fit for a salad, but it makes a great dipping sauce for proteins, and vegetables—raw or roasted. 

Yield: 1 pint jar  

Ingredients 

  • 1/4 cup vegan mayonnaise (or regular mayonnaise of choice) 
  • 1/4 cup plain whole milk Greek yogurt 
  • 1/4 cup cottage cheese 
  • 2 tbsp. buttermilk 
  • 1 garlic clove 
  • 1 1/2 tsp. white wine vinegar 
  • 1/4 tsp. kosher salt 
  • 1/2 tsp. ground black pepper 

Directions 

Add all ingredients to a blender. Blend for 30 seconds, or until all of the ingredients are thoroughly blended together.  

Transfer to a clean airtight container, such as a pint jar. Add the lid and tightly screw on the ring. Refrigerate and enjoy within two weeks. 

This dressing can be eaten right after making. But allowing a couple hours for the flavors to meld makes it even tastier. 


Read more: Love salad? Here are some more homemade dressings to try out!


Notes 

We use vegan mayo in this ranch dressing recipe because my husband can’t eat chicken eggs. Regular mayonnaise can be substituted. 

Tweak this recipe to your liking. Consider adding in a teaspoon of fresh chives, one garlic clove, or fresh or dried dill or parsley. 

This recipe has been shared from Stephanie Thurow’s WECK Home Preserving cookbook with permission from Skyhorse Publishing, Inc.  

Categories
Animals Chicken Coops & Housing Chickens 101 Farm & Garden Health & Nutrition Poultry Poultry Equipment

6 Things To Watch For During Chick Days

Chick Days once again returns and, for a handful of weeks, farm-supply stores and feed shops across the country will resonate with the sounds of baby poultry peeping from stock tanks and storage bins. While it’s always tempting—and occasionally downright dangerous for those of us with chicken-math issues—to take a peek at the peepers, in some cases it can be life-threatening if you don’t.

Not for you … unless you go home with two dozen baby chicks when you were only supposed to buy safflower seeds. No, in this instance the life you may be saving is that of a chick… or, as may well be, chicks.

Oftentimes, mega farm stores hire applicants with no experience with poultry. They may have a background in horses or sheep or swine—or no livestock background at all. It may also well be that the same holds true for store management. Come Chick Days, staff may know enough to open up the cartons of chicks,  put in a feeder and waterer, and put them on display … and that’s it. Chick loss is just an expected percentage, just a small dip in the store’s profits.  

But every baby chick deserves a chance to be adopted and live a full life in a backyard or small-farm flock. Your intervention at stores where negligence and ignorance adversely affect chicks can not only save dozens of lives but may also better train store employees so that they are better equipped to deal with Chick Days in the weeks and years to come.

Here are six things to watch for.  
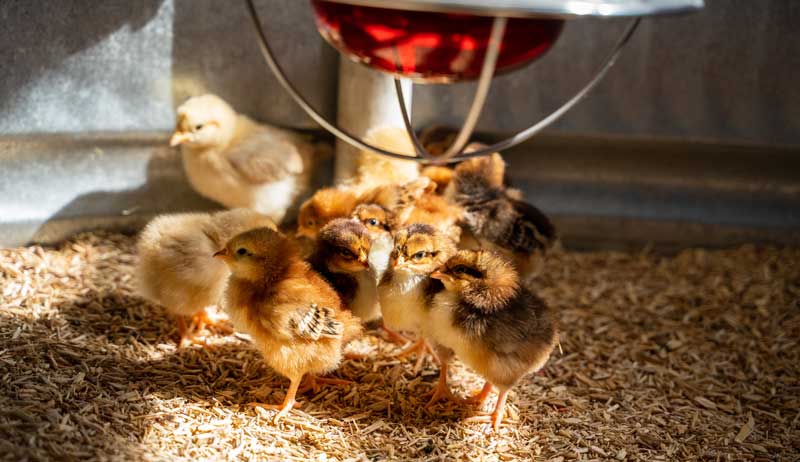
1. Improper Heating 

Newly hatched chicks require a constant temperature of 95 degrees F for the first week of their lives, then five degrees less each subsequent week until room temperature is reached. Hatcheries ship baby chicks out immediately after hatching, so that 95 degrees is absolutely necessary, especially for chicks stressed from shipping.

Additionally, baby chicks are unable to regulate their body temperature. They rely on their mother hen, their owner or store employees to maintain their body temperature for them. Store employees may not realize this. They may only know that each tank needs a heater, with no details about how high above the tank or over what section of the tank the heat lamp should go.

Keep an eye out for tanks with:  

  • No heat lamp or heat source at all (chicks will be clustered together for warmth; the chicks on the outskirts may be sluggish, unconscious, or dead from hypothermia) 
  • Heat lamp hung too high (chicks will be clustered together for heat; chicks on the outskirts may be sluggish from hypothermia) 
  • Heat lamp hung too low (chicks will be scattered to the far sides of the tank and possibly panting) 
  • Heat lamp hung over waterer (chicks will be positioned far from their water source and possibly panting; a possible ozone-like smell may be present from the heated plastic or metal waterer) 
  • No thermometer in the chick tank (staffers will have no way of determining the temperature within the chick tank) 

2. Improper Bedding 

I’ve lost count of how many times I’ve seen chick tanks with either no bedding at all—the chicks were on bare metal—or with newspaper as bedding. It is crucial for baby poultry to have at least 1 inch of fresh, clean bedding in their holding pens. Not only will the bedding be the chicks’ sleeping surface for the immediate future, but it also helps absorb and safely distribute the heat from the brooder lamps as well as absorb any waterer splashes and runny baby-chick poo.

Bedding also provides developing chick leg muscles a suitable, nonslip surface. Newspaper, which is slick, should never be used in chick brooders as it can lead to the development of spraddle leg. A slippery metal tank floor can also cause leg-development issues.

What to look for: 

  • Tanks with bare floors (chicks reluctant to move about) 
  • Tanks lined with newspaper (chicks reluctant to move about; possibility of “split-leg” chicks) 
  • Tanks with minimal bedding (litter is matted and soiled; possibility of chicks with pasty butt)  
  • Tanks with improper bedding (bedding is pellets, shredded paper, straw) 

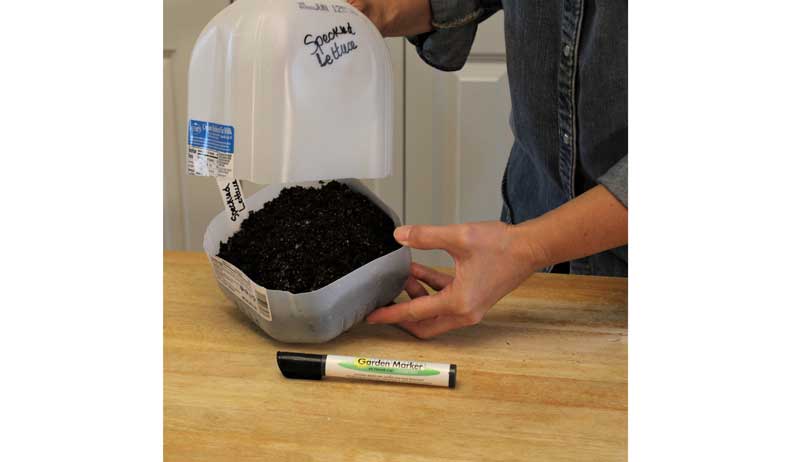
Read more: Let’s dig in to the great chicken bedding debate.


3. Feed Issues 

While it is hoped that store employees would at least be instructed to fill baby chicks’ feeders with chick grower, during Chick Days it is quite possible they received no instruction at all and that any sack of feed was grabbed off the shelf to give to the chicks.

Commercial feed is scientifically formulated for each stage of a bird’s growth, however. Feed formulated for adult layers can permanently damage infant poultry kidneys and more.

Furthermore, the starter feed given to baby chicks destined for a backyard coop is not the same type of feed given to baby meat chicks destined for the freezer in a few months. Beyond the type of food offered to baby chicks, it’s important to observe that the feeders contain food at all … and that chicks have not soiled the food with their droppings. Also important: Feed sacks being used to nourish the chicks need to be properly closed to avoid contamination by dampness, insects, rodents or even humans.

What to look for: 

  • Sacks of feed improperly clipped closed or left wide open (moisture can enter the sack, encouraging the growth of mold or mildew; insects and rodents can enter the sacks, contaminating the feed) 
  • Sacks of feed specified for adult poultry or for other animals (improper balance of nutrients can cause improper development or damaged internal organs) 
  • Sacks of grower feed near tanks of meat chicks (improper percentage of protein can lead to improper and delayed development) 
  • Adult feeder used in the chick tank instead of feeder specified for baby chicks (adult feeders encourage chicks to clamber over, poop and sleep on the food, soiling it. Baby chick feeders have “portal covers” which prevent chicks from messing up their feed) 
  • Empty chick feeder (chicks peeping loudly and incessantly from hunger; possibility of chicks sluggish from hunger or chicks pecking each other out of hunger and boredom)

4. Waterer Issues 

As important as food is to baby chicks, water is far more crucial for them to have. Water not only will keep chicks hydrated in the high-temperature brooders but also helps prime their infant digestive systems, which have only experienced liquid nourishment inside the egg.

Chick water should be clear and clean, with no shavings or droppings in the saucer. Only chick waterers should be used with baby chicks, as the depth of the drinking saucer in adult waterers can cause chicks to drown.

Keep an eye out for: 

  • Adult waterers in the chick tanks (wet chicks; drowned chicks in the waterer saucer or lying dead/dying close by) 
  • Empty waterers (chicks peeping loudly and incessantly from thirst; some chicks may be sluggish from dehydration) 

Read more: Make sure your chickens always have water—no matter the weather.


5. Bullying  

Every year, we end up getting a call from our local farm-supply store, asking us to come pick up rescue chicks. These babies usually sport injuries caused by other chicks, most commonly feather picking and vent attacks.

The injured chicks thankfully have had their injuries Blu-Koted, but they are depressed little things that don’t always recover from vicious, early-life bullying. Chick bullying is not intentionally malicious. It is often spurred on by the environment in which the chicks are kept.

Watch for: 

  • A couple of unsold older chicks housed in the same tank as dozens of younger newcomers (the older chicks have always ended up being the beat-up, bullied birds)  
  • White brooder lights being used instead of red (white lights agitate baby chicks and tend to frenzy them so that they begin pecking and fighting; red is calmative and hides injury from view) 
  • Injured, bullied chicks housed in the same tank as uninjured chicks (bullied chicks attempting to hide or stay out of the reach of the other chicks, often perching on top of the waterer or feeder or the edge of the brooder itself) 

6. Overcrowding 

The majority of farm-supply stores receive their Chick Days shipments from hatcheries on a contracted schedule. This doesn’t necessarily mean that the stores will sell out of their supply of chicks before the next shipment arrives.

My local farm-supply store usually ends up with a half-dozen stock tanks set up in the employees-only area in order to have room for all the chicks. Other stores will just combine chick shipments in one tank, resulting in an unhealthy overcrowding situation.

Things to watch for: 

  • More than one type of chick in a brooder (indicative of merged shipments due to lack of brooders, lack of floor space or lack of motivation to set up new tanks) 
  • No visible floor space in a chick tank (chicks peeping loudly and incessantly because they cannot reach food or water; chicks may be sluggish due to hunger or dehydration) 
  • Trampled chicks (dead, dying or injured chicks anywhere in the tank, including under live chicks) 

When You Notice Something Wrong 

If you recognize any of these situations at your local store, first and foremost keep your cool. Nobody likes being told what they are doing is wrong or putting lives at risk.

Take note of exactly what is going wrong before approaching the staff. Unfortunately, if one issue is occurring, there are bound to be others, again due to staff inexperience.

Next, your best bet—and the chicks’ best bet—is to speak to a manager. Chances are that a sales associate will not want to risk getting in trouble or fired so will not take any action. Or they may just see you as an interfering busybody who isn’t even buying any chicks. A manager, however, will be more apt to safeguard store “merchandise” and keep positive communication going with a customer.

Ask if you can speak to the manager in private. Publicly pointing out chick issues will most likely result in their embarrassment and anger.

Offer to help them correct what’s wrong. A pair of willing and experienced hands is always appreciated, especially if the staff is busy helping customers. By offering your assistance—versus handing over a list of things to correct—you not only help your local store better understand what baby chicks require, you also ensure these and future Chick Days chicks have healthful brooder environments while they await buyers.

You also build valuable connections with store management. You never know … you may end up being their go-to chick expert come the next Chick Days. 

Categories
Crops & Gardening Farm & Garden Homesteading Permaculture Urban Farming

Make A Meadow Anywhere With “Tiny + Wild”

According to Graham Laird Gardner, you don’t have to have vast acreage to be able to enjoy the look and feel of a wildflower meadow. “Three plants in a container could potentially meet this concept,” Gardner says. He’s the author of the forthcoming book, Tiny + Wild: Build a Small-Scale Meadow Anywhere.

Gardner has been in landscape design for well over 20 years. Some of the largest agencies he’s worked with include the Denver Parks Department and the U.S. Fish and Wildlife Service. But he’s succeeded in plenty of small spaces, too.

While writing Tiny + Wild, he took pains to identify what made some of his largest installations successful. Then he distilled those elements down so that they could be applied to smaller projects.

“You have to be more deliberate and more simplified,” Gardner explains. “In a larger space, you can go a little wild, as long as you still keep the eye moving through the space. But if you’re in a smaller space, it can look chaotic quickly if you’re trying to plant one of everything.”

A Meadow’s ‘Essence’

Obviously, the smaller your space, the more limited your planting choices may be. Even so, Gardner says, “I don’t want to limit people into thinking they need X number of plants before it constitutes a meadow.” (On the other hand, he doesn’t want to run afoul of ecologists either: “I could see them saying, ‘I’m sorry, but you’re really misusing that word when you’re talking about a few plants in a container!’”)

So, to be fair, Gardner sometimes uses the word “meadow” in a somewhat loose, creative way. “When you’re getting into a really small scale, it’s probably more the essence of a meadow than a true meadow,” he notes.


Read more: Lose the lawn, gain a prairie. Here’s how (and why).


Small but Mighty

Nevertheless, whether you have a few large containers, a balcony or a strip of sidewalk, even these can be transformed. Much of Gardner’s guidance aims to help readers work the “wildness” of more naturalized gardening into their own landscapes—without losing sight of their specific goals.

(Some of these goals could include attracting and supporting native pollinators, mitigating the need to mow especially tricky terrain or, perhaps, screening an unsightly view.)

“There are a lot of elements in the book that touch on naturalized gardening and how to make things look more deliberate,” Gardner says. “[That includes] where you might site things based on proximity to neighbors and how you might approach things differently if [you’re planting] in the front yard versus the back yard.”

To that end, Tiny + Wild explores site evaluation, design ideas, plant choices, seed starting, plant installation, long-term meadow management and more. Gardner also covers plant choices for different kinds of space constraints and growing conditions.

For example, he says, “You wouldn’t be putting Joe-Pye weed in a small container. If you did use Joe-Pye weed, you might pick one of the dwarf varieties so that you could still be taking inspiration from nature but taking into account the scale of the space that you’re working in.”

Keep It Simple

Considering all of the different colors, heights, and textures different meadow plants can afford, it’s easy to become a little overwhelmed when choosing what to plant. When in doubt?

“Circle back to simplicity and to some of the [provided] design concepts … and the goals for the project,” Gardner suggests. “Your goals are going to guide you. If your intention is to attract more pollinators and beneficial insects and you keep reminding yourself of that, it will help you to choose your plants. Or, if your goal is to screen an unsightly area in your neighbor’s yard, you know that you’re looking for plants that have four-season structure and height.”

Of course, your budget will also play a role. One of Gardner’s favorite mini-meadow hacks? Working with landscape “plugs” or smaller plants in 2- to 4-inch containers, rather than springing for larger potted specimens. He also uses seeds to fill in the gaps.

“That way, you have [plants] at different ages, and those smaller landscape plugs and smaller pots will catch up to the 1-gallon pots pretty quickly,” he says. “It’s also a smaller root zone, so you’re not having to worry as much about watering and the shock of establishment.”

Mini-meadows provide at least one other benefit—particularly for beginners.

“If you have a smaller space that you’re maintaining, you can pay more attention to the small things that are happening amongst the few species that you’ve selected,” Gardner says. “You can really learn what your seedlings look like and what your problem weeds look like and not get overwhelmed by a larger space.”

Categories
Crops & Gardening Farm & Garden Homesteading

Favorite Jung & Johnny’s Seeds For Your 2023 Garden

Looking to try some new seeds in your garden this year? We rounded up our favorite options from two seed suppliers—Jung Seed Company and Johnny’s Selected Seeds—to consider for your upcoming growing season.

Jung Seed Company

Part of the fun of growing a garden each year is trying out new varieties, and Jung Seed Company has three of our favorite seeds for the new year. Find out more about these three seeds and other 2023 varieties.  

Bohan Hybrid Beet

This heat-tolerant beet variety (pictured above) adapts to wet and poor soils with ease. It has a long taproot, allowing it to pull nutrients from deep within the soil. Strong, vigorous stems top the 3-inch, rounded beets, which have smooth skin, an attractive deep red color, and a deliciously sweet flavor.

Bohan is highly resistant to soil-born diseases.

Look no further than the Bohan Hybrid Beets for a deliciously flavored beet. This year’s superstar is highly resistant to soil-born diseases and productive. You’ll be enjoying this sweet treat this summer.

Megatron Hybrid Jalapeños

Fill your garden with the biggest, earliest jalapeños around. The Megatron Hybrid Jalapeños bears jumbo fruits 4 1/2 inches long, which are up to an inch longer than other jalapeños. The average Scoville rating is 5,000+. 

garden seeds
Jung Seed Company

These disease-resistant plants yield loads of peppers that show good shelf life after harvest. The fruits mature to red but are typically used green.

Megatron Hybrid Jalapeños are the must-have jalapeños for 2023. These large, disease-resistant peppers are high yielding. You’ll be craving this all year!

Kai Kai Hybrid Winter Squash

This winter squash is so pretty you may want to use it as fall décor before you eat it! Flattened fruits with deep ribbing begin green with lighter speckles and mature to a beautiful mottled tan.

gardening squash
Jung Seed Company

The thick, dark orange flesh has a sweet flavor and smooth texture, similar to butternut squash. Vining plants have excellent resistance to the mosaic virus and Papaya ringspot virus.


Read more: These garden veggies are root cellar rock stars!


Johnny’s Selected Seeds

Here are three of our favorite garden seeds for the new year from Johnny’s Selected Seeds. Find out more about these three seeds and other 2023 varieties.

Mochi Tomato

This unusual cherry tomato brings an entirely new texture! A Johnny’s Selected Seeds exclusive, Mochi doesn’t burst in the mouth and invokes a gumdroplike eating experience. The large fruits are thin-skinned and uniquely glossy.

garden seeds
Johnny’s Selected Seeds

This indeterminate plant is compact and easy to train, and offers high resistance to leaf mold. Harvest Mochi regularly, and gently, but allow fruits to hang as long as possible for best sweetness.

Night Shift Winter Squash

This high-yielding acorn maintains its intense, dark color and superior flavor and eating quality through the winter holidays and beyond. Vigorous vines provide excellent cover and hold up well under disease pressure.

garden seeds
Johnny’s Selected Seeds

Night shift offers intermediate resistance to powdery mildew and has an average weight of 1 1/2 to 2 1⁄2 pounds. 

Olly Pepper

This organic, early red bell is ideally suited for tunnel or field production. Its medium-large, sturdy plants reliably produce high yields in heated and unheated tunnels.

gardening peppers
Johnny’s Selected Seeds

Large fruits mature a little earlier than similar bells (54 days green; 74 days red ripe). Olly offers high resistance to tobamovirus races 0–2.

This article originally appeared in the January/February 2023 issue of Hobby Farms magazine.

Categories
Beginning Farmers Equipment Farm & Garden

What Outbuildings Do You Need On A Farm?

It’s an exciting time when your homestead is growing and expanding. Are you considering adding farm outbuildings, such as a full-size barn to shelter your livestock, a new chicken coop for the next batch of poultry, or a shed for better storage and organization? Decisions like this can be challenging to know where to start when you’re preparing for a new building project. 

Purpose of the Structure

One of the first (and most important) things to decide is the purpose of your structure. A homestead can use a variety of buildings. Knowing which one to make a priority and construct first can be a challenge.

Look over what areas of your homestead are growing the most rapidly. This can help determine where you need to focus your time, energy and resources.

The clearer you can be on the purpose and direction of your homestead, the better and more informed choices you’ll be able to make. Constructing a new building is an investment in the future. It shows that you have a plan and hope for what is to come and that you’re willing to invest in that.

The clearer your plan can be now, the more likely your farm outbuildings will meet your exact needs later!

Regardless of what outbuilding you’re preparing to add to your homestead, it’s always important to think through and plan before you start construction. These choices are important as the building will likely be on your land for many years. You’ll want it to enhance your living and not hinder any future growth and improvements. 


Read more: Keep an eye on your farm outbuildings with a security camera.


Building Materials 

It can be challenging to know what kind of materials you should use when constructing farm outbuildings. Wood and steel are two of the most common options, and there can be a variety of opinions on which is better. 

farm outbuilding outbuildings
peter/Adobe Stock
Wood

Wood building materials tend to be less expensive than steel and are a natural insulator. They do tend to be more prone to warping, mold, pests and rot. But some of that can be reduced if using treated lumber (wood that has been treated with preservative chemicals). 

A good rule of thumb is that any lumber that comes into contact with the soil should be treated. (Although, if you have goats, this can pose a hazard for them.) Over time, wood-framed buildings will need repairs and maintenance that steel buildings won’t. 

Steel

Metal-framed buildings can be damaged, too, though steel materials are less likely to degrade as quickly as wood. Steel is more weather-proof, but metal-framed buildings are generally more expensive and require special equipment to cut or put together (such as torches and welders).

Steel will rust if exposed to standing water over time.

Zoning & Permits 

Local regulations on permanent building structures can vary from place to place. In Kansas, where I live, zoning laws are quite relaxed when it comes to land that is zoned as “agricultural.”

Of course, there are a few things you should check into wherever you are, such as calling 811 before you dig to avoid hitting any existing utilities. Make sure you check any local building codes, ordinances, zoning laws, etc. to understand any boundaries before you invest your time and money into farm outbuildings. 

farm outbuilding outbuildings coop
Yulia/Adobe Stock

The Perfect Location 

Choosing the perfect spot for a new shed can be challenging. With most any structure, a flat piece of ground with good drainage is the best place to start. 

The utilities you need access to will depend on what type of structure you’re building. While a greenhouse will need a nearby water well (or other source of water) and electricity (to run a heater and lights), a garden shed used for storing tools might be fine without any utilities nearby and just a battery-powered light. 

Barns will need access to fresh water, whether it’s near an existing well or one needs to be drilled. You’ll also need to run electricity to them. Drainage is a huge factor, as standing water will hurt the integrity of your barn and its ability to function properly and pose potential risk to livestock.

Make sure to check the slope of the land and watch after a rain to see where the water goes. Does it just stand around in puddles or does it run off and drain downhill? 

If livestock are being housed inside, consider shade for not only the barn but any pens or runs leading outside. Natural lighting should also be taken into account when you’re choosing a location. 

Machine sheds and shops should also be placed very carefully. Consider ease of access for large equipment, the current flow of traffic through the yard, available utilities and any plans for future expansion. 

Wherever you choose to place your building, outline and draw up a proper plan, and prepare the land as well to help construction go easier. Brush and trees can be cleared away, and grass and top soil can be removed. You can run a compactor to create a firmly packed floor, and dirt work should be done to ensure a level building site.

When you think the time has finally come to begin expanding your homestead, it’s good to not rush right into it and make any rash decisions. Allot yourself a dedicated amount of time to study, read and discuss the different options available with other homesteaders, as well as anyone around the area that has put up farm outbuildings and would have some advice to offer.

Give yourself time to mull it over. You might be surprised at how differently your final decisions are from the first plans you made!


More Information

Storage Solution

A storage shed can be used to hold just about anything, from seasoned firewood to extra buckets, heat lamps and extension cords. Just like a garden shed, they can be purchased already constructed, as a kit or built from scratch on site. 

If you decide to build it from scratch, start by planning out what it will be used for and the size needed. To help visualize how big you want the shed, try putting stakes into the ground the same length and width as the shed dimensionsm and run a string around them to show how big the shed will be.

Put a few tools inside to visualize how much space they will take up. Don’t forget about any shelves or work benches that will stick out from the wall and take up space. Be generous, and if your space and budget will allow, try to give yourself a little extra wiggle room in the size of the shed. 

This article originally appeared in the January/February 2023 issue of Hobby Farms magazine.

Categories
Crops & Gardening Equipment Farm & Garden Homesteading

Winter Sowing The Spring Vegetable Garden

I love how winter sowing works with Mother Nature to give us a jump start on our early spring seed starting!

Benefits to this system of seed starting include:

  • earlier seedlings
  • re-use of existing plastic containers
  • no expensive equipment
  • no hardening off
  • stronger plant growth

This method has been around for over 50 years and reuses plastic jugs and containers to create mini-greenhouses. This allows gardeners to harness the sun’s growing energy early in spring and add a little extra heat to the soil. This results in the seeds germinating faster, but not so fast that they can’t handle air temperatures once they break dormancy.

This practice was originally used as a way to have a little more control over direct seeding native plants that needed that cold stratification period (a certain amount of time in freezing temperatures and the need for the freeze thaw process to break down seed husks).

But I have been using winter sowing to jump start some early season vegetable crops for years.


Read more: You can use these 4 items as emergency cloches.


Make a Winter Sowing Container 

First, save food grade plastic containers like milk jugs, takeout boxes, rotisserie chicken containers, salad clam shells, water jugs or anything that has a clear-to-opaque top half.

Drill, puncture or melt drainage holes in the bottom of your containers. Add holes to the tops of anything that doesn’t have a cap you can remove. Cut open (with a box knife) if needed to allow access. (Leave a hinge in jugs, or just open takeout containers.) 

Add seed starting soil. Plant seeds at suggested depth and water them in well. (Go ahead and overseed, as you’ll be transplanting anyway.)

Double label your plants with both a plant stake label in the soil and identification on the outside of the jug written with a waterproof and sunproof garden marker.

Seal the cut opening with high-quality, waterproof tape. (I use silver duct tape.) Move the winter sowing containers outside to an area that gets good sunshine and has access to rain. Then, just wait for Mother Nature to work her magic!


Read more: Check out these handy seed-starting tips and tricks!


Grow On

You’ll grow these seedlings on in the containers for a few more weeks after germination. Once the seedlings emerge, make sure to open the tops of the jugs as needed to keep your mini greenhouses from overheating. Transplant at the same time you’d normally transplant indoor grown seedlings.

These plants tend to be a little stronger than those started indoors because they haven’t been coddled with the perfect indoor environment. But all this means is there are certain seeds that work better than others. 

I most successfully use this process for cold-hardy spring vegetable crops. Some of my favorites are the brassicas like kale, cabbage, broccoli, cauliflower and Swiss chard plus beets and lettuces. For flowers I’ve had great luck with poppies, calendula, marigolds and sweet alyssum.

I love placing these winter-sown jugs inside my cold frames as well. This “double layer” effect bumps up my harvests another few weeks. In a northern garden, we’ll take every extra week we can!

This can be a great additional system of starting seeds for home gardeners and farmers alike.   

Want more information on starting growing garden seeds? Check out Michelle’s blog, Forks in the Dirt, and most recent book (co-authored with fellow Hobby Farms writer Stephanie Thurow), Small-Scale Homesteading.


Categories
Farm & Garden Food Recipes

Make Some Miso Noodle Soup With A Soft Egg!

This miso noodle soup serves up the flavors of traditional Asian-style dishes such as ramen but comes together quickly so you can enjoy a comforting meal with less time spent in the kitchen. Top with crunchy vegetables and a soft-cooked egg with a velvety center. Use any of your favorite Japanese-style noodles in this soup such as ramen, udon or somen. 

Yield: 4 servings

Ingredients

  • 4 large eggs, room temperature
  • 2 cups shredded napa cabbage
  • 1/2 cup shredded carrot
  • 2 teaspoon fresh lime juice
  • 1/2 teaspoon fine sea salt
  • 6 cups prepared chicken stock
  • 2 tablespoons red miso 
  • 1 clove garlic, grated
  • 16 ounces Japanese-style noodles (ramen, udon or somen), cooked according to package directions
  • cilantro for garnish

Read more: Salt-cured egg yolks let you preserve your hens’ harvest!


Preparation

Fill a medium saucepan halfway with water, and bring to a boil over high heat. Add the eggs, and then more water if not completely submerged. Once the water returns to a boil, reduce the heat to simmer the eggs. 

Cook for 4 to 5 minutes for runny yolks. Alternatively, steam the eggs in an Instant Pot pressure cooker. Set to steam under high pressure for 4 minutes. Manually release the pressure once the eggs are done cooking. Transfer the eggs to a bowl of ice water and prepare the rest of the soup. 

Place the cabbage and carrots in a medium bowl. Add the lime juice and salt. Toss the ingredients together and set aside. 

Bring the chicken stock to a boil in a medium soup pot over high heat. Reduce the heat to a simmer, and whisk in the miso and garlic. 

Peel and halve each egg. 

Divide the noodles between four bowls. Fill with about 1½ cups of stock. Top each with the vegetables and then an egg. Garnish with cilantro and serve warm. 

This article originally appeared in the January/February 2023 issue of Chickens magazine.

Categories
Animals Beginning Farmers Farm & Garden Farm Management Homesteading Large Animals Video

Using GPS Collars On Your Livestock Guardian Dogs (Video)

GPS collars create wireless fences to keep dogs within set boundaries. On our farm, Porter Valley Ranch, we use the Halo collar, which promises to be a virtual fence, track dogs through GPS, track the dog’s activity and aids in training dogs. The creator is Cesar Millan, world-renowned dog training expert and star of the TV Show, “Dog Whisperer.”

But training dogs for shows and obedience is not typically the goal of Livestock Guardian Dog (LGD) owners. We explore the pros and cons of using a GPS collar in livestock guardian dogs in the video above and below.

Why Use a GPS Collar?

The number one concern for animal keepers is safety. Predators are a huge threat on hobby farms, wiping out livestock easily. Most farms have LGDs to patrol and ward off any attacks. For this reason LGDs are usually roaming the property and patroling several enclosures and pens at one time.

Their nature drives them to expect a pretty extensive area to roam. These dogs aren’t as helpful or happy staying in one pen. 

The problem with roaming is when the dog starts to venture outside the property lines. The Halo dog collar and other GPS collars aid in teaching the LGDs the limits of their property.

Staying in their limits keeps the LGD safe and working on the farm.


Read more: Considering a livestock guardian dog? Here’s what you need to know.


GPS Collar Features

The Halo Collar comes with a very extensive training program for users. Pretty much any training you want to accomplish with your dog can be done through their videos. For LGDs it is important to make sure they are welcoming and not threatening to guests, sit on command and even hunt. This product will help you meet any of those training goals. 

Cool features:

  • GPS virtual fence
  • GPS tracker
  • Training system
  • A deterrent for any zone within your set perimeter (Beacon)

The downsides? Battery charge life and the price.

The battery says it can stay charged for  20 hours, but most online reviews say it’s closer to 10 to 12 hours for highly active dogs. Because of this situation, you will need to decide whether you charge during the day or at night. For LGDs it’s likely more important they wear the collar during the night, when they are patroling.

The second downside is the price. The product retails at $699 and requires a monthly subscription plan. However, can you really put a price on security? If you have a LGD who loves your family and protects your flocks, it is less expensive than buying a new dog and taking the time to acclimate them to your property. 

The Halo 2+ Wireless Dog Fence and GPS Dog Collar are, together, a great way to integrate technology on your farm. In addition to teaching your dog new tricks, the collar will also teach you to watch their roaming habits. Looking at where the dog goes shows you where they are also not going. If you have an area of your property exposed, you will learn that through this device.

The device is also not specific to just one dog. It is possible to purchase one device to use on multiple dogs, which decreases the overall price. If you plan to have livestock guardian dogs on your property, a wireless GPS collar will definitely prove to be beneficial over time. 

Categories
Animals Farm & Garden Flock Talk Poultry

Shutterclucks: Chickens Editors Choose Reader Photos

The editors of Chickens magazine are always on the lookout for great chicken photos, and in the January/February 2023 print issue they ran a contest titled Shutterclucks.

Above is the winning photo submitted by Cassidy Hermann of Portola, California, and below you’ll find others chosen and printed in Chickens. Each one includes the name and city of residence of the chicken lover (or lovers) who submitted it.


Virginia Wong, Denair, California

shutterclucks


Trevor Larkin, Bridport, Vermont

shutterclucks


Stephanie Woodard, Quincy, Illinois

shutterclucks


Nila Gamblin, Edmond, Oklahoma

shutterclucks


Melissa Scalise, Clairsville, Ohio

shutterclucks


Lori Hughes, Evans, Georgia

shutterclucks


Lauren Richardson, Houston, Texas

shutterclucks


Katie Lind, Burnsville, Minnesota

shutterclucks


Denise Williams, Knoxville, Tennessee

shutterclucks

Got a cool clucker you want to show off? Email us an image of your chicken(s) to chickens@chickensmagazine.com with the subject line Shutterclucks, and include your name and mailing address. The winner will receive a prize from one of our sponsors!

This story originally appeared in the January/February 2023 issue of Chickens magazine.