

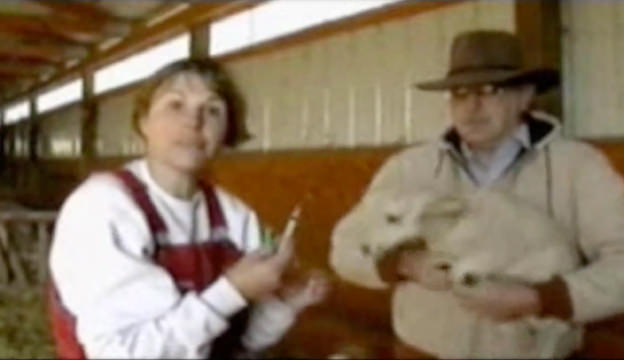
Dr. Dianne Hellwig, DVM, PhD, demonstrates how to give a shot to a lamb, including where to give the shot on the animal, what type of needle to use and how to hold the needle.
Dr. Dianne Hellwig, DVM, PhD, demonstrates how to give a shot to a lamb, including where to give the shot on the animal, what type of needle to use and how to hold the needle.
By Carol Ekarius, John Barbagello and Heather Smith Thomas
Spring is truly a joyous time on farms. The grass starts turning green again, the flowers begin to bloom, and for most of us who have breeding animals, spring is when the babies arrive. Birthing season is a period of hard work, but also a period of great reward.
| Be Prepared Birthing is a life or death situation. If you are new to the process, you may ask your vet or experienced breeder to be present at kidding time. If a kidding problem develops, it is too late to call a vet. Read up on problems and how to deal with them before kidding time. Here are some resources to help. The Encyclopedia of Country Living Raising Milk Goats the Modern Way The Complete Herbal Handbook for Farm and Stable |
Whether you are looking forward to a foal from your favorite mare, a calf from that nice heifer, some lambs or some kids, there are a few common things to keep in mind:
Lambing
Sheep are prolific. Twins are common, triplets aren’t uncommon, and for some breeds, quadruplets and quintuplets are a distinct possibility. Mamas that have more than two may not be able to raise them all, so really watch the small lambs from litters to be sure they are growing well. Plan on bottle feeding or grafting, bonding a lamb onto a surrogate mother, if they aren’t getting enough to eat. The average gestation for sheep is 148 days; the ewe has a 16-day estrus period.
| When to Assist As a general rule, let a mom go on her own until:
|
There are a few husbandry practices for sheep that can be very helpful if done a few weeks before the ewe’s due date. These practices, such as shearing if weather permits, or crotching and facing if it is still a bit wintery, can help keep a clean environment for the newborn lamb and remove obstacles that make it hard for newborns to nurse.
Shearing is completely removing the fleece. Crotching is removing wool from the inner tops of the legs, around the hindquarters, and around the udder; facing (aka wigging) removes wool from around the face. The advantages of these practices include:
As the time approaches, the lamb (or lambs) in the womb will drop, giving the ewe a sway-backed and sunken appearance, and a restless attitude. The ewe will probably be doing some grunting when getting up or lying down. She will pick out a spot to lamb and lie down away from the rest of the sheep, sometimes pawing the ground before lying down. She may get up, paw and lie back down frequently. Look for her vulva to relax and be slightly pinker in the last day or two before parturition. It is common for ewes to have a slight mucous discharge, which can be fairly clear or slightly bloody. Her feeding habits may also change, though ewes have been known to simply walk away from the feed trough and plop out a lamb.
Mom will usually get right to work licking a newborn; if not, wipe the mucous off its nose and place it at the ewe’s head right away so she can identify it as her own. A lamb that has difficulty breathing may have excess mucous in the throat and lungs, so grab it securely by the hind legs and give it a couple of aggressive swings—the centrifugal force will usually expel the mucous—making certain its head is clear of any obstacles. If it is somewhat cold and the ewe isn’t drying it off well (which often happens when she still has more lambs on the way), you may want to get a towel and help dry off the baby.
Lambs will get up and try to start nursing quickly. If the lamb hasn’t been able to find a teat and get milk within about 15 minutes, go ahead and try to assist. Sometimes, this simply requires holding the little one’s mouth over the teat. Sometimes it may require taking one or more lambs away and raising them on a bottle (particularly for ewes that have three or more lambs). One sure way to tell if a lamb is actually getting milk is to watch its tail: For lambs that are getting milk, their little tails swing back and forth like a flag in a good breeze. If the tail isn’t in motion, you may have a problem. A lamb that is getting milk will also have a puffed-out belly, whereas one that’s not has a sunken belly and its skin piles up in folds. Be vigilant for the first two or three days in making sure that all is well.— CE
Kidding
In our barn we have had more than 75 kids born—21 kids last year alone. When labor starts we’re prepared for emergencies, but thankfully our help usually isn’t needed. Most often we sit spellbound, watching another miracle take place.
After roughly 150 days, a pregnant doe’s sides will appear hollow below her lower spine as the first kid is positioning itself for birth. Labor is only hours away. If a doe is panting, bleating or grunting while bearing down, labor has begun. Place the doe in a pen with clean bedding, such as straw, and gather your birthing supplies.
We use two pickle buckets with lids. One is full of clean, old bath towels. The other has rubber gloves, iodine and emergency items such as molasses, plastic bottles with nipples, syringes, reference books and a drench gun. The buckets keep everything sanitary and provide seats while we wait.
A trouble-free birth should take only an hour or so. The doe will likely walk in circles, paw the ground, lie down for contractions and then get up and walk again. When she is effaced and dilated enough to deliver, she will normally lie down to push.
A water bag should appear first, showing both front hooves and a nose. Any different presentation requires intervention. When correctly positioned, the head and front half of the kid should come on one contraction and the rest of the kid on another contraction. Remove mucous from the nose and mouth with your finger even before the second half comes out.
Catch the kid in a towel and check for breathing. The cord will either sever during birth or the doe will chew it off and eat it. Dry the kid to avoid chilling, then transfer it to a clean towel. Dip the cord or navel area in iodine to prevent infection. If the weather is cold, place a two-liter plastic bottle containing hot tap water in the towel to keep the kid warm.
Multiple births are normal and siblings should come quickly, so watch the doe carefully for difficulties. She might pace again or stand to smell and lick the kid.
Help each kid nurse on the doe within 15 minutes of birth. Their first drink is filled with colostrum, which boosts immunity. Nursing also helps the doe to have stronger contractions to deliver the next kid or the placenta. Does may try to eat the placenta; wild goats instinctively do so to avoid attracting predators.
Finally, give the doe warm water with molasses as an energy booster, then supply food and cool water. Keep doe and kids together in a pen to bond for several days, checking them regularly.
Watch for mothers who reject kids, especially with multiples. She should let each kid nurse fully while sniffing the kid’s tail for identification. Make sure the doe is nursed well on both sides to avoid mastitis.
Kids must nurse often to thrive. Observe kids for strong nursing reflexes and help weaker kids eat more frequently.
Kidding time in our barn can be challenging andsometimes tragic. Yet nothing compares to watching, and occasionally helping, the miracle of birth.— JB
Foaling
Gestation length for mares is 335 to 340 days (about 11 months), but this is only an average; mares rarely foal on their “due date” and may foal as much as three to four weeks earlier or later.
A few days or weeks before foaling, her udder will fill with milk. Mild uterine contractions signal the start of early labor, positioning the foal for birth with head and front legs aimed toward the birth canal. The mare may not show much outward sign, but if you are observant you’ll notice a change in her attitude.
She may be restless or stand at the far corner of her pasture. The pelvic muscles on either side of her tail will relax fully and she may paw, nose at her flank, switch her tail, or get up and down a few times, but she will be fairly comfortable between contractions.
During second stage labor, however, contractions will come faster and harder with abdominal straining. The mare will show more constant signs of discomfort, getting up and down or just lying down and straining until the foal is born. If she’s in a stall, make sure she has plenty of fresh bedding (straw, rather than sawdust, as sawdust can block foal’s nasal passages), since she may go down hard when the pains hit.
The water sac will rupture (with a flood of straw-colored fluid rushing from her vulva) or it will emerge from the vulva before breaking. When this happens, the foal should be coming through the birth canal right behind it. A whitish sac should appear within a few minutes, encasing the foal. If this sac is already broken, you’ll see the front feet. Once the water bag and/or the feet appear, the foal should emerge quickly, making fast progress each time the mare strains.
If only one foot appears or birth does not progress swiftly, the mare is in trouble and needs assistance immediately. A cow can safely be in active labor for an hour or two and still deliver a live calf, but if a mare takes longer than 20 or 30 minutes, the foal is in danger. A mare is so strong that if a foal is not in the proper position, the pressure of abdominal contractions will kill it, push a hoof through her uterus or tear the birth canal. If the foal is in an abnormal position, you need professional help.
With a big foal, the shoulders must come through the pelvis one at a time. One front foot is usually extended farther than the other. If the mare is having trouble, pull on one front leg to advance it farther and help the shoulders through. Once the shoulders pass, the foal should be born quickly.
Once he’s born, the mare will rest for 10 to 20 minutes. The foal should start shaking his head (to free himself of the membrane sac) and breathing, even though his hind feet are still in the birth canal. Make sure the membrane is away from his nose.
Do not pull him out or force the mare to get up. Part of the foal’s blood supply is still within the placenta in the uterus, pulsing into him for a few minutes asthe mare rests. If the umbilical cord is broken prematurely by the mare jumping up or by your pulling the foal out, he may be weak. Also, the placenta is starting to detach and work its way into the birth canal; if the mare jumps up too quickly, it will fall back into the uterus and the mare will take longer to expel it. After a normal, healthy birth, the placenta will be hanging down when the mare eventually gets up, and she should shed these membranes within a very short time. If she takes longer than an hour or two, this is abnormal and could lead to serious uterine infection. Consult your vet; never try to remove the placenta or it might tear, leaving a piece inside the uterus.— HST
Calving
Gestation length for cows is about 283 days (roughly nine months). Cows are more predictable than mares, usually calving within a week of their due date.
A few days or weeks before she calves, a cow’s udder will fill with milk and the muscles around the vulva will become saggy. Her teats will fill 12 to 24 hours before calving. She is alert and restless as uterine contractions begin. As contractions occur, she may kick at her belly, pace the fence or stall, or lie down. In between, she may continue chewing her cud or eating.
As the cervix dilates, the calf’s feet enter the birth canal, stimulating the cow to begin straining with her abdominal muscles; active labor has begun. The membranes and fluids surrounding the calf are often pushed through the birth canal ahead of it. The water bag (a dark purple membrane enclosing straw-colored fluid) may appear at the vulva before breaking, or you may simply see the fluid rushing out.
Occasionally the water bag will come alongside the calf or even behind it.
Once active labor begins, a cow generally lies down and starts hard straining. The amnion sac (whitish membrane) enclosing the calf should appear soon, with front feet inside it. As the feet protrude farther, the calf’s nose should be visible. In a mature cow, the calf should be born within minutes of the feet appearing if he is positioned properly. A heifer having a first calf may take longer. If the calf is large, it may take up to an hour of hard labor. If a cow or heifer takes longer than an hour, she needs assistance. If only one front hoof appears, or if two hooves and no head, or hind hooves only appear–or if the cow acts like she’s in labor but nothing happens–she needs help to deliver the calf. If a leg or head is turned back, the calf must be pushed back into the uterus where there is room to straighten it out. A backward calf needs to be pulled out to ensure the birth will be swift enough to get him out before he suffocates (since the umbilical cord will be pinched off or broken as his hips come through the cow’s pelvis).
In a normal birth, the calf slides out quickly once the head emerges (it may take a few hard strains to pass the head and sometimes the shoulders). The amnion sac should break as he slides out. If it doesn’t, pull it away from his head so he can start to breathe. The cow usually gets right up, turns around and starts licking her calf. A first calver may rest for a few minutes before getting up, but a mature cow will immediately stand to take care of her calf, licking off the birth fluids. Her rough licking stimulates him to breathe; if the sac is still over his head, she will usually lick it off and eat it. Her licking also encourages the calf to try to get up and seek the udder for his first nursing.
The final stage of labor involves passing the placenta. The cow continues to have contractions as the placenta detaches and the uterus starts to shrink. The placental membranes will migrate through the birth canal and may hang down after she gets up. She will generally shed the placenta within two to eight hours (and may eat it as soon as she sheds it), but some cows take much longer. Do not pull on the placenta; there will be less risk of complications if you leave it alone. Cows are not as vulnerable to uterine infections from retained placenta as mares, but a cow should be closely monitored until she sheds these membranes. If she goes off feed or develops a fever, she’ll need immediate medical help and antibiotics.—HS
*This article first appeared in the May/June 2006 issue of Hobby Farms magazine. Subscribe to Hobby Farms today!!

Eating more fish has become more popular in recent decades, but aquaculture farming—or the production of fish and other crops that thrive in water—has been around for centuries:
Yet here in North America aquaculture is a relatively young industry.
In contrast to more common agricultural ventures, many see the rise of aquaculture as a contemporary phenomenon. Much of the waters for aquaculture farming are yet uncharted!
Compared to other more traditional crops, the investment returns can be much higher on a per acre basis.
Additionally, most aqua-crops will only require a growing period of three to four months reducing the period when cash flow might be an issue.
Finding Knowledgeable Assistance
One of the major drawbacks of working in aquaculture is that the knowledge base is much smaller than that of crops that are more traditional. It’s hard when problems arise to find others with the expertise to help.
It’s a New Market
But by far the biggest problem for this young industry, certainly for the small farmer, is the lack of market structure.
Most producers have to deal one on one with marketing their own product, all the time working against the clock with a highly perishable commodity that, like fruit, has a very short shelf life.
Threats to Your Stock
Aquaculture probably has the best potential for relieving the pressure on threatened wild populations and allowing the conservation efforts on those populations to succeed.
Aquaculture’s ecological footprint is pretty small. Everything has its consequences but compared to wild fisheries, aquaculture is a very low impact enterprise.
A huge issue with wild catch is the “catch”. Dolphins are caught in the tuna nets, turtles hauled in with the shrimp, and for every pound of fish caught in the wild, at least five to ten pounds of other fish perish.
One farmer talks about farming shrimp and one crisis moment
Nat Henton has been a freshwater shrimp farmer for over 12 years.
He started at the age of 17 on the insistence of his grandfather who– concerned that he was going to turn into a ne’er-do-well teenager–managed to get him interested in the aquaculture program at Kentucky State University.
“Some years we make money, some years we don’t,” says Nat, who in addition to farming, is a sous-chef at a local gourmet market that specializes in locally sourced foods.
“The most important thing is pond maintenance” says Nat, “the animals take care of themselves.”
One year Nat recalls the Ph balance of the pond getting “out of wack,” causing a critical deficiency of oxygen in the water.
“This was an emergency situation and we had to act to fast,” he says.
The solution? Faced with the possibility of loosing his entire crop Nat says, “We didn’t know what to do so we just ran out to the nearest grocery store and bought 200 lbs of sugar, dumped it in the pond and miraculously that fixed the balance.”
Nat readily admits that he’s not going to get rich shrimp farming, but that he has found a niche market he loves.
Working in the restaurant world has provided him with an immediate market and there is nothing he enjoys more than taking his young daughter with him strolling down to the pond in the early morning or late afternoon to check on his crop and feed the shrimp.
Author’s Note: My sincere thanks to Nat Henton and Dr Jim Tidwell of Kentucky State, Professor/Chair of Division of Aquaculture for taking the time to share their knowledge, enthusiasm and love of aquaculture.
Infectious diseases do not spontaneously appear in chicken flocks. Almost all infectious diseases are introduced into a flock by means that go unnoticed, such as inadvertently carring an infectious disease on shoes or clothing and then tending to chickens.
Just as common are introductions of disease from equipment, feed, other animals, pests, vermin, migratory waterfowl, and most commonly, from new chickens introduced to an existing flock.
Preventing disease in flocks entails proper management and sanitation practices, such as thorough cleaning of equipment and of facilities with proper disinfectants, and minimizing or eliminating the introduction of new chickens to your flock.
Biosecurity measures such as limiting contact with visitors and preventing contact with other birds such as ducks, sparrows and pigeons will reduce the risk of disease in your chickens.
Routine disinfecting of the chicken coop is one of the single most important things you can do to for your flock. Here are some things to keep in mind when disinfecting:
When an unhealthy chicken is noticed, it is important to immediately quarantine it and accurately diagnose the disease. By expediting the treatment of infected birds, you’ll prevent further spread of the disease.
Vaccination is seldom used by small-flock owners due to the expense and limited availability of vaccines, the simple lack of disease in small flocks, the unknown presence of disease and the improper diagnosis of disease.
Vaccination should be performed if birds have had a disease problem in the past, if they are transported on and off premises regularly and if birds are continually introduced to an existing flock.
Good husbandry should provide the small-flock owner and hobbyist with healthy, disease-free chickens without the heavy use of medications.
In general, a sick chicken is less active, retracts its neck close to its body and has an unkempt appearance, but not all diseases have the same presentation. Here are 11 common chicken diseases to be aware of:

Back in the days before my layer flock came to enliven life on our farm, I would have picked the egg for sure—or maybe the egg carton. After all, the runny, pale-yolked eggs I cooked came from cartons sold at the grocery store, not from any chickens that I could see. My perspective changed, however, when I brought home our first fuzzy chicks, watched them grow into gawky pullets and waited—and waited—with bated breath for our first farm-fresh eggs to magically appear.
I eventually learned that not only did you first need chickens to have eggs (obviously), but to start getting eggs, you also needed your pullets to reach about 20 weeks of age. And to get an ongoing supply of good eggs, your chickens needed the right food, clean nest boxes, sufficient daylight and more. In other words, because an egg’s quality reflects the care and management the hen receives, getting good eggs takes some work—and not just on the chicken’s part. Take it from anyone who has ever kept a layer flock, the delicious results are well worth the effort.
If you think fun chickens giving delectable eggs every day sounds like a recipe for hobby-farm happiness, our guide to getting good eggs will help you collect the right ingredients.

Before we look at what should go into a laying chicken, let’s talk about what comes out. That amazing chicken egg has a protective, external, porous shell consisting mainly of calcium carbonate covered with an invisible protein barrier called the cuticle that shields the interior from bacterial contamination.
These structures, along with an inner membrane, surround a cushiony, cloudy albumen (the white), composed mostly of water and protein. The albumen in turn envelopes the nutrient-packed yolk, the egg’s main nucleus of protein, fatty acids, vitamins and minerals. On average, a chicken egg contains about six grams of protein and six grams of fat.

To keep its body functioning and to produce one of these self-contained, nutrient-rich units each day, it’s essential a laying hen receive a balanced diet with adequate levels of protein, carbohydrates, fat, vitamins and minerals.
For laying flocks older than 16 to 20 weeks, experts generally recommend a balanced layer ration containing 16- to 18-percent protein and approximately 3½-percent calcium to promote strong eggshells.
Many raisers also offer free-choice oyster shell for extra calcium in case their feed falls short of this important mineral. Calcium deficiency can result in thin-shelled eggs and leg problems. You may need to offer your birds the higher-protein feed during periods of peak egg production and when hot weather causes birds to eat less.
If you keep your flock confined, don’t forget to provide them with a source of insoluble grit to assist in grinding the feed in their gizzards. You’ll find oyster shell, grit, formulated layer rations and various types of feeders at your local feed store. Some even carry balanced, organic layer diets, if you prefer your flock dine on food free of antibiotics and grown in a sustainable fashion.
Chickens allowed to free-range pastures, orchards, gardens or other outdoor areas will consume a nutritious and diverse mix of insects, grains, berries, seeds and plants in addition to their formulated fare. Many chicken keepers treat their flocks to other goodies, too, from bread to surplus cow’s milk. However, a number of poultry experts advise against this practice.
“A lot of farmers try to save money by feeding scratch grains and household food scraps,” says Jacquie Jacob, PhD, poultry extension associate at the University of Kentucky College of Agriculture, Food and Environment. “This dilutes the nutrition of the laying feed and can result in shell weakness or cessation of production altogether.”
Laying chickens also require a constant supply of fresh, clean water. Not only does a chicken’s body use this life-sustaining liquid for numerous physiological functions, but water also comprises more than half of an egg’s volume. You must ensure your birds have a reliable water source during both hot and dry periods and freezing weather or their egg production will suffer.

Along with a balanced diet and ample water, your chickens need protection from the elements, predators and disease to stay alive and healthy—and thus keep laying eggs. A cold, wet chicken, for example, will be forced to spend its energy reserves trying to stay warm rather than on egg production. A sick or stressed chicken will often reduce its egg output or completely quit laying. And it goes without saying that a bird killed by fowl cholera or a coyote will not be giving you any more eggs—ever.
A snug, secure, well-built and properly ventilated chicken coop will offer your flock shelter from inclement weather, give your birds a predator-safe spot to roost at night, and discourage the presence of disease-carrying rodents and wild birds.
Outdoor access into a covered coop or pen gives the chickens a protected place to dust bathe, scratch for bugs and preen in the sunshine. However, not all raisers keep their birds cooped round-the-clock; many allow their flocks to free-range around the farm during the day, while others utilize pasture-based systems that incorporate mobile chicken tractors or moveable poultry netting.
Both confinement and free-range systems have their pros and cons, Jacob says. Free-ranging birds may have more room and increased opportunities to behave like chickens and forage for a varied, natural diet, but outdoor living does pose definite risks.
“Many people think that having chickens romping around a pasture is idyllic, but they can’t imagine all the threats the birds are exposed to, such as diseases and predators,” says Francine Bradley, PhD, an extension poultry specialist with the Department of Animal Sciences at the University of California, who recommends confining layer flocks. “If your birds are enclosed, you’ll also be able to quickly find the eggs. You can supply a clean nest box so the chicken lays there instead of hiding its nest somewhere or laying its eggs in a mud puddle. This increases your chances of getting clean eggs.”

Whichever raising system you use, avoid crowding your chickens and keep their environment as clean and dry as possible.
Regularly layering fresh litter in houses, preventing mud formation in pens and raking up droppings will help prevent your birds from tracking feces and mud into their nest boxes and onto their eggs. Hygienic conditions promote healthier hens, as will paying attention to biosecurity issues, such as quarantine periods for new fowl and limiting visits to your farm from other chicken raisers.
“If a visit is necessary, the farmers should have showered before coming to the farm and should not wear clothing, including baseball caps, shoes and boots that they’ve worn anywhere near their own birds,” Jacob stresses.

To get eggs—especially nice, clean, intact ones—you’ll need to persuade your chickens to lay where you want them to lay, not in some poopy corner of their coop or hidden in tall grass somewhere out in the back 40.
Bradley stresses providing plenty of covered nest boxes for your flock; one for every four hens. You can purchase easy-to-clean nest boxes from poultry supply companies or build your own from wood. Install the boxes about 2 feet off the floor and deeply layer each with clean, soft litter, such as non-toxic wood shavings, to provide cushioning for the eggs and to absorb droppings.
“You might want to tack a little cloth over part of the opening to make it secluded and dark. Chickens like this and it will help prevent egg eating,” Bradley says. “You’ll want to put a plastic or rubber egg in the box first to attract the chickens to the nest box.”
For birds allowed outside, Jacob suggests keeping them inside until later in the day so you won’t have to embark on an Easter egg hunt every morning.
Most chickens finish their egg-laying by 10 a.m. or so. Knowing exactly where your birds deposit their eggs will enable you to find and gather the eggs promptly, making it less likely for them to become broken and attract a hungry chicken’s attention.
“Egg eating is a very bad vice and one chicken can teach the others this habit,” Bradley says. “It’s best not to let the habit start to begin with.”
Light is another important factor that affects egg production and a good many neophyte chicken keepers have been left scratching their heads and wondering why their chickens quit laying as winter set in. (Note: Hens will also cease laying during molting periods.)
“Hens come into production with increasing hours of light per day and go out of production with decreasing hours of light per day,” Jacob explains. “A minimum of 14 hours of light per day is necessary to maintain egg production. Timers can be used so that the [artificial] lights don’t have to be on all day; they can come on before sunrise and/or stay on after sunset in order to maintain the required number of hours of light per day.”
Frequent egg collection coupled with clean, dry, uncrowded nest boxes and coops will go a long way toward keeping your flock’s eggs clean. Not only is a pristine, freshly laid egg a thing of beauty, but it can go right into a carton and into your fridge, no scrubbing required.
“If eggs are found clean, there’s no need to wash them since it would remove the bloom, or cuticle, which is the invisible, protective layer naturally found on eggs,” Jacob says.
But despite our best efforts, sometimes dirty eggs happen. With a small amount of dirt or droppings, you can:
Once you figure out the right ingredients, getting good eggs from a small layer flock actually doesn’t take that much time and effort on a daily basis.
In fact, it’s a wonder more people don’t keep chickens, given that fresh-from-the-coop eggs look and taste so much better than store-bought. As Golson has discovered, the straightforward recipe for optimal egg production has changed little over the years.
“I have a favorite book, first published in 1895, called The Biggle Poultry Book, which gives advice for the ‘urban hennery,’” she says. “It used to be that most everyone had a few hens in their backyard to provide eggs for the table. The advice that worked then is just as good now: Provide a secure shelter, access to a yard and sunlight, good food, and keep it clean. That’s it!”
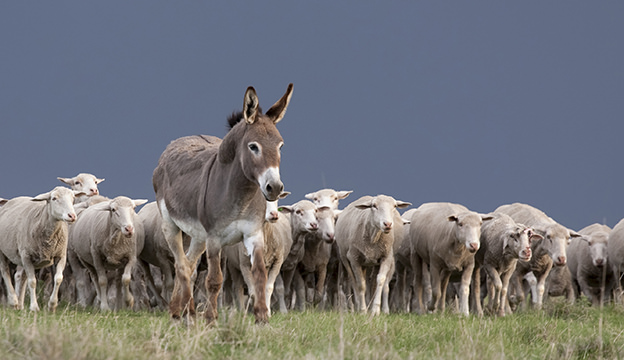
Coyotes and dogs had been a major problem at the University of Rhode Island’s Peckham Farm, home to a prize-winning flock of Dorset sheep. Then the university bought Bonnie, a guard donkey.
She came to the URI campus in December 2003 after a pack of dogs had attacked the sheep. Of the 26 ewes in the flock then, 17 suffered severe puncture wounds. One was killed, and six were badly injured, including one so seriously hurt she had to be euthanized a few weeks later.
Since the guard donkey’s arrival, the university has not lost a single animal, says Dave Marshall, Peckham Farm manager, so the school acquired a second guard donkey, named Dee.
In nearby Lebanon, Conn., Paul Tubey says he’s seen coyotes lurking in the woods surrounding his Beltane Farm, but the predators have stayed away from his mixed herd of Oberhasli and LaMancha goats since he acquired a guard donkey.
In addition to dogs or coyotes, guard donkeys can also protect farm animals against foxes and bobcats, according to the Texas Department of Agriculture, but black bears, wolves and mountain lions might prey on donkeys.
“Donkeys rely predominantly on sight and sound to detect intruders,” according to a bulletin from the Ontario Ministry of Agriculture, Food and Rural Affairs. “When approached, sheep will tend to move so the guard animal is between the intruder and themselves. The donkeys’ loud brays and quick pursuit will scare away predators and may also alert the shepherd.
Usually, a donkey will confront the predator and run it out of the pasture.
“If the canines do not retreat quickly, the donkeys will attack them by rising up on their hind legs and striking with both front feet,” the bulletin says. “A solid blow can injure, kill or at the very least discourage the predator.”
When a visitor brought a leashed dog to URI’s Peckham Farm, Bonnie and Dee brayed menacingly as they charged to the pasture fence. Before buying a potential guard donkey, it’s wise to test its reaction to a dog.
Like horses, each donkey is different from others, says Dave Marshall, a former farrier. During lambing season, he had to separate Dee from the sheep because the younger guard donkey was being impatient and rough with lambs.
“Bonnie, the older one, lets things happen as they happen,” Marshall says. “Dee is an enforcer. She wants everything to happen the way she wants it to happen, but lambs can’t conform; they don’t have that in their brains. They have no real ‘flock sense.’ Dee can’t put them together; one goes this way and another goes that way, so she tries to grab them.
Marshall says Dee will have an easier time controlling the sheep once they turn 6 months old because the lambs will become part of the dynamic of the flock.
Donkeys are often available at livestock auctions or by reaching out to donkey and mule breed associations.
“Jennies (females) are suitable for use as guard animals,” according to the Texas Department of Agriculture. “Jacks (intact males), which cost about half as much as jennies, should be gelded before use as guard animals.”
Fred Launer, an animal-science instructor at URI, recommends buying guard donkeys from breeders who have selected stock specifically for the donkeys’ herd-protection instincts. The donkeys might cost more, but it’s a wise investment, he says. Dee and Bonnie came from guard-donkey breeders in Pennsylvania.
Some guard-donkey owners breed their own donkeys. The practice allows selection for donkeys with good guarding tendencies. In 2004, URI’s Bonnie foaled Clyde, who after gelding, was sold to a nearby shepherd.
“The donkey should be introduced to the sheep as early as possible to increase the likelihood of the donkey bonding to the flock,” according to the Ontario Ministry of Agriculture, Food and Rural Affairs. “Getting the sheep and donkey to accept each other as ‘flockmates’ is the first step in allowing the donkey to exhibit its true guarding instincts. Under ideal circumstances the jenny and her foal should be raised with the sheep. The weaned foal should then be left alone with the flock.”
Donkeys are very sociable animals, though, so many think that in order to effectively do their jobs, they need to work alone. Farmers worry that if the donkeys are allowed to mix with cattle, horses or other donkeys, then the sheep will be ignored. At Beltane Farm, however, Tubey had to buy a pony to be a calming companion for his donkey, a common and sound solution for donkeys that can seem to be stressed, says URI’s Fred Launer.
Donkeys are hardy and usually require minimal care.
“Annual worming and occasional supplemental feeding during periods of poor range conditions may be all that is required,” according to the Texas Department of Agriculture. “Water should be readily available and snow or ice should not be relied on for meeting water intake needs during cold weather. Do not allow donkeys access to feed containing Rumensin, urea or other products intended only for ruminants. Donkeys can benefit from vaccination against common equine diseases, such as tetanus and encephalitis. Veterinary care, hoof trimming and floating of teeth may be needed at times.”
Guard donkeys do not need special training, but they’re easier to handle after they have become accustomed to a halter.
If you think adding a guard donkey to your menagerie is in your future, use these tips from the Texas Department of Agriculture to find the best animal to fit your farms needs.

Dr. Dianne Hellwig, DVM, PhD, demonstrates how adjust a lamb that is not correctly positioned during birth and help the ewe complete the birth.
It’s Wednesday night, you’re tired from a long day at work and all you want is a nice, healthy meal for dinner. In fact, you’d love to sit on your porch with a glass of wine, a loaf of crusty bread, and a plate of perfectly ripe, right-off-the-vine tomatoes.
Unfortunately, you don’t have a garden, you missed Sunday’s farmer’s market and there is no co-op in your urban neighborhood. You tear open a box of macaroni and cheese and settle in for a day-glow meal in front of the TV.
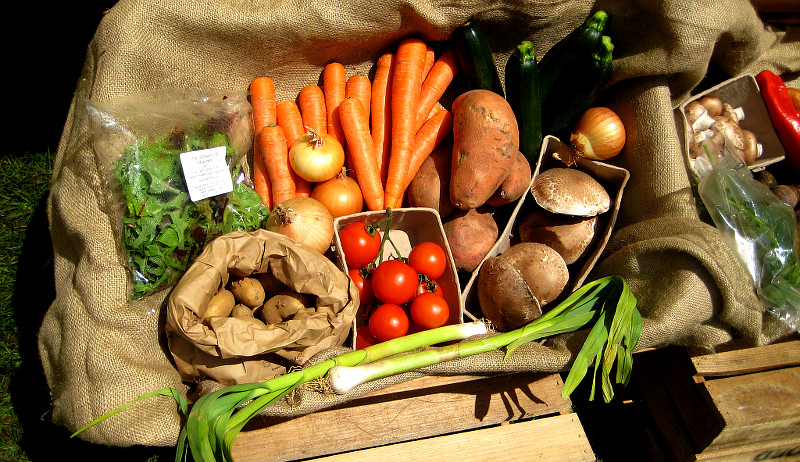
Or, if you’re a community supported agriculture, or CSA, member, you pull up to your house and find your weekly basket of just-picked vegetables on your porch. You’re in luck, there’s two pounds of vine-ripened tomatoes that smell like they’ve been picked within the last few hours.
You take a deep whiff, and explore the rest of your box, thankful that you signed up for the fresh bread that your CSA offers for an extra couple dollars each week. Ditto for the bouquet of flowers, which you quickly place in a vase.
Ten minutes later you’re eating tomatoes and fresh basil (another bonus in your CSA basket), chewing a bite of rosemary bread and enjoying the sight of fresh flowers on the table.
Things look a little better now. There’s only two days until the weekend–smooth sailing. Maybe you’ll take a drive to the country and visit your CSA farm and pick strawberries for free, an amenity they offer their members. There’s nothing better than a day in the country to revitalize your spirit.
According to CSA farmers and CSA members, community supported agriculture serves as a bridge between food eaters and food growers.
“CSAs are becoming the connection between the public and the family farm: part of the food system renaissance,” says farmer Judith Redmond of Full Belly Farm in Guinda, Calif.
The concept behind Community Supported Agriculture is simple. Members purchase a share of the harvest in advance. Then, they receive a weekly basket of fresh produce throughout that farm’s growing season.
Some CSAs offer shares of harvests year round, while others only offer shares through the prime growing season: late spring, summer and early fall. Many offer a standard season, usually around 22 weeks, with an extended season share available for an additional fee.
Ryan Voiland, owner of Red Fire Farm in Granby, Mass., offers a 17-week season and then an additional 12-week winter season.
“We encourage everyone to do an entire season but some people get sick of root crops,” he says with a laugh, adding that the winter season also offers greenhouse-grown produce, as well as cabbage and sprouts.
CSAs can be very large, serving 500 families or more, or very small, serving less than 20. While most CSAs offer produce from one farm, there are cooperative CSAs, where several farmers join together to offer members a wider selection and more quantity. Some farmers even do both. Voiland is a member of a cooperative CSA, in addition to running his own.
“It works out nicely because the farms are on different scales,” says Voiland. “It provides the small farms with a more consistent market and it provides larger farms with marketing assistance, including more exposure and more markets.”
Some CSAs even tie into other community programs. For example, the Food Bank Farm in Western Massachusetts is a 60-acre farm that provides 150,000 pounds of organic produce to The Food Bank of Western Massachusetts programs each year. CSA memberships help support the farm and its food distribution.
CSAs charge varying amounts for shares. Some charge $250 for a 22-week season, others $500. Cost depends on the particular farm, its geographic location, quantity and variety of crops and added services. Many CSAs also offer a work share, where members can work on the farm in exchange for all or part of their share.
Distribution to CSA members varies. Some CSA members must pick up their baskets at the farm, while others provide one or several in-town pick-up sites. Distribution generally depends on the size and location of the CSA.
A CSA serving an urban area may offer several pick-up sites within the city, while smaller, rural CSAs expect members to pick up their own baskets. Some CSAs even offer front-door delivery, either for an additional cost or as part of the member fee.
Peter Wilsrud in Ojai, Calif., works two acres of land and provides vegetables to 25 to 40 families. He sets out the boxes one day a week and members come to the farm to pick up their shares. Despite any inconvenience of having to pick up their shares at the farm, Wilsrud says that he has to turn members away.
CSAs work for several reasons. The pre-harvest deposit allows farmers the freedom to plan their season and also gets them through lean times. Given the vagaries of farming, this allows the farmer to risk less each harvest.
Because he or she has already been paid for shares of the harvest, they are able to pay for equipment, seeds and farm help without indebting themselves.
“CSAs provide stability with long-term commitment,” says Voiland. “The deposit before the season helps with the cash crunch in the beginning of the season.”
The shareholder does take on some of the farmer’s risk: The farmer divides the crop among members and if pests ruin the tomato crop, the shareholders get no tomatoes.
However, if the crop is successful, members receive farm-fresh, often-organic produce at a fraction of the cost they would pay for organic produce in a grocery store. Some farmers say that a CSA member pays as little as 50 percent of the amount they would otherwise.
“It’s a very reasonable way to improve your diet,” says Redmond.
More important than savings for many consumers is that they know where their food comes from. Food security is a big issue among many CSA members. Involvement in a CSA also provides an important link between farms and consumers–leading to stronger support for small farms and agricultural concerns.
“One element is supporting the small farms,” says Davis, Calif., CSA member Janice Corner. “It’s a social and political choice to make sure they can stay in business so they can keep growing healthy food.”
The system allows the public to support small farms and rural life on an intimate level. Without the CSA option, many small farms wouldn’t survive.
CSA participation often leads members to become active in supporting small farms and agriculture in both direct and indirect ways. A CSA member, for example, helps a small farm stay in business through their share purchase but they also may be more likely to support a bill preserving ag land in a periphery urban area.
“For a lot of people it goes beyond the produce,” says Voiland. “They feel they’re part of a community and feel like they’re doing something to preserve small farms.”
Redmond agrees, “After they’ve been members for awhile it goes way deeper than the food. They start to feel really connected to the farm. It provides city dwellers a grounding and a connection to the cycle.”
Community supported agriculture originated in Japan and Switzerland in the 1960s as a way to combine the interests of farms and consumers. Small farmers were seeking a stable market, while consumers were looking for food security. With the move toward large-scale commercial farms during the 1900s, small farms had been pushed out and consumers were largely left with impersonal, anonymous sources for their vegetables.
CSAs slowly started cropping up in European countries throughout the 1970s and finally made their way to the United States by the 1980s. Now, there are hundreds, if not thousands, of CSAs across the country, with a wide range in location and size.
As small farms struggle economically, they are constantly looking for new ways to market themselves. While many have turned to farmer’s markets and roadside stands, others have incorporated a CSA program, either on its own or in conjunction with other marketing methods.
“The CSA is one-third of our business,” says Redmond. “It’s a really important part of our farm.”
The level of marketing varies widely among CSAs. Many farmers say that their business is largely word-of-mouth and that they do minimal marketing, other farmers are highly conscious of ways to attract and keep customers.
To attract members, CSAs market themselves by distributing brochures, having a stand at a local farmer’s market or joining a farm cooperative, which may distribute brochures with information on local agriculture.
Janice Corner learned about the Eat Well Farm CSA, of which she is a member, through a co-worker who had a brochure. “I looked into it and saw that there was an option that worked for me. I get one basket every other week.”
The flexibility of the schedule, convenience, and the fact that the CSA provides recipes for unfamiliar vegetables has kept Corner involved. “Mine is really convenient, I just walk across my neighborhood. The baskets are on the back porch of a neighbor.”
Corner adds that she appreciates Eat Well’s presence at local festivals, where they often set up a table. It allows her to interact with the farmers and she sees it as a powerful marketing tool for the CSA.
Corner adds that flexibility and convenience are key to her continued involvement in the CSA; something that most CSA farmers seem to know from experience.
“We’re really flexible,” says Redmond. “We’ve designed the CSA to be flexible and convenient for people. For example, if someone wants a box every other week they can really just get the box when they want it.” CSAs generally allow members to stop delivery for vacation or donate a week to charity.
Voiland offers members the opportunity to pick up vegetables at an in-town site or on the farm, where they can mix and match the vegetables they want. In town, he provides a trade box, so members can discard vegetables they don’t like in exchange for vegetables they enjoy more.
“A trade box made sense right from the beginning,” explains Voiland, “people have preferences.”
While some CSAs are bare bones, others differentiate themselves by delivering member shares in woven baskets or wooden pails. Often farmers provide recipe cards for unusual vegetables, as well as other personal touches, such as a few sprigs of a fragrant herb or fresh flowers.
Some CSAs also offer value-added products, such as fresh-baked bread, bouquets of flowers, farm-raised eggs or meat, or preserves.
A number of CSAs also use websites to promote their CSA and provide information to members. Many CSAs provide the contents of the upcoming week’s basket, so members know what they’re getting.
As the seasons progress, the basket offerings change: Spring generally provides lettuce, greens, peas and herbs. In the first week or two, the number of items may be few: a couple heads of lettuce, a pound of peas, and a bunch of carrots.
As the harvest progresses, there are generally more choices and larger amounts. Some weeks will bring 18 to 20 items in a basket. If the farmer has too much corn, a member may find 12 ears in their basket, which they can share with their neighbors or freeze for winter.
Voiland adds that if there is any complaint among members it’s that they sometimes get too much of one thing, so he tries to accommodate that through the trade box.
Convenient pick-up sites are also essential to the success of a CSA. Generally, a large CSA provides several sites in each town they serve. Some pick-ups are at the Sunday farmer’s market, others at a library or school or just an amenable CSA member’s porch.
To keep members involved, many CSAs invite their members out to the farm either to pick their own vegetables or for annual festivals.
“Some of the crops are difficult to pick so we reserve a section of the field and offer them as U-pick for our members,” explains Voiland. “Members can come out and pick as many strawberries, raspberries, beans, peas and herbs as they want. That means we don’t have to pick them and they get the opportunity to bring the family out to the farm.”
Red Fire Farm also has a tomato festival each year, when they offer tastes of their 50 varieties of heirloom, along with hay rides and seed-saving workshops. Full Belly Farm has a farm day for their members once a year, with classes and other events.
Ultimately, however, the proof comes in the baskets. “It comes down to having good produce,” says Voiland. “Every Wednesday I pick up a wonderful basket of freshly harvested, organically grown edibles,” marvels CSA member Corner. “I’m eating more vegetables than I would have and making new things. It makes people into healthy eaters.”
This article first appeared in the Fall 2002 issue of Hobby Farms magazine.
By Cherie Langlois
 jeanmfogle.com |
Kathy Hightshoe, of Foristell, Mo., wanted some ducks.
Specifically, she wanted a flock of ducks to use as surrogate sheep so she could practice herding with her two Border Collies.
She and her husband, Bob, both lifelong animal lovers, lived on a farm with 15 acres—ample room for creatures large and small; in fact, their menagerie already included Missouri Fox Trotter horses, mules and chickens.
“He told me, ‘We already have so many animals, we can never go anywhere. We spend so much time caring for them, we couldn’t possibly find anyone to take over so we could go on vacation,’” recalls Kathy.
“Right then I had a lightbulb moment. I said, ‘You know, I bet other people in this area have the same problem—I bet I could start a business taking care of other peoples’ dogs and horses.’ My poor husband shook his head in defeat, saying something about me being in the ‘funny farm.’ I thought that was brilliant and I immediately decided to name my business Funny Farm Barn Care.”
A Brief History of Farm Sitting
Kathy hasn’t been the only country woman to experience this particular flash-of-the-lightbulb moment.
After Christina Wright of Joelton, Tenn., found herself jobless in the aftermath of a divorce, she started brainstorming ways to earn a living. She had a degree in animal science from Middle Tennessee State University and experience working for a small animal veterinarian, plus she’d also done some casual farm sitting for friends and acquaintances; working with animals seemed a given.
“I’ve always loved and owned horses, so in the beginning I wanted to do boarding,” says Christina. “Unfortunately, there wasn’t much of a market for it, but I started getting calls about kenneling dogs.”
In 2001, she launched Town & Country Farm & Pet Sitter to provide pet and farm sitting for dogs, cats, horses, sheep and other animals.
Working together fulltime, she and her husband, James, also board dogs and horses on their 13-acre farm, which serves as home-sweet-home to their own animal family of five horses, two dogs, two cats, chickens and a couple of exotic birds.
As Patti J. Moran recounts in her book Pet Sitting for Profit, pet sitting has come a long way since she opened her own business in 1983.
Back then, pet sitters were a rarity and a novelty, eliciting amused reactions of “You’re a what?” When pet or livestock owners took a vacation or business trip sans critters, they had to rely on kennels, neighbors, relatives, friends or the kid next door to take over—with sometimes dire consequences if that kid forgot to feed the dogs or Aunt Rose got kicked by the horse. (As a farm sitter travelling to often-times unfamiliar rural areas alone, you need to be aware of a few farm-sitting safety tips)
This changed during the 1990s, however, as the pet-sitting market blossomed and more people discovered the benefits of having someone experienced with animal care come to their home to mind their furry or feathered friends.
Back then, few sitters specialized in livestock, but more farm sitters have popped up in recent years; the pet-sitting profession as a whole continues to grow despite travel-industry catastrophes such as 9/11 and recently soaring gas prices.
In December 2007, the educational pet sitter’s organization Pet Sitters International boasted some 7,900 members.
A Woman’s Work?
Interestingly, according to Moran’s book, the pet-sitting field thus far has lured way more women than men.
Why the bias? Like Kathy and Christina, many women find working from home and being their own boss an extremely attractive alternative, especially when they have children—or a farm bursting with animals and crops to nurture.
A pet- or farm-sitting business offers amazing flexibility: You control how many clients you accept (depending on whether you can say “no”), your fees, how large a service area to cover, what types of animals you tend and, to an extent, what time you make your visits.
Would you prefer to sit part-time? Stay close to home? Specialize in cats because you’re phobic about dogs? Schedule pet-sitting visits before your husband heads to work and after he comes home so you can spend the day with your kids? No problem.
Pet or farm sitting offers other perks, too, like the novelty—and challenge—of tending different creatures with distinct personalities in diverse settings. In other words, as a pet sitter, you can pretty much kiss monotony goodbye; no two days will be exactly the same.
There’s also the intense satisfaction of caring for animals well and making them feel as happy and stress-free as possible in their owners’ absence.
Face it: We’re women and we like to nurture things.
“I love being able to take care of the pets just the way their owners would and I love helping a client with a behavior problem they might be having with their pet,” says Kathy.
Christina recalls one female Weimaraner that arrived for a stay at their little kennel and promptly went on a hunger strike. She brought the dog into the kitchen and plied her with dog-food sandwiches, giving the pouting pooch a quarter at a time until her appetite revived.
On another pet-sitting occasion, making one lonely kitty happy involved literally sitting with the cat twice a day and watching TV together. Christina says her greatest joy is when a dog runs back to say goodbye to her after its owner arrives to pick it up following a long stay.
“I call it getting the doggy endorsement,” she laughs.
See what a sample farm sitting chore list looks like.
Page 1 |2
About the Author: Cherie Langlois is a Washington-based hobby farmer, freelance writer, and former zookeeper who enjoys doing a bit of farm and pet sitting on the side for friends and relatives.
Bug Basics & More Tips Get indepth details on the ticks, flies and more. Read “Nature’s Nasties” for help keeping the bugs away from your livestock!
|
Do you begin to itch just thinking about the insects that buzz and sting during summer gardening and evenings outdoors — and that pester your farm animals to no end? It may seem futile at times, but here some ideas to help keep the bugs at bay.

