There are countless root cellars in Scandinavia. The popularity of storing food on the farm and woodland homestead has been persistent in a country with both a long tradition of DIY food growing and a climate that necessitates a system for winter food storage when the gardens go dormant.
In my travels I found many cellars dating back to 50s and far earlier. The older cellars had large natural stone block walls, and the new ones were poured concrete. It was interesting to note how many were still in use even though those who built them were no longer around to fill them up with carrots, beets and potatoes.
These are the most popular crops I found in the cellars I visited. But there were also rutabaga, turnip and even some hardy flowers bulbs being held over for spring planting.
Features of Scandinavian Root Cellars
The Scandinavian cellar has a few features that stood out. You can find similar features in other cellars, such as those in North America. But I saw some particularities that gave me a sense of the builders being innovators.
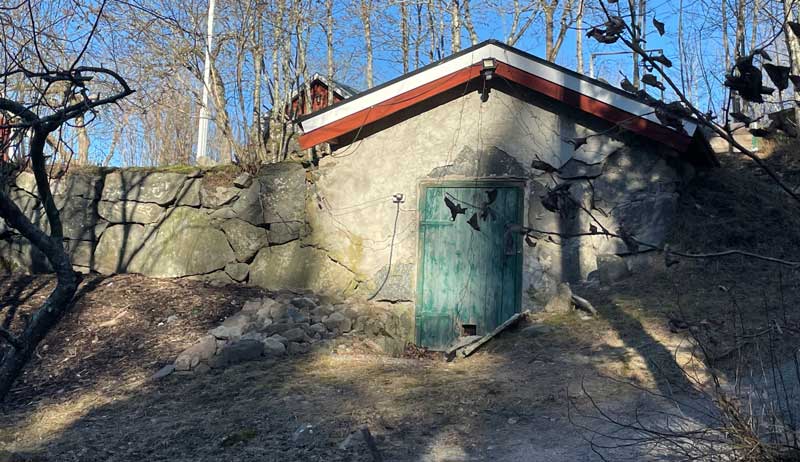
The cellars were often built into a small ridgeline or hillside—often glacial morraines and eskers (which are common in northern Europe). This takes advantage of a few geographical features. First, the cellar gains protection and thermal mass from the earth on three sides. Second, it means availability of ample boulders and cobble stones to make a façade for the cellar and retention walls for the front.
However, unlike my own cellar—which is deeply buried in my glacial moraine ridge with over 4 to 6 feet of soil cover—these Scandinavian cellars were more often built toward the top of the hillside, with less soil cover and often a frame roof. This offers less protection from extreme cold, but the temperatures in southern Sweden are not as cold as my own Ontario winters.
Still, with roof trusses possibly filled with wood chips as an insulation and the roof covered over with snow, there must be enough protection. When there was no pitched roof, the rounded earthen mound would usually have an overhang of corrugated metal to keep rain and snow off the doorway.
That being said, the cellars often had stairways down into the cellar and made use of triple airlocks! Two horizontal-style cellar-style doors would lift up. Rhen, at the bottom of the staircase, there would be a regular vertical door into the second airlock, followed by a third vertical door into the cellar.
This would have a great thermal regulating effect in extreme weather, despite people going in and out.
These cellars all had air intakes and exhaust. The exhaust went out the top, a normal feature in a cellar. But more often than not the cold air intake was built into the front walls or even as a slider at the bottom of the door!
Rooms
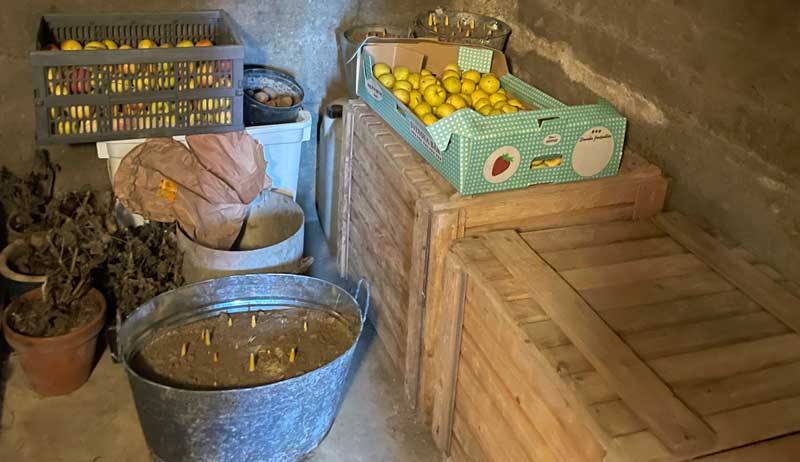
Some cellars had one room. But I saw a number of two-room cellars, with smaller cellars holding apples with the vegetables. (The concern over ethelene gas would be minimal with only small amounts of fruit stored at a time.) In one case, the second room was actually the well house, with well water lines in and out and the pump controls. Wooden crates full of soil-covered potatoes, bins with sand and even old deep freezers were used inside for food storage.
I also found larger cellars built into hills and barns with garage-style doors—a more commercial style.
But what struck me most was that every homestead had a cellar. The cellars were also found often in the woodland beside the house or even in the wooded field nearby, providing shade and cooling on the cellar for summer use! However they were designed, though, Scandinavian cellars appear consistently simple, affordable and effective and have shown to be well suited to the geomorphology of the area and its peoples’ culture of putting food by for winter.
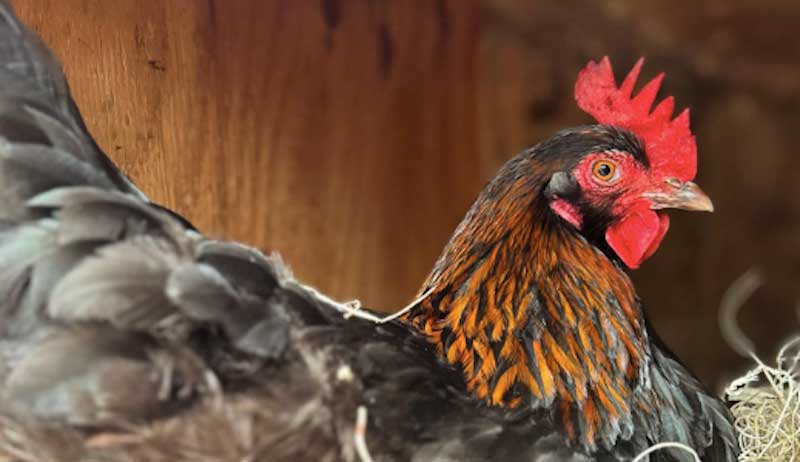
“Having access to your own food is priceless,” says Emily Loflin, a self-proclaimed chicken enthusiast based in Northern California who shares her poultry adventures to the world via the Ems Eggers Instagram account.
Loflin’s farming journey escalated during the early era of the Covid-19 pandemic. “We were homesteading more than ever and we realized the importance of becoming self sustainable,” says Loflin, who adds that originally she and her husband “wanted to teach our children to be responsible humans and to love and nurture living things such as animals as well as plants.”
Taking a break from tending to the chicks, we spoke to Loflin about her early inspiration to begin a hobby farm and the range of chicken personalities. We also touched on dark chocolate paint eggs.
“The original appeal for chickens was honestly eggs!” says Loflin, when asked why poultry became such a focus of the Ems Eggers homestead.
“My husband and children built the cutest little coop out of scrap-wood around the property, and we picked up four or five chicks,” she continues. “Raising them taught the kids responsibility. Feeding them, cleaning the coop and collecting eggs was the ultimate reward.”
Loflin adds that her interest in chickens really bloomed during the pandemic, when she and her family were spending more time than ever homesteading.
“We had the best garden we’ve ever had, and I really started researching chickens,” she explains. “I became super interested in all the different breeds and egg colors, and decided I wanted to have our own beautiful egg rainbow.”
During this time, Loflin adds that late night research sessions helped to hone her poultry chops and expand her knowledge of specific breeds and egg-hatching techniques. “This is when I knew I had a real passion for chickens and their beautiful eggs,” she says.
Looking over her flock, Loflin says she’s noticed distinct personalities emerging.
“Our Delaware hen Daisy was always so pushy and greedy and had to be first to all the feed bowls and treats,” she says. “Daisy would follow me and almost pester me until I’d offer her something. Then there’s Val, our first Easter Egger—so curious and not pushy, but she always seemed interested and intrigued by what was going on.”
“I truly am in awe [of] the beauty of nature and all the amazing colors a chicken can lay,” says Loflin as she considers the range of egg colors her peep produces. “I love the blues and dark olives and speckles and even the lovely pastels or eggs with heavy blooms that make them look grey or purple!”
Pressed to pick a current favorite shade of egg, Loflin selects “the dark rich red and chocolate colors of Black Copper Marans.” She adds that at times the eggs resemble “dark chocolate paint coming out of a texture spray gun and covering the egg shell in a rich dark red speckled coat. It’s amazing.”
If you’ve been weighing up the pros and cons of adding some chicks to your own homestead, Loflin says don’t hesitate.
“Just say go for it!” she enthuses. “Don’t be afraid. It’s a win-win with chickens. They’re entertaining, beautiful, easy and give you eggs! Just always get more than you think you need or want because you’ll wish you had in the end!”
My great grandparents were born in Sicily. Sadly, I never got to meet any of my Italian grandparents before they passed away. I cling to the Italian side of my heritage, and I am eager to learn as much as I can about my ancestors. I love Italian food and try to make authentic meals for special occasions. Last fall, I visited my Italian Grand Uncle for the first time, and he showed me videos and pictures and told me so many wonderful stories of my Sicilian family. It was a trip I won’t soon forget.
This limoncello recipe is an authentic Italian liqueur that is best made when lemons are at their peak. I make a batch every winter and sparingly share it with friends and family; we savor the heck out of it!
The process of making this recipe from start to finish takes a few weeks, but it is worth the wait – trust me. I can’t even imagine what limoncello made with fresh lemons in Sicily tastes like (but hope to someday find out)!
Limoncello
Yield: About 3 quarts finished limoncello
Ingredients
Skin of 9 organic lemons (just the yellow, no white pith)
Wash lemons and remove the skin. Allow the lemons to dry. Don’t include any soft or damaged parts of the skin.
Using a vegetable peeler, carefully remove the yellow peel from the lemon, not the white, bitter pith.
In a clean quart jar, add the lemon peels and cover until the jar is filled with Everclear. Add the clean canning jar lid and tightly screw on the ring.
Allow the lemons and Everclear to steep for three weeks. Keep at room temperature, out of direct sunlight or cover with a dishtowel.
After at least three weeks, you’ll make a simple syrup with the sugar and water. In a large sauce pan, bring the water and sugar to a simmer and stir until the sugar is dissolved completely. Once the sugar is dissolved, remove from heat and allow the syrup to cool to room temperature.
Using a fine mesh strainer, pour the lemon-peel-infused Everclear into the syrup. If you want an even cleaner strain, you can line the fine mesh strainer with cheese cloth or a coffee filter before pouring into the simple syrup. Stir well.
Transfer the limoncello into clean jars and screw on the lids tightly.
Store in the freezer for best longevity.
Enjoy as a sipping liqueur, as this has a very high alcohol content.
courtesy Tom Koerner/U.S. Fish and Wildlife Service
The bag of seed I ordered must’ve weighed close to 30 pounds. It’s enough custom prairie mix to transform most of my half acre from patchy lawn to native prairie. The seed mixture includes more than 20 types of grasses and wildflowers intended to thrive in my moderately moist or “mesic” southern Indiana spot.
I’m at the very beginning of what likely will be at least a three-year process. Truly, this project will take a lot of effort, but I think the personal and environmental benefits will be well worth it. And I’m not alone.
Increasing numbers of people are replacing some or all of their thirsty, labor-intensive lawns with meadows or prairies. (What’s the difference? Technically, a meadow is a wetter area made up mostly of wildflowers and other non-grass plants. A prairie, on the other hand, contains an abundance of native grasses with a smattering of wildflowers mixed in.)
Why Bother With a Prairie Yard?
Once successfully established, deeply rooted prairie plants are able to withstand both drought and flooding much better. Prairies also attract and support all sorts of bees, butterflies, songbirds and other wildlife.
And then there’s the matter of mowing. With spring rains and warm weather, many lawns grow profusely enough to require weekly trims. (Now, I realize some folks love to mow, but I’d rather spend my time in other ways!)
To make it all work, you need to choose native grasses and wildflowers that are best-suited to your location’s hydrology, weather and microclimate. (If you aren’t quite sure where to start, ask your local native plant society for guidance, or try these state-by-state Natural Resources Conservation Service listings.)
For my part, I consulted Heartland Restoration Services which suggested I go with grasses like little bluestem, prairie dropseed and Virginia wild rye, among others. As for my prairie wildflowers? Lance-leaved coreopsis, yellow and purple coneflowers, and false sunflower are just a few that should turn up after planting.
Besides picking the right plants for the job, carefully preparing the planting site is critical.
“The more competition you can remove from the equation for whatever seed or plant you’re putting in, the more successful those seeds or plants are likely to be in establishing themselves,” says Nathan Pugh, director of restoration services at Heartland Restoration Services, Inc.
Ideally, you want a “blank slate” in which to plant—that means having no existing lawn or weeds getting in the way. For small areas, Pugh suggests using tarps for a month or so during the spring or fall. “[Tarps] just smother that space and block light access for any of the grass that’s growing there or any weeds that are popping up,” he says.
When used judiciously and according to label instructions, a one-time application of glyphosate can also work well since it will kill the above-ground vegetation as well as its below-ground roots. “If the grass that you killed off was fairly dense, allowing that to break down a little bit or being able to scrape it off the surface so that you get to the soil is optimum,” Pugh says. “You want that seed-to-soil contact to allow for germination to be the best it can be. But, if you’ve got a really thick grass layer in there and then you try to put the seed down and it’s just laying there on top of the grass clumps, you’re really not accomplishing much of anything.”
Weed-whack or mow any thick layers of dead vegetation. Then, he continues, “Do a light raking [with] a rock rake…. Just scarify the soil a little bit on top without fully turning it over.”
Vigorously hand-digging or rototilling the soil are both non-starters, since these actions bring dormant weed seeds up to the surface.
Seeding, Protection & Patience
The size of your prairie may help to dictate the seed-sowing method you choose. In small areas, you can easily spread seeds by hand or use a crank-style seed spreader. Larger sections may call for a push spreader or tractor-fitted seeder.
After sowing is complete, watch for your seedlings to emerge—and watch out for nibbling creatures. “If you live in a subdivision with a retention pond and geese frequently populate the area, the geese will just eat everything,” Pugh warns.
Depending on your location, deer and rabbits can also sheer off the tops of newly germinated plants. Still, rather than surround your space with costly fencing, consider trying one of the liquid rabbit and deer repellants currently available.
Once the plants take off, a little random foraging shouldn’t be a problem. But you will need to remove any weedy interlopers you find before they have a chance to compete with your prairie plants.
“Patience is a key part of being able to manage these areas,” Pugh adds. “Up front, it looks a bit barren, but it will eventually fill in. Then people are like, ‘Oh, my gosh! It’s so pretty!’”
Denzel Mitchell talks about urban farming in Baltimore, bringing up new farmers, the heirloom Baltimore Fish pepper, and more.
Hear about how food and farming have been part of Denzel’s whole life, from his extended family’s 600-acre homestead in Oklahoma to his college English professor’s homestead. His experience running farms in Baltimore—the city and the county—helped to prepare him for his current role of co-executive director of Farm Alliance of Baltimore.
You’ll learn about Farm Alliance of Baltimore’s many programs, including a cooperative farmers market, food assistance doubling, mobile cooking demonstrations, technical assistance, soil testing and nutrient management research, compost coaching, and—the newest and largest program—the Black Butterfly Urban Farm Academy. Two years in, 20 farmers have trained in a 9-month intensive with mentorship, coursework, field days at urban and peri-urban farms, and work days at the teaching and demonstration farm with the intention of getting into their own farming business. Hear about an exciting, brand-new aspect of this program, a 7-acre teaching and demonstration farm that will allow the organization to offer farm-business incubator space for academy graduates.
Have you heard of the Baltimore Fish pepper? Listen to Denzel’s history of this heirloom, how he started growing it, and how you can grow it, too.
Denzel talks about his natural inclination toward being a connector and educator and how this has helped him in his farming journey and has served his vision of seeing more people farming.
Follow along with Denzel as he talks about what it looks like for small-scale farmers to truly have support from their customers and communities, and how farmers can come out and ask for that support.
Lichens are two organisms sharing one body: an alga and a fungus. So it may not surprise us to learn that the benefits of usnea lichens share similarities with many of the mushrooms (fungi) popularly used for immune health and nourishment.
There are usnea species in the Appalachian region that are found thriving in cooler and wetter forests. They grow high in the air on older, dead or dying tree limbs. These gorgeous tiny lichens are slow to grow and hard to reach, but such limbs can be found having eventually dropped to the ground.
A hike through the right woods can make for a delightfully slow and ethical harvest.
Usnea lichens live in the air and provide a benefit to the lungs. Its habitat may be threatened in your area, so harvest with nuance and respect.
Where to Find Usnea
There are several species of usnea found all over the globe and within the U.S. In the Pacific Northwest, Usnea longissima are found in long bushy forms. In fact, with the common name “old man’s beard,” the forms are long enough to resemble Spanish Moss, a cousin found in the southern states.
Spanish Moss, however, is not an usnea species and is not recommended for the uses we’ll discuss here. But its morphology is familiar to many and a good way to begin picturing this family of lichens by association.
Usnea can be found on a variety of trees. Here in Kentucky I find it on trees like thorny locust and ash, usually 10 years or older, who have some dying limbs and a lot of height. Sometimes small clumps appear on the black rot of the failing peach orchard. I’ve hiked trails in the Daniel Boone National Forest that seemed to rain usnea when the struggling hemlocks yielded their domination to the changing ecosystem.
I don’t think usnea requires a tree to be dead or dying in order to anchor on its limbs, and I certainly don’t see it causing trees harm. Some even consider it a harbinger of air pollution and a forest protector. These “lungs of the forest” extract environmental contaminants with their air use.
In fact, if air pollution is a concern in your area, beware toxins will be contained in the lichens.
But I have always found it in abundance in places that rapid tree loss might feel overwhelming due to disease or heavy insect pressures. Here, usnea offers a comforting treasure in stark times.
Identifying Usnea
One distinguishing field test to find out if your lichen is an usnea is to slowly and gently create tension along a longer section of an individual “arm” of the lichen. Hold this thicker strand between thumb and forefinger of each hand and pull them evenly apart. This should reveal a small inner “string” running inside the outer layer you just tugged.
Fresh or moistened usnea easily yields its outer “sheath” to reveal a white elastic “core” that looks like a string inside the tube of its algal “skin”(see picture). Spanish moss also has this elastic string inside, but it is black, not the white or cream color we’re hoping for with usnea. The somewhat toxic wolf lichen of the Pacific Northwest does not have the inner string.
Many other lookalikes have flat (rather than tubular) strands. But if you look closely and patiently, and wait to prepare it until you’ve consistently identified it and had your findings corroborated by a more knowledgeable plant person, the rewards are bountiful.
Melissa Calhoun
Harvesting Usnea
Hiking a forgotten deep woods trail is a great anytime pick-me-up, and it’s the best way to discover usnea, too.
The likelihood of abundant usnea increases in climates with more fog, rain and humidity. Watch the ground for a lichen that looks out of place, like it fell. When you pick one up, an usnea will be unattached to the ground, loose or “stuck” on a fallen limb.
First, do the “stretch test” described above. If that white elastic fungal core is there, look up. If you see loads of lichen hanging high above, you’ve found a reliable place to harvest.
If you don’t see fuzzy silhouettes outlining many limbs above, consider this a spot where usnea is either overharvested or too rare to be responsibly gathered. A good rule of thumb among herbalists is, if we have any doubt about abundance, we consider gathering no more than one fifth of the observable population at hand.
Rather than taking the living usnea from high above, come back to this spot again and again. Just harvest the fallen clumps the wind sends you year round. (Hint: take the day and head out after a big windy storm).
Using this harvest method, you’ll eventually collect the amount that’s right for you to make the medicine you need. But even a pinch or a handful is enough. You can even stuff them in your pocket and forget about them when you get home.
A week or two later when you venture out again, a perfectly dried clump will await you in your jacket, to add to it if you’re lucky!
I’ve heard folk history of wilderness survivalists and soldiers alike packing open wounds with usnea with great results. But let’s not hope you come to that situation on your restoration forage hikes this year.
Proper preparation, like harvest, also requires some nuance. Combining both water and alcohol extracts will yield a wider range of potential benefits for your body.
Use the whole lichen to concoct your brew. There’s no processing required for either fresh or dried (that’s the easy part). Usnea has a long traditional history of use for a wide number of ailments and is still used in many cultures around the world. Its preparation techniques, as a result, are also widely variable and may depend on the tradition, targeted ailment or tools at hand when the need arises.
If you’re experienced with successful herbal oil infusion processes, dried and powdered usnea will serve you well as an ingredient in your next salve. But tinctures are simpler and can be taken internally, and a dilute tincture can also be placed on the skin for topical woes!
Making Tea
For the beginning home medicine maker, however, I recommend a hot tea that is not strained, followed by the addition of alcohol by an amount to preserve your extract. Twenty to 30 percent pure alcohol by volume will keep an extract shelf-stable. You can easily achieve this by purchasing grain alcohol or any 190 proof liquor.
Measure the amount of just-boiled water it takes to cover the amount of lichen you’re steeping. Then add half as much grain alcohol as this water amount to the mixture. This yields an about 25 percent alcoholic solution—plenty to preserve and further extract alcohol-soluble constituents.
Cover your container with a tight lid. Then invent some safe way to occasionally give warmth to the mixture (i.e. do not allow flame or high heat to contact alcoholic vapors). A slow cooker with a sous vide setting or a very low double boiler setting might work for you.
Heat until hot to the touch, then set aside. Repeat the next day. Do this heat application three to five times, then set it somewhere you will pass by every day. When you notice it, give it a quick shake and think about the lovely adventure you had under the trees.
Wait several weeks or months to strain—at least until the mixture both smells and tastes like a divine mushroom.
Decoction
If you prefer not to ingest alcohol, you can still prepare usnea as a decoction, which is just what herbalists call making concentrated tea. Your usnea tea will be more potent and effective when brewed over low heat for a prolonged period of time.
Place usnea in a pot or double boiler and cover it with about three times as much water as it would take to soak it. Use the lowest possible simmer setting to heat, covered, until the liquid is reduced to about a third of its original volume.
Ideally your heat is so low that this takes a day or more.
Store strained concentrate in the fridge and drink by the ounce two to five times per day until symptoms are gone. If you have extra, you can freeze it for another sick day or skin ailment. You can also freely adjust this recipe for flavor and strength, and consider powdering the lichen for a stronger and faster extraction.
As you begin to employ this great helper in times of need, taking notes on each recipe will help you study variations in effectiveness and palatability. The goal is to respectfully and effectively prepare so as not to overuse this slow-growing herb.
Melissa Calhoun
Usnea’s Benefits
When extracted with heat, water and time, then used internally, like many mushrooms, usnea’s fungal components may exercise our immune system function and awareness (like a fire drill without the fire). Usneas also contain water-soluble sugars that feed our bodies’ natural cellular functions, aiding in digestion and immune strength.
But we can get these same benefits from much more easily obtained mushrooms such as turkey tail, oyster, shiitake and chicken of the woods.
So let’s consider usnea’s other actions for our niche use of this powerful lichen and appreciate the extra goodies that come with it. Usneas also contain alcohol-soluble acids that can harm bacteria, viruses and fungi. A super-powered herb for pandemic times, it boasts the additional actions of mild expectorant and inflammation mediation. Consider usnea a “first responder” for immune support in early stages to prevent suspected infection, especially indicated for sinus, respiratory, urinary and fungal situations.
Usnea is also renowned for wounds and skin ailments, especially fungal ones.
Based on these multiple applications, researchers have decided to test usnea’s protection against a long list of harmful biotic agents. This is science catching on to ethnobotanical history. You can find a simple but detailed list of studies from the generously prolific herbal educator Rosalee de la Foret.
The necessity of deeply exploring our debt and privilege to receive and share herbal knowledge with our foregone and current indigenous herbal practitioners here is utmost. Like countless other botanical friends, usnea’s amazingly multi-pronged existence may become so desired as to be exploited on the global market very soon, if not already.
Respectfully and humbly approach herbalists who are culturally native to your area for their advice on both the ethics and practical applications of gathering and preparing usnea. Don’t overharvest, and likewise, don’t overuse usnea. Use only in small doses and only when illness seems threatening.
If it’s not raining in your neck of the woods, email me and I’ll share:)
Iwas a 16-year-old 4-H’er when I first heard of the avian flu. I was at a poultry show having my birds tested and someone asked if they were testing for it. While they weren’t, I learned a lot speaking to the National Poultry Improvement Plan inspector that day and became fascinated with poultry illnesses and how to prevent and treat them.
Now that I have my own small homestead flock, I worry about the avian flu killing them off.
History of Avian Flu
Avian Influenza A (H5N1) has run rampant for years. In 1878, this highly pathogenic avian influenza (HPAI) was first noticed in northern Italy by veterinarian Edoardo Perroncito. First called fowl plague, the disease killed many birds but was thought to be the result of another disease—fowl cholera—caused by the bacteria Pasteurella multocida.
Throughout the early 1900s, avian flu continued to have outbreaks. In 1996 in China, an outbreak caused mortality of 40 percent of aquatic birds. This disease really made headway in recent times with its rapid mutations. In 2014-2015, North America lost 50 million birds to avian flu.
This disease has become a major killer of domesticated avian species, including chickens, and wild bird populations. There are many bird species that are endangered, and protecting them is a critical component of keeping our ecosystems safe. While governments are concerned with domesticated and wild birds, hobby farmers are mainly worried about our backyard flocks and what this disease could mean for us.
Avian flu can kill entire flocks, and many need to be culled due to contamination. Many larger farms have needed to cull their entire flock for the good of the entire agriculture industry. Backyard flocks have needed to be culled as well.
So the main question here is: How do I prevent this tragedy from happening to me?
Maria Sbytova/Adobe Stock
Danger to Humans?
Avian influenza viruses rarely infect people, according to the USDA Centers for Disease Control and Prevention. However, it does pose a slight risk to a specific population of people in direct contact with birds. Farmers are in that population. Some symptoms of avian flu in humans include fever, cough, sore throat, body aches, respiratory issues, and nausea and vomiting.
“Most previous bird flu virus infections in people have occurred following close, prolonged and unprotected (e.g., no gloves or medical mask) contact with infected birds or environments contaminated by their saliva, mucous or poop,” it states.
This means that if we handle our birds in a hygienic manner, we can significantly lower our risk. When handling poultry, always practice good hygiene by washing your hands after any contact. This is important for more reasons than just avian flu.
Bird Symptoms
Having a sick chicken or other poultry can be worrisome. Many vets won’t see poultry, and it can be nerve-wracking figuring out what is wrong with your birds.
“Chickens may have swelling around the head, neck and eyes,” they write. “The heads and legs may also have purple discoloration.”
This is important to note because knowing the signs is important to ensure your chickens are safe. The paper’s authors state that if your flock has sudden, high death rates or many birds with signs of HPAI, contact your veterinarian or your local board of health.
The University of Minnesota also makes note that flocks within 6 miles of confirmed cases will need to be checked for the virus and potentially euthanized. This is important to help limit the spread as most cases have been found within backyard flocks.
Sick poultry will look ruffled, be quieter than usual, eat or drink less and overall look sick. You should always separate a sick bird from the rest of your flock. Even if it is not avian flu, it could help prevent the spread of other illnesses to the rest of your flock.
While there is no surefire way to prevent avian flu, ways to help mitigate the spread and keep your flock healthy do exist. First and foremost is biosecurity, a procedure that helps protect your animals or yourself from harmful biological diseases. While biosecurity doesn’t 100 percent prevent disease, it can be a great way to drastically reduce the risk of the overall spread of these diseases.
When I was in 4-H, I ran a rabbitry and poultry farm where many of my pet customers were upset they couldn’t tour our farm. This was due to our biosecurity. When you allow people onto your farm, you increase the risk of diseases coming onto your property.
When I think of my biosecurity measures, I think about the start to finish. When I buy new birds, I always quarantine them. Another way is by ensuring that whatever I buy looks healthy when I purchase. If I buy directly from a farm, I look around to see if their farm is clean and healthy.
Questions I typically ask myself are:
Do these animals look healthy?
Are enclosures clean?
Are there too many animals for the space given?
Animals should look healthy around. Unhealthy animals mean that there is a chance the bird I am buying could get sick soon.
If the environment isn’t clean, there is a high-risk of illness. Pens that are filled with dust increase the risk for respiratory issues in birds. Birds that are at an increased risk for illness typically come from high-stress environments such as these.
Birds and other animals that are crammed into areas that aren’t big enough typically spread illnesses quickly. I think of the plague era. People that were closer to others got sick much quicker than those away from crowds. Crowded environments are a red flag when buying as well.
I typically enjoy farms that don’t allow tours. This shows they are conscious of disease, and the less people coming in and out of their farm the better.
For my own farm, I don’t allow just anyone to come over. Not only is it important to the health of my animals, but my family as well. Limiting the amount of people that expose your animals and propery to pathogens is important to the biosecurity of your farm.
When people do come over, I ask them to wash their hands and disinfect their shoes. I am always wary of other poultry owners coming over, but anyone could carry diseases on their shoes.
Birds of a Feather
Another main concern you should have is feeding wild birds. Many of us enjoy birdwatching on the farm and don’t think much of it when we see wild birds inside our coops or around feeders. I once had a feeder in my backyard that our chickens would often scratch under. However, this can be deadly!
Wild birds can carry avian flu. By encouraging them to fly around your yard, you increase the risk of spread to your flock. They also carry other diseases and parasites that could harm your flocks as well.
Your free-ranging flock may need to be kept inside to prevent contact with wildlife. It’s near impossible to stop wild birds from entering your yard.
Mites and other diseases can spread quickly to your birds. Ways to prevent wild birds include:
not allowing feed to sit out
preventing waterfowl from landing in your pond
making your yard less appealing to these birds.
You may even need to drain standing water.
You should disinfect all your poultry housing and equipment at least monthly. This includes scrubbing feeders and waterers. When cleaning your poultry equipment, practice personal hygiene and wear gloves and masks. Afterwards, change your clothing and shower.
Any new poultry you bring on your farm should be quarantined away from your existing birds for at least a month. This gives time for any diseases they may have to show themselves.
Another good way to keep your flock safe is to have special shoes strictly for your coop. Not only does this protect your flock from outside diseases, but you won’t potentially track diseases outside of your coop as well.
Destiny Parker/Adobe Stock
Extracurricular Activities
You might be asking yourself, Does this mean I shouldn’t attend poultry shows, swaps or other chicken-related events? Can I still hunt wild game birds? These are tricky questions.
While hunting is relatively safe if you don’t let your poultry encounter any gear that may have been in contact with wild birds, shows and swaps are a different story. A good way to gauge the current guidelines is through the CDC, which has maps of the current outbreaks of the disease.
For instance, I live in the Panhandle of Florida, and avian flu has only currently affected two counties, which are nowhere near me. I feel safe to show and attend local swaps. However, states such as Montana have a few more counties under alert, so I would look at what is near me and if there are any cases around me. It is truly a personal preference whether or not you choose to continue on.
However, even if the avian flu isn’t near you, still be wary of other diseases that you may pick up at these events.
Learning to be cautious isn’t a bad thing and could potentially save the lives of your flock and many others by preventing the spread of diseases. Keeping a healthy flock is critical to ensuring that they stay healthy and continue to provide your farm with products such as eggs for years to come. Remember to keep your coops clean and to disinfect everything to help keep your flocks safe from diseases!
This article originally appeared in the January/February 2023 issue of Chickens magazine.
Up here on my northern Wisconsin farm, there are tried-and-true plants I grow every year. Sun Gold tomatoes. Sweetness sweet corn. Casperita pumpkins.
But half the fun of shopping through seed, garden and nursery catalogs is looking for new plants to try. Sometimes I’m experimenting with a different variety of a favorable vegetable. Other times I’m looking for a new type of tree to plant.
After putting plenty of thought into my choices, I’m happy with the orders I’ve placed for spring 2023. I’m particularly excited to try growing the following three plants for the first time.
Hazelnuts
Growing nut trees in northern Wisconsin isn’t quite as easy as growing fruit trees like apples and plums. The winters are too cold for many nut trees, including almonds and pecans. Even walnuts and hickories can find the top of Wisconsin a little chilly.
My farm has three old black walnut trees. While they tolerate the winters well enough, spring frosts often prevent the trees from producing meaningful nut crops.
But I’m trying my best to add nut trees to my orchard. I’ve planted a couple of Chinese chestnut trees hardy to my region. Now I’m adding hazel trees.
Hazel trees grow wild around these parts as small shrubs. While there aren’t any currently growing on my farm, that will change as soon as I plant the two hazel trees I’ve purchased.
I’m excited to give these little nut producers a try. I’m not very familiar with the growth habits of hazel trees, so I’m eager to watch them develop. And with two trees to ensure proper pollination, I’m hopeful I’ll be harvesting bountiful nut crops in the future.
The northern Wisconsin growing season runs on the short side. So the pumpkins I grow tend to be on the smaller side, so they have time to sprout, flower and fruit between spring and autumn frosts.
But this year I’m going to push the limits of the growing season and try Big Max pumpkins. They’re supposed to reach 100 hundreds or more, dramatically larger than the sub-10-pound pumpkins I normally grow. Best of all, Big Max pumpkins require less than four months to grow, simplifying the challenge of squeezing them into a northern Wisconsin growing season.
I may have to get a little creative to ensure my Big Max pumpkins have a chance to ripen. My goal is to plant them as early as possible in the spring, covering my raised garden beds with plastic beforehand to warm the soil and introducing cloches to protect the young pumpkin plants at night. With a little effort early on (and ample watering throughout the summer), I’m optimistic I can grow some impressive Big Max pumpkins.
The Gala apple is considered to be one of the sweetest-tasting apple varieties. I can vouch for their delicious flavor. They’re commonly sold in grocery stores, and I’ve enjoyed many Gala apples acquired that way.
But now I intend to grow a Gala apple tree of my own. As far as I can tell from online research, Gala may be the sweetest apple variety that grows this far north, so I’m excited to add it to my orchard. I’ve ordered a relatively small specimen (compared to the large trees I acquire from local nurseries), but waiting a few more years for Gala to grow up and fruit is bound to be worthwhile.
Which plants are you excited to try growing in and around your garden in 2023?
Over the years, my home library has grown extensively on a variety of homesteading-related topics, from gardening and seed saving to raising cattle, horses, goats and poultry. I enjoy having a wide range of books close by to refer back to when needed.
Whether you’re just mulling over the idea of buying a couple of bucket calves or you’re already neck-deep in raising and caring for your own herd of cattle, these books cover a variety of bovine-related topics. While they’re not in order by my particular preference, I do consider them to be more advanced the further down the list you read.
Now if the idea of homegrown beef is just as intriguing to you as fresh milk every day and you’re not sure which direction to head, this book will give you a look into raising both beef and dairy cattle. It includes a brief overview of a variety of beef cattle breeds, the basics of cattle nutrition and a look at the breeding and calving processes.
In the next section, Thomas dives into dairy cattle as she shares about selection and care of dairy breeds, as well as the breeding and calving processes.
The book then concludes with an eye-opening discussion on owning your own dairy, covering such topics as:
developing a business plan
ways to diversify
pasture needs
milking schedules, milk flavors
differences between raw and pasteurized milk
In the back, you’ll find 16 pages of glossy color photographs of a variety of cattle breeds, too.
While the thought of your own heifers giving birth might seem daunting, this book will help prepare you to navigate the various stages of the calving experience. You’ll learn about everything from caring for both the cow and calf, to identifying and treating illnesses such as scours, pneumonia and bloat.
With over 300 pages of information, black and white photographs, and pencil-drawn illustrations, this book will be a great resource to help familiarize yourself with the calving process.
An essential guide for any cattle-keeper serious about raising and caring for a herd, this book holds a wealth of information and personal stories on a wide variety of topics. It’s the kind of book you’ll want to spend the evening curled up with, just soaking in the personal stories and information.
In the beginning, you’ll learn about the basics of good herd management, including immunity, vaccinations, stress minimization, illness and treatments, and proper seasonal herd management.
Thomas dives into everything from bacterial and viral diseases to bloat, hardware disease, pinkeye, warts, shipping fever, foot rot, lump jaw and a variety of udder ailments.
Within these 370 some pages, you will find helpful suggestions, explanations and preventive measures to take in the future, along with black-and-white photos and pencil illustrations. This is a great resource to keep in your barn office or homesteading library.
A more in-depth look into the specific topic of grazing, Flack provides a compact book with over 200 pages of beautiful color photographs and chapter after chapter of information on such topics as:
good pasture management
plant varieties
nutritional needs
health problems to watch for
how to set upgood grazing systems
In the back of the book, you’ll find a chart of different pasture problems you might run into, both livestock- and plant-related.
Eventually, the time will come when your cattle have reached butchering weight. Then it’s time to either haul them to the meat locker or butcher them yourself.
If you’ve toyed with the idea of harvesting beef at home, this book is a great guide to familiarize yourself with the process beforehand. It also serves as a guide for humanely slaughtering animals, methods of butchering, cutting and processing the harvested meat into various cuts of steaks and roasts, and more.You’ll even learn how to properly package and freeze your meat.
Chock full of photographs, Danforth presents an informative guide for anyone considering butchering their own beef.
Hopefully you found a book on this list that can answer the questions you might be facing, whether related to starting a new herd or tackling new approaches to caring for your current cattle. It’s good to keep in mind that, while books can be a great resource or starting place, at times the best bet is talking to a trusted rancher or local vet for practical solutions and advice. So make the most of all opportunities around you and keep your phone book handy alongside your reference books!
Please note: A book’s inclusion on this list does not indicate an endorsement of all content or advice it contains.
Even a small-scale farmer can use a helping hand now and then. And John Deere has been working hard to create smarter farms for every type of farm and every kind of farmer. The bar was set high after last year’s announcement of the self-driving tractor. CES 2023, however, saw the company reveal a few exciting devices that could change the way you grow on your farm.
John Deere Announces ExactShot
Crop success or failure is always due to a variety of factors, some outside of your control. But wouldn’t it be nice if you had someone to tell you exactly where you should plant seeds for best results?
If you are gardening or farming on a large scale, John Deere ExactShot could be that helping hand. ExactShot is a precision planting implement designed for some models of John Deere 8 and 9 series tractors. When attached to your tractor, you can rely on it to guide you to the best seed placement possible.
ExactShot uses advanced GPS technology to map out your land in real-time and determine the best spot to plant seeds. Once it determines where the seeds will best grow, you will be guided as you work with your seed drill or planter to help you plant the seeds at the right depth and with the right spacing for best output.
By planting your seeds in the best location, at the right depth, and with the best population, you can automatically increase your chances for a better yield
With ExactShot guiding you, there is less risk of seed waste because the GPS system helps ensure you plant the seeds correctly the first time. ExactShot can also help reduce your overall fertilizer usage during the growing season, as precise seed placement reduces the risk of runoff or inefficient fertilizer spread. You can also use ExactShot to track your overall growth progress so you always have a good idea of how your crops are doing over time.
Who is ExactShot for? While it’s designed for larger scale farms, it could also be used for hobby farmers with large vegetable gardens and fruit trees and other types of orchards.
If you own a John Deere tractor with excavator attachment, you know how useful that extra arm is for digging trenches and clearing land. John Deere is taking excavators to the next level by designing their first electric excavator, which will be powered by a Kreisel battery and completely electric.
Details are limited, and there is no set date for release. But this new design will reduce noise pollution and emissions while still offering the power and features you love from John Deere excavators.
Farm Equipment for a More Sustainable World
While not every farmer or hobby farmer can take full advantage of John Deere’s smart technology yet, we can all benefit from these tech advancements. John Deere has stated that their ExactShot precision planting system has the potential to save over 93 million gallons of fertilizer in corn crops in the United States alone.
This system will also reduce runoff to minimize pollution of rivers, streams and other bodies of water. The electric excavator will run more quietly and provide a more comfortable driving experience. It will also emit fewer pollutants into the environment.
John Deere is well on the way to working toward its goal of more than 20 electric or hybrid-electric offered vehicles by 2026. It will be really exciting to see what’s next.