What Do YOU Think? What are your thought about NAIS and the U.S. attempts to track and trace animals and animal disease? Share your thoughts–pro and con. Send them to hobbyfarms@bowtieinc.com. If we get enough feedback, we’ll compile your thoughts and share with our readers. Any requests to remain anonymous will be honored. Thanks!
In late December 2007, the U.S. Department of Agriculture’s (USDA) Animal and Plant Health Inspection Service (APHIS)announced the release of two National Animal Identification System (NAIS) documents:
A draft Business Plan to Advance Animal Disease Traceability, available for review and comment, and
Draft Business Plan
The draft plan provides a comprehensive look at the country’s current traceability status, including a breakdown by species and seven strategies for traceability.
These strategies involve state and federally regulated and voluntary animal health programs, industry-administered animal management and marketing programs, as well as various animal identification techniques.
Drawing from already existing systems and data reduces the cost, amount of time and effort needed to implement a national animal identification system.
Write:
NAIS program staff
USDA, APHIS, VS
4700 River Rd., Unit 200
Riverdale, MD 20737
NAIS User Guide
An official NAIS User Guide, which replaces the November 2006 draft version, was released by the USDA in December.
USDA reports having reviewed and incorporated public comments into the official version, making the document easier for readers to understand and use.
USDA says the user guide:
Gives producers information about how the NAIS works,
Tells how they can put the system to use and
Explains why participation would benefit them and their animals.
The user guide contains information on the NAIS and how to participate in all three aspects of the program: premises registration, animal identification and animal tracing.
Livestock Registration Rates Noted
The USDA in mid-December praised Nebraska for registering more than 50 percent of the state’s more than 30,800 livestock premises.
The national rate for overall livestock premises registration was at 30 percent.
States vary widely on premises registration, according to statisics from USDA’s Animal and Plant Health Inspection Service (APHIS).
Two examples:
Montana’s registration rate is 4.2 percent (835 of the more than 19,700 livestock premises USDA believes are in that state have been registered).
Wisconsin’s rate is counted as 115 percent; Wisconsin is one of few states that has its own mandatory registration requirements. It has registered 59,251 livestock premises; more than of the 51,373 USDA has listed for the state.
Texas is believed to have the greatest number of livestock premises–and according to the USDA statistics, has registered less than 16 percent.
Premises registration, the foundation of NAIS, is considered by the USDA to be fundamental to containing animal diseases.
Whether registration of premises and/or individual animals should be manadatory has been the subject of numerous debates.
Choosing the right trailer to hitch or haul your animals makes the job safer and easier. I bought our stock trailer at a large consignment auction, on a cold March afternoon, back in the mid-1980s. It was to be my husband Ken’s birthday present that year, so he didn’t know I was going trailer shopping—instead of to work—when I left the house that morning.
I spent all morning in the area of the auction yard where several dozen trailers were lined up. Some were pretty, with striking paint jobs; others were homely, with dings, dents and faded paint. There were two-horse bumper-pull trailers and big gooseneck types that could easily haul a dozen animals.
My budget was somewhat limited (as budgets usually are when you’re in your 20s), and my practical knowledge of trailers was even more limited. An “older” farmer (probably not too much older than I am today) saw me studying the trailers, and struck up a conversation.
I told him that I wanted to bid on one as a present for my husband. It didn’t take him long to realize I was a complete neophyte. He took me under his wing that day, and we studied each trailer together.
He pointed out where striking was a spiffy new paint job masking big structural problems—most likely the result of an accident, and where homely was simply on the outside of a really great trailer. As we studied each trailer, he gave me his appraisal of top price and bargain bid for each. He was my angel that day, and we still use the trailer that I purchased with his assistance.
If you’re a first-time trailer buyer, you may not have an angel with you as you go shopping, but armed with some knowledge, you will improve your chance of getting what you need at the right price.
Determine Trailer Your Needs
Norm Helmke, director of administration for Featherlite Inc. and president of the National Association of Trailer Manufacturers, recommends that before you buy a tow vehicle or a trailer, determine what you are going to do with the rig, both now and in the future.
For example, he says you should think about your payload and the conditions you will be operating under. Consider things like:
What kinds of animals will you be hauling?
How often will you be hauling them?
How many will you need to haul at one time?
How far will you be going?
Do you need storage space—and if so, how much?
Are living quarters a requirement in the trailer?
Will you drive on highways or off-road?
Will you drive in the mountains? Snow?
What about maintenance; do you have time and skill to do it yourself, or will you have it done by someone else?
The answers to these questions will ultimately help you decide on the appropriate trailer.
Helmke recommends that if you have neither truck nor trailer, you start out by shopping for the trailer that will meet your needs, and then shop for the truck that is most suitable for hauling it. If you already own a truck, you need to find out what the manufacturer’s recommended ratings are, and not exceed those when purchasing your trailer.
Know Vehicle Rating Before Choosing Trailer
When talking to truck or trailer dealers, you start to hear them discuss a variety of important ratings:
Gross Vehicle Weight Rating (GVWR): The GVWR is the amount the truck may weigh when it is fully loaded, including passengers, fuel, and payload.
Gross Trailer Weight Rating (GTWR): The GTWR is the weight of the fully loaded trailer, carrying livestock, tack and other equipment.
Gross Vehicle Combination Weight Rating (GVCWR): The GVCWR is the total weight of your fully loaded truck and trailer combined.
Gross Axle Weight Rating (GAWR): The GAWR is the rating that the individual axles can handle, and it is determined by the axle, the type of tires, the rims, and the other components within the axle-and-brake system.
The GAWR is important because it is often the rating that trailer owners are likely to exceed, causing problems as they drive. Helmke says you can avoid exceeding this rating by balancing your load front to back, and side to side. For example, one customer had a four-horse trailer with slant-type stalls so it was designed for four horses to ride in a row. This person loaded one horse into the trailer, in the very back stall, thereby placing the load behind the rear axle. He had trouble, and blamed it on a trailer problem, but by loading the trailer the way he did, he actually exceeded the GAWR on the rear axle, even though it was nowhere near the trailer’s GTWR.
Tongue weight is the last measurement you might hear manufacturers and dealers refer to, and it is the amount of the trailer’s weight that presses down on the hitch.
Types of Trailer Hitches
There are two basic types of trailers:
The tag-along (or bumper pull), which connects to a hitch receiver that is mounted to the truck’s bumper or chassis.
The fifth-wheel hitch (gooseneck) that connects to a receiver mounted in the bed of the truck.
The hitches used for tag-along trailers are further broken down into five classes. Here’s how the U.S. Forest Service classifies them in its Fleet Equipment Management Handbook (#7109):
Class 1 – All types of tag-along trailers up to 2,000 lbs. GTWR.
Class 2 – All types of tag-along trailers over 2,000 lbs. to a maximum 4,000 lbs.
Class 3 – All types of tag-along trailers over 4,000 lbs. to a maximum 6,000 lbs.
Class 4 – All types of tag-along trailers over 6,000 lbs. to a maximum of 10,000 lbs.
Class 5 – All types of tag-along trailers up to 14,000 lbs.
Class 1 and 2 hitches are insufficient for pulling any kind of livestock trailer. Class 3 hitches are the minimum that will do the job, but they are limited to hauling a two-horse style trailer; for any trailer that is larger than that you must have either a Class 4 or Class 5 hitch. Class 3 hitches may have a weight distributing design, and Class 4 and 5 both utilize weight-distributing mounting brackets to transfer the weight to all of the truck’s wheels.
The fifth-wheel hitch takes more of the weight off of the trailer and transfers it to the truck as it centers the hitch over the truck’s rear axle. This increases the GTWR you can pull by transferring a greater percentage of the trailer’s weight to the truck. Fifth wheels also have more stability and a better ride, as well as a decreased turning radius.
Disadvantages to the fifth wheel include: higher profile than tag-along trailers; the hitch might limit use of the truck bed; the fifth wheel can’t be towed by SUVs or vans; and the up-front cost (which tends to be significantly higher than acomparable tag-along).
As a rule of thumb, the tongue weight for a hitch is one tenth the maximum GTWR. Too much tongue weight for the hitch system can cause the front of the truck to lift up, possibly resulting in suspension or drivetrain damage to the truck.
Trailer Features: Contruction, Safety
Today’s trailers are constructed using aluminum, steel or a combination of an aluminum skin over a steel frame. Aluminum doesn’t rust and there’s minimal maintenance, so it tends to have a longer life span than steel or steel/aluminum.
It’s also lighter than steel by about 25 percent, so it improves mileage. All-aluminum trailers have higher resale values, but they cost as much as 50 percent more up front than a comparable steel trailer, and they have higher insurance rates.
Steel trailers are durable, particularly if you will be hauling off-road or on gravel roads, and durability is an important selling point if you will be hauling animals that are rough on their surroundings (for example, if you will be hauling bison or range cattle). In spite of their durability, steel trailers require more maintenance, including repainting. Dents that are not repaired will quickly rust.
The combination trailers cost more than all-steel models and less than all-aluminum trailers. Although the skin doesn’t deteriorate as quickly as un-maintained steel, it may have problems with “electrolysis”—a type of potentially serious corrosion that occurs where the aluminum skin and steel framing meet.
John Hall, director of corporate communications at Featherlite says it is important to consider safety features when shopping. You need the windows to be sturdy and large enough to affect good airflow in the trailer.
“Mats, which should be thick rubber, are particularly important—especially if you are transporting horses any distance—because it reduces fatigue on the animals’ legs, causing them to be calmer and more rested when they arrive,” Hall says.
There are some other safety features to look for as well:
Check that latches and connecters are easy to operate.
Good lighting, both inside the trailer and outside, is important.
Enclosed wiring harnesses reduce light failures due to corrosion.
Resin coatings on chains and rings will reduce noise, which makes the ride less stressful for animals.
What to Know When You go Trailering
Towing a trailer is not a simple matter; any mistakes or problems can lead to tragic consequences for you or your animals. The gross trailer weight and the tow vehicle’s capacity, as well as the connection between the trailer and the tow vehicle, must all be compatible. The trailer and the truck must be in good repair. Live animals are even more challenging to tow than a trailer with dead weight (like a car or a boat), because animals tend to move around and shift their weight during the trip.
Also, you need to consider some of the legal and liability issues associated with trailering. Generally speaking, most livestock trailers that are operated for personal use are exempt from the Federal Motor Carrier Safety Regulations. But if you are crossing state lines and are operating a commercial stable, or hauling animals for shows, sales or rodeos with intent to profit, or hauling horses that you will be training for compensation, you may fall under the “commercial ventures” language of this United States Department of Transportation regulation, meaning that you will have to comply with its terms. If you fall under this regulation, you will be required to have a commercial driver’s license (CDL) and you will have to maintain a logbook and have a medical card, as well as suitable safety equipment.
Some states may require a CDL, even if you are exempt from the federal regulation, if the GVCWR of your trailer and truck exceeds 10,001 lbs., a weight that is fairly easy to exceed with anything above a two-horse bumper-pull trailer. Your state may have an exemption from CDL requirements—called a farm exemption—if you strictly trailer within 100 miles of home. Check your state’s requirements.
Jennifer Brooks of Gloria Walker & Associates, an insurance agency in Raymore, Mo., specializing in farm and ranch insurance, including trailer coverage, says, “Between your truck, your trailer and your animals, you can easily have up to $100,000 tied up every time you pull out of the driveway! With that kind of investment, it is important that you make sure the coverage and liability limits are adequate before you begin trailering.”
Brooks explains that typically your truck provides the liability coverage for your trailer, but comprehensive and collision on the trailer are separate. To complicate matters, contents of the trailer are not covered under these policies.
She illustrates with an example: “Let’s say that you are driving along with your trailer and have an accident that is your fault—maybe the trailer comes unhitched and goes down the road and whacks another vehicle. The regular auto insurance liability coverage that is on your truck is what would cover this accident from a liability aspect. In other words, your regular vehicle policy will pay the other driver’s expenses and damages.
But, if the trailer has sustained damage, it won’t be covered unless you have a comprehensive and collision policy specifically on it—your vehicle collision and comprehensive won’t pay for your trailer.
If your animals were injured or killed in the accident, they would not be covered by either your regular auto policy or the trailer policy, so to cover the animal-related losses, you would need a livestock medical and mortality policy. And finally, if your tack or other personal property was lost or destroyed in the accident, those items would have to be covered by your homeowners policy.”
The rate for trailer coverage depends on the state and county you live in. For full coverage, which includes comprehensive, collision and theft, you can expect to pay somewhere between $100 and $500 annually, depending on the value of the trailer and your location.”
This article first appeared in the May/June 2004 issue of Hobby Farms magazine.
March is an excellent time to run a pre-season safety check of all machinery and equipment on your farm.
Getting the tractor out of the barn in early spring — especially if you live in a cold climate — is nearly as big an event as the first sprouts in the garden or buds on the trees.
If your farm tools and equipment have been mostly in storage during the winter months, check out this list of basic tips to get them ready for the growing season.
Tractors and Equipment Checklist
If you haven’t already, adjust brakes, clutches and drives, according to the manual. Make sure they’re in working order.
Ensure steering, ignition and exhaust system are in top condition.
Check and/or change the fluids (differential, transmission and hydraulic fluids oil etc.) to ensure purity and removal of water that may have condensed.
Check the cooling system. Look for for cracks from freezing and leaks.
Check all rubber hoses and plastic parts like fans for cracks.
Belts may become brittle and crack. Replace them if they are worn. Check that belts and pulleys are at the proper tension. This reduces slippage.
Check that intake guards and shields on grain augers secure.
Check that all power take-off units have shields and are back in place if they were removed.
Sources: Iowa State University Extension, Utah State University Extension, National Ag Safety Database
For those who believe the NAIS plan is extreme, especially for small farmers, and fails to protect the privacy and traditional rights of farmers, there’s good news:
In early June, U.S. District Court, District of Columbia, ordered the Department of Agriculture to suspend the effective date of NAIS, which is its plan to identify and document animals in the U.S. (Read the Federal Register notice on the suspension)
The court action was the result of attorney Mary Zanoni’s lawsuit seeking information under the Freedom of Information Act (FOIA). She claimed the USDA was collecting records under NAIS without complying with the requirements of the Privacy Act.
Since the District Court ruling–and in chorus with the its finding-a group of 11 individuals, representing various livestock and other associations, sent a letter to members of the U.S. Senate Committee on Homeland Security and Governmental Affairs.
The letter details the reasons–such as improper attention to privacy rights and several states taking protective steps–which they believe make USDA’s procedures related to NAIS improper, if not outright unlawful.
In case a family member or friend still needs a nudge in the right direction–or if you’d like to increase your own recycling rate, now’s the time: the 11th America Recycles Day is November 15.
Consider this Data
The national recycling rate is 33.4 percent, which means we recycle about a third of the items we discard.
Americans in 2007 recycled and composted 85 million tons of the 254 million tons of total municipal solid waste produced.
RESULT: This saved the energy equivalent of more than 10.7 billion gallons of gasoline and prevented the greenhouse gas emissions equivalent to 35 million passenger vehicles.
Each person produced 4.6 pounds of trash per day, of which 1.5 pounds were recycled or composted.
Recycling has increased slightly over 2006, when people recycled and composted around 82 million tons of the 251 million tons of total municipal solid waste produced.
Recycling reduces costs to businesses.
Recycling creates jobs. WHY? The American recycling and reuse industry is a $200 billion dollar enterprise involving more than 50,000 recycling and reuse establishments, employing more than 1 million people, and generating an annual payroll of approximately $37 billion.
Source: EPA’s 2007 Municipal Solid Waste Characterization report
More than 35 states are holding America Recycles Day events, with state and local governments, non-profit organizations, and large industry partners promoting recycling efforts.
Dos and Don’ts of Recycling Get to know what should and should not be recycled.
Your local public works department or recycling organization should have the details. In general, the National Recycling Coalition has a few things to keep in mind:
Cleanliness counts Rinsing cans and keeping boxes out of the weather makes them easier to process. That keeps costs down.
Be an accurate recycler. A cereal box is probably great, but a greasy pizza box may not be. Check the lid of your recycling bin for guidelines, or make a call or visit your municipal Web site to find out the rules and follow them.
Good bets Here are some sure-thing recyclables:
Steel cans
Aluminum cans
Newspapers, magazines, catalogs, junk mail
Plastic beverage bottles
Milk jugs
Glass bottles and jars
Cereal boxes, other clean and dry cardboard boxes.
Probably not Don’t recycle these:
Plastic grocery bags
Styrofoam
Lightbulbs
Food-soiled paper
Wax paper
Ceramics
DO Recycle Electronics Recycle your old computers and cell phones. Check out Dell, Staples, and Waste Management/Recycle America websites for information on how you can recycle these items.
Hazardous wastes have their place Household hazardous wastes like paint cans, motor oil, antifreeze, car batteries, pesticides, pool chemicals, etc., usually need to be disposed of separately. Again, check your community resources and guidelines –or check out this great website>>
Coping with the effects that dry weather or drought has on your crops and/or livestock can become a reality for any farmer, livestock owner or gardener.
Don’t forget to take care of yourself. Talk about any feelings of anger, frustration and related stress rather than isolating from family or neighbors.
Compiled below are tips to help you prepare and manage with drought and dry weather. Your local university cooperative extension office can also offer guidance.
General Drought Preparedness and Response Tips
Examine your water use efficiency and irrigation needs. Look carefully at irrigation systems as a long-term investment.
Keep up-to-date forage inventories. Your local feed representative or agricultural agent can help.
Consider alternative on-farm related businesses. Diversification can be a good long-term approach to revenue shortfalls from drought. Some ideas: alternative crops, alternative livestock, non-production farm-related ventures such as camping, fee hunting/shooting preserves, farm vacations, bed and breakfast establishments, summer camps on the farm, herd sitting, farm markets or home-based enterprises. Contact your cooperative extension office or your Small Business Development Center for information.
If you’re hit hard by a drought consider the following:
Discuss financial and feed assistance in the early phase of a drought.
Adjust fertilizer rates based on lower yield expectancy.
Protect livestock from heat. Call a veterinarian if heat stress is a concern.
Cull unprofitable cattle.
Source: University of Wisconsin Cooperative Extension.
Water Saving Tips
Here are some water-conservation techniques for your garden:
Use correct watering techniques: Water early in the day to reduce evaporation loss. Water less frequently, but for longer lengths of time, to encourage deep root growth. Check hoses for leaks before watering plants, and position sprinklers so they water only plants — not the road or house.
Condition the soil: Adding organic matter to clay and sandy soils will increase the penetrability of clay soils and the water-holding capacity of sandy soils.
Mulch the soil surface: This helps cut down on water loss due to evaporation. A two-inch layer of mulch or compost is recommended. Apply mulches to shrubs, trees, annuals, vegetable gardens and even containers.
Collect compost for mulching: Use food scraps, yard trimmings, and other organic waste to create a compost pile. Compost is a rich soil amendment that can help increase water retention, decrease erosion and replace chemical fertilizers.
Shelter container plants to conservewater: Move containers to areas with partial shade to keep them from drying quickly in hot windy areas.
Install a drip or other water-conserving irrigation system: An irrigation system can save up to 60 percent of all water used in garden care.
Discourage competition: Eliminate weeds to discourage competition for water. Consider a landscape fabric between the soil and your mulch to further reduce weeds.
Use barrels to collect rainwater: Use it to water plants.
Sources: Maryland Department of the Environment; Environmental Protection Agency
Livestock: Protection and Management
Heat Protection:
If animals are kept outside, provide shade during hot weather.
Swine may sunburn during hot, sunny weather. Sun shades can cut the radiant heat load and pasture wallows are also effective for sunburn protection.
Turn cows outside at night to cool them and cool the barn.
Maintain access to water. Provide automatic drinking cups.
Keep water containers clean.
Adjust the drinking space for the size and number of animals in the pen or group.
Check the water delivery systems periodically for plugs or other problems.
If necessary, spray water on animals to cool them.
Keep an eye on animals; monitor body temperatures.
Your county agricultural agent, ventilation specialists or your veterinarian can offer expert advice.
Watering Requirements Water requirements may increase to double the normal intake for animals during hot weather. Clean, fresh water is important. Your extension office or veterinarian can offer some watering estimates.
Feed Requirements Farmers unable to afford additional feed may face an emergency situation. Some considerations include:
Develop an inventory of livestock numbers and feed supplies to plan for current and long-term feed needs.
Two major options when facing a feed shortage are to: a) Buy or obtain additional feed. Feed assistance may be available from relief groups, the ASCS or through loans.) Sell non-essential animals. The money received can help buy additional feed for remaining animals.
Plant alternative crops for forage.
Source: University of Wisconsin Cooperative Extension
Completed forms may also returned by mail using the envelope you received with your form.
Data from the Census will be compiled and reports releases beginning in February 2009.
“More than two million responses have already been received,” says Agriculture Secretary Ed Schafer. “I thank those who have … However, a good number of producers have not been heard from, so I’m encouraging everyone to help make this the most accurate Census of Agriculture on record.”
More Information Visit the Ag Census website or call toll-free 888-424-7828.
What Grows on Trees Cherie Langlois muses about lemon trees and other trees that provide food. More
Here are our favorite ways right now for farmers of all sizes, both urban and rural, to honor the land we live on.
In Garden, Field and Yard
Use a rain barrel. The typical roof on a house can direct as much as 200 gallons of water into its downspouts during a ¼-inch rain shower. In other words, they’re not just cute art projects anymore—they’ll help us save up one the farm’s most precious resources. You can find already-assembled rain barrels at many garden centers and online, or you can make your own (you’ll find step-by-step instructions in the March/April 2009 issue of Hobby Farms magazine).
Decrease the size of your lawn by 25 percent. Need inspiration, read a book about the benefits of natural grasses and plants–and even so-called weeds. Here’s a suggestion; this book is by an author who loves to see a mix of greens in her lawn: A Weed By Any Other Name: The Virtue of a Messy Lawn, or Learning to Love the Plants We Don’t Plant (Beacon Press, $23.95).
Plant a tree; make sure tree placement and type are appropriate for your region and for your property (i.e., avoid planting certain trees near electrical wires).
Avoid chemicals; instead, try one or two new ways to keep the bad bugs away from your crops.
When Rip Van Winkle went to sleep back in the 1970s, olive oil was something you cooked with occasionally. When Rip woke up in 2007, olive oil was the talk of the town: at the kitchen table, in foody magazines, in health news. And people were passionate about it.
Maybe it was the result of more folks traveling to Southern Europe and having their hearts stolen by the silvery trees with the golden juice. Whatever the reason, olive oil and olives are definitely hot.
Written records of olive cultivation date back to 3000 B.C. in Syria; from there olives spread through Egypt and Crete to the ancient Greek and Roman world. References by Homer in 900 B.C. show olives and olive oil to be important parts of the culture.
The olive came to the United States with the Franciscan fathers and followed the missions north. The earliest written record of domestic olive oil production is from 1803. The first commercial olive oil mill was most likely established in Ventura County, Calif., in 1871.
Unable to compete with low-priced oil from Europe, the California olive industry turned its attention to table olive production around 1900. Table olives dominated the domestic olive scene for over three-quarters of a century.
The California olive-oil renaissance began in the late 1980s when a small number of growers began to produce high-quality olive oil for the gourmet market. For the first time in many years, olives were planted specifically for oil. Since then, the number of acres of olives in California being cultivated for olive-oil production has risen to over 10,000. During the same period, acreage of table olives has declined, largely due to competition from inexpensive imports in the California-style black olive market.
For years the domestic olive-oil industry was essentially a salvage operation using culls from table-fruit production, but this new olive-oil industry is producing world-class extra-virgin olive oil.
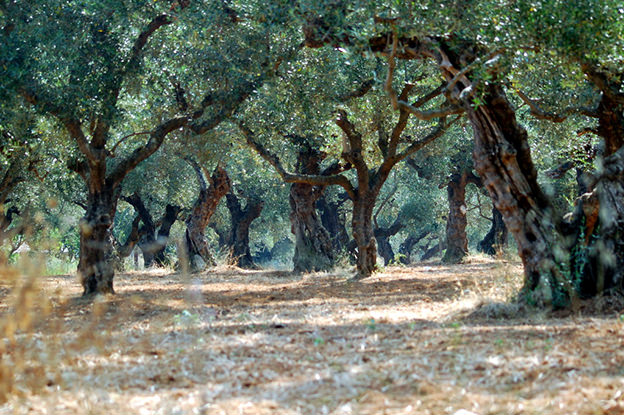
Anatomy of an Olive Tree
Robert Wallace/Flickr
Olive trees are shallow-rooted, long-lived and evergreen. Trees are sometimes hundreds of years old and have been said to live 1,000 years. The fruit is borne on wood grown the year before, making olive trees prone to alternate bearing. When supporting a large crop of fruit, a tree lacks the resources to produce much new wood resulting in a light crop the following year. This permits the tree to produce a lot of shoot growth one year and a heavy load of fruit the following year. Alternate bearing can be ameliorated with careful management aimed at supplying the tree with plenty of resources when it’s supporting a large crop and pruning when there is an overabundance of flowers (an “on” year).
Olives are largely self-fruitful, but the presence of pollinator trees can improve fruit set. This is particularly important when weather conditions are less than optimum; certain varieties should always have pollinators.
Olive trees are tough. They were grown traditionally in locations unsuitable for much else: steep hillsides, areas with poor soil and places where water was scarce. But that does not mean that olives will grow anywhere: Although tough as nails in many respects, they are intolerant of certain conditions. Temperatures below 22 degrees F can damage small branches, and large branches and trees can be killed below 15 degrees F.
Some varieties are more sensitive than others, but no olive can be considered truly cold hardy. The fruit is even more sensitive; freezing before harvest can seriously damage the crop, resulting in off flavors in the oil.
They also need moderate and fairly dry conditions during bloom in order to set fruit well. Since olives are wind pollinated, wet weather from April to June can interfere with proper pollen distribution. Extreme heat during flower formation can also result in poor fruit set. Olives do, however, require some cold (below about 45 degrees F) for proper flower development. This fluctuates greatly with olive variety. Because of the chill requirement, olives will not produce in tropical and semi-tropical areas.
Deep, highly fertile soils are not desirable for olives since they tend to produce excessively vigorous trees. The best production comes from trees of moderate vigor. As with climate, however, the ability of olives to tolerate lean soil conditions does not mean they are entirely invincible. The fastest way to kill an olive tree (short, perhaps, of setting it on fire) is to plant it in poorly drained soil. Olives hate wet feet–period. If you have drainage problems, plant something else. A common sight in olive orchards is a swath of dead trees corresponding precisely to a drainage swale.
Nutrient deficiencies in soil must be corrected and toxic levels avoided, but overall olives have modest fertility needs. Nitrogen and, to a lesser extent, potassium and boron, are the nutrients most commonly supplemented in California. Olives require 40 to 100 pounds of actual nitrogen per acre yearly, an amount that can be supplied with legume cover crops or composted manure. Olives tolerate quite a wide range of pH, from 5 to 8.5, with about 6.5 being considered optimum.
Though traditionally dry-farmed, olives that are irrigated will come into bearing much sooner (in eight to 10 years instead of 20 to 30). Careful irrigation will also help avoid alternate bearing and produce a better product. Although table olives are irrigated generously in California (fruit size increases with additional water), olive oil quality benefits from modest amounts of added water. Keep in mind that young trees will require more water to reach full production in the shortest time possible.
Farming Olives
When selecting your cultivars, consider cold sensitivity, maturation speed, intended use (table, oil or dual purpose) and desired oil style. If you’re in an area that is likely to experience colder temperatures or early frost, you should stay away from varieties known to be particularly tender or late to mature.
There are many varieties that make both excellent oil and table olives, so it’s possible to have your oil and eat olives too. The issue of oil style is extremely personal and will require that you taste a lot of different oils and decide what you like; even then, the olive cultivar is only part of the equation (fruit maturity, irrigation and “terroir” are also factors).
Dry-farmed olive trees were planted far apart, anywhere from 30 to 60 feet. Virtually no orchards are being planted on such distant spacing anymore; the more modern, “high-density” spacing is now the norm. In high-density orchards, trees are planted eight to 20 feet apart and rows spaced 16 to 24 feet apart, the average being around nine feet between trees and 18 feet between rows. This system is suitable for any variety; olives can be harvested by hand or by using a trunk shaker.The maturity of an olive at harvest can be anything from completely green to completely black (all olives turn black eventually), depending on the style of oil desired. Greener fruit yields oil that is more bitter and pungent (peppery), and that has a grassy, herbaceous character. Completely ripe fruit produces oil that is mild and buttery. The entire spectrum of colors and flavors in between is available; most oils are a mixture of green and ripe flavors, and are made from fruit harvested as it is turning color.
The super-high-density (SHD) planting system has caught on in a big way in California because of economics. The highest cost in producing oil olives has always been the hand harvest (variable, but around $300 to $400/ton). SHD allows the fruit to be harvested with modified over-the-row grape harvesters (around $40/ton) and pruning becomes the highest cost. SHD spaces the trees four to five feet apart and rows 12 to 13 feet apart, with trees topped around nine feet and trained to a hedgerow. To date, only three varieties have been successfully grown in SHD orchards because of the low-vigor/early-yield requirement. SHD also provides a speedier return on investment. High-density spacing is expected to take eight to 10 years to reach full production; a SHD orchard can be expected to bear heavily in only three years.
High-density olives are usually pruned in an open center “vase” shape. The trees are allowed to grow unpruned for the first four years and then they are opened up in the center with the removal of a few good-sized branches. The objectives are to allow sunlight to penetrate the center of the tree and to lower the canopy to make harvesting easier. The best time to prune is in the springtime when the trees are in bloom.
Pests
All the significant pests of olives can be successfully managed with products that are approved for certified organic production. Considering the value that organic status can add to a product, certification is certainly worth considering. Olives are susceptible to verticillium wilt; the fungus penetrates the root system and blocks a plants water-conducting system. It usually enters through wounds in the roots. When in doubt about a particular site, have a laboratory soil analysis done.
The two most common diseases of olives are peacock spot and olive knot. Both can be controlled with by applying a fixed-copper fungicide. The worst insect pest is the olive fruit fly. The fly lays an egg in the olive and the larva tunnels inside. The fruit is then worthless for table use and the damage tolerance for oil is around 10 percent. There are a number of effective controls available, such as setting traps and using sprays. Olives are also prey to various scale insects. These are usually minor pests, but they can cause cosmetic damage to table fruit and stress trees if severe.
Good weed management is critical when olives are young; competition from other plants while the trees are growing and filling out will slow their growth rate tremendously. After the first five to 10 years, the trees can tolerate a green cover crop as long as they are not being dry-farmed.
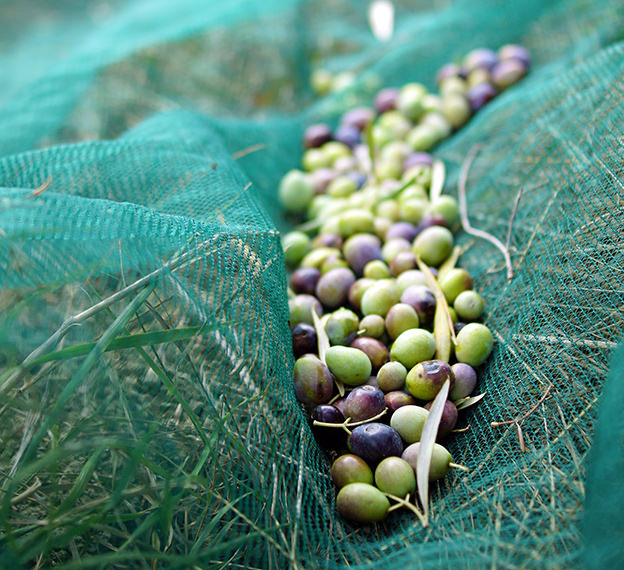
Harvest
Daniel Coomber/Flickr
The olive harvest usually starts in mid- to late-October and can continue into the new year. A large amount of harvest is still done by hand and relies on nets placed on the ground to catch fruit that has been pulled, raked, shaken or beaten off the trees. To assist hand harvest, devices such as pneumatic rakes and mini-shakers may be used.
Good fruit, harvested at the right time and processed promptly, makes good oil. The moment an olive leaves the tree, it begins to deteriorate. Fruit should be processed within 24 hours, sooner if possible. Olives that are left in bins or piles for too long begin to compost, heating up inside the pile and deteriorating quickly. This causes a very distinctive defect in the oil called fustiness.
During the past few years, the number of olive-oil mills has increased dramatically; if you’re in the olive-growing regions of California, there’s a good chance a mill not too far from you. A possible option for the isolated producer is one of the smaller mills on the market.
Olives To Olive Oil
Making olive oil is a simple process. The olives are washed and then ground to a paste, usually with a hammermill, but some mills still use stones. The paste is then stirred slowly in a warmed tank, a process called malaxation. This helps the droplets of oil combine to form bigger drops. The next step is to separate the oil from the solids and fruitwater. The traditional method used a stack of grass mats smeared with paste; the mats were squeezed to separate the liquid from the solids. The modern method uses a centrifugal decanter that spins the paste to separate solids, water and oil. A second centrifuge (a modified cream separator) removes the last of the wastewater and impurities from the oil.
The oil is allowed to settle before bottling and will often be bottled as it is released for sale because the quality of the oil is better preserved when it is stored in bulk. Oil isn’t necessairly filtered before it is bottled. Olive oil is a perishable product; its enemies are heat, light, air and time. Store it in a cool place (refrigeration is not necessary) protected from light (dark glass is best for olive-oil bottles). The longevity of any olive oil will depend in large part on its polyphenol content. Polyphenols have antioxidant properties that make olive oil more stable. An earlier harvest oil will have a higher level of these compounds, so it will tend to keep longer. A late-harvest oil will be lower in polyphenols and subject to rancidity much sooner. You can figure that an unopened, well-stored, greener-style oil will keep for about two years; a late-harvest oil will last half that long. To get the most out of high-quality, extra-virgin olive oil, treat it as a condiment rather than subjecting it to high heat.
What Makes An Olive Oil Extra Virgin?
Many olive oils in the market claim to be extra virgin, yet the price range is enormous. What’s up with that?In Europe and many other countries, “extra virgin” is a narrowly defined grade of olive oil. Standards developed by the International Olive Council (IOC) require it to be produced entirely by mechanical means (no solvents) under temperatures that will cause no alteration of the oil (less than 86 degrees F). It must have a maximum free-fatty-acid level of less than 0.8 percent (a measure of the soundness of the fruit) and a peroxide value of less than 20 meq (a measure of oxidation). It must be free from defects when evaluated by a trained sensory evaluation panel and possess at least some degree of fruitiness.
Unfortunately, the U.S. government does not enforce IOC standards for use of the term “extra virgin.” As long as the product is made solely from olives, it can be labeled “extra virgin olive oil” in this country. A petition has been filed to adopt the IOC standards for “extra virgin” in the United States. In the meantime, the playing field is anything but level for the domestic producer of true extra-virgin olive oil who must compete with low-cost imports that could never to be sold as extra virgin in Europe.
If you’re looking for a way to get rich, olives are definitely not your best bet, but opportunities do exist and the market for olive oil is growing fast. Olives are easy to grow and require little in the way of inputs. They can be integrated into the landscape as ornamentals and they are a wonderful way to add diversity to your farm.
The Economics Of Olive Oil
Bring up the topic of making money among domestic olive-oil producers and you’ll probably hear the adage, “Do you know how to make a small fortune on olive oil? Start with a big one!” Is that really the case? It can be. The costs to produce olive oil are high and competition in the marketplace is fierce (see “What makes an Olive Oil Extra Virgin?” for the import dilemma), but super-high-density (SHD) planting can greatly reduce harvest costs and bring a quicker return on investment. The yields per acre for both SHD and high-density should be similar in well-managed mature orchards, in the vicinity of five tons per acre (this can be much lower or higher depending on many variables). Oil yield is hugely variable also, from 12 to 15 gallons/ton for low-oil varieties to 40 to 50 gallons/ton for high-oil cultivars. Processing is around $400/ton.There are ways to improve the economics. Direct marketing is one; the added value of growing organic is another.
Differentiating your product from the other premium olive oils is a challenge. Consider the angles: regional loyalty (Eat Local!), uniqueness (unusual varieties), awards (medals suit any bottle), specialty table olives in addition to oil … exercise your marketing imagination! The bottom line? People grow olives and produce olive oil for many reasons. Most olive oil producers have other income, so don’t think about mortgaging the farm. But if you’re passionate about olives and olive oil, do some research and look at the scenario for your property. You may decide that money is not the biggest consideration, and that producing your own elixir of the gods is reward enough.
This article first appeared in the March/April 2007 issue of Hobby Farms magazine.
“What does YOUR garden grow?” is an activity designed to get the kids involved, but adults beware: You will be enticed.
Adults may wish they were kids again when it comes to some of the activities in the children’s area at the Bluegrass GreenExpo, held recently in Lexington, Ky.:
Live compost “layer cake” demonstration
Mini wind turbine construction
“What does YOUR garden grow?” (using recycled seed catalogs)
Yep! That last one offers yet another use for last season’s discarded seed catalogs.
Garden Activity Instructions
Grab a scissors, paper, glue and a stack of the most colorful catalogs you can find. Then create the garden of your dreams.
Jessica Ballard, who created the project, is enrolled in the Sust
Take a bunch of old seed catalogs and magazines with pictures of flowers and veggies
Pick your favorites, cut out the pictures and design a garden
Use bean and seeds to embellish your “gardens”
Grab crayons, markers, construction paper–glue it all together!
“Lots of folks got quite creative,” says Ballard.
“I even had a lady tell me that she did something like this when she was deciding on how she would landscape her yard. She took a bunch of pictures of shrubs, flowers that she wanted and tried out her design on paper first. Lotta fun.”
Studying Sustainable Agriculture in School
Ballard’s career goals reflect her passion: She says, “I’m interested in owning and operating my own self-sustaining farm in the future with veggies, livestock, and perrenial crops.”
At the moment, Ballard educates young people (and the public) about local food, local food programs, and organic gardening and farming.
She says, “I would most love to offer hands on learning experiences in the garden by possibly helping to establish some classroom gardens or working in community gardens. I am also interested in getting involved with agritourism efforts.”
University of Kentucky College of Agriculture Sustainable Agriculture Program. The degree focuses on three pillars of sustainable agriculture:
Environmental stewardship
Social health of communities
Economic profitability
The goal is to promote systems that integrate all three. Students may also have an interest in local food production through minimal impact or organic farming systems, and raising social awareness of environmental and economic costs associated with many conventional agricultural practices.
Cherie Langlois and Sue Weaver, two Hobby Farms contributing editors, share two holiday craft traditions and Sarah Coleman, managing editor of Hobby Farms, offers Santa-making ideas (including one with a goat-fiber beard) and more holiday cheer.
One-of-a-Kind Festive Farm Animal Cards Sue Weaver has a great holiday card-making idea for hobby farmers.
Our favorite holiday tradition begins in mid-November when we shoot pictures of our animals decked in festive attire.
We pick our favorites (the donkey decorated with blinking Christmas tree lights? The ram with the homemade wreath around his neck?) and make prints, then the fun begins.
Using blank deckle-edged Strathmore cards, rubber cement, Christmas stickers, and felt tip markers, we design a special card for each of our friends.
Are they fancy? Not at all. But they’re unique, and each is a one-of-a-kind.
~ Sue Weaver
Christmas Yarn Dolls Cherie Langlois and her 15-year-old daughter Kelsey tell us how to make Christmas Yarn Dolls.
photos by Kelsey Langlois
Each holiday season we bring out our yarn box and create old-timey yarn dolls as gifts or just for fun. With this craft, you can set your imagination free, making dolls of every size, color, and texture. Add handmade or craft store-bought wings and you’ll have a beautiful yarn angel to adorn your tree.
Here’s all you need:
A book (rectangular, not square)
Two colors of yarn
Scissors
Wings, if making an angel
To form the body, wrap one color of yarn around the book long-ways twenty to thirty times. Carefully cut all the strands at one end and lay the bundle aside.
For the hair, wrap your second color around the book short-ways the same number of times. Cut as in step 1.
Place the two bundles across each other at the center.
Take the two ends of the bottom bundle and pull them up so they’re even. Pull the two ends of the second bundle down (enlist a helper, if needed). Lay down the two interlocked bundles or have your helper hold them.
Cut a piece of yarn, tie it tight around one bundle above where it joins the other bundle. Repeat with the other bundle. You now have a head with hair and a bunch of yarn hanging down.
For arms, make another yarn bundle the same size and color as hair. Tie with a yarn string about ½-inch from one end. Now braid for about four inches. Tie again at the other end and trim to ½-inch.
Divide yarn beneath the head, center arms in between, and add wings, if making an angel. Close strands below the arms and tie off with yarn “belt.”
For a skirted doll, trim the uneven yarn ends and you’re done! If you want the doll to wear pants, separate the yarn, then braid and tie off the sections to create legs.
~ Cherie and Kelsey Langlois
No Place Like Home … Sarah Coleman reflects on home and old and new holiday memories.
Santas … of All Sorts Every year for as long as I can remember, my mother and I have made some form of Santa; whether it be a 6-foot tall paper mache Santa formed from chicken wire or Santa ornament, something new and Christmas-y has always graced our farmhouse.
Once we turned an antique quilt into a stocking that featured a Santa with a real goat fiber beard (goat fiber courtesy of the Leicester Longwools from Ann Brown in Kentucky!).
~ S. Coleman
Since my mother is a night shift ER nurse, her schedule is always a bit crazy—when I finally make it home from wherever I’m living, she takes all manner of cookie dough out of the freezers and we bake and bake and drink tea while we catch up on life. I have always been the official “Pitzelle maker!”
On Christmas Eve, it’s usually just my father and I while my mom works a 12-hour shift; something I dreaded as a child (I had to wait for her to get home to open gifts!). But now ask her to do so the younger kids might have their mother home for the holidays.
To me, nothing says “home” like pulling in the driveway, tires muffled by snow, to the sight of our house aglow with Christmas lights, the barn and milkhouse with big welcoming wreaths, and the smell of a fire lingering in the crisp, winter air. There literally is no place like home.


 How Do I Complete My Census?