You can celebrate Farmers’ Market Week–every week–by visiting your local farmers’ market. And adding their farm-fresh produce to the food you serve at mealtime.
For specific information about organic farmers, read a report on “Organic Produce, Price Premiums, and Eco-Labeling in U.S. Farmers’Markets” by the USDA Economic Research Service.
Key Findings:
Participation of organic farmers in markets. Finding: Steady numbers to slight increase.
Demand for organic products. Finding: Medium to strong demand in more than 80 percent of markets interviewed.
Advertising strategies used to highlight organic products.
Price premiums charged for organic products. Finding: varies according to market location and presence of other organic farmers, but generally higher prices is a perception rather than a reality.
Whether it’s the whiteflies blanketing your tomatoes or those squash vine borers worming their way into the pumpkin patch again, you’re probably already well acquainted with the bad guys in your garden.
The good news? You don’t have to rely on synthetic or organic pesticides to be rid of insect pests. Turns out, there are plenty of good guys out there—including ladybugs, nematodes and lacewings—that are perfectly happy to work for you.
Such beneficial insects naturally reduce the numbers of many other, not-so-beneficial bugs, either:
by preying on them directly or
by parasitizing them—laying their eggs in or on the host insect of their choice.
Gardeners looking to quickly boost the numbers of beneficials in their own gardens can purchase both predatory and parasitic types from specialty retailers, but, to use beneficial insects most effectively, you’ll need to know a bit about their life cycles and eating habits.
In other words? Knowing just what kinds of insect helpers to enlist really depends on what sorts of insect pests you’re fighting.
Predatory Insects Here are some of the most popular and effective predatory beneficial insects.
Ladybugs For aphid infestations, ladybugs are especially useful. Both larval and adult ladybugs will eat thousands of aphids as well as many soft-bodied beetle larvae, whiteflies, mites and thrips.
Although they’re among the most widely used of the beneficials, not just any ladybugs will do. Look for the native species, Hippodamia convergens, and, even though they are more expensive, opt for preconditioned ladybugs. By feeding them just long enough that they’re ready to lay eggs, insect supply companies “precondition” ladybugs to linger in the areas where they’re released. To further discourage your investment from flying off, you can spray the plants on which they’ll be released with water and then, because ladybugs don’t typically fly at night, turn the insects loose at dusk.
Green Lacewing Larvae Since green lacewing larvae are not yet winged adults, you needn’t worry that they’ll fly off—at least not right away. As long as they are around, they’ll prey on mealy bugs, spider mites, scale, whiteflies, thrips and aphids, too.
About 5,000 green lacewing eggs will cover an acre and, during its two- to three-week predacious period, each green lacewing can eat hundreds of insects a day.
Praying Mantis Known for its voracious appetite, the praying mantis also has its merits in the garden. As they’ll eat virtually any insect they can physically overcome, they’re handy to have on hand for those particularly bad Japanese beetle years.
The only problem? Praying mantids don’t discriminate. Not only will they eat your other beneficial insects, but also, if food is scarce, they’ll even go after one another!
A single praying mantis can grow to be four inches long, and just one praying mantis egg case will hatch between 100 and 200 young. The egg cases are available from GardeningZone.com; the on-line retailer recommends placing two egg cases per every 3,000 square feet.
Parasitic Insects Here are some of the most popular and effective parasitic beneficial insects.
Parasitic wasps They won’t sting, but parasitic wasps do effectively combat over 200 species of caterpillars, including tomato hornworms, squash vine borers, cabbage loopers and bagworms. Just don’t expect to see them in action.
The wasps are so tiny that three or four of them will fit on the head of a pin. The way they work? Adult females lay their eggs inside the eggs of the insect pests, and, when parasitic wasp larvae hatch, they feed on the host egg.
Planet Natural sells 5,000 parasitic wasp pupae per one-inch-square paper tabs; releasing just one square’s worth covers 5,000 square feet in the garden.
Nematodes As with parasitic wasps, beneficial nematodes are tiny, but they also pack a punch.
The tiny roundworms parasitize the larvae of over 250 kinds of insects by boring into the bodies of soil-dwelling grubs like cutworms and Japanese beetle or flea beetle larvae.
More than one million nematodes will fit onto a two-inch sponge and will cover about 3,000 square feet. Nematodes are dispersed into the garden by way of a hose or watering can. Once established in the soil, nematodes can live up to eight weeks.
Planning, Storage and Care Suggestions No matter which predatory or parasitic insects you decide will work best in your garden, be sure to ask for rush delivery, and follow any accompanying release instructions carefully so that you’ll get the most benefit for your buck. In some cases, you can refrigerate beneficials; for example, if you’d like to use successive groups of ladybugs, they can be put into cold storage for a month or two.
Aside from plenty of insect pests upon which to prey, beneficial insects also require a water source. A terra cotta saucer filled with a little water makes a fine bug bath.
Beneficial insects also need nectar and pollen; by always having something in bloom, you’ll be more likely to sustain their populations from early spring through late summer.
Natural Attraction In fact, better than buying beneficial bugs when you need them is naturally attracting them to your garden for free by including a wider variety of the types of plants they like.
For instance, parasitic wasps are typically drawn to flower heads comprised of multiple, smaller flowers. As such, growing herbs like dill, fennel, coriander, parsley and thyme should keep the tiny parasites from straying from your garden. Several good sources of nectar and pollen for ladybugs, lacewings and other beneficials include bee balm, calendula, clover, daisies, lobelia, sunflowers, asters and coreopsis.
Still not sure just where to start? Suitable for planting in garden borders or even between plant rows, March Biological’s “Bug Blend” seed mix contains evening primrose, red, white, and crimson clovers, yarrow, alyssum, black-eyed Susans, and more.
Finally, whether you purchase beneficials outright or choose to attract them one by one, plan to swear off insecticides — even the all-natural kinds — since they’ll kill the good guys along with the bad.
About the Author: Susan Brackney writes about gardening, beekeeping, environmental affairs, the natural world and more from her home in Indiana. www.susanbrackney.com
So few growers might indicate an opportunity for new farmers who are looking for a major year-round crop. After all, mushroom prices stay fairly steady, and customers are loyal. But any would-be mushroom farmer better know what he’s doing.
Today’s big fungi farmers operate expensive, labor-intensive businesses. Those less-than-300 growers produced over 800 million pounds of mushrooms last year. They’re well capitalized, and have large established sales and distribution systems that certainly intimidate new entrants to the market.
On the other hand, while a farmer who grows only a hundred logs of mushrooms may not be counted as a full-time mushroom grower, he can still enjoy profit from his crop. A rustic farmer who sterilizes his compost in a barbecue pit and raises only 12 beds in his basement won’t qualify as an official mushroom grower either, but he’ll likely enjoy a ready local market for his crop.
Mushroom farming is not for everybody. It takes a knack and careful attention to important cultural details. Whether you’re considering building a large commercial Agaricus facility or growing a few Shiitake logs in the barn, profitable mushroom farming, like raising any farm crop, is a just a matter of hard work and careful procedures.
Mushroom farming is a lot like making cheese. It’s a delicate balance in which farmers must variously encourage and suppress the growth of desirable and undesirable microorganisms.
Organisms that support the mushroom bloom must be made to grow, and those that can spoil crops must be halted. Successful mushroom farming on any level is about establishing the procedures that ensure the right balance of control.
Even the seasonal mushroom growers who do not use climate-controlled environments have to maintain a strict adherence to bed preparation and mycelial growth procedures.
One key to any new mushroom-growing operation is good record keeping. As new growers experiment with different techniques in an effort to find the most productive methods for their farm, good records will allow them to more easily duplicate their most successful attempts.
Create A Mushroom-Growing Medium
Forest Farming/Flickr
The mushrooms we see on top of the surface are the fruits of plants made up of thin, threadlike cells called mycelium. Just as tomatoes are the fruit of tomato plants, mushrooms are the fruit of organisms that spend most of their lives in the form of a mycelium.
The basis of any mushroom-growing operation is the growing medium that supports this mycelium.
Mushroom fungi are saprophytic, which means that they eat dead plants rather than produce chlorophyll to trap energy from the sun like common green plants. They do not grow well in regular soil, but prefer more fiber-filled environments.
There are two basic categories of cultivated mushrooms:
those that prefer composted materials, like Agaricus (button mushrooms), and
those that prefer woody or straw-type mediums, like Pleurotis (oyster mushrooms) and Shiitake mushrooms.
For the new farmer, the wood and straw types are the easiest to grow. To decide what species of mushrooms you will grow, you must first know what sort of medium you might use. For example, to try to grow Portobello mushrooms on cotton waste would be difficult, but Pleurotis mushrooms would thrive.
Types of Growing Mediums
Plant Chicago/Flickr
Most U.S. commercial growers produce button mushrooms in tiered beds of compost that are housed in climate-controlled rooms. A fair amount of European farmers grow crops on hay bales in darkened greenhouses. Many Asian farmers grow their crops in rooms full of thousands of glass jars filled with spent barley husks. Tall plastic bags of straw are hung from the ceiling in some other facilities.
Many growers are now growing their crops on cut tree logs, either inside or in outdoor, open sheds. Probably the most popular new method is to grow mushrooms in plastic bags filled with sawdust. New growers can take their choice of designing a system that fits their situation, or following the methods of an established grower.
The basic requirements are the same: Growers must provide a controlled medium on which the mycelial growth can spread.
It’s no surprise then that a grower’s ability to locate a steady supply of the base materials they use to prepare their growing medium is a key point.
A nearby dairy farm, a field-crop refuse supply, or a relatively inexpensive source such as animal fodder or processing waste, are all possible material sources. Smaller growers may weigh the cost of slightly more expensive materials such as stove pellets or feed cubes.
Compost
The historical method of medium preparation is to make compost from hay mixed with animal manures. The composting process encourages the growth of microorganisms that pre-digest some of the organic materials and make the food within them more easily obtainable for the young mycelium.During the first stage of composting, material is turned and watered every few days. At the end of the composting process, the heat produced by decomposition is allowed to accumulate in order to dissipate excess ammonia and kill undesirable pest organisms.The goal of mushroom composting is to create a uniform material. Large-scale compost production requires a constant flow of raw materials and a fair amount of handling equipment and processing experience. In today’s more ecological-conscious society, many outdoor composting facilities are under pressure to maintain strict odor-free and non-polluting programs.
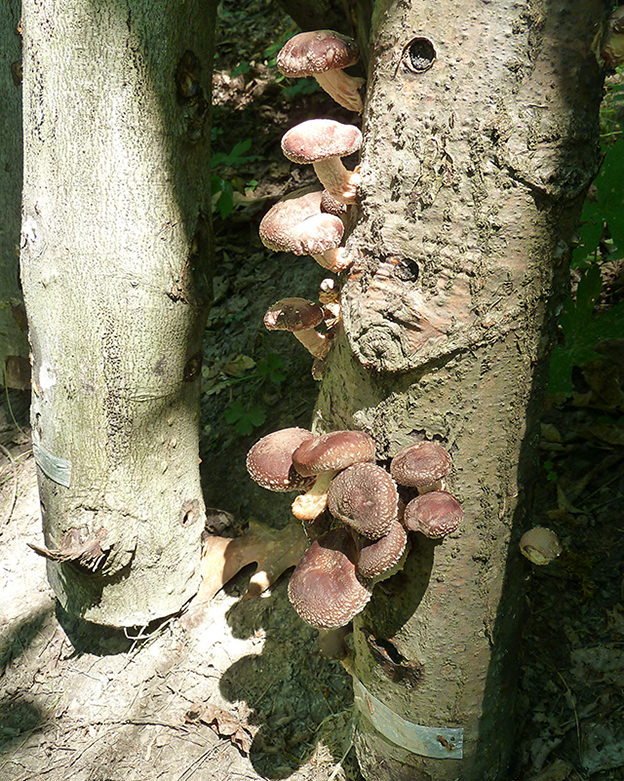
Logs
Shiitake mushrooms have traditionally been commercially produced in beds or bags of sawdust. But today’s market believes that Shiitake mushrooms grown on logs taste better, so many commercial growers are now converting parts of their operations to log culture. This is feasible for farmers who have a steady supply of logs from their own brush clearing or woodland management efforts, but the cost of buying logs decreases the chance of profitability.Logs to be used must come from hardwood trees. Oaks are generally the most commonly used, but beech, liquidambar and sycamore also grow good crops. Walnuts and conifers contain oils and resins that make them mostly unsuitable, and eucalyptus and cedar logs actually repel mycelium growth.The logs need to have a diameter of at least four inches to be a reliable growth medium. Small logs will mature the mycelium more quickly, but growth will not last as long as larger logs. The logs must have a relatively high moisture content, and cannot be allowed to dry out. Fresh-cut logs are preferred for this reason. In addition, fresh-cut logs are less likely to have other fungus organisms already growing on them.Logs are “inoculated” by inserting bits of young mycelium or “spawn” material. An inoculated log generally needs a year to allow mycelium growth before fruiting can begin. Logs that are in a fruiting stage can be shocked into production by soaking in ice-cold water for a day. Logs are usually fruited for a month or so, and then allowed to rest for several months before they are shocked into production again. A log will produce mushrooms for many years unless allowed to dry out.
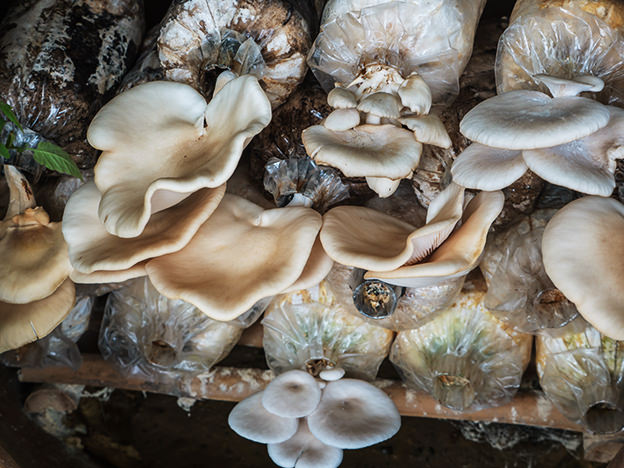
Straw and Sawdust
Growers of Pleurotis mushrooms have been using straw in various formats for many years. Abundant supply and inexpensive cost make straw a desirable growing medium. Growers that use straw in a baled form also save on handling costs by not having to repackage the material prior to inoculation.Sawdust is a newer growing medium. It wasn’t until after the button mushroom industry was well established that western growers discovered a whole group of mushroom species that preferred sawdust to traditional compost beds.Once Shiitake and Pleurotis farming became more popular, growers started inventing many different methods for handling the sawdust. Today’s straw and sawdust users enjoy the flexibility that plastic packaging allows, and most farmers stuff plastic bags or tubes full of the growing medium.
The Mushroom Growing Process
Pasteurization and Sterilization
Pasteurization is the process of heating a substance in order to destroy harmful bacteria within.The process of composting includes a final stage where the temperature is high enough to accomplish pasteurization. But most other growing mediums must consider a process of purification that is even more intense: sterilization.Conventional steam sterilization uses high temperatures and generally kills everything in the mixture, even some possibly helpful organisms. Large ovens are a common means of sterilizing growing mediums. In previous years, methyl bromide and other fumigants were employed. Today, other organic methods of sterilization, such as using hydrogen peroxide, are becoming popular with many growers. Mushroom farmers have always been self-reliant and inventive.
Today’s growers are no different, having devised a wide range of custom sterilization methods including using barbecue pits to heat oil drums filled with growing medium, and using tractor motor emissions to fumigate materials.While tractor emissions certainly aren’t officially sanctioned, farmers and nurserymen have used this cheap fumigant occasionally for years by putting a vent pipe from the tractor into a tarp-covered pile of soil, then airing out the treated mixture well before using it.
Farmers must use their brains to figure out clever solutions that make use of what they have at hand, rather than simply picking procedures out of a manual. Mushroom farming, particularly small mushroom farming, seems to be a specialty of particularly resourceful and innovative growers. The successful growers are making up their own systems rather than following others’ systems. If you’re considering becoming a mushroom farmer, you too will want to put your brain to work devising a sterilization system that’s right for you.
Inoculation
Mushroom growers don’t use spores to directly start growth in the beds. Instead they use small pieces of a juvenile mushroom mycelium known as spawn. The mycelium spawn is stirred up, broken apart and mixed into the growing medium to inoculate it. Each small piece of the mycelium then grows and if properly controlled, will bear mushrooms. For growers using logs, the inoculation process includes drilling shallow holes in the logs, filling them with spawn and then plugging the holes with wax.Once your mushroom facility is up and running, to save the expense of purchasing commercial spawn, you may want to make spawn yourself by culturing pieces of mushroom cap. In general, the more spawn used in the inoculation process, the faster the mycelium will grow and the sooner the medium will be ready to produce mushrooms.
Cultivation
Once the medium is inoculated, the grower will control the environment to encourage maximum mycelial growth. This control may include slightly cooler temperatures and increased carbon dioxide levels in bed cultivation. Log growers usually leave the inoculated logs outside under a tarp for a year. Once the mycelium is mature, farmers can use a variety of methods to induce fruiting; most involve some change in temperature and humidity.
Casing
In button mushroom bed culture, there is a process known as casing in which a layer of organic material, usually treated peat moss, is spread onto the tops of the mature beds. This is odd, but it works. The casing material perhaps represents a layer of leaf mold on top of the soil. The mycelium doesn’t actually colonize the casing in the same way as the growing medium underneath, but the moist and nutrient-free casing makes a good launching area for fruiting bodies to form.
Harvest
If you’re growing in conventional beds, you’ll see mushrooms start to pop up about three weeks after casing. Similar time frames accompany other culturing methods. Shocked logs and irrigated straw bales also produce new mushrooms within a month. Once the mushrooms start appearing, they should be harvested frequently while they are producing. Growth flushes produce new fruit every week or so for a while.Mushrooms are extremely perishable and require great care after harvesting. The fruit self-destructs quickly and starts decomposing the moment it’s picked. Growers try to keep the harvested mushrooms as cold as possible to minimize deterioration, and most large outfits have storage rooms that keep the packaged crops just above freezing. Mushrooms also bruise easily, so careful harvest and handling methods must be employed.
Have You Developed a Marketing Plan?
iStock/Thinkstock
Market research, potential customer interviews and the design of product packaging systems should all occur before the first crop is inoculated.
New growers will have a difficult time competing against established outfits. Instead, new growers must find a niche market, which is likely to be the small local grocer or farmer’s market. New growers may also be able to find a spot in the value-added marketplace by incorporating their mushrooms into a cooked food product.
The demand for specialty mushrooms is booming these days. Portobellos are particularly hot right now, but that’s a difficult type to grow if you don’t already have a large compost-type facility. There’s no doubt that mushrooms are popular with consumers.
Historically, mushrooms were considered a food for the aristocrats, and both the Romans and Egyptians considered them the “food of the gods.” Since the first large-scale European mushroom cultivation in the limestone caves near Paris in the 18th century, mushrooms have been growing in popularity, and today U.S. mushroom consumption is around 750 million pounds per year.
Mushroom-growing industries are springing up in many countries around the world including Mexico and Bolivia. Huge quantities of mushrooms are grown for the Asian market, which is the largest in the world. Asian consumers also are devout believers in the medicinal value of mushrooms—over 50 different species are regularly prescribed by Chinese doctors.
Understanding Commercial Mushroom Varieties
There are two main types of mushrooms: mycelial and mycorrhizzal. Essentially all the cultivated types are mycelial and can grow wherever there is an appropriate growing medium.
Mycorrhizzal types need to grow in association with the roots of a living plant or tree. Morels, chanterelles and truffles are examples of mycorrhizzal types. There are some efforts to develop systems for growing truffles and morels, but essentially all of the commercially cultivated mushrooms are of the mycelial type.
Far and away the most commonly cultivated types are varieties of Agaricus button mushrooms; 835 of the 853 million pounds of mushrooms produced by the major U.S. growers last year were white button-cap Agaricus species. There are also many other types of cultivated Agaricus, most notably the Italian brown-capped Crimini mushrooms.
Next in line are the big brown Shiitake varieties, which are also popular dried. Wild Shiitake were originally found growing in Japan, where their name means “oak-tree mushroom.” The gray-fruited Pleurotis varieties, known as oyster mushrooms for their distinctive taste, are also widely grown. Beyond those three types there are many other popular cultivated varieties, including the Hericium mushroom (Lion’s Mane, Pom Pom Blanc) which has a crab-meat flavor, and the long-stemmed Enoki mushrooms.
If the idea of mushroom farming appeals to you, there’s no better time to get started. A bit of research, a little Yankee ingenuity, and you’ll be ready to start producing delicious mushrooms.
This article first appeared in the December/January 2003 issue of Hobby Farms magazine.
Farm fencing is a big expense, both in terms of time and money, but it’s one of the most important purchases a farmer will make, and it’s best made early in the process of setting up your farm. After all, you’ve achieved your goal of moving to the country, but without the right type of fencing for your farm, you could look out the window and see your flock of sheep and their guardian llama heading down the road, your goats enjoying the newly planted fruit trees, or your pigs digging in the neighbor’s garden. Oops!
History of Farm Fences
In the distant past, natural materials were the only available supplies for farm fencing. Then in the late 1800s, barbed wire was invented, offering the intrepid farm fence builder an effective means of creating long-standing barriers. Today, fencing technology has grown more humane and includes a much wider range of materials, from the old standbys, such as wood, to new, high-tech materials, such as high-tensile polymer rail and electro-plastic twine.
Stan Potratz, owner of Premier Fence Systems, has been instrumental in introducing many modern farm-fencing products to North America.
“While attending college in England in the late 1960s, I found a used copy of Andre Voisin’s book, Grass Productivity, which outlined the principals of rotational, or intensive, grazing,” he explains. “The college had an operating farm, and because of my background, I got recruited to work on it, and I began experimenting with the ideas. New materials were showing up in Britain at the time, like low-impedance energizers, step-in posts, electro-plastic wire and high-tensile wire.”
When Stan returned to the family farm in the late 1970s, he wanted to run sheep. He went to local farm-supply stores but couldn’t find any of the materials he’d been using in England, so he began importing them for his own use.
“My neighbors looked kind of askance,” he says. “At the time in Iowa, you raised corn and beans, maybe some hogs. But the economy of the late 1970s was good for sheep, and I was running 700 ewes using these products I’d imported. Other sheep producers became really interested in what I was doing—as did staff from some of the agricultural colleges.”
Stan didn’t intend to start a fencing supply business, but by the early 1980s, he had a viable sideline business.
Today his accidental business has grown because, as he explains, “There has been a real increase in the availability and quality of these newer fence products in the last couple of decades, both with the imported products and the domestic ones.”
Fence Laws and Regulations
Every state has laws that regulate ownership and control of livestock. In some areas where “free-range” laws are still enforced, a landowner must fence out the neighbor’s animals, but in most places, it is the livestock owner’s responsibility to control his or her animals with adequate fencing.
Fence laws typically define who is responsible for constructing and maintaining a fence, who has liability when animals get out and cause damage (including when they get on the road and cause an accident), and a description of what constitutes a “legal fence.”
Some local governments also have fence laws, which often prohibit the use of certain types of fence—for example, barbed wire or electric fence are often illegal in towns and subdivisions. Your County Extension Agent or local animal control officer should be able to provide information on the fence law in your area.
Your Existing Fence: Fix or Replace?
If you’ve inherited an old fence, you’re faced with the dilemma of fixing it up or replacing it. Some old fences still have lots of life left in them, and with just a minor amount of repairs can provide years of service. But many are more trouble than they’re worth.
To decide which category your fence falls into, take a stroll. Walk the entire fence slowly and look at its condition. Are posts rotting and falling over? Push them with all your strength; do they move easily? Are wires rusted to the point that it takes little pressure to break them? If you answer yes to these questions, scrap the existing fence. On the other hand, if the posts are still stout and firm and wires aren’t severely rusted, or if there are just one or two spots that are failing, you might be able to just tighten up an existing fence.
Map Out Farm Fencing
Before you start purchasing materials, it helps to map out your fencing project. Draw your farm on grid paper showing roads, buildings, paddocks and significant natural features, such as heavy woods, ponds and rock outcroppings.
Paddock Design
Having multiple paddocks (pasture subdivisions) to rotate livestock through improves grass management, feed quality and herd health. The more paddocks the better, but ultimately, aim for at least eight. Paddocks can be easily subdivided using temporary electric fencing to start out, though developing permanent paddocks reduces the workload. When designing paddocks, keep in mind that a square requires less fencing material per square foot than an oblong or triangular layout, though at times, these shapes work best to meet other needs, such as access to water.
Gate Placement
Gates are best constructed at the onset, and extra gates provide greater flexibility, but they also cost extra money. Plan gate layout for ease of movement, both for animals and equipment that might need to pass through. Man gates should be 4 feet wide, and equipment gates should be 12 to 16 feet wide. Show property lines, paddock lines and gates on your map. Take measurements for the lines, and mark them accordingly.
Now with your design mapped out, begin pricing materials and comparing products or contractors.
Guidelines for Fence Posts
While the type of post you choose depends on the type of fencing you ultimately select, there are some general guidelines:
Posts should be stout with about one third buried.
8 to 12 feet between posts is the usual spacing recommendation.
PVC posts generally require more concrete.
Standard metal “T” posts fit with PVC sleeves reduce impalement risks.
Wood posts should be treated with a preservative before being put in the ground. Peeling the bark is also recommended as it can harbor boring insects and trap moisture, which hastens decay.
This article was excerpted from the Summer 2002 issue of Hobby Farms magazine.
Hunting is a constant in nature. Survival of living things often depends upon the consumption of other living things.
The basic food web taught in elementary science provides a clear picture of this simple truth.
Man, the earth’s top predator, uses superior intellect and creativity to maintain his role in the environment.
However, intelligence and a complex social structure have also created a separation between man and the land.
Today, many people do not connect basic necessities to the environment—they believe that food comes from the grocery store and lumber comes from the hardware store.
As society becomes more urbanized, those who work the land to support the masses become fewer, as do those who are willing to fill the role of top predator. This article offers information about wildlife management, hunting access and hunting on small farms.
Hunting’s Role Has Changed Over Time Like society, hunting has changed significantly in the last 150 years. Before modern agriculture, the harvest of game was a critical component of survival. The Industrial Revolution began to change the place of hunting in America.
Game became exploited and viewed as a commodity; market hunting led to the slaughter of wildlife for profit. Many species were driven to the brink of extinction; some extinct, like the passenger pigeon.
Fortunately, early conservationists like Gifford Pinchot and Teddy Roosevelt, understood the error of man’s ways. By 1900, the Lacey Act was passed, which banned market hunting and started America’s wildlife management legacy.
As modern agriculture blossomed in the 20th century, hunting became referenced as a “sport” because the need for food from the wild was replaced by man’s taming of the earth.
Today, American wildlife are held in public trust, meaning they are the property of the people. Wildlife management is performed by government.
This basic concept is at the heart of the North American Model of Wildlife Management–no more can wildlife be exploited for personal gain and all law-abiding citizens have the opportunity to utilize the renewable wildlife resource.
Sportsmen and women have been leaders in the conservation of wildlife through habitat management and protection, funding and control of populations.
As man tamed the earth, many large predators were lost in their wake. Mountain lions, wolves, eagles, bears and others were eradicated from large parts of their historic ranges. The absence of these large predators left many prey species unchecked.
Because of this, man must replace the predator’s role in an effort to maintain the delicate balance of nature.
The white-tailed deer is a prominent benefactor of the lack of large carnivores. Never before have white-tailed deer numbered so many, and never before have we seen the destruction a large herbivore can wreak on the environment.
Deer have decimated forest understories, leaving them devoid of wildflowers and young trees. Overpopulated deer have been blamed for the decline in songbird populations and deer have caused extensive damage to crops, landscaping and vehicles.
The land can only support a finite number of deer. Left unmanaged, deer will decimate plant communities, crippling the land’s ability to support the herd and other wildlife. The end result can be widespread starvation of animals and/or disease.
Modern Conservation, Wildlife Management The profession of wildlife management was born in the 1930s. Aldo Leopold’s Game Management was the first professional text dedicated to the conservation of wildlife.
Nature has a way of bringing things back in balance, and the goal of today’s wildlife manager is to minimize catastrophic natural events like disease, environmental degradation and widespread starvation. Hunting remains one of the most important wildlife management tools to avoid these events. In many respects, hunters provide a benefit to society, particularly when their quarry are large herbivores like deer and elk.
Hobby farmers are often among America’s best land stewards. They are generally interested in the outdoors and working the land, but they are not reliant on the land for income. Therefore, hobby farmers are more likely to make concessions for conservation like wildlife habitat management or maximizing water quality.
Small-farm owners purchase land for a multitude of reasons: to grow crops, to raise livestock or to have a place for recreation. Some purchase land specifically for hunting, whereas others do not support hunting on their land. Regardless of the landowner’s motives, every farm should be managing wildlife for the good of the environment and their farm; hunters can provide many other services besides control of wildlife populations.
Utilizing Hunters on the Farm Historically, landowners readily allowed neighbors and the general public hunting access. Thirty years ago, a father and son or daughter could knock on a farmer’s door and gain permission to hunt. This tactic used today yields so many “no’s” that many have abandoned trying. Human population growth and America’s shift from a rural to an urban society has changed access to private property.
Also, hunters are leasing hunting rights, tempting landowners to generate income instead of allowing friends and neighbors free access to the property. Leasing can be a viable option for the hobby farmer, especially if additional dollars are needed to offset the cost of the land. However, landowners lose a little control over their property because paying hunters will generally require unlimited access.
A better solution can be bartering hunting access for other skills of hunters. This strategy gives the landowner complete control over their property and builds a sense of community. Hunters come from all walks of life and from various professions. Accountants, lawyers, carpenters, bulldozer operators, biologists, foresters and countless others can offer unique talents that could benefit the hobby farmer. Just think–a dozer operator could dig a pond and an accountant could do your taxes. Trading hunting access for people’s skills and abilities just makes good sense.
Another great way to reap rewards from hunters is to schedule workdays. Sportsmen and women have a sincere interest in the land they hunt. How the land is managed has a direct impact on hunting success and strategy. So, managing and improving habitat are tasks hunters may even ask to do. A smart hobby farmer will identify tasks that meet the goals of both the farm and the hunter.
Fortunately, many management practices can benefit both parties. Maintaining or erecting fence can keep livestock out of the woods, resulting in a healthy forest for wildlife, improved timber potential and better livestock control.
Another example is timber stand improvement (TSI). Oaks and other fruit-producing trees are valuable timber trees, so wildlife and forestry practices can work together. TSI involves a forester marking unwanted trees and a landowner removing them. Tree removal can be accomplished through herbicide application, girdling or felling. The common theme among all these removal methods: They’re all labor intensive! So you will need all the help you can get. TSI can be a great project for a group of hunters.
Finally, hunters love to plant food plots to attract wildlife. If a hobby farmer doesn’t have an interest in hunting, then he or she may have an interest in wildlife viewing. Many different species of wildlife will use food plots and hunting will not eliminate wildlife use.
Be sure to make workdays a fun, family affair. Have everyone bring a dish to pass for a potluck lunch or dinner. Also, schedule them on weekends to accommodate work schedules. A workday should ideally be four to eight hours in length, and three to four days per year is a feasible target.
Most hunting seasons take place in the fall, so the best time to plan workdays is late winter and summer. Spring can work too, but many hunters like to spring turkey hunt. For labor-intensive outdoor work, the late winter makes for comfortable work conditions. Remember, it’s your property, so if work must be done in the fall, schedule it accordingly.
Finding Hunters to Visit Your Farm Many hunters don’t knock on doors anymore, so how do you find them? Hunters are everywhere, but they aren’t wearing signs! Coworkers are a great place to start. Other options may be your church or youth groups like 4-H or Boy Scouts. Targeting local banquets of hunting organizations such as Quail Unlimited, the National Wild Turkey Federation or Ducks Unlimited can generate potential hunters as well.
If all else fails, your local Fish and Wildlife Conservation Officer can quickly identify potential candidates. You will need to find only a hunter or two because they will likely want to include their family or friends. Actually, this makes for a better arrangement since the group should get along well. Finally, make sure you “interview” the hunters to make sure his or her values match yours.
Once you’ve identified hunters, set ground rules. Rules will minimize misunderstandings and make the experience better for everyone. Be sure to personally meet every hunter that will be on your farm. Explain what you expect of them, including workday requirements. Workdays may scare off some hunters, but no matter, you want dedicated and respectful hunters on your property anyway. Make it clear that you own the land, and that you control access and activities. If you prefer to not have hunters out on a given day, be sure they understand that.
Liability Concerns According to the National Safety Council, hunting is a safe activity. In fact, hunting results in fewer injuries per 100,000 participants than do many other sports, including cycling, bowling, golf and tennis, yet liability is a common concern for landowners. The idea of using firearms generates concern for landowners and for the general public alike.
Many states have laws that protect landowners from liability for those hunting on their property. Check with your state fish and wildlife agency to be sure you’re protected. If no law exists, you may consider a waiver for the hunters to sign. Either way, hunters are many times more likely to be hurt driving to the farm than to be hurt in a hunting-related accident.
Hunting and hobby farms should exist in perfect harmony. Controlling wild populations of deer is a necessity for agricultural production, forest health and the deer themselves. Hunters can provide professional services to farmers, complete farm or habitat projects, and help minimize trespass from unwanted people and ATVs.
It’s also common courtesy for hunters to share the harvest with the property owner. There are few foods as healthy as venison or other wild game. Game is lean, with no preservatives, antibiotics or growth stimulating compounds. Not to mention that it’s delicious!
Leasing hunting rights is also a potential option, but fostering friendships on the farm will be more rewarding than simply taking a check every year. The good ole’ days of rural America were based on strong ties to neighbors and to the community. Hunters and hobby farmers working together can bring back that feeling once again.
About the Author: John Morgan is a Certified Wildlife Biologist that earned a B.S. in Wildife and Fisheries Science from Penn State University and a M.S. in Wildlife Management and Ecology from the University of Georgia. He owns a small farm in Kentucky that he manages for wildlife.
This article first appeared in the November/December 2006 issue ofHobby Farmsmagazine. Pick up a copy at your local newsstand or tack and feed store.
In nature, where there’s no common, spoken language to facilitate contact, color can send a clear message. Color speaks to the brain in a way unlike any other form of communication.
Red can be a warning for poison or a lure as food. Blue can indicate nourishment in the shape of berries or flowers. Bright green signals fresh, new plant growth, tender and tasty for hungry herbivores.
Without color, it would be difficult to see differences in nature—or in life in general. We can determine food—and definitely its ripeness—by its color; animals can distinguish predator or prey by being attentive to color variations on the body. Most living things have and use color as an identifier—skin, hair and eye colors or leaf, berry, stem and flower colors.
I recently purchased a new, Orchard Mason Bee nest block and the bee specialist recommended painting different stripes of color across the front of the many-holed block to help the bees determine exactly to which hole they were returning.
Color can move us on a profound level—think of a glorious, golden sunrise or crimson sunset, the striking contrast of a bright-yellow dandelion against its nest of rich, green leaves, or a pristine, white cloud floating in a pure azure sky.
During Victorian times, certain colors of roses were used as messages, sent to convey feelings to the recipient—red meant passionate love, white meant purity of intention, yellow could be jealousy and orange signaled desire. Color can be metaphorical, as in “green with envy” or “red with rage”; it’s used to typify different people, such as a “greenhorn,” a “redneck,” a “yellow coward” or a “blue blood.” Aliens—the proverbial “Martians”—are referred to as “little, green men” even though we now know Mars is a red planet.
The eye is drawn to color. Plants use color as a warning, an attractant or a decoration, all of which serve to ensure future offspring. Children are taught that some red-leafed plants, such as poison oak, emit skin irritants. By giving them a wide berth, humans leave them to grow and reproduce unhindered. Flowers decoratively stand out from green foliage, indicating to insects and birds that there is nectar or pollen to be found there. The bright colors entice pollinators to collect pollen, fertilizing the plant to produce fruit that turns color when ripe. Animals then eat these brightly colored fruits; by passing the seeds in their waste, new plants are spread and fertilized to begin the cycle anew.
Nature wraps itself in color seasonally: Spring brings new growth and early flower blooms, summer has a wider variety of flowers and fruits, autumn revels in a cloak of brilliant hues as the leaves sing their swan song, and winter, although bare of growth, still has much to offer the eye. We think of snow as white, but it actually has many shades of blue in it as well. Red- and yellow-twig dogwoods stand out in the barren climate, as do the berries of certain shrubs. Persimmons ripen and are vivid on branches devoid of foliage. Everywhere around us in nature there is color. So it’s only natural that we as humans, at some point, would have wanted to imitate this and clothe ourselves in a variety of colors found in nature. What better way to do this than to borrow the colors from nature directly?
An Ancient Art
The origins of humans using color go as far back as human history. Cave paintings around the world show that humans drew before they had cohesive, written alphabets. Paint was applied to the skin to symbolize characteristics of the wearer or to inspire fear or awe in the onlooker. Charcoal and various minerals were used to color pictures on ancient walls. To this day, tribes in areas of Africa mix together minerals, leaves or berries with animal fat, using the resulting paste as paint to decorate and mark caves and other dwellings.
Although quite different from surface painting, dyeing is also a very ancient art, first recorded during the Bronze Age. The clothing fibers used for dyeing have an equal history: The use of wool and linen dates back to 5000 B.C., cotton to 2000 B.C., and silk from the Orient around 2600 B.C., the same time and place from which come the earliest records of dyeing. Many different substances besides plants and foods were used for dyes, including minerals and insects, which were dried and then ground up. One of the most famous and highly prized colors through the ages was Tyrian purple, a dye obtained from certain shellfish. Deep red could be gotten from the cochineal insect, which is indigenous to South America. Because of the expense and difficulty of obtaining the dyestuffs that yielded the strongest colors, those colors became associated with nobility. This is the derivation of the term “rolling out the red carpet” as a show of great honor.
The mid-19th century brought the advent of chemical dyes, which, with their vivid color ranges, ease of use and lower costs, soon rendered natural materials less desirable and eventually obsolete. The knowledge of dyeing with natural materials was not lost, however, and the craft is something anyone can do easily, safely, and most likely with things already found in the kitchen and garden. While many of the strongest colors for dyeing textiles come from special dye plants, there’s a large range of colors that can be derived from ordinary vegetables and fruits. You’ll be surprised at what you can do.
Courtesy iStockphoto/Thinkstock Homemade paper can be made from trees on your farm, garden plants or recycled paper.
Papermaking has a long history dating back to Ancient Egyptians, who pounded certain parts of the papyrus plant into a stable writing surface. Many plants, from rice to trees, can be used to make paper, and today, both recycled material and your own garden can supply materials for artisan paper that you can use for pleasure or even profit.
Photo courtesy Lane Parks Consider using homemade paper to create value-added products.
Lane Parks and his wife, Susan Ferrel, oversee a the Madrona Center, a nonprofit, rural gathering place in Washington State that caters to eco-farmers, gardeners, fine artists and others. Among various other crafts, they make handmade paper and use it for various projects, including fine-art books with covers and/or pages made with their handmade paper.
The hand-bound, homemade paper journals have contributed significantly to Parks’ personal income. They sell well at local bookstores and other gift and art outlets, so much so that the profits are used to help fund the Madrona Center.
Value-added Homemade-paper Ideas
Handcrafted paper is like any art or craft in terms of turning a profit. If you can plug in to a niche market, as Parks and Ferrel did, you might create a regular income stream.
You might also consider handmade paper as inspiration for an indirect income source:
Hold papermaking classes on your farm, with an emphasis on some of your own crops.
Display homemade-paper products for the sale at your farm stand, a retail outlet or a local bed-and-breakfast.
Add a personal touch to gift baskets filled with other products you make and sell from your farm.
Recreational Homemade Paper Ideas
Even if you’re not aiming for income, there are countless projects for putting your homemade paper to use. These include:
framed art, with or without your own art or calligraphy
Some paper artisans even embed viable garden seeds within their handcrafted paper invitations. Recipients eventually can plant the invitations directly into the ground! (Get party designs here that include invitations and place cards, which can be printed on homemade or plantable paper.) Items like these can be used as gifts, customer thank-you cards or little bonuses added to your farm’s CSA shares.
Making Homemade Paper
Upon visiting Parks’ homemade-paper workshop, one quickly discovers that homegrown crops and native plants can be used to make a signature paper.
Handmade paper starts with the base fiber that makes up the bulk of the paper. The bulk of paper crafted at home is usually comprised of either recycled paper or purchased papermaking fiber, such as cotton or hemp. As experience mounts, you may recycle cotton scraps into handmade paper or even grow the bulk fiber for paper.
After you establish the bulk of the paper, add smaller amounts of other decorative materials. Parks uses various wild and cultivated plants to add color and texture to his paper. These materials from your own garden, farm or woodlands will add textures, flecks, colors and sometimes even scents that will make your homemade paper one-of-a-kind. You can try adding Bachelor’s button petals, dried lavender and even spinach leaves, though these are just three examples of natural materials that you can use.
Beginning papermakers can start with less technical papermaking methods—papermaking is similar to cooking as far as being an exact science, so you improvise and experiment until you develop a method that works for you. Like putting together a new cake recipe, you eventually get faster at the process.
Pippin tackles his Christmas squirrel (before he pulled the stuffing out). A Treeing Walker Coonhound mix, Pippin resides with his humans, the Langlois, on their hobby farm in Graham, Wash.
Hey, fellow farm dogs—January 21 is Squirrel Appreciation Day!
I don’t know about you, but I plan to show my local squirrels how much I appreciate them by encouraging each one to scamper up the nearest tree, where they’ll be nice and safe.
Don’t you just love it when those nutty critters scold you and twitch their fluffy tails? Makes me want to bark my brains out.
Now, as we know, our humans often seem unappreciative of our squirrel friends, whining that they take over attics, chew through electrical cords, steal birdseed and corn, blah blah blah.
I say, tell them to get over it–and show them these cool, squirrel facts:
Over 250 species of squirrels exist worldwide (dogs, that’s a whole lot of squirrels to chase).
They range in size from the 5-inch long African Pygmy Squirrel to the 3-foot long Indian Giant Squirrel (yikes!).
As members of the rodent order, squirrels have four, sharp front teeth that grow throughout their lives (dogs, that means chase, don’t catch).
Squirrels are omnivorous: dining on nuts, seeds, plants, fruit, even eggs and nestlings (but not dogs).
Squirrels are important prey for many predatory mammals and birds (dogs, remember those nasty, pointy teeth: Chase, don’t catch).
The Arctic Ground Squirrel is the only warm-blooded mammal known to survive below freezing body temperatures when hibernating (you’re right: BOR-ing).
Squirrels can run 20 mph (And I can run 19 mph. Perfect!)
As I packed my bags to head south to the John C. Campbell Folk School in Brasstown, N.C., I couldn’t help but be anxious for the trip ahead of me.
I am a homebody; I love my little farm in northeastern Ohio and prefer it to the most luxurious hotel or far-flung bed-and-breakfast the world has to offer.
Traveling for anything, let alone by myself, was ordinarily out of the question.
You know all the little things you have to prepare for: Is there enough grain to get the llamas and the goats through my time away? Are the emergency vet numbers posted clearly? Will my husband recognize if something is wrong with any of the animals? Will the dog die of loneliness without me?
Without the encouragement of my daughter, Hobby Farms’ managing editor, I never would have made the trip to North Carolina. But I am so glad I did!
As I loaded up the truck, I tried to lay these apprehensions to rest and focus on the fun things I knew awaited me: a week full of cooking, getting to see my daughter and loads of fabulous fare!
As the miles ticked away, I could feel myself relaxing as I took in the beautiful scenery; the hills near Brasstown were very similar to the ones I had loved and played on as a child visiting family in West Virginia.
A Sunday Arrival I arrived on Sunday, bid adieu to my sisters who had been my road-trip buddies and took a deep breath.
Anything set in a place this spectacular had to be good!
I got a room to myself (which was great as I work nights and tend to be wide awake at 4 a.m.) in a sweet little log cabin with a porch that ran along one side so we could sit and watch the sun set every evening.
When I walked from my lodging to meet my instructor, I was struck by how quaint the School’s buildings were and how breathtaking the mountains were, all covered in vibrant red and yellow-leaved trees.
My instructor, Jan Miles, promised to teach me how to make “Gifts of Food” –there were be five other students in the class with me–two from Georgia, one from Tennessee and one from Massachusetts.
I also learned that there were 15 classes taking place that week covering everything from fly-fishing, stained glass creation, wood working, rug weaving, blacksmithing and music making. I wanted to see if I could get my sisters down there to take a class with me!
That night I toured the History Center, which chronicled the School from conception to present. I also checked out the craft shop as I needed a coat – I forgot how chilly it gets in the mountains when the sun goes down!
The First Day I participated in the morning walk on Monday and it was wonderful – it was pitch dark when we ambled along, but there was something so soothing about darkness in the country.
I had breakfast in the communal dining room (forgot about good old Southern grits!) and headed off to my first day of class from 9 a.m. to 4:30 p.m.
We made ladyfinger cake, chocolate mousse in chocolate cups and chocolate leaves for decorating. I could already tell I was going to gain 10 pounds in just a week!
That evening I attended a slide presentation about fly-fishing in Alaska. I hadn’t ever considered fly-fishing, but it sure looked like fun, especially because it was a catch-and-release trip.
Photos from Class Here are more photos from the Gift of Food class at John C. Campbell Folk School, courtesy Keather Weideman.
I made a cup of tea, grabbed my flashlight and headed “home.” A shower and time to read a few chapters of my book and it was time to climb into bed. As I drifted off to sleep, I wondered if my tendency to stay on the farm might be waning just a bit …
Chocolate Overload On Tuesday’s morning walk, we explored a part of the Folk School I hadn’t been to yet: the gazebo made by the framing class and raised garden beds guarded by some really cool scarecrows made by local elementary school children.
Hunt Smith, a musician who plays the mandolin and guitar, as well as sings, provided MorningSong.
In class we churned out dark chocolate chip walnut meringue cookies, cracker cookies (so easy and good!), snowballs (a macaroon with—what else?—chocolate inside) and raisin cookies.
I thought I was going to lapse into a sugar coma! We took samples to the music students and the spinning class next door.
We were quite popular with the other students! Many people who were touring the school stopped in to admire our delicious creations.
After supper, I went to watch the square-, contra- and circle-dancing and even participated in one dizzying dance.
It was so much fun to watch as many of the dancers were from the area and come weekly to assist in teaching the steps to those of us who are inexperienced.
After all the good food and entertainment, it was time to go back and rest up for another (delicious) day!
Happy Halloween! I began my day with a brisk bird-watching hike, but between the darkness and the cold (it had frosted overnight), very few birds were active.
We did see a heron fishing in the creek, though! Because of the prolonged drought this area had experienced, the water in the creek was hardly moving.
The dry weather also put a damper on camping here—they weren’t permitting campfires for fear of forest fires.
Our walking trip was so lengthy that we missed MorningSong, so I ate a quick breakfast and headed off to class.
Today we made some non-chocolate desserts (thank goodness! Who knew you could get tired of chocolate?) like pumpkin cake, lemon tulles and four-layer espresso cake.
We had not sampled any of our cakes yet, but we did try the pumpkin muffins and cookies. Most were pretty good—but some are not!
Our instructor loved teaching as much as we enjoyed being taught, which made me eager to get back to the farm to make homemade goodies for the holidays!
That evening there was a drum gathering and all of us were encouraged to participate by using a tambourine or similar musical instrument that required only a sense of rhythm.
I politely declined as I had forgotten to pack my rhythm. Instead, I chose a ghost walk to celebrate Halloween.
There also was a chair caning demonstration, but being exhausted, I it so I could go back to the cabin and rest.
Friends in Town Thursday started bright and early with the Rivercane Walk. This walk included several sculptures to honor the Cherokee Indians.
One that stood out to me was the Eagle Dancer, which was a metal sculpture that portrayed the eagle as a protector with great power.
There was also a Clan Cane Pole, which signified the seven Cherokee clans. This place is truly steeped in history.
MorningSong featured David Brose, who entertained us with ballads and local legends.
A hearty breakfast was followed by a full day of finishing the projects from the previous day. We also made fruitcake without fruit (who knew!), toffee cookies, a Tucson lemon cake and lemon bars.
We briefly forayed into Brasstown to see the gift shops and I fell in love with a lovely bird print that would look just perfect in my kitchen.
After cleaning the kitchen (which was amazing and fully equipped with loads of counter space, a fireplace big enough to walk in and outlets galore—something I wish my kitchen had more of!), my daughter Sarah Coleman and Karen Acevedo, Hobby Farms’ editor in chief, arrived for a visit.
It was so nice to see familiar faces!
I took them on a tour of the gardens where Karen had worked earlier that year during the Fall Gardening class, the blacksmith shop and the gift shop. We all ate dinner and then Sarah and I sat on the porch with cups of tea and watched the activities and meadows below.
Before we headed home, we listened to a pick-up music, which was incredibly enjoyable as it brought back memories of my uncles playing their guitars in West Virginia when I was a child. How quickly time passes.
A Fond Farewell Today we tied up all the loose ends we had left in the kitchen and got ready for the big Student Exhibit. It was so interesting to see what everyone else at the school had been working on that week.
When my sisters came to pick me up to head back to Ohio, they surprised me with the little bird print I had fallen in love with.
In addition to the plethora of recipes, I now had something else to remember my trip by; I look at that little chickadee every morning and am thankful for my family and friends—and for the John C. Campbell Folk School, which gave me back a piece of my childhood, if only for a few days.
About the Author: Holly D. Coleman is an emergency room nurse who lives on a small farm in Canfield, Ohio. She has a barn full of critters and is going to try to adapt some of her holiday recipes to make them llama-, goat-, dog- and cat-friendly.
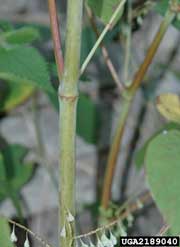
Among common weeds, autumn olive, Japanese knotweed, and milkweed are some of the most pernicious.
And delicious!
Incredibly invasive, they’re hard to kill. So, if you can’t beat ‘em, eat ‘em.
Russ Cohen is the rivers advocate for the Massachusetts Department of Fish and Game, and the author of the book, Wild Plants I Have Known and Eaten, published by the Essex County Greenbelt Association in northeastern Massachusetts.
Autumn Olive Berry … Fruit Leather
He leads foraging walks throughout New England. During an orientation chat before each walk, Cohen generally serves strips of “fruit leather,” made of the dehydrated pulp of autumn olive berries, with no additional sugar or other flavoring.
In the spring, its shoots taste like fresh asparagus lightly sprinkled with lemon juice. The shoots are best when their first leaves are still huddled together in the shape of a spear tip, and the shafts are crisp enough to crack off. Steam them for only a minute or so, add a little butter, and have a feast.
During a walk at the Tower Hill Botanic Garden in Boylston, Massachusetts, Cohen said the tender tips of Japanese knotweed also make a tasty pie used instead of rhubarb.
Related to buckwheat, Japanese knotweed is one of the last plants to blossom in late summer – early autumn in New England. Honey bees use its nectar, mixed with goldenrod nectar, to produce a honey as black as motor oil with a strong, distinctive flavor. It’s good for sweetening baked beans and for brewing unusual beers and mead.
Milkweed Meals
During his walk at the botanic garden, Cohen had high praise for milkweed, a plant that offers three opportunities for harvest:
1. when its shoots first emerge in spring
2. when its flowers begin to bud in early summer, and
3. when its seed pods first appear.
Like Japanese knotweed, the shoots of milkweed taste a little like asparagus. The flower buds are nutty and sweet, a little like pesto. Young seed pods taste like intensely flavorful green beans.
The key to cooking any of the milkweed parts, Cohen explained, is to immerse the parts into water that is already boiling. The sudden immersion into boiling water shocks the bitterness out of the plant. Boil them for seven minutes.
After boiling, use the milkweed in omelets, casseroles, soups, or by itself with a sprinkling of butter or good olive oil.
Other yummy weeds:
Barberries in cookies
Beach plums, in preserves and pies
Dandelion leaves in salads, blossoms in wine, roots instead of coffee
Jerusalem artichokes instead of potatoes
Lamb’s quarters, steamed or fresh
Poor man’s pepper leaves in salad, seeds for spice


 Game became exploited and viewed as a commodity; market hunting led to the slaughter of wildlife for profit. Many species were driven to the brink of extinction; some extinct, like the passenger pigeon.