Categories
Animals Farm & Garden Homesteading Large Animals

Preparing Cattle (& Yourself) For Cold Winter Temperatures

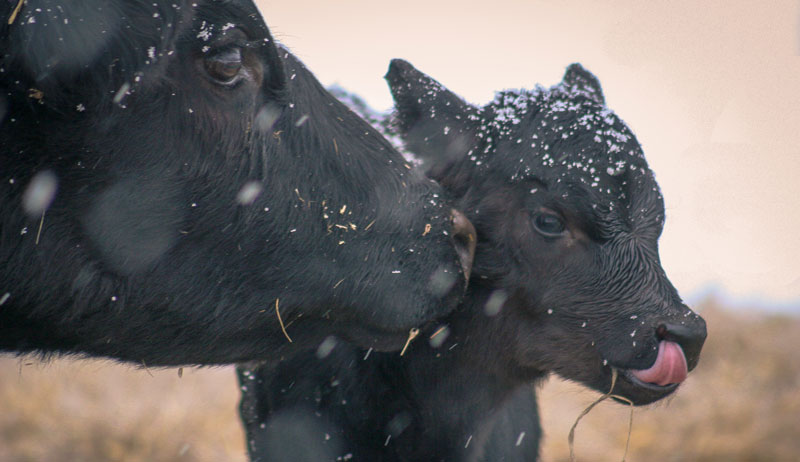
As the wind howls and the mercury drops, people tend to layer on more coats and burrow deeper into their quilts. Unlike humans, cattle don’t have the opportunity to go lay by a fireplace and warm themselves when things get cold. Fortunately, their heavy coats of hair insulate and keep them warm during the chilly days.

If you’ve ever seen a herd of cattle with backs covered in snow, it doesn’t mean that they’re not taken care of. It’s a sign that their coats are doing a good job of providing so much insulation that the snow doesn’t even melt from their body heat! 

Todd Krispense (my father-in-law) is a multi-generational rancher and cattleman. For this article, he shared some of the practices that they implement for keeping their cattle comfortable during the winter season. 

When it’s time to go out and care for your livestock, the first step is to make sure you are well prepared. By bundling up in warm layers and plenty of outer garments (coats and coveralls), you can avoid rushing through chores while you focus on how cold your body is. Instead, you’ll be able to take longer and do a better, more thorough job of caring for your herd. 

Study Your Animals 

While you do chores, take time to watch your animals’ behavior. Are they laying down, contentedly chewing their cud? Or are they extremely hunched up and not eating? The latter can be a sign of stress, so keep an eye out for that.


Read more: Cattle and their wild cousins have adapted to cold temps in interesting ways.


Water Source

Whether your water source is a stock tank and hydrant or a pond in a pasture, you need a plan to make sure your cattle will have access to fresh water despite cold winter temperatures. 

If you’re using a well and water hydrant, make sure to insulate and prepare both before winter hits. If you have floats in your stock tanks, consider unhooking them to avoid any freezing up.

One trick that Todd himself uses is to just unscrew the threads enough that the water trickles a little all night long. So long as the wind doesn’t blow on it and the temperature is above zero, it shouldn’t freeze. If you have other hoses around the hydrant, make sure to unhook and drain them before properly storing away. 

Using ponds as a main source of water can be challenging, as the ice will continually need chopped during particularly cold spells. When you do go to chop the ice, make sure you chop in a place in an easily accessible place, where the herd is standing nearby. If not, you’ll run the risk of the water freezing again before they are able to drink.

Other natural sources of water can include a stream, river or continually flowing spring that never freezes.

Cattle are herd animals. While they might go up to drink separately when confined in a feedlot, cattle in a large pasture will generally all want to drink at the same time. If one animal is not able to make it to the water by the time the rest of the herd starts to leave, they will skip drinking in order to leave with the rest of the cattle. It’s important to make sure there is adequate water available for all animals to get a chance to drink.

Todd explains that his preferred source of water is a tank, as he can fill it during the morning and the ground temperature during the day will keep it from freezing. Since cattle do not generally drink water during the night, it’s good to avoid filling tanks in the evening, as they will be frozen by morning. 

Feed

When feeding cattle during the winter, make sure to increase  the feed quantity enough to meet their nutritional needs during cold weather. Grain is a high energy source that helps produce body heat and can be fed in higher quantities as needed.

Make sure to use good quality feed in your rations. Pay attention to body condition not only during winter but especially in the weeks leading up to it. Fat acts as insulation and works alongside a thick coat of winter hair to keep cattle warm.

If you really study the habits of your herd, you might notice that, when a storm or bad weather event is coming with moisture or a lot of snow, cattle bodies will tell them to eat more ahead of time. Once there’s a hard snow they won’t want to eat very much (especially if their feed is covered in snow).

After the moisture has passed, they will resume eating and drinking.

Part of caring for your herd during the winter is planning ahead. If you see that a spell of nasty weather is coming in, do what you can ahead of time to make life easier. Buy or order extra feed and make sure it is stored away properly in a dry place. Be sure that your vehicles or feed trucks have the fuel treated and are parked in places that you can easily access if they need to be worked on after the cold weather hits. 


Read more: Barn ventilation is important, especially in winter. Here are some tips to keep air moving.


Bedding

We typically don’t give steers in our feedlot pens bedding unless the weather is extremely bitter. But my brother-in-law’s cow/calf herd gets given bedding just as soon as the weather starts to get worse. Even though the calves can be born during the bitterest parts of winter, on a sunny day with no wind you will see them out running and frolicking around. 

If the steers in the dry lots do need some bedding, round or square bales of straw are rolled out in the pens for them to bed down in. 

Shelter 

If you look around our cattle pens, you notice that the shelters are three-sided buildings that face open to the south. During the winter days, the sun can shine all the way into the back of the shelters.

Wind protection is a big concern during the bitterest of days. When we confine animals into pens, they aren’t allowed to find the natural shelter and protection that they might normally find in nature. Cattle don’t need to be inside a heated barn, but the protection offered by a three-sided shed or a thick hedgerow of trees can be very helpful to offer a wind block.

Do your best to pay attention to your animals and their habits. Make sure that cattle are kept comfortable in cold weather, and provide plenty of access to shelter, feed and water, as well as bedding if necessary.

Categories
Animals Farm & Garden Large Animals

The Why Behind Winter Wear For Livestock

Most people are familiar with the concept that some animal species grow a longer, thicker coat in the winter. Some of our livestock species also partake in this physiologic thermostat. But how do their bodies know it’s time to grow the equivalent of an extra sweater? You may be surprised at the answer.

Let’s debunk a myth right at the start. Ambient temperature does not determine when an animal starts to grow its winter coat. Instead, the trigger is the shortening of daylight.

Here’s how: Hair growth is controlled by a small gland at the back of the brain called the pineal gland. This gland secretes the hormone melatonin. Occasionally known as the “light of night”, melatonin is produced by the brain when it is dark outside.

What does this have to do with hair growth, you may ask? Hair follicles have melatonin receptors, which stimulate hair growth. As the days grow darker, more melatonin is produced, which stimulates hair growth.

The end result: a thicker coat for winter.

This is a wonderful method to help keep livestock self-sufficiently warm in the depths of winter. But sometimes mother nature can’t do it all, and we have to step in and help. You’ve probably seen horses donning jackets when the weather is poor.

So when are you supposed to provide a winter coat for your livestock animals? Do cattle, sheep or goats need jackets, too?

Horse Coats

Let’s start with horses. There are a handful of reasons to put a blanket (coat and rug are also synonymous) on a horse.

Many horses are clipped in the fall and winter to a varying degree. This helps them cool out faster after long rides. Understandably, if you take away an animal’s natural winter coat, you’re obligated to replace it. Hence the blanket.

Some horses, due to genetics, simply don’t grow as thick a winter coat as others. For example, some Thoroughbreds and Arabians have pretty wimpy winter coats as compared to, say, a Shetland pony.

Such breeds, if living in places with harsh winters, may need extra help to keep them warm. Additionally, older horses and those with metabolic diseases or other health issues may need help staying warm in the winter regardless of their own coat length and should be blanketed.


Read more: Check out these tips for getting your animals’ run-in shed ready for winter.


Cattle Coats

OK, so what about cattle? No one drives past a herd of a hundred and sees each steer with his own jacket. Personally, I’ve never seen coats on adult cattle but they do exist, mostly for use in keeping show animals clean.

Dairy calves, however, are another manner. These calves are typically born inside and are removed from their mothers very early. These calves are susceptible to cold stress, which can occur in calves under three weeks of age in temperatures below 50 degrees F, especially if the calf is already sickly. For these reasons, calf jackets are a common management practice in some dairies.

Protocols vary, but a general recommendation is to utilize calf jackets during the first three weeks of life when the ground is frozen.

Goats & Sheep

Adult sheep and goats tend to follow the same guidelines as cattle. With the exception of very old or sickly livestock animals, they don’t need winter coats.

There are two exceptions for sheep. Some hobby farmers will put coats on sheep to help keep the fleece clean prior to shearing. Likewise, if cold weather occurs after shearing, these sheep may need a blanket. Lambs and kids, if born in winter, do benefit from a snug blanket to prevent cold stress just like dairy calves do.

Plus what’s cuter than a lamb in a jaunty jacket?

Categories
Beginning Farmers Crops & Gardening Equipment Farm & Garden Farm Management Permaculture

Build Permabeds With A 2-Wheel Tractor & Power Ridger

When it comes to growing food, there is nothing more important than managing your soil. Garden beds that are permanent and have soil conservation cores are called Permabeds. There are many ways to make Permabeds with four-wheel tractors, hand tools and two-wheel tractors.

For two-wheel tractor growers, the equipment used can change depending on how the grower equips their farm operation. The rotary plow or tiller/furrower can easily form a 12-inch path and raise the bed 3 to 5 inches. 

This is a common start-up system for growers. The tiller loosens the soil, and the hiller/furrower attachment pushes the loose soil into the adjacent spaces to form beds and leave the path.

Making Beds with Power Ridger on a Two-wheel Tractor

For a wider bed system with higher beds and wider paths, the power ridger is perfect. Because it is so straightforward and efficient, let’s look in more detail at this method of building Permabeds. This method relies on the power ridger, which has many other future applications.

Note: It is important to remember that this bed-forming time is well worth it. You only have to do it once, since Permabeds are never destroyed! 

The land needs to be plowed and tilled first. For a 5-foot (60-inch) bed (center-of-path to center-of-path), mark out all the lines of the path centers. Then, one pass with the power ridger leaves a 35-inch path space between the newly formed beds, which are now roughly 26 inches on the bed top and raised 5 to 8 inches. 

After a pass with a PDR tiller or power harrow on the bed top, the path will narrow to 30 feet. The bed top is widened to 30 inches and the height reduced by 2 inches.  

For a 66-inch bed, with wider paths and wider/more gradual shoulders, the power ridger is run down marked lines 66 inches apart. This leaves a 34-inch trench and forms a bed top that is approximately 32 inches wide. This can either be softened to 30 inches with gentle shoulders (for a taller bed with a 30-inch bed top), or multiple passes can leave a wider and lower bed. 

To widen the path, you need to do multiple runs with a power ridger with the baffle set to the highest setting (allowing more soil to jettison out). The garden rake or other bed top tool can help to set desired width more precisely (especially for initial forming after primary land preparation of plowing and tilling a new field).


Read more: Permabeds can bring organizational improvement to community gardens.


Step-by-Step Permabed Forming Method

1. Land must be previously worked

Plowing and tilling are recommended. But, at a minimum, you need to plow. 

2. Layout review

Use the lines made in your plot layout to mark and flag paths for bed formation. Make sure to leave your 6-foot perimeter and mark paths 48 inches apart for normal Permabed architecture, and 60 or 66 inches apart for the Compost-a-Path Method. 

3. Mark your perimeter line

Tie a taut string between corner stakes along a perimeter line, parallel to your garden beds.

Note: The stake-and-string method is a one- or two-person job. 

4. Mark your first path

This can be done by measuring and placing flags or marking them into the previously tilled soil with your boot or even spray paint.

The flag method is great if you want to lay out a whole plot in one phase, then build all the beds later. Otherwise, the other methods work well if you just want to mark the soil directly for each new path before making it.

Note: Flagging is a two- or three-person job. 

5. Flag method

Person No. 1 walks along the perimeter string line, and person No. 2 walks in the field holding the tape measure at the 6-foot mark. Person No. 3 flags the first path at exactly the 6-foot measurement.

Walk and flag a point 6 feet from the perimeter line every 5 to 10 feet. 

6. Continue marking paths

The three-person team continues measuring and flagging across the plot using each row of flags as the new line for measuring the 48-inch bed to mark the middle of the next path.

Note: Place flags straight and measure from the flag bottom. (There is nothing exact about the top of a flag.)

Remember: You can have any chosen bed width. But a bed’s width equals center-of-path to center-of-path. A 48-inch Permabed has these measurements: a (30-inch bed top) + (2 × 3-inch shoulders = 6 inches of total shoulder) + (12-inch paths [2 × 1/2-path width is 12 inches]), so (30 inches + 6 inches + 12 inches = 48 inches). 

Note: A 66-inch Permabed has a 30-inch Compost-a-Path, so width would be: (30 inches + 6 inches + 30 inches = 66 inches).

7. Making the paths and beds

Person No. 1 operates a two-wheel tractor with a power ridger. Line the tractor up centered on the flagged line or soil markings. Lock the differential and operate in 1st gear with 2/3 throttle for the most control. (Only do this when the soil is dry.) 

Then, the two-wheel tractor operator trenches out the path—moving forward and keeping an eye on the line of flags ahead. This is actually easier than it sounds, so long as you have the tractor centered on a marked row.

The soil of the future path will be jettisoned onto the adjacent bed tops. The power ridger leaves a 34-inch trench that is reduced to 30 inches when shoulders are formed by passing the power harrow or PDR tiller on the bed top. 

For the flag method, person No. 2 will simply walk ahead of the tractor operator and pull the flags as the two-wheel tractor approaches. As soon as a flag is pulled, the tractor operator can proceed to use the next flag as a point of reference.

8. Now, your Permabeds are built

Or they are at least roughed in. There is work yet to make them perfectly formed for the long-term and to create finished bed tops for easy seeding, weeding and harvest.

Grow On,
Zach

For more on growing with a two-wheel tractors, check out Zach’s new book, The Two-Wheel Tractor Handbook, available for pre-order here.

Categories
Farm & Garden Homesteading Projects

Warm Up The Holidays With Homemade Jar Candles 

Every fall and winter, my daughter and I make a couple batches of lightly scented cinnamon soy candles, as well as plain beeswax candles. We love to burn them as the days become darker into winter.

They are not only convenient to have on hand, but they also make great gifts. It’s also much more cost effective to make them versus buying them.  

Soy is a clean burning option compared to the regular wax you’ll find used in the majority of candles at big box stores. Beeswax is the very cleanest burning option but also holds the highest price tag. 

Here is my easy method of making hand-poured jar candles.  

Yield: 2 – 16 ounce jar candles 

Supplies 

  • Medium saucepan to use as a double boiler to heat water 
  • Heat-safe container to melt wax in (preferably with handle) 
  • Candy thermometer 
  • Soy or beeswax pellets 
  • Candle wicks (I prefer 8-inch hemp pre-waxed and tabbed wicks) 
  • Wick stickers or high temperature hot glue to adhere the wicks to the bottom of your candle 
  • Organic essential oils (optional) 
  • Stirring utensil (I prefer a long wooden kebab skewer) 
  • Clothespins 
  • Pint sized clean canning jars or other heat-safe containers to use for candle making 
  • Water, as needed 

Note: Animals can have adverse effects to essential oils, especially once the oils are heated. Please consult an expert on essential oils for more info on safe and unsafe essential oils to scent candles with if you have pets.  


Read more: Make homemade beeswax candles from your beehives’ wax!


Directions

Line your workspace with newspaper or paper towels to catch any spillover. 

Adhere your tabbed wicks to the center of clean, dry pint canning jars. You can use high-temperature hot glue (it must be high-heat glue or it well melt when burned) or use wick stickers for this step. Use the wooden skewer to push down the tabs firmly to the bottom of your container.

Thread a clothes pin over the adhered wick and center it over the jar. 

Create a double boiler by using a medium sized saucepan. Fill pan about half full with water. In the saucepan, add a 4-cup heat-safe glass measuring cup or other heat-safe container for melting wax. Fill container with wax and warm pot to a simmer to melt wax.

Once the wax has melted somewhat and made room for more wax, add more wax. You’ll need about 4 cups melted wax to fill two pint jars. 

Different brands of wax have different instructions regarding how high to heat the wax and how low to let it cool before pouring. Please check the directions for the specific brand of wax you purchase. The particular soy wax that I buy directs me to heat wax to 165 degrees F and cool to 135 degrees F before stirring in scent, and cool to 115 degrees F before pouring. 

Once your wax is fully heated, stir in organic essential oils of choice (optional), and remove from saucepan to allow it to cool. I use 2 tsp. of cinnamon essential oils for a light cinnamon scent.  

Once cooled to advised temperature, carefully pour the wax into the prepared jars, leaving 1 inch of headspace. Center the wick again and leave undisturbed until completely cooled. Once the wax is firm, you can trim the wick to about 3/4 inch. 

Notes

Once candles have been burned and only have about a quarter inch of wax left, they can be cleaned out and re-used. To clean out the remaining wax, dip the emptied candle jar into a pan of hot water until the wax loosens and melts.

Once the wax has melted, it can easily be dumped and wiped out from the jar. The jar can be reused to make a new candle. 

Though, just a gentle sprinkle is enough because you don’t want to catch the flowers on fire once burned. 

I do not use synthetic colors or scents when making candles. But you can incorporate them if you so choose.  

Beeswax doesn’t hold scent as well as soy wax, so I tend to keep the beeswax candles scent-free. 

You can sprinkle dried (pesticide free) flower petals over the hot wax after pouring to add a little beauty to the candle. 

This special sneak peak has been adapted from Small-Scale Homesteading (2/23 release) with permission from Skyhorse Publishing, Inc.  

Categories
Beginning Farmers Crops & Gardening Farm & Garden Homesteading

The McLaughlin Homestead Embraces A Purposely Old-Fashioned Mentality

The McLaughlin Homestead is run in a fashion that Maggie Roque describes as “old-fashioned on purpose.” Situated on 15 acres in northern Ontario and focused around a century-old farmhouse, Roque has used her background in environmental science and a belief in living “a more sustainable and environmentally cautious lifestyle” to shape the venture.

“I think it’s a reminder to take a step back, slow down and really live in the moment,” says Roque as she sums up her homestead’s abiding mantra.

We spoke to Roque about pickling cucamelons and the benefits of slowing things down. We also touched on the joys of floral-infused gin.

The Importance of Slowing It Down

After seeing her homestead, Roque says that people often tell her how they wish they could “live a simpler life like you.” But, she says, there’s nothing simple about running the McLaughlin Homestead.

“Let me tell you, it is the opposite of simple,” says Roque. “I think the word they are looking for is slower. Nothing in this lifestyle comes quickly. You have to do things from scratch, learn the process, plant the seeds, feed the sourdough starter, tend to the animals—and none of that can be rushed. When you try to cut corners, that’s usually when something goes wrong.”

As for the pay-off?

“Slowing down and really learning where all our food comes from and trying to grow [and] raise it all ourselves like our ancestors used to do is so humbling,” says Roque. “But even though it’s a lot of work and takes more time, in the end, that feeling we get knowing we did all this ourselves is so gratifying.”

Pickling Cucamelons

Earlier this year, Roque posted a photo to social media about an experiment to pickle a batch of cucamelons.

“They were so good!” says Roque. “I will definitely be growing them every year and pickling them.”

Along with snacking on the addictive diminutive cucamelons (which in some regions are also known as Mexican sour cucumbers), Roque says that adding them to salads and turning them into a relish for burgers proved to be hits.


Read more: Farmer Ken talks food forests and his love for cucamelons.


Pass the Lilac Honeysuckle Gin

Infusing gin with lilacs and honeysuckle is another creative project that Roque has attempted recently. She says the concoction was a success and also a cinch to whip up.

“If you have lilacs or honeysuckles in your yard, just add them to some gin or vodka. Let it steep for a few weeks or more and try it out! If you like florals, you won’t regret it.”

A Focus on Flowers

Flowers have become an eye-catching part of the McLaughlin Homestead. “I was never really interested in growing flowers,” admits Roque, “but in learning more about growing veggies, flowers are a super important part because they bring in the pollinators that are needed for some veggies to produce. And to my surprise I loved growing them!”

While this year’s batch was focused around a collection of calendula, nasturtium, sweet peas and zinnias, for next year Roque plans to add hollyhocks, tulips, cosmos and poppies to the garden.

Reflecting on Progress

“The most rewarding part of running a homestead has to be getting to look back at what we started with and seeing how far we have come,” says Roque as she reflects on her journey to date.

“All the hard work we have put in to make all of these big amazing changes in our lives. Thinking about how little we knew three years ago about home renovations, gardening and raising animals. We have a lot of pride when we look at everything we have accomplished.”

Follow McLaughlin Homestead on Instagram.

Categories
Animals Homesteading Projects

Make A Downy Woodpecker House On The Cheap

Downy woodpeckers may be small, but they have great big personalities. I usually only see these black-and-white beauties when they’re snacking on the suet cakes and black oil sunflower seeds I offer this time of year.

But I recently noticed a female downy woodpecker had taken a strong interest in my bluebird house. Despite the bluebird pair which has raised multiple broods there over the last few years, the downy woodpecker has been alighting on the front of the nest box and pecking madly around the entrance hole.

I’m used to monitoring the bluebird box for wrens hoping to take over, but this was a first. After a little research, I determined that the woodpecker is probably seeking a warm place to roost. In the hopes that I could lure it away from the bluebirds’ digs, I decided to add some extra woodpecker habitat. Although both downy and hairy woodpeckers generally nest in dead tree cavities, sometimes they will accept manmade nest boxes.

Rather than build something fancy from new—and expensive!—wood, I used a large, partially hollow tree limb as the basis for my downy woodpecker nest box. If you have access to an old log or suitable tree limb, you just might have a good start on your own downy woodpecker nest box.

woodpecker house

Specifications

Ideally, the floor size for your downy woodpecker nest cavity should measure about 4 inches by 4 inches. The entrance hole to the birdhouse should be an inch-and-a-half in diameter, and the hole itself should be located roughly 9 inches up from the bottom of the birdhouse.

The nest cavity interior should measure about 1 foot tall.

I found a partially hollow limb that easily could easily meet each of these requirements. It was about 7 inches in diameter and a few feet long. Although the wood along one end and around the sides of the limb was still intact, the interior at the other end of the limb had become spongy.

If this limb were still up in its original tree, it would be prime real estate for a downy woodpecker. But since it had already fallen to the ground, I’d need to make a few adjustments in order to make it a suitable potential nest site once again.

Since the interior section of the tree limb had already begun to break down, it was soft enough for me to carve out with a hammer and chisel.


Read more: Build a handmade bluebird house with these plans.


Step by Step

Now, you don’t necessarily have to find a cavity-riddled log in order to make your own woodpecker nest box, but having the start of a cavity does make the work much easier. To start, cut the log or limb section so that it’s about a foot-and-a-half tall.

If your log already has the start of a cavity, use a hammer and chisel to enlarge it as needed. Remember, the goal is to create an interior nesting section that is 4 by 4 inches across and 1 foot high.

(If the log you select lacks a cavity, measure and mark a 4-by-4-inch area at the center of one end. Next, drill a series of large holes inside the area you marked, then carefully use a hammer and chisel to further enlarge the nesting cavity.)

When you’ve finished excavating, you should have a log with an opening at one end. Cover this open end with a piece of scrap wood and secure with nails or screws. (If this will be the roof of your woodpecker house, you might also want to add some spare roofing shingles or additional overhang to help keep the nest dry.)

Measure 9 inches up from the bottom of the nesting cavity and use a 1.5-inch wood boring drill bit to add the entrance hole.

Finishing Touches

I mounted my woodpecker house several feet up atop a sturdy base attached to a freestanding post. (If you can, angle your birdhouse forward about 15 degrees and then fasten it securely in place. Angling the log this way will help juvenile woodpeckers have an easier time launching themselves out of the nest box when the time is right.)

Finally, because excavating potential nesting sites is an important part of their courtship and breeding behavior, I stuffed the birdhouse’s interior with clean, dry pine shavings. And, to further lure the downy woodpeckers away from my bluebird house, I also attached a bit of suet cake along the underside of the new birdhouse’s mounting shelf.

So far, it seems to have done the trick.

Categories
Animals Farm & Garden Flock Talk Poultry

12 Chicken Ornaments To Decorate Your Poul-Tree 

‘Tis the season to deck the halls with holly, mistletoe and all the trimmings of the holidays. For many, decorating a tree is one of the chief holiday traditions. Some celebrants hang heirloom ornaments, while others use their crafting skills to string popcorn and cranberries, create colorful construction-paper chains, and even crochet intricate snowflakes.

Themes are a fun way to change things for the holidays. At my home, I select a yearly theme, and all of our holiday decorations reflect it throughout the house.

Past themes have included pine cones, gingerbread, silver and Star Wars. Last week, I realized that, in the 30-odd years I’ve been selecting holiday themes, not once have I chosen chickens as my motif. Of course, this observation occurred after I’d already decorated my home and tree with snowmen.

Here are 12 suggestions for chicken ornaments that’ll turn your spruce, pine or fir into a holiday “poultree.” 

French Hen 

This blown-glass ornament (pictured above) features a pretty white hen speckled with black sitting contentedly on a bowl trimmed with poinsettias. Glitter details emphasize her wings, wattles, comb and tail feathers, as well as the flower petals and bowl design.

This ornament, crafted by Old World Christmas, measures 3.25 inches in height and is sold by Callisters Christmas. Retail price: $24.99 plus shipping and taxes. Item #16144. 

Hen on Nest 

Nestled on a nest of straw, a baby chick snuggled up to her, this lovely mother hen embodies the spirit of family. Made by Old World Christmas of blown glass, this ornament shows gorgeous feather detail and a content expression on her face.

This ornament measures 2.5 inches in height and is sold by Christmas Mouse. Retail price: $19.99 plus shipping and taxes. Item #425246.

Garden Winter Roost Chicken 

This little brown hen has taken refuge from the snow inside a bow-bedecked overturned flowerpot. Fortunately, there’s straw for warmth and comfort. This mother hen is accompanied by an adorable baby chick, who watches Mom from a garden trowel.

Designed by Marjolein Bastin and crafted from plastic by Jim Kemme, this 2022 Hallmark Keepsake ornament measures 2.46 inches in height. Retail price: $18.99 plus shipping and taxes. 

Three French Hens 

These silver-tone hens hold their heads upright, beaks open in song. Perhaps they are warbling The 12 Days of Christmas along with a partridge and a couple of turtle doves? Gold-toned combs and waddles add a touch of color to this metallic trio.

Sold by Macy’s, this ornament measures 2.5 inches in height. Retail price: $30 plus shipping and taxes. Item #12543514. 

Christmas Chicken with Sign 

This little white hen certainly has the holiday spirit! Wearing a sparkling Santa hat, she has a Christmas-bulb-draped sign around her neck that reads Merry Christmas.

Made of resin by Red Shed and sold by Tractor Supply, this festive hen measures approximately 2 inches in height. Retail price: $4.99 plus shipping and taxes. Item #185839999. 

Crocheted Chickens 

Hand crocheted to order out of acrylic yarn by Stacie71, these adorable hens are the perfect addition to any holiday tree. Each hen measures approximately 4 inches in height and comes in your choice of black, brown, grey, orange, red or white.

Stacie also crafts and sells matching crocheted rooster ornaments. Retail price: $5 each plus shipping and taxes. 

Shiplap Chickens  

This trio of holiday hens is ready to celebrate the season! Each chicken wears a sparkling red bow around its neck and is bedecked with boughs of greenery.

Handmade from shiplap wood by WinslowsCreationsCo, this set of three 3.25-inch-high chicken ornaments comes in white, brown, grey, or in a set featuring one of each color. For an additional fee, you can have the year or names engraved onto the chicken ornaments. Retail price: $19.99 plus shipping and taxes. 

Chicken Nest Boxes 

Feature your hard-working layers on your tree with this adorable resin ornament. This design features two rows of green nest boxes, each with a hen and eggs inside. A red shingled roof and red and white accents add festive touches. Made by Red Shed and sold by Tractor Supply, these nest boxes measure approximately 2.5 inches in height. Retail price: $4.99 plus shipping and taxes. Item #185840199. 


Read more: Decorate your chicken coop for the festive holiday season!


Chicken Coop 

Old World Christmas offers us the opportunity to bring our flock’s home into our home with this stunning blown-glass coop. This little red henhouse features a four-panel window, dark roof and a runged ramp with cute white hen at the top, ready to come out for the day.

This ornament, sold by Callisters Christmas, measures 2.75 inches in height and retails for $29.99 plus shipping and taxes. Item #16128.  

Chubby Chick 

Each of these chubby baby chicken ornaments is handmade from pure New Zealand wool, so no two chicks are alike. Designed by Danish company Én Gry & Sif, the chicks are crafted by female artisans in Nepal to help support their communities. Each chick is Fair Trade certified and measures approximately 1.75 inches in height. Choose from purple (pictured above), white or yellow  (each color listed separately).   

The German Christmas Shop USA also sells a miniature trio of chubby chicks, one of each color, in a separate listing. Chubby chick retail price: $12.  

Baby Chick  

This unique blown-glass ornament doesn’t hang on your tree. Instead, it clips onto a tree branch. This baby chick is a soft butter yellow in color and features tiny wings and little feathers starting to peek out from its down. Its angelic little face makes this Old World Christmas ornament almost irresistible.

Sold by Callisters Christmas, it measures 1.75 inches in height. Retail price: $10 plus shipping and taxes. Item 425334. 

Egg Carton 


Add an eggstra-special touch to your tree with this sweet set of farm-fresh eggs! Hand-crafted from glass in Poland, this ornament features a dozen brown eggs, all packed in a glittery golden carton.

Sold by Bronner’s Christmas Wonderland, this ornament is 1 inch in height and 3 inches in length. Retail price: $12.99. Item #1212666. 

Categories
Animals Farm & Garden Health & Nutrition

Some Chicken Home Remedies Are Better Than Others

Home remedies for humans and animals alike are as old as (or older than) traditional medicine. The challenge in determining what works as a magical elixir and what is snake oil can be difficult. 

The seemingly simple question of “did my chicken get better because I gave it apple cider vinegar and rubbed a magnet on its crop and left-wing counter-clockwise versus it got better on its own?” can be a challenging, time-consuming and expensive answer to determine.

In lieu of getting a Ph.D. in epidemiology and running your own randomized clinical trial, this article is meant to summarize what we know (or think we know) about various chicken home remedies. 

Before we go over some common home remedies common amongst chicken keepers, remember we aren’t in the Dark Ages. We do have science.

You can go onto Google Scholar and have some level of access to tens of millions of scientific articles. We take it for granted, but in the scientific world, Google Scholar is the greatest invention to facilitate information sharing since the library (7th century) and the Gutenberg press (15th century).  

Long story short, if you don’t believe me or want more detail, head over to Google Scholar. You can read the research. And if you really are curious, the authors’ contact information is part of the article.

We scientists are boring but harmless, and we love that someone reads one of our papers and is interested enough to contact us. We also don’t make any extra money by recommending a product. So you know if we recommend something, we don’t have any conflict of interest.

If we did, we’d have to tell you! 

Ones that Work

Some chicken home remedies actually are magical elixirs. Let’s start with a few of those. 

Essential Oil of Oregano

At 500 parts per million, oregano oil can be used as a preventative and a treatment for coccidiosis. Add it to the water as directed.

You can also give dried oregano, but there is less of the active ingredient (aka polyphenols). And you don’t want to displace too much of your birds’ regular feed with oregano leaves, so stick with the essential oil of oregano if you want the greatest effect. 


Read more: Oh, oregano! This powerhouse herb deserves a place in your garden.


Manuka Honey

You can use this honey in your tea and then use it on your chickens’ wounds. Just make sure you wash your hands after!

Manuka honey has gone from mere folklore and alternative medicine to legit antimicrobial. After you clean out a wound with a dilute soap and water solution (always flush with plain water so no soap residue remains), you can use manuka honey on wounds. The honey has a broad spectrum of action against various types of bacteria.  

However, while the value of manuka honey as a home remedy for wound management is becoming more and more established, one challenge is how to apply it on a chicken wound. Because it’s so sticky, it tends to attract bugs and dirt.

Hence, while it works, consider a less-is-more approach (keeping the wound clean). If you use the honey, make sure to cover the wound with a bandage. I like Tegaderm bandages, which you can purchase over the counter. 

Fermented Feed

Fermenting feed increases the digestibility of the feed, helping with weight gain that ultimately can help with egg production. This is especially true in pullets as weight gain is one of the best predictors of pullets becoming full-fledged laying hens.

One other plus? Fermented feed reduces phytate-bound phosphorus, which facilitates bone development. Fermented feed might also help encourage a healthy chicken microbiome. 

Ones that Don’t Work

For each of the home remedies that do work, there are hundreds of ones that do not help chicken ailments. Here are some that are pure snake oil. 

Apple Cider Vinegar

Apple cider vinegar doesn’t make eggshells stronger. And it doesn’t prevent or treat coccidia, avian influenza or Newcastle disease, among others.

For some reason, apple cider vinegar is seen as a panacea for chickens’, horses’ and a bunch of other animals’ problems. However, absolutely no scientific articles support this.

Obviously, absence of evidence is not evidence of absence. But no evidence exists that it works in the way that some people irresponsibly say it does. 


Read more: Do chickens really need apple cider? (Answer: no)


Herbs

Some flock owners report that placing fresh or dried herbs in the chicken coops repels mites, lice and other ectoparasites. Unfortunately, no research has shown the efficacy of this.

The idea may have originated from the observation of what different birds use for their nests. Baby chicks, however, don’t nest in the same way as other birds. Long story short, the leaves themselves likely don’t have enough of any toxic compound to repel ectoparasites.

Red Pepper Flakes

Adding red pepper flakes to chicken feed won’t increase egg production.

Garlic

Does this easy-to-grow garden staple work as a poultry dewormer? Nope! 

Allicin, one of the active ingredients in garlic, has been found to be antibacterial, antifungal and antiparasitic. However, the research literature doesn’t show it to produce any reduction in various worms, including roundworms. 

Tomato Juice

You might have heard that this acts as an electrolyte (or that pumpkin seeds, cayenne pepper, black walnut tincture and “herbs” act as dewormers). At this point there is no specific tomato juice, pumpkin seed, cayenne pepper or black walnut tincture research.

However, tomato pomace (aka the leftover material from tomato processing) has been shown to be an excellent source of vitamin E, which is used as an antioxidant in broiler meat.

Over-the-Counter Pet Flea Meds

Using topical flea medications, such as Advantage and Frontline, on poultry does work to kill fleas and mites. However, because chickens are food animals, you need to consider how long it takes for the active ingredient (fipronil) in the drug to be metabolized.

We don’t currently know how long it takes to eliminate fipronil from chicken eggs and meat after you stop treating your chickens with the topical flea medication. For that reason, don’t use medications (even over-the-counter medications) that might seem harmless on or in your chickens. 

As you can see, the snake oil list is longer than the magical elixir list. In summary: If it’s too good to be true, it’s probably not true.

Occam’s razor is a famous saying from the English philosopher William of Ockham. It basically means the simplest explanation is correct. Based on that principle, apple cider vinegar, toothpaste and the feathers of an African swallow are good for cooking, brushing your teeth and flying—but not good for chicken remedies.

My recommendation is to be a skeptic and ask people for experimental proof that is repeatable! 

This article originally appeared in the November/December 2022 issue of Chickens magazine.

Categories
Animals Chicken Coops & Housing Farm & Garden Poultry Poultry Equipment

Protect Your Chicken Coop From Common Predators

It’s unfortunate, but it will happen: One day, you’ll walk into your chicken coop and find the worst-case scenario. Something has killed your chickens. It’s a nightmare scenario that happens to anyone who raises poultry. While it’s impractical to think that you can eliminate the threat of something preying on your chickens, you can do some things to mitigate the risk to your chickens.

Like any risk mitigation strategy, it’s always best to be proactive. In other words, do things to manage the threats before they even become a threat. By constantly thinking ahead and being diligent, you can protect your chickens when they can’t protect themselves.

The Risk Assessment 

There are two ways to think about risk assessments regarding your chickens: pre-coop construction or post-coop construction. Each assessment strategy has a plan you can employ to help spot possible problems or eliminate the risk before it even becomes a problem. 

If you haven’t built your coop yet, it’s relatively easy to think ahead and implement construction techniques to make your coop predator-proof when your chickens are in the pen. You can employ materials and construction techniques to mitigate threats by thinking like a predator.

If your coop is built already, there are still some things that you can do to retrofit it further. If you follow some simple considerations, your chickens will thank you.

Building Considerations

If you are building a chicken coop from scratch, it’s much easier to plan predator-proof construction techniques from the beginning. While the urge to save money and cut corners on construction costs is omnipresent, if you want to protect your chickens and have a low-maintenance chicken coop and run to boot, start with good materials and be consistent in your construction quality.

For example, your chosen wire may be the most crucial construction component. Go into any hardware or feed-supply store that sells fencing supplies, and they’ll have chicken wire. Chicken wire is a light-gauge, hexagonally configured wire made to keep chickens in—not keep predators out. 

A raccoon or bobcat can easily tear a hole in chicken wire and enter the coop to decimate your flock. Instead, use hardware cloth to protect your chickens. Hardware cloth is a heavier gauge wire than chicken wire and has smaller holes between the wires. The smaller holes make it more difficult for a hawk to get a talon through or a raccoon to tear a hole in the wire. 

Therefore, it makes sense to spend the extra money to design your chicken run effectively and cover any coop windows with hardware cloth instead of chicken wire. Consider, too, covering the top of your chicken run as well. It will protect your chickens from avian predators or feral cats during the day when your flock is out foraging.

While you can use hardware cloth to cover the top of the run, you can also use sheet metal. Materials such as correlated metal or R-panels can have a dual purpose of protecting your chickens from threats that come from above. In addition, a coop roof can also provide shade on hot days.

Using the same hardware cloth material, you can also consider buying an apron around the chicken run. An apron is simply a width of hardware cloth that lies horizontally and runs around the perimeter of the chicken run at the run’s base. Once the apron is in place, you can cover it with soil to hide it.

The open wire spacing shouldn’t prevent grass from growing through the apron. What the apron does prevent, however, is predators digging at the base of the chicken run and getting in.

chickens chicken predators coop
Peter Turner Photography/Shutterstock

Install a Coop Door

The most vulnerable part of a chicken’s day may be when they sleep. Once your chickens go to roost, they are all but helpless. A chicken won’t fight back at a predator. Therefore, if predators get inside where your chickens roost, they could kill the entire flock.

A coop door can solve that dilemma. You can install a simple door that you’ll have to go out and close each time the chickens go to bed. Alternatively, several companies manufacture automatic doors that open and close via timers or a photovoltaic cell that makes the door open in the morning and close in the evening. Automatic doors are beneficial and convenient, especially when you’ve got to go out of town.

Whichever door you choose, the key is to completely isolate your flock at night where nothing can get in. Except for you, of course.


Read more: Improve the doors in your coop to ensure your flock’s security.


Use Good Latches & Strong Fasteners

Like hardware cloth, good latches and robust hardware to construct your coop and run are also imperative. It will cost you more money, but complex latches and strong fasteners such as screws and bolts keep out predators such as raccoons.

Raccoons are smart, and they can open simple latches with their articulating hands.

Motion-Activated Lights

Because most predators come at night, you can help deter them by installing motion-activated lights around your coop. 

In preconstruction planning, an electrician can run an underground power source to your coop. You can also install solar-powered lights for your run. The idea is to startle potential predators and scare them away from your chickens. 


Read more: No chicken coop is impenetrable, but take these steps for added security.


Predatorproof Your Yard

Even if you have an existing coop or are planning to build a new one, you can mitigate the effects of predators by proofing your yard. An easy way to do that is to keep weeds from your coop or plan your coop construction in an area away from weeds or heavy brush.

Remember, predators use their camouflage, cover and the element of surprise to catch their prey. If you can take some advantage away from the predators, you can mitigate their effects on your flocks.

Guard animals can also be helpful. A dog, a goat or a rooster can help deter predators.

chickens chicken predators
Kate Aedon/Shutterstock

Monitor

In the end, it’s up to you to protect your flock. Even if you used the best materials and construction practices to build your coop, you still need to stay diligent and monitor your area continually.

I like to keep motion-sensing cameras deployed to see what may be sneaking around at night. 

Today, you can buy these cameras from sporting goods stores, which are relatively inexpensive. Some cameras require you to remove a memory card and download the pictures, while others use cellular technology and text you an image the moment it’s taken.

In addition, look for tracks and scat that may indicate predators roaming nearby. By watching what’s happening around the coop, you can plan accordingly to deal with any potential predators.

Predator-proofing your chickens doesn’t have to be expensive or easy. By staying on top of the problem, you can ensure your chickens will live a long and productive life. An ounce of prevention is truly worth a pound of cure. 


More Information

The Big Offenders 

If you want to build a solution, you must understand the problem. One of the first steps is to determine what predators live in your area and understand the threats to your flock. Each predator species will prey upon your chickens differently, so it’s best to meet the threat head-on. 

Therefore, the first step is to make a possible list. Consult with a local wildlife biologist or animal damage control specialist to find out what chicken predators are most common in a specific area.

For example, in my area, we primarily have coyotes, bobcats and raccoons. Therefore, feral cats and foxes aren’t much of a threat. As such, I can key in on these three predators and develop strategies in my initial construction and ongoing flock management to deal with these animals and keep them away from my flock.

To find out more about identifying common predators, check out my article “ID Chicken Predator Problems To Protect Your Flock. But I’ll do a short recap here. 

chickens chicken predators
Savoy tymesha/Shutterstock
Raccoons

They are virtually everywhere and one of the most common mammals in the United States. They are highly adaptable and can make their home in cities and rural areas. These intelligent mammals have incredible problem-solving abilities. Couple that with articulating fingers and forepaws, and you have an animal that can be deadly to your flock.

Chickens are especially vulnerable to raccoon depredation at night. Because chickens can’t see in the dark, they won’t run when attacked. Therefore, the results are devastating and complete if a raccoon gets inside your coop at night.

Opossums

While typically not chicken killers, these nocturnal animals are nest raiders. Slow-moving, they can affect your flock—especially if your hens are sitting on nests, incubating chicks. 

Skunks

Like opossums, skunks are primarily egg stealers. However, they will eat a chicken if given the opportunity. They tend to eat the chicken’s entrails as opposed to the breast or other meat. They tend to dig.

Learning to discern if a skunk’s been present is straightforward. Smell for them. While skunks spray when threatened, that musky smell follows them everywhere.

Coyotes

Daring chicken predators, they’ll steal a hen in broad daylight. After a short stalk, they’ll run into the flock, snatch a bird and run off to eat it. While they can dig and affect your flock while in their run or coop, your chickens are most vulnerable to coyotes when they are out foraging in the yard.

Like raccoons, coyotes are common in urban and rural areas alike. They are highly adaptable, prolific, and opportunistic and, as such, are a constant threat to your flock.

Feral Cats

One of the most recognized and deadly predators for birds is the feral cat. These felines, for whatever reason, are homeless and are forced to hunt for their food. Feral cats are tough to detect because they are stealthy and come and go in the dark.

Unless you catch one on a motion-sensing camera, you may never see them. Instead, you may have a secret chicken predator that is like a phantom.

Bobcats

These formidable chicken predators can dig, sneak, chase down chickens and completely decimate a flock. Like feral cats, they are stealthy and difficult to see. Unless you catch them in the act, chances are you may never see the feline.

Bobcats are also more common than you may imagine. They live across the United States. Like coyotes and raccoons, they are highly adaptable and are commonly found in urban areas, as they use green spaces for travel corridors and prey on whatever animals they can find.

Hawks & Owls

If you’ve got an adequately built chicken run, hawks and owls can predate your flock. If the chickens run loose and free-ranging out of their pen, they are vulnerable. Hawks hunt during the day, and owls hunt at night.

Therefore, chickens locked up in a house at night aren’t susceptible to predation. The same holds during the day. Chickens confined to a run are safer from avian predators. 

Foxes

Foxes are crafty, can dig and will steal a hen and run off, and you may never know what happened to it. Where foxes live, they can be deadly chicken predators.

This article originally appeared in the November/December 2022 issue of Chickens magazine.

Categories
Equipment

7 Gift Ideas For Farmers In 2022

Is it too early to wish you all a Merry Christmas? I say no, definitely not!

Thanksgiving is over, Black Friday is in the books, and the Christmas shopping season is underway. If you’re like me, you’re keen to get an early start so you’re not trying to think of gift ideas for your favorite farmers at the last minute. This is especially true if you’re shopping for a farmer.

It can be hard to find good, practical, and budget-friendly gifts that farmers don’t already have.

Need some help with your Christmas shopping this season? Here are seven gift ideas for farmers (mostly related to tools and machines) to spark your imagination and get you started.

1. Bungee Cords

Let’s start with a perfect stocking-stuffer item. Bungee cords are incredibly useful for quickly tying down loads of all sorts for transport.

Around my farm, I’ve moved hay bales, corral panels, loads of brush, potted trees and more using bungee cords to secure them safely to a wagon or cart. Consider gifting bungee cords of several different lengths for maximum versatility.


Read more: Consider these features when buying bungee cords.


2. Stone Boat

Yes, I’ve used bungee cords to tie down loads to a stone boat as well. A wooden stone boat (you can build one yourself) is a simple way to move heavy items like stumps, logs, boulders or even small machines.

Tie down your load, hook up the stone boat to a tractor or ATV, and you’re ready to go.

3. Leaf Shredder

Is the farmer in your family using a lawn mower to shred leaves for mulch? This approach can work, but it’s not necessarily as effective as using a standalone leaf mulcher/shredder.

When prepping large amounts of leaves to use as mulch or as an addition to garden soil, a leaf shredder is a convenient tool to have.

4. Tripod Stepladder

Apple pickers are helpful for harvesting apples from high in trees. But a tripod stepladder can elevate your apple-harvesting game to another level—literally.

They’re wider at the base than the top and feature three legs instead of four, providing much better stability for outdoor use and on terrain that isn’t perfectly flat. When used carefully, tripod stepladders make picking hard-to-reach apples easy.


Read more: These 5 tools make apple harvesting easier.


5. Tractor Ballast & Weights

Do you know a farmer who is struggling to perform heavy farm work with a lightweight tractor? Maybe you can’t afford to gift them a bigger tractor, but a little ballast might be all their lightweight tractor needs to gain proper traction and sharply boost performance.

Properly counterbalancing heavy loads can be the key to operating a front-end loader or lifting heavy implements on the three-point hitch. And a little extra weight near the drive wheels can help with towing or negotiating tough terrain.

Suitcase weights or wheel weights might be the perfect gift for farmers.

6. Tire Chains

While not a necessity in every climate, tire chains can make a world of difference for the farmer tackling snowy and icy conditions with their truck, tractor, ATV, etc. Using snowblower and snowplow attachments is a lot easier when tire chains are providing a big traction boost.

7. A Subscription to Hobby Farms Magazine

Let’s face it, we’ve saved the best gift idea for farmers for last. For inspiration, innovative ideas, equipment reviews, tips and tricks, farming news, instructional projects and much more, a subscription to Hobby Farms magazine brings recurring joy to mailboxes all year long.

Merry Christmas!