These design testing questions can help growers sort out the important factors in decision-making around their scale, and they can help determine equipment needs for growing farm business and projects.
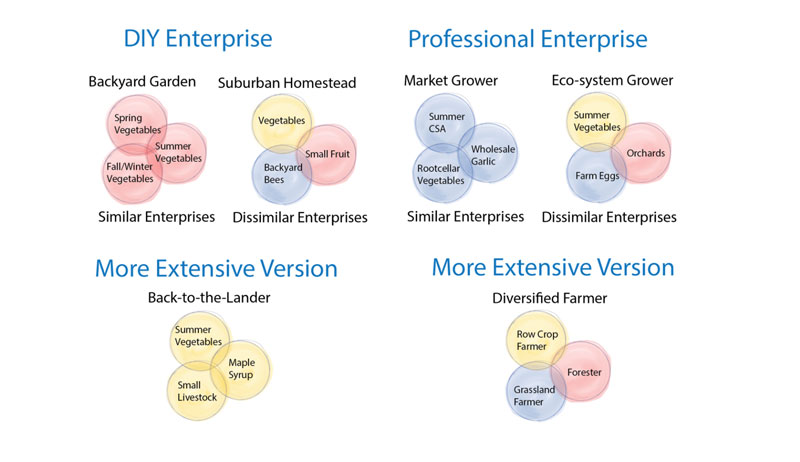
Understanding your guild enterprise production is critical for farm planning, and it is never too late to start! This template can be used to help brainstorm your guild enterprise production by asking key questions and providing space for equipment guild selection in a balanced manner.
A guild enterprise production is a blend of three enterprises
that share equipment
that use outputs (waste) from one enterprise as inputs (like fertility) for another
where labor is balanced throughout different seasons (such as avoiding a bottleneck).
These questions are all ones that should be answered very early in your design and planning process to clarify key areas of understanding for your farm and your enterprises.
Example: Suburban, just within city limits, zoned rural residential.
Why? This context helps you understand your customer base and marketing strategies, as well as the potential for expansion and the bylaw surrounding your development.
Are you extensive or intensive?
Example: Intensive, often three or five rows per bed, 12-inch footpaths, two to three successions per bed per season.
Why? This puts your design goals within the very critical parameter of how you will manage your crops (intensively or extensively). Intensive management is tight rows, many successions of plantings, smaller acreage managed by bringing in inputs (compost) more often than growing them in-situ (green manure). Defining if you are intensive or extensive sets you up for many clear decisions about tools, equipment, types of crops and management.
What are your actual production acres?
Example: 5 acres, 1.75 arable, .25 for buildings and 3 in woodlot.
Why? This is critical to define because the size of your property is less important than the actual land you manage. This is very important in helping make budgets for equipment scale and labour needs. Don’t be distracted by your larger unmanaged acreage nor feel the need to manage it unprofitably!
What are your intended actual production acres?
Example: 4.75 acres will be used actively for production; no other land is going to be rented or used.
Why? This is about planning your scaling-up process so you set intentions for how you will grow instead of just growing to fill your available acreage.
Example: Dissimilar; I will need to invest in more types of equipment, skill-building, etc.
Why? Enterprises can be similar (summer vegetables, fall root cellar crops and organic garlic) or dissimilar (honey, vegetables and pastured meats). By defining this you can plan for the very real increased cost and knowledge needed to set up a dissimilar guild enterprise production, while also understanding these tend to be more resilient in the face of socio-economic and environmental change. Understand your pros and cons of enterprise companionships.
Are enterprises DIY or professional?
Example: Mixed; this model will both provide profit and enhance well-being and resilience for me and my community.
Why? Because you may grow for yourself or as a business, and this must be defined. Either way you should be profitable! And some enterprises can be a business and other for your homestead.
Example: Transplanting trays from the new greenhouse to the fields
What is your scale-up timeline for different enterprises?
Example: First garden, then sugar bush, then market garden over three to four years.
Why? Because you should clarify where you focus your budgeting and planning in the first years of your farming or homesteading. Then you determine where you will subsequently focus investment of time, energy and money.
Will you mechanize most operations as you scale-up? Why?
Example: Yes, because I have a shortage of consistent labor and workers’ time will be focused on harvest and other tasks that cannot be tractor-mechanized easily. Hand tools will complement the basic garden guild at start-up and will continue to be used. Implements will replace some key functions later—like opting for a compost spreader and utility cart instead of a wheelbarrow and extra hands for compost jobs and hauling.
Why? When you define your weak links and set goals for your need for mechanization you can make good budget decisions.
These questions help set the stage for your enterprises and allow you to think critically about your context, where you are going and how you will get there.
We just had our first frost warning in the Twin Cities this week, while other parts of the state had their first freeze warning. We even had snow showers along the Gunflint Trail in northern Minnesota. With the temperatures dropping and the growing season coming to an end, it has us northern gardeners scrambling to preserve everything left in our gardens before it’s all lost. And one of the simplest and most common methods for quickly preserving fresh garden produce is to freeze it.
Here are five tips and tricks for successfully freezing your harvest.
Quality Matters When You Freeze Produce
Only freeze fresh produce that doesn’t show any signs of damage or spoilage.
Pick the Right Container
When freezing liquids (such as soups and sauces), use containers with straight ridged sides or wide mouth glass jars. When liquids freeze, they expand upward and outward.
Glass jars with shoulders tend to break more often from expansion because, as the liquid freezes and pushes upwards, it cracks the shoulders off the jar. This is also why you must leave headspace when freezing liquids.
Leave at least 1 inch of headspace for pint size containers and 2 inches for quart size containers.
Blanching is not a requirement but does tend to retain better color, flavor, texture and nutrients in vegetables compared to when frozen raw. Blanching is not required for fruit.
rasica/AdobeStock
Blanching is recommended for nearly all vegetables by the National Center for Home Food Preservation.
Flash Freeze Your Berries
A tip for freezing berries is to individually quick freeze them, also referred to as “flash freezing”. Wash them, dry them completely and lay the berries in a single layer on a parchment paper-lined pan or dish.
Put the fruit in the freezer to freeze solid and once frozen solid, consolidate the frozen berries into a freezer bag or other container. This allows you to pour out the number of berries you need, versus having a blob of frozen berry-mess to thaw out.
This same method works for sliced peppers, beans, chopped rhubarb, grapes, etc.
Package Properly
Proper packaging is key to avoiding freezer burn. Freezer burn occurs when air gets to the food and moisture evaporates. To avoid freezer burn, use freezer bags and remove as much air as possible from the bag before sealing and freezing. You can also use containers specifically designed for freezing, straight sided jars or (even better) a vacuum sealer.
bravissimos/AdobeStock
Frozen produce that’s continually kept at a temperature of 0°F or lower should keep for many, many years if sealed properly.
The editors of Chickens magazine are always on the lookout for great chicken photos, and in a recent print issue they ran a contest they titled Shutterclucks. Above is the winning photo submitted by Jordan Reed of Flemington, New Jersey, and below you’ll find others chosen and printed in Chickens. Each one includes the name and city of residence of the chicken lover or lovers who submitted it.
Alyse Monta
Hopedale, Massachusetts
Cecily Anderson
Burnsville, North Carolina
Cynthia Mansfield
Worcester, Massachusetts
Damon Hair
Cabot, Arkansas
Jeanne Spain
Danbury, Connecticut
Jodi Feldhaus
La Grande, Oregon
Katie Spears
Johns Island, South Carolina
Sammy Harris
Kodak, Tennessee
Shea Price
Russellville, Alabama
Got a cool clucker you want to show off? Email us an image of your chicken(s) to chickens@chickensmagazine.com with the subject line Shutterclucks, and include your name and mailing address.
This story originally appeared in the September/October 2022 issue of Chickens magazine.
Thanks to widespread public information campaigns, most of us know that ingesting lead is harmful to our health. We’ve likely heard that lead exposure is especially serious for young children. It can damage the still-developing brain and nervous system, slowing an exposed child’s overall growth and capacity to learn.
It can also cause hearing and speech problems in children and cardiovascular issues in adults.
Over the years, we may have heard warnings about potential lead exposure from flaking lead paint or old lead plumbing fixtures. But what about lead (and other heavy metal) that may be present in our garden soil? Turns out, surprisingly little guidance exists when it comes to the lead content in the garden.
“What we found is that just more than half of the 40 most populous cities that we looked at had any sort of policy pertaining to soil safety and urban agriculture,” Lupolt says. “A lot of the cities didn’t have any sort of guidance whatsoever.”
The researchers found just 10 policies dealing with lead-contaminated soil, in particular. And the “acceptable” levels of lead in soil varied widely—from 34 to 400 parts per million (ppm).
Some of the cities that do have soil safety policies also provide soil-related services, such as soil testing for urban farms. They include Austin, Texas; Columbus, Ohio; Denver, Colorado; Los Angeles, California; Louisville, Kentucky; Milwaukee, Wisconsin; Minneapolis, Minnesota; New York, New York; Philadelphia, Pennsylvania; Phoenix, Arizona, and Washington, DC.
Los Angeles, California; Phoenix, Arizona; Philadelphia, Pennsylvania; and Tucson, Arizona also offered urban farmers some site history/assessment services.
Our cities and states offer a hodgepodge of soil safety policies, but what about something official from the federal government?
“We have guidelines for the EPA Superfund Program, which is about redevelopment of sites that are known to be contaminated,” Lupolt explains. “Those are guidelines for industrial or residential kinds of land uses. But there’s really not guidance out there at the federal level for soils that are used to grow food in urban areas or rural areas coming down from EPA or FDA.”
In 2014, the U.S. Environmental Protection Agency’s Office of Solid Waste and Emergency Response did release special recommendations to help gardeners reduce their lead exposure. However, the GeoHealth study authors noted, “[The guidance] does not consider that urban growers may be exposed to urban soils at greater frequencies (e.g., 5 or more days a week) and for longer durations (e.g., 8 or more hours each day) than hobby gardeners. Consequently, the recommendations may not be adequate to protect urban growers from lead exposure.”
Whether your city has safe soil policies in place or not, you can still take action to reduce your exposure to lead and other soil contaminants in the garden.
“One thing that we always recommend to anybody starting out is to familiarize themselves with the history of the site that they’re growing on,” Lupolt says. “Conduct a site history to learn a little bit more about past land uses. That site history can be particularly helpful in understanding which potential chemicals to look for. So depending on how the land was used previously, lead might not be the particular thing to be looking for. It could be something else.”
You may be able to turn to local government agencies to learn more about your property or simply start by asking your neighbors what they may recall. She continues, “Was there a demolition of a home built before 1970 on the site? Those sorts of things can just kind of give you some clues.”
Depending on your results, you may need to grow in raised beds with clean soil, rather than farming the area’s native soil. To further reduce your potential lead exposure, Lupolt recommends thoroughly washing your hands after time in the garden and removing gardening clothes and shoes before entering your home.
“Thoroughly wash all of your produce before you consume it,” she says. “And peel any vegetables that can be peeled just to be sure that any kind of soil splash or soil adherence is completely removed.”
Whenever I go away, be it for a week or a weekend, I always experience a slight hesitation about returning home. Not because I don’t miss my family—I do! But with four sons and a husband left to their own devices, I tend to worry about what shape I’ll find the house in upon my return. You may therefore understand my worry when I returned home after my three-week road trip across America with my youngest son, Bryce.
Surprisingly, the house was in perfect shape. No laundry awaited washing or folding. No dishes awaited washing. Furniture, floors, everything was in tip-top shape. Even the cats were groomed and fed. I breathed a sigh of relief that all was well and didn’t require a week of dedicated cleaning (or repair).
That relief vanished when I went to lock up our flocks for the night. All of our birds were alive. They had food, water, grit and shell, and their litter was fresh (a little too fresh, but I’ll let that slide). With minimal difficulty, I locked up both groups of Ancona ducks and our Ameraucanas, then headed over to close up the Silkie/Orpington coop. Fortunately, the girls were fine. Butters Orpington was settled into a nestbox for the night, with Natalya Silkie tucked underneath her.
And then there was Tiny Orpington, on the floor of the coop, motionless.
Tiny’s Troubles
I immediately panicked. Tiny—Thomas, Jr., or TJ, but nicknamed Tiny because he is a dwarf—had been the picture of health when I’d left in mid August. Here he was, for all appearances, dead. I gingerly reached out a hand to feel if he were breathing … and Tiny immediately roused, rather grumpily and noisily. He gave me the ol’ stinkeye, then settled himself back down to sleep.
Once again, relief flooded through me. And once again, it was only momentary. What the heck was Tiny doing sleeping on the floor?
He always occupied the leftmost spot on the roost, closest to the ventilation window. He’d never in his life had issues perching. As a baby chick, he had been the first of his rooster brothers to figure out how to use the perch in the brooder. When, as a cockerel, I’d moved him into his coop, he had almost instantly leapt up to the perch, where he could have a great view of all the hens he’d now be guarding (or, quite possibly, to escape from the hens).
He’d never been ill. He’d never been injured. Yet here he was, snuggling down in the fresh litter for the night.
Perplexed, I left him alone, locked up his coop and headed back to the house. I asked my family about Tiny’s odd behavior. My older teen, Jaeson, nodded. “Oh yeah! I meant to tell you. Tiny’s been sleeping on the ground for about a week.” I promise I did not put my sons through an Inquisition, but I did learn that there’d been no predators, the weather had been constantly temperate, no injury had been noted on any bird, and the feeder and waterer had been vigilantly maintained at full.
In short, no outside factor was causing Tiny to bed down on the ground.
The next day, I caught him as he exited the coop and brought him over to our examination table. He balefully glared at me while I thoroughly examined his feet, his legs and pretty much every other part of his body. I searched for a physical cause that might have initiated this bedtime ritual.
I spent a good half hour just observing him in his run, watching how he interacted with the hens and with his environment.
There was nothing amiss at all there, just as there had been nothing wrong with him that I could detect. I even waited semi-patiently for him to poop so I could examine his droppings for any telltale signs like worms, blood or mucus. Nothing.
Tiny seemed hale and hearty. So it was time to contact the poultry scientists and veterinarians I know to get their thoughts on Tiny’s behavior.
As it turns out, there are various reasons that a chicken—male or female—might stop perching. Here are the top four culprits.
Ana Hotaling
Bumblefoot
Bumblefoot (or Pododermatitis) is an inflammatory condition in the soft tissues of a chicken’s foot. This affliction can range from a minor change in skin texture to a very noticeable limp and crippling deformity. Caught early enough, bumblefoot is easily treated with antibiotics and frequent coop cleaning.
Severe cases of bumblefoot can affect the bone, resulting in the death of tissue, bone and possibly the bird. Bumblefoot develops very quickly and could have set in while I was away. It would definitely have interfered with Tiny’s ability to perch.
A thorough examination of his feet, however, showed not even the slightest change in skin texture and no inflammation.
Scratching keeps chickens active all day, but it also serves a second purpose: the repetitive clawing at the ground naturally trims the birds’ talons, keeping the claws at a functional length. Like human fingernails, chicken talons continue to grow throughout a bird’s life.
When birds become inactive—either by choice, by confinement, or by inclement winter weather—their talons can grow overly long, possibly even curling over the tops of the toes. Overgrown talons can inhibit movement. Even simple motions like walking and scratching become difficult or impossible.
Overgrown talons would definitely impede a chicken’s ability to perch, as this involves a rooster wrapping toes around the roost. When I checked Tiny’s feet, however, I saw that his talons were their usual size.
Although the skin on a chicken’s foot seems tough and impervious, it can be pierced by needle-sharp objects such as roost splinters, nettles and thorns. An embedded splinter can cause pain and swelling. If not removed, infection and abscess can occur, requiring medical treatment.
Tiny was strolling, trotting and hopping around his run without any indication of a sore foot, however. And visual inspection uncovered nothing noticeably embedded there.
Viral Arthritis
Just like humans, chickens can suffer from arthritis. While human arthritis is most commonly caused by injury and by the wear and tear of age, arthritis in chickens is caused by a reovirus infection.
Affected birds suffer from inflammation of the leg joints and/or tendons. They present as lame, have swollen joints, and experience difficulty with walking, scratching and other forms of mobility. Because of the swelling in the toe joints, perching would be extremely difficult for a bird afflicted with viral arthritis. Tiny, however, showed no signs of joint swelling or hampered mobility.
Tiny’s refusal to perch stymied me. He was the picture of perfect poultry health, fluidly active and doting yet protective of his hens. I tried lifting him onto his coop’s perch, feeling his feet to make sure the little rooster had gripped the roost. Each time, he squawked angrily at me, then settled himself on the roost, only to purposely hop back down moments later.
One night, after struggling to get him to perch, I peeked through one of the coop’s vents to watch what my rooster would do next. After a minute or so, Tiny jumped off the roost, then softly vocalized to his hens as he settled himself in his new favorite sleeping spot. To my surprise, a couple of the girls went over and snuggled up to him!
Tiny’s flock consists of Silkies too small to hop up to the roost and blind Butters, who perched until she could no longer see. Tiny wasn’t being difficult, nor was he suffering from some malady. He was choosing to sleep on his coop’s floor to be closer to his hens.
I returned to my house, proud of my responsible little rooster and relieved to know that, come winter, Tiny wouldn’t shiver alone on that coop perch.
Alittle red hen struts around the pen, clucking away, when suddenly it lets out a weird, warbly cock-a-doodle-doo. Did that chicken just crow? Probably, and it’s not as uncommon as you might think.
Chicken sex reversal can occur in hens for various reasons, but ultimately, it’s tied to an ovary that quits working and the output of the one that never worked. Genetically, the hen is still female, but she may no longer look or act like one.
Inside a Normal Hen
Like other females of a species, hens have two ovaries. However, only one of these ovaries works, usually the left ovary, and it’s perfectly normal for chickens.
“In most avian species, however, there’s a failure of one ovary and its corresponding oviduct to develop,” Jacob says. “The result is normally the presence of the left ovary and oviduct reaching functional development in the adult. The right oviduct is underdeveloped or rudimentary.”
Jacob has a Ph.D. in poultry nutrition and more than 40 years of experience working in poultry extension and outreach. She previously worked in Mozambique, Africa, for four and a half years on a poultry project, in Florida for five years and Minnesota for seven years before settling in Kentucky, where she’s been for more than 12 years.
She specializes in small and backyard flocks and youth poultry programs, especially 4-H and embryology in the classroom.
Richard Blatchford, an assistant professor of extension, small- to large-scale poultry, in the department of animal science at the University of California, Davis, specializes in husbandry, behavior and welfare of poultry. He works with broilers, layers and backyard flocks and speaks to groups about backyard flock behavior and nuisance behavior that he helps them fix.
“Female birds only have one functional ovary, and the other ovary doesn’t create ova, but it does release some testosterone,” he says. “If the functional ovary is fine, it’s not enough testosterone to make any big changes in the bird. She appears to be a female, she lays eggs, she goes on with her life as she should.”
Hens undergo chicken sex reversal, physically changing into a rooster, due to a malfunction in their working ovary. Numerous things can prompt this malfunction in the chicken, leading to a spontaneous sex reversal. Something must happen to the functional ovary to cause it to become inactive before this change occurs.
“This could be something like a disease,” Blatchford says. “She could have ovarian cancer, which is pretty common. She could have some other tumor on her ovary. It could be caused by an injury.
“Sometimes, it could just be age and her body just kind of gives out. There could be lots of reasons why the ovary becomes nonfunctioning. For whatever reason, the ovary stops working.”
Jacob adds that an ovary damaged by tumors or disease causes the hen’s hormone levels to drop and the testosterone takes over. The increased testosterone gives the chicken secondary male characteristics and, sometimes, the right oviduct develops into a testes-ovary.
“Essentially what happens is they stop producing estrogen,” Blatchford says. “So, the testosterone from the nonfunctional ovary becomes the major sex hormone. Because they now predominately have testosterone circulating, they start to develop secondary sex characteristics of males.”
Both experts agree that chicken sex reversal appears to be more common in older birds. This makes sense as their bodies naturally produce less estrogen as they age, and they’re more prone to disease, tumors and other issues with their functioning ovary.
“We typically see this when the birds reach, I’d say most commonly around 5 to 6 years of age,” Blatchford says. “Their reproductive system is starting to break down normally, and they just become prone to other types of diseases. So that’s when you see things like ovarian cancer and other types of tumors occurring on the ovary.
“This is mostly because she’s been using it a lot. It’s starting to break down.”
However, Blatchford stresses that just because a bird is aging doesn’t mean she’s eventually going to experience chicken sex reversal and start showing signs of becoming a rooster. Jacob agrees that although it’s more usual for older hens to have sex reversal, it can occur any time after a chicken starts laying.
“It can happen in younger individuals,” Blatchford says. “It just kind of depends on the underlying pathology that has to occur for the change to happen. There’s some genetic, heritability component.”
namaki/Shutterstock
Crowing & Other Odd Behavior
Hens that undergo chicken sex reversal usually only develop some rooster traits. One of the most common traits is crowing, which could be bad in urban areas where roosters aren’t allowed. Trying to explain that there’s not a rooster present may be difficult with all that crowing going on.
According to Jacob, hens are physically capable of crowing without any male changes occurring. But they usually don’t want to because of the estrogen in their bodies. She said it’s rare for a hen to start crowing for no reason. Generally, it means there’s a problem with their hormones.
When a chicken begins crowing, it’s often not a full crow. “It’s kind of a weird sounding crow,” Blatchford says. “For people who’ve had roosters, they know when they first start crowing, it kind of sounds weird. That’s kind of the sound that comes out because she’s not used to doing it. Plus, the acoustics or the vocal systems of the two sexes are slightly different. She just doesn’t have the crow a rooster has, and it’s probably always going to sound a little off.”
Blatchford adds that people often notice other behavior changes in hens that are changing before the birds start crowing. The hen may become more alert or start bossing the other birds around. She might try to get them to go places or follow her. Essentially, she starts doing things you’d expect roosters to do.
“She may even start mounting other birds, but that doesn’t always happen,” Blatchford says. “The hen may become much more protective of the flock though. Sometimes they become more aggressive toward people, which is usually only a behavior roosters exhibit.
“But the biggest difference is she probably won’t lay any eggs.”
For hens that undergo chicken sex reversal and start taking on rooster traits, their egg-laying days are usually behind them. Jacob says changed hens won’t ever lay eggs again. “The changed chicken is typically infertile,” she says. “No eggs or sperm — at least none that reach the outside of the body.”
Blatchford confirms that, for the most part, hens that undergo the chicken sex reversal stop laying eggs because of the underlying issue with the ovary. However, people have told him that some hens do still lay eggs.
“I’m not entirely sure what’s going on there,” he says. “But for the most part, hens will stop laying when the change happens. However, it’s not because they’ve changed into a rooster. It’s because their ovary is no longer working, so they’re not producing eggs.”
Moira McGhee
Backyard Flock Issues
Blatchford also notes that backyard chicken flocks seem more prone to having hens undergo sex reversal. Primarily, it’s because the phenomenon occurs more frequently in older birds. He says the condition is much more common with backyard flocks because we allow the birds to age. In comparison, chickens raised as farm animals or in commercial productions get slaughtered when they’re relatively young.
“Weight is also a big issue,” he says. “Most backyard birds are overweight and that can be an issue with the reproductive system and the ovaries. That’s probably why I hear about sex reversals a lot because most backyard birds are overweight. We feed them too much good stuff.”
Even foods we think are healthy, sometimes they aren’t healthy if the birds are eating a lot of it. Kitchen scraps, usually some sort of vegetable or fruit, are something the birds really like. But eating a lot of scraps over time isn’t good for them. It actually packs on the pounds.
Some chicken-keepers have never even heard of a chicken turning into a rooster, much less have seen this sex reversal happen. However, it’s becoming more common for backyard flock owners to mention seeing the change occur.
While it’s difficult to gauge how often this phenomenon happens, it seems to be happening a lot. “It seems to be more common than it used to be,” Jacob says, “[but we’re] not sure why.”
Blatchford says that it’s difficult to know what the percentage is in the population that we see this, he does get asked about this a lot. “So, I assume it happens quite frequently,” he says.
Both experts agree that the reverse doesn’t occur. A rooster won’t suddenly become a hen and start laying eggs, so don’t expect to hear a cock-a-doodle-cluck-cluck-cluck any time soon!
More Information
Special Care Requirements
Backyard chicken-keepers tend to treat their chickens as pets and are greatly concerned about their well being. Therefore, some common questions are whether they need to do anything for their hen-turned-rooster and will it die sooner than its flock mates.
Jacquie Jacob, poultry extension project manager in the department of animal and food sciences at the University of Kentucky says the lifespan of a chicken could be affected because a disease or tumor may have caused the sex reversal. However, the hen generally doesn’t require any special treatment.
“It really depends on why the change happened,” says Richard Blatchford, an assistant professor of extension, small- to large-scale poultry, in the department of animal science at the University of California, Davis.
“For instance, she may live out her life fine. She may just be more like a rooster and not lay eggs but live out her life. However, she may have a shorter lifespan if it’s a cancer issue or some other disease that may cause mortality. As far as special treatment, she’s still a chicken. She’s still doing her thing, so you really don’t have to change anything you’re doing.”
Due to the concern that a disease or cancer caused the change, backyard chicken-keepers may want to take their hen to a vet to learn the underlying issue and/or request care. Unfortunately, this may not help.
“The vet may not actually be able to tell exactly what’s happening either,” Blatchford says. “Usually after the birds have died, there’s a necropsy performed. This is when you can actually see what’s happening with the organs. Then, you can kind of backtrack, and determine what disease was happening, why her ovary wasn’t functional and why she was doing all these weird things for a hen.”
You’ll have to let nature take its course for the most part. Jacob says that once a chicken begins morphing into a rooster, it’s usually too late to stop or reverse what’s happening. Plus, treatment is pretty limited for backyard flocks. Many vets won’t even treat chickens.
If there’s no sign of illness, Blatchford says the male behavior isn’t necessarily something to worry about.
This article originally appeared in the September/October 2022 issue of Chickens magazine.
Just like all of our pets, chickens get injured. Whether it’s a dog bite, drama with a flock mate or a run-in with sharp fencing, your chicken can acquire a wound. However, a chicken is just different enough—as a bird as opposed to mammal—to make wound management a little trickier.
That being said, if you’ve done some basic first aid on yourself, your kids, dogs, cats, horses, llamas, etc., you can also treat a wound on a backyard chicken. While chickens aren’t dogs, cats or even children, in general, more similarities exist than differences.
Example: If something is bleeding, you need to stop it from bleeding.
First: Know When to Call a Vet
First of all, know your limitations. If something is bleeding excessively or you’re dealing with broken bones, puncture wounds from dogs and cats or similar emergency-type situations, your bird needs a veterinarian.
To that point, make sure you have found a veterinarian who treats poultry before an emergency happens. Finding a veterinarian is relatively easy, but finding a veterinarian who treats poultry isn’t.
Most veterinary schools in the U.S. offer limited, if any, training in chickens. We’re working on addressing that supply issue due to the increased demand for veterinary services for backyard poultry.
Make sure when you do use first aid on the wound that you take notice of the rest of the chicken. For example, if there is a laceration from a dog bite, don’t ignore the rest of the bird. Examine the entire bird feeling for deformities, fractures and additional injuries that might be less obvious.
Other things to take notice of include:
The bird should hold its head high and even. Head tilts can be a sign of disease or trauma.
The comb should be red, upright comb and free of scabs. If it’s not red, the bird could be anemic or could have lost a significant amount of blood.
Head and the orbital areas around the eyes should be free of swelling. Swelling in these areas can occur from sinus infections and trauma.
Eyes shouldn’t be cloudy and should be free of discharge.
Nostrils should be clear and free of any discharge, crust and scratches
First-Aid Basics
Murphy’s Three Laws are:
If anything can go wrong, it will.
Nothing is as easy as it looks.
Everything takes longer than you think it will.
Sometimes, I think Murphy must have been a veterinarian, who owned a fixer-upper house and an old car he not so affectionately called “Lemon.”
My point? It’s easier to talk about wound management in chickens than it is to do wound management in chickens. Noting that, don’t make perfect the enemy of good. Good wound management is better than no wound management.
Remove the Injured Bird
First things first: If you have a chicken that is bleeding, remove it from the flock. Chickens are naturally attracted to blood, and they’ll peck at the bleeding chicken, often making the wound worse (and it’s not pretty!).
By having a small “sick pen,” you can house the bird temporarily until the wound heals. (Chickens don’t like to live by themselves, so long-term housing by themselves isn’t good either.)
Clean the Wound
As far as wound management, clean and flush the wound to remove dirt. Use a bathtub sprayer and/or have a 12- or 20-cc syringe can help with the flushing.
First, flush with lukewarm water, and then wash and flush with either dilute soap or very dilute betadine. (The betadine makes the water turn brown, and we’re looking for a faint brown color.) Betadine in high concentrations can be caustic to the skin of chickens.
Chad Robertson Media/Shutterstock
Dressing the Wound
As far as dressings on top of the wound, you have two general choices: dressing with a bandage or no dressing and bandage. A lot of your decision on this really comes down to personal preference. You can typically get the same results either way.
With respect to dressing, you can either use silver sulfadiazine (SSD) or manuka honey, which are both considered bacteriostatic (i.e., they prevent the growth of additional bacteria). If the injury is near the eyes, don’t use SSD because it can be harmful to the eyes.
If you use the SSD or manuka honey, put a bandage on it because both are sticky and will attract dirt.
For a bandage, use a nonadhesive bandage and change daily, if possible. For nonadhesive bandages, I prefer Tegaderm, which you can purchase over the counter at a local pharmacy. You can put some loosely wrapped vet wrap on after the Tegaderm.
Alternatively, clean the wound two to three times a day, and keep the wound area as clean and dry as possible. The issue I have with bandages and dressings in general is that for some birds you end up messing with them so much they often stop laying because they’re being overly stressed. From my perspective, unless it’s absolutely necessary, don’t use ointments and bandages.
If the chicken irritates the wound, you can find equivalent e-collars online. The chicken with the e-collar isn’t usually too happy wearing one, but such is life sometimes.
When our backyard chickens are injured, our paternal instincts take over. We want to do everything possible to get them healthy as soon as possible. Unfortunately, many people tend to go overboard beyond what has been described and start to use antibiotics inappropriately.
If the wound looks infected or if you’re dealing with a puncture wound, antibiotics may be necessary. In general, most antibiotic therapy will be selected based on culture and sensitivity of an isolate taken from the wound site. In some cases, veterinarians have an informed guess about what type of antibiotics work best.
You can use a topical ointment-based antibiotic such as Bacitracin. However, ointments as previously discussed can attract dirt.
For the do-it-yourselfers out there, access to over-the-counter antibiotics has been drastically restricted over the last few years. This is due to the inappropriate use of antibiotics in food animals, including chickens. Specifically, recent federal regulations (FDA Veterinary Feed Directive) have severely restricted access to previously over-the-counter antibiotics commonly sold by feed-supply stores.
Per the VFD, owners must now have a relationship with their veterinarian to get a prescription for antibiotics deemed medically important.
Note Withdrawal Times
In a hen, when any drug is administered, its ovary, follicles and oviduct are exposed to the drug. Hence, there is potential for drug residues to be present in those tissues that play an integral role in table-egg production. More specifically, the yolk and egg white can serve as “storage sites” for drug residues within the egg.
This is why it’s important to only use drugs and withdrawal times that are approved by the FDA. When drugs are used in an extra-label manner, the Food Animal Residue Avoidance and Depletion Program can provide an estimated withdrawal interval.
The FDA has currently approved eight drugs for over-the-counter purchase for use in laying hens (active ingredients: amprolium, bacitracin, erythromycin, hygromycin B, nystatin, tylosin, nitarsone and proparacaine hydrochloride). If used appropriately, these approved medication formulations can be administered without any withdrawal time (i.e., the time period required to not consume or sell their eggs and meat after the antibiotic has been withdrawn).
Due to the recent revision of the VFD, all of the previously listed drugs—except for bacitracin and amprolium, which is an anticoccidial drug and hence isn’t an antibiotic and therefore not considered medically important for human health—aren’t currently available over the counter.
If you think your chicken has an infection, you’ll now need to have an established veterinarian-client-patient relationship in order to get a prescription to the previously-mentioned antibiotics.
In summary, basic first aid of poultry isn’t too complicated, and you can certainly do it. However, be preventative and astute so you can catch small issues before they become big deals.
More Information
Avoiding First Aid
As stated in the column, we want to mitigate the chance of things that lead to needing first aid in the first place. The famous line from Robert Frost’s “Mending Wall” poem notes that “good fences make good neighbors.” This could be paraphrased to the less eloquent but hyper-relevant “chickens that have good fences are more likely to have healthy and happy lives.”
In other words, good fencing will help you avoid the drama associated with predators. With respect to fencing, chicken wire just doesn’t cut it. Unfortunately, chicken wire is far too weak and the spacing of the gaps is way too wide.
Instead, hardware cloth should be used and buried at least 4 to 5 inches underground (rodents are good diggers) with gravel placed at the fence line (5-inches wide and 5-inches deep), because rodents don’t like digging through gravel.
This article originally appeared in the September/October 2022 issue of Chickens magazine.
Lately, I’ve been taking down a lot of old fencing around my farm. Actually, it’s not really accurate to call it fencing anymore. Decades ago, my farm was crisscrossed with barbed wire fences installed on wooden posts. But most of the wires have either come loose from their posts or the fence posts have rotted and collapsed. This left the wire on the ground with weeds, shrubs and trees growing up in between.
Cleaning up these old fence lines is easier than you might think. I wait for autumn (when I can comfortably wear heavy clothing), put on safety goggles and leather gloves, and carefully cut the wires into short sections with sturdy bolt cutters. Each piece is placed in a box for safe transport and disposal.
When I get to a broken fence post, I carefully remove the old fencing staples holding the wires in place … and debate whether or not to salvage the post.
Wait—what? Why would anyone salvage these decades-old wooden posts? If they’re rotted enough to have collapsed, aren’t they useless? And if they’re still standing, aren’t they ready to fall over at the slightest touch?
Those are all valid questions, but fence posts age gracefully in my opinion, and there’s something about the patina and weathered history of an old fence post that makes me pause when clearing them away.
And if you’re willing to put in a little effort, old fence posts can often be salvaged and repurposed in useful ways.
In a best-case scenario, the posts you’re removing might be surprisingly strong and sound. A couple years back, I cleaned up the largely fallen barbed wire from a fence line surrounding my farm’s old pond. Many of the wooden posts are still rock-solid and sturdy in the ground.
I could probably dig them out and put them to use somewhere else. I’m more inclined,however, to install boards between the posts, paint everything white, and turn the fence line into an attractive wooden board fence.
Other times, you might run into situations where wooden posts have rotted at ground level, but the aboveground portions are still sound. Depending on the height of the posts, you might be able to repurpose them into a shorter fence. If the posts were originally 9 feet long (with 6 feet above ground and 3 feet underground), you can take the good 6-foot sections, bury the bottom 2 feet, and have a 4-foot-tall fence perfect for growing grapes or other climbing plants.
Of course, wood doesn’t last forever. Not every fence post will be salvageable.
If the entirety of a post is soft with rot, it might be time to dispose of it. And if you don’t know the origin of an old fence post, you should consider the possibility it may have been treated for rot resistance before its original installation. You should be careful using old posts for gardening or agricultural purposes (like marking the border of a garden bed), because you don’t want the post leaching toxins into your soil.
But posts that still have sound sections don’t have to be disposed of with the rest of the fencing material. Taking down an old and unneeded barbed wire fence line might supply you with enough posts to build something new from the remnants, with a well-aged patina coming along as a bonus.
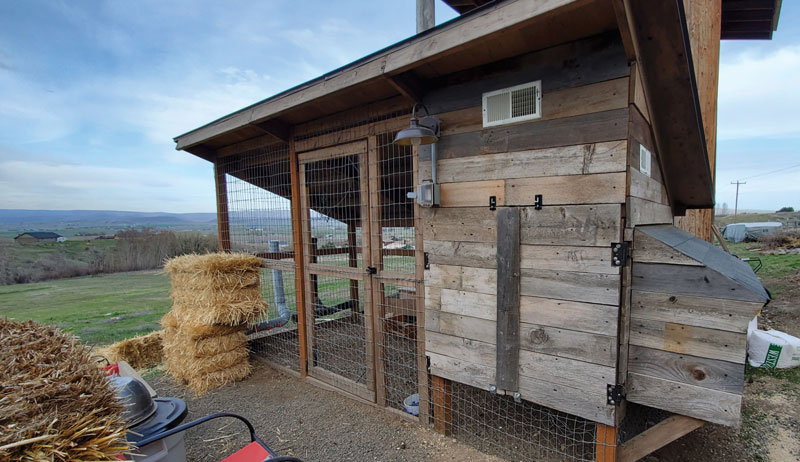
My family decided to move to the country a few years ago. And the first thing my 6-year-old daughter had her heart set on was chickens. We initially rejected the idea, but after a few months, my husband and I dug into the world of chickens online and decided that keeping a small flock could be fun.
We decided on a small chicken coop, and I had to have it look good. We set the fencing down into the dirt and put large rocks on it before covering it up, as we know coyotes were close by.
We used house vents up high in the chicken coop area for ventilation, which can be closed, if needed. We live in a windy area so the closable vents have been handy.
We gussied up the chicken coop with reclaimed fencing boards, which I absolutely love. My husband is an irrigator at a local college. So he used his imagination and PVC pipe skills to create a feeder and waterer, which hold about a week’s worth of each in them.
Overall, we love our chicken coop and our small flock. It has been a joy having chickens in the yard and in our hearts. — Erica Smith
This article originally appeared in the September/October 2022 issue of Chickens magazine as a “Cool Coop” feature. Have a cool coop you’d like to share? Email us a short write-up (~250 to 500 words) about your chicken coop along with a few images to chickens@chickensmagazine.com with the subject line One Cool Coop, and include your name and mailing address. Check out Chickens magazine for current prizes and contest rules.
As leaves begin to fall and nights get cooler, daily management of your cattle herd begins to change and take on new upcoming challenges. During the summer the main concerns included navigating consistent heat and providing plenty of water and shade. Winter, however, requires us to pull on coveralls, break the ice and set up a dry place out of the wind—in addition to providing plenty of quality feed.
Cattle can adapt well to cold temperatures and bitter winter weather when properly cared for.
While you likely won’t bring your cattle into the house to lay next to the fireplace, there are several steps you can implement to help your animals cope with harsh winter weather. These include:
Ensuring good body condition before entering winter
Setting up an adequate windbreak or run-in shelter
Providing plenty of proper feed
Providing access to non-frozen water
As Seasons Switch
Conditions can indeed be unpleasant for cattle during the hot summer days or cold winter nights. But spring and fall, with their extreme temperature fluctuations, can actually be harder on animal health.
During these times, it’s not uncommon to experience more sickness running through the herd as the hot/cold begins to take a toll on their immune systems. Work to be proactive and jump on early signs of sickness. Do what you can to reduce their stress by offering a comfortable resting place and plenty of fresh water.
As with most other areas of the homestead, it’s good to make a list of tasks around the barn/cattle facilities to tackle before cold weather comes knocking. Basic chores include cleaning out any feeders that could use a good scrubbing after a summer of use. Also check the watering systems and ensure all of the heating elements are in working order.
The shelter provided for cattle can range from a full barn to a simple windbreak. Regardless of what structure you choose, make sure it’s in good shape and well maintained so that it can do its job properly.
Repair barns or shelters to help reduce major drafts, while still keeping proper ventilation in mind. A more simple windbreak can be created with a shelterbelt (a group of trees in a row to help provide protection from the wind). You can even set up a group of round bales against each other or a fence lined with tin or metal sheeting to block cold winds.
Kolton Krispense, (a multi-generational cattle rancher, farmer and my husband!) recommends that, if any animals on your homestead do not have access to a body of water (such as a river or pond) and depend on a well, you should ensure a plan is in place in case electricity is knocked out and the well is unable to be run as normal.
I can remember times as a child when we would have an ice storm and the power would go out. My dad would pull the Ford tractor and generator out of the lean-to, back them up to the power pole in front of the house, and turn it on long enough for us to shower and do any necessary chores.
Cattle require plenty of fresh, clean water year-round, and a winter back-up plan is critical. By having a plan, you can turn what might have been an emergency situation into just an inconvenience.
It is also a good habit to check over your wells and waterers before winter even arrives. Order replacement parts and make repairs while the weather is still pleasant enough for outdoor jobs.
If not using heated waterers, be sure to invest in a good pair of coveralls and a quality axe for when you need to chop the ice.
Feed & Body Condition
Just like people stay warmer with multiple layers of clothing on, cattle will stay warmer when they have enough extra fat (insulation) and a good quality coat of winter hair on them before entering the colder months. If you have any cows preparing to calve later in the winter (known as spring-calving), it’s especially important to ensure they enter the colder season in good condition to avoid extra stress and compromised health.
During the winter, you should feed cattle a variety of dried forage, as access to fresh grass is extremely unlikely. To counteract the change in forage quality (dried as opposed to fresh), you’ll likely need to supplement larger quantities of the right grain into your cattle’s daily feed rations.
Last year during one of the most bitter cold snaps, the guys went out to the pens and began unrolling round bales for the cattle to bed down in.
I don’t think they had even finished unrolling a bale before the cattle curled up in it. To help reduce stress on your animals and offer another means of comfort, make sure you keep plenty of bedding on hand such as straw or hay to unroll during times of extra cold weather.
Supplies to Stockpile
Whether it’s a helpful tool to keep in the shed or something you will need to stock a quantity of, here is a list of suggested items to make sure you have on hand:
Plenty of feed (both forage and grain)
Salt and mineral
Tightly-lidded containers (for feed storage)
Mouse traps and barn cats
Bedding (such as hay or straw)
Medicine
First-aid items (for when the vet can’t make it right away)
Tools for breaking frozen water troughs (such as axes and ice picks)
Heat lamps and bulbs
Extensions cords
Extra garden hoses (in case one freezes and splits)
Water well and heated waterer components and parts
Tractor and generator
Fuel for machinery
Feed Storage
Stocking up on necessary items can be very helpful, but preparedness can turn wasteful if improperly stored goods begin to spoil. If you decide to store an extra amount of grain or other feed, make sure you have the proper means to store it, such as an overhead bulk bin or trash cans/bins with well-fitted lids.
Keep the feed in a dry, dark place with enough ventilation to prevent dampness and mold. (Fungus could present a whole other problem for your herd.)
Winter preparation can certainly feel daunting. But don’t underestimate the sense of calm one gets from knowing animals are safely bedded down in the comfort of provided shelters. Just a little bit of forethought and hard work can go a long way to making sure your livestock stays comfortable and healthy all winter long.


 We decided on a small chicken coop, and I had to have it look good. We set the fencing down into the dirt and put large rocks on it before covering it up, as we know coyotes were close by.


