Categories
Farm & Garden

Growing Mushrooms at Home: A Beginner’s Guide

Growing mushrooms at home is easier—and more fun—than you might think. With just a little space, some humidity, and the right starter kit, you can cultivate gourmet varieties like shiitake, oyster, lion’s mane and even portabella right on your kitchen counter.

How I Started Growing Mushrooms at Home

Years ago, I received a box in the mail as a birthday gift from my kids. It contained a big lump of white, popcorn-looking stuff in a plastic bag (so attractive!). How sweet of them to remember me with this … whatever it was! Well, it turned out to be mushrooms.

Of course, my kids knew that I loved mushrooms and would get a kick out of watching them grow. And yes, they grew. With a little coaxing and misting, we enjoyed delicious and, ultimately, fresh shiitake mushrooms for a few weeks.

I tried fruiting it again after the allotted resting period and got a few; then, I lost interest or got busy or didn’t maintain the schedule of misting and soaking … you know how it goes. But now, it’s time again. I’m determined to have mushrooms, as fresh as can be, plucked from my own mushroom farm, right in my own kitchen.

I did a little research of companies that offer kits, whipped out the old credit card, and ordered oysters, portabellas and shiitakes; lion’s mane in a bag; and a shiitake-impregnated log. This time, I read everything I could find to learn the how and why of these mysterious little plants. (Are they plants? Or are they animals?)

What Are Mushrooms, Really?

Mushrooms are certainly not animals, but they do consume decaying animal matter and plants. They aren’t exactly plants either, without real roots, leaves or chlorophyll. Fungi, in a class all their own, include mushrooms, molds and yeasts. They live everywhere: underground, in the air, on our walls and sometimes in our bodies. The mushrooms we eat are the fruiting bodies of certain mycelium (vegetative part of a fungus) strains that carry spores for reproduction.

Choosing the Right Mushrooms to Grow Indoors

Mushrooms can be found growing all around the world. While mushroom hunting is an option, it’s not something that I care to do. Identifying safe, edible mushrooms should be left to the experts. People can become quite ill, and sometimes die, from eating certain poisonous mushrooms.

There are more than 2,000 species of mushrooms that have been classified, with only about 200 being edible. Of those, only a handful are cultivated through mushroom farming or wild-crafted, like morel mushrooms, for sale. Consumed for thousands of years, these mushrooms have been used medicinally and as dyes for fibers, and they also have ceremonial applications. However, it’s the culinary aspects that interest me. Besides tasting so darn good, they are low in calories and high in protein, iron, zinc, fiber, amino acids, vitamins and minerals. What could be better?

Indoor Growing Conditions for Mushrooms

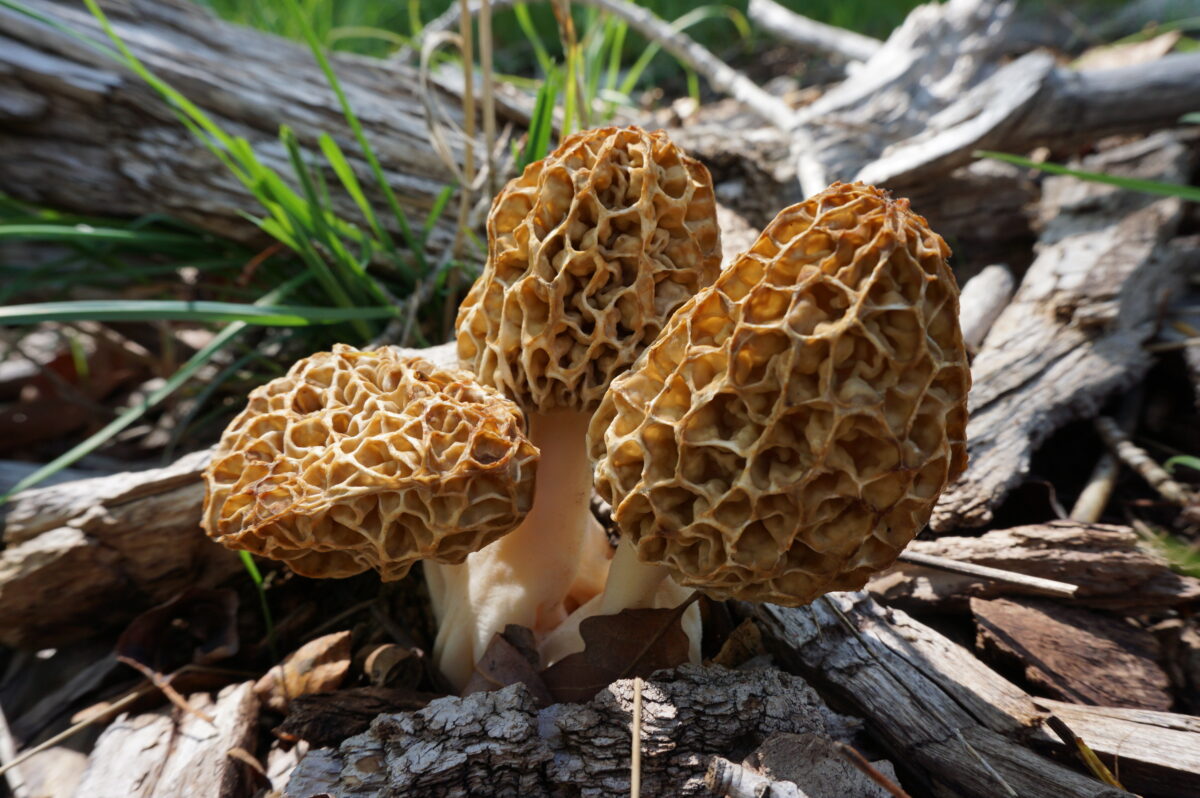
Because I’m attempting to grow mushrooms in my house, not a climate-controlled room, I’m a bit more limited in the varieties I can grow. There are two basic types of mushrooms. One requires a living organism — typically a tree — to survive. This type includes morels, truffles and porcinis that are all wild-crafted and need to grow outdoors. Other mushrooms, such as the portabella, shiitake, oyster and lion’s mane, that I chose, flourish on dead or dying materials, such as composting grains, straw, coffee grounds, wood chips and the like. These will grow indoors.

Another basic requirement is temperature. While the underground portion of the mushroom can survive freezing temperatures, the fruiting portion requires 50 to 75 degrees Fahrenheit, which is obtainable in most households. Each species has its own temperature range and may require a bit of creativity in placement.

Humidity is also a factor. Providing a tent made from a plastic bag will generally do the trick. Mushrooms do need oxygen. There are holes punched in the bags provided by the companies selling the mushrooms. Low, indirect light is the best, so they need a spot away from the windows.

My Favorite Beginner Mushroom Growing Kits

As a beginner, I chose small, inexpensive kits to learn the method and get the fastest results. Kids love to watch the process, and the incubation time is relatively short. These kits were all populated with mycelium and ready to fruit. Growing the mycelium from spores can take months, if not years, to develop. Your kids may lose a little patience with this. (I may lose a little patience with this!)

Mycelium can grow undisturbed for years underground. One of the largest colonies ever discovered is in Oregon.

It’s more than 2,000 acres (more than 3 square miles) in size and believed to be older than 2,400 years. All five of my little colonies fit on my kitchen counter and fruit within a few weeks. This is doable for my busy life.

How to Grow Mushrooms on a Shiitake Log

You can purchase oak logs inoculated with shiitake spawn in several sizes. I chose a 10-inch size. It should produce mushrooms off and on for three to four years with the mycelium it contains, and that which will grow as it consumes the nutrients in the log.

It needs to be soaked for 12 to 16 hours every two weeks for maintenance and can be shocked (soaked in ice water for 24 hours or treated to a day in the freezer) every eight weeks to induce fruiting. It lives quite happily surrounded by houseplants that require high humidity and indirect light.

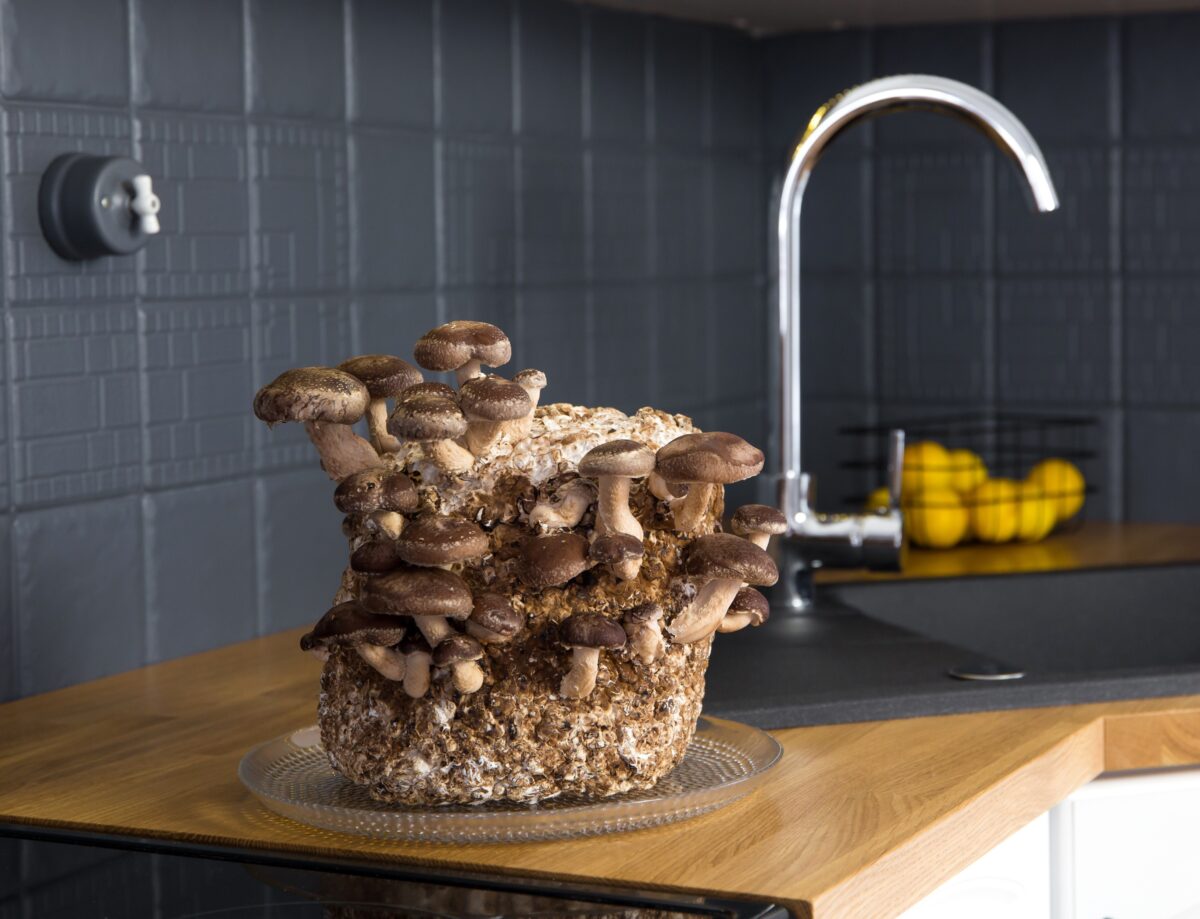
Using a Shiitake Mushroom Block Kit

When my shiitake patch arrived, I took it out of the plastic bag and checked it over for any fruiting mushrooms. There were none, so it went back in the bag and into the refrigerator for three days. Water was added to cover the patch, and it soaked for three hours. Drained and resting on a tray, I placed a plastic bag over the block of mushroom substrate to keep in the humidity.

After misting two to three times a day for a week, three little brown buttons appeared. One took off and grew into a giant shiitake mushroom weighing 31⁄2 ounces and was 41⁄2 inches in diameter. The others did not develop.

After harvest, I let the patch dry out for 10 days. Then, with a chopstick, I poked three holes into the block and soaked it in water for four hours. The misting schedule resumed. In a week, I harvested 19 medium-sized mushrooms. The process can be repeated three to four times before the mycelium has consumed all the nutrients in the substrate.

Lion’s Mane: A Unique Mushroom to Grow Indoors

The lion’s mane looked very similar to the shiitake patch but was treated differently. There were already small mushrooms growing on top that I removed (supposedly bitter). It stayed in the bag, and the mushrooms grew out of the slits that I cut into it. It also got misted two to three times a day and was tented with a plastic bag. I put some wooden skewers into the top to hold the bag away from the developing mushrooms. In 10 to 12 days, one mushroom had taken the lead and grown into an 8-ounce shaggy lion’s mane measuring about 6-by-4-by-2 inches.

I was very curious to taste this mushroom. It is likened to lobster or crab in taste and texture. I tore half the mushroom into pieces and sautéed it in butter with salt and pepper and just a squeeze of lemon. It had the texture and a slight scent of seafood, but it was not as sweet as I had expected. With the addition of heavy cream and some fresh thyme, it tasted much better, and served over toast, it became our lunch. With the other half, I tried a not-lobster salad recipe that created a great vegetarian version.

Easy-Growing Oyster Mushrooms in a Kit

Back to the Roots is a company that has grown almost as fast as their mushrooms. It was conceived in an apartment kitchen by two college guys. They took spent grounds from the local coffee shop, inoculated them with oyster mushroom spawn, and grew their first bucket of mushrooms.

Now in national distribution in grocery stores and coffee shops across the country, the kits make it easy to grow food in a sustainable manner. The block of mycelium-impregnated coffee grounds came in a plastic bag encased in a cardboard box. I removed it from the box, cut a slit in the bag and soaked it in water for 12 hours. Drained, and back in the box, it got misted three to four times a day. Two weeks later, the mushrooms sprouted and grew into a 4-ounce cluster within the span of five days. After harvest, I cut a slit in the other side of the bag and soaked it; now it’s back in the box for a second flush.

While the oysters looked delicate, they were quite thick and very meaty in texture. I cooked them simply by tearing them into pieces and slicing the stems. They were fried in a bit of olive oil, a small clove of sliced garlic, salt and pepper. I finished with a touch of butter and squeeze of lemon juice, and sprinkled with fresh chives from the garden — delicious!

Watching Portabella Mushrooms Grow

The portabella kit I chose had a different method of cultivation, using composted horse manure. While it seemed like the most boring selection, since I buy portabellas at my local market, it was really the most interesting to watch and the most prolific.

The substrate came in a plastic bag in a large cardboard box. A separate bag of material was included. This casing layer needed to be soaked in warm water and scattered on top of the white substrate. The plastic bag was folded up and the box lid closed. I put it near the heat mat to keep warm (70 to 75 degrees) for a week. In that time, the mycelium crept up the sides and grew into the casing. Then I opened up the box lid, cut the plastic even with the substrate, and another plastic bag was placed over it to hold in the humidity. I also moved it to the garage for a cooler temperature (55 to 65 degrees) required for fruiting.

In 10 days, it started forming tiny brown mushrooms. I harvested 2 pounds, 4 ounces five days after that. After harvest, I continued to mist every day or so, and the pinning began again. The second flush yielded more than a pound, and it’s now starting up again with tiny brown buttons.

Tips for Cooking and Preserving Fresh Mushrooms

Because all mushrooms contain a small amount of toxins, and the cell structure is difficult for our bodies to digest, it’s always recommended to thoroughly cook them. To really taste the flavor of the mushrooms, I like to simply sauté them in a little butter or olive oil. Cream is always a nice addition that readily picks up the earthy flavors.

Always store mushrooms in the refrigerator in a paper bag or wrapped in a paper towel. They should keep for a week or two.

Mushrooms can be preserved by drying in the sun in arid climates or in a dehydrator. Simply cut into uniform pieces, and place on racks. The time required will vary with the amount and thickness of the mushrooms. Dried mushrooms can be rehydrated by soaking in boiling water for 20 to 30 minutes. Powders can also be made from the dried mushrooms by grinding in a small spice or coffee grinder.

Mushrooms need to be cooked before freezing. Sauté them in a little oil, or simmer in water for 5 to 8 minutes. Drain and transfer to zip-lock freezer bags. Use in soups and sauces within six to eight months.

Pickling is a good way to preserve mushrooms if you have a bumper crop. They can be stored in the refrigerator for 2 to 3 weeks or canned by the water-bath method to keep on the shelf for a year. (See “Oh, You Know I Can!” on page 40 of this issue to can using the water-bath method.)

Why Growing Mushrooms at Home Is Worth It

While it might not be as cost-effective to grow mushrooms from kits, I certainly enjoyed eating the mushrooms, and freshness was a big plus. Would I do it again? You bet — to try unusual mushrooms I can’t get at the market or to educate kids about mushroom culture.

What started as a grand science experiment and a way to have the freshest mushrooms to eat has revealed a whole new world. I discovered there is a thriving organism growing right below our feet. Besides giving us delicious, healthy gourmet foods with a variety of earthy flavors, medicines and dyes, the mycelium is connecting the plant world, nourishing trees, composting decayed materials and helping to balance our environment.

Nurturing a kit is a wonderful way to start. It is fascinating as well as sometimes frustrating. I’ve been known to shout “Grow!” a few times, and I was then, with patience and lots of misting, rewarded with delicious mushrooms. The next step is to experiment with creating the substrate inoculated with spawn, and eventually growing spawn from spores. The adventure is only beginning.

What Makes Mushrooms So Delicious?

According to the Mushroom Council, mushrooms are a rich source of umami (pronounced oo-MAH-mee). The darker the mushroom, the more umami it contains. “Umami is the fifth basic taste after sweet, salty, bitter and sour. Derived from the Japanese word umai, meaning delicious, umami is described as a savory, brothy, rich or meaty taste sensation.

It’s a satisfying sense of deep, complete flavor, balancing savory flavors and full-bodied taste with distinctive qualities of aroma and mouthfeel.” For recipes, nutritional information and more, check out the Mushroom Council’s website: www.mushroominfo.com.

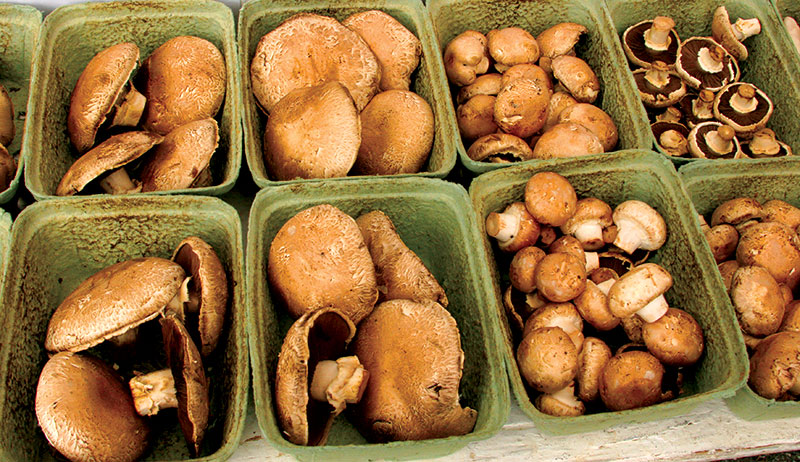
Popular Mushroom Varieties to Try Growing

Try your hand at growing one of these mushroom varieties.

CRIMINI: These are basically baby portabellas, similar in appearance to whites but with a light-tan to rich-brown cap and a firmer texture. They have a deeper, earthier flavor than whites. Sauté, broil, microwave or cook almost any way. Their hearty, full-bodied taste makes them an excellent addition to beef, wild game and vegetable dishes.

ENOKI: Enoki have tiny, button-shaped caps and long, spindly stems, and are mild-tasting and crunchy. Before using, trim roots at cluster base. Separate stems before serving. Try them raw in salads and sandwiches, or use them as an ingredient in soups, such as a stock made with soy sauce and tofu.

MAITAKE: These appear rippling and fan-shaped, without caps, and have a distinctive aroma and a rich, woodsy taste. Sauté lightly in butter or oil. For a richer taste in any recipe calling for mushrooms, use maitake. They can be a main-dish ingredient or used in side dishes and soups. Maitake mushrooms are also called “Hen of the Woods.”

OYSTER: These can be gray, pale-yellow or even blue, with a velvety texture. They have a very delicate flavor. Sauté with butter and onions to bring out their flavor, try over linguine with sliced steak and red peppers, sprinkled with grated Parmesan cheese, or pan-fry in olive oil/butter with garlic.

PORTABELLA: This is the larger relative of crimini. Portabella have tan or brown caps that measure up to 6 inches in diameter, and have a deep, meat-like texture and flavor. They can be grilled, broiled or roasted and served as appetizers, entrées or side dishes. Their hearty taste and texture make them a flavorful vegetarian alternative; grill and serve them as “burgers.”

SHIITAKE: Shiitake are tan to dark-brown and have broad, umbrella-shaped caps, wide-open veils, tan gills and curved stems that should be removed. They have a meaty texture and are rich and woodsy when cooked. Taste best when cooked. They add a meaty flavor and texture to stir-fry, pastas, soups, entrées and sides.

WHITE: White mushrooms represent about 90% of the mushrooms consumed in the United States. They have a fairly mild taste and blend well with almost anything. Their flavor intensifies when cooked. They can be sautéed or cooked any way or enjoyed raw in salads. Try them sliced and sautéed on pizza or in pasta, quesadillas or cheeseburgers.

Common Mushroom Growing Terms Explained

Here are some common terms used when discussing mushrooms:

Buttons: tiny mushrooms, next step after pins, starting to take the shape of the full-grown mushroom

Flush: Mushrooms tend to sprout all at once, go into dormancy for a few days or weeks, and then flush again.

Fungus (plural: fungi): A separate class of organisms that feed on organic matter. They include yeasts, molds and mushrooms.

Fruiting Bodies: the mushrooms that we eat or use

Mycelium: the vegetative system of tiny filaments growing underground, in trees or composting matter, comparable to the root system in the plant world

Pins: the first points of the fruiting body showing through the substrate

Spawn: mycelium-impregnated material (plant or animal compost)

Spores: comparable to seeds to spread and colonize new habitats; formed on the underside of the cap in the gills. Once the spores are released the mushroom disintegrates quickly, usually within a week.

Substrate: the growing medium that supports the mycelium (wood, grains, compost)

Growing Mushrooms at Home: Final Thoughts

Growing mushrooms at home has turned out to be more than just a quirky kitchen experiment—it’s become a rewarding, flavorful adventure. From watching tiny pins emerge to harvesting full-grown clusters, the process offers a satisfying mix of science, patience and delicious payoff. While kits may not replace a trip to the grocery store, they do offer something far more valuable: a closer connection to the food we eat and the fascinating fungi that produce it. Whether you’re a curious cook, a gardening enthusiast or just looking for a fun family project, mushrooms are a great place to start.

This article about growing mushrooms at home was written for Hobby Farms magazine. Click here to subscribe.

Categories
Farm & Garden

Mushroom Farming: How to Grow & Sell for Profit

Mushroom farming is sprouting up across the country as more people discover its potential for profit, sustainability, and culinary excitement. Whether you’re selling gourmet varieties at the farmers market, supplying chefs through wholesale channels, or leading agritourism tours in your woods, mushrooms offer unique opportunities for small-scale growers. But while the mushroom farming industry is booming, building a successful mushroom business takes more than just passion—it requires planning, persistence, and the right sales channels.

The mushroom market is growing 5% to 6% each year, according to Tradd Cotter, owner of Mushroom Mountain near Easley, South Carolina, speaking at the Organic Growers School Spring Conference earlier this year in Asheville, North Carolina.

With many consumers no longer content to eat only the white button mushrooms purchased in neat plastic packaging at large-chain grocery stores, think morel mushrooms and more.

“I’ve been involved with the mushroom business for 15 years, and it’s amazing to me to see how much more educated the general public is now,” says Mike Kempenich, owner of the Minnesota-based mushroom-focused business called Gentleman Forager.

If you’ve considered mushroom farming, many business outlets exist for you, but—spoiler alert—none is simple.

Selling Mushrooms at Farmers Markets

mushrooms being grown in an indoor area on metal shelves
Amy Fox

The first market that often comes to mind for home-produced items is the farmers’ market. While farmers’ markets are becoming crowded for vegetable producers, there seems to be room for mushroom growers.

Why Farmers Markets Work for Mushroom Farming

“I take great pleasure in being able to provide the public with a variety of mushrooms they might not otherwise have the opportunity to purchase,” says Amy Fox, owner of Fox Farm & Forage in Apex, North Carolina. “I really take delight in educating my customers and absolutely love it when I am able to convert the reluctant or self-proclaimed mushroom hater to a mushroom lover. Weekly repeat customers are confirmation of my goal: to provide a quality product that people enjoy.”

Fox Farm & Forage, in its second year of operation mushroom farming, has a presence at three Saturday farmers markets in The Triangle area of North Carolina, a region anchored by North Carolina State University, Duke University and the University of North Carolina. That means Fox, her husband and a trusted employee work every Saturday. Finding that trusted employee has been tough.

Challenges of Selling Mushrooms at Markets

“Selling mushrooms is not like selling produce that people are familiar with,” Fox says. “Profits from selling mushrooms directly correlate to being able to engage a potential customer and then having the knowledge to complete the sale. One must be relatively knowledgeable about cooking and be able to make recommendations on which product to use in an indicated culinary application.”

Building Profitable Mushroom Farming Wholesale Accounts

Restaurant sales make up the bulk of Fox’s business, as well as grower Steve Sierigk of Trumansburg, New York.

How to Break into the Wholesale Mushroom Farming Market

“Shiitake growing and selling can be efficiently done if established accounts are eager for the crop,” Sierigk says. And his accounts at Hawk Meadow Farm are: he sells about 1,000 pounds per year, mostly to restaurants.

mushroom farming by growing mushrooms on logs
Hawk Meadow Farm

Wholesale vs. Farmers Market: Which Is Better?

“When I compare the amount of profit made versus the time and expense of wholesale versus farmers markets, wholesale is the obvious winner, hands down,” Fox says. “Also, there is much more room for growth within the wholesale market, whereas farmers markets have a pretty consistent profit ceiling.”

Fox points out that this might not be the case in your area, though. Fox will also continue to sell at farmers markets because wholesale accounts don’t let you connect with your customers in the same way that farmers markets do.

Be aware that in many states, it’s illegal to sell wild-harvested mushrooms to restaurants or wholesale accounts, so check your local state laws.

Adding Mushrooms to a CSA Program

A community-supported-agriculture model—or perhaps a community-supported-fungi model—is less common in the mushroom farming world than in traditional agriculture, but it’s out there.

How Mushroom CSAs Work

In Minneapolis, Kempenich partners with independent grocer Pahl’s Market to offer a mushroom add-on to the market’s vegetable CSA. This is the mushroom CSA’s first year, and 200 people—10 percent of the Pahl’s Market CSA—purchased a share, which exceeded expectations.

Considerations Before Starting a Mushroom CSA

“With more education, over time, we’ll continue to see that number grow,” says Kempenich, who has been foraging for more than 40 years.

He looks at this CSA as a wholesale account for his business because he knows he has a standing order of 200 mushroom units each week. Kempenich cautions that doing this as a stand-alone CSA would be more challenging: “It would be cost-prohibitive up front until you built a substantial number.”

Plus, part of the appeal of this CSA model is getting to partner with another independent, locally owned business.

Using Agritourism to Grow Your Mushroom Brand

While mushroom farming includes mushrooms that are cultivated in growth medium in buildings, they can also be cultivated outdoors. Both are interesting to the consumer, and Sierigk capitalizes on this by offering farm tours.

Hosting Farm Tours to Boost Sales

“The tours are a very different angle on things and require some degree of marketing energy and outlay of cash for advertising and all,” Sierigk says. “Farm tours can become time demanding … however, we really like connections with people that have generally not been exposed to the type of agriculture that we practice.”

Sierigk looks for any opportunity to spend time in the woods—such as leading these tours—and he points out that participants generally make a purchase on the tour, which adds a lot of value.

Foraging Adventures and Educational Events

About four years into his mushroom farming business, Kempenich started leading classes as a break from tending to mushrooms 70 to 80 hours each week. He now runs foraging classes as well as overnight tours through the woods of Minnesota with well-known chefs to forage and then cook mushrooms.

“I like tying everything together,” Kempenich says. “The mushrooms go to a great restaurant, so why not bring the chefs to the woods?” By adding this social aspect to forging, he creates more collective mushroom knowledge and also connects more people to the outdoors.

Selling Medicinal Mushrooms: What to Know

There’s an industry of mushrooms used for medicinal research. In biosecure labs and growing facilities, mushroom cultivators and scientists alike experiment and develop products for medicinal industries.

Regulatory Risks and Selling Restrictions

Independently, however, farms that sell tinctures and supplements from their mushrooms have to be much more careful. Scrutiny from the U.S. Food and Drug Administration has mushroom growers quietly offering these products. Those who make and sell holistic, health-promoting mushroom products must refrain from making any medical claims and can’t make the products on a large scale.

Creating Value-Added Products with Mushrooms

In any agricultural pursuit, waste occurs. How you handle that “waste” is up to you. At the OGS Spring Conference, Cotter, who has grown mushrooms commercially since 1994, suggested value-added additions to any mushroom enterprise.

Dehydrating and Composting for Profit

Dehydrate the mushrooms that you don’t sell at the market today so you can sell them later, and offer compost and vermicompost from your scraps. Partner with others to see your mushrooms in prepared foods, beer and other products.

There are nearly as many ways to profit from mushrooms as there are varieties of mushrooms themselves. None of these enterprise options is a simple, hands-off business, but each has a reward for the mushroom lover.

Quality vs. Quantity in Mushroom Farming

When producing mushrooms indoors, an economy of scale is at work, as you need to build a whole space for cultivation. See “The Mushroom Gold Rush” on page 62 for more about start-up costs. In these operations, mushroom producers such as Fox Farm & Forage’s Amy Fox say the key is to go big.

Indoor Growing Requires Scale

The directive here is quantity plus quality.

When using logs and an outdoor setting, Steve Sierigk, co-owner of Hawk Mountain Farm, suggests quality be the initial focus—forget about quantity right now.

Outdoor Growing Prioritizes Craft and Care

“Start modestly, as there are so many variables that need to be right for this to work well,” he says. “I always recommend quality over quantity in all aspects of natural-log mushroom production. It can be as small as about 100 production logs to give a modest weekly supply. In fact, I always recommend starting small to get the knack for handling the logs and all of the demands of the crop.”

Part of cultivating this quality is to have some idea of what you’re doing before you get started, in business as well as mushroom production. There are too many variables in the market and in production that can’t be learned just by reading a book. Fox has never hired a consultant, but she had known to do so: “It would have saved me thousands,” she says.

This story about mushroom farming was written for Hobby Farms magazine. Click here to subscribe.

Categories
Farm & Garden

Morel Mushrooms: How to Find, Identify and Cook Them

Morel mushrooms are one of the most sought-after wild edibles. Their rich flavor, sponge-like texture, and unique appearance make them a favorite among chefs, foragers, and mushroom hunters alike. In this guide, you’ll learn how to find morel mushrooms in the wild, identify them safely, and cook them to perfection.

Not only do morel mushrooms have a meatier texture than most store-bought mushrooms, but they are relatively easy for beginners to learn to safely identify. As the mountain folks say: “If it’s hollow, you can swallow.” 

What Are Morel Mushrooms?

Morel mushrooms (Mochella deliciosa, M. esculenta, M. elata) somewhat resemble the outline of a cartoon Christmas tree: a fat stalk and a crinkly, conical cap. Cut a morel in half from top to bottom. Both the stalk and cap have enough of a void that you could stick one on every digit like so many finger puppets.

The hollow is also big enough to house a few insects, another reason to slice them open before cooking. But then again, there are some people who say that bugs are the next wave of foraging!

There are a few mushrooms that, with some enthusiastic wishful thinking, look enough like a morel to earn the name “false morels.” But they are mostly solid inside with terrible potential as finger puppets.

No matter whether you are an expert or using our beginners guide to mushrooms, those who find these should leave them be. They are either unappetizing or could play havoc with your digestion.

How to Cook Morel Mushrooms

Always cook morels. The heat denatures a toxin that would send you running to the toilet. In any event, even if you grow your own mushrooms, you don’t want to eat mushrooms raw for three reasons. 

  1. They are about as digestible as wood, so there’s no nutritional value in a raw mushroom. 
  2. A tiny number of people will be mildly allergic to any given mushroom, more so to one that hasn’t been cooked long enough. 
  3. There’s a small chance that on the surface of the mushroom, some woodland bacteria might exist that won’t sit well with some people. Especially if your edible mushrooms were left in the back seat of a hot car all afternoon or left on the counter overnight. Always refrigerate in a paper bag as soon as you get home to reduce the possibility of old-fashioned food poisoning. 

So be a smart mushroom hunter. Cook morel mushrooms and everything else you find for at least a few minutes in butter or fat and only eat a small amount of a new species your first time to learn if you’re sensitive.

And even with all those precautions, experienced mushroom hunters can develop an allergy to morels decades after their first bite. Sometimes—but not always—this is triggered by eating superhuman quantities of morels. So, don’t be greedy. 

When and Where to Find Morels

Morels appear in mid-spring, usually after the last frost, but before the tree leaves come out. They seem to be triggered by a good rain about the time the soil temperature reaches 50 to 53 degrees. 

Being a good morel hunter means being a good tree hunter. The submersed part of a morel—its inedible, stringy mycelia—grows in forest floors in collaboration mostly with mature tulip poplars, but also elms and ashes and among old apple trees in orchards. A dying elm tree can also spur its morels to fruit heavily before their primary food source is lost.

In the Midwest and Pacific Northwest, morels respond to the previous year’s forest fires with great flushes rising from blackened earth. Unfortunately, Southern morels haven’t learned this trick. This makes them a bit more difficult to track down. 

Chefs and farmers-market shoppers will pay $25 to $50 a pound for fresh or dried morel mushrooms. If you’ve ever had them in a stew, perhaps with venison and ramps, you’d understand why.

If you have a surplus, putting them in a dehydrator overnight at about 110 degrees Fahrenheit will let you save them in a jar in your cupboard. Rehydrate for 10 to 20 minutes in warm water, milk, broth or wine before adding to a sauté pan, soup or casserole. 

Tips for Successful Morel Hunting

Don’t be discouraged if you don’t find morel mushrooms on your first foray. Most edible soil-borne mushrooms announce themselves across the forest floor like so many brightly colored periscopes of yellow, orange, red or blue.

But morels camouflage themselves quite well. They wear the brownish grays of fallen leaves, with their outline broken up by a shadowy honeycomb of craters in their caps. 

My technique for finding morels? Like the commander of a luckless sub-chaser, I often stop in disappointment and disgust at being empty-handed even though I’m standing amongst massive tulip poplars. Then I look down at my feet.

Half the time, I’m standing in the middle of an under-the-radar fleet of morels. Then, I use my pocketknife to cut morel mushrooms off at soil level (no sense getting dirt in all those craters). I debate the various ways to cook them on the way home. 

This article originally appeared in Hobby Farms magazine. Click here to subscribe. 

Categories
Farm & Garden

How to Save Money on Farm Boots: 5 Budget Tips

How to save money on farm boots is important when you’ve got multiple tasks to complete, like mucking stalls or digging potatoes, that each require the right types of farm boots. Having what you need can keep you safe, dry and efficient—whatever the day’s tasks throw at you. Mud and wet terrain create unsafe conditions without proper traction, and a pair of rubber-coated, waterproof boots that can be hosed off quickly can mean the difference between getting back to work fast or losing half a day waiting for boots to dry.

A good mud boot shouldn’t be too light to protect against penetration hazards like nails or broken glass, but it also shouldn’t be so bulky that it traps excess mud and weight on the soles. Look for boots that reach high enough on the leg to prevent leaks when walking through deep mud, bedding, or wet fields.

Most farmers own two to three pairs of task-specific shoes in addition to their mud boots. These can include a quality pair of steel-toed boots for working around construction materials, as well as riding boots for those who depend on horses to keep their farms operational. Other types of dedicated footwear include snow shoes, protective gardening clogs and hiking boots. Your foot wardrobe will depend largely on the terrain and climate of your area, as well as your farm’s outputs.

Some jobs even require a second pair of the same style. Angela England, author of Backyard Farming on an Acre (More or Less) (Penguin Group, 2012), keeps an extra pair of mud boots just for working with chemicals or quarantining new livestock. In snowy climates, having a second pair of snow boots stored in the car can be a winter lifesaver.

So, how can today’s small-scale farmer afford so many boots? Start by using these five smart, budget-friendly tips:

1. Look for Boots with Warranties & Guarantees

Choose farm boot brands that offer a money-back guarantee or a generous manufacturer’s warranty. Premium brands tend to offer protection against premature aging, wear and flaws in the materials, and might offer a refund or replacement if they don’t meet expectations.

2. Skip the Fancy Patterns. Go for Performance

While colorful boots may look good in the store, seasoned farmers­­­ skip the cost of a pretty-patterned pair in lieu of trusted, plain, high-performance farm boots brands that perform for decades.

3. Buy Off-Season and Ask About Sale Schedules

Want to save 30% or more? Buy farm boots off-season to save on shoes aimed at a particular climate, like those made for winter or rainy weather. Ask your local farm-supply store when they put their boots on sale. Many offer clearance sales at predictable times.

4. Always Try Boots On Before You Buy

Fit matters. Specialty footwear, such as steel-toed or insulated boots, can fit wide or narrow compared to fashion footwear. Try on boots in-store to ensure proper fit. Don’t assume that you’ll wear the same size even in the same brand.

5. Extend the Life of Your Boots With Care

Get more value from your farm boots by maintaining them well. Use waterproofing sprays, swap worn laces for high-quality replacements, and dry boots properly using racks or boot dryers. Just be sure any modifications won’t void the warranty. Don’t, however, do anything that will void your warranty!

How to Save Money on Farm Boots: Final Thoughts

Investing in the right farm boots doesn’t have to drain your wallet. With a little planning, smart shopping, and proper care, you can build a boot collection that keeps you safe, comfortable, and ready for any job the farm throws your way—without overspending.

This article about how to save money on farm boots was written for Hobby Farms and Chickens magazines. Click here to subscribe.

Categories
Poultry

How a Chicken’s Body Works: A System-by-System Guide

How a chicken’s body works is more than just identifying chicken anatomy on a diagram. It’s about understanding how each system functions—and how chicken owners can support those systems to keep their birds healthy, productive, and thriving. From vision to digestion, circulation to reproduction, learning how a chicken’s body works will help you better care for your flock from the inside out.

Vision: How a Chicken’s Eyes Work to Detect Danger and Food

A chicken’s vision is fascinating. Did you know that the left eye on a chicken functions differently from the right eye? It’s true. While a graph on the anatomy of a chicken doesn’t show this unique trait, the left eye and right eye have different purposes.

Chickens use their left eyes for spotting far-off predators, such as a hawk in the sky, while their right eye allows chickens to see things clearly that are up close.

This is how your flock can be foraging for tasty bugs in the garden, while still keeping an eye on the sky and land for potential predators.

Chicken Care Tip:

Just like humans, chickens need vitamin A to support healthy vision. Supplementing your flock’s diet with broccoli, carrots, cantaloupe, cilantro, dark leafy greens, parsley and sweet potatoes will help to boost vitamin A levels and maintain healthy vision.

Beak: How a Chicken’s Beak Functions Beyond Eating

The beak is often thought of as simply “the mouth” on a chicken. Chickens do use their beaks to feed themselves, but that is not it’s only function.

Chickens also use their beaks to insert their place in the pecking order, investigate the world around them, and preen and oil their feathers from the gland located at the base of the tail.

Chicken Care Tip:

Chicken beaks to be in good working order to survive. Too short or too long can make it challenging for our flocks to go about their daily lives.

To help keep your flock’s beaks in tip-top condition, never debeak your flock. Check your flock’s beaks regularly to ensure they are not becoming overgrown.  If beaks are overgrown, take them to a qualified veterinarian for a beak trim.

Circulatory & Immune System: How a Chicken’s Heart and Spleen Keep It Alive and Well

The heart and spleen are part of the circulatory system. The circulatory system moves oxygen and blood throughout the body.

Like mammals, chickens have a four-chambered heart. These chambers receive and send blood through the body and back again to the heart. When compared in size, chickens have a much larger heart than humans, due to their higher metabolism.

The spleen also plays a large role in the immune system as well as the circulatory system. The spleen helps to filter blood and fight off diseases. In a chicken, the spleen also does the work of the lymph nodes.

Chicken Care Tip:

To best protect the circulatory and immune system, feed chickens a healthy diet, complete with supplemented prebiotics and probiotics. Do not allow chickens to become overweight. Avoiding stress factors in the flock is another way to keep both the spleen and heart in optimal conditions.

chicken digestive health
Shutterstock

Respiratory System: How a Chicken’s Lungs and Trachea Work Together

Just like humans, chicken lungs are what make it possible to breathe air in and out, but what the anatomy of a chicken graph doesn’t show is how complex a chicken’s respiratory system is.

Chicken lungs work differently than human lungs, as chickens’ are attached directly to the rib cage without a diaphragm.

Chickens’ lungs are relatively small and work in conjunction with the bird’s air sacs. These sacs act like bellows to help move air in and out of the lungs.

The trachea may seem like a little part of the respiratory system, but it is an important part of the respiratory system, aiding airflow to the lungs.

The trachea helps to move air and gases in and out of the respiratory system, and even helps to regulate body temperatures by removing excessive heat when a chicken exhales.

This vital part of the respiratory system is what helps with our flock’s vocalization.

Chicken Care Tip:

Chickens have a delicate respiratory system and lungs, so care should be taken to promote good husbandry skills to prevent respiratory problems.

House chickens in a well-ventilated coop or barn to promote good respiratory health, and frequently clean the coop to keep dirt and dust at bay.

Supplementing your flock’s diet with respiratory boosting herbs such as basil, lavender, rosemary, and sage is another good way to keep your flock’s lungs in tiptop condition.

Digestive System: How a Chicken’s Digestive System Processes Food

The digestive system is comprised of seven unique parts, and is one of the most complex systems when studying the anatomy of a chicken. This system is where seventy percent of a chicken’s immune system is located and enables your chickens’ bodies to digest food and ward off disease at the same time.

The Esophagus and How it Works:

The esophagus is the long tube that runs down the neck into the crop and then into the stomach. It is here where the digestion starts to take place.  The muscles located in the esophagus walls help to break down the food before it enters the crop.

The Crop and How it Works

The crop is the holding sack at the base of the esophagus, located directly in front of the breast, and is easy to spot on a diagram of the anatomy of a chicken.

The crop has earned its popularity due to its notorious health concerns, such as crop impaction and sour crop. Crop problems are usually caused by a secondary issue, so let’s take a look at how the crop works to learn more.

The crop holds whatever a chicken has consumed, slowly releasing the feed bit by bit into the next area of the digestive tract called the proventriculus.

Feed is never digested in the crop, but if there is a blockage in the crop or further down the digestive tract such as a reproductive tumor, enlarged liver, or a foreign body (material that isn’t safe for chickens to consume, i.e. long grasses, string, twine, screws, ect.), the crop will back up and refuse to empty.

Proventriculus and How it Works

Translated from Latin as “before the cavity,” the proventriculus is known as a chicken’s true stomach. The proventriculus is oblong and connects the crop and the gizzard.

The proventriculus is where digestive enzymes and hydrochloric acids are secreted and mixed with the bird’s food to begin breaking it down. From here, the food travels to the ventriculus, also called the gizzard.

The Gizzard and How It Works

The gizzard is the muscular part of a bird’s stomach, which crushes the food to aid in digestion. Since chickens don’t have teeth to chew their food, they rely on the gizzard to crush feed for their bodies to absorb nutrients.

Offering grit to your flock free choice in the form of commercial grit or coarse dirt is essential to helping the gizzard function properly.

The Ceca and How They Work

The ceca are two blind pouches where the large and small intestines meet. The ceca help to absorb water, break down fibrous material, and produce B vitamins to aid in the fermentation process.

Large and Small Intestines and How They Work

The intestines work to digest food and eliminate waste, and are a critical part of the chicken’s digestive system.

The small intestine is used to digest food, adds enzymes to aid in digestion, and is where most of the nutrients are absorbed into the bloodstream.

The large intestine absorbs remaining water from the feed. This process helps to solidify the waste before excretion. Any waste is then stored in the large intestine until it passes through the cloaca.

Chicken Digestive System Care Tip

Proper nutrition is the best way to keep the digestive system running smoothly and your flock’s immune system strong.

Avoid feeding harmful treats such as baked goods, breads, pasta, and tomatoes, as these treats can cause potential digestive upsets.

Supplementing your flock’s diet with fennel seeds, fresh herbs, probiotics, and prebiotics will help to keep the digestive system in working condition.

Shutterstock

Legs & Bone Health: How a Chicken’s Hocks and Shanks Support Its Whole Body

The hock is the leg joint located at the base of a bird’s thigh. Its placement in the middle of the “leg” and the way it bends when chickens walk readily draws comparisons to our knees. However, the hock is most like an ankle, connecting the bird’s thigh to its shank. What we consider the leg to be is actually the foot.

The anatomy of a chicken contains a lot of cool facts about how our chickens’ bodies work, including how body parts work together. Hocks and shanks are a good example of showcasing how the chicken’s body works, as they have a direct impact on eggshell quality.

When you think of how an egg is formed through the reproductive tract, it would appear like a hen’s feet have nothing to do with the quality of an egg shell. However, a hen draws calcium from her legs, feet, and other bones from her body to provide calcium to form an egg shell.

Chicken Care Tip

Laying hens often suffer from a lack of calcium in their diet. Not only does this deficiency create weak eggshells, but it can also cause broken leg bones.

Supplement your flock’s diet with free-choice oyster shell at all times to be sure your flock is receiving enough calcium to keep both egg shells, hocks, and shanks strong.

Reproductive System: How a Chicken’s Body Forms and Lays Eggs

If you’re raising chickens for eggs, the most important parts of a chicken make up the reproductive system. Chickens have two parts to their reproductive system, called the ovary and the oviduct.

When a hen hatches, the right ovary stops developing, while the left ovary continues to develop until the hen has reached the point of lay.

The oviduct and left ovary work together to form eggs. The eggs start off in the ovary, where the yolk is developed, and then are released into the oviduct.

The oviduct is a long, tube-like organ that the yolk must pass through, and is where the yolk is fertilized and the rest of the egg is formed. Finally, the egg passes through the cloaca as it is laid.

Chicken Care Tip

Since chickens are bred to lay an abundance of eggs, their reproductive tract is constantly working. This constant wear and tear of egg laying can be hard on a hen’s reproductive tract, causing inflammation and reproductive tumors.

Allowing your chickens to rest over winter, by eliminating artificial light and giving your hens’ reproductive tract a break, will help to reduce reproductive diseases in the flock.

chicken anatomy fluff
Shuttersock

Fluff and Cloaca: How a Chicken’s Fluffy Butt and Cloaca Function Together

Chicken fluff may be one of the best parts of a chicken anatomy lesson, as most flock owners love their hens’ fluffy butts. Fluff is those soft, fleecy feathers on your bird’s bottom. After all, not all scientific terms have to be complicated!

Chicken fluff covers the entire backside of a chicken’s bottom end. These small, fluffy feathers help protect against flystrike and work to regulate body temperature.

The cloaca is located at the end of a chicken’s digestive, urinary, and reproductive tracts, leading to the shared external opening known as the vent.

The cloaca chamber shifts and folds depending on what bodily function needs access to the vent. When a chicken defecates, the cloaca folds back, sealing the oviduct. At egg-laying time, the cloaca covers the excretory exit to keep feces and uric acid from contaminating the egg.

When chickens mate, the rooster’s cloaca comes into contact with that of the hen. This is called a “cloacal kiss.”

Paying attention to your flock’s fluffy butts and cloacae is a good idea if you’re concerned that your flock is suffering from vent gleet (a condition where a chicken’s cloaca becomes inflamed, causing diarrhea, messy feathers, and a foul odor).

Chicken Care Tip

Vent gleet is usually easy to treat and prevent with a few dietary changes. If you notice a flock member frequently has messy feathers, chances are she is suffering from this condition.

To prevent and treat vent gleet, keep treats to a maximum of ten percent of your flock’s diet. Adding probiotics and apple cider vinegar to your flock’s drinking water is an excellent way of preventing and combating this condition.

Knowing the anatomy of a chicken can go a long way in helping our flocks live healthy lives, produce an abundance of eggs, and live longer.

Final Thoughts: How a Chicken’s Body Works to Stay Healthy

Understanding how a chicken’s body works—from the eyes and beak to the lungs, digestive system, and reproductive tract—gives flock owners a powerful advantage. When you know how each system functions and supports the others, you can spot issues early, provide better nutrition, and create a healthier environment. Whether you’re raising chickens for eggs, companionship, or both, learning how a chicken’s body works is one of the best ways to keep your flock thriving for years to come.

This article about how a chicken’s body works was written for Hobby Farms and Chickens magazines. Click here to subscribe.

Categories
Poultry

Types of Chicken Feathers: A Complete Guide

Types of chicken feathers are an important part of chicken anatomy and include an astonishing range of colors and patterns, which help to make each breed recognizable. Below is an excerpt from The Illustrated Guide to Chickens reviewing the common types of feathers found in a backyard flock.

The Illustrated Guide to Chickens Excerpt…

Plumage plays an important role, protecting the chicken from rain, cold and sun, and a chicken must spend a considerable part of its time maintaining it. This is done by preening. Each feather has an axis or shaft, on to either side of which vanes are fixed. Each vane has barbs on either side, which cling together but need to be “combed” by the chicken, who also applies oil from a gland at the base of its tail.

A cockerel can be distinguished from a hen by the fact that some of its feathers take on a different shape. Its hackle and saddle feathers are thinner and longer than a hen’s, and it also develops sickles, which are the spectacular curved feathers on either side of the tail.

Some breeds have much fluffier feathers than others, and game breeds have very tight feathering that often leaves a strip of bare skin down the breast. There may be feathering on the legs, and some breeds sport beards, muffs and crests.

Every year, hens molt, generally at the beginning of fall, and replace their old feathers with new. As feathers are largely made up of protein, this takes a good deal of the hens’ energy, and it’s important to give them plenty of replacement protein in the form of good-quality layers’ ration at this time.

A hen will stop laying until her molt is complete, which could take anywhere between six and 12 weeks. If the days are growing shorter, she may not start laying again until they start to lengthen after the winter solstice.

Types of Chicken Feathers by Pattern

Barring: Two distinct colors appear in bars across the feather; they may be regular or irregular and the width can vary.

chicken feathers barring
Celia Lewis

Lacing: Appears as a border of a different color right around the edge of the feather; it may be broad or narrow.

chicken feathers lacing
Celia Lewis

Double Lacing: Same as lacing, but this has a second loop inside.

chicken feathers double lacing
Celia Lewis

Frizzled: Each feather is curled, causing the bird to look distinctly unkempt.

chicken feathers frizzled
Celia Lewis

Mottled: This is being spotted in a different color in a random fashion.

chicken feathers mottled
Celia Lewis

Spangling: There is a distinct contrasting color at the end of the feather.

chicken feathers spangling
Celia Lewis

Splash: This appears as drop-shaped marks of a contrasting color randomly.

splash chicken feather pattern
Celia Lewis

Penciling: This is the tricky one, as it goes more or less with the breed. Mostly it can look like a kind of barring, but it can also be fine lacing. Hamburg hens have stripes, and the dark Brahma has concentric lines around the feathers similar to lacing; both are known as penciling.

chicken feathers penciling
Celia Lewis

Peppered: Feathers look as if someone has ground pepper onto them, the specks being a darker color.

chicken feathers peppered
Celia Lewis

Types of Chicken Feathers: Parts of a Wing

chicken feathers wing diagram
Celia Lewis

Chicken Feather Color Variations

chicken feather pattern chart
Celia Lewis

Birchen: hackle, back saddle and shoulders white; neck hackles narrow black striping; breast black with silver lacing

Black: male and female uniformly black with green sheen

Black mottled: male and female black ground with white v-shaped tips on random feathers

Black red: red hackles and black body and tail

Blue: male and female uniformly slaty blue; head and neck may be darker; lacing, if present, darker

Buff: male and female uniformly buff

Chamois: male and female uniformly buff with paler lacing

Columbian: male and female body mainly white; neck and tail black with some white lacing

Crele: male hackles, back and saddle barred orange on pale ground; body barred gray and white. Female hackles barred grayish brown on pale ground; breast salmon; body as male

Cuckoo: male and female dark gray to black indistinct barring on white ground. Female can be darker than male.

Exchequer: male and female black and white randomly over body in blobs

Gold barred: golden ground with distinct black barring

Gold spangled: male and female hackle golden red with dark vane; body gold ground with black spangles; tail black

Jubilee: male head, neck, body, legs and tail white; back and wings white with dark red markings. Female head and neck white; rest of body dark red with single or double lacing.

Lavender: male and female uniform slaty gray throughout

Mahogany: male and female rich mahogany brown throughout

Mille fleur: male and female orange ground with black spangles with white highlights

Partridge: male hackle, back and saddle greenish black with red lacing; breast and body black. Female reddish lacing on black ground.

Pile: male head golden, hackle and saddle lighter; back red; front of neck white; wings mainly white. Female hackle white with gold lacing; neck and body white with salmon breast.

Porcelain: similar to Mille fleur but bright beige ground

Quail: complicated coloring giving impression that upper parts are dark and lower light; gold lacing and shafts

Red: male and female bright red throughout

Silver barred: male and female white to pale gray ground with bright black barring

Silver cuckoo: male and female white to pale gray ground with dark gray to black indistinct broad barring.

Silver duckwing: male silver hackles and back; breast and body black; tail black with silver edging. Female silvery gray with salmon breast; tail and wings black with gray edging

Silver spangled: male and female gray ground with black spangles

Speckled: in Speckled Sussex, male and female mahogany ground with white tips and black/green intermediate strip

Splash: male and female white ground with irregular slaty blue blobs, gray in places

Wheaten: male gold hackles, rich brown body and dark green tail; female shades of wheat from golden to chestnut with black tips.

White: male and female uniformly white throughout

Reprinted with permission from The Illustrated Guide to Chickens (Skyhorse Publishing) by Celia Lewis. Copyright 2011 text and illustrations by Celia Lewis.

This story about types of chicken feathers originally appeared in the March/April 2018 issue of Chickens magazine. Click here to subscribe.

Categories
Crops & Gardening Farm & Garden

How Plants Get Nitrogen: Natural & Fertilized Sources Explained

How do plants get nitrogen? It’s one of the most important nutrients your plants need whether you’re grow bag gardening, growing from raised beds or in a traditional garden. Plants need nitrogen for their photosynthesis process, to make amino acids, and for the nuts-and-bolts of being alive and growing. While gardeners often add nitrogen-rich fertilizers to boost growth, plants also access this essential element through natural processes and even with a little help from microbes and lightning. Understanding how nitrogen reaches your plants can help you make smarter, more sustainable choices for your garden.

Why Plants Can’t Use Atmospheric Nitrogen

Here’s something interesting. 78% of our atmosphere is nitrogen. Why don’t the plants just put that to use? They already take carbon from the air to build their structures, and carbon dioxide represents just a tiny 0.04% of Earth’s atmosphere. So, when plants need nitrogen, and there is a whopping 78% of the atmosphere in nitrogen right there up for grabs, why don’t they use it? Why do gardeners and farmers sometimes need to supplement nitrogen?

The answer lies in a bit of simple chemistry. Nitrogen, if you recall from the periodic table, is an element, consisting of a single nitrogen atom, signified by the letter N. But the nitrogen in our atmosphere isn’t formed from single, independent nitrogen atoms. It’s a pair of nitrogen atoms joined together—written N2. Nitrogen atoms are highly reactive and snap together in a way reminiscent of two magnets. It takes a good deal of energy to break them apart again. But plants can’t put N2 to use—it’s just not a form they can utilize or have the ability to break apart.

How Synthetic Nitrogen Fertilizers Are Made

To help solve this problem, farmers and gardeners often use human-manufactured forms of nitrogen. In this case, we take N2 from the air—which is abundant—and use hydrogen (usually from natural gas) and pressure to facilitate a series of chemical reactions designed to break apart the bond of N2. The result is typically some sort of ammonia or similar compound, which can be easily applied to crops. In fact, 2% of all the world’s energy goes towards the industrial process of converting N2 into other plant-friendly forms.

Natural Ways Plants Get Nitrogen

But obviously, plants were growing just fine for millennia before the Green Revolution. Where did their nitrogen come from before that? In nature, a surprising alliance of lightning, bacteria, and other microbes performs this work. First, high-energy lightning activity in the atmosphere combines nitrogen with oxygen to form nitrates, which enter the ground with rain. Some microbes in the soil, in a symbiotic relationship with a plant’s roots, convert the nitrates into plant-friendly ammonia compounds, ready for the plant to absorb and utilize.

Nitrogen-Fixing Plants That Enrich Soil

Legumes—beans, peas, peanuts, alfalfa, clover, and others—actually restore nitrogen to the soil thanks to that same symbiotic relationship with soil microbes. Amending soil this way is called nitrogen fixing. Rotating crops is a nice natural way to increase soil nitrogen—you can plant a legume for a year, then something else, then return to the legume.

Final Thoughts: Feeding Plants the Right Way

Understanding how plants get nitrogen helps gardeners make informed decisions about soil health and plant nutrition. Whether you rely on organic methods like planting legumes or supplement with store-bought fertilizers, knowing where nitrogen comes from and how plants use it can lead to healthier, more productive gardens. With a bit of science and strategy, you can keep your soil healthy and your plants thriving.

This story about how plants get nitrogen was written for Hobby Farms magazine. Click here to subscribe.

Categories
Poultry

Chicken Anatomy Explained: From Beaks to Tail Feathers

Chicken anatomy is a fun and informative way to learn about your chicken’s body, how it works and what physical characteristics set roosters and hens apart from each other.

Understanding the Chicken Face: Key Features Explained

One of the first things you notice on a chicken is its face. With their hawk-like eyes and red, fleshy combs, a chicken’s face attracts a lot of attention, and can tell you a lot about each individual.

Chicken Combs: Types, Functions, and Breed Differences

The comb is the fleshy crown on the top of a chicken’s head. No two combs are alike, helping to give each chicken a distinctive look. Combs vary in shape, depending on breed, with the most common varieties being single, rose, and pea.

Comb color also varies depending on the breed; however, most breeds sport a waxy, bright red comb.

The comb features two other body parts on the chicken anatomy chart: the base and point.

The backside of the comb is called the base or blade. The base is not directly attached to the head and will often flop over on breeds with large, single combs. The base is featured on several comb varieties, including single and rose combs.

Points only appear on single comb varieties, giving this comb style the look of a hair comb.

What Are Wattles in Chicken Anatomy?

Wattles are the red, fleshy objects that dangle from a chicken’s chin. They may not be a crucial part of a chicken’s anatomy for humans, but they are quite useful for chickens.

Wattles help to keep chickens cool during the summer months. And large wattles are also helpful for roosters when attracting a mate.

Chicken Ears and Eyes: How They See and Hear the World

An interesting thing about chicken anatomy that you may already know is that the ear and the earlobe on a chicken are not the same thing.

The ear is a small opening covered with tiny feathers directly in front of the earlobe. The ear isn’t usually visible to the human eye, but if you’re lucky, you may be able to catch a glimpse of it.

The fleshy skin located on the side of the chicken’s face directly behind the ear is called the earlobe. While it may look ornamental, the earlobe’s job is to help protect the ear canal and keep temperatures regulated within the inner ear.

A chicken’s eyes are set on either side of its head, allowing them to see in every direction at once and keep a lookout for danger. Looking at a chicken’s eyes is a good gauge to tell if the individual is healthy, as a healthy chicken’s eyes should appear bright and alert.

Chicken Beaks and Nostrils: Function and Structure

Beaks are the chicken’s answer to a mouth and is where food enters the body and begins the digestive process. An interesting fact about beaks is that chickens not only use their beaks for their mouths, but they also use them to investigate the world around them.

The nostrils work as the human nose, allowing chickens to breathe air in and out. Nostrils are located on either side of the face just above the beak.

Hackles and Neck Feathers in Chicken Anatomy

Chicken anatomy not only comprises many different body parts, but it also displays the various feathers chickens have, including capes/hackles.

The chicken’s long neck feathers, usually referred to as hackles, help insulate a chicken from both heat and cold.

In roosters, the hackles are often used as a display to attract hens and show dominance.

Rooster Anatomy and Hen Anatomy

Back Feathers, Cushions, and Saddles: Chicken Feather Types

Chicken backs feature several different chicken feather varieties, known as back feathers, cushion and saddle feathers.

The back feathers are the short feathers that cover the chicken’s back. These feathers help insulate a chicken and protect them from the elements.

Cushion and saddle feathers are located at the bottom of the back, directly in front of the tail. The difference between these two feather varieties is that hens sport cushions and roosters’ saddle feathers.

Saddle feathers are long, thin feathers that help attract hens to the rooster and should always be showy.

Chicken Breast vs. Keel: What’s the Difference?

Chicken breasts and keels can be mistaken for the same thing, but chicken anatomy graphs show the difference between these two body parts.

The breast is the fleshy part of the chicken and is where most of the meat is found when butchering.

The keel on a chicken is the large bone running from the chicken’s breast, where the wing muscles attach. Often referred to as the breast bone, the keel is what enables chickens the ability to flap their powerful wings.

Anatomy of Chicken Wings: Feathers and Flight Functions

Chicken wings do not have the same meaning in chicken anatomy as they do at a Super Bowl Party. Take a closer look at your chickens’ wings. You will see that they are comprised of seven different types of feathers.

The shoulder feathers are where a chicken’s wing is connected to the body. The bow coverts are to the right of the shoulder feathers and are followed by the thin alula feathers.

The bar feathers, also called the wing speculums, are located above the secondary flight feathers just below the shoulder and bow coverts. In some varieties and breeds, roosters’ speculums should be showy, similar to a duck’s wing speculum.

Located to the right of the wing speculums are the primary coverts, protecting the shafts of the primary flight feathers.

The primary flight feathers are the first ten feathers at the tips of the wings. These feathers provide thrust for takeoff and are vital for flight. Primary flight feathers are the largest feathers located on the wings.

The fourteen secondary flight feathers (located next to the primaries toward the body) allow lift in flight to help a chicken escape predatory danger and fly onto the perch for the night.

Chicken Legs, Feet, and Spurs: A Closer Look

Chicken legs and feet are an essential part of understanding chicken anatomy. Chicken legs, also referred to as hocks, are the bones that connect the thigh to the shank (ankle).

The toes are located at the base of the foot, with a sharp toenail at the end of each toe.

Roosters sport a spur on the back of each leg, a long toenail-like weapon used to battle other roosters and predators. While hens sport a small bump called a rudimentary spur.

Chicken Tail Anatomy: Sickles, Fluff, and More

There is no such thing as just a tail feather in chicken anatomy. There are main tail feathers, greater sickles, lesser sickles, and fluff. While hens only have main tail feathers and fluff, roosters sport all four feathers.

The main tail feathers are what the hen’s tail is completely comprised of, while a rooster’s main tail is covered with sickles.

The greater sickle is the longest, full feathers that cover the tail. The lesser sickles cover the sides of the main tail feathers, but are neither as long or full as the greater sickles.

The fluff on a chicken is located beneath the tail, covering the chicken’s bottom end, and giving them the signature “fluffy butt” look many chicken keepers love.

Explore Chicken Anatomy Up Close With Your Flock

Chicken anatomy is a fun and informative way to learn more about chickens and how their bodies work. So next time you are visiting your flock, take some time to identify and admire some of their physical characteristics and their many feather varieties.

Backyard chickens may be small, but every element of them is important. Learn all that you can about your roosters and hens, from their combs to their toes and every feather in between, with the help of the included chicken-anatomy diagrams.

This article about chicken anatomy was written for Hobby Farms and Chickens magazines. Click here to subscribe.

Categories
Crops & Gardening Farm & Garden

Grow Bag Gardening: What Works and What Doesn’t

Grow bag gardening was originally popular in the 1970s for use in greenhouse gardening and has seen a resurgence of popularity over the past several years. Grow bags are a great option for those with limited space and those with acreage alike.

Grow bags are soft-sided containers that come in various sizes, ranging from wide and shallow to deep and narrow. They allow you to grow plants in spaces that you may not otherwise be able to. Because of their portability and versatility, they’ve become quite trendy for urban and rural gardeners.

Grow Bag Gardening: Pros and Cons Explained

A favorite vegetable to grow in bags is potatoes. Growing in bags makes planting potatoes easy and harvesting them (and root crops in general) since they can be flipped over and dumped out – some potato bags even come with a flap window for partial harvesting. It can be much easier to dump out a grow bag full of potatoes, rather than to dig them out of the ground. However, like everything, grow bag gardening has its pros and cons. Below is a helpful list to see if grow bag gardening is right for you.

1. Grow Bag Portability: Garden Anywhere, Anytime

Pro – Grow bags are not permanent and therefore can be moved around as needed such as finding a new space for fall gardening needs. They allow you to grow on top of a concrete, on driveways or even a balcony for apartment gardening.

Con – They can become heavy once filled with dirt (depending on size), which can be more difficult for some to move if they have lift restrictions. However, this can be remedied by putting the bag on a base with wheels. We put bags on a children’s wagon to more easily move them to different spots around our yard.

2. Better Drainage with Breathable Grow Bags

Pro – Grow bags are breathable so you’re less likely to overwater and experience root rot. They offer excellent drainage. Grow bags are typically made of felt, wool, burlap, other recycled materials or sometimes plastic.

Con – Because the bags are breathable, they dry out a lot faster than plants that are grown in the ground. Therefore, you must water them more often. Also, it’s common that the water spills off to the sides of the soil into the bag, not saturating the center of the grow bag as well. It requires you to be mindful when watering to make sure the center of the bag is getting watered well enough.

3. Compact Storage: Grow Bags Are Space Savers

Pro – When grow bags are empty, they flatten down. They are lightweight and store easily without taking up much space.

Con – Because of their soft sides, they can easily be chewed through by garden pests such as mice.

4. Are Grow Bags Reusable? Long-Term Use Tips

Pro – Gardening grow bags are reusable year after year. On a personal note, we have been using ours for six years already.

Con – It’s recommended to clean the bags with soapy water at the end of each season before storing them away to kill any harmful bacteria or fungus.

5. Air Pruning: Grow Bags for Healthier Roots

Pro – Mike Hogan, an extension educator with Ohio State University, explains that in typical clay and plastic pots, plants roots run into the pot’s sides and turn and begin to circle. With grow bags, when roots reach the side of the bags, they are exposed to air and stop growing. The roots are “air pruned” which forces the plants to grow new roots, which ultimately results in a healthier, more fibrous root system and happier plants.

Con – None, when it comes to root health.

Grow Bag Gardening: A Flexible and Accessible Option

Grow bag gardening offers an incredibly flexible and accessible way to grow food and flowers—especially for gardeners working with limited space or tough ground conditions. While they’re not a perfect solution for every scenario, their portability, breathability, and root-health benefits make them an appealing option for many. With a little planning—such as proper watering and end-of-season cleaning—grow bags can become a lasting part of your gardening setup. Whether you’re gardening on a patio, driveway, or homestead, they’re a tool worth trying at least once.

This article about grow bag gardening was written for Hobby Farms magazine. Click here to subscribe.

Categories
Poultry Sponsored

Who Knew? Chickens Need Two Kinds of Stone

Think of calcium like Alice in Wonderland – chickens need just enough calcium, not too much and not too little. Most laying hens don’t get enough calcium from their feed alone–and that’s on purpose because over-feeding calcium is detrimental. But insufficient calcium puts a big demand on a hen’s system, especially if she’s laying regularly, and can lead to soft, small eggs, weak bones, and poor health. The good news is that adding extra calcium (free choice) to your hen’s diet is super easy.

Why Calcium Matters

With eggshells containing around two grams of calcium, laying hens need 4 to 5 grams of dietary calcium per day. Low blood calcium at night means calcium is borrowed from their bones. Slow-release calcium works best. If you’re starting from scratch, growing pullets require almost three grams a day. All told this ranges from 1.5 to four pounds each year. POULTRY NOTE: Broilers and turkeys have similar requirements.

Oyster Shell and Coral Calcium

Offering hens a free-choice calcium supplement is simple and effective. Don’t blend it with feed. If provided calcium through free choice, chickens will only take whatever amount of extra calcium they need. Oyster shells and coral are a popular choice, but hens can be picky, and many will refuse this option. Plus, the depletion of limited marine resources isn’t the best choice. If returned to the ocean, oyster shells restore reefs, breakwaters, and estuaries.

Peppy-Shell™ Travertine Calcium from Utah

Here’s where the choice gets easy. In central Utah is a large deposit of travertine from ancient hot springs (the very same kind of stone used to make travertine tile, pavers, and dimension stone). Turns out that this travertine is outstanding as a calcium source for chickens – they love it! Like oyster shells, it’s high in aragonite minerals that release slowly during digestion, plus it’s coarse. This ensures that your hens have high blood calcium at night when they need it most. Just offer Peppy-Shell™ free choice in a separate feeder. It’s that simple. You’ll be amazed what a big difference just a few pounds of extra calcium per year will make! And best yet, you won’t be depleting ocean resources.

Chickens Don’t Have Teeth

Most chicken owners don’t appreciate the importance of insoluble gritstone and gizzard development (exercise!). Chickens “chew” their feed in their gizzards. Unlike calcium, insoluble grit is not absorbed. If it’s large enough, gritstone gets stuck in the gizzard where it works like teeth. Grit-fed poultry gizzards are as much as 50% larger! Poultry science calls the gizzard the “central modulator” of poultry digestion. Did you know that food only stays in the gizzard for 30 to 60 minutes? Gritstone dramatically slows down the entire digestive process. The longer the better. Proper grit and gizzard development typically results in significant production increases (20% or more on the same feed).

Size Matters

Most gritstone sold in feed stores is too small to do much good. Gritstone has to be larger than the gizzard outlet, otherwise it passes through the body and is wasted. For layers, gritstone needs to be around 5mm in size but the best size can vary over time and breed. Chickens are smart. If provided a variety of sizes free-choice, they’ll take exactly what they need.

Chicken Chompers™ Insoluble Gritstone

A great pairing with Peppy-Shell™ is Chicken Chompers™ Insoluble Gritstone. Chickens love it! It may look large compared to other brands but you can trust the poultry science behind it. Chickens will eat the correct size and amount they need. Just make it available free-choice in a separate feeder (do not mix with feed or calcium).

Stone For Chickens: Final Thoughts

Providing calcium for chickens is a must to raise happy, healthy and efficient layers. The question is, how do you want to provide that calcium? Pairing a slow-release option like Peppy-Shell™ with an insoluble gritstone like Chicken Chompers™ provides laying hens with the tools they need to stay healthy and provide lots of strong-shelled and yummy backyard eggs. Who knew two different kinds of stone could make such a difference in your flock’s health and productivity? Try it and see for yourself.