To honor you and your beautiful birds, we put together another great Best of Cluck photo contest that allowed you a chance to win some awesome prizes. This year, we offered five categories to enter: Cutest Chick, Best Hen, Best Rooster, Best Group and Coolest Coop.
Scroll down to see who won!
Cutest Chick
Martha Tully/Glen Spey, New York
Sponsored by Grubbly Farms Prize: a $100 Grubbly Farms Gift Card. Since 2015, family-founded Grubbly Farms has pioneered the use of healthy and sustainable insect-based pet foods. The protein comes from black soldier fly grubs sustainably grown on leftover fruits, veggies and grains that would normally go to waste in a landfill. As Grubbly’s earth-friendly, farm-fresh recipes give love to the planet, they also keep our fluffy ones happily nourished with foods they naturally love.
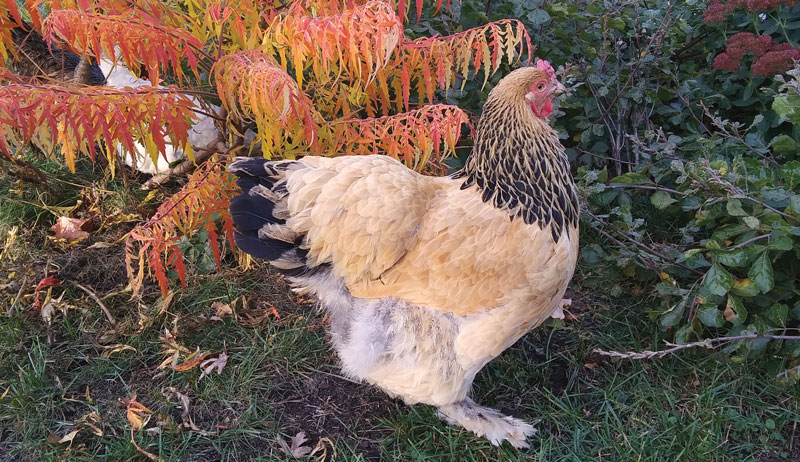
Best Hen
Debby Dathe/Minneapolis, Minnesota
Sponsored by Brinsea ProductsPrize: A ChickSafe Eco Automatic Chicken Coop Door (retail value: $150). This tough and reliable system automatically opens the coop door in the morning and closes it in the evening as light levels fall, keeping your birds safe and giving you peace of mind.
Best Rooster
Shannon Keeler/Ariel, Pennsylvania
Sponsored by Murray McMurray Hatchery Prize: a $100 gift certificate to Murray McMurray’s online store for poultry and/or other merchandise. Murray McMurray Hatchery provides the highest quality poultry and auxiliary products to their customers, and have been a trusted, knowledgeable industry resource for more than 100 years. Whether you are an experienced or novice enthusiast, you will enjoy its wide selection of breeds and supplies to assist you with raising your flock.
Sponsored by Mt. Healthy Hatcheries Prize: a $100 gift certificate to Mt. Healthy Hatcheries, a family-owned and operated business founded in the mid-1920s. From 1924 to today, they have hatched and sold millions of chicks throughout the nation.
Coolest Coop
Ben Lightner/Olympia, Washington
Sponsored by Cutest CoopsPrize: one welcome mat of choice and one sign of choice from Cutest Coops, which build the highest quality and customizable coops, with thoughtful design features that make chicken-keeping a fun and easy hobby. Each coop is hand-built, with attention to detail and careful measurements, leaving a flawless finished product. Each coop is predator safe, weather resistant, easy to clean and customizable, with superior ventilation.
This Best of Cluck photo gallery previously appeared in the July/August 2022 issue of Chickens magazine.
It looked like a dead leaf hanging off of the side of the bottom corner of my house. But on closer inspection, I noticed that “leaf” had tiny claws, leathery wings and downy-looking fur. I made sure all the people and pets in my house gave the juvenile bat a wide berth.
By the next morning, it had moved on.
For a few years, I’ve tolerated a small number of bats living just under the siding of my house. After all, they’ve been running out of natural habitat. What’s more, we’ve lost more than 90 percent of certain bat populations to white-nose syndrome.
While I’ve rarely seen or heard “my” bats, I’ve certainly benefitted from having them around. “They’re going to be removing insect pests from your environment,” says Brad Westrich, a mammalogist with the Indiana Department of Natural Resources Division of Fish & Wildlife. “Those may be mosquitoes that could transmit various pathogens to you or your livestock or pests in your garden or in your local forest.”
In fact, some estimate that bats save farmers nearly $4 billion in pest control services annually.
Who’s Roosting?
When it comes to finding suitable roosting spots, the big brown bat, the evening bat and the little brown bat aren’t as choosy as some of the other bat species. “They’re going to be more flexible and all right with utilizing one of those human structures,” Westrich says.
He continues, “If maintenance on the outside of a structure hasn’t been kept up, bats are going to utilize those openings … and have that nice place to roost.” Bats easily can exploit small openings created by mice or other animals. They’ll also take advantage of breaches in siding, gables and soffits from natural wear-and-tear.
It’s one thing to harbor a few bats under the siding on the outside of your house, but what if they’re inside your attic?
“While they’re in the attic roosting, they’ll flip over from their hanging position, so that they can urinate and defecate,” Westrich says. “Obviously, that accumulation of moisture wouldn’t be good for insulation in the longterm.”
Bat guano may be good for the garden, but allowing it to build up indoors is a non-starter. “You can either hire a professional to remove those things or very cautiously—wearing a respirator and sealing goggles—you can remove [the guano] yourself,” he says.
(Donning personal protective equipment for these cleanup operations is essential, since the dust and debris you encounter may contain harmful pathogens.)
People & Pets
Bats can pose further risk to people and pets because they are a potential vector for rabies. “If you have pets, make sure they’re current on their rabies vaccinations,” Westrich says. “Should they have an encounter with a bat inside the structure or outside—if the bat’s clinging to the side of your house or barn—then you know that that pet is as safe as it can be.”
If there are children in your household, tell them never to touch a bat they encounter. “They shouldn’t try to pick it up,” he says. “You want to avoid those incidences when a bite could happen and then you have to deal with the hospital and worrying about getting post-exposure [rabies] prophylaxis.”
Let’s say you find a bat in your living space and you suspect you or someone else may have had contact with the animal. “In those cases, you need to go to all lengths possible to safely capture that bat and get it to your local county or state health department,” Westrich says. “If you can capture the bat and get it submitted [for rabies testing], you could get those results back quickly to prevent yourself from having to go through the post-exposure prophylaxis.
“If you don’t have the bat, then more than likely doctors are going to err on the side of caution and urge you to get it.”
The Fix
In North America, bats emerge from hibernation and begin looking for roosting structures in the spring. “If you can catch it between April and early June, you have the possibility of excluding the bats,” Westrich explains. To keep them out, you can buy one-way bat exclusion devices or make your own.
If, like me, you have a sizable bat colony and you’re already well into summer, you’ll want to wait until fall to remediate. In October, bats typically head to area caves to hibernate. Once they’ve gone, you can remove any guano, make necessary repairs and install bat excluders to keep them out next season.
Finishing Touches
Depending on the species, bats can live from five to 30 years, and, Westrich notes, “They’re going to return to some of those habitat areas for various portions of their life cycles.”
With that in mind, consider offering any returning bats some alternate digs. “That can involve putting up a bat house, either on your structure near where they were getting in and out, or putting up a bat house, at least on your property near that structure,” Westrich suggests.
“I wholeheartedly believe that the world would be a kinder, more understanding and joyful place if we all had a tiny homestead to care for,” says Telo Anderson from the Goose Pond Homestead in Poynette, Wisconsin.
Running the venture in tandem with her husband Travis, the homestead focuses on providing a mix of rainbow eggs, seasonal produce and hand-crafted small goods. There’s also a farm stand, which helps forge connections with the local community.
“We’re building an infinite amount of invaluable skills that not only benefit our family and our homestead, but also benefit our friends, family and community,” says Anderson as she reflects on her family’s adventures in homesteading to date.
We spoke to Anderson about building up the homestead and caring for chickens. We also got into the joys of adding Snapdragons to the land.
“I owe my interest and inspiration for homesteading to my husband, Travis,” says Anderson, recalling how her interest in Goose Pond Homestead began. “He planted our first garden all by himself. I harvested and cooked the bounty for our little family.”
Building on that early sense of momentum, the Andersons added six chicks and a homemade coop the next year.
“Our first little garden and tiny flock of chickens opened my eyes and heart to the better quality of life that comes with homesteading,” says Anderson.
The homestead’s resident poultry reside in a converted barn that’s been dubbed the Chicken Clubhouse.
“They may have ‘bird brains,’ but their intelligence and personalities are not to be underestimated,” says Anderson. “They remember their favorite people, foods and nesting spots and know how to safely put themselves to bed each night.
“I find the members of our Chicken Clubhouse to be full of joy and intellect.”
In general, Anderson characterizes the chickens on the homestead as “goofy and entertaining.” She says they merrily follow her around like puppies. They hop up and down to snack on low branch fruit and enjoy sprawling out to bask in the sun.
“Oh, and dust bathing!” she adds. “I always find it fascinating that chickens clean themselves with dirt. It’s so entertaining to see dirt flying in the air, landing on their bodies and magically ridding them of bothersome pests.”
Alongside the chickens and the produce, Goose Pond Homestead hosts a vivd array of flowers. It turns out this was Anderson’s first year attempting to grow cut flowers.
“I am most proud of my Snapdragons because they are grown from seeds that literally look like specs of dirt,” she says. “When I first planted their seeds I wasn’t very confident that they would sprout. But I’m grateful to say that they did!
“Those little specs of dirt-like seeds are blooming to life with such vibrant happy colors.”
In 2020, Anderson added a farm stand to bring an extra element to the homestead. She calls it her “favorite creative outlet” and explains how it’s “one of the best ways to share our homestead with the community.”
The farm stand offers seasonal produce, homemade goods and rainbow eggs.
“Each year I find myself adding at least two new items that are either made on our homestead or made in Wisconsin,” she says. “We are already needing more room for all our goodies!”
I have kept and loved chickens since I was a boy. Growing up in the suburbs on the edge of a large city, through necessity, much of my early poultry-keeping exploits were solely limited to raising bantams, a type of chicken just like full-size breeds but only 1⁄5 to 1⁄4 the size.
In those far-off days, pocket money only went so far. Fortunately for me, I quickly discovered that bantams were the most economical fowl to keep. They required less food and smaller (cheaper) housing, and they produced more than enough eggs to satisfy our household.
My youthful bantam-keeping experience also taught me the valuable lesson of expenditure versus income. I soon learned that any surplus eggs, chicks or birds produced were always in huge demand around the neighborhood.
These beautiful fowl had the ability to pretty much pay for their own keep simply by virtue of the fact that all their products were edible. The eggs were keenly sought after (especially for cake baking). And surplus birds, though small, made a delectable feast, with a full, natural flavor.
If you choose your breed wisely, these triple points of eggs, meat and the profitable sale of hatching eggs, chicks and growers can still be combined. And these are just some of the many reasons bantam breeds are so very popular today.
A History
The Bankiva junglefowl, or red junglefowl, may be the origin of our bantam breeds. The term “bantam” would seem to establish that fact.
Bantam (aka Banten) is the name of a town and district in the northwest of Java, Indonesia. In 1595, the Dutch established themselves at Bantam. And in 1602, the English erected a factory in the same place, which was the first possession of the English in the East Indies.
These beautiful miniature junglefowl, sold to the British at Bantam, were imported into England under the very natural appellation of bantam fowls. Their elegance and diminutive size rendered them favorites. In due time the name came to be conferred to all small or dwarf fowls.
What is undeniable is the surge of interest created by the bantam. From the Victorian era, when large fowl were quite literally ruling the roost, the little bantam gradually replaced it. This rapid advancement can be traced through old poultry books.
In the early 1880s, that masterpiece of poultry literature, The Book of Poultry by Lewis Wright, only denoted 30 of its 591 pages to bantams. However, by 1893, L. C. Verrey wrote the Book on Bantams, said to be the first devoted solely to their breeding and culture.
By 1899, The Practical Poultry Keeper announced that renowned English poultry breeder W. F. Entwistle had “reproduced in bantam form almost all large breeds of poultry”—the first clear indication of purposeful “bantamisation.”
At many of today’s poultry shows, bantams are often more in evidence than their larger counterparts.
The defining characteristic of a true bantam is that, unlike other poultry breeds, it doesn’t have a larger counterpart. The true bantam classification covers breeds such as the Sebright, the Booted, Japanese and the Belgians.
These dwarves of the poultry world make up for what they lack in size by having larger-than-life personalities and friendly natures. However, you can’t really depend on them for their eggs, which are tiny and certainly won’t make a satisfying meal!
For the purpose of this article, I’ll focus on those bantams selectively bred down in size (from productive large fowl) that still retain their utilitarian value. If you’re looking for an egg producer but lack space, do exactly as you would if you were choosing a larger breed. Select bantam varieties of the Rhode Island Red, Sussex, Wyandotte or Leghorn.
If purity of your stock is of no big concern, you can still produce tasty meat by crossing Cornish bantam/Old English Game with a Rhode Island bantam. The result will be a yellow-skinned succulent bird that will be greatly enhanced by corn-heavy feed and access to grass.
Andy119/Shutterstock
Plymouth Rock
Having never kept this breed before, I was particularly interested in the response from Grant Tenley, president of the Plymouth Rock Fanciers Club of America to my questions. The club has a directory, which is an excellent tool for locating good breeders in different areas.
Growing up on a farm, Tenley has always lived around poultry. “We raised White Plymouths and White Leghorns for eggs and meat. (But) Plymouth Rocks became my favorite chicken,” he says. “We had Barred Plymouth Rocks for years. And then in 2012 I purchased Columbian Plymouth Rocks for 4-H and have been breeding and improving them to meet the Standard of Perfection since 2016.”
Plymouth Rock bantams are bred of quality genetics that conform to the Standard of Perfection, a written description of an ideal bird of the breed. “A novice in the fancy should be looking for a thrifty and vigorous chicken (with) a single comb of medium size with five points, nice yellow legs, good tight wing carriage, stout bone structure, a wide stance and a well spread tail, carried at a 20-degree angle for females and a 30-degree angle for the male,” Tenley says.
Good Layers
A good layer should be active and thrifty. They should be bright-eyed and in good body condition.
“You must monitor the diet of your chickens to increase egg output,” Tenley says. “Fat hens will not lay as many eggs. A wide bird with good body carriage will lay best. Try to avoid narrow, smaller birds.”
Plymouth Rock cockerels weigh a good bit more than the majority of bantam breeds. Standard weight is 32 ounces for the bantam cockerels. Many can reach a larger weight at maturity, making the breed a good table bird.
Plymouth Rock bantams make great birds, as they’re easy to raise and hatch; fertile, hardy, good mothers; and great layers. They also produce a good-sized carcass.
They’re perfect for small-scale breeders, fanciers or hobbyists, whether you want them for eggs, meat or exhibition. However, they do tend to eat more than the smaller ornamental bantams.
Wyandotte
Another American creation is the Wyandotte, which is also my favorite bantam breed. While utility considerations seem to have been the driving force behind the creation of many breeds, looks were at the forefront in the creation of the Wyandotte.
An eclectic mix went into its creation. Sebrights, Hamburgs, Brahmas and Cochins all played their parts in what was provisionally called the Eureka. They were finally admitted to the American Poultry Association’s Standard of Perfection as Wyandottes in 1883.
Bantam versions were soon created. Although small, they’re often on the large size for bantams (thus unwanted cockerels can make a decent meal). So for those looking for a beautiful utility bantam, these really can’t be bettered. However, although exquisitely beautiful, some of the white birds often have the capacity for excess feather and fluff. Though welcomed by the exhibition world, these traits are often quite unproductive.
Interestingly, the more intricately marked birds (Gold, Silver, Buff-laced, Silver-penciled and Partridge) often lay extremely well—even throughout the harshest winters.
The docile, quiet, hardy, friendly and attractive Wyandotte simply can’t be recommended highly enough and are also eminently suitable for the beginner.
It was the poultry farmers of Rhode Island—motivated by the demand for a fowl that could produce eggs and meat—that subsequently developed the Rhode Island Red. And their clear focus on utility would see it become the world’s most successful breed.
Murray McMurray Hatchery
Their aim to produce the hardiest stock, capable of surviving the harsh New England winters, has served this adaptable chicken well.
Some folk dismiss the large Rhode Islands exhibited at shows throughout the country as being too big and not laying enough eggs to be classed as utility. Conversely, some exhibition bantam strains are renowned for being excellent layers of reasonably sized tinted eggs.
While the hens are usually sweet little things, the cocks often go oversize—making them ideal for the stew pot! The docile, friendly and easily contained Rhode Island Red is yet another bantam perfect for the beginner interested in utilitarian values.
Welsummer
Most of Europe’s indigenous poultry breeds laid white eggs. Holland (home of the Welsummer) was no different. But the Dutch breeders were amongst the very first to recognize the commercial importance of the brown egg, which were then (quite erroneously) perceived to be the healthier choice.
I have kept this delightful breed—famous for rich brown eggs—in its large and bantam form.
Welsummers are friendly, active but placid birds, supremely suited to a backyard or hobby farm. Some bantam strains are very productive. But many produce a much lighter-tinted egg than their larger counterparts. If shell color is vitally important to you, ask the breeder of your stock to show you some of the eggs their birds have produced.
Araucana
The popularity of blue-shelled eggs has exploded in recent times. My young nephew—a very fussy eater—would only eat blue eggs and was convinced they tasted better than the conventional colored ones!
The producers of these sky-blue eggs are, of course, the wonderful Araucana. Named after the Araucano Indians, this is South America’s only native fowl. A number of forms can be found in the U.S., with rumpless and striking tufted-eared versions being seen. Its most distinguishing feature, though, is of course production of those beautiful-colored eggs.
A word of warning to anyone buying stock. Go to a well-known, registered breeder and ask to see some of the eggs his strain produces.
Egg color varies enormously, and many produce a disappointing olive or muddy green color (often a sign of crossbreeding). There are some excellent strains of Araucana bantams out there that produce scores of pastel blue eggs. You just have to do your research.
Note: This very active, hardy, fascinating chicken can be a bit flighty and vocal.
The Leghorn
This old Italian breed is extremely well known—no doubt helped by Foghorn Leghorn, the animated rooster that appeared in numerous Looney Tunes cartoons! Although Italian in origin, American breeders developed it. Mr N. P. Ward of New York City is recorded as being the first importer of Brown Leghorns back in 1834.
Leghorns have historically been highly valued for their egg-laying abilities. And the breed is still unsurpassed in its ability to produce large numbers of white eggs. Utility whites have been recorded as laying 300 eggs a year.
Exhibition breeding for massive upright combs in the standard-sized cockerels and big floppy ones in hens has detracted from their utility performance. However some bantam strains of black/brown leghorns lay almost as well as the commercial hybrids.
I wouldn’t recommend this breed for anyone with close neighbors; they tend to be flighty and can be quite noisy. However for those with a bit of space, they make a superb choice.
This article originally appeared in the July/August 2022 issue of Chickens magazine.
Right now is the perfect time to notice which perennials survive summer heat. Anything still in bloom is guaranteed to be hardy—and, most likely, drought tolerant. Seeing plants thrive in these conditions makes us want more of them. Transplanting perennial flowers allows the plants to spread out more if they are in a tight space and allows you to capture wildflowers moving them to an area you intend.
Often you’ll find wildflowers surviving outside of garden gates. Heavily tended plants inside, however, often wane this time of year.But it is possible to transplant these perennial survivors now if you carefully follow these steps.
Stay Aware of Temperatures
Fall and spring are the safest times to transplant perennial flowers due to cooler temperatures. If you are transplanting in the summer, work during the late afternoon so the roots have lower temps to settle in, rather than during the heat of the day.
Dig a hole twice as wide as the root ball, but not deeper.Add soil amendments. Avoid using chemical fertilizers that will burn the roots.
Water the area thoroughly. Make sure all the water drains. You do not want to put a new plant in standing water.
Dig up the Plant
Dig outside of the plant’s drip line. This may be wider and deeper than you think. Avoid cutting into the root ball. When you transport the root ball to the new location, do not break off roots or buds.
Place the Plant in the New Location
Make sure the crown of the plant is not buried and is flush with the soil level. Gently tamp down the soil around the plant, leaving room for oxygen to circulate.
Mulch will help the soil stay placed and help the new plant retain water for the root system.
Water & Observe
The first few weeks of transplant will be a vulnerable time for the plant. The roots need to stay moist to have power to accept the transfer and begin new life in the new location. Do not drown the plant, but keep the moisture level high enough to relax the roots.
Observation is key for all gardeners. Take notice of what plants are thriving right now and don’t miss an opportunity to add these perennial flowers to your garden.
I didn’t until I saw it on a list of national days taking place in August, and while I might question whether thrift shopping needs its own day (especially so soon after National Garage Sale Day—Aug. 13), I’m ready to celebrate.
I love shopping for good deals, and it’s satisfying to find a useful product at a bargain price.
Thrift shopping, or shopping for used items in general, can take on many forms. Maybe you’re shopping at a physical thrift shop, or maybe you’re shopping for used items online, either through an online store or through a social media page for sellers in your area.
Wherever you choose to shop, you can find just about anything you might need if you look long enough.
Thrift shopping can be a great way for hobby farmers to acquire tools, machines and more at discounted prices, expanding their farm’s capabilities without breaking the bank. But to avoid buyer’s remorse, it’s important for farmers to keep these three questions in mind when shopping:
Is the item in good condition?
A thrift store sells used items, and the condition will naturally vary from item to item. Ascertaining whether the condition is suitable for your needs is the first step in finding a good buy.
How much wear and tear you’re willing to accept may depend on the type of item. I frequently buy used books because I don’t mind if the pages are creased or the cover worn. But I’m more skeptical when it comes to bigger purchases like a lawn tractor or string trimmer mower, because you can’t always know how well it’s been maintained. A machine that looks fine on the outside might have an engine that’s close to worn out.
Depending on the seller, some used items might come with a limited-time guarantee or return policy, which can alleviate concerns on higher-priced purchases.
Just because a used item is in suitably good condition doesn’t make it a bargain buy. That’s determined by the price. Are you getting an appropriate discount by thrift shopping, farmers, or is the price still steep?
Think about it—an attractive old hand saw with a wooden handle might seem like a bargain at a price of $6. But if the blade is rusty and the teeth well worn, wouldn’t you rather buy a brand-new saw for $12?
It might be twice the price, and you might have to accept a plastic handle. But the time of a busy hobby farmer is valuable. A new saw with sharp teeth will save you time and effort compared to using (or stopping to sharpen) a dull saw.
And the time you save can offset the difference in price.
Exactly what constitutes a reasonable price will vary from product to product. Conducting a little online research can give you a ballpark price range for an item (both used and new). So you can gauge for yourself whether the item you’re viewing is reasonably priced for its condition.
This is perhaps the most important question to ask yourself. Particularly when you’re visiting physical stores, it’s tempting to come home with something—anything!—to make the trip worthwhile. But if you can’t find anything you want (or more importantly, need), why let thrift shopping turn into an exercise in unnecessary monetary expenditure?
Several years back, I visited a large emporium in a nearby town. One room was dedicated to old tools, and I thoroughly enjoyed perusing the seemingly infinite collections of wrenches, hand saws, screwdrivers and more. I wanted to pick something out, but what was the point?
They were well-used tools, and I already owned nice ones, so I reluctantly passed. No need to spend money on backup tools for my backup tools.
Keep these three questions in mind, farmers, and you’re more likely to find a solid thrift shopping bargain. Happy National Thrift Shop Day!
When it comes to disasters and preparation, psychologically it might be good to consider the quote from Irish poet and playwright Oscar Wilde (1854-1900): “To expect the unexpected shows a thoroughly modern intellect.” From the strings of tornadoes that routinely ravage the Midwest and South to the recurring and intensifying cycle of wildfires and flooding along the Pacific Coast, disasters can strike at any time and have devastating consequences for humans and animals alike.
Local officials and disaster preparedness groups often advise to have evacuation plans and provide lists of supplies that everyone should have on hand. However, these measures rarely take animals into account and almost never consider backyard chickens in emergency prep.
Whether our chickens are kept as companions, sustainable food sources or a combination of the two, keeping our feathered friends safe and healthy during a disaster is important.
In this column, we’ll discuss how to best prepare to care for chickens when an emergency occurs.
The Dangers You Face
Understanding the types of disasters that occur in your area is an important step in preparing for them. Generic evacuation plans and emergency kits will only get you so far when preparing for helping chickens in specific emergencies.
Both authors of this column live on the West Coast, so wildfires, floods and earthquakes are primary concerns. Severe earthquakes often disrupt transportation routes, so evacuation might not be an option and extended stores of food and water are needed.
During a wildfire, expedient and safe evacuation is the No. 1 priority. Flooding can damage transportation and affect your ability to find viable land to raise your flock on. While reading this column, keep in mind the specific risks you and your flock face, and adapt the information presented to prepare for them.
As previously mentioned, whether you evacuate or wait the disaster out depends on the specific disaster you face and a gazillion other variables that you can’t predict with 100 percent accuracy. As we are all well aware, some situations call for waiting and some situations require immediate evacuation. Therefore, prepare for both.
Having some level of situational awareness will be essential toward making the best decision possible. When it comes to pets, many people stay longer because they don’t have a viable plan in place for their animals. This increases the risk for you, your pets and first responders.
Local emergency response officials will typically communicate with residents about what they should do, evacuation routes, etc. In order to be prepared “to stay or go,” have a checklist so you can easily prepare, evacuate, stay or both. Things to have on your checklist include the following.
Communication Essentials
Assume the internet won’t be functioning. Having multiple evacuation plans in place and old-fashioned maps (aka paper maps because the internet may be down) can help to expedite evacuation and reduce harm to you and your birds. Familiarize yourself with local resources including your nearest community emergency response team.
Evacuation Routes & Shelters
Situational awareness is vital in an emergency. Again, assume the internet is down. Know where bridges, elevated roads, and rivers and streams are in your area. Look for sources of smoke and fire in the distance. Be familiar with multiple surface roads in case one or more evacuation routes away from sources of danger are blocked or congested with traffic.
Transportation Plan
Having a plan to quickly round up your chickens and put them in your vehicle is important in an emergency situation. Assign family members tasks in the roundup process and practice together. Ensure that the person in charge of picking the chickens up in the coop is able to do so. Have the following readily accessible.
Cages: Crates to transport chickens are easy to purchase online or at your local farm-supply store. The crates come in a variety of sizes but are roughly 2 1⁄2 by 2 by 1 feet can fit roughly eight full-grown chickens for several hours.
Vehicle:One challenge is that chickens poop (a lot), and the crates are slotted which means your car could get dirty and stinky very quickly. Putting down a heavy-duty trash bag under the crate should at least help with keeping your car clean.
In a perfect world, you would be able to keep the crates in the bed of a pickup and bungee cord the crate in so it doesn’t excessively slide all over the truck bed. Gas stations will likely not be working or will be busy with others trying to buy fuel. Keep at least enough fuel in your vehicle’s tank to get you and your flock to safety.
Keeping Them Calm
To reduce stress, cover the crate with a breathable cloth. In general, darker is better.
Regardless of whether you stay or go, have a go-bag (or bags) ready with supplies to last at least two weeks. Things to have in your go-bag include the following.
Feed
An average laying hen eats approximately 1⁄4 cup of feed per day. Plan for at least 14 days of feed. Include a feeder or low-walled container to portion feed.
Water
Chickens drink roughly twice as much as they eat. Plan on about 1⁄2 cup of water per chicken per day for at least 14 days. Bring a portable waterer or low-walled container to portion water, and clean it frequently.
If you are sheltering in place, running water may still be available from a well or municipal water supply. However, this water may not be safe for you or your animals to drink. Sewage, smoke, heavy-metal contamination, etc. may make the water nonpotable. Make sure you have the ability, if necessary, to boil or filter water at home.
First Aid
In case your chickens get burned or are otherwise injured, have contact information for your veterinarian handy, making sure you at least have contact information for a vet who treats backyard poultry. Also have contact information for a diagnostic lab because these laboratories will typically euthanize chickens for free.
For small injuries, keep a bottle of povidone iodine solution on hand for disinfection. Diluting commonly available 10 percent povidone iodine solutions with water to a light brown color retains the antiseptic properties of the original solution while reducing causticity to poultry skin. You can also use dilute soap. Rinse with water.
Temporary Enclosure
Once you reach an area safe from the emergency, allow your chickens to resume their normal activities to reduce the stress of evacuation. Plastic fencing and collapsible metal cages marketed for rabbits and other small animals work well as temporary enclosures in place of your flock’s normal run. Ensure that the enclosure you choose is taller than the height of your birds, and allows for at least 1 1⁄2 square feet per bird.
General Emergency Equipment
A readily accessible flashlight with extra batteries is perhaps one of the most important pieces of emergency kit. Keep this flashlight in a readily accessible area at all times in case your power is out. A battery and/or crank operated radio will allow you to get updates from emergency officials. Keep a bag containing any tools you will need to set up your enclosure.
British Prime Minister Benjamin Disraeli (1804-1881) is credited with saying: “I am prepared for the worst, but hope for the best.” When it comes to disaster preparedness, this quote reflects how we may want to think in order to get in the right mindset with respect to preparation. In addition to the lists and information in this column, brainstorm with your neighbors and loved ones on your plan/checklist. What might seem obvious to some might not be so obvious to us until it’s too late. Regardless, update your plan and go-bag annually.
This article originally appeared in the July/August 2022 issue of Chickens magazine. It was written by Joseph Gendreau,Dr. Chelsea Sykes, Dr. Maurice Pitesky and Dr. Robert Poppenga, all from the school of Veterinary Medicine at the University of California, Davis
Harvest is just around the corner. If ever there was a time when the homestead needs a pig, it is right now!Just look at the garden. You’ve got zucchini the size of blimps every time you turn around, overripe tomatoes, cucumbers grown fat and bitter, and all those cobs and shucks from the sweet corn.
Canning and freezing leave you with buckets full of peels, seeds, pods, rinds and cores. And all that is next to nothing compared with what the fall will bring, when you empty the garden and strip the fruit trees in preparation for winter.
Finding a pig at the right time can be tricky. It’s a good idea to get the word out early if you are going to want a fall feeder pig. You’re looking for a pig between 35 and 60 pounds, usually, recently weaned and trained to solid foods. And you want to find a reliable source, because at this stage, just after being weaned off his mother’s milk, he can be extremely susceptible to germs.
Homesickness
Shipping fever is the pig keeper’s term for the fever, cough and runny nose that not infrequently occur when a young pig changes living quarters. It could have many causes.
Too often animals are moved with little thought for their comfort, when just a little care could make a big difference. If piglets are being moved in the back of a pickup, a truck cap or bed cover can keep the little ones out of the wind.Even on a warm day, the back of a pickup can be a cold place to ride!
If no cover is available, try putting the piglets in a pet crate. Strap a tarp over it, leaving room for some air to get in (of course).We’ve seen pigs moved successfully in a plastic IBC or “tote” as well. Even a heavy-duty appliance box can keep a piglet contained and out of drafts for a short journey.
Some simple attention to comfort during transport can go a long way to protecting a pig against shipping fever.
After the move, make sure little pigs have a comfortable bed of hay or straw in their living quarters to prevent shipping fever illness.If they come from a farm where slatted floors are the norm, they may never have encountered grass bedding.They’ll probably eat some of it, so make sure there is plenty!
Use clean, mold-free hay or straw, especially in these first days. Pigs can have allergic reactions just like humans, and you’re trying to give them the fewest health challenges possible.
Pig pens should be open to fresh air, but not drafty.Solid walls toward the prevailing breezes—in the U.S. this usually means to the west and north—give the animal a place to get out of the wind.At least part of the pen should have a roof for shade, protection from rain and a dry spot for a comfortable bed.
Clean water, of course, is a must. And then there is the matter of food! Obviously weanlings will no longer have the perfect nourishment of their mother’s milk, and it’s up to us to make sure that what they do get is nutritious and easy to digest.
If you are switching your new pigs from a solid food diet high in commercial grains to one consisting largely of your own farm-raised calories, you want to start out gradually.A 50-pound sack of proprietary pellets or crumbles will last a long time when mixed with kitchen scraps and garden surpluses. It also lets the little guy adjust his gut over time.
Porcine Nursing
But what if, when you’ve taken all the precautions, the pig still turns up with symptoms of shipping fever?
Well, first of all, consider that the cost of a visit from the local vet will probably be as much as or more than the cost of the piglet. That’s without counting the price of any procedures or meds.
It isn’t always the best choice to bring in the professionals.Don’t think we’re heartless. We are very careful of our animals’ health. But for a homestead or farm to be viable, it has to keep expenses proportionate.
If you call the vet out for every health problem, you’re likely to be raising some expensive animals.And you’ve no guarantee that the visit will save pig in any case!
The best remedy for a sick animal is considerate, appropriate nursing. And the first order of business is to make sure the pig pen is dry and draft-free.
The piglet should be able to lie down in a shady spot with plenty of bedding so he can regulate his temperature.If he has roommates, separate the sick pig from his companions. This obviously decreases the likelihood of passing on an infection. But also, sick animals, like sick people, need peace and rest in order to heal.
If baby is still willing to eat, make sure you offer food of the best quality.Table food scraps are pre-cooked and easy to digest.If you keep a dairy animal—whether cow, goat or sheep—surplus milk or dairy products make the very best hog food.
High in proteins, fats and sugars, raw milk is a complete food rich in probiotics.
Colostrum, the first milk made after a mammal gives birth, is especially nutritious. And since many people don’t care to use if for drinking or cooking, you’re likely to have some extra. We freeze colostrum in gallon jugs for starting bucket calves. It’s also nice to have some available as a tonic for just such situations as pigs with shipping fever.
It is a wonderful food. We’ve seen animals dosed with colostrum pulled back from death’s door.
How to Feed
Make feedings small and frequent.Offering more food than the pig will eat quickly means excess food will grow stale or sour, and breed flies. Liquid foods like milk, whey, colostrum and broth provide hydration as well as nutrition.
Offering several times during the day can encourage the animal to eat more than they would of free-choice feed.
If the piggy’s condition is severe, you may find him panting for breath rather than eating. In this case, offer small amounts of fluids every hour or two. In our experience, even a piglet with pneumonia can be aroused by the sound of milk being poured into its trough.
Quickly lapping a few ounces of milk before he has to stop to catch his breath can often keep him hydrated and nourished long enough for his immune system to kick in and deal with the infection.
And that’s the good news! Pigs have a great power of self-healing. If we give them the conditions they need, they can pull through just about anything.
Comfortable quarters, peace and quiet, and simple, nutritious food are the best medicines we know for a pig suffering from shipping fever.
Growing trees for sale is a great option for the small farmer. But maintaining a tree nursery requires a long-term plan for years of tree growth. Here are some tips for growing fruit and other trees throughout the year.
Consider Climate
Choose varieties for your tree nursery that are well-suited to your climate and the climate of your customers.
You really need to understand your hardiness zone. Sure, growing barely hardy trees can be a great niche for sales. But you should grow them for several years on your own property first. You need to experience and understand their potential to survive the coldest winters you might experience in your area over a decade.
Getting Started
Explore your options for getting started, and decide on the best setup for your operation. You can, of course, buy in small seedlings. Or you could start seedlings from seed or even graft favorite varieties onto chosen root stocks in quantity and of the varieties you wish to sell.
The best way to sell trees? Either bare root (lifted from ground to sell in spring) or newly potted (potted in spring for summer sale).
In both cases, you’ll see demand for trees in, primarily, three different sizes.
There’s a lot of demand for small trees (1-2 feet tall). These are usually bought by reforestation organizations and orchards wanting to plant large acreage.
There is also demand for tree whips (when lateral branches have been pruned off), usually sold in a medium size (3-5 feet tall).
Lastly, there is demand for larger trees (bareroot and potted) of a size desirable for landscaping (5-9 feet tall) where trees are already established.
Of these three sizes, the most economical for the nursery is usually the size they are best set up to manage and market. I like the middle size.These 3- to 5-foot trees grow out well in your fields, from small 6-inch seedlings to the desired size, following the following steps.
Starting Your Tree Nursery
Fist, furrow your plot for the tree rows about 3 to 5 feet apart, depending on equipment used and scale. I furrow about 8 feet apart. I grow vegetables in beds between the trees to allow for efficient use of the land and maintaining good access for tree harvest later.
Next, plant small seedlings in early spring into the furrows. Bury roots and keep stems straight.
Make sure to mark variety changes with wooden stakes and permanent paint marker labels.
Hill the trees periodically to reduce weeds in summer and avoid exposure of roots. I use a two-wheel tractor and the power ridger attachment. You can also cultivate with a Tilmor tractor and various types of sweeps or tine weeders.
Maintaining Your Young Trees
Use blueline or other heavy-duty drip to maintain water in droughts and for early establishment.
In the fall I cover crop with winter rye and dwarf clover. The cover crop will protect soil surface over the winter and prevent erosion in the spring time.
Use rodent guards to protect seedlings over the winter. You can also set traps, and keep cats to maintain rodent populations.
Lift trees in the spring for sale using shovels for smaller scale farming. You can use tree lifting equipment for a four-wheel tractor for larger-scale operations.
If you wish to leave the trees in the ground for multiple years to grow, deep cultivate alongside the trees to prevent excessive lateral root development.
I use a chisel plow or subsoiler on the two- or four-wheel tractor, depending on scale. Shanking 16 inches on either side of the tree row will disrupt small roots entering pathways. This allows the trees to focus root growth in the deep fertile trench.
This will make tree harvest after multiple years much easier and with less root damage to larger diameter roots.
When growing a tree nursery, remember to plan for multiple years to come. It takes time to grow your trees, and you need to have plots planted every spring to maintain a consistent supply.
It’s prime summertime and nothing shouts “summer” more than pineapple. This sweet and spicy fermented pineapple salsa will be eaten up before you know it. You can serve it with tortilla chips or tacos or use as a condiment to top grilled chicken or fish.
By fermenting the salsa, the flavors meld together in a way that cannot be created through any other process.
Yield: 1.5 cups finished salsa
Ingredients
1.5 cup ripe pineapple, cubed into small “salsa-sized” chunks
2 tbsp. red onion, finely diced
1/2 cup cilantro, loosely packed (or less, if you prefer)
2 tsp. fresh garlic, chopped
1 hot jalapeño pepper, finely diced (or other hot pepper of choice)
2 tsp. fresh lime juice
1 tsp. coarse kosher salt
Dash of ground black pepper, to taste (optional)
Preparation
In a medium-sized, non-reactive bowl (such as stainless steel or glass), prep ingredients and mix them together. Stir well to distribute the salt.
Once mixed well, transfer ingredients to a clean glass wide-mouth, pint-sized canning jar. Push down ingredients so that none are on the side of the jar. A jar weight is very helpful with this ferment, as it keeps all of the chopped bits held under the natural brine that is created.
Wipe off the rim of the jar and place the canning lid (or airlock) on the jar and tightly screw on the ring.
This is a two- to three-day ferment. Ferment at room temperature, out of direct sunlight. If you notice that food has floated to the top of the brine, use a clean utensil to push it back down.
Give the pineapple salsa a taste after 48 hours of fermentation. If the ingredients still taste too raw, allow it to ferment another day and give it another sample.
Once the ferment has reached your ideal flavor, transfer it to the refrigerator. This ferment is best enjoyed within two weeks.
Notes
It is not recommended to use canned or frozen pineapple for this recipe.
If you don’t want a spicy salsa, consider adding half of a medium-sized green bell pepper in place of the jalapeño.