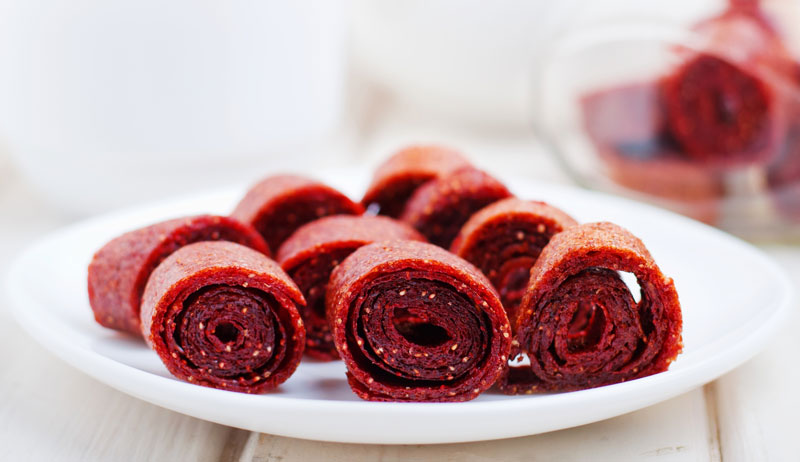
Before blueberry season ends, make this recipe that the entire family is sure to love. This recipe is quick to prep, full of flavor and fun to eat. Blueberry apple fruit leather is a great grab-and-go treat and a healthy option to boot!
Ingredients
1 apple, medium size, cored
2 cups fresh blueberries
1 1/2 tbsp lemon juice
Additional optional ingredients: honey, maple syrup, and citrus zest
Directions
Clean berries and apple, removing any bruised or flawed fruit. Using a food processor or blender, blend the fruit into a smooth fruit puree.
Pour the blueberry apple puree onto a parchment paper-lined dehydrator tray and evenly smooth it out, ideally about 1/8 inch in thickness.
If you have a flexible silicone baking mat, you can use that in place of parchment paper.
Dehydrate at 140 degrees F for six-plus hours. Once accurately dried, the color of the fruit will enhance deeply, and no liquid will come out when pressed on. The fruit leather should not be sticky to the touch.
Once done, allow the fruit leather to cool completely to room temperature before storing.
To store, cut into serving-sized strips and roll up in parchment paper. Store in an airtight bag or jar and keep them in the refrigerator.
Dehydration time will depend on the humidity where you are located. Humid locations will take longer to dry.
To add additional sweetness, add in 2 tbsp of pure maple syrup or honey before pureeing.
Consider adding a burst of citrus by stirring in 1 tsp of lemon, lime or orange zest before dehydrating.
To dehydrate in the oven, bake at 175 degrees F for two-plus hours. Check periodically, starting at two hours and again in 20 to 30-minute increments after that until the fruit leather is dry to the touch.
“I’ve seen my pickles used to add a tangy or sweet flavor to a charcuterie board, chopped up in a creamy dip, chicken salad, tuna salad, dill pickle pizza or wrapped in bacon and grilled,” says Trey Gonzalez, who runs the Flat Brim Farmer pickling emporium in Austin, Texas.
Focusing on a range of pickles, peppers and jams, Gonzalez’s offerings mingle hot honey habaneros next to amped up jalapeños, all fronted up by pop art-influenced packaging.
Running through creative ways to incorporate pickles into mealtimes, Gonzalez adds, “The brine makes a nice marinade for chicken wings or to add some zip to a margarita, Mexican martini or my favorite, michelada.”
Taking a minute out from pickling duties, we spoke to Gonzalez about his family farming roots and the current roster of peppers. We also got the scoop on a little something he calls Mexican candy corns.
Gonzalez’s path to launching Flat Brim Farmer has deep family roots.
He recalls his mom’s father being a sheriff who ran a local farm market on the side. After retirement, he hauled produce from South Texas to wholesale markets in Houston.
When Gonzalez’s own father retired, he pursued a dream of working on land he owned, ultimately focusing on hay and produce.
“This is where the love of growing produce started for me,” recalls Gonzalez. “Fast forward 40 years. I’m right back doing what both grandfathers did for a living, just on a smaller scale.”
Similarly, the decision to make jalapeños a key part of Flat Brim Farmer came from Gonzalez’s family roots. Both of Gonzalez’s grandparents made salsas and his great-grandmother loved to can.
“As I grew older and got more into growing my own produce, I thought I’d do something that would combine both of my family’s interests but not salsa,” explains Gonzalez.
“My own vegetable plants were producing so much, especially cucumbers. I thought I would experiment with pickling spicy flavored cucumbers and jalapeños.”
When it comes to Gonzalez’s favorite chili peppers, he holds up a list including jalapeños, serrano, habanero, tabasco and occasionally Carolina reaper varieties.
“I have outgrown my space to grow much of what we use, so we also locally source,” he adds. “I’m very particular about who we source from. We grow organic, and we only buy from farmers who practice similar methods.”
Farming in Austin means Gonzalez deals with two growing seasons for cucumbers, plus decent summer and fall seasons for peppers.
“They like the heat,” he says. “The keys to keeping it successful for me in our zone starts with quality soil, an organic fertilizer program and using companion planting methods. This will help attract beneficial insects with minimal needs of insecticides and assist with pollination and create a natural defense.”
Gonzalez also adds that with “a good organic fertilizer program you help reduce plant stress from the heat and help reduce water consumption.”
Gonzalez has playfully dubbed his orange habanero peppers as Mexican candy corns. It turns out, the name came about after a group of neighborhood kids rode by his garden on their bikes. They asked about the eye-popping flame orange crops.
“I said jokingly, Mexican candy corns,” he recalls. “It stuck. Still today the kids ask if I have any Mexican candy corn. Not to worry, I didn’t give them any. And I did educate them on the spicy pepper and its many uses.”
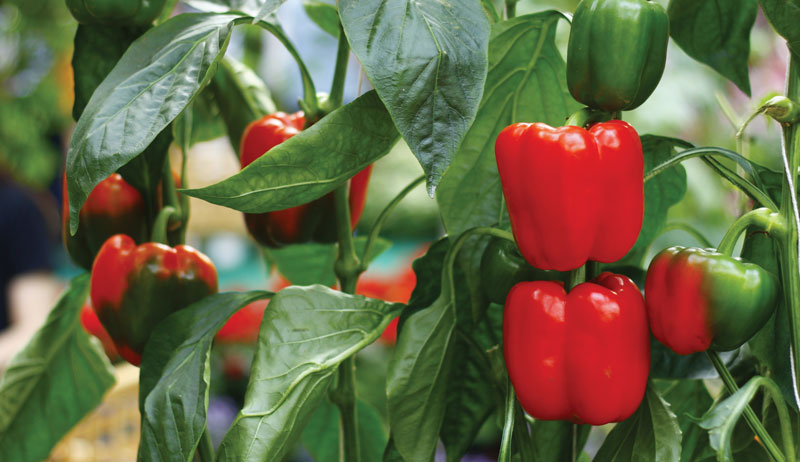
Does your garden selection need spicing up? Peppers can be a great option whether you grow them to enjoy fresh from the garden, store in the pantry or perhaps even diversify your farming operation’s income strategies by selling your produce through local farmers markets or fruit and vegetable stands.
A local produce stand owner, a local pepper producer and a local garden store manager share their tips for making pepper production a success.
Recommendations for Produce Stands
Owned by Donald Hughes, Hughes Produce, located in Dunlap, Tennessee, is a local, family-owned business that has been in operation in the Sequatchie Valley for decades. From spring to winter, they carry a variety of items ranging from fruits and vegetables to Amish butter and cheese.
As for peppers, the business sells more of the mild variety. “But even people who don’t like a lot of heat will add a half or a whole hot pepper for flavoring,” Hughes says. Customers of the produce stand use peppers to make salsa, chow-chow, relish and pickles. They also freeze jalapeño peppers to make poppers on demand.
For those wishing to grow peppers to sell at a local farmers market or produce stand such as his, Hughes recommends packaging peppers in smaller containers. His best-selling peppers are bell, rainbow bell, jalapeño, cayenne and serrano.
Vasin Hirunwiwatwong/Shutterstock
Common local peppers
Hughes offered the following descriptions of these locally grown peppers.
California Wonder
This is a juicy, sweet, bright red pepper that is approximately 3 to 4 inches in length. This pepper is not a hybrid. It’s great as a stuffed pepper, for use in chow-chow and as an ingredient in fajitas.
Sweet Banana
This mild/sweet yellow pepper turns red as it ripens. Approximately 6 to 7 inches in length, it’s a long, narrow pepper known for its large yields all summer long.
Use it in salads, pickled, in chow-chow, as a relish and as a popper that is filled with cream cheese and onion and wrapped in bacon. Hughes says that hot banana peppers have less heat than jalapeño peppers.
Jalapeño
Primarily known as a hot pepper variety, new varieties exist that have less heat. Although not seen this way in a typical grocery store setting, these peppers are green or bright red when ripe. They are approximately 2 to 3 inches in length. Most commonly used when cooking Mexican dishes, these versatile peppers are also great for pickling, in chow-chow, in hot sauces, in poppers and more.
Anaheim
A medium to hot chili pepper, this dark green vegetable is usually 7 to 8 inches in length, thick-walled and 2 to 3 inches wide. It makes a great addition to chili.
Cayenne
For the uninitiated, their wrinkled appearance may make this pepper seem old. Turning red when ripe, this pepper is about 6 to 7 inches in length. Use it in a hot sauce, for drying or in chow-chow.
Habanero
This orange and very hot pepper is good in a hot sauce and diced into small bits for an added kick to soups and chili.
Serrano
This dark green to red pepper has a Tabasco-like flavor and packs a lot of kick into a small package. A 2-inch-long pepper with a narrow shape, serrano grows best in hot climates. Its best uses are for pickling, hot sauces and as a cooking additive.
Poblano
Dark green in color, this pepper is approximately 6 to 7 inches long with a shape that is wider at the top and tapers to a narrower bottom. It has a mild chili pepper-like taste with a slight kick. Add to a variety of dishes or use in a meat-and-cheese stuffing.
Ghost
This red and very hot pepper rates close to one million on the Scoville scale (used to rate the heat of peppers). They are surpassed only by the Carolina Reaper and the Trinidad Scorpion. Hughes Produce sells these peppers in cheese at their store, which adds to the overall hotness of its flavor.
Sweet Rainbow Bell
A purple, yellow and red pepper that is approximately 3 to 4 inches wide and tall. It is described as being sweeter than a normal green bell pepper. It is good in salads, for cooking, or cut up and eaten raw with a vegetable dip.
According to Hughes, peppers need at least six to eight hours of sunlight per day. For best results, he recommends using a gradual-releasing fertilizer mixed in the soil weekly throughout the growing season. “You need to use a fertilizer that will give a balanced ratio of the proper nutrients,” he says.
Shutterstock
In the absence of a soil test, a fertilizer that covers a broad variety of soil needs is best.
“Once your plants get taller, Epsom salts help your plants by providing them with magnesium and helps them to absorb nutrients more efficiently,” Hughes says. He recommends 1 to 2 tablespoons twice a month.
Frost Advisory
Due to the threat of frost in the Sequatchie Valley of Tennessee, it’s best not to plant peppers before April 15. “Even then, there is the threat of a small frost or two, sometimes an even bigger one. But this gives you the earliest chance with a lower risk of a killing frost,” Hughes says.
Peppers planted in April in the Valley are generally harvested June through July.
In the higher elevations of the area, the best planting dates come later in May through June. Harvest arrives August through October, depending on the date planted and if any frost occurred. Consult with your local extension office to determine the best planting dates for your area.
Raising peppers most of the time, local producer Gary Swafford of Pikeville, Tennessee, has farmed for more than 50 years. He now farms alongside his son, Cameron.
The Swaffords grow mainly bell, serrano, poblano and jalapeño peppers, choosing these varieties based on customer demand. They primarily sell their peppers straight out of their packing shed located on their farm but also ship to Florida as well as selling to local stores.
For local customers, the father-son pair also have a “you pick” opportunity.
Peppers at the Swaffords’ farm are sold loose, while those shipped to Florida or sold in local stores are wholesaled in bushel boxes. Most of their customers use their peppers for making salsa, canning and cooking. “The jalapeño peppers are good for salsa, while the poblanos are good for stuffing,” Swafford says.
Swafford’s biggest piece of advice for those considering growing peppers has less to do with uses and growing recommendations than it has to do with choosing a phytophthora blight-resistant variety.
“It’s getting worse,” he says.
Taking the Pepper Plunge
Where should you go to get quality peppers now that you have decided to grow them or perhaps make a change to your current pepper gardening routine? Local farm-supply stores and garden centers make excellent options.
The Barn Nursery in Chattanooga has supplied local growers since its inception. Stores such as this one can help you select the best varieties and plants for your needs and area of the country. They can also advise you as to local pepper trends. Awareness of such trends can ultimately increase your profitability by allowing you to grow one or more varieties of in-demand peppers.
So Hot Right Now
For example, David Spurling, manager of the garden center at The Barn Nursery, has recently seen an increase in the demand for hot pepper plants, which he believes is thanks to the growing popularity of television shows and YouTube videos featuring guests and hosts eating increasingly hot peppers for entertainment.
Location, Location
Aside from trends, Spurling advises choosing a pepper variety that grows best in your particular climate. “They like the heat and humidity,” he says. “Peppers do well here.” Spurling’s favorite pepper to recommend is the Giant Marconi.
“They are three or four times larger than a regular bell pepper and great for grilling, stuffing or eating raw,” he says.
For growers just getting started with peppers, start with plants versus seeds. “They are easier because they are ready to go,” Spurling says. The only downside of starting with plants versus seeds is that, when shopping from catalogs versus stores, you usually have a greater variety to choose from. To compensate, Spurling advises planting half of your crop in plants and the other half in seeds.
Regardless of whether you choose to start with plants, seeds or some combination of the two, for volume, choose a variety that produces a larger number of peppers per plant to grow.
However you decide to get started, the variety you choose to grow, or how you decide to enjoy their production, peppers can make a great addition to your garden.
This article originally appeared in the May/June 2022 issue of Hobby Farms magazine.
On this episode of Hobby Farms Presents: Growing Good, Colorado farmer Meighen Lovelace talks water issues in the West, empowering people to grow food in community, and your chance to speak truth to power with the White House Conference on Hunger, Nutrition and Health. This is episode one of two with Meighen. Check back in for the rest of the conversation in two weeks!
Listen in for Meighen’s take on how to work with your land, including the hard decision she’s made to put her San Luis Valley farmland in cover crops for a couple of seasons, and the challenges of working with water rights of farmers and communities throughout the Western US. Meighen tells us about a gardening project she helped start at the Salvation Army when she was a client there herself and how it’s grown into a year-round urban farm with a four-season greenhouse and a training and job placement program. Then, Meighen talks about her Central Rocky Mountain Permaculture Institute training and the permaculture forest greenhouse concept (including the simple climate battery, which you have to hear about!).
Listen in to the end for details about the White House Conference on Hunger, Nutrition and Health—the first to be held since 1969. As a small-scale farmer and someone interested in food systems, you have a chance to have your voice heard! Meighen tells us about how.
A few weeks ago, Bella—a local relatively new to chicken keeping—messaged me, hoping for some guidance. One of her quartet of backyard hens became lethargic the previous day and died within hours. Bella was extremely worried that her remaining girls would suffer the same fate. What should she do?
When a chicken suddenly dies, especially a young one like Bella’s year-old hen, it’s perfectly normal for alarm bells to go off in your head. Are your other chickens at risk? Is there something you could have done for your chicken to prevent her death? What happened?
First things first: don’t panic. Take a deep breath, then review these seven potential causes of your chicken’s demise.
Sudden Illness
Sadly, there are diseases such as Pullorum, Fowl Typhoid and Avian Influenza that can quickly lead to death for an infected chicken. Fortunately, the United States launched the National Poultry Improvement Plan in 1935 to survey and control these deadly diseases. Outbreaks are extremely rare.
Nevertheless, it never hurts to carefully examine your bird for symptoms such as mucus build-up or discharge in the nasal openings and mouth, oozing or crusted-over skin lesions, and swollen or enlarged abdomen. Make sure you wear disposable gloves while handling your bird.
If you notice any of these, carefully bag the carcass and contact your state’s veterinary diagnostic laboratory for instructions.
Heat Stress
Chickens do not perspire. They pant to release heat and cool themselves down.
In extreme heat conditions, they’ll hold their wings out to allow for better air circulation near their bodies. When they are unable to cool down, they become subject to heat stress. They will grow lethargic, their combs and wattles will become pale, and they may go limp or unconscious.
Should a chicken exhibit these symptoms, she is in danger of death from heat stress.
Treat any affected birds by gently submerging their bodies in a tub of cool (not cold) water. Be sure to keep their heads out of the water. Once they revive, keep them in a cool, well-ventilated shady place until they regain their previous level of activity.
To prevent heat stress, provide your birds with well-ventilated, shady places to which they can retreat from the heat. Provide plenty of fresh, cool water in their fonts. And offer treats such as chilled grapes or frozen watermelon to keep them hydrated.
Toxic Plants
Chickens are naturally inquisitive and, if your birds free range or roam your yard, they are apt to poke their beaks into anything that captures their attention. Unfortunately not everything that grows in a garden is safe for your flock.
In fact, several commonly cultivated plants are highly toxic to chickens. These include azaleas, most flower bulbs, rhubarb, holly, oaks and yews.
Yews are one of the most common ornamental shrubs in the U.S. But the toxins contained in its leaves, berries and roots are extremely toxic to a chicken and can quickly cause death. If you grow any of these plants in your yard or garden, fence these areas off so that your chickens cannot access them.
It goes without saying that most poultry keepers do not use poisonous chemicals on their premises. Unfortunately, neighbors may not be as environmentally conscientious, especially if they have vegetable plots, fruit trees, small ponds or swimming pools.
Even if they do their best to apply these substances solely on their properties, the wind and rain have a way of spreading the chemicals beyond their property borders. We lost five of our Orpington hens to our neighbor’s algaecide last year. Our chickens didn’t go for a swim, but they were contentedly scratching and digging at the ground on our property which butts up to his pond.
And of course this was the year he decided to try chemicals on his water.
We can’t control what our neighbors do in or to their yards. But we can control where our chickens roam. If the chemical problems persist, open communication with your neighbor and let them know that they are unintentionally affecting your flock.
Contaminated Food
Layer rations contaminated with droppings and mold can quickly sicken a chicken, often leading to death. To ensure your flock’s health, always purchase feed that is sealed in moisture-proof sacks. Store open feed in an airtight and vermin-proof container.
Should you notice droppings in your feed container or a clumping of the crumbles, don’t just scoop out the affected part. Discard the entirety in the trash (not in your compost, as it can sicken wild animals) and open a fresh sack of feed (and invest in a new airtight container).
Be sure to inspect the feeders in your runs and coops. Hot, humid days and changing weather conditions can cause the feed in your yard to go bad quickly.
Dirty “Dishes”
Bacteria and fungus can build up quickly on feeders and waterers, as your birds’ saliva—and, every now and then, their droppings and dander—comes into contact with these vessels. Unless these are frequently scrubbed and sanitized, the fonts and feeders themselves can cause health issues for your flock.
Dr. R.M. Fulton, DVM, PhD, a Diplomate with the American College of Poultry Veterinarians, recommends using a disinfectant with no residual ability, meaning it won’t affect the food or water placed inside the sanitized container. Halogen disinfectants such as commercial bleach and iodophor (tamed iodine) serve as a broad-spectrum cleanser that will quickly kill microbes but present no danger to animals.
In the even of an unexpected death, carefully inspect your chicken coop, especially the high corners of the main coop and each nest box. As diligent as we are in maintaining a safe and secure living environment for our birds, every now and then other creatures decide to freeload and make the coop their home, too.
Wasps are common perpetrators and can repeatedly sting an inquisitive hen. If you live in an area where fire ants are common, check your yard—and your coop, if you have a natural floor—for fire ants, as these are known to dig extensive tunnels through sand and soil.
While insect and ant venom merely irritates in small amounts, should your chicken be attacked repeatedly, she can become quite ill from the toxins, potentially even resulting in death.
Request a Necropsy
If none of these scenarios seem to apply to your chicken, you may wish to consider a necropsy to further investigate the death. Carefully bag your bird and place her in your freezer or deep freezer. Then contact your state’s veterinary diagnostic lab for information on how to submit your bird for necropsy and the costs involved.
You’ll also want to keep an eye on the rest of the flock and watch for any signs of illness.
The rest of Bella’s birds never sickened or showed any signs of lethargy. Bella still does not know what could have killed her hen. She believes it might have been the horrid heat wave that hit the Midwest in mid-June.
She has set up additional shady spots in her backyard and discovered the pleasures of watching her microflock chase down grape halves and melon balls, knowing that these treats will help keep her birds safe throughout the summer.
It’s summer, and it’s time to bale hay. While any large-scale field cultivation has its challenges, growing hay is relatively straightforward for hobby farmers to tackle. Since grass grows back year after year, you save the time and effort of planting each spring.
Whether you grow hay to sell or to feed your own livestock, the benefits are obvious. Are you interested in tackling small-scale hay production on your farm? Through the years, HobbyFarms.com has covered the topic from a multitude of angles.
For your convenience, we’ve rounded up 20 of our past articles on hay production, sorting them into four categories: equipment, storage, safety and miscellaneous. If you want to learn about growing and baling hay, we’ve got you covered!
You definitely don’t want to run out of baling twine when there’s hay on the ground and rain is coming. Whether you’re making square bales or round bales, a little high-school algebra can help you calculate how much twine you need for hay season.
Baling hay involves a lot of steps, which is why we’ve assembled a six-step checklist to help you cover all the bases and prepare your equipment, supplies, and more for the big day(s).
Hay bales can be heavy, and getting them into the loft of a barn (or to the top of a stack) can be difficult. A motorized hay elevator carries square bales up a track and saves you lots of effort.
Square hay bales come in different sizes, so in making sure you have enough set aside for winter, measuring by volume can be more accurate than counting bales.
The hay produced from one field or cutting can be different in content from the hay produced by a different field or cutting. From creating separate stacks to color-coding baling twine, here are some ideas to help you distinguish between different crops of hay.
Properly storing hay is important to increasing its longevity. Whether you’re storing hay indoors or outdoors, we’ve got you covered with tips and ideas for best results.
This could also fall under equipment, but we’ll file our story on hay moisture (and temperature) testers under safety since they provide an easy means to measure the moisture content of hay bales and confirm they’re dry enough to safely store.
Need a primer into the entire process of growing and baling hay? Are you wondering about the differences between grass and legume hay? You can learn a lot from this broad overview.
Does your farm feature old hayfields that need to be restored to peak productivity? Our in-depth guide to restoring hayfields steers you through the process.
Some types of hay are perfect for horses. Others are more suitable for cattle or goats. Wondering which type you need, and what you should look for in quality hay? This article dives into the details.
In my previous article, we discussed how important it is to choose carefully when selecting your next beef cattle. Buying from a trusted individual can greatly increase your chance at a successful experience raising cattle.
Once you’ve found the ideal animals, it’s important to make sure facilities are prepared and ready to use before actually bringing them home.
Don’t Buy Everything
Keep in mind not to overwhelm yourself and avoid trying to purchase every single item when you bring home the first calf or two. A lot of new cattle owners (or even just small operators) will borrow or rent some items (such as a dart gun or stock trailer) from a friend in the cattle business rather than fully stocking their facilities.
This can be a great help to avoid purchasing expensive tools that you might only use once or twice a year.
Sometimes it can even be helpful to simply haul your cattle over to a neighboring ranch to get them vaccinated or treated for any issues you might run into. Oftentimes, in order for ranches to accommodate the large volume of animals they run through their working facilities, they will have not only a reliable squeeze shoot and fresh medications handy, but an entire building or area dedicated to the care of their herd.
When it comes to your own facilities, be sure that you have some of the most basic items covered for your cattle.
Fencing
Make sure you have a sturdy fence around the pasture or lot that will keep your animals inside. (Nobody likes when cattle get onto a road.)
Safe Pasture
You need a pasture or other grassy area for them to graze in (unless you’ll be keeping them on a dry lot), free of noxious or unsafe weeds. Dangerous weeds include poison hemlock, nightshade, lupine and several others.
Shelter
A shelter will not only protect from the bitter cold and wind but offer some shade during the heat of summer. It’s helpful if there are windows or portions of walls that can be opened on either side of the building to help promote good airflow and ventilation. You won’t want a fully enclosed building for cattle to stand inside during the summer.
An Emergency Setup
A strong, separate pen or enclosure should be available in case of a veterinary emergency and the need to separate or confine an animal.
Feeders
Cattle need hay feeders as well as mineral feeders, depending on the time of year and current feeding regime. Dedicated places for salt and mineral blocks to sit up off of the ground can also be helpful.
Water Trough or Tank
A clean water trough or tank is also an absolute necessity. Regardless of the time of year or current temperature, cattle will need access to good, clean water. If the temperature is over 95 degrees, cattle will need more than 4 gallons of water per 100 pounds of body weight (according to cattle writer Heather Thomas). This means that a 500-pound animal can drink over 20 gallons of water a day.
There are a variety of ways to provide fresh, accessible water for your cattle. Functioning windmills can pump fresh water into a tank, provided you have enough wind to keep them pumping a sufficient amount.
If turned out in a pasture, dependable ponds can also provide a supply of drinking water, as well as a place to swim and cool off. Streams and rivers can also be good sources of water, so long as they continue to flow and don’t become contaminated. As a last resort, you do always have the option of hauling water to fill a stock tank.
Supplements
Also consider what supplements or items you might need right from the beginning, such as a means of fly control and wormer. If you’re bringing home a smaller calf, you’ll also want to think of grain or other feed that will be required.
My husband, Kolton, raises cattle both on grass and in a dry lot. When it comes to the care and feeding of your cattle, he recommends you carefully consider your future plans with them when stocking facilities. This will help determine what you should feed animals.
He suggests that you ask yourself these questions: Do you want solely grass-fed beef? No hormones used? A large quantity of meat? (This will mean that you keep them longer to feed and fattened to a larger size.) Or are you more concerned with the quality of the meat?
These will all play a part in your feeding decisions.
In general, there are a few t`hings that all cattle need to grow:
Fresh, clean water to drink
A source of roughage (which could be hay and/or green grass)
An energy source (this will help to fatten them and is oftentimes some variety of grain)
A source of protein (how much your cattle need this will depend on not only the time of year it is, but the quality of the grass in their pasture/pen)
It’s best to put your cattle on a feeding schedule and stick to it pretty close. If they get too hungry and gorge themselves once feed is finally available, the grain could upset their stomachs, causing them to bloat (which can in some cases lead to death).
Re-evaluate Regularly
After you’ve had your cattle for awhile, reexamine your feeding regime and look for any signs of their nutritional requirements not being met right by your facilities.
For example, to determine if they’re getting enough protein in their rations, you can simply look at their manure. If it “stacks up” with some firmness, they’re getting enough. If it just kinda drops into a pile, they’re likely lacking protein and will need their rations adjusted. S
ome sources of protein can include alfalfa, soybean meal or even cotton seed meal.
As the boy scouts say, “always be prepared”. During the warmer months you should prepare and gather hay (small squares or large round bales) to feed during the winter months. If you live in an area that can be inaccessible at certain times, it’s a good idea to go ahead and purchase extra feed and store it in a dry, rodent-proof container.
Don’t wait until fall or winter to purchase the hay and feed you need. Prices might go up, other people will be looking for the same things, and (during any time of the year) freak weather can prevent you from getting to town to purchase supplies if you’re buying them on a short-term basis.
When it comes to preparing for your cattle, just take a moment to think through the basic scenarios of what might happen after you get them home. Think beyond daily care and feeding to questions like when they will get turned out on pasture and what to do in the event of a storm, illness or injury, etc.
When is the best time for weaning lambs? That’s the age-old question for relatively new sheep owners, isn’t it? Well, at least it’s an age-old question for me. As in most aspects of keeping sheep, I want to do whatever I need to, with as little stress to the animals as possible.
So when to wean? I think the only right answer is, “It depends.”
But really the best time to wean depends on a lot of conditions, most of them unique to your farm. Here are a few questions to ask yourself:
Do you have pasture available?
Are lambs eating hay and grain?
Do you have a goal of getting them to a certain weight for market?
Are just trying to keep it as easy as possible?
Also, lambs should drink plenty of cool, clean water at this point.
Although some lambs do wean earlier than 60 days, it’s generally not recommended.
At the other end of the spectrum, some lambs wean naturally and stay with their mothers for six months or more. One problem scenario with this option: You have an intact ram lamb who may be old enough to breed at 6 months. If you have only ewe and wether lambs, though, that shouldn’t present a huge problem. And this approach to weaning does reduce stress to all the lambs involved.
One thing to know: weaning bottle lambs is a very different story. In general, you want to get them off the lamb milk replacer when they are about 40 lbs and anywhere from 30 to 42 days.
Before you attempt to wean your lambs, they should have received any vaccines, such as their CDT vaccine, in order to keep stress down on that front. Another way of preparing the ewe/lamb duo for separation is to stop (or sharply cut down) on grain for the ewes so their milk will diminish.
I’ve also read it’s not a bad idea to give them less nutritious hay. I feed my lambs and ewes hay together, though, so I’ll start that after I separate everyone.
My lambs were born mid-April, and I will separate them in the first week of August. By then, I should see the ewes getting pretty tired of the lambs trying to nurse. And, honestly, by then lambs won’t receive much of their nutrition from the ewe.
One thing I have been told is to move the ewes to a new pasture and leave the lambs where they are. This can decrease the stress on the lambs tremendously.
You’ll likely hear some really sad cries for a day or two. But, really, life after that seems to go on as usual for all the sheep on our small farm.
We asked you to tell us about your beloved livestock breeds, and you answered. Connecticut farmers Chris & Mavis Newton wrote in to tell us all about keeping the Gloucestershire Old Spots breed of pigs!
We really enjoy the docile nature of Gloucestershire Old Spots pigs. Both the sows and boars are mildly tempered.
The sows typically have large liters, and they deliver with ease. They make really good mothers. The meat quality from Gloucestershire Old Spots is exceptional with excellent marbling, which enhances the flavor.
We will definitely continue to raise registered Old Spots for many years.
This article originally appeared in the May/June 2022 issue of Hobby Farms magazine. Email us your thoughts (~250 words) and a photo of you and your livestock to hobbyfarms@hobbyfarms.com (subject line: I Love My Livestock!). We’ll publish our favorites in upcoming issues.
Honeybees don’t always get the nutrition they need. Finding rich sources of pollen and nectar when they need it most can be especially difficult. This, in turn, affects their ability to ward off pathogens and pests.
The microbe, Bombella apis, can survive in royal jelly—a generally inhospitable substance. It can also live in sugar solution for more than 24 hours. That means beekeepers might be able to add B. apis as a nutritional supplement for their bees in the future.
IU Department of Biology Professor Irene Newton led the study. In a recent news release, she noted, “We’ve changed the way we use our land in the U.S. Now we have tons of monoculture crops like corn, which are wind-pollinated and therefore no use to bees, covering acres and acres of land. Other crops that bees do pollinate grow in monoculture as well, limiting the options for bees.”
Newton continued, “The effects of poor nutrition are most damaging in the developing larvae of honeybees, who mature into workers unable to meet the needs of their colony. It is therefore essential that we better understand the nutritional landscape experienced by honeybee larvae.”
Turns out, the B. apis microbe could be an important part of that landscape. Newton and her colleagues fed malnourished bees the probiotic microbe. And the result?
“When we limited bee nutrition during [larval bee] development, we saw a drop in mass for the bees; bees were much smaller than their control counterparts,” Newton explained.
“When B. apis was added to these same bees, although they had poor nutrition, they reached the same mass as control bees given full nutrition. The microbe was able to make up for the poor diet. This suggests that B. apis could be added to colonies as a probiotic to protect from nutritional stress.”
Increased Amino Acids
The researchers also determined that B. apis affected the amount of some amino acids in the diet of larval bees. In particular, it increased the amount of lysine—one of several amino acids essential for honeybee health. (Previous research has revealed that the mass of adult bees suffers when their diets lack lysine.)
In the recent International Society for Microbial Ecology Journal article, the authors write, “Many commercial crops which rely on honeybee pollination services only barely meet an adult bee’s minimum lysine requirements…. It is easy, therefore, to imagine a scenario where a honeybee colony must rely on mutualistic bacteria such as B. apis to fill in the nutritional gaps in the larval diet.”
Insects—and larger animals, too—routinely rely on so-called mutualistic bacteria. The study’s authors specified, “Bacterial symbionts can have dramatic effects on animal hosts, including nutrient supplementation of incomplete host diets, protection from parasites and pathogens, and providing developmental cues. Many [organisms] rely on bacterial partners for fundamental aspects of their metabolism, such as providing key nutrients absent or insufficient in the host diet.”
That may be just what’s happening in the case of B. apis. “B. apis appears to be shunting its metabolic energies into production of the essential amino acid lysine, which may be particularly valuable to developing larvae,” the authors add.
However, it’ll take more time and study to link that lysine secretion with direct, nutritional benefits to larval bees.
Future Study
Newton and her colleagues also maintain that other bacteria, such as Lactobacillus kunkeei, could benefit bees in certain ways. Like B. apis, L. kunkeei also can survive in some royal jelly environments. It’s possible that both of these microbes could be working together to benefit bees.
Or, for its part, L. kunkeei might provide specific benefits on its own.
Of course, Newton suggests, there are still plenty of unanswered questions around B. apis all by itself. “We are excited to explore the other interactions that B. apis has in a colony, to better understand what it’s doing in different environments and the role it plays in association with honeybee queens,” she said.