Looking for a crop to grow in a container? Sure, you have options, and tomatoes and peppers are common choices for container growing.
But don’t forget about potatoes, which are the perfect garden crop to plant and grow in a container.
My preferred method of growing potatoes in a container is pretty straightforward.
After locating a large container to grow the potatoes in, I mix some compost with potting soil. I use a ratio of about 2/3 potting soil to 1/3 compost.
Next, grab your seed potato and cut out the eye from each. As you’ll see in the video, just one potato can often yield as many as five (or more) seeds. Then just place these cut portions on top of the soil, pushing a bit to secure them in the dirt, eye-side up.
After your potatoes are in place, just add more potting soil to the container, covering the potato seeds with a couple inches of soil. Spread the soil evenly.
Next, top everything with a slow-release organic fertilizer, mixing it into the potting soil. This will feed the potatoes for a while, and because it’s organic, it doesn’t present the risk of burning the seedlings.
Water your container, then wait. In about 100 days, your potatoes will be ready to harvest and eat.
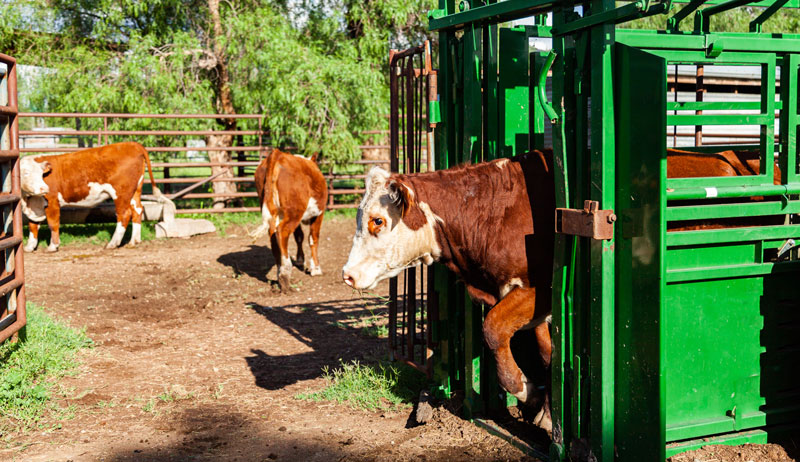
As novice hobby farmers gain experience with hooved livestock, they quickly realize that some things are easier said than done.
For example, say your steer has an infection and your veterinarian has prescribed antibiotics. Via injection. In the shoulder. Of a 650-pound (and growing) animal.
Sounds easy, right?
If you have the right equipment to restrain your livestock, it should be. Here’s some information on what you may need to restrain your livestock for safe handling.
Cattle
Many small farms lack the space or facilities for large bovine handling equipment. So let’s start with the simple stuff.
Halter
A halter is the most basic of equipment for handling many types of livestock, including cattle, sheep and goats, and horses. There are even special camelid halters for llamas and alpacas. Their small, angular faces don’t fit the “average” livestock halters.
A halter allows you some control of the animal’s head. But it is only as good as the animal trained to it. Most cattle (4-H animals and pets excluded) are not halter-trained. So you cannot assume this will be the only piece of equipment needed. It’s simply the first step.
Head Gate
Second to a halter (and lead rope), a head gate is a huge help when treating cattle.
Head gates range in expense and style. Hydraulic gates can come with super-duper body-squeeze chutes that contain the entire animal. A home-made device, on the other hand, could just be made with metal poles that you manually close. (You’ll find a range of DIY head gate instructions available online.)
What you choose will depend on your budget and needs. But either style or something in between will work.
The benefit of a head gate with cattle is that it safely and comfortably restrains the animal at the neck. This prevents him or her from moving forward or backward. If the animal has horns, a head gate can also help protect you from getting hooked but it’s not fool-proof. The animal will still be able to move from side to side.
Squeeze Chute
A step up from a head gate is a squeeze chute. This prevents not only front-and-back motion, but also side-to-side movement. A quality chute is the safest method to restrain cattle, but it can be expensive and take up considerable space.
Understanding your budget and space availability will help you narrow down your choices. Remember that you not only need space for the chute, but also space behind it to herd the cattle into the chute. This should ideally be a small pen that funnels down into the chute.
Luckily, as smaller livestock, sheep and goats don’t need quite the amount of muscle or machinery to restrain. Typically, a rope halter and lead rope is enough to handle these animals with the key pointer in mind: keep their noses up. If they are able to put their heads down, they will be able to leverage against you and pull away.
When restraining a sheep or goat for any procedure such as injections or hoof trims, it’s best to have a second pair of hands to help. If one person is focused on holding the animal, the other can focus on getting the job done.
There are also sheep and goat stands for more specialized procedures like shearing and grooming as well as stands for hand milking. These stands keep the animal’s head up in a cradle, which allows the handler two free hands with which to work.
Horses
Most horses are halter broke. A halter and lead line are all you need for simple veterinary procedures and the farrier. A horse that will not stand reasonably with a halter may need additional professional training.
Additionally, some procedures, such as reproductive examinations, may require use of stocks for safety to both horse and owner/veterinarian. However, horse stocks are usually only on the premises of large equine hospitals or large equine farms.
What about pigs? There’s no such thing as a halter for swine (but there are harnesses for mini pigs!). But you can find a device called a hog snare, used when a pig needs to be restrained for simple veterinary procedures.
This is quite literally a snare—usually made of thick rope or wire—connected to a pole. The snare is fitted over the upper part of the pig’s snout. When snared, a pig will pull back, making the snare tight. The pig will vocalize during the use of the snare, and this device is used only for short procedures such as injections or a blood draw.
When you need to restrain and work with any animal, be aware of the stress level of your livestock. Particularly in the summer, animals can become overheated when worked. For this reason, it is best practice to do treatments or other husbandry chores either early or later in the day and in the shade (or indoors with a fan) to reduce heat stress.
Musette Gonzalez became smitten with chickens at a young age. “I was raised in New York, and my mom brought home some chicks once. I think it might have started from there,” recalls Gonzalez.
These days, Gonzalez presides over Lé Koopé, a family-owned venture situated in Clermont, Florida, focused on pasture-raised chickens.
We spoke to Gonzalez about surprising chicken behaviors and the joys of French Marans. We also got into poultry hats.
Gonzalez says that her family always had animals around while she was growing up, although she didn’t specifically pursue an interest in farming back then. But when she discovered the colorful array of chicken eggs it’s possible to produce, her outlook changed.
“I think everyone is used to just a white egg or a brown egg. But you can almost get a rainbow of colors, and you can match up chickens yourself to get the color you want in the long run,” she says. “That’s very interesting.”
Right now, Gonzalez anoints her French Marans as the chickens responsible for producing the most eye-catching eggs. “It’s the dark chocolate ones at the moment that are my favorite,” she says.
Once she began raising chickens, Gonzalez quickly realized that “they can eat you out of house and home!”
Digging deeper into chicken behavior, she adds: “They’ll tell you when they’re not feeling good, that’s the most surprising thing about them. You can really tell from their whole demeanor.”
During the last holiday season, Gonzalez posted a photo to her Instagram account of a chicken decked out in a knitted hat. It turns out, the poultry headgear was a gift from her sister-in-law.
“She thought it would be cute to bring them over and put them on the chickens,” recalls Gonzalez. “[The chicken] was cool with it for a while, very calm and still. But we don’t usually do that. I do little photoshoots here and there, but we usually keep them as natural as possible.”
Reflecting on her poultry adventures to date, Gonzalez says that she takes inspiration from “the final plate I see my clients produce at the end of it.”
She adds that it’s always motivating to hear people comment how Lé Koopé’s eggs taste superior to store-bought ones. “Those are the most rewarding comments I get, ’cause I know I’m doing something right,” she says.
Seventeenth-century French mushroom farmers tended their crops in caves near Paris. In the oxygen-rich basement of Nick Fox’s downtown duplex in Durham, North Carolina, he and Rob Jones used to grow oyster mushrooms for the local markets and restaurants.
It’s not as romantic as a cave (or Paris). But it kept their costs low enough that they could start their Woodfruit Farm with minimal debt. And Fox couldn’t complain about his commute.
While they’ve both moved on to other ventures, their principles for starting a small-scale mushroom farm are still sound.
To create the growing media for these basement mushrooms, they combined local organic wheat straw and cottonseed hulls. They then pasteurized this “substrate” in a horse trough by using a steam generator. They mixed mycelium with the substrate by hand and loaded the mix into ventilated plastic bags, then harvested by hand and delivered to restaurants and local farmers markets.
To improve productivity, Fox designed a system to filter outside air and add oxygen to benefit the mushrooms in the basement. He also used quiet, efficient fans (from the marijuana-
growing industry) and lights that can handle the high humidity (from the aquarium industry).
These fans and lights hung from the copper pipes that supplied water to his home upstairs.
In addition to edible mushrooms, Jones and Fox also grew medicinal mushrooms such as reishi, chaga and turkey tail. They sold to local restaurants in a variety of cuisines: fine French, Spanish tapas, Italian pizzaria. Their interests have drawn them into other ventures since then. But Jones and Fox’s project inspired me to explore growing oyster mushrooms at my home.
As Easy as Making Coffee
I first learned the ease of growing oysters in our kitchen by filling a 5-gallon bucket with our spent coffee grounds. I sprinkled a bit of mushroom spawn—you can start your own or buy the spawn online—in the bucket as I added coffee grounds. This way, I created a miniature garden of growing mushrooms.
I merely had to leave the bucket lid ajar for ventilation and to let a little light in. It took about a month to harvest a couple pounds of mushrooms without leaving the house or doing anything that resembled work.
Making coffee essentially pasteurizes the grounds with wet heat: an important first step in mushroom cultivation. When organic matter is damp, it becomes an attractive food source for any fungi spores floating in the air.
However, by first using sufficient heat to pasteurize your mushroom’s food source, you give your chosen mushroom spawn a head start in the race to colonize your pristine coffee grounds. But as any farmer or gardener knows, no system is perfect.
Along with my first oyster mushrooms, another unknown and inedible mushroom got a foothold. A “weed” mushroom if you will.
Weed mushrooms can overpower most edible mushrooms. But oysters grow fast enough to get a harvest regardless of weeds. This makes them the best species for beginners to start with and at least have some success.
ermess/Shutterstock
But Will It Pay?
Summer is a tough time to start a new crop. But what if a farmer could grow a highly profitable crop in the farmhouse basement (or a shed) in summer (and year round) at a comfortable temperature of 75 degrees?
In an indoor growing area that measures even as small as 10-by-10 feet, a proficient farmer can harvest about 400 pounds every other month. That would produce around 2,400 pounds of oyster mushrooms each year. Selling at $6 a pound wholesale, that means even that tiny 100 square foot growing area can gross about $15,000 a year.
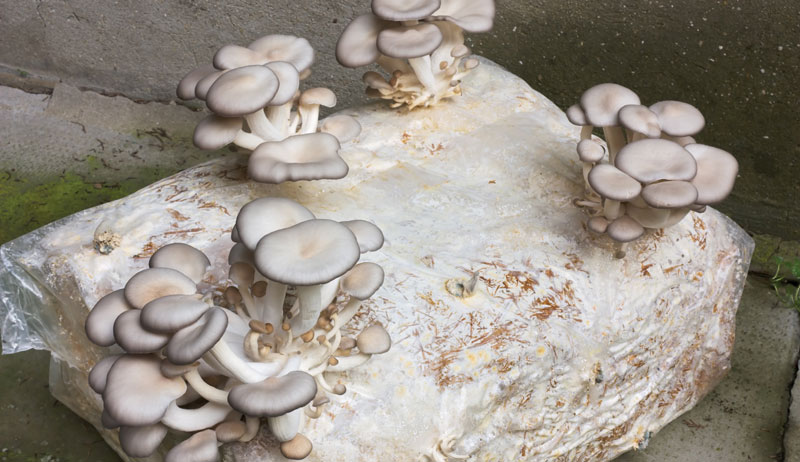
Rather than plowing a field or foraging in the woods, oyster mushrooms, which normally grow on trees, will grow from plastic bags full of straw. When the mycelium has completely taken over the straw, the edible part of the mushroom will fruit and erupt from slits in the bags.
With the bags hanging from joists or rafters overhead, the mushrooms are easy to harvest from a standing position. And any mushrooms that can’t be sold fresh to restaurants or for retail prices at a farmers market can easily be dried in a dehydrator, stored in jars and sold another time.
Probably the most commonly used substrate is wheat straw. And you can easily buy bales of straw. Be sure to shred the straw into shorter bits.
A string trimmer can do the job if you drop some straw into a big garbage can and insert the trimmer like a kitchen mixer whipping up some batter.
The Mushroom Manual
But no matter what substrate you use, you’ll find all the hands-on advice—and photos—you’ll need in Tradd Cotter’s book Organic Mushroom Farming and Mycoremediation. The book covers cultivation techniques for two-dozen edible mushrooms including
chicken-of-the-woods, shiitake, maitake, beefsteak, lion’s mane as well as oyster and many others.
His website, which he runs with his wife Olga, can supply all the spawn you’ll need to get started in mushroom cultivation. In the book Cotter writes that “Oyster mushrooms are some of the fastest-fruiting fungi on the planet, making them perfect for educational projects and disaster relief.”
In addition to growing on straw, Cotter shares techniques for growing various mushrooms on wood chips, logs, stumps, sawdust and yes, even fresh coffee grounds and old blue jeans. One chapter is dedicated to suitable fast-acting classroom projects for schoolchildren.
Frank Hyman
Keys for Success
The keys things to keep in mind when growing oysters are:
Start with a pasteurized substrate to give your spawn a head start.
Inoculate the substrate with good, fresh mushroom spawn immediately after the substrate has cooled to keep weed fungi out.
Maintain a growing environment of fresh air, appropriate humidity, optimal temperature and indirect light (as found in the woods).
Use an opaque container. Oyster mushrooms will start to fruit wherever they’re exposed to light. In a transparent container such as a clear plastic bag, tiny mushrooms will start to fruit over every square inch of the bag. They will be too diffuse and too tiny to be worth harvesting. In an opaque container, mushrooms will fruit only through openings that allow light to enter.
Use a container with the optimal amount of openings so that you get the optimal number and size of mushrooms sprouting. For example, if growing in a sausage-shaped plastic bag big enough to produce 10 pounds of mushrooms, cutting only one hole would likely yield one 10-pound mushroom. That would be too large to sell. But 50 holes would yield too many tiny mushrooms and could dry out the substrate as well. But eight holes would likely yield an equal number of clumps, each a little over a pound in weight: the perfect size for market.
Harvest at maturity, as the curled-down edges of the caps start to flatten out.
Pasteurizing your substrate can be done with several low-tech methods. Cotter describes using solar heat or even a solution of wood ashes that can pasteurize at room temperature. His preferred method is to pasteurize a batch of wheat straw by dunking it into 55-gallon, food-grade metal drums with tight-fitting lids.
He stands his drums on bricks or cinder blocks to make room for a propane burner. Then he heats the drums to about 170 degrees F for 1 to 2 hours, which is enough to pasteurize the straw.
The wet straw is heavy, so he uses an electric hoist and a simple aluminum cage to raise and lower each batch of straw in and out of the drum. A winch on a vehicle or a set of pulleys (and a set of muscles) would work in place of an electric hoist. After it’s been heated long enough, the straw is dumped out onto a stainless steel table that’s been wiped down with rubbing alcohol beforehand to eliminate weed fungi.
Once the substrate has cooled enough to handle, Cotter puts it in his containers, which might be long plastic bags, poly tubing, PVC pipes or even repurposed nursery pots that have been soaked in a 1:10 solution of bleach: water to eliminate weed fungi.
When two-thirds full of substrate, the nursery pots are easy to stack. And the drainage holes make perfect escape hatches for the mature stalks of oyster mushrooms.
Frank Hyman
Best Practices
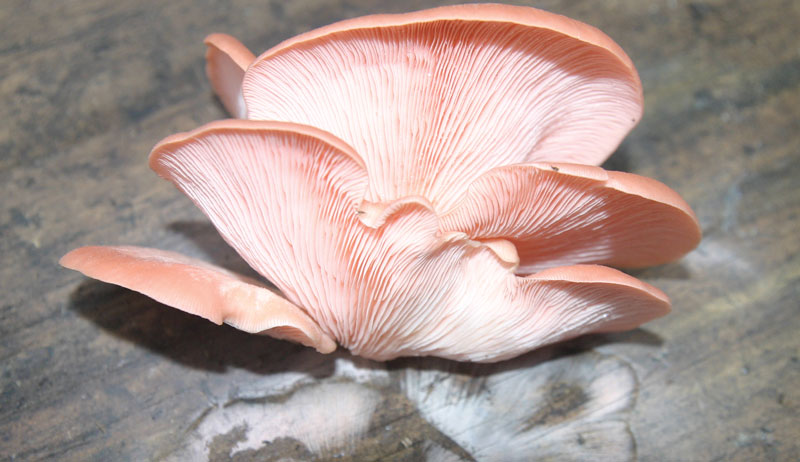
Some oyster species can be grown outdoors on fresh logs and stumps with assistance from overhead sprinklers during dry spells. But best results are found growing them in enclosed structures that allow the farmer to manage humidity and temperature. This is especially true for oyster mushrooms such as pink, golden and Florida oysters from tropical regions.
But even temperate varieties such as king, tree, blue and phoenix oysters will produce more under controlled conditions. Some farmers even adjust the oxygen and carbon dioxide levels indoors to a small degree to promote growth and fruiting.
The time from inoculation of the substrate with spawn to harvest may be 3 to 5 weeks. Subsequent flushes should arrive several weeks apart.
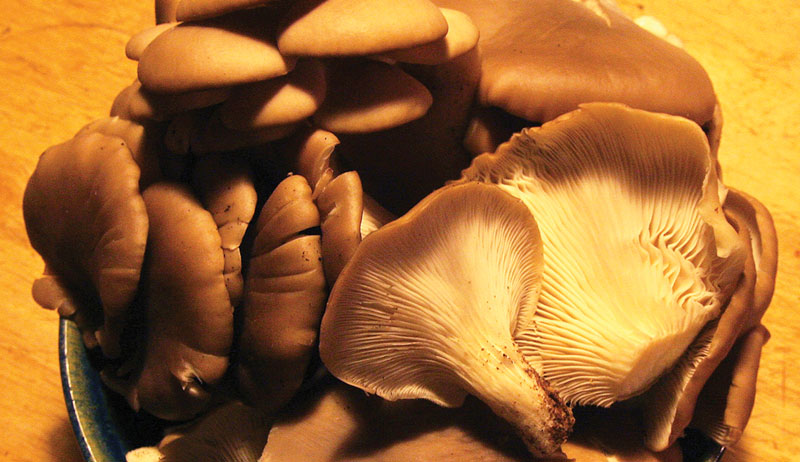
Harvest singles or clusters of oyster mushrooms by hand. Twist them to remove the base of the stalk. Trim the end to keep your harvest clean. (The trimmed ends can also be used to start another batch of spawn.)
Arrange the mushrooms facing the same way in boxes to save space, reduce damage and to make them look more appealing. They can be stored in a fridge for 1 to 2 weeks. But given their flavor and the demands of the market, I bet they won’t stick around that long.
More Information
Foraging for Oysters
Oysters mushrooms (Pleurotus ostreatus; Latin for: ear on its side, oyster) make a perfect reward for the novice forager: They’re easy to spot and identify, and they taste great, too. You may be able to find cultivated oyster mushrooms at your farmers market and get a good look at them before foraging for wild ones.
When a friend wanted me to teach him to forage, we walked across the road from his property into some woods. Less than 50 feet in, oysters greeted us on a big fallen beech tree. We both grabbed double handfuls to bring home.
We spent more time preparing and eating them than we spent foraging. You may not always find oysters so quickly, but they’re very common in the woods.
Most edible mushrooms grow on the ground, where they may be small, few in number, obscured by leaves and hard to find. An oyster mushroom, on the other hand, may only be a few inches across. But they often grow in clumps the size of a soccer ball.
And they are up off the ground, making them among the easiest mushrooms to find, especially in winter when tree leaves no longer block your view.
Lookalikes
Crepidotus species look somewhat similar but are smaller, more often individuals, have no stem and a brown spore print.
What, Where & When
decomposers (or as I call them “eaters of the dead”) on live or dead deciduous trees, standing or fallen
clustered, overlapping rows
throughout North America
Oysters grow year-round, even in snowy winters. In warmer weather, they grow fast, get buggy and pass their “harvest-by date” pretty quickly. They’re best harvested in cooler weather.
ID Checklist (all must be correct)
They project out from a tree trunk or stump.
Caps the size of your palm up to full hand spread, sometimes larger.
Each individual mushroom overlaps two mushrooms below it like shingles on a roof.
The gills continue along the stem.
Gills are white.
The stubby stem doesn’t rise to meet the center of the cap as with most gilled mushrooms. It comes off from the side.
Their smooth cap color ranges from bright white to gray to brown, making them standout from the darker bark of the deciduous trees they grow on.
Spore print white to pale lilac.
Feasting
Unfortunately, oyster mushrooms get their name from their appearance not their taste or texture. The dense, white flesh has a straightforward mushroom flavor, although some people detect a mild licorice scent on the fresh ones.
My wife isn’t fond of the texture of mushrooms generally, but I found a cooking method that had her asking for seconds of oyster mushrooms. I sautéed them in bacon fat on medium low heat for about 25 minutes, until the deep gills got crispy like fried chicken batter and the meaty caps were imbued with porky goodness.
Try that and you won’t care at all that they don’t taste like oysters.
This article originally appeared in the May/June 2022 issue of Hobby Farms magazine.
Ask anyone who has owned a hobby farm for a while what their best piece of advice is for new or potential farm owners, and odds are that piece of advice will involve tractors. It might be because a tractor can be the single most important piece of farm equipment you’ll bring home, but it’s also the most difficult to choose.
Buying Advice
When we first bought our hobby farm, I received three pieces of advice about buying a tractor.
The first piece of advice is that you shouldn’t buy a tractor at the same time as you buy your farm. It’s a good idea to have a lay of the land and know what you’ll use the tractor for before you buy one. This is difficult to do that unless you’ve lived there for a while.
The second piece of advice came from a tractor salesman, and that was to go big or go home. In general terms, we have small tractors, mid-size tractors and very large tractors. Choosing one step up from what you think you need is always a good idea. That means choosing a tractor with the most amount of horsepower your budget will allow, because you’ll never wish you had picked a tractor with less power.
The third piece of advice was by far the most important: A tractor isn’t going to be as useful as you need it to be unless you have the right attachments.
The problem people have with tractor attachments is that it’s difficult to know which you’ll use the most and which you won’t. The line between splurge and smart investment depends entirely on what your property is like, what you need to do on that property and how often you’ll need to perform that task.
The good news is that you can get a general idea of whether a specific tractor attachment is for you just by knowing what they are and what jobs they can take on.
Let’s imagine you’ve bought a brand-new tractor from the dealership. The tractor itself has no attachments on it at all, so nothing is on the front or back of the machine when you bring it home. You’ll have a good time driving it around your property, but to be useful at all, your tractor needs a few must-have attachments.
Tractor Loader
You can’t have a tractor without a tractor loader bucket. A loader bucket is a square bucket that attaches to the front of the tractor. You can use a loader bucket to scoop dirt, backfill, move gravel, and if you’re skilled at handling your tractor, digging. The size of your tracker loader bucket can vary so you’ll want to ask your dealership which is right for your farm.
Tooth Bar Bucket Extender
A tractor bucket is mostly limited to scooping and moving dirt, gravel or snow, but you can get more out of your bucket when you add a tooth bar attachment. A tooth bar is an extension you place on the edge of your bucket, essentially adding a row of “teeth” that can dig into hard dirt, flip rocks out of your way or get underneath a bed of clay.
A tooth bar is the tractor attachment I never knew I always wanted, and it’s an indispensable addition if you plan on using your bucket for multiple jobs on the farm.
Pallet Forks
Pallet forks don’t look like much, but you’ll soon realize how many jobs you can take on using them. Available in different weight ranges, pallet forks attach to the front of your tractor and let you slide under objects to lift them.
Need to move 1,000-pound round bales of hay? No problem—you can take the hay off your trailer or truck with ease using pallet forks. Want to move your chicken coop or another small structure? Slide your pallet forks underneath, and you’ll be moving your chicken to a new location in no time.
Pallet forks are adjustable so you can move the forks close together or further apart as needed. When shopping for pallet forks be sure to choose one designed for your specific tractor and with the length and weight range required for what you’d like to move.
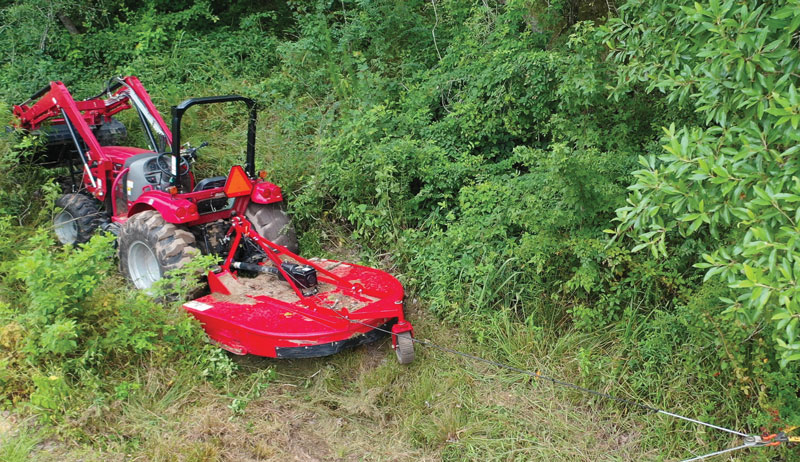
Mower Deck
If you have a few or more acres of grass to mow, you’ve probably realized it’s not something you can take on with a ride-on or walk-behind lawnmower. Left to grow without mowing, tall grass and weeds can prevent you from fully utilizing your land.
EngineerPhotos/Shutterstock
A tractor mower deck is an indispensable attachment on farms with large fields. It attaches to the back of your tractor and can cut several acres of grass in a few hours.
There are two main types of tractor mowers—a brush hog and a finish mower. A brush hog mower is the most popular mowing attachment because it can cut through tall grass, small trees, shrubs or other dense foliage such as blackberry bushes. When it cuts it mulches the grass and leaves it on the ground underneath the mower.
If you’d like a landscaped appearance in your fields complete with lush grass and perfectly manicured lines, a finish mower gives your tractor a lighter touch. Just keep in mind that a finish mower attachment doesn’t have the power to cut through dense areas or brush.
Trailer Hitch
A trailer hitch is a useful tractor attachment because it lets you use your tractor for pulling. It’s easy to pop on and off, and you can do everything from connect to a trailer to haul hay through your field or use your tractor and a tow rope to pull a neighbor out of a snowbank.
Some tractor attachments can save you a ton of time while doing bi-yearly jobs, but they are considered a bit of a splurge because you won’t use them every day.
Post-hole Auger
A post-hole auger is a tractor attachment that digs holes. It attaches to the back of your tractor and, depending on the model, ranges in size from 4 inches up to 18 inches. It looks a lot like a big drill bit, and it’s incredibly useful for drilling holes for fence posts or trees. Having a post-hole auger will save you from doing a lot of manual labor, but if you’re not continually putting up fences or planting trees, it may be something you only use occasionally.
Snow Blower & Blade
If you live in a colder climate and routinely get several feet of snow in your yard, your back probably starts to ache the second you see the first flake fall. Shoveling snow can be a body-breaking job, so a snow blower or snow blade attachment can be a worthwhile splurge for your tractor.
Courtesy LS Tractor USA
A snow blower attachment works just like a walk-behind snow blower in that it will blow snow out of your pathway and make it easy to clear a driveway. Snow blowers can churn up ice chunks too. If you just want to push snow out of the way and you don’t mind making a pile or hill, a snow blade will be a helping hand. It simply pushes snow out of the way so you can clear a path where you need to.
Rotary Spreader
If you plan on seeding or fertilizing your fields every year, a broadcast spreader will be something you’ll grow to depend on. Depending on your make and model of tractor, you can find rotary spreaders that connect to the back of your tractor and spread seeds, fertilizer or anything else you’d like to add to your fields.
Most types will offer different spread patterns so you can choose the best spread for seeding, over-seeding or fertilizing.
Backhoe
A backhoe attachment connects to the back of your tractor. It can be taken off and on whenever you need it, and it has its own seat and controls for the backhoe arm. When you use it, you’ll park your tractor in one location and use the backhoe arm to scoop rocks, dig deep into the earth, or move debris around your yard. If you’d like to build a small pond on your property, a backhoe attachment will be very useful. You can keep moving the tractor to new locations and keep digging until you’ve reached the right depth, and it’s a great tool for dredging shallow ponds or ripping out thorny bushes.
A backhoe attachment will be one of the biggest splurges you can buy for your tractor. Depending on your tractor size and type, they can run you between $10,000 to $20,000 for the attachment alone. That’s a significant investment for something you might only use occasionally, but they are also incredibly useful attachments.
Every hobby farmer has different priorities, but if you use this list of tractor attachment must-haves and splurges before you shop you’ll save money, avoid any buyer’s remorse, and really enjoy the attachments you do bring home.
More Information
Tractor Tillers
Having a tiller on your tractor means you can turn the dirt in your fields when you need to. This very useful, must-have attachment shines in the spring when you’d like to do a light aerating or turn dirt before seeding. It’s the best attachment if you’d like to plant vegetables or other crops because it helps you get beyond the grass and into the dirt quickly.
Choosing a tiller isn’t as simple as choosing other attachments. You need to know what you’ll be using it for and assess the type of land you have before you pick one, or you might be disappointed with its power and performance.
There are reverse-rotation and front-till tiller attachments, with the reverse-tilling models digging deeper into hard dirt than a forward-till model. Think of a reverse tiller as the attachment you’ll use to dig into untouched soil, while a forward till model is a helping hand if you’re tilling dirt that’s already been worked.
You’ll want to choose the right number of tines for your tractor, too, and most tractor manufacturers offer four- or six-tine tillers. Just keep in mind that your tractor will need more horsepower the more tines you add.
Tilling depth is also a consideration when choosing a tiller attachment, so if you know you have a layer of fine dirt over hard pack that’s 5 or 6 inches down, you’ll want a tiller attachment that can dig deeper than that.
Connecting Your Attachments
Tractor attachments won’t be helpful if you can’t switch them out easily. For that reason, many manufacturers offer something called quick hitch. Quick hitch gives you a fast way to hook up to all of your attachments, and with it installed on your tractor you won’t have to worry about pulling stuck pins or bolts to remove your attachments.
You’ll be able to line up your tractor, click in or out, and get to work.
This article originally appeared in the May/June 2022 issue of Hobby Farms magazine.
We asked you to tell us about your beloved livestock breeds, and you answered. These shepherds wrote in to tell us what they love about keeping the St. Croix Hair Sheep breed!
We have fallen in love with St. Croix Hair Sheep for the breed’s ease of day-to-day care, parasite resistance and the rarity of needing to trim hooves. They are a little smaller than other breeds of sheep, which makes them easier to manage. If you have never been around livestock, this the perfect breed to start on, regardless of age or experience.
My wife and I were in our mid-50s when we started, with only limited experience with livestock prior to that, and it has proven to be an incredibly enjoyable experience. Their size and ease of management allows hobby farmers to raise an animal with little health care management and no shearing.
You can also set up a very good rotational grazing operation on a small acreage. No need to mow or hay when you can use an income- and fertilizer-producing animal to do it for you.
They also make perfect 4-H projects. We had a couple of bottle feeders last spring that we sold to a family with young kids. They finished raising them and are using them in their activities. A great bonus is that they produce delicious, mild-tasting meat that doesn’t have the gamy flavor that come with the wool breeds.
St. Croix Hair Sheep were the silver lining in our little grey cloud! Frustrated in our attempts to find another breed of sheep, we found a small farm selling a half dozen St. Croix ewes and lambs.
Right from the start, they were a perfect fit for our land.
Rotating between pastures, they search the thin, high-desert vegetation. Browsing as much as grazing, they thrive on green or dry grasses and weeds, leaves and twigs that most sheep breeds can’t or won’t eat. Light on their feet, they leave the roots of perennial grasses unharmed.
The pastures are richer with their manure, and reducing the vegetation reduces the fire danger here in the arid West.
With ancestors left behind on Caribbean islands, meant to supply meat to residents and to future ships exploring the New World, this breed is hardy and healthy, needing little care. Ewes most often present twin lambs. No shepherd’s help required!
Genetics and selection make them heat- and cold-tolerant and parasite-resistant.
For more information, check out The St. Croix Hair Sheep Breeders Inc., the official registry for St Croix Sheep (www.stcroixsheep.org).
This article originally appeared in the May/June 2022 issue of Hobby Farms magazine. Email us your thoughts (~250 words) and a photo of you and your livestock to hobbyfarms@hobbyfarms.com (subject line: I Love My Livestock!). We’ll publish our favorites in upcoming issues.
Ask a homesteader about manure and they may tell you it’s their biggest chore—or their best friend. The truth is that manure can be both, and learning to make the most of its benefits while minimizing the work it entails is a key to getting the best out of our homesteads.
The good news is that your farm—your animals, pastures and gardens—is there to help you do it right. So put down your pitchfork and check out these ways to get your farm really growing.
Magical Manures
Think of the living community that is your homestead as an endless, intricate web. Sunlight, rainfall and air are the raw materials for a photosynthesis-driven energy cycle that passes through plants, plant-eating animals, omnivores, carnivores and soil.
All livestock make mounds of manure. And manure is one of the most important ways that solar energy becomes available to the soil to fuel more plant growth—more food—for animals and people.
So where do we need manure? The answer is practically everywhere! But without good management, manure can be a messy, smelly, pest-breeding problem. It doesn’t always land where you want it most.
Luckily, you can develop patterns for animal management that get the most mileage out of your manure with a minimum of labor input. And when you do, you’ve got a win-win situation.
Shawn & Beth Dougherty
Poo in the Pasture
Manure is transformed solar energy from plant leaves, so it makes sense that we want to put the manure back where it came from: in the ground that grew the plants. Pasture is the most obvious source of diet for many of our animals.
Ruminants such as cows, sheep and goats, as well as pastured poultry including turkeys, ducks and geese, area all enthusiastic grazers. You can include pigs managed on pasture, too.
These animals partner with us in turning the abundant sunlight that pours down on our homesteads every day into meat, milk and manure.
But if they’re all out on pasture already, and the pasture is where we require manure, what’s the need for management? Aren’t the animals already taking care of that?
Well, yes and no—usually no. Conventionally grazed animals—animals turned loose in a large pasture for extended periods of time to wander and browse at will—will, indeed, leave their manure somewhere in that pasture. But the bulk of it will be deposited in those places where the animals go to drink or rest.
Think by the water trough, under a shade tree or in the barn.
More will land on the hard-packed, bare soil of regularly used trails. While these places build up loads of nutrients that will quickly become toxic to plant growth, the rest of the pasture will still experience a deficit of fertility. So manure needs management—even in the pasture.
The good news is there is a simple fix for this problem: attentive, thoughtful grazing practices. This goes by lots of names—rotational, holistic, regenerative, to name a few—all of which require the frequent, even daily or twice-daily, shift of grazing area.
By confining animals—usually by means of portable electric fence—on small paddocks, the effects of grazing and manuring are concentrated. Moving them frequently assures that these effects are spread over the whole pasture.
A long rest period before the grazing animals return to the area allows complete recovery of the forage. It also encourages complete integration of manure into the soil.
Whatever species of grass-eater you raise, managed grazing is necessary for healthy animals and productive soils. You don’t need a PhD or a course in pasture science or a master class in grass management to begin a program of regenerative grazing.
Putting in place a few principles will get you started. In no time your animals, plants and soils will be teaching you the details.
Shawn & Beth Dougherty
The Cleanup Crew
With all that manure out there, you can look forward to improved growth in your pasture plants with every rotation, right? Well, again, yes and no. You’ve got the nutrients in the right place—back on the grass they came from. But it’s in piles, not spread around where they can fertilize the whole pasture.
Mounds of manure, if they aren’t soon incorporated into the top layer of soil and plant litter, are going to breed flies. Not only that, but plant growth around a large manure pile will also be “hot”—excessively high in nitrogen. Grazing animals will avoid the area.
So we need to spread those manure piles around. Does that sound like a lot of work? It would be if we had to do it ourselves.
Instead, we’ll get the farm to do it for us.
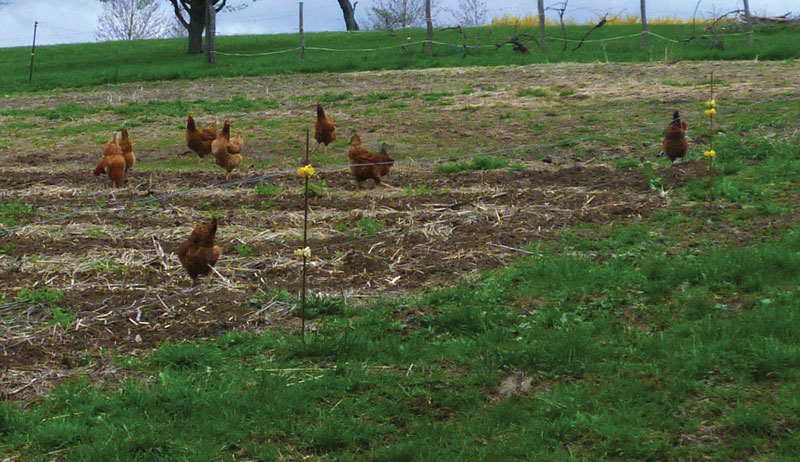
Scratching poultry, such as chickens, is one solution. Following grass-eaters with scratching birds is a good way to help nature help us while it helps itself. Tearing into cow pies after parasite larvae, maggots, beetles and worms, chickens perform several tasks at once:
Reduce the farm’s population of pest insects (and your feed bills as well)
Eliminate parasites that might otherwise reinfect livestock
Spread manure, all at the same time.
Win-win-win!
Putting Wildlife on the Payroll
But chickens aren’t the only manure-spreaders around. Lots of other farm helpers are just as willing to do the job.
Wild birds such as quail, prairie hens and turkeys—all scratching birds, like chickens—love the chance to forage in your pasture. Soil critters such as earthworms and dung beetles can form manure-processing armies that mobilize almost as soon as a cow flop lands. They can incorporate manure into the soil in a few days.
For a double-whammy, larvae of the yellow dung fly consume manure while adults prey on pest fly species. All of these and many more natural partners are poised to spread your farm’s manure for you.
There’s just one catch about these wild dung-managers, though. Unlike chicken populations, which the farmer can increase simply by placing an order for chicks, wild populations take a little time to develop.
Think about it. When you add ruminants (and ruminant manure) to your farm’s ecosystem, you create a new opportunity for biodiversity. You send an invitation to helper species, a notification that this farm is becoming more biologically active, more productive.
Those species will begin reproducing at a great rate. But they may be starting from almost zero. So it can be a while before you see generous populations.
Patience is key. If you want nature to do a job for you, you have to let her do it in her own time.
While we’re making sure of balanced fertility in our pastures, lots of other places need nutrients, too. Our animal management practices can help us get it there.
For instance, take the ancient practices of fold and fallow—a sort of rotational management for cropland and garden. Before the invention of chemical fertilizers, farmers used their herds and flocks to build fertility in places where crops were to be grown for harvest.
Between crops—when the land was resting, or fallow—these would be used as a night pen for sheep, goats, geese and other small grazers.
Confined to limited spaces, the livestock laid down a generous layer of manure, adding copious showers of nitrogen-rich urine into the bargain. And all of this fell exactly where it was most needed. It fell where the crops would grow.
Bale Grazing
The same benefits can be accomplished with bale grazing. In empty gardens, or anywhere you want to drop a load of fertility, feeding hay on bare soil can be a good option. This is the same trick we’d use if we wanted to turn any bare land into pasture.
Not only manure and urine, but all the “wasted” hay goes directly on the ground. There, tiny living things return the organic matter to the soil.
Green Manures
Green manures can be used in a similar way. Plant a cover crop or green manure. Then, when it is ready to be mowed or tilled, let your grazing animals do the work instead. In addition to mowing, they’ll drop their dung—right where it’s wanted, no manure-hauling necessary.
Smaller livestock can be particularly useful in this way. Their diminutive size means they won’t cause soil compaction. Poultry in sliding pens are our favorite garden grazers, tilling their nitrogen-charged droppings right into the soil along with shredded cover crops.
Free animal food, plus manure, tillage and shredded plant material dumped right on the garden…. All the homesteader has to do is put her animals in the right place.
Concentrated Fertility
Sometimes, though, it isn’t practical to put livestock on the garden. Often the places where we want a boost in fertility are too small to be used as pasture or fold. What’s needed here is a source of collected manure, and, fortunately, getting that is easy.
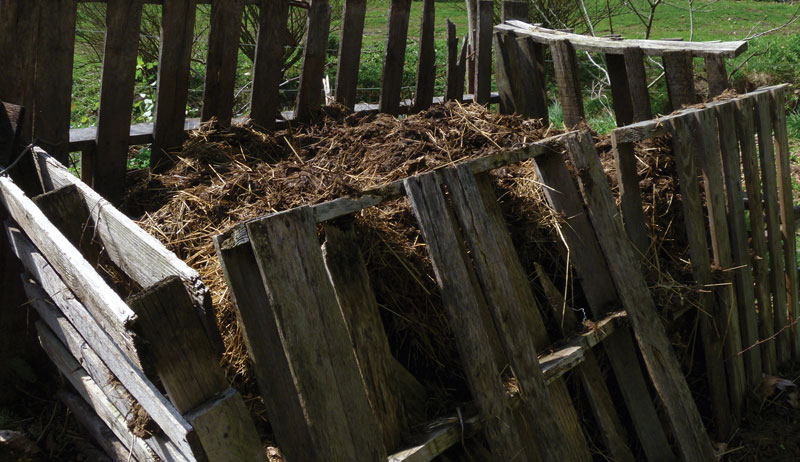
Whenever animals must be confined for a time, we have an opportunity to harvest some concentrated fertility—with deep bedding.
Deep Bedding
Hay, straw, ground corn cobs or shredded corn stalks—even sawdust or shredded paper—are high-carbon plant material. This material will absorb and tie down nitrogen (poos and pees) that would otherwise be lost to evaporation or leaching.
Putting deep bedding under our penned livestock keeps them dry and comfortable. It also forms the basis for valuable manure compost, rich in nitrogen and minerals. Composting this material produces some of the finest possible soil amendments.
And composting doesn’t have to mean lots of turning and temperature-reading. Bedding containing manure and urine—like many kinds of organic matter—must be allowed to age before it can safely be applied to human food gardens. But that doesn’t have to mean extra work for the gardener.
Waiting Game
Clean compost can be accomplished with a minimum of labor—if we are content to wait. When your compost has broken down to a crumbly black mass—a process which may take several months—it’s safe to apply to your food garden beds.
As a homesteader, you already know that manure is your friend. And that’s a good thing, because there’s always so much of it!
Fortunately, the living things on the farm—our partners in the ecosystem—already know how to deal with every spare nutrient. All we must do is to help them help us. Good planning, with careful attention to the patterns of nature, are our best guides to building a homestead that is clean, fertile and beautiful.
More Information
Go with the Flow
We can simplify the work involved with confined animals by planning our barns and pens to facilitate manure handling. Sometimes this is as simple as making doorways and gates wide enough to accommodate a wheelbarrow or garden cart or building pens with removable sides.
Or it might involve designing a holding area for ruminants that can double as a pig pen. After the ruminants move on, turn in the pigs and let them root to aerate bedding pack and convert it into compost.
Flow is another consideration. Manure and soiled bedding from poultry and ruminants (cows, sheep and goats) can be used as food and bedding for pigs. Arranging your livestock holding facilities so that wastes can be passed easily into the pig pen makes for one-step manure handling.
On our farm, cows or sheep confined for calving, lambing or weather issues are penned right next to the pigs. Daily, rejected hay from the ruminants’ manger becomes their bedding. Their soiled bedding is forked over the fence into the pig pen.
Likewise, the poultry brooder is located just west of the pig pen, making it easy to turn accumulated chick litter into pig food. What the pigs don’t eat, they combine with their own manure, urine and bedding. This gives a biological boost to this future soil amendment.
Shawn & Beth Dougherty
Thinking Outside the Fence
With the rise in awareness over the past few decades of the benefits of holistically managed grazing, it’s important not to fall into the mistake of assuming that all animals must be on pasture all the time, no matter what the circumstance.
Temporarily penned animals are not necessarily unhappy or unhealthy! On the contrary, conditions of weather, parturition (birthing), of food sourcing or provision, or the state of the pasture itself, can easily make confinement a temporary best option for your livestock and your farm.
Luckily, this is also a great time for collecting some concentrated soil nutrients! Sheep barned for lambing, cows held in a lounging area until soil firms up in spring, pigs confined in the fall to be fattened on abundant garden surpluses, and poultry shut in at night to keep predators at bay, are all depositing loads of manure and urine high in soil-food.
Capturing those nutrients lets us move them where they’ll do the farm the most good.
This article originally appeared in the May/June 2022 issue of Hobby Farms magazine.
We asked you to tell us about your beloved livestock breeds, and you answered. Texas farmer Joy L. Rogerson wrote in to tell us all about keeping the American Aberdeen breed of cattle!
I absolutely love American Aberdeen Cattle. This breed is so docile, curious and friendly. They instantly become one of the family. Whether it’s an older cow or a new calf, their personalities come out and they become individuals, not just ear tag numbers.
You know you have happy cows when they come running and jumping when you call them up to see you!
This very feed-efficient, easy-keeping breed requires minimal acreage: 1 acre per head. Most owners only feed grass and hay with minerals.
Aussie Roots
This heritage breed comes from an original herd developed in New South Wales, Australia, carefully selected for efficiency and smaller frames. The end result was a breed of small, polled cattle of pure Aberdeen Angus descent. American Aberdeen Cattle are free of known genetic defects, including the dwarf gene.
Breeding Options
American Aberdeen cows require very little or no assistance at calving time and are excellent mothers raising healthy, well-developed calves. Very little cattle equipment is needed to manage the cattle making them the perfect breed for beginners.
The American Aberdeen Association allows cross breeding or percentage cattle to be registered. This helps the small farm owner offer more variety to their breeding program to fit their individual needs. An example of percentage cattle would be crossing American Aberdeen Cattle with miniature American Herefords.
The cross results in adorable black or red baldly calves registerable as “Moderator.”
This article originally appeared in the May/June 2022 issue of Hobby Farms magazine. Email us your thoughts (~250 words) and a photo of you and your livestock to hobbyfarms@hobbyfarms.com (subject line: I Love My Livestock!). We’ll publish our favorites in upcoming issues.
If you’re growing beans this season or find some fresh at the farmers’ market, save a trayful to turn into these easy quick pickled dilly beans. This recipe doesn’t require any canning, just a refrigerator and some time.
Dilly beans are enjoyed as you would eat any other pickle, including on the side of a sandwich or cut up into a salad. We tend to snack on them straight from the jar and use them as a fun garnish in a Bloody Mary.
Yield: 1 pint
Ingredients
Main
1/2 lb. fresh green beans (use a mix of colors if you’d like, just make sure they are tender)
1 clove of garlic, halved
1 tsp. dill seeds or 1 sprig of fresh dill
To give them a kick of heat, add a sliced hot pepper or red pepper flakes (optional)
Wash the beans and discard any soft, bruised or damaged beans. Trim off both ends. Lay the beans next to the pint jar to measure length. Cut the beans so that they sit under the shoulder of the jar (about 4 inches).
Pack the jar full of beans vertically, with beans standing on end. Fit as many in as you can without bruising or damaging the beans. Add in the garlic and dill prior to completely filling. To spice this recipe up, add in a halved hot pepper, such as a jalapeño, or add in 1 tsp. of red pepper flakes.
In a nonreactive pan, bring the brine ingredients to a simmer until the salt is dissolved.
Ladle the warm brine over the beans until they are completely covered with brine by at least a 1/4 inch.
Allow the warm jar of dilly beans to cool on your counter until it reaches room temperature. Wipe rim with a dampened towel to remove any brine and add the canning lid and screw on the ring. Allow the beans to pickle for at least 48 hours before tasting.
The longer your dilly beans pickle, the more flavor they will have. These pickles have the best flavor and texture if enjoyed within two months.
“The strawberry harvest was incredible this year,” says Germaine Miller, who runs the Dandelion Haven urban homestead in Buffalo, New York, alongside Michelle Miller. “We harvested over 42 pounds of fruit in two 24 square-foot beds—our largest harvest ever!”
Miller adds that the strawberry bounty came in despite the little issue of a rabbit nest in one of the beds. A bunch of baby bunnies emerged during the harvest.
Running with an ethos of living simple and taking a do-it-yourself approach to growing food, the Dandelion Haven homestead also puts a healthy emphasis on incorporating canning and preservation techniques into the mix.
Taking time out from homestead duties, we spoke to Miller about the roots of Dandelion Haven. He discussed how they overcame soil issues stemming from an old house that was torn down on their land. We also got into the best ways to use strawberry crops.
Recapping the origin story of Dandelion Haven, Miller says that he and Michelle had always been keen to grow things on their apartment patio. But coming across a work share program at a local farm during the 2009 recession elevated their interest to a new level.
“At the end of the season, we moved from New Jersey to upstate New York and carried the passion with us,” says Miller. “When we moved into our current home with a spacious yard we had mostly grass but experimented with various beds and containers to grow a few herbs and vegetables.”
When the COVID-19 pandemic hit in March 2020, the Millers focused even more on taking control of their own food supply.
“While unemployed and quarantined, we calculated what we needed to grow in order to eat for a year,” says Miller. “We used the funds we had to purchase lumber, a couple truckloads of composted horse manure and seeds. We built several raised beds, planted trees, ordered chickens and quail. For years we had read books and magazines like Hobby Farms long before we had a homestead. Now we could finally make practical application of what we learned.”
When it comes to issues specific to farming in an urban environment, Miller says that the biggest early challenge was the soil.
“According to property records, our garden is where a house was torn down decades ago and backfilled,” he explains. “We never felt comfortable growing food directly in the ground and when we did, soil compaction or debris limited growth. We tried growing in kiddie pools, grow bags and buckets.”
These days, Dandelion Haven is based around a combination of raised beds, garden tables and trellises. “We fill our beds with soil that we make using the compost from our chickens and quail,” says Miller. “The plants thrive in it.”
Focusing on this year’s bountiful strawberries, Miller says their favorite ways to use the harvest is to make jams, shrubs, syrups and flavored kombucha. They add them to pancakes and baked goods, along with freezing a bunch of them.
“Since we only eat our own homegrown strawberries and have to wait 12 months for them, having them fresh while still warm from the sunshine can’t be beat,” says Miller. “It’s also a special crop because they usually appear right around our wedding anniversary in June.”
Preserving the farm’s produce is a key part of running Dandelion Haven, even if canning might sometimes seem overwhelming at first.
“To first-time canners I would say try not to be intimidated by what looks like a complicated process,” says Michelle Miller. “Canning books, websites and experienced teachers on YouTube provide you with everything you need to get started and be a successful canner.”
Along with canning beans and corn, Miller also pinpoints tomatoes as a prime canning crop. “Tomatoes are a favorite. We use them to can sauce, salsa, soup, barbecue sauce and the most delicious ketchup.”
When asked about the most satisfying part of running their own farm, the Millers say that it’s a mix of being able grow produce that might be difficult to find (or is overpriced) in grocery stores along with the reassurance of knowing exactly what is going into their meals.
“Reading, deciphering and trusting labels is exhausting. So growing our own food allows us to know where our food comes from. That is comforting. The return on our investment of time and money is unmatched because we are provided with enough to feed ourselves and share with friends and family!”