I knew there was trouble as soon as I saw two rats scurry away from the homeowners’ compost bin. Designed to come apart, its plastic sections had popped free of one another and area critters took full advantage. What’s more, the material in the bin was a gloppy—and stinky!—mess. Time for a compost makeover.
The family I was working with lives in an urban area without room for a huge, open-air compost pile. And, like millions of other folks, they’d purchased their plastic composter so they could recycle their kitchen waste as neatly as possible.
But they are busy people with full-time jobs and kids to raise. Additionally, they knew the compost pile wasn’t working out as they hoped and had become discouraged.
If you get things just right, compost piles can really “cook.” Microbial life gets busy breaking down carbon- and nitrogen-rich material. And your kitchen scraps are transformed into rich, useable compost with surprising speed.
To accomplish this, the pile needs to have a carbon-to-nitrogen ratio of about 25–30 to 1. That means for every one part nitrogen-rich material, you have 25 to 30 parts carbon-rich material. (Watch the video for more specifics on this.)
Ideally, the waste you include also should be shredded or chopped. Smaller pieces break down much more quickly than large ones.
Containing kitchen and food waste almost exclusively, our “before” compost was decidedly out of balance. Its temperature was a little over 70 degrees F—far from the 100 to 130 degrees that indicates the pile is actively breaking down.
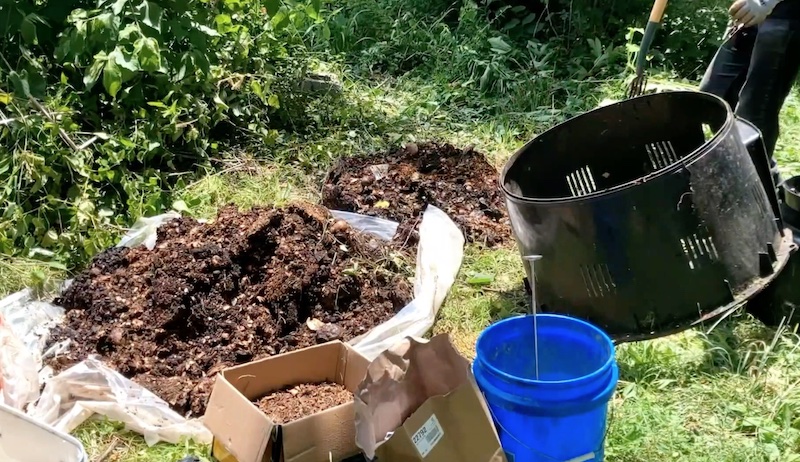
To jumpstart the necessary microbial activity, I removed the bin’s contents and set it aside. Next, I added a couple of layers of large sticks. (I put them in a criss-cross pattern to take up extra space and facilitate air flow.) Then I dumped in a first layer of mostly “brown,” carbon-rich material.
This included some ripening compost from one of my own piles, dried grass, pine needles and a dash of garden soil.
I wore a mask and gloves to protect myself from potential pathogens during the next makeover step—the big re-mix. In small batches, I shoveled the original nitrogen-rich goo into a large container. I mixed in several handfuls of shredded paper, cardboard, wood chips, old straw and other carbon-rich materials.
These would absorb some of the extra moisture, reduce odor, and, hopefully, help dial in the overall carbon-to-nitrogen ratio.
The compost makeover worked surprisingly well. The temperature shot up over the next several hours. As for the homeowners, they’ve updated their compost plan. For every bucket of kitchen scraps they dump, they’ll now top things off with some large handfuls of straw. And by monitoring the temperature, they’ll also have a much better idea about the state of their bin.
Chickens and other poultry members come in all sizes, shapes, colors and personalities. Nearly 400 recognized breeds and varieties of poultry exist, including large-fowl and bantam chickens, ducks, geese, turkeys and guinea fowl. Using our illustration and a few selected hints, can you guess the mystery breed we have depicted here? Find out the answer below!
Hints
This chicken breed was originally bred as a utility poultry breed for winter eggs.
According to Murray McMurray Hatchery, these cold-hardy birds are “good-sized chickens with a beard, muff, feathered legs and feet, and fifth toe.”
Males are straw-colored with reddish brown and black markings. Females are a creamy white and salmon brown, and l`ay cream-colored eggs.
The breed originated in a small village in France called Faverolles.
This mystery chicken breed was brought to you by Murray McMurray Hatchery, which provides the highest quality poultry and auxiliary products to its customers and has been a trusted, knowledgeable industry resource for more than 100 years. Whether you are an experienced or novice enthusiast, Murray McMurray is sure you will enjoy its wide selection of breeds and supplies to assist you with raising your flock!
This article originally appeared in the May/June 2022 issue of Chickens magazine.
There’s no question about it: Those of us who keep chicken flocks truly love our birds. Whether we keep them as pets, raise them for their eggs or meat, breed them to help conservation efforts, or enjoy them as part of the homesteading experience, we all show our avian affinity in a variety of ways.
Some people (myself included) sport chickens on their sweatshirts, T-shirts and ties. Others (myself included) decorate their homes with chicken art motifs on their walls, curtains and linens.
Still others (yes, myself included) perk up their kitchens with chicken cookie jars, stoneware and teapots. There are so many ways we show our love for chickens. And now, here’s yet another for the most diehard devotees.
Road trip, anyone? Let’s visit some places with ties (in name, at least) to chickens.
Chicken, Alaska
This tiny northern town—population 12 according to the 2020 US census—is one of Alaska’s remaining active gold-mining towns.
Founded in the late 1800s, the town of Chicken boasts a post office, gas station, liquor store, café, saloon and mercantile, but no electricity or plumbing. The Chicken Historic District, consisting of more than a dozen gold-rush-era structures, can be found on the National Register of Historic Places.
During the summer, the population swells to approximately 100 residents, mostly miners traveling to this Eastern Alaskan outpost via the Chicken Airport (CKX) or by Alaska Route 5 (not maintained during the winter).
Surprisingly, the town was not named for everyone’s favorite domestic fowl. Don’t visit Chicken expecting to see a lot of chickens.
The settlers noticed an abundance of wild ptarmigan—Alaska’s state bird—in the area and thought the town should be named for them. Nobody could agree on the spelling of ptarmigan, however. So they named the town Chicken, which everyone could spell.
Ironically, the Fork River (okay, okay, the South Fork River) runs through Chicken. No word on whether a town called Carving Knife is nearby.
Located in the north central region of New Mexico, this tiny town—population 299 according to the 2020 US census—bears the name of Hen in Spanish. Gallina (pronounced gah-YEE-nah) isn’t particularly known for laying hens, however. Its claim to fame, like its Alaskan cousin, is mining.
Silver, copper, lead and uranium were once hauled out of the earth at the nearby Gallina Mine. Today, the town is a jump-off point for exploring the US Forest Service’s San Pedro Parks Wilderness, a 41,000-acre region boasting more than 100 miles of trails crisscrossing grassy meadows and high plateaus.
Coincidentally, the ptarmigan’s close cousin, the grouse, thrives in abundance in this wilderness region. Only a visit will reveal whether the same is true regarding chickens. But who puts a place named for hens next to a town called Coyote?
Chicken Gizzard Ridge, Kentucky
Just southeast of Louisville and southwest of Lexington, in Kentucky’s beautiful Appalachian region, lies sparsely populated Casey County. Driving west from Clementsville on Kentucky Route 70, you’ll soon come to State Highway 1859 heading north.
This scenic road—also known as Chicken Gizzard Road—will lead you right over Chicken Gizzard Ridge. The vistas from this 1,030-foot ridge are quite lovely and bear no resemblance to chicken gizzards or any part of a chicken, for that matter.
Looking for another poultry-related locale? Consider continuing slightly further west on Route 70, then turning south onto Speck Ridge Road (Kentucky Route 1752). This will lead you to the town of Feathersburg.
Located in one of the country’s largest metropolitan areas—Los Angeles—Wattles Garden is home not to wattle-bearing chickens but to 141 avocado-bearing trees. A group of 30 devoted gardeners tirelessly labored to recover these century-old trees. The surrounding acreage from the neglected, overgrown land that was once one of Hollywood’s earliest attractions.
In the early 1900s, the Wattles Garden complex featured four carefully cultivated gardens:
a formal Spanish garden
an Italian rose garden
a Japanese tea garden
an American vegetable garden
These gardens were part of the Wattles Estate, which served as the winter home of Omaha businessman Gurdon Wattles. Wattles opened his beloved gardens to the public for everyone to enjoy. But these sadly fell into disrepair after his death in 1932.
In 1975, Mayor Tom Bradley established Los Angeles’ community garden program, and Wattles Garden became one of the first gardens in the city.
Today, approximately 300 members maintain almost 200 garden plots as well as the estate’s original avocado and citrus trees. Wattles’ Mediterranean-style mansion was recognized as a City of Los Angeles Cultural Monument in 1993 and is now managed by the city’s Recreation and Parks Department, which maintains a hiking trail through part of the estate grounds.
If any part of the estate grounds looks familiar, you’re not imagining things. Several movies and television shows have been filmed here, including Buffy the Vampire Slayer, Rain Man and Ghoulies.
If you share your life with more critters than just a couple of dogs and some chickens, you probably own a stock trailer—or you need to own one. Whether it’s goats, sheep, cows or pigs on your farm, you should have a safe way to transport them. And unlike the dogs and the chickens, you can’t just toss your farm animals in the backseat of your car.
Livestock trailers come in a variety of sizes and styles, and the one you have—or the one you will choose to buy—will depend on what kind of animals you want to transport, and how many. While horses have their own special transportation needs—and trailers designed especially for them—most other farm animals do well traveling in a basic stock trailer.
Trailer Basics
Most people have seen horse trailers tooling down the highway. But a livestock trailer is different from a horse trailer in several ways.
Unlike horse trailers, stock trailers tend to be lower in height and also narrower in width. Stock trailers have a rear swing gate as a door, and a step-up entry, as opposed to a ramp.
An escape door is usually located at the front of the trailer for human use. Most stock trailers have an open design with no dividers. Some have floor-to-ceiling gates inside that allow you to separate some of the animals while they are traveling.
Stock trailers are typically less expensive than horse trailers. One reason is because of the construction. Basic stock trailers usually have single-wall construction and no padding on the inside. They also have slots for ventilation as opposed to windows that can be opened and closed.
Two Kinds of Trailers
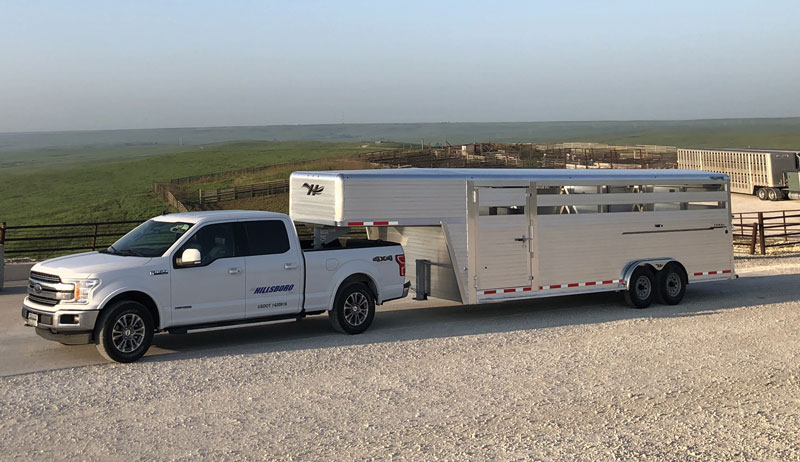
Stock trailers can either be bumper pulls (attaching to a hitch on a vehicle bumper) or goosenecks (attaching to the inside of a truck bed). Unless you have a lot of animals to haul, a bumper pull stock trailer is probably the better choice.
Gooseneck stock trailers tend to be large and are often designed for big loads. And, of course, they’re more expensive.
Some stock trailers have storage compartments, but most don’t. Horse trailers have tack rooms and other places to keep saddles and tack. But for hauling critters such as goats, sheep, cows and pigs, you probably don’t need a place to keep equipment.
If you want to bring feed along, you’ll likely want to put it in the back of your tow vehicle.
Whether you are considering buying a stock trailer or already own one, it’s crucial that your tow vehicle be capable of hauling the weight of the trailer plus whatever you put inside.
You will need a heavy-duty truck or SUV, preferably equipped with a tow package. This will enable you to plug the trailer power connector into the tow vehicle, and receive electricity to the trailer. Your brake lights and turn signals will be synced with your vehicle via this connection.
How do you know if your vehicle is capable of safely pulling your trailer? According to Kelley Blue Book, a California-based vehicle valuation and automotive research company, the towing capacity of your vehicle is the maximum amount of weight it can safely pull. This changes based on how the vehicle is configured, how much weight it’s already carrying, and how you distribute and control the load you need to tow.
You’ll find that the vehicle manufacturer has assigned an estimated towing capacity weight for your truck or SUV. But you can’t just look at that weight and the weight stamped on your trailer, and assume you are good to go.
Gross Combined Vehicle Weight Rating
What you really need to look at is your vehicle’s Gross Combined Vehicle Weight Rating (GCVWR). This is the weight of your vehicle with people and equipment loaded, plus the weight of your trailer, with animals, feed and anything else included.
You also need to know your vehicle’s “curb weight.” This is the weight of the vehicle itself without people or equipment inside.
According to Kelley Blue Book, subtract your vehicle’s curb weight—available from your vehicle manufacturer—from the GCVWR, and you’ll get the towing capacity of the vehicle. For example, if your vehicle’s loaded weight is 10,000 pounds (includes vehicle weight plus people and equipment) and your trailer’s loaded weight (includes trailer weight plus animals and feed, etc.) is 6,000 pounds, your GCVWR is 16,000 pounds.
If your vehicle’s curb weight is 5,000 pounds, your needed tow capacity is 9,000 pounds. Kelley Blue Book recommends not coming within 10 percent of your maximum towing capacity for safety reasons.
The less weight you are pulling, the safer you and your animals will be when traveling.
To determine the weight of your trailer while loaded, you need to have an idea of how much each of your animals weighs. If you’re not sure, do some research on your type of animal and what they typically weigh at their current age, or ask your veterinarian for an estimate.
If you plan to bring along feed and other equipment in the trailer, include the weight of this as well.
Trailer Maintenance
Keeping your trailer in good shape is key to its longevity, and to your animals’ safety. Most trailers are stored outdoors, so the elements, along with time, take their toll.
Livestock trailers should be inspected at least once a year for safety. A knowledgeable mechanic, or a trailer maintenance shop, should conduct the inspection. These are the key areas that need inspection:
Tires
Look at each of the tires on your trailer—including the spare—and exam the condition and the tread. You should see at least 1⁄4-inch tread left on the tires.
If the tires are worn, replace them. Poorly maintained tires are recipes for disaster when hauling. Rotate the tires once a year, too. This will help keep the wear even.
Brakes
Have the brakes examined for wear, just as you would the brakes in your car or truck. If the brake pads and/or drums are worn, have them replaced.
Floor
Examine the floorboards to make sure they are secured, and that the wood has not rotted, or that the metal has not rusted. An unstable floor can give way while you are hauling, resulting in a catastrophe for your animals.
Metal
Lubricate the metal areas of your trailer, such as the coupler, hinges and other areas where rust may settle or where stiffness might set in. A spray lubricant should do the job.
Lights
Make sure signals and brake lights are functioning properly. And replace any burned out bulbs or malfunctioning circuits.
Brake controller
The brake controller box on the front of your trailer is designed to engage and stop your trailer should it become separated from your vehicle while you are hauling. Have your brake controller inspected to make sure the battery is charging, and that the controller is in proper working order.
Having a well-maintained stock trailer at your disposal will enable you to haul your animals whenever you need to, for pleasure or in an emergency.
Once you have made the commitment to trailer ownership, you will wonder how you ever lived without one.
Whether you plan to travel regularly with your animals—like for vet visits or trips to the fair—or just want your trailer for emergencies, it’s a good idea to train each to load into the trailer before hauling day.
Most types of livestock are naturally claustrophobic, and won’t willingly go into what looks to them like a big metal box. It can take time and patience to teach your animals the trailer is a safe place to enter.
The best way to introduce your animals to a trailer? Feed them in it. Park the trailer where they can see it (hitched to the vehicle for safety reasons). Place some food on the floor, close to the entry, with the door securely propped open. Your animals will learn to eat out of the trailer while standing just outside.
Once they are comfortable, move food farther into the trailer. Eventually, your critters will enter to get at the food. Once they go inside, let them come and go at will. This will help them feel comfortable being inside. Eventually you can close the door while they are eating. Leave them inside for short periods of time.
The next step is to take them on short trips, making sure they have plenty of food while inside the trailer. Even if you just drive around the neighborhood for 20 minutes, a short ride will help them adapt to movement. Be aware you may have some loading regression after that first ride. You may have to go back to putting the feed near the door, slowly working them back inside.
Safe Driving
If you’ve ever been a passenger in a car with a bad driver, you know how unpleasant it can be. You not only feel physically uncomfortable, but you may become anxious, too. The same goes for animals traveling in a poorly driven trailer. After one or two bad rides, the animals may refuse to load.
What constitutes a bad trailer ride is not far off from a bad car ride. Stopping short, turning sharply, and abruptly accelerating and decelerating can all make for a scary ride for a four-legged passenger.
Here are some guidelines for good driving when hauling livestock.
Reduce speed: Many highways and interstates have slower speed limits for vehicles that are hauling, and with good reason. Slower speeds are safer when pulling a trailer. A slower speed will also reduce the amount of jostling your animals will experience when you go over potholes and rough roads.
Gradually accelerate and decelerate: Nothing is more alarming for an animal in a trailer than to be thrust forward or thrown backward when the towing vehicle abruptly speeds up or slows down.
Make slow turns: Animals standing in a trailer have to work to keep their balance as the vehicle moves. The most difficult part of the ride is during turns. As you make a turn, remember your animals are working to keep their balance, and the slower you go, the easier it will be for them. A good rule of thumb when hauling your animals is to pretend you have a glass of water in the trailer that you are trying not to spill.
This article originally appeared in the May/June issue of Hobby Farms magazine.
One of my favorite trees in my orchard is a young Bali cherry tree. Despite its diminutive size (it’s no taller than I am), it’s blossomed beautifully every year since planting in 2019. And fruit production is starting to pick up. I enjoyed a few delicious cherries off the tree in 2020. But 2021 was a different story. Just as the cherries were ripening to perfect readiness, birds swept in and stole the crop in a single day.
Now, by “crop,” I mean approximately 25 cherries. It’s not like the birds made off with hundreds of cherries in the blink of an eye. But that’s little consolation to an orchardist disappointed in missing out on his once-per-year cherry harvest.
The birds may have scored a point, but this match is far from over. This year, my Bali cherry tree is producing cherries in abundance, and I expect they’re about a month away from ripening. The birds won’t catch me by surprise this time around.
I’m ready to battle for my fruit, but how to keep birds out of cherry trees?
Birds, orchardists and cherries have a long and intertwined history. I’m hardly alone in having issues with birds eating orchard-grown cherries. Conduct the slightest amount of research into ways of protecting cherries from birds, and you’ll come across an impressive array of tricks and tips for how to protect cherry trees from birds.
Many of the tactics involve scaring birds away. The list of options goes on and on:
Install decoy predators and move them around daily to keep birds at bay.
Employ motion detectors that use audio to project scary noises through the orchard
Hang reflective tape or other shiny items in my trees to provide a simple visual scare
I could also endeavor to draw birds away by providing more enticing sources of food, either with bird feeders or by planting other tasty berries and fruits birds enjoy. But of course, the planting approach would take time. And there are already plenty of other options for birds to eat. Black cherries and chokecherries grow across my farm, but evidently my Bali cherries are preferable.
Truth be told, I’m not too keen on experimenting with how to keep birds away from cherry trees. I want an approach guaranteed to work. Decoy predators might work … or they might not. Motion detectors sound fancy … but will they be effective?
There’s probably an approach (or a combination of approaches) that would work. But I only have one Bali cherry and one opportunity per year to harvest. I don’t want to shrug my shoulders a month from now and say, “Well, that method of protection didn’t work! Better try a different one next year.”
Instead, I’m going to take advantage of my Bali cherry’s small size and protect it with bird netting. If the birds can’t physically reach the cherries, they can’t steal them. My chances for a satisfying harvest, as a result, will increase exponentially.
Since the tree is only about 6 feet tall and not especially wide, I can use T-posts and/or scrap lumber to build a straightforward square frame around the tree. By installing the bird netting over the frame, I can keep the netting away from the branches and prevent birds from reaching through to grab the fruit.
My Bali cherry tree is a beautiful, lush specimen all throughout the spring, summer and fall. And its vibrant bark is attractive in winter.
Even without fruit, it’s a pleasure to have in my orchard. But outsmarting the birds and harvesting fruit this summer will be a (literal) cherry on top!
The term “dude ranch” likely conjures up images of the movie City Slickers, the sitcom Hey Dude or a famous episode of Modern Family. But what is a dude ranch and why should hobby farmers be interested?
Tom Warren of Meadow Lake Ranch in Sand Springs, Oklahoma, runs his venue for multiple purposes, including hosting weddings, bed and breakfast rentals, and exciting dude ranch vacations. He says his clients are, in his words, “looking for solace.”
Wealth of Outdoor Opportunities
What many people on a farm take advantage is what his clients seek. Dude ranches have something for everyone. Adventurous activities he offers include:
tomahawk throwing
gun ranges
archery
calf roping
trail riding
fishing
hiking
sling shotting
Activities such as these offer a huge draw for kids who need time in nature and to experience skills they don’t get to practice in their neighborhoods. Chimineas, gardens, porches, rivers and lakes appeal to anyone looking to get out of the hustle and bustle of life and escape.
Check out the video above to see more of Warren’s agrotourism destination for ideas on how you might open up your farm to solace-seeking travelers. Or maybe just plan your next family getaway.
The Warrens have hosted people from every state in the U.S. and 42 different countries. Their ranch has been the setting for movies such as Minari and Reservation Dogs.
One of their rentable cabins is called “Paul’s Cabin” after the legendary Paul McCartney who stayed there.
Dude ranches are a great place to visit for many hobby farmers to learn different ways to steward their own land and operation. It is inspiring to experience a place that has so many amenities working well.
Farm theft has been on the rise over the past few years. It’s not hard to understand why a hobby farm is a target for thieves. Given that your property stretches out over a few acres or more, it’s almost impossible to keep an eye on everything. For many hobby farmers, the biggest source of break-in worry is the barn.
Barns hold our expensive farm equipment, implements and animals, and one of the best ways to add security to your barn is to use a smart camera. There are a lot of barn security cameras to choose from, so you’ll need to know what you’re looking for in terms of features and what your farm is capable of supporting for power and Wi-Fi.
What is a barn security camera?
A barn security camera is a smart camera that either connects to your farm’s Wi-Fi network or has its own SIM card that works via your cellular network. You can choose wireless smart cameras that have a lithium-ion battery you’ll need to charge or wired cameras that connect to power via a standard plug.
Some smart cameras are weather resistant and will work in blistering heat and freezing winters, while others are meant for indoor spaces only. Not only will smart cameras give you a clear view of the location you place them in, but they will also detect motion, sound, people, vehicles and animals.
Some smart cameras also have advanced AI built in that can send you an alert if they detect fire or the sound of glass breaking.
To watch your barn’s video footage, you’ll need to add an app to your phone or tablet. Some smart cameras show a live stream but won’t save video clips. Others will offer you limited cloud storage or let you add a memory card to retrieve stored video.
How to choose the right smart camera for your barn
The key to choosing the best barn security camera is to know where you’ll be placing the cameras, what features you need, and whether or not you’d be willing to pay a subscription fee for extra features.
Where will I place my barn camera?
Many of the latest smart cameras connect to your farm’s Wi-Fi network and have an average range of 300 feet. If your barn, outbuilding or livestock are within 300 feet, a Wi-Fi-based camera might be a good choice.
If a brand states that the Wi-Fi camera will work within 300 feet of your router, that is the absolute furthest distance it will work. The distance can be affected by walls, trees and other obstacles too. At the furthest range you may only have one bar of Wi-Fi, so the camera could lag when you’re trying to connect to it on your phone.
The camera may also stream choppy video at max range, or fail to send motion or sound notifications.
To avoid any lag or choppy video issues, you can choose a wired smart camera. Wired smart cameras connect to a central hub or DVR via a cable that supports video feed and power. You’ll need to pull the wire from your barn to your house so you may have to upgrade to longer cables to place your cameras in locations that work best for you.
There are also game cameras that don’t require Wi-Fi or a wired connection. These cameras use a SIM card or have a spot for an SD memory card. Some types will offer motion detection and a live view, while others will just store photos you’ll need to retrieve whenever you’re near the camera.
Smart cameras will provide you with a live view of whatever you’ve pointed them at. They will also send you motion and sound alerts. Depending on which brand you choose, there are quite a few features you may be interested in.
Custom alerts that identify whether it was a person, vehicle or animal that triggered the motion notification
Short clip motion capture that pre-rolls for 15 seconds before the motion was triggered so you don’t miss anything
180-degree field of view
Night vision and color night vision so you can see motion in the dark
Sirens built in so you can turn them on if you spot an intruder
Spotlights that turn on when motion is detected
Two-way audio so you can press the microphone button and talk to whomever is there
Fire detection in case you have a fire in the barn
Are you willing to pay a monthly subscription?
Depending on the brand, some barn cameras won’t offer specific alerts unless you pay a subscription fee. They also won’t store video clips. So if you’d like seven days of storage or 30 days of storage for your video clips, you can sign up for a monthly subscription.
The fee can range from $5 per month and up.
Which barn security camera will you choose?
Having a camera in your barn is one of the best ways to prevent theft. It keeps you in the loop about what’s happening in and around your barn, even when you’re not at home.
The key to choosing the best barn security camera is to research a few brands, decide which features you must have, and then sit back and enjoy the view.
You may be familiar with stinging nettles but you might not realize just how beneficial this herb can be.
The first thing that you’ll need to harvest this useful herb is a pair of sturdy gloves! If you’ve ever brushed up against stinging nettles, you’ll understand how they got their name. The fine hairs along the stems and leaves of the plant contain histamines and formic acid. They leave an itchy red rash on any of your skin they come in contact with.
I recommended not only gloves for this job, but a long-sleeved shirt as well. You’ll also need a pair of snips.
Nettles thrive in moist soil and can be found growing along riverbanks, near creeks and in low-lying forests. They tend to grow as an understory plant, preferring to be in the shade of the taller trees above.
The leaves are long, oval shaped and serrated. The leaves are opposite, and there are fine hairs on the underside of the leaves and along the stem.
There is a similar, related plant that you might find which is known as wood nettle. This is another useful plant, but it is a different species. Wood nettle has rounder leaves that grow alternating along the step, as opposed to the opposite leaves of stinging nettles.
This is the characteristic to identify for proper identification.
Harvesting Stinging Nettles
To harvest, simply snip the plants off near the ground. Collect them on a tarp or sheet. This will make them easy to bundle up when you are done.
When you get home, lay the plants out in a single layer on screens and allow them to dry. You can use a fan to speed up the process, which is particularly beneficial in humid weather. Once the leaves are dry, they can easy be stripped from the stems and stored in airtight containers.
After nettles have dried, they no longer irritate the skin on contact. So they are safe and easy to work with.
Heating also dissipates the formic acid found on nettles leaves. This means that you can harvest the young leaves, cook them up and enjoy their deep, green flavor. Nettles are packed full of vitamins and minerals, and are one of the healthiest spring greens that we can forage.
This herb can also be crafted in salves or lotions and enjoyed for their anti-inflammatory benefits. Stinging nettles make a wonderful topical treatment for inflammation, joint pain and arthritis.
It’s just that easy to take this “pesky weed” and turn into a beneficial herbal ally that you can grow and enjoy right on your homestead!
If I had to select one crop to read an entire book about, beans would certainly be at the top of my list. Fortunately for me (and you), Susan Young has already written just such a book. Growing Beans: A Diet for Healthy People and Planet reads as a kind of manifesto for bean growers.
As she describes throughout the book, beans have the potential to offer a kind of triple bottom line: They’re healthy, delicious and good for the soil.
A Bean Manifesto
As with any good manifesto, Young’s objective is unsubtle. Simply put, Young wants people to grow and eat more beans. As she describes in the preface, “Beans are an ancient food that has nourished a host of past civilizations and remain a staple food in many parts of the world, yet for some reason, many of us have yet to discover the delights of beans in all their variety and deliciousness. Why don’t we grow and eat more?”
The answer that Young offers is a simple one: In the UK, at least, (where Young is writing from) there isn’t a long-standing tradition of growing beans. Beans are certainly a larger part of our culinary tradition here in the U.S., but they’re still not what’s for dinner most nights.
Nor are they a staple in most home gardens or small farms that I’m familiar with. But perhaps they could be.
Aside from making the case as to why we should grow more beans, Growing Beans also provides a detailed guide for doing so. Young devotes much of the middle of the book to the basics of growing beans, covering everything from germinating to watering, trellising and harvesting. She also spends time investigating a few of the common pests and diseases that afflict bean crops, including halo blight and bean weevils.
Although many of Young’s references to pests and varieties are specific to Europe, much of the information is relevant no matter where you’re growing beans.
Culinary Focus
Another large portion of the book explores several of Young’s favorite bean varieties, describing everything from their cultural history to their culinary attributes. When describing borlotti beans, for instance, Young outlines their many uses in Italian cuisine, including their role in various stews and pasta dishes.
And she follows up all of these culinary references with a full chapter at the end of the book on the basics of bean cookery.
Finding these culinary details in the same book that teaches you about bean weevils is a large part of what makes Growing Beans sounique. Books on growing food and preparing food (and I read a lot of both) are typically very distinct from each other. Addressing both the agricultural and culinary dimensions of beans in the same pages brings more of one story together in one place.
Although the information throughout the book is generally geared toward a home gardener, as someone who’s grown beans commercially for years, I came away with more than a bit of new knowledge myself.
Overall, Growing Beans is a unique, ambitious and exciting project, and one well worth checking out.
This twist on basic deviled eggs can be enjoyed as an easy summertime snack or as a make-ahead side dish for an upcoming cookout. The shrimp salad is filled with crisp summer vegetables and the blend of creamy mayonnaise, tangy sour cream and vibrant cilantro melt together with the smooth egg yolks in each bite.
You’ll want to pile your eggs high with extra shrimp salad, so be sure to serve this one with plates and possibly a fork and knife.
Yield:16 servings
Ingredients
2 green onions, sliced
1⁄3 cup diced cucumber
1⁄3 cup diced red bell pepper
2 teaspoons minced fresh jalapeño
1⁄2 pound cooked cocktail shrimp or cooked large shrimp, chopped
To a medium bowl, add green onions, cucumber, red bell pepper and jalapeño.
Stir in the shrimp.
In a separate medium bowl, stir the mayonnaise and sour cream together.
Add the salt, cumin and black pepper and continue to stir until mixed well into a thick dressing.
Transfer 2 tablespoons off the dressing into the bowl with the shrimp. Stir to coat all of the ingredients.
Add the egg yolks to the bowl with the remaining dressing. Smash and stir with a fork until a thick paste forms. It should be mostly smooth with minimal lumps of egg yolk remaining.
Place the egg halves cut side up on a serving plate. Spoon about 1 teaspoon of the blended egg yolks into each egg. Use a clean finger dampened with water or the back of a spoon to pat and flatten the filling into the hole of each egg.
Spoon a generous amount of shrimp salad over each egg. Be sure to drain the liquid away from each spoonful before topping the egg. Any remaining shrimp salad can be placed in a small bowl and served alongside the stuffed eggs for anyone who wants extra. Serve right away.
This recipe can be prepared up to 24 hours in advance. Store the egg yolk filled eggs and the shrimp salad separately in airtight containers in the refrigerator. Then top the eggs with shrimp salad just before serving.
More Information
How to Boil Eggs
Here are some tips to get a perfectly hard-boiled egg.
Use a wide saucepan so eggs fit in one layer without crowding.
Use cold water to prevent cracking.
Cover with a lid as soon as the water starts boiling.
After 30 seconds, remove from heat and let sit for about 10
to 12 minutes.
Place eggs in cool water for a few minutes before peeling.
This recipe originally appeared in the May/June 2022 issue of Chickens magazine.