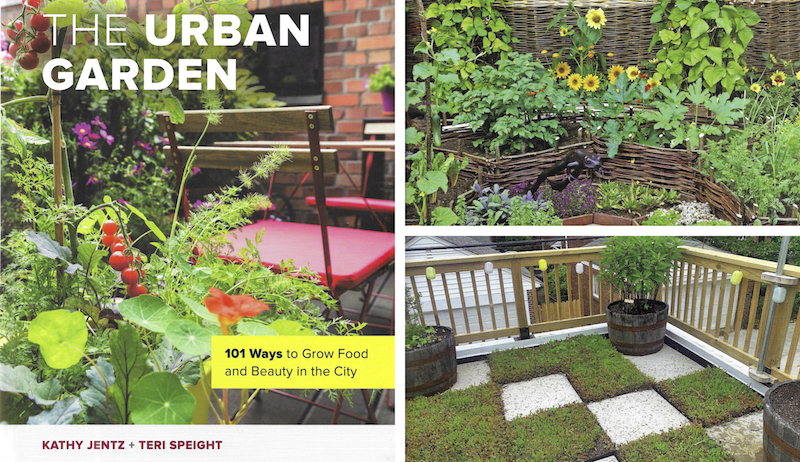
Authors Kathy Jentz and Teri Speight see gardening opportunities absolutely everywhere. “Both of us have traveled gardens near and far,” Speight notes.
While writing The Urban Garden: 101 Ways to Grow Food and Beauty in the City, both Speight and Jentz drew upon memories of others’ gardens they’d visited as well as their own extensive gardening experience. (Jentz edits Washington Gardener magazine and is a columnist for the Mid-Atlantic Grower newspaper. For her part, Speight is the former Head Gardener for the City of Fredericksburg, Virginia.)
As a result, The Urban Garden offers inspiration and real-world advice for would-be gardeners no matter where they may live. Recently released by Cool Springs Press, The Urban Garden includes practical landscaping solutions and gardening techniques for myriad challenges.
For example, there are tips for making small garden spaces look and feel larger. Readers will also learn how to use plantings to boost privacy and reduce noise. There’s advice on creating pet- and pollinator-friendly yards, composting in the city, growing a table full of salad greens and more.
“Gardening should not be prohibitive to anyone,” Speight says. “You know, gardening is something that anyone can do, everyone should try and all of us should enjoy.”
Still, getting started can feel overwhelming. “You have to imagine or re-imagine the possibilities,” Speight suggests. “When you look at your space, compartmentalize it.”
To begin, the authors recommend taking stock of the outdoor spaces around you. Do you have a small balcony, patio, rooftop access or even a shared alley? Also, take note of your growing conditions.
Is an area sunny or shady? If you have any soil to work with, is it heavy, well-draining, fertile or less-than-ideal? Is your potential mini-garden very noisy or exposed to passers-by?
All of these factors—along with your own personal preferences—will help to guide your next steps. “Maybe you don’t have a massive space, but you want to conceal that air conditioning unit,” Speight suggests. “Choose the appropriate plant material to present and install a screen that’s appealing from your side and not in the way of the repairman.”
“Basically, it’s reimagining the possibilities and finding the positives in whatever space you have,” she adds.
In the case of a super-shady spot, for instance, consider transforming it into a calming, Zen hideaway. “Usually when you’re in the midst of tall buildings, it creates a bubble,” Speight says.
“You don’t really hear a lot once you step beyond those buildings. So, you have like this little private cove. Make the best of that. Make it someplace where you can go and meditate. [Include] something that’s a focal point that just brings you calm.
“Consider it a hideaway if you want, but make the best of all situations.”
In addition to being open to new possibilities for small spaces, The Urban Garden authors also urge patience and planning. “With all of the new gardeners that are out there now, you know, some people [say], ‘I just tore up my whole yard!’” Speight says. “And we’re like, ‘Ooh. Maybe you should have done a big planter first.’”
“Take it in small nuggets and savor each nugget that you break apart from that big picture,” she continues. “What can you do with that small area first? And then next year, try a different area.”
Considering where your water will come from and what you can do to be water-wise is especially important for urban gardens. “You can always find that cute, small pot,” Speight says. “But that cute, small pot is no longer cute when you realize you have to water it every other day. If you start with a larger planter and diversify that space—add different things with different heights, colors, and textures. Make it absolutely abundant with beauty.
“Then you’re going to have more fun with that planter than with that cute, little pot.”
Larger containers will also hold a lot more water than their cuter, smaller counterparts. “We have to be real when we’re thinking about the garden,” Speight notes.
The authors get real about citified composting, water storage options and screening unsightly areas from view, among many other practical topics. With photos and descriptions of countless mini-landscapes—along with tips and tricks to try yourself—The Urban Garden inspires and energizes, too.
“Think before you plant and think as you plan,” Speight concludes. “That way, you’re pretty much guaranteed a successful outcome.”
“Hens have been doing this for thousands of years! Why can’t I get it right?” Beth, a fitness instructor in North Dakota, has been following my chicken antics online for years. She credits my flock for inspiring her to start one of her own and is now mom to a dozen Easter Eggers and Buff Orpingtons in addition to her teenaged son. And this spring, Beth decided to try her hand at hatching eggs.
She thought it would be a fun thing to share with her son as well as a way for her flock to sustain itself.
Her first attempt, however, resulted in not one egg hatching. Beth waited 25 days, then 28 days. At 30 days, she threw away the eggs, sanitized her incubator, double-checked the humidity and temperature settings, and made sure the egg-turning function was operating correctly.
She then started over with a dozen new eggs.
At 21 days, one Buff Orpington egg emitted peeping sounds, but the chick within never breached the shell. For her third try, Beth stuck to just Orpington eggs, but the results were the same as the first. For her most recent try, Beth invested in a candler, then tried with a mix of eggs. Everything looked great at seven days. At 14 days, however, every egg had long stopped developing.
It seemed to me that Beth was doing everything right in order to properly incubate her flock’s eggs. She guaranteed that her rooster was quite active with the ladies and that she had thoroughly read all the instructions that came with her incubator. She had even contacted the manufacturer to clarify a couple of things.
She’s set the eggs pointy side down, placed the incubator in a low-traffic area of her home, and made sure the machine was set at the proper temperature and humidity. The only time the eggs were ever handled was when she candled them on her fourth attempt … and when she had to dispose of them.
“They’re not even old eggs,” she assured me. “I’m literally taking them from the nest box and putting them into the incubator. Could that be it?”
Age Does Matter
Some poultry scientists advise flock owners to let fresh eggs rest for three to 10 days after hatching before incubating them. Others believe the best success rates come from hatching the freshest possible eggs.
Similarly, some experts advise not to use eggs that are older than 10 days. Others consider two weeks past lay the maximum age for hatching eggs.
I have had success with eggs fresh from the hen as well as from properly-stored 2-week-old eggs. Since Beth’s eggs were coming directly from her nest boxes, age of the eggs was not the issue. And since Beth’s flock was less than 3 years old, the age of the laying hens was also not an issue.
Beth’s conundrum became clear when I confirmed how frequently she was handling the hatching eggs. She reiterated that only she handled the eggs:
putting them in the incubator
candling them
throwing them away
The only other time she touched them was when she collected them … and when she cleaned them for the incubator.
Aha! It turned out that, in addition to sanitizing her incubator, Beth was also carefully scrubbing every single speck of dirt and dust off her eggs with a little scrub brush she’d bought just for this purpose. She seemed quite stunned when I gently informed her that all that scrubbing was removing the all-important bloom—the protective coating that seals the eggshell’s pores to keep moisture in and bacteria out.
Without this layer, the porous shell could be and most likely was penetrated by harmful bacteria that sabotaged Beth’s incubation attempts.
The Scoop on Soil
It’s easy to understand why poultry keepers would assume a soiled egg would need to be cleaned prior to being incubated. Dirt, droppings, and even egg splatter from neighboring broken eggs become breeding grounds for bacteria inside a hot, humid incubator.
These microbes can then penetrate the hatching eggs, killing embryos and, occasionally, even causing the hatching eggs to explode inside the incubator. Because of this, soiled eggs should never be chosen for incubation.
However, there’s soiled and then there’s soiled. An egg with a couple of dirt or poop spots—nothing totally an area bigger than a dime—can be gently cleaned with a dry cloth or paper towel. Never use a wet cloth or towel, sandpaper or anything abrasive. These will remove both the debris and the bloom.
Beth is now on her fifth attempt to hatch eggs. She now regularly changes the bedding in her nest boxes, which results in cleaner eggs for both eating and hatching.
This time around, she carefully selected the cleanest eggs her hens laid for incubating. Her 14th-day candling showed all 12 eggs developing healthfully, and she and her son are looking forward to finally having a bunch of baby peeps joining them soon.
It’s likely that no story from Otterridge Creek has garnered more exclamations of surprise than the one of a chicken hatching a duckling. “What? A real duckling?!”
I used to pull out my phone and show off a short video clip of the dedicated Black Australorp with her fuzzy yellow-billed baby quacking behind her. It was highly satisfying.
I’m sure many a backyard fancier has wondered about the possibilities of setting eggs from differing species under their wistfully waiting broody. Perhaps your farm is overflowing with spring chicks and doesn’t need any more, but another hen is setting, so can you give her duck eggs? Pheasant eggs? Turkeys?
It can be done, if the circumstances are right and you make a few allowances for natural differences. Some things are simply common sense. You wouldn’t want to put quail eggs under a goose, or vice versa.
I’ve had some success with cross-species brooding, and I’m happy to share a few of my war stories and tidbits of information I’ve gained along the way.
Size
One of the first considerations for brooding is size. Ask yourself these questions:
How large of an egg can fit underneath your broody and still incubate correctly?
How many eggs can she set comfortably in the clutch?
How large will the babies be right off the bat?
Will she be able to keep them covered and warm as they grow?
Conversely, is the surrogate mother so big that an accidental step onto the chick would kill it? To avoid excessive complications, it’s probably best to match birds with eggs that are close to their normal egg size.
Incubation Periods
The standard chicken incubation cycle is a precise 21 days, or exactly 3 weeks. As poultry enthusiasts know, many dedicated broody hens will set much longer if chicks don’t appear on time.
If the incubation temperature is colder than the natural mother’s body temp, hatching will be delayed. If it’s warmer, hatching will be accelerated. Either option tends to cause deformities or lower hatch rates in the offspring. (These are common problems with novice operation of household electronic incubators.)
Last summer was busy, to say the least. Broody after broody started setting in the barn, we were raising hogs, the cows were getting out frequently and, of course, full-time off-the-farm jobs all around. Since we gather eggs daily and have to set aside eggs for our hens to set, it’s not very surprising that we missed giving one new broody a clutch of eggs for brooding.
“Did you give that new broody eggs today?”
“Ah, no, I forgot!”
So it went, for about two weeks. I thought ruefully that I’d missed the window, and putting eggs under her after two weeks of setting would be a waste. They’d likely die when she left the nest.
Still Setting
Fast-forward two months and that hen was still setting!
Of course, I felt terrible. So, when I went into the local farm-supply store on Sept. 1 and heard little cheeping sounds, I gravitated over that way to investigate.
Some young Pekin ducklings were contentedly grouped together in a brooder. I knelt down to investigate. While I don’t usually like getting chicks from feed stores, this option could possibly solve my problem. I could give that poor broody hen a couple of babies to mother, then harvest duck meat in a few months.
Besides, we had a large swampy pond area that wasn’t being utilized and was the perfect duck habitat. It would be a win all around.
Duck Deals
One of the store employees saw me studying the ducklings and quipped: “Do you want them all?!” Without missing a beat, I replied: “What discount would that get me?” After all, it was already cold outside. No one wanted to raise chicks that late in the year, not even me.
She knelt down to look into the brooder. After a moment’s consideration she spoke again.
“Half-off?” she asked.
“I’ll take ’em,” I said.
So, instead of just two ducklings for my long-term broody hen, I left with 19. Oh, well—I’m a sucker for a good bargain. I’d just have to set up a supplemental heat lamp.
I got the ducklings home and set up their brooding circle inside one of the barn stalls. Heat lamp, waterers, feed, litter—check.
Best-Laid Plans
I had a vague hope that I’d put one or two of the ducklings underneath the mama in her nest, she’d accept them, then I’d move her into the stall to raise all 19. What an idyllic dream world I had created. Ha.
Long story short, mama and babies firmly rejected each other, with mama pecking and babies fleeing. I was left to raise the ducklings, and mama continued sitting on her nest for another full month. (Yeah, I should’ve just given her eggs—four times over.)
The longer you raise birds, the better idea you’ll have of how long each individual is willing to set.
Wishing to expand my poultry operations, I purchased a nice set of Midget White turkey poults from a good-quality backyard breeding program. We kept a breeding pair, and the next year I watched eagerly as the young hen set a generous clutch. The turkeys were given a separate breeding pen to help brooding go smoothly.
When hatch day came, I was delighted to see one of the healthy yellow poults run out to greet this brave new world. Knowing that the hen had set somewhere between 13 to 16 eggs in the clutch, I anticipated a large hatch.
I started preplanning the sale of Thanksgiving turkeys and the growth of my flock. Not wanting to disturb the new family, I would only go into the pen briefly to replenish food and water, then exit.
The young tom strutted and the young mama huddled over her nest. I’d wait until mama and babies started traipsing about the barnyard before counting the hatchlings.
Turkey Troubles
Several days passed, and the turkey hen stayed on her nest. I thought it was odd that every time I went to the barn, the poults needed to be huddled. After three days, I saw the tom climb on top of the hen and realized something must be wrong. Going directly over to the nest, I moved the mama turkey hen against her protests. To my horror, the stench of flat, dead babies greeted me.
The hatch had indeed been successful. But the mounting tom was too heavy for the mama’s legs to support. Not one single poult survived.
I cleaned up the horrible mess, and moved the turkey hen out of the pen to distract her. However, the hen immediately set up a new nest on some chicken eggs she found. I wasn’t sure how that would turn out, so I bought some fresh turkey eggs from a neighbor for her.
Nurlan Mammadzada/Shutterstock
Success (of a Sort)
Twice, the hogs got out and ate the eggs from underneath her, yet still she sat, brooding. I finally gave her a tiny clutch of three chicken eggs. Wouldn’t you know it, two hatched! (Yeah, I locked up the tom this time.)
So, I had a turkey hen raising chicken chicks. Right around that time I lost a good broody chicken hen, leaving her two chicks motherless. The orphaned chicks were only a few days older than the turkey’s.
Might it be possible to get her to adopt these extra babies?
I carried the two motherless chicks to the turkey area, snuggled warmly against my torso. When I arrived, the turkey mama and chicks were calmly stepping about, completely unaware they weren’t at all related. Well, I thought, “here goes” and put the other chicks down.
A Care Caveat
Now it should be noted that chicks hatched by a living mama, surrogate or not, memorize the sound of their mother’s voice. That’s how they stay in their own little family cliques out in the barnyard, and conversely the mothers know their own babies.
However, occasionally you run into a mama—whether bird, sheep, cow, etc.—that simply loves nurturing any offspring, her own or others’. Such was my hope for the turkey hen. This was her first (well, second, technically) hatch, and I wasn’t sure of her mothering preferences.
After all, she was raising chickens!
Expect the Unexpected
The orphaned chicks, hearing the sounds of their cousins’ cheeping, ran towards the eclectic little family. For one brief moment all was good. Then the turkey cocked her head, studying the new chicks. Peck! The little yellow chick went down. I hastened to snatch it up but couldn’t grab fast enough. Peck! A second time. Poor little dear.
I cuddled the yellow chick against my chest and went to rescue his littermate, when all of a sudden I saw something astonishing: The turkey hen had accepted the black chick, because it looked like the ones she hatched!
I tried to sneak the yellow chick in again, to the same result. Nope. She would take the dark one, but not the light one. I found this completely ironic, because her own biological babies had been 100 percent yellow!
All this to say, expect the unexpected with cross-species surrogacy.
Moisture
If you decide to set waterfowl eggs underneath a land bird for brooding, such as a chicken, recall that mama ducks typically get off of the nest to swim once or twice per day. They climb back in on top of their eggs with damp feathers, increasing the moisture during the incubation period.
In the example of my Black Australorp hen with the duckling, I had tried to compensate for this difference by adding water to the nest occasionally. I’m pretty sure I overdid it, though, since only one of the eggs hatched.
Moisture content during incubation is important, and specific to each species. If the moisture is too low, the air space inside the egg will be excessively large, the interior of the egg will be too dry, and the chick will not be able to turn around during the hatching process. If the moisture content is too high, then the air pocket will be too small and the chick won’t have enough oxygen to last through the exertion of hatching.
In either case, the chick will die. Try to match similar surrogate mothers-to-eggs for this reason.
Andrey Abryutin/Shutterstock
It’s a Risk
Bear in mind that successful animal breeding is complicated enough, and cross-species brooding is always a risk. Occasionally, however, surrogacy might be the best option available.
For example, it seems guinea hens are chronically poor—albeit very determined—mothers outside of their native desert habitat. Hence, it’s common here in the extreme north for chickens to be used for setting and raising guinea keats instead.
Chickens have a more moisture-resistant feather structure and stronger brooding instincts, usually raising the survival rate of those cute little camouflaged cheepers.
You’ll be glad to know that, as of this writing, last year’s guinea keats have finally figured out they aren’t chickens.
This article originally appeared in the May/June 2022 issue of Chickens magazine.
There is nothing better than a charming homesteader scene of a small flock grazing happily in a chicken tractor. A great solution for any smallholding, a chicken tractor has lots of benefits. Not only does it provide poultry with constant access to natural food, but it also controls pests and helps fertilize the soil.
Homesteaders use a chicken tractor to provide their poultry with shelter, forage and exercise. In this article, I’ll teach you how to build a portable, lightweight, predator-proof poultry home that can be dragged around by several people or by one, depending upon the size of the unit.
The chicken tractor includes a covered part for storm protection and a floorless wire enclosure that allows for ventilation and foraging on the ground. It’s basically a moveable yard. Any poultry can use a chicken tractor as long as the height and size are appropriate for their needs.
The use of the chicken tractor gives poultry a chance at fresh greens and a wide variety of insects that they may find on the ground at each new location. It also allows you some control over where your poultry forage and how often they can be moved. Birds using a chicken tractor continuously fertilize the soil as it is moved around. Additionally, they control pest and tick populations.
A chicken tractor is like having your poultry free-range, making their eggs and meat superior in taste and nutrition, but also confined and relatively safe from predators. If you would like your poultry to forage in large pastures that pose serious hawk and other predator threats, a chicken tractor may be for you. Chicken tractors also work well to contain just a few birds in a small backyard.
This model is very fast and simple to make. You can expect to create this wonderful chicken tractor in several hours without being in any way fatigued. This plan is lightweight for easy maneuvering—a few people should be able to move it easily—and it should hold a handful of birds comfortably.
Keep in mind that this is just one type of chicken tractor; you can easily make yours larger, smaller, longer or shorter by making simple adjustments to the measurements. When calculating the size you need, as a rule of thumb, allow 4 square feet per chicken.
The measurements for the tractor given here will accommodate three birds quite easily. If you have a bigger flock, substitute the 36- and 48-inch aluminum angles for 48- and 96-inch aluminum angles (all standard lengths commonly sold in stores) to make the tractor 4-by-8-by-2 feet. This will result in a not very large tractor that will hold a much larger number of chickens.
Materials
The cost of all the materials combined would cost less than 100 bucks, therefore making it much cheaper than any chicken tractor on the market. To get started, you’ll need the following.
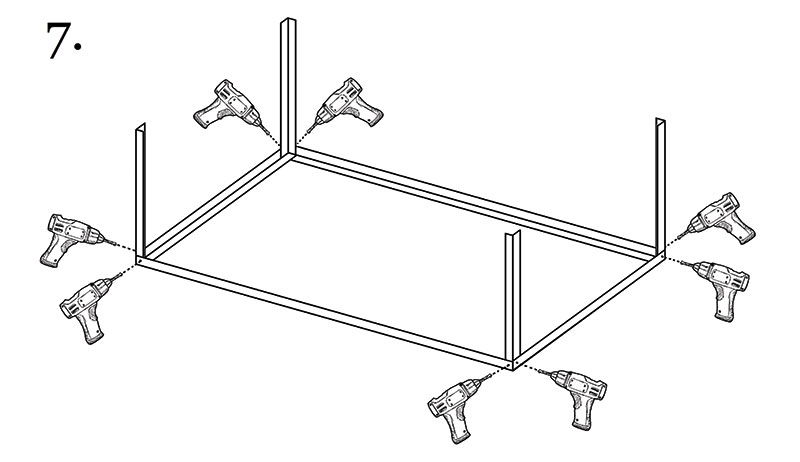
Start by assembling the chicken tractor frame. Lay the 36- and 48-inch aluminum angles to make a rectangular frame 4 feet long and 3 feet wide. Drill holes connecting the four aluminum angles.
Use bolts in the holes drilled earlier to secure the frame. You’ll probably need several pairs of hands to hold the aluminum angles in place while securing the bolts and drilling. Therefore, it’s advised to be extremely careful.
Steps 5 to 7: Add Vertical Angles
Add the 24-inch vertical aluminum angles. Drill holes connecting them inside the four corners of the frame and secure them with bolts. Make sure that you connect them to the inside of the frame.
Steps 8 to 10: Build Another Rectangular Frame
Now make another rectangular frame, similar to step 4, only with a 36-inch aluminum angle in between. Drill holes connecting all the corners and secure them together with bolts.
Try as best as you can to make the frame exactly corresponding by width and length to the one in step 4. You can make it a little wider and longer but never the opposite. This will prevent problems later and make the process much easier.
Steps 11 to 13: Assemble Pieces
Now, assemble the pieces together and secure them with bolts in drilled holes. If you followed steps 8 through 10 correctly, this should be easy. When assembled, you should have a lightweight, sturdy aluminum frame that should resist wear and tear for years to come.
When your frame is ready, add the wire fencing. The type of fencing to use depends on the predators in your area. Use a small mesh for smaller predators such as raccoons, opossums and snakes. More durable fencing will keep out coyotes, wolves and other larger predators.
Here, I used durable small-mesh hardware cloth to keep out raccoons. Using a combination of both durable fencing such as chicken wire and some fine mesh will effectively protect against both.
Cut out two pieces of wire fencing to fit the tractor. Arrange the wire fencing to fit as shown in the illustration. Sew or weave the fencing to fit the frame using wire, thick fishing line or string. For added durability, fasten them with plastic ties. An opening is left on top for the door.
Steps 17 to 20: Add Opening & Roof
To make a door and roof for the chicken tractor, you’ll need a rectangular board a little larger than 2-by-3 foot, two smaller boards 2-foot wide for the roofing, and a 3-foot wide triangular wooden plank to keep it all together. The triangular plank should be thick enough to hold screws securely without splitting.
Any material for the boards will work, provided that they are painted waterproof and reasonably lightweight. I used thin wooden boards, painted with nontoxic paint to make them waterproof.
Drill holes in the larger 2-by-3-foot board as shown in step 18. These will be used to attach the ready “roof-door” to the tractor frame. Now assemble everything together as shown in step 19, and secure with small screws. You can also add peel and stick roofing shingles on top for more durability.
When your roof-door is ready, attach it to the chicken tractor using plastic ties through the drilled holes. It should open and close freely, making a convenient door for the chicken tractor as well as providing some shelter for your flock in case of rain. You can also make a covering of tarp to cover half the tractor in case of severe weather. Finally, simply add a hook-and-eye latch to keep the opening closed tightly.
Now you have a complete, inexpensive, portable, lightweight, predator-proof chicken tractor that will supply your poultry with nutritious, fresh forage as well as greatly fertilize the soil and effectively minimize pests for many years to come; your flock will surely thank you for it.
This article originally appeared in the May/June 2022 issue of Chickens magazine.
If you live in a part of the country that doesn’t receive much annual snowfall, you’ve probably never pondered how much snow weighs, and how great quantities of snow can have adverse effects on the roofs of farm buildings.
We’re not talking about a thin coating of fluffy dry snow. We’re talking about the accumulation of heavy wet snow and ice over the course of a long winter. This can quickly build up on rooftops if not consistently removed. Over time, this layer can grow thicker and thicker (and heavier and heavier) until it causes a roof to sag or—worse—collapse.
(Don’t) Do the Collapse
A collapsed roof is the last thing a farmer needs in the middle of a challenging winter. Taking precautions to avoid this possibility is important.
The winter of 2018-19 was a difficult one in northern Wisconsin. February saw 35 inches of snowfall during the first two weeks of the month. I did my best to reduce the loads on roofs (a specialty snow-clearing tool worked reasonably well). But one roof in particular—a wide lean-to structure built on the back of a barn—seemed to be strained by the snow.
Since the lean-to serves as the winter parking place for the majority of the farm tractors and machinery, the possibility of the roof collapsing on the equipment was unacceptable. My father, formerly a carpenter working in construction, reduced the concern by installing a series of sturdy 4×6 posts underneath the roof. These reached vertically from the rafters down the ground.
The rafters were placed down the middle of the roof, providing extra support suitable for the width of the structure.
The 4×6 posts proved effective. The lean-to happily survived the craziest winter in recent memory.
Since then, putting up and taking down the 4x6s has become a twice-annual exercise. In the fall, they’re propped up underneath the rafters and held in place using short blocks of wood and a few screws.
The blocks of wood are left attached to the 4x6s year-round. I store the 4x6s stored under the lean-to, so installing the posts is quick and easy. In the spring, we just remove the 4x6s by unscrewing the blocks of wood from the rafters.
With a row of 4x6s running down the center of the lean-to, access to the stored equipment is compromised, but that’s okay. We have no use for hay equipment in the dead of winter. And the lean-to is wide enough so even with the 4x6s installed, there’s enough room for the tractors to drive in and out of either end as needed.
So what’s the takeaway here? Sometimes, roofs (especially farm roofs) need a little extra support during heavy snow. But this support doesn’t necessarily have to come in the form of permanent structural enhancements.
My father already had the 4x6s, blocks of wood and screws on hand. So installing the support posts couldn’t have been simpler. In a pinch, a quick and seasonal solution can do the job just fine.
One final note. It goes without saying that care should be taken when working underneath any roof with a heavy snow load. In my case, my father knows roofs and rafters like the back of his hand.
But if you’re concerned about snow loads, consulting an expert can help determine if a seasonal solution like the one I’ve outlined is suitable and safe for your needs, or if more in-depth modifications are needed.
A lot of people think a drone is a high-tech robot toy you use to take cool photos and videos from the sky. Drones are also considered a pricy camera used by content creators to capture and share outdoor adventures.
It’s easy to dismiss drones as just a toy or just a camera. But this flying robot has quite a few practical applications that can make the daily life of a hobby farmer easier.
Drones: A Valuable Tool for Every Hobby Farmer
At the most basic level, a drone is an unmanned flying robot you can control via a remote or using an app on your phone. Drone technology has evolved from a basic drone that could only fly back and forth in front of you to a high-powered quadcopter with four sets of propellers, an onboard camera and software with GPS.
You can opt for models with a 4K camera, long-lasting battery and obstacle avoidance built-in too.
How can a device like this assist a hobby farmer on a day-to-day basis? A drone is a valuable addition for every hobby farm, no matter what size. If there is something you’d like to explore, you can take to the skies and be on your way faster than the time it takes to put on your boots.
Fly Your Fence Line
On a farm, fences are designed to keep your possessions and animals in. They keep people or other animals out, too.
If you have a large property, you know how long it can take to walk from one end of your ‘yard’ to the other to check the security of your fences.
Use a drone to check for downed fence panels or other breaches. It’s a lot easier and faster than walking. And the latest drones can travel up to 18 miles away without losing a connection to the remote control.
You can fly low and check every fence. Navigate around trees yourself or using your drone’s obstacle avoidance. And make a note of what needs to be repaired or where there is an issue.
Finding your cows, sheep or horses on a large property can be a bit of a guessing game. With a drone, you can swoop down and take a look inside your barn at any animals inside. Or you can head out to the furthest corners of your property to find a lost lamb.
Some types of drones are quiet enough so they won’t startle animals. You can do a headcount or even get up close and check for health issues.
Cruise Your Crops, Row by Row
One of the best benefits of owning a drone on a hobby farm? Checking in on your crops.
You can fly overhead and assess any damage done by hail or rain. Or you can fly low over a row and capture photos and videos of a potential issue like blight or insect damage.
If you see a potential issue you’re unsure about, your photos will be a valuable tool in analyzing and answering the problem.
Agricultural Drones Take over Crop Spraying
If you’d like to go one step further and take on more significant farm tasks, you can upgrade to an agricultural drone. Agricultural drones are more powerful than hobby drones. And they have field software onboard you can use to monitor everything from growth to weeds to lack of water.
An agricultural drone carries a camera that takes near-infrared images to access NDVI data (normalized difference vegetation index). You can use the data to plan out your crops or assess crop health.
Some agricultural drones have crop sprayers on board, too. This eliminates the need for you to spend hours in your tractor. Some models can spray up to 6000 square feet in 10 minutes.
If your goal is to spend less time walking your fields and more time performing other tasks, a basic hobby drone will be a good choice for you. To ensure you have the latest technology, you’ll want to choose a drone with a minimum of a 4K camera, 30 minutes or longer battery life and obstacle avoidance software.
The average cost of the latest hobby drones is approximately $800.
When you’d like a drone with the capacity to take on tasks like crop spraying or you want to map out your property using near-infrared images, you’ll want to look into agricultural drones. Just keep in mind this type of drone is a sizable investment. The average price is from $4000 up to $30,000.
Is Your Next Farm Tool a Drone?
Drones have so many practical purposes. But for me, one of the best parts of having a drone is being able to document my farm as it grows year after year.
The photos and videos of our farm as it changes and grows make this a technology well worth its weight in gold.
Pink eye is an infectious and contagious bacterial disease in sheep and goats. The term “pink eye” is a lay term for the official term “keratoconjunctivitis.” It refers to inflammation of the cornea and conjunctiva.
At Porter Valley Ranch, we experience pink eye once a year, usually early spring. Last year we did not recognize the symptoms soon enough. As a result, a large portion of our herd became infected. (Pink eye is extremely contagious.)
This year we brought in a new ram, who soon after started to show symptoms. We treated and isolated him, and luckily no other sheep caught the bacterial disease.
What Is Pink Eye?
Pink eye is an effect of a few different bacterial strains. Chlamydia psittaci (ovis) and Mycoplasma conjunctiva are the culprits.
Any time you bring a new animal into your flock, these bacterias are a concern. Make sure to monitor any new animals in isolation for two weeks or more.
Other times pink eye begins to present when animals are stressed or seasons change. We have noticed our own sheep developing pink eye as a result of spring allergies.
whites of their eyes grow reddened and inflamed as (you can see this in the video)
opaque covering over their eyeballs that makes their eyes appear very cloudy
Pink eye has the possibility of causing blindness. That is, thankfully, very rare.
You may choose to let the virus run its course. However if you have a large herd that is not affected, it would be wise to treat the problems before everyone in the herd becomes contaminated.
Check out the video with Josh demonstrating why he chose to treat his sheep Creole and the results of the treatment. He also shows the pink eye ointment you can find at just about any livestock store.
If you order potted trees, check with your supplier to find out where the plants were stored before being shipped. If they were kept in a heated greenhouse or another location with ambient temperatures significantly warmer than your outdoor conditions, you probably need to harden off the plants. Hardening off involves gradually exposing plants to the outdoors by putting them outside for a short time the first day and gradually increasing exposure time over the next few days until the plants are left outdoors for a full 24 hours.
When a potted tree is adequately hardened off and you are ready to plant, water the root ball thoroughly. The best way to do this is to submerge the potted plant in a bucket of water in an upright position until air bubbles cease to rise to the surface. Then remove it from the pot and inspect the roots. If the roots are root-bound—encircling the outer surface of the root ball—trim them with a scissor or clippers until you can spread out the still-attached roots to examine their expanse. If you plant trees or shrubs in the root-bound state, the roots will likely continue to grow in this manner, circling round and round within the planting hole, and your plant will struggle to survive.
Once you’ve trimmed the roots as needed, place the root ball back in the pot or otherwise protect the root ball from the air and sun while you are digging a planting hole to size. Place the root ball in the hole to make sure the depth and width of the hole are adequate. Then plant as described previously, spreading out any loose roots to encourage their outward growth. If the root ball is a solid mass of fine roots, you needn’t build the mound of topsoil to spread the roots around. Just place the bottom of the root mass on the bottom of the hole and fill in around it. Water it well, then apply a trunk guard and mulch.
Dani Baker
Transplanting Trees & Shrubs
As your garden develops, there will be occasions when you need or wish to move an established plant. You may decide that a tree would do better in a new habitat that you think will be more conducive to its growth. Or you may want to relocate a shrub that is becoming too crowded or shaded by neighboring plants. When transplanting, the goal is to capture as much of a plant’s root structure as you can, retaining as much of the soil surrounding the roots as possible. This will give the plant the best chance of establishing itself successfully in its new location. Here’s the technique:
Make vertical cuts with a shovel in the soil around the plant at a distance about half the height of the bush or tree. These cuts should overlap so you create a continuous vertical slice encircling the roots. If the plant is 1 foot (30 cm) tall, a circle with a 6-inch (15 cm) radius is probably sufficient. If it is 2 to 4 feet (60–125 cm) tall, a radius ranging from 9 to 12 inches (23–30 cm) should be adequate, and so on. The depth of the cuts also depends on the size and root structure of the plant. For shallow roots, cuts 6 inches deep may capture most of the roots. If the plant has deeper roots or a taproot, dig deeper to capture as much of the root mass as possible.
Begin digging down deeper and toward the tree. Your goal is to extricate the roots in a bowl-shaped mass with the soil intact. You may encounter roots that you need to cut through using the point of the shovel or a pruning implement.
Once you have cut through all the roots you encounter, spread a damp cloth on the ground nearby.
Extricate the root ball from the hole, wrap it in the damp cloth to shield the exposed roots from the air, and transport it to the new location. Depending on the size of the tree, a root ball can be quite heavy; you may need help to move it.
At the new site, dig a hole to match the size and shape of the root ball you have extricated.
Remove the cloth and lower the root ball into the hole. The surface of the root ball should be level with the soil surface surrounding the hole.
Use the excavated soil to fill in any gaps between the root ball and the sides of the hole.
Apply some water to settle this soil, and add more soil again until it is level with the surrounding surface.
Use more of the removed soil to build a raised circle around the tree to form a saucer to hold water.
Water the tree just until the water begins to pool.
Finish by applying a trunk guard and mulch as described previously in the instructions for planting a bare-root tree. Sometimes soil does not adhere well to the roots, but instead falls away, leaving the roots bare. In this case wrap the roots in a wet cloth and follow the instructions for planting a bare-root tree.
Pruning is the practice of selectively removing branches from a tree or bush. In nature, “pruning” occurs randomly when branches are broken or damaged by a windstorm, a fire, or the nibbling of wild ruminants. In a garden or farm setting, though, productivity and health of plants improves when limbs are systematically clipped. Thinning branches improves air circulation to ward off disease, lets in light to hasten ripening, encourages blossoms and can result in fewer but larger fruits. Removing dead, damaged or diseased limbs helps prevent infestations from spreading to healthy growth. Pruning also renews a tree or bush by encouraging growth of new branches that fruit more reliably than older ones. If your space is limited or you prefer not to climb high to harvest fruit, you can prune to manage the size of your trees and shrubs. Pruning can also result in plant forms that are more resilient and aesthetically pleasing or in dense growth of a hedge. Removing lower limbs of a tree can allow more light to bathe plants below.
Dani Baker
Learning to Prune
Each type of tree or shrub you plant may require slightly different pruning techniques. Permaculturist Sepp Holzer does not prune any of the plants on his extensive permaculture farm in Austria. That is an option for you as well, especially if you have a good deal of acreage and prefer to let your forest garden remain more natural. But if you would like to actively enhance the health and productivity of your plants, it is wise to apprise yourself of pruning basics. Most domesticated fruit trees benefit from pruning to enhance the quality of their fruit. I am admittedly a novice in this endeavor, though I tried my hand at pruning a few apple and peach trees the last few seasons. I learned that this enterprise is as much an art as a science, and takes much practice to master. I also observed that trees are resilient and will in most cases survive even the most egregious mistakes of the beginner.
Shaping and maintaining trees and bushes when they are young promote the best form and growth from the get-go. In addition, pruning cuts heal more quickly when only young, thin branches are removed. I recommend you seek expert advice to learn how best to maintain the plants you choose, and do so early on. Excellent references for pruning techniques can be found in the resource sections of some nursery websites and on YouTube. Your local cooperative extension office can also be a resource.
I recommend that you familiarize yourself with basic pruning principles and, if possible, apprentice yourself to a more experienced friend or neighbor to learn specific techniques.
Thinning Fruit
In addition to pruning, many fruit trees benefit from annual thinning of immature fruit. Thinning can remove diseased and distorted fruits while enhancing the size and quality of those remaining. It is also a way of helping a young tree by allowing it to direct most of its energy into expanded growth rather than fruit production. Each type of fruit tree will benefit from a slightly different thinning practice; consult your nursery or another source to determine the timing and technique best suited to your chosen trees.
Tomatoes are long-season crops that prefer warm weather. Because of this, most gardeners typically need to start their tomato seeds indoors, under lights, to ensure their plants have enough time to produce a harvest within that growing season.
To keep our young, indoor plants happy and healthy, we’ll need to transplant our tomato plants into larger pots, a process sometimes referred to as “potting up”.
This will need to happen at least once before our tomato plants can finally make their way outdoors into the garden when warmer weather arrives.
When tomato plants have developed two sets of true leaves, they are ready to be up-potted. Waiting too long to transplant our tomato plants into a larger pot may risk the plants becoming rootbound.
This will stunt their growth and possibly even their future fruit production.
When you transplant your tomato plants into larger pots, be sure to bury the stem up to the first set of leaves. Roots will develop along the buried stem, producing larger and more vigorous plants.
A narrow, deep pot is perfect for this. Backfill the soil into the pot around the plant and tamp it down firmly. This ensures good root to soil contact.
Water your transplants well and they should be good to go until summer weather arrives. Then, warmer soil temperatures will signal that it’s time to relocate the plants out into the garden.
There are a few more tomato-related chores that we’ll need to consider later in the season, such as trellising and pruning. A well-trellised tomato plant holds the tomatoes are up off the ground. Collecting our fruits without having to lean over is so much easier.
And a regular pruning routine encourages airflow between tomato plants, helping to stave off disease. This means a longer harvest season.
When you transplant young tomato plants, you prevent them from becoming rootbound—and that gives them a great head start. It ensures healthy, vigorous plants and a bountiful harvest of delicious, homegrown tomatoes. And tomatoes are the ultimate summer fruit!
We asked you to tell us about your beloved livestock breeds, and you answered. Texas farmer Cathy Valle wrote in to tell us all about keeping the Texas Longhorn breed of cattle!
Almost 20 years ago, we acquired a few longhorns in order to maintain our agricultural exemptions for our ranch in Texas. Over the years, however, we have developed a profound admiration for this iconic breed.
In our experience, we have found that our Texas Longhorn cattle are aesthetically pleasing, smart, sociable and a pleasure to have around. We have learned so much from our herd that a few years ago we started a blog to share our ranching experiences as well as our knowledge of the breed.
In comparison to many other breeds of cattle, Texas Longhorns are relatively easy to maintain, hardy and disease-resistant. And as long as they have adequate nourishment and water, they can look after themselves for the most part.
This article originally appeared in the March/April 2022 issue of Hobby Farms magazine. Email us your thoughts (~250 words) and a photo of you and your livestock to hobbyfarms@hobbyfarms.com (subject line: I Love My Livestock!). We’ll publish our favorites in upcoming issues.