Categories
Beginning Farmers Crops & Gardening Farm & Garden Homesteading Permaculture Urban Farming

Say Goodbye To Peat Moss & Hello To Alternatives

If you make your own potting mix or seed-starting soil blocks, your recipe probably requires at least some peat moss. In fact, myriad gardening books and magazines still praise peat for its ability to retain moisture and improve soil texture. The ingredient certainly has its benefits, but we’d all be better served by leaving more of this natural resource undisturbed.

“If we weren’t in the state that we are with our climate, I think [using peat] wouldn’t be quite such a negative thing,” says Briana Bosch, owner of Colorado-based Blossom & Branch Farm. “But, because of the dire straits that we’re in with climate change and carbon emissions, we really can’t afford to be taking away such a massive sequester-er of carbon.”

Bosch adds, “When [peat] is harvested, it actually releases that carbon, so then it becomes a contributor.”

Going Peat-Free

With that in mind, Bosch began combing her local gardening centers for peat-free alternatives last fall. Reading the fine print on product websites and packaging was somewhat disheartening. “There’s really not a lot on the U.S. market that’s peat-free,” she says. “Part of that is because so many people don’t know to ask [for peat-free products].”

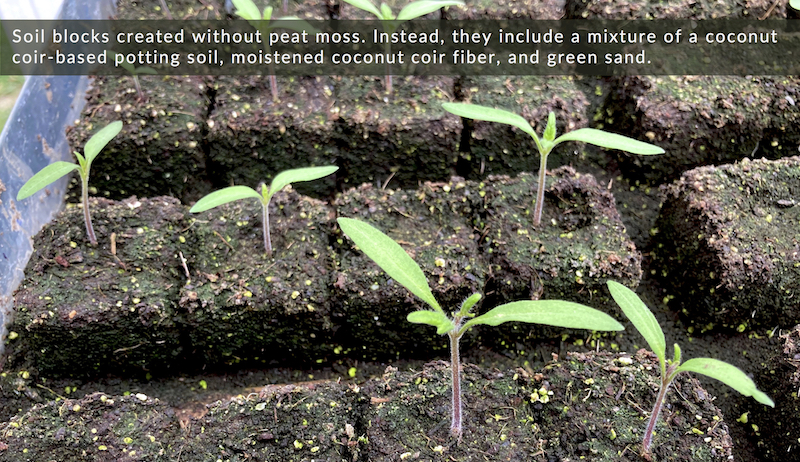
Bosch was able to find some peat-free options. She found a product called BeyondPeat at Wal-Mart, for instance. And she discovered FoxFarm’s Coco Loco potting mix, bricks of compressed coconut coir fiber and green sand.

“We just kind of grabbed a bunch of stuff off the shelves,” Bosch says. “And I said, ‘I’m going to try combining all of these things at different ratios and see if I can get a soil-blocking recipe that I’m happy with.’”

After lots of trial-and-error, she did. (She shares her peat-free, soil-blocking recipe and pointers in this video.) “We’ve had really good results with that,” she says. “But, of course, now we’re always trying to take the next step forward for sustainability. I started looking at the coconut coir, which has its own set of issues.”


Read more: Soil blocks give your plant starts a leg up.


Coconut Coir Caveat

What’s the problem with coconut coir? For starters, processing it is very water-intensive. “In its natural state, coconut coir tends to be really high in saline,” Bosch says. “Obviously, that’s not good in gardening. So, it takes a lot of water to process it to the point where we can use it.

“And water is a precious natural resource, too.”

Also, Colorado isn’t exactly teeming with coconut groves. So, the resource travels a long way to get to Bosch’s farm. As such, she began a new search for gardening ingredients with an even smaller carbon footprint.

“Every year we get more and more in depth with the sustainability piece of all this,” Bosch explains. “It’s our responsibility as growers to be cautious and mindful, because we do rely on the planet to make our living. Part of that is being responsible and taking care of [the planet] in return.”

To date, Bosch has yet to find a potting soil mix that contains neither peat moss nor coconut coir. She has experimented with rice hulls, leaf mulch and leaf mold as potential substitutes. Bosch recently changed her soil-blocking recipe again. It now includes PittMoss, a blend of recycled cellulose fiber, as a main ingredient. With the new addition, she’s been able to reduce the amount of coconut coir she uses.

“That was really intriguing, because it is material that was otherwise going to go to the landfill,” Bosch notes. “It’s OMRI-certified, so there’s nothing weird in there. It’s cellulose, and, so, its water retention is really good.

“We tweaked the [soil-blocking] recipe a little bit to make it work.”


Read more: These 3 soil conditioners are even better than peat!


Good, Better, Best

So far, the new concoction is working. However, finding a hyper-local resource that works just as well would be even more ideal. “Step one is to step away from peat moss and find something else,” Bosch says. “And then the next, even better step is just finding something recyclable like the PittMoss. And then the best thing is to find something that is in your own yard. Or something that you’re reusing from the [local] environment.”

Of course, accomplishing all that on a large scale doesn’t easily happen overnight. “Especially with big operations,” Bosch says. “If someone is scared to do a big transfer, say, ‘OK. Next season we’re going to try starting a quarter of our seeds in something that’s peat-free.’ Then tweak it if you need to.

“And then in the [following] year you can expand. One step at a time.”

Categories
Chickens 101 Farm & Garden Health & Nutrition Poultry

Is Your Broody Hen Too Young To Hatch Eggs?

Lynn was very excited about her chicken flock becoming self sustaining. She had purchased a dozen month-old pullets and a month-old cockerel in July, nurtured them through the Michigan winter, and was thrilled to gather her first eggs in March.

Her cockerel had been active long before then and, by mid-April, three of her girls had gone broody.

Lynn’s excitement about having springtime peeps, however, turned to dismay, then heartbreak. The fertilized eggs were continually crushed by the expectant mamas. As a homesteader, it was vital to her plans to be able to hatch her own chicks.

“Can I bring our hatching eggs to you?” she asked.

Knowing Lynn took homesteading seriously, I took the opportunity to guide her through the basics of hatching. She had specifically selected Buff Orpingtons, Light Brahmas and Black Cochins, all dual-purpose heritage breeds with strong tendencies towards broodiness. Lynn had also familiarized herself with the requirements for heat, humidity and egg turning … but these applied to eggs incubated in a machine, not under a hen.

Going old school necessitated my explaining three key guidelines.


Read more: Chickens can develop bad habits, and it’s up to you to train them right.


Avoid Baby Broodies

Pullets who have reached point-of-lay may be old enough to produce eggs. But this is by no means an indication that they are mature enough to set them.

These young females may feel curious or instinctively drawn to a nest full of eggs. They may even sit down on them. But, beyond this, they may not understand what is expected of them.

This is especially true if there is no older hen present in the coop to set an example for the younger girls. Because of their age—pullets are female chickens less than one year of age—these young females most likely have not reached hormonal maturity.

The hormone prolactin is crucial to the onset and maintenance of incubation behavior. Pullets simply may not be physically ready to enter a broody trance. Lynn’s pullets were 10 months old when they began showing interest in setting eggs. Their jittery uncertainty may have led to cracked or crushed eggs.

Isolate the Mamas

A broody hen needs peace and quiet in order to stay in her trance and focus on incubating her eggs. Left in the coop with her flockmates, the poor broody can be continually disturbed by other girls who (of course) must lay their eggs in the same nest box as the would-be mama.

Even worse than two or three girls cramming into the broody’s nest box to lay? Two or three broodies trying to set the same clutch of eggs.

It came as no surprise that Lynn’s hatching eggs were damaged by multiple broody girls jostling them in their eagerness to set. If you plan on using a broody hen to hatch eggs, separate her from the rest of her flock. A Rubbermaid tote or a study cardboard box placed in a safe, sheltered location such as a barn, basement or spare bathroom works quite well.

Be sure to provide plenty of shavings plus food and water, as a broody will leave the nest once or twice a day to eat, drink and relieve herself. Broody droppings tend to be foul smelling, so you’ll want to remove these to keep her nest area clean.


Read more: You can help a broody hen hatch her chicks!


Offer Oyster Shell

Layer rations are usually formulated with additional calcium to help build stronger egg shells. Since laying hens require large amounts of calcium for proper shell development, it’s always a good idea to offer a supplemental calcium source, such as oyster shell or limestone chips, to your flock in a free-choice hopper or feeder.

This is especially true when a flock consists of laying pullets that are still growing themselves. They require calcium to help their bodies reach full maturity. The supplemental calcium will strengthen the eggshells, helping them better survive being accidentally stepped on or otherwise disturbed by a broody or other flock member.

Be sure, however, that oyster shell is not offered if your flock has chicks or pullets under 20 weeks of age. High levels of calcium can adversely affect growth and cause kidney damage.

Lynn separated her broody pullets from the rest of her flock and placed each girl in her own Rubbermaid Tote. Not surprisingly, two of the pullets lost total interest in setting eggs and soon returned to the coop. The third, a now-11-month-old Buff Orpinton girl, has become fully broody on a clutch of five eggs.

Lynn is eagerly looking forward to the chicks’ arrival and to a happy future homesteading with chickens.

Categories
Equipment Farm & Garden

Farm Storehouse: 8 Products For Chickens & More

Every issue of Hobby Farms magazine, our editors search for items useful to hobby farmers, whether heavier equipment such as tractor attachments, useful tools, innovative helper items or accessories for livestock management. So take a look at the things we found that can help your farm run better or keep you and your animals safer this winter.

Roll-Out Nesting Box

The Homestead Essentials Roll-Out Nesting Box (pictured above) includes one, two or three slanted laying trays that allow eggs to roll forward and stay protected under the lid. The boxes’ slanted roofs keep hens from roosting on the roof. Price varies by size

Grasshopper Zero-Turn Mower

Grasshopper’s zero-turn mowers are built for strength and durability, while minimizing weight for agility and a light footprint. They start with robotically welded, high-grade steel tubular frame with I-beam reinforcement, then add design-matched components to a fusion-bonded, chip- and rust-resistant powder-coat. Prices vary

Pigology

PIGOLOGY: The Ultimate Encyclopedia from Princeton Architectural Press contains tons of pig facts and illustrations. $19.95 

Excelsior Poultry Pads

Excelsior poultry pads provide stable footing for newly hatched chicks or, in the nesting box, a clean place to lay eggs. Made of Great Lakes aspen excelsior fibers and brown kraft paper, the pads are completely biodegradable. Price varies   

Caddi Treat Holder

Pack fresh fruit or veggies in the body of the Caddi Treat Holder, and adjust the hanging height to keep the flock entertained. $12.99   

Sav-A-Chick Electrolyte

Add Sav-A-Chick electrolyte and vitamin supplement to drinking water during periods of stress or hot weather. It comes premeasured and ready to mix in a gallon of water. Price varies  

Airscape Bucket Insert


The BPA-free, food-grade plastic Airscape Bucket Insert now fits larger buckets and features a nitrogen port, turning any round 3-, 5- or 7-gallon bucket into bulk storage solution for coffee beans, nuts, seeds and more. The insert removes and locks out air, light and moisture. Starts at $22 

Lentil Crunchers

Farver Farms’ new snack line of Lentil Crunchers are made from lentils grown on the prairies of Montana, packaged in small batches and shipped directly to homes. Flavors include Regular, Dill Pickle and Sweet Hickory. $10  

Chick-N-Feeder 

Made of all-weather plastic, the Chick-N-Feeder is able to hang or sit on the ground and includes a scratch ring to prevent wasted food. Price varies   

This article originally appeared in the March/April 2022 issue of Hobby Farms magazine.

Categories
Equipment Farm & Garden

Historic Aerial Photo Reveals New Farm Details (& Old Fruit Trees)

Time passes, and things change—sometimes slowly, sometimes quickly. Through the years, a farm can change significantly. I can vouch for this from personal experience. My farm in northern Wisconsin has seen some buildings come and others go over the past 25 years. I’ve planted new fruit trees and watched old trees fall.

Rocky fields transitioned to blackberries, birch trees, quaking aspens and conifers. Others have been reclaimed from the teetering edge of wilderness and are now productive hayfields.

Century Farm

My farm was originally settled more than 100 years ago, and I’ve often wondered what it must have looked like decades ago. Clues can be found everywhere—in the rock piles overgrown with grass that line the edges of the field, in the rotting stumps of long-gone trees, in the obvious transitions between elderly stands of hardwood trees and the young conifers growing up around them.

But as a farm history buff, I’ve always wanted to know in greater detail what my farm looked like in the 1920s, 1930s, 1940s … etc.

Well guess what? Sometimes wishes come true! I was recently shown an aerial photograph of the area surrounding my farm, taken by airplane in the late 1930s. The resolution is surprisingly high—high enough to pick out individual trees in many cases. And my farm appears crisp and clear in the image.

Looking Back in Time

It’s remarkable to scrutinize the black-and-white photograph and effectively turn back the clock by more than eight decades. Unlike a single photograph taken at ground level, this image provides a snapshot of the entire farm from a time less than 20 years after its settling.

Examining the photograph, I can see the old farmhouse, barn and a couple of sheds right where they’re supposed to be. Interestingly, the old farm garage (now a barn) had yet to be built. And the farm pond was just a low-lying field.

The rows of coniferous windbreaks are nowhere to be found. This makes sense, since I’ve counted the growth rings on fallen specimens and dated them to the 1940s. Instead, the area surrounding the farmhouse is clearly dotted with small trees—almost certainly fruit trees. A few very old apple trees still occupy spots evident in the aerial image.

The more I study the photograph, the more revelations burst forth. I see the big sugar maples still standing proudly stand in the middle of the farm fields. They’re a bit smaller and more numerous but already at impressive sizes in the photograph. This confirms my long-held belief that they’re more than 100 years old.

Off in the corner of my farm, there are many sugar maple and yellow birch trees that—today—give the impression of being old-growth trees. The fact this corner is clearly a wooded forest in the 1930s suggests they are indeed very old trees.


Read more: Look, then plan before repairing an old pond.


A History in Fruit Trees

The impressive number of apparent fruit trees around the old farmhouse is equally interesting. They are visible in tidy rows and columns. This gives me a greater understanding of the numerous old stumps around the farmhouse.

I’ve removed many of them through the years (quite rotten), but I still remember their approximate locations. In retrospect, they ran parallel to the surviving apple trees. So the stumps likely marked the locations of old fruit trees.

You might wonder why a black-and-white photo from eight decades ago matters to my farm today. Certainly satisfying my curiosity has been fun, but there’s more to it than that.

My farm still thrives some 80 years later, but several other farms visible in the 1930s image have faded away with the passing of time. Their fields all returned to forestland and their buildings are long gone. It reiterates the specialness of living on a farm with such a long history.


Read more: These new grafting tools add excitement to the task.


History as Inspiration

Plus, seeing how the farm has changed over time inspires me to spark changes of my own. After seeing what the old farmyard orchard looked like in the 1930s, I’m intrigued by the thought of planting new fruit trees in that area. Perhaps I’ll grow heirloom varieties from that time.

I could even cut scions from the still-surviving apple trees and use grafting to propagate new specimens with the same genetics. This would potentially carry on the orchard legacy for another 100 years.

If you live on an old farm, why not conduct some research and see if you can find an aerial image from decades ago? Perhaps you can find one online or in a state library.

Turning back the clock by analyzing a historical snapshot of your farm is a fun way to spend an afternoon. And you never know what exciting details you might uncover.

Categories
Animals Breeds Farm & Garden Large Animals

Love My Breed: Babydoll Southdown Sheep

We asked, and you answered. Here’s what Babydoll Southdown shepherds wrote in to tell us about their love for the breed!

What a Face!

Babydoll Southdown sheep have been the perfect addition to our hobby farm in Minnesota. When I started looking for sheep to add to our farm, I wanted to find a breed that would do well with kids and the Minnesota weather. I found the perfect fit for us with Babydoll Southdowns.

They’re peaceful, curious, smart and hardy. On our farm, I keep them together with our Nigerian Dwarf goats and miniature donkeys, and they all get along beautifully. Along with being fuel-efficient lawnmowers, we use their wool for various projects and crafts. Their wooly teddy bear face will always give you a smile! 

Courtney Bonnin, C2 Ridge Farm, White Rock, Minnesota

Babydoll Southdown Sheep
Courtney Bonnin, Linnae Carlson

Smarter Than You Think

Babydoll Southdown sheep are the cutest, friendliest, easiest to care for breed of sheep in the United States.  Sheep are smarter than most people think they are and deeply emotional animals that recognize and remember faces. They hide their feelings because they are defenseless but will reveal themselves to be surprisingly deep to a caring shepherd.

John Fitzpatrick, Rockstair Farm, Hemet, California


Read more: Learn more about the adorable Babydoll Southdown sheep breed!


Easy-Keepers

Babydolls are easy-keepers. Most of the year, they can stay in good condition on grass or hay. They make excellent natural lawnmowers, and their short legs make it much easier to provide adequate fencing.  

Tammy Wall, Rosie’s Little Flock of Babydoll Southdowns, Central Oklahoma


Adorable!

Babydoll sheep are adorable, and they’re perfect for a hobby farm because they’re easier to work and smaller. 

We especially love our Babydoll Southdown sheep because they have the most entertaining, individual personalities! The mischievous one, the cuddler and the one that would do anything for a treat—their personalities are as unique as the family dog or cat. 

Beth Byard, Black Sparrow Ranch, McLoud, Oklahoma

Babydoll Southdown Sheep
Beth Byard

Small but Mighty

I love my purebred Babydoll Southdown sheep because it’s a smaller breed that makes it easier for me to handle, house and provide several pastures for rotating. They’re usually very docile and make great lawnmowers. These sheep are a nice all-around breed for beginners, but as with any animal, I strongly suggest a mentor if you are considering breeding. 

They grow a dense wool that requires yearly shearing, and the fleece can be used for a variety of things once you learn how to process it for your projects. The cute “smiles” aren’t so bad either! 

Susan Hurrell, Daybreak Farmstead, Upstate New York


Read more: Sheep & goats provide year-round value!


Orchard Sheep

We were looking for small sheep suitable for grazing in our orchard. As it turned out, Babydolls are the perfect orchard sheep—as long as you protect the trunks of your young trees!

They are short and squat with a low center of gravity, so they don’t like to stand on their hind legs much. So any branches above about 40 inches are quite safe from their browsing.

But even beyond being great in orchards and vineyards, we love them for so many other reasons! They are probably the most adorable sheep out there (especially the lambs), and they are such easy-keepers without a lot of the issues of larger and newer sheep breeds—the perfect beginner sheep breed!

Adam Dusen, Hundred Fruit Farm, Buckingham, Pennsylvania


They Do It All!

Babydolls do it all for a hobby farmer. Their milk is rich; it’s over half cream. It has the mildest flavor, and though only about two cups per milking is produced, it’s superior to others I’ve tasted. Their wool, though short stapled, is so soft and fine.

The meat of a Babydoll wether is unbeatable in the sheep breeds and better than even other sources of meat. The meat is literally unbeatable when you talk flavor, tenderness and leanness.  

Marylou Anderson, LT Livestock Hobby Farm, xDeSoto, Missouri

This article originally appeared in the March/April 2022 issue of Hobby Farms magazine. Email us your thoughts (~250 words) and a photo of you and your livestock to hobbyfarms@hobbyfarms.com (subject line: I Love My Livestock!). We’ll publish our favorites in upcoming issues. 

Categories
Animals Farm & Garden Large Animals

Coccidiosis Is A Deadly Sheep Parasite, Too

Recently I had the chance to pick the brain of a sheep producer who has raised sheep for more than 50 years. You know the saying, “He’ll forget more than I’ll ever know?” That’s him!

At any rate, I asked him what he saw as the biggest threat to sheeps’ health in addition to worms … which we all know and talk about.

He thought for a minute, and then said, “Well, parasites really are the biggest problem. I guess in addition to worms, there’s coccidiosis. That can be pretty bad for the sheep.”

Coccidiosis in Sheep?

I’m no stranger to the plague of coccidiosis, but had only encountered it in chickens. In chickens, it’s a terrible, fast-spreading and quick-killing disease. I’ve lost a few chicks in rapid succession once I noticed the bloody diarrhea—a sign the infection has spread to a dangerous degree.

Interestingly, the coccidia that affect poultry are not the same ones that infect sheep. It turns out there are many different kinds of coccidia. And different ones affect different animals.

What Is Coccidia?

What is coccidia? Well, it’s a single-cell protozoa that causes damage to the sheep’s intestinal system. Once one of your flock has this, the egg-shaped coccidia comes out in the animal’s feces. Like worms, the coccidia can be picked up by an animal eating off the ground where feces are present.

An adult can actually have coccidia in their intestines and not show symptoms. But, according to a ruminant specialist from the University of Maryland, lambs up to age six months are the most susceptible.


Read more: When you buy sheep, make sure the seller provides these documents.


Signs of Coccidiosis

One sign of coccidiosis in sheep: dark diarrhea, possibly containing blood or mucous. You might see a very dirty back end and tail on the young ones. Your lamb may be weak or not eat as well.

Experts often note that weaning is a particularly stressful time for lambs. They also may be more susceptible to diseases like coccidiosis during that time.

So if you see signs of some serious diarrhea in your lambs, it’s time to act–and fast. You can buy over-the-counter meds used to treat coccidiosis. But according to the Maryland ruminant specialist, they may not be approved for use in sheep.

So my advice? Call your vet! There are also other drugs that require a vet’s prescription that are very effective against coccidiosis.

The Best Treatment

The best treatment for coccidiosis in sheep, though, is prevention. By the time you notice your flock is ailing, some of the damage has already been done.

As with chickens, the best rule of thumb is to keep the housing and bedding extremely clean. Don’t feed hay on the ground where there are feces present, as this can spread other types of parasites, as well as coccidia.

Also make sure your feeders are off the ground and that none of the sheep leave feces in there as well.

Another tip? Keep your water tanks clean as well. When the tank gets low, take the time to scrub it out and make sure it’s clean as well.


Read more: Should you feed your sheep kelp meal?


Nutrition, Stress

Good nutrition goes a long way toward helping your flock resist parasites of all kinds. Feed the best grain you can (if you feed grain). And make sure hay or pasture is high quality.

Finally, from everything I’ve read, keeping stress down in your flock is essential to keeping them healthy. I know we all have to handle our sheep at some point, especially if you shear and trim hooves or vaccinate. But try to plan out your activities so that you can get the most done at one time.

For example, when we shear, we also check hooves and trim if needed. We’ll give the CDT vaccine at this time, too.

Our lambs are doing well so far. We had our first one in early April and still have a couple more ewes left to give birth. That may delay our weaning of the lambs in the entire flock as well. But we will definitely watch for signs of stress and illness when we do finally separate them.

Categories
Animals Farm & Garden Projects Video

Video: How To Make Your Own Hummingbird Food

On our farm, we’re always trying to look beyond the daily production of our landholding and see our acreage’s potential. I am particularly interested in change the nature of our farm from the traditional hayfield we purchased to add more habitat to promote the wildlife species that could potentially call our farm home.

One of the first native species we spotted here at our Texas farm was the hummingbird.

Now, I just love hummingbirds. They’re fascinating creatures and get their names from the sound their wings make when they beat them. These wings move so fast as they move or hover, they make a humming sound.

So in order to encourage these marvelous little creatures to visit our farm property, we went to town and, like many people, bought a hummingbird feeder. We also bought the traditional hummingbird food, which is purported to simulate the taste of nectar.

The problem? The hummingbirds didn’t like this food we purchased and provided for them. And, as a result, they didn’t visit the hummingbird feeder we put out for them.


Read more: Grow some green bird flower, a different kind of hummingbird plant.


Making My Own Hummingbird Food

I still really wanted these cool little birds to come sup at our homestead, though. So I set out to find a recipe the hummingbirds would enjoy. There are plenty of recipes available on the internet, books and other information resources.

But I I happened to have easy access to a recipe I knew worked, so I called up my dad and asked him what he put in his hummingbird feeder.

It turned out my dad had been given this recipe from someone else years back. Hummingbirds love the food, and it’s both inexpensive and simple to make.


Read more: Check out these 8 cool facts about hummingbirds.


Recipe

Here’s what you’ll need to make hummingbird food sure to please your hummingbird visitors.

  • 4 parts water
  • 1 part sugar

That’s it! Just mix up the water and sugar, put it in the feeder and watch the hummingbirds dine on your offering.

You may note that this mixture is clear, as opposed to the red stuff you get in the store. All I can figure is the additives that give the commercial feed its color also puts hummingbirds off the taste.

Check out the video above for more tips on how to mix homemade hummingbird feed as well as some fun footage of the little beauties who frequent our farm.

Categories
Animals Beekeeping Beginning Farmers Farm & Garden

The Bees Always Come First At On One Acre Farm

“I just love watching the bees,” says Martin Robinson, who oversees the On One Acre farm in Queensland, Australia. “Having 12 hives means there’s always bees on flowers and buzzing to and from the hives.”

Bees are an integral part of On One Acre, but the venture is also about maximizing space and respecting the land. To that end, Robinson has integrated hydroponics to combat the summer heat and extend his growing season.

We spoke to Robinson about his farming roots and how bees can really make a difference to your land. We also got into the benefits of growing baby corn.

Farming in the Genes

“I’ve always had an interest in farming, especially growing up on acreage and that’s what my family did,” reflects Robinson, as he looks back on his path to starting On One Acre. “Dad has show poultry and my parents are keen gardeners, so it’s probably in my genes.”

Robinson adds that he became hooked on farming when he was able to secure his own acreage and realized he finds “growing our own food very relaxing.”


Read more: You can plant these garden crops early in the spring.


Maximizing Your Acreage

When it comes to getting the most out of his plot of land, Robinson says that the summer Queensland heat is a significant challenge, as it limits what he can grow during that season.

“I overcame this by setting up a hydroponic system to be more water wise,” he says. “Now [I’m] able to grow more successfully all year round.”

Bees Make a Difference

When Robinson decided to add bees to his farm, he began with a single top bar beehive. The intention was to let the bees pollinate the orchard and vegetable garden.

“I found, soon after getting the bees, our yields increased each year,” says Robinson. “That’s when I knew the bees were making a difference.”


Read more: Beekeeper (and TikTok star) Erika Thompson of Texas Beeworks is all about the bees.


The Bees Come First

If you’ve been weighing up adding some bees to your own land, Robinson says that “it can be a painful hobby at times, but the rewards outweigh any pain.”

“I run by the belief the bees always come first when taking honey and leave food for them,” he adds. “If I look after the bees, they will look after me by producing more honey.”

Keeping It Fresh

Beyond the bees, Robinson says he’s particularly partial to the baby corn that he grows.

“Tasting it fresh makes you realize how good it tastes compared to anything from the shops,” he explains. “It is able to be eaten fresh straight from the garden or brought inside and put straight into a stir fry. Really, anything from the veggie gardens makes you realize how good fresh is.”

Follow On One Acre at Instagram.

Categories
Crops & Gardening Farm & Garden Food Homesteading Permaculture

Author Dani Baker Grows Edibles, Environmental Resilience With Forest Gardening Methods

Plant by plant, Dani Baker has been assembling what she calls her “Enchanted Edible Forest” for the last 10 years. “Going way back to my youth, I’ve been very into being ecologically friendly to the earth, and this technique of gardening is kind of the epitome of that,” she says.

Baker is the author of the forthcoming book The Home-Scale Forest Garden: How to Plan, Plant, and Tend a Resilient Edible Landscape. (Chelsea Green Publishing will release The Home-Scale Forest Garden later this month.) Baker’s own permaculture paradise is based in New York state and boasts hundreds of different edible fruits, nuts and flowers.

The Home-Scale Forest Garden shows readers how to grow a greater diversity of plants across the many levels that make up a forest garden. Those levels include the overstory and understory—where fruit, nut and other trees flourish—as well as shrubs, herbaceous plants, groundcovers, vines and fungi.

A Different Mindset

A traditional vegetable garden requires digging, planting, weeding, watering, fertilizing, pest management and other routine tasks year after year. For their part, edible forest gardens require plenty of work, too. Much of it entails painstaking planning and intensive effort around their initial setup.

But after that? As the (largely perennial) plantings in the forest garden become established, there isn’t nearly as much to do. “It’s not like you’re going to eliminate your labor,” Baker says. “But, for a comparable amount of land, there’s going to be a lot less labor going forward than with an annual vegetable planting—and you’re going to have a huge abundance of harvest.”

She continues, “When you landscape with edibles, you also build in other plants that support those edibles. So, you’re going to minimize your need to add any kind of amendments over time. And you’re going to minimize your need to deal with pests and disease, because of the [plant] diversity [you’ve introduced.]”

Such diversity, in turn, attracts many of the natural predators of garden pests. For instance, while certain kinds of fruit trees might attract voracious caterpillars, other nearby plantings may attract some of the very birds and parasitic wasps that feed on those caterpillars.


Read more: Starting a permaculture garden? Invest in a good shovel.


Where to Start

In The Home-Scale Forest Garden, Baker outlines more than 100 food-bearing and multi-purpose plant species. She also suggests beneficial plant groupings to accommodate different needs in the landscape. But before you know which plants and groupings might work best for you, you’ve got to study your landscape.

“Understand the different habitats that may exist there,” Baker suggests. “Take a soil sample, so you know what the qualities are of your soil. And then do your best to match plants with the type of soil and habitat that you have.”

Aim to include lots of plant diversity across each of the forest garden layers—that is the overstory, understory, shrubs, herbaceous plants, groundcovers, vines and fungi.

It’s also a good idea to think ahead about the trajectory of the elements in your existing landscaping. For example, Baker inherited a number of ash trees along a hedgerow on her property. Due to the widespread and destructive emerald ash borer, she suspects those trees eventually will die.

To plan for that likely outcome, Baker explains, “I built my own hedgerow with mostly edibles—like pecan trees—planted just adjacent and parallel to [the ash trees]. That assumes that my [newly planted] trees … will basically take the place of those ash trees once they’ve died.”

Also, rather than immediately remove dead or dying trees, Baker uses them to support vining edibles like grapes.


Read more: Prune and rejuvenate older fruit trees to give them new life.


Patience Pays Off

By their nature, annual vegetable gardens provide plenty to harvest at the end of a single growing season. That’s not necessarily the case with an edible forest garden. If you plant certain kinds of herbs or, say, strawberries, you might be able to harvest some items during your first year.

Still, as the size and diversity of your edible forest garden grows, so will the time you get to spend harvesting. “Starting in my second year, I was harvesting berries,” Baker recalls. “I started getting a little tree fruit even that early.”

Now, after years tending to so many edible perennial plantings, Baker spends much of her time simply harvesting.

How long it may take you to get to this point depends on your access to land and how much time you can devote. Don’t have much time or land? A simple foundation planting of a single tree ringed with a grouping of beneficial plants is a worthwhile start. So are a few well-placed border plants—perfect for screening out the neighbors while feeding and sheltering birds.

“These are all very simple things that people could incorporate,” Baker says. “And they would benefit them as well as the environment.”

Categories
Chickens 101 Farm & Garden Flock Talk Health & Nutrition Poultry

What’s The Average Lifespan Of Chickens, Anyway?

The weather has been somewhat wacky this spring: 80 degrees and sunny, then 30 degrees and snowy, often in the span of a single day. I should therefore not have been surprised to discover eggs in our nest boxes back in March, a good two months before our girls usually start laying. I shared a photo of our first tinted egg of the season on our social media, along with an image of Natalya, the 3-year-old blue Silkie who’d laid it.

A flurry of likes ensued, along with comments praising the little Silkie’s beauty. Amid all the praise, I spied a starkly different comment: “She’s gorgeous! Too bad you’ll have to kill her soon.”

The Commercial Concept

A common—and distressing!—misconception that some new backyard flock owners have is that hens are only useful until they are 3 years old. Once they’ve reached this landmark age, their production plummets and their value zeroes out. When your chickens have reached the end of their lifespan, so it’s best to euthanize them or use them for soup.

As shocking as this misbelief may be, it’s easy to understand where it comes from. Most commercial egg farms keep their layers until the hens reach 2 to 3 years of age. Once their laying stock reaches this age, commercial farms generally dispose of their hens, refreshing their flocks with pullets just past point-of-lay.

Because of this commercial practice, those new to chicken-keeping often assume it’s also standard operating procedure for backyard flocks. They couldn’t be more wrong.

chicken chickens hen hens lifespan lifespans live how long
Ana Hotaling

Small Flock Facts

While it’s true that a hen’s egg production begins to decline after age 3, it is by no means over. With a proper diet, plenty of fresh water, sufficient natural light and a safe living environment, a layer can continue to produce eggs for five to 10 years.

She may only lay an egg every couple of weeks, but she’ll sing her egg song as proudly and loudly as the yearlings.


Read more: Chickens can make a lot of noise. Here’s a quick guide to what they may say.


Lifespan Factors

Many factors affect the lifespan of a chicken. Poor nutrition plays a key role in a hen’s longevity. If not fed a layer ration specifically formulated with the percentages of protein and calcium needed for proper egg production, a hen will draw these building-block nutrients from her own body’s reservoirs, directly impacting her health.

Similarly, continual egg production can negatively impact the lifespan of chickens. Even if fed a nutritious layer ration, daily or near-daily production exhausts and depletes a hen, causing caged-layer fatigue. Allowing laying hens to rest and recuperate during the shorter daylight months can help extend their lives.

Other factors that affect a hen’s lifespan include a safe, clean living environment; poultry illness and parasites; the presence of predators; and the type of chicken she is.

Production hybrids will typically have a shorter lifespan than dual-purpose and heritage breed chickens.


Read more: You can keep the eggs going in winter with some supplemental light.


How Long Can Hens Live?

Given a safe, clean and stress-free living environment, with winters off to rest and replenish their bodies, and plenty of nutritious food and clean water, hens can live as long as eight to 10 years … and quite possibly longer. According to the Guinness Book of Records, the record for world’s oldest chicken is held by Muffy, an American Game bantam who died at the age of 22.

Natalya, being only 3, hopefully has many years ahead of her. She has homegrown inspiration: She shares a coop with Butters, our Spangled Orpington girl, who hatched here on June 30, 2015, and will be 7 next month.

Our grand dame, Dolly Ameraucana, lives in the next coop over. Dolly will be 10 this June, and she is every bit as spry as her daughters Harriet and Laetitia, whom she laid and hatched at the ripe old age of 6.