Categories
Crops & Gardening Farm & Garden Food Homesteading Permaculture

Author Dani Baker Grows Edibles, Environmental Resilience With Forest Gardening Methods

Plant by plant, Dani Baker has been assembling what she calls her “Enchanted Edible Forest” for the last 10 years. “Going way back to my youth, I’ve been very into being ecologically friendly to the earth, and this technique of gardening is kind of the epitome of that,” she says.

Baker is the author of the forthcoming book The Home-Scale Forest Garden: How to Plan, Plant, and Tend a Resilient Edible Landscape. (Chelsea Green Publishing will release The Home-Scale Forest Garden later this month.) Baker’s own permaculture paradise is based in New York state and boasts hundreds of different edible fruits, nuts and flowers.

The Home-Scale Forest Garden shows readers how to grow a greater diversity of plants across the many levels that make up a forest garden. Those levels include the overstory and understory—where fruit, nut and other trees flourish—as well as shrubs, herbaceous plants, groundcovers, vines and fungi.

A Different Mindset

A traditional vegetable garden requires digging, planting, weeding, watering, fertilizing, pest management and other routine tasks year after year. For their part, edible forest gardens require plenty of work, too. Much of it entails painstaking planning and intensive effort around their initial setup.

But after that? As the (largely perennial) plantings in the forest garden become established, there isn’t nearly as much to do. “It’s not like you’re going to eliminate your labor,” Baker says. “But, for a comparable amount of land, there’s going to be a lot less labor going forward than with an annual vegetable planting—and you’re going to have a huge abundance of harvest.”

She continues, “When you landscape with edibles, you also build in other plants that support those edibles. So, you’re going to minimize your need to add any kind of amendments over time. And you’re going to minimize your need to deal with pests and disease, because of the [plant] diversity [you’ve introduced.]”

Such diversity, in turn, attracts many of the natural predators of garden pests. For instance, while certain kinds of fruit trees might attract voracious caterpillars, other nearby plantings may attract some of the very birds and parasitic wasps that feed on those caterpillars.


Read more: Starting a permaculture garden? Invest in a good shovel.


Where to Start

In The Home-Scale Forest Garden, Baker outlines more than 100 food-bearing and multi-purpose plant species. She also suggests beneficial plant groupings to accommodate different needs in the landscape. But before you know which plants and groupings might work best for you, you’ve got to study your landscape.

“Understand the different habitats that may exist there,” Baker suggests. “Take a soil sample, so you know what the qualities are of your soil. And then do your best to match plants with the type of soil and habitat that you have.”

Aim to include lots of plant diversity across each of the forest garden layers—that is the overstory, understory, shrubs, herbaceous plants, groundcovers, vines and fungi.

It’s also a good idea to think ahead about the trajectory of the elements in your existing landscaping. For example, Baker inherited a number of ash trees along a hedgerow on her property. Due to the widespread and destructive emerald ash borer, she suspects those trees eventually will die.

To plan for that likely outcome, Baker explains, “I built my own hedgerow with mostly edibles—like pecan trees—planted just adjacent and parallel to [the ash trees]. That assumes that my [newly planted] trees … will basically take the place of those ash trees once they’ve died.”

Also, rather than immediately remove dead or dying trees, Baker uses them to support vining edibles like grapes.


Read more: Prune and rejuvenate older fruit trees to give them new life.


Patience Pays Off

By their nature, annual vegetable gardens provide plenty to harvest at the end of a single growing season. That’s not necessarily the case with an edible forest garden. If you plant certain kinds of herbs or, say, strawberries, you might be able to harvest some items during your first year.

Still, as the size and diversity of your edible forest garden grows, so will the time you get to spend harvesting. “Starting in my second year, I was harvesting berries,” Baker recalls. “I started getting a little tree fruit even that early.”

Now, after years tending to so many edible perennial plantings, Baker spends much of her time simply harvesting.

How long it may take you to get to this point depends on your access to land and how much time you can devote. Don’t have much time or land? A simple foundation planting of a single tree ringed with a grouping of beneficial plants is a worthwhile start. So are a few well-placed border plants—perfect for screening out the neighbors while feeding and sheltering birds.

“These are all very simple things that people could incorporate,” Baker says. “And they would benefit them as well as the environment.”

Categories
Chickens 101 Farm & Garden Flock Talk Health & Nutrition Poultry

What’s The Average Lifespan Of Chickens, Anyway?

The weather has been somewhat wacky this spring: 80 degrees and sunny, then 30 degrees and snowy, often in the span of a single day. I should therefore not have been surprised to discover eggs in our nest boxes back in March, a good two months before our girls usually start laying. I shared a photo of our first tinted egg of the season on our social media, along with an image of Natalya, the 3-year-old blue Silkie who’d laid it.

A flurry of likes ensued, along with comments praising the little Silkie’s beauty. Amid all the praise, I spied a starkly different comment: “She’s gorgeous! Too bad you’ll have to kill her soon.”

The Commercial Concept

A common—and distressing!—misconception that some new backyard flock owners have is that hens are only useful until they are 3 years old. Once they’ve reached this landmark age, their production plummets and their value zeroes out. When your chickens have reached the end of their lifespan, so it’s best to euthanize them or use them for soup.

As shocking as this misbelief may be, it’s easy to understand where it comes from. Most commercial egg farms keep their layers until the hens reach 2 to 3 years of age. Once their laying stock reaches this age, commercial farms generally dispose of their hens, refreshing their flocks with pullets just past point-of-lay.

Because of this commercial practice, those new to chicken-keeping often assume it’s also standard operating procedure for backyard flocks. They couldn’t be more wrong.

chicken chickens hen hens lifespan lifespans live how long
Ana Hotaling

Small Flock Facts

While it’s true that a hen’s egg production begins to decline after age 3, it is by no means over. With a proper diet, plenty of fresh water, sufficient natural light and a safe living environment, a layer can continue to produce eggs for five to 10 years.

She may only lay an egg every couple of weeks, but she’ll sing her egg song as proudly and loudly as the yearlings.


Read more: Chickens can make a lot of noise. Here’s a quick guide to what they may say.


Lifespan Factors

Many factors affect the lifespan of a chicken. Poor nutrition plays a key role in a hen’s longevity. If not fed a layer ration specifically formulated with the percentages of protein and calcium needed for proper egg production, a hen will draw these building-block nutrients from her own body’s reservoirs, directly impacting her health.

Similarly, continual egg production can negatively impact the lifespan of chickens. Even if fed a nutritious layer ration, daily or near-daily production exhausts and depletes a hen, causing caged-layer fatigue. Allowing laying hens to rest and recuperate during the shorter daylight months can help extend their lives.

Other factors that affect a hen’s lifespan include a safe, clean living environment; poultry illness and parasites; the presence of predators; and the type of chicken she is.

Production hybrids will typically have a shorter lifespan than dual-purpose and heritage breed chickens.


Read more: You can keep the eggs going in winter with some supplemental light.


How Long Can Hens Live?

Given a safe, clean and stress-free living environment, with winters off to rest and replenish their bodies, and plenty of nutritious food and clean water, hens can live as long as eight to 10 years … and quite possibly longer. According to the Guinness Book of Records, the record for world’s oldest chicken is held by Muffy, an American Game bantam who died at the age of 22.

Natalya, being only 3, hopefully has many years ahead of her. She has homegrown inspiration: She shares a coop with Butters, our Spangled Orpington girl, who hatched here on June 30, 2015, and will be 7 next month.

Our grand dame, Dolly Ameraucana, lives in the next coop over. Dolly will be 10 this June, and she is every bit as spry as her daughters Harriet and Laetitia, whom she laid and hatched at the ripe old age of 6.

Categories
Podcast

Episode 29: Fatuma Emmad


Fatuma Emmad

Farming, political science and the food system intersect for Colorado farmer, organizer and professor Fatuma Emmad, the guest on this episode of Hobby Farms Presents: Growing Good. Hear about how her family’s immigration and emigration shaped her understanding of the food system and how that led her to become a farmer herself, now at FrontLine Farming in Denver, Colorado.

You’ll learn how Mile High Farmers, a coalition of 60-plus farmers and supporters, connects eaters and farmers with events and education in health and wellness, racial equity, marketing, land and policy. (Fatuma is president of this nonprofit.) Fatuma also talks about the farming work and food justice work being done at multiple farm sites for FrontLineFarming, including food access initiatives, a paid apprenticeship program and their own search for farmland.

Also learn about the ways farm workers are being supported with Project Protect Food Systems Workers, and take some advice on keeping foodways alive through seed saving.


Categories
Animals Beekeeping Farm & Garden

The Business Of Beekeeping At Montana’s Smoot Honey Co.

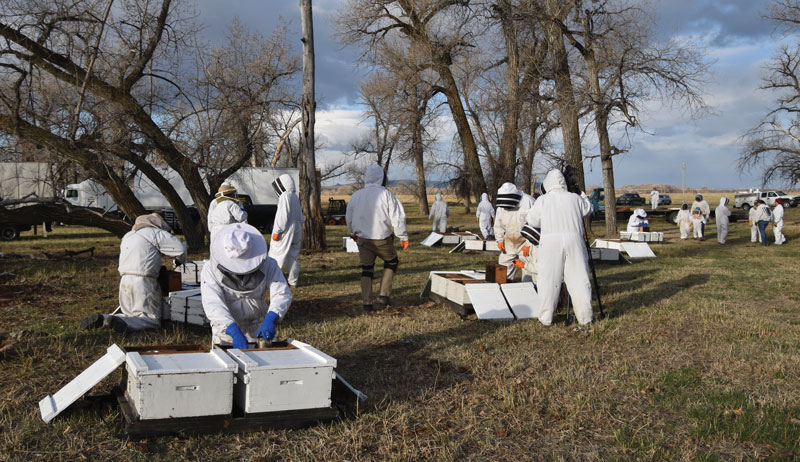
Watching the semi-truck driver skillfully wind through mature cottonwoods along the river bottom, there was an unmistakable focus. A corny person might say that the mood was abuzz with excitement. Some 1,800 honeybee packages awaited their summer home, ready to be tucked into the new hives before the spring weather changed for the worse.

For this hobbyist beekeeper of well over 20 years, helping a commercial operation such as Smoot Honey Co. in Power, Montana, was an eye-opening experience. Single hive bodies in groups of four sat ready at the first bee yard. As the stacks of 2-pound packages of honeybees lifted off the truck, the crew, most of us donned in white bee suits, divided into two groups.

The first group, which I chose, unstrapped the hives, removed the lids and put the packages out for each of the hives.

Even wearing the bee suit, grabbing a row of bees, particularly the “fuzzy” ones with escapees clinging to the outside of the wire, and holding them to my mid-section initially required a deep breath. But it didn’t take long to fall into the rhythm and not give it a second thought.

We placed a package on each hive, four per group, quickly unloading the entire pallet.

This installing group had its own rhythm, prying up the feeder can and removing the queen cage. When I install packages at home, I typically add a piece of marshmallow to replace the plug of the queen’s cage. But in this smoothly honed operation, they smeared a bit of honey and wax in its place.

Then they set the queen cage on the feeder can. They placed this in the corner of the hive.

They then dumped the bees in the hive, set the package inside and replaced the lid. Despite the added steps to their process, my group could not dawdle and stay ahead of them.


Read more: Ready to buy bees or expand your hive? Here’s how to make the purchase.


Expert Advice

Smoot veterans, employees and friends who’ve been part of this spring dance for decades generously and kindly explained how and why they do things a certain way. There was a distinct sense of camaraderie, even for a newbie.

This is, of course, serious business. But there was still a fair amount of humor, particularly when someone was stung.

Beekeepers are just like that. 

After installing roughly 1,800 hives in three bee yards over four hours—done before the predicted snowfall—my takeaway impression was that it’s like an Amish barn raising, but with more than a million lives at stake. At the end, enjoying the satisfaction of good work, we celebrated with a piece of date cake from their grandmother’s recipe. 

Tradition in a Changing Industry

I also walked away with a greater appreciation for what they do and how they do it. Each year, Smoot Honey typically tends more than 4,500 hives spread over 5,000 square miles, producing close to 600,000 pounds of honey.

There are undoubtedly larger operations in Montana. But Smoot Honey is well-known throughout the region. They’re still closely tied to the national scene, however, when it comes to honey production and the health of the industry. 

honeybees honey Smoot

In the Beginning…

The economic and natural landscape looks differently than when Smoot Honey began in 1964 after Don Smoot and his father, Boyd Smoot, bought the business. In 1996, Don decided to retire so he asked his son, Dan; nephew, James Rehm; and son-in-law, Mark Jensen, to “try it for a year.”

To this day, Jensen and Rehm still helm the operation. 

While they’ve modified their operation as needed, they follow how northern beekeepers used to manage apiaries. Instead of traveling to pollinate orchards in California and other regions, they start with new bees every spring. As long as it works, they’ll continue in this direction.

But outside forces do impact them. 

“A lot of it is due to a shift in farming practices,” Jensen says. “When it’s all sunflowers, soybeans, canola or wheat as far as the eye can see, it doesn’t leave much for the bees.”

Reduced Forage

Mark says there has been more CRP land pulled out of production when grain prices were good. This, in turn, reduces forage for the bees. But there are also some excellent incentives for producers to plant for pollinators through national farming policies.

Plus, organizations like Pheasants Forever work with farms to provide habitat for the birds. This ultimately helps bees.

The second piece that has changed significantly is the presence of the varroa mites beginning in the 1980s. Realistically, beekeepers—whether hobbyist or on a commercial scale—must deal with the mites or likely lose their hives.

This is where Smoot Honey was almost ahead of the game from the beginning. Because it is difficult to winter over hives in northern climates, it was standard practice to gas the bees in the fall and buy new packages in the spring.

As this practice shifted, Smoot Honey found a new market for the honeybees in the fall.

“Around 1990, we started to sell the shake hives in the fall,” Jensen says. “My father-in-law would buy packages for $12 and sell them for $4. The shakers (beekeepers buying the hives) would travel and do all the work.

“We’re still doing the same thing.” 

The good news? The market for bulk bees has grown steadily since the early 2000s, particularly because many large commercial operations switched from primarily honey production to almond pollination. Smoot Honey is able to sell their hives in the fall to offset the cost of spring packages.


Read more: Learn more about the importance of seasonal nectar flow.


The Year in the Bee Yards

The market to buy bees in the spring is challenging some years, depending on how the bees overwintered.

“We have standing orders with different folks,” Jensen says. “Deals between beekeepers are generally done with a handshake, although it’s getting less and less that way.” 

He explained that it’s a balancing act to source their bees. If a particular apiary is accidentally sprayed by agricultural chemicals or is wiped out because of an environmental situation, it’s extremely difficult to find thousands of packages of bees at the last minute. 

Smoot Honey brings in many of their bees from California beekeepers they’ve worked with for years. Almond orchards and honeybees are mutually beneficial to each other.

Obviously, the honeybees enable almond pollination, but the bees also thrive on the nutritious almond pollen. This gives the colonies a boost, growing to a number that allows the beekeepers to split the hives and sell packages to hobbyists and professional beekeepers. 

Buying Bees Local

To further mitigate the risk posed by traveling from California to Montana in the early spring, Smoot Honey also purchases packages from a Montana apiary. “It’s gotten to where it’s not all the eggs in one basket,” Jensen says. 

He notes they also lease semi loads of bees to increase their overall honey production. “Lots of guys don’t have honey territory like we do. And we need more production but don’t have to buy 400 hives. We put them in areas where it’ll produce early.”

Around Memorial Day, they’ll have a truck arrive with 480 hives, which is the average semi load, and put them on land they use near the Smith River. Because the leased bees are already established in hives, they produce honey right out of the gate. The Smith River tends to be an area with a single solid bloom period, which allows them to put up a lot of honey before preparing to go to California for the winter.

Mitigating Challenging Conditions

One advantage of starting with new packages every spring and selling them in the fall: They can leave their hives out longer to produce more honey. Many other commercial beekeepers wrap up their season early in order to prepare them for their journey to warmer climes. But Smoot continues production until late September or even mid-October, depending on the weather. 

“We have a longer season because we’re not treating for mites,” Jensen says. “This year we were done on Oct. 3. In 2019, we were done on Sept. 26, and the next day it snowed 18 inches.”

Even so, honey production has decreased over the years. “The average we produce is 105 pounds per hive,” he says, continuing that in the 1980s and ’90s, the honey harvest would range between 100 to 150 pounds per hive.

Now, many producers are happy with 55 pounds.

Smoot Honey typically harvests between 550,000 to 600,000 pounds of honey each season, which varies depending on the occurrence of late snowstorms, fires, drought, grasshopper invasions or any other matter of agricultural hurdles. “We’re farmers; that’s how we roll,” he says. 

The Beauty of Buying Local 

Smoot packages half of the honey for commitments to statewide businesses. These include Great Harvest Bread Co. in Great Falls, which regularly wins awards with their honey-based bread, as well as other local bakeries, brewing companies and Daily’s Premium Meats, which has partnered with Smoot Honey since the 1980s. 

Local Favorite

Beyond being a key ingredient in local products, central Montana residents find Smoot Honey in grocery stores or by visiting their storefront in Power. In typical Montana fashion, you write your own receipt and leave a check or cash. 

The rest of the honey goes to commercial packers. But the prices add to the industry’s challenge. “Imports have been killing us for 20 years,” Mark says. 

China is the world’s largest producer of honey, but they don’t always play fair.

Years ago, China and Argentina dumped honey, including rice syrup mixed into the product and labeled as honey, on the world market. And while duties and embargoes are in place to slow down the situation, the countries are known to ship the “honey” to India, or another country, where they label it from that particular country.

With a worldwide shortage, inferior “honey” enters the system. 

honeybees honey Smoot

Keep Going

Even with some many challenges, Smoot Honey prepares for another season. “Beekeepers are very resilient,” he says. “As an industry we’ve been pretty good about adapting. You figure out how to keep going.” 

Jensen was 25 when his father-in-law asked him to consider joining the family business. “Giving it a year” led to a lifelong career where family and friends work together. With his nephew working as the fourth generation in the business, there’s hope to continue the family business. But like everything in agriculture, nothing is a sure thing. 

“It’s still a good way of life, but the cliff is closer than it used to be,” Jensen says. 

In the meantime, Smoot Honey is gearing up for the upcoming season when everyone will be back in the bee yards, undoubtedly racing the snow, and hoping for a very good year. 


More Information

To Bee of Service 

You don’t have to keep bees to help bees. One way we can do our part to remedy the current situation is to buy local. If a regional honey isn’t available, at least read the label to make sure it’s from the United States. 

Smoot Honey’s co-owner, Mark Jensen, also comments on how anyone can plant for pollinators. Last year at Smoot Honey headquarters, they planted a small plot of a pollination mix that blooms from spring to fall. 

“It was cool,” Jensen says. “In July, we had I don’t know how many species of bumble­bees. It was nuts. It was alive with flying creatures.”

Everyone can do this to benefit their local bees.

This article originally appeared in the March/April 2022 issue of Hobby Farms magazine.

Categories
Equipment Farm & Garden Homesteading Projects

Add A Farmhouse Porch Swing For Seasonal Fun

Having worked my way through nine seasons of Little House on the Prairie, I recently decided it was time to try out its iconic 1970s rival: The Waltons. I quickly learned that despite amusing overlap in character actors and plot lines, there were some significant differences between the two shows as well.

Most importantly: The Waltons had a porch swing.

Now, the Ingalls’ lack of a porch swing could likely be attributed to the lack of a front porch on their little house on the prairie. The Waltons’ home (recycled from Mayberry R.F.D., by the way) boasted an expansive veranda with ample space for a charming porch swing. The Walton family spent plenty of hours on that porch swing, and it became an iconic piece of television memorabilia.

In 2015, the owner of the swing sold it to Warner Brothers for an undisclosed sum. The proceeds benefited a children’s residential treatment center.

That’s a lot of enthusiasm for a porch swing! And why not? A porch swing is a staple of farmhouse life, as integral to the framework of the home as window boxes and apple pies.


Read more: Harvest fruit faster with this advanced fruit-picking bucket!


Meet the Swing

There’s something comforting about a porch swing—the coziness, the peaceful rhythm drifting back and forth like a rural lullaby sung to the song of the stars and the moon and the peepers.

Any farming or agricultural pursuit requires a lot of time outside. And a lot of those hours involve fighting the elements.

We work in the weather all the time, but we don’t spend enough time just enjoying the outdoors. So when we do find some downtime, what better place to go than the porch swing? 

Seat of History 

The porch swing, it seems, didn’t really exist prior to the 1880s. By 1900, newspapers advertised porch swings along with hammocks as tools for combating the dog days of summer. In those days, you could snag a porch swing for $3.75.

The Lewisburg Journal in Pennsylvania described the new-fangled porch swing in their June 15, 1900 issue. “A large seat suspended by stout reliable ropes. Hung from the ceiling of porch or the limb of tree. [Won’t] disarrange one’s clothes and hair like the hammock. They are comparatively new. We will show them in town for the first time.”

(Historical note: In those days, the swings were described as “2-passenger,” as opposed to “2-person” or “2-seater” as they’re known today.)

By 1910, you could purchase porch swings in any manner of styles and materials. And free installation was a popular marketing technique of the time. “[Hanging the swing is] not the easiest task in the world,” read an advertisement in The Indianapolis Star in 1909. “We supply the chain and hang every swing bought of us,” it added. 

In 1913, syndicated columnist George Fitch penned a widely circulated article entitled “The Porch Swing” that compared the charms of the porch swing versus that of the automobile.

“A porch swing can be bought on installments like the automobile, but the buyer does not have to mortgage his home in order to do it.” 

A Timeless Classic

By the 1950s, however, porch swings had fallen out of fashion as American lifestyles evolved. Still, the porch swing remains an icon of the South. Not that northern inhabitants dislike porch swings. But those in southern climates have the opportunity to utilize their porch swings for far more of the year than their northern neighbors.

While a December night might be splendid for porch swinging in South Carolina, the same swing would most likely be covered in a foot of snow in Minnesota—not exactly conducive to small talk and secrets.


Read more: Add these 20 homesteading skills this year!


The Nuts & Bolts 

A porch swing is a porch swing, right? Not so fast!

You can have a hanging porch swing, which is suspended by chains from the joists of the porch ceiling. Or you can choose a freestanding porch swing that has a frame and a canopy overhead.

There are advantages to the freestanding swing. You can move it around if you decide you prefer a different location. Plus it’s a safe alternative if your porch ceiling isn’t secure enough to support a hanging swing. 

But there’s something decidedly traditional about a hanging swing, with its thick chains or rope and permanent location on your porch. 

Materials Matter

A porch swing can be crafted from a variety of materials. Wood is obviously a classic choice, but metal, plastic or wicker are also options. Your choice of material will reflect your priorities in terms of durability, comfort and aesthetic. 

Aluminum porch swings are durable but a bit light and might bang around somewhat in windy conditions. The same can be said for wicker and some light plastics. Swings made of quality HDPE (high density polyethylene), however, are heavier and may rival wood for sturdiness. 

Wrought iron swings have a classic look and are much heavier than aluminum but may not be the most comfortable swing unless cushions are added. Wrought iron is also susceptible to paint chipping. In the end, your porch swing will probably become a cherished piece of family furniture with plenty of memories surrounding it, regardless of the material you choose.

farmhouse porch swing wood
Daniel Johnson
Would Wood Work?

It’s worth looking a bit more closely at the various wood types that can be used for a swing. Strong, durable woods such as cedar, cypress or teak are perennial favorites for outdoor furniture, including porch swings.

These woods tend to be naturally rot-resistant when exposed to the elements. This gives them a long outdoor lifetime. 

Cedar and cypress will turn a pleasing gray over time if left natural, although you can stain them as well for a different color and for added protection.

Cedar, in particular, has that awesome pleasant scent that everybody seems to love. It also has some insect-resistance.

Cypress performs well in applications where it doesn’t touch the ground—so it can be just right for a porch swing project.

Teak can be an expensive wood, but might be worth the cost because of its natural water-resistant oils, along with the fact that it continues to darken to an attractive brown over time. 

If cost is a factor, or you’d just like to keep things simple, you can always opt for pressure-treated pine, leaving the wood natural or painted/stained. Treated pine has a very long lifespan, even in an outdoor setting. A swing in the fairly protected environment of your porch may last even longer.

However, pine is a softwood and may damage easily from nicks and bumps.

Safety First!

Always keep safety in mind when it comes to installing your porch swing. Carefully follow the manufacturer’s directions for assembly and installation, paying special attention to the necessary requirements for safe hanging from your porch ceiling. Your ceiling joists will need to be of sufficient size (2-by-8 is commonly recommended) to support the weight of your swing when it’s occupied by two or three people. 

You’ll also need to invest in the appropriate heavy-duty hanging hardware so that your porch swing can hang safely and securely. If you opt for a DIY porch swing rather than one from a manufacturer, you can find step-by-step instructions online that explain all the specifics and considerations for safely installing your swing. 

You certainly don’t want the swing to somehow come free and crash down, especially when people are using it, so always prioritize safety and correct installation. Also, always consider the specific weight capacity of your particular swing. This figure will vary.

DIY Tips

Porch swings are the stuff of Hallmark movies (so romantic!). And making one yourself can be a real labor of love.

But there is just something nice about a manageable-but-large project such as a porch swing that appeals to the DIY nature of many people. If the thought of constructing your own wooden porch swing appeals to you, keep the following tips in mind.

farmhouse porch swing wood paint
Daniel Johnson
Get Help If You Need It

Not everyone has a carpentry background. While a porch swing certainly isn’t the most difficult project in the world, a project like this needs to be of sound construction.

You might enlist the help of a friend or relative with carpentry skills. They’ll probably jump at the chance to work on something fun like this. 

Use Rust-Resistant Hardware 

Be sure to purchase exterior-grade screws, hooks, chains and other metal hardware for your porch swing that won’t rust or degrade and will look fantastic.

Use a Plan

If you don’t have experience designing furniture, research plans that are already tried-and-true. You might also want to avoid getting too fancy with an initial DIY project. Save the graceful curving armrests for a future project! 

Finishing Touches

Once your new porch swing is installed and ready to go, you’ll probably still want to add a couple of finishing touches to make the final product picture-perfect. Some of these might include:

Upholstered Cushions

Comfortable though the porch swing may be on its own, a nice selection of outdoor-safe upholstered cushions will help make it even more relaxing. Plus, you can utilize attractive patterns to upgrade your outdoor space and interesting colors to compliment your home’s exterior. 

Musical Instruments

They knew all about simple pleasures in the old days—just think of Andy Griffith sitting on the porch and casually strumming a guitar.

If you’re looking for your own taste of Mayberry, consider adding a guitar, harmonica, kalimba or other portable musical instrument. See who shows up for the outdoor concert!

Porch Swing Beverages

It almost goes without saying that you’ll be most likely using your front porch on warm days and evenings. A nice pitcher of icy lemonade, sweet tea or a couple of cans of soda will add the perfect finishing touch to this wonderful setting.

And if the weather does cool off, you can always swap them out for coffee and hot chocolate! 

With a swing in place, your porch will become an idyllic hub for family gatherings, reminiscent of the olden days and a gentle reminder to slide into a slower pace of life. Perfect for breezy days and evenings filled with the chirps of crickets, this simple addition to your home will soon grow into a centerpiece of sentiment and solace. 


More Information

Porch Gliders

Similar to the porch swing, the porch glider is a stationary unit that you don’t have to suspend from above. The relaxation benefits are the same as the swing, with greater ease of setup. Plus you can move a glider around more easily. 

No front porch? No problem! Place your porch glider in any suitable location with a good view and glide into some downtime.

Extra Tip

Porch swings need more space than you might think. It’s more than just the physical size of the swing. Whether it’s 4- or 5-feet-long doesn’t matter much). You have to factor in the necessary vacant space around the swing (2 to 4 feet on all sides).

You’ll hang your porch swing so that it’s approximately 18 inches off of the ground—just the right distance to make swinging comfortable for everyone. 

This article originally appeared in the March/April 2022 issue of Hobby Farms magazine.

Categories
Equipment Farm & Garden

5 Features To Consider When Buying A Tractor Grapple

One of the most useful and versatile attachments a tractor can utilize is a grapple. Mounted in place of the bucket on a front-end loader, a grapple is essentially a claw with hydraulically-controlled jaws that open and close. They grab hold of materials not so easily scooped with a bucket.

Think about it. A bucket is great for handling loose materials like dirt and compost.

But try to pick up a brush pile with a bucket, and you won’t get very far. Front forks might fare a little better. But they can’t grip items the way a grapple can, so you run the risk of dropping some (or all?) of your load during transport.

You can use grapples in many ways. Depending on the design, they can perfectly pick up branches, brush, logs, boulders and more. They can dig up roots, rocks and small trees. Some models even combine a bucket with a grapple so you can have the best of both worlds.

But as implied, you will run across many types of grapples. Figuring out which one you need isn’t always easy. While names can help (a brush grapple does great with brush, a root grapple digs roots well, etc.), you won’t necessarily find standardized differences between each type.

Therefore, rather than focus too much on names, we’ll highlight a few of the key features to consider when shopping for a grapple.


Read more: Check out these 4 helpful, unusual tractor attachments.


How much does the grapple weigh?

Grapples can be heavy, so consider the weight of the implement and strength of your tractor before making a purchase. Buying a powerful, heavy-duty grapple won’t do you much good if the grapple takes up a big portion of your tractor’s lifting capacity.

What is the width of the grapple?

The width of the grapple is an important factor. The wider the grapple, the more brush and debris it can grab hold of at once. On the other hand, you may find a narrow grapple lighter and more maneuverable, while focusing its strength into a smaller area. So bigger isn’t always better.

Depending on the size and strength of your tractor, a narrow grapple might actually carry more than a wide grapple. The narrow grapple probably weighs less and leaves more lifting capacity for the lead itself.


Read more: Make sure you respect your payload and towing limits.


How many lids does the grapple have?

If you opt for a wide grapple, you’ll want to consider how many lids it has. A lid is the upper jaw of the grapple, which bites down toward the lower jaw to pin loads in place. In many cases, you’ll just need a single lid.

But if you have two lids that adjust independently of each other, they can provide a tighter grip on misshapen loads by individually biting down as much as needed to secure a grip.

How long are the grapple teeth?

The length of the teeth on a grapple is a factor in determining its intended use. Long teeth can do great at digging into the ground for removing roots and rocks.

Consider also whether the teeth are replaceable, since teeth used for digging are bound to suffer significant wear and tear over time.

Is the bottom jaw a bucket?

We mentioned earlier that picking up brush with a bucket isn’t so easy, but if the bucket is part of a grapple, then all bets are off. Add a lid or two to help pin debris into the bucket, and you can securely move a load while also benefiting from the impermeable nature of the bucket.

It won’t let small pieces of debris fall through the way an open grapple will. Of course, if you want dirt, small rocks and such to pass through, an open design might do better.

One thing is certain—a tractor armed with a grapple is a brush-clearing force to reckon with, no matter which type you wind up buying.

Categories
Animals Farm & Garden Large Animals

What To Watch For When Checking Cattle On Pasture

“Is he blind?” I quizzed curiously. “I’m not sure. He might have gotten poked by a tall piece of grass,” my husband answered from the driver’s seat on one of the first trips out to the pasture to check the newly turned-out cattle. 

We somewhat haphazardly bounced through the rocky parts of a Flint Hills pasture in the late afternoon. We carefully counted the random bunches of cattle, watching for any injuries or ailments that might have popped up since they were turned out a few days earlier. 

Mineral Matters

The pickup was loaded with multiple sacks of mineral, picked up from a local feed mill. We distributed this at the various mineral feeders stationed throughout the pastures. 

We put out this mineral via a medicated feed made specifically for cattle on pasture. It helps to encourage good weight gain and keep the herd healthy. Some of the ingredients used in one particular blend of mineral feed include calcium, salt, magnesium, potassium, copper, cobalt, iodine, zinc and a variety of vitamins. 


Read more: Minerals are important, but be careful when providing them to livestock.


Head Count

We check the cattle throughout the summer, usually at least once a week. Sometimes it’s a fairly quick trip out there; other days it seems to take forever to get the right count. Even if you’re off by just a couple, that’s reason enough to necessitate a drive through the whole herd again and to search until you find the strays.

They might have been down in a draw by themselves or just tucked in the shadow of another steer. 

When we finally reach the right count, we drive through again and look at each animal to see if anything out of place catches the eye. To a less experienced person, the cattle can all look the same. “Yep, four legs and a tail! Looks great!”

But to the seasoned cattlemen in the truck, just a cloud in the eye, change in the gait, or strange look to the manure can raise a red flag. 

While we aren’t going to discuss how to treat all of these ailments, we’ll at least run through some of the most common ones we find in our cattle out in the pasture.

Eye Problems

You can sometimes tell that a steer has an eye issue by their behavior. If they’re blind or the eye really bothers them, they will sometimes go off by themselves, away from the rest of the herd.

My brother-in-law, Kordell Krispense, explained that the eye might weep and the steer will generally hold his head out and turn the injured eye upwards towards the sky. Sometimes he will even squint.

If the eye has more of a cloudy look and isn’t weeping, it’s generally scar tissue from a past injury that you see. 

Pinkeye is another condition that can plague cattle. This bacterial infection of the eye can be spread from cattle that already carry it to others in the herd, often via flies. While usually treatable, it can cause inflammation and, in some cases, even temporary or permanent blindness.

If one steer appears to be infected with pinkeye, treat it quickly before it spreads to others in the herd. 


Read more: How to protect and treat cattle against pinkeye.


Lameness or Limping

Depending on the severity of the injury, limping can be one of the easiest things to spot as you drive through the pasture. Some cases might be due to a steer rough-housing with another steer and pulling a muscle or staining himself. Other times it could stem from foot rot or an infection.

This will usually cause the foot (and possibly leg) to swell up. Stepping on a hard rock can also cause issues, as well as going from standing on soft ground in a pen to harder ground in the pasture. 

Scours (Diarrhea) 

As my husband, Kolton, later explained, diarrhea can be caused by a variety of things including:

  • cattle eating dirt (as strange as it sounds)
  • drinking bad water (possibly from water holes if it’s been raining a lot and there is standing water)
  • lack of access to the right supplements
  • bacteria

We check the rear ends of the cattle as we drive through to see if any manure looks strange, raising a red flag. 

Thinness 

At times you will come across a steer that won’t gain much weight—if any. Weight loss is not a good sign when cattle are out on grass and indicates something is seriously wrong with the animal.

If it’s lame, injured or even just has a bad eye, the animal might not want to graze as much and will become thinner than the rest. Internal worms can also cause thinness. 

Sometimes cattle might need a mineral supplement or just simply increased access to good pasture grass. Don’t wait until cattle become thin to take them off grass. If they’re still out in the pasture and starting to look thinner, you waited too long. 

When we go out to check cattle, we also keep an eye on a few other things in the pasture, such as:

  • water supply (pond levels, windmill functionality, etc.)
  • the fence (if using an electric fence, check the fencer closely to make sure it’s still functioning correctly)

Checking in with your herd often will ensure that you catch things quickly and can get on top of any problems before they turn into major catastrophes! 

Categories
Animals Farm & Garden Large Animals

It’s Time For Farm Animals To Get An Annual Tetanus Shot

Most hobby farms stay busy in spring, don’t they? Even if you don’t raise young animals, many typical animal husbandry practices occur this time of year.

One of the more common practices? Administering spring vaccines, and this typically includes a tetanus shot. We’ll take a closer look at this lethal disease and the simple steps to prevent it.

What Is Tetanus?

Tetanus has an interesting origin story. The disease—you may have heard its common name lockjaw—occurs via toxins produced by the bacteria Clostridium tetani. These anaerobic bacteria (they thrive in environments without oxygen—an important note) live in the soil.

They also show up in the intestinal tracts of humans and animals.

C. tetani hang out as spores in normal, healthy tissue and the ground. They don’t cause a problem—they exist basically in suspended animation—until their dream environment arrives: no oxygen.


Read more: Dr. Pol provides 5 tips for keeping farm animals healthy.


Tetanus, Meet Animal

How does this happen in an animal? Consider the most common cause of tetanus: a deep puncture wound, as in stepping on a nail.

Within the damaged tissue, oxygen supply is cut off. Even in the smallest of wounds, this anaerobic environment stimulates the activation of C. tetani spores. They “awaken,” start to metabolize and grow, and release a very potent neurotoxin.

This causes tetanus.

This neurotoxin causes spasmodic muscle contractions. These gradually worsen as the toxin travels through the body via lymphatic drainage and the circulatory system. Eventually the toxin reaches the muscles needed for breathing.

If untreated, an animal with tetanus will die.

Vaccination Information

Luckily, you can buy relatively inexpensive tetanus vaccines easily and administer them yourself. You can purchase livestock tetanus vaccines as an individual vaccine or together with other vaccine combinations.

A common combo is the “C/D & T” vaccine for ruminants. This also vaccinates against two other types of Clostridial disease (C. perfringins, the cause of overeating disease) and C. tetani.

It’s also good to know the two types of tetanus shots you can give: tetanus toxoid and tetanus antitoxin.

Toxoid

The tetanus toxoid is the “true” vaccine in that, when given, it stimulates the animal’s immune system to develop antibodies against C. tetani for any future infection.

The key word here: future. You typically administer toxoid vaccines as a series of two shots as part of a regular vaccination program. Like any vaccine, the tetanus toxoid takes several weeks to stimulate the body to make an appropriate level of antibodies.

This immunity will last several months up to a year.

Antitoxin

Conversely, the tetanus antitoxin acts more as an immediate prophylactic. This injection offers immediate protection from any C. tetani toxin in the body but only lasts a few weeks. Administration occurs if an animal already suffered an injury or wound.

It is also typically given on the day of castration and/or tail docking.


Read more: When is the best time to vaccinate calves?


Timing

So should you give the toxoid or antitoxin to your animals? Or both? The answer depends on timing.

If you perform castrating/tail docking, give the toxoid vaccine—complete with its booster—several weeks prior, and then give a dose of the antitoxin on the day of the surgery. If you simply give your adult animals their spring vaccines without any other procedures, a tetanus toxoid will do enough to provide year-long protection.

However, if at any point an animal suffers a puncture wound or deep laceration, your veterinarian will likely administer a dose of antitoxin just in case. Simply put, doubled up, a toxoid on board in the spring and the antitoxin when any surgical procedure or injury occurs is the best way to protect your animals from this lethal disease.

Categories
Beginning Farmers Crops & Gardening Farm & Garden Homesteading

Try These Early Season Heirloom Tomatoes In The Garden!

At the time of this writing, it’s snowing outside my farmhouse window. Right now all I can think about are garden-fresh tomatoes, juicy and warm, brightly colored and bursting with flavor. But the calendar reminds me that it’s going to be a while before the garden resumes its brilliant production of tomatoes and fills the kitchen with unparalleled delight.

Is it any wonder, then, that gardeners continually seek out ways to shorten the tomato-growing process? 

I Want It Now

Face it: Tomatoes take time. Sure, we tell ourselves we can show patience. But, truthfully, we want tomatoes and we want them as early in the season as possible!

Of course, we also want these early tomatoes to be packed with flavor. And if they were heirlooms, it’d be even better. 

Is that too tall of an order? Maybe it is, but it’s not impossible.

“Many of the common or most popular tomato cultivars are what we call ‘main crop’ types, meaning they need 75 to 80 days to ripen,” says Daniel Goodspeed, a horticultural consultant with Jung Seed Co. “Because most gardeners must wait until the last average frost date to plant, these main crop tomatoes won’t give fruit until the end of July.… Tomato lovers can speed up the process to first fruits by choosing wisely and planting some early season tomato varieties.”


Read more: Save your heirloom tomato seeds this year! Check out this video to learn how.


Early Season Variety?

But what constitutes an early season tomato variety?

“We would consider early season tomatoes as those that ripen in 60 days or less,” Goodspeed says.”

(Important distinction: When we talk about “days to maturity” for tomatoes, we’re talking about the number of days after transplant, not counting from the date you originally planted seeds.) 

It’s easy to see why gardeners find allure in the idea of harvesting tomatoes two to four weeks earlier than the average tomato variety, especially in regions with short growing seasons.

“Although many modern breeders have developed hybrid varieties that fall into this [early season] category like Early Girl, there are several other excellent open-pollinated heritage/pass-along varieties that provide rich, gourmet heirloom tomato flavor and early reliable yields,” Goodspeed says.

“Most of these early bearing tomato plants have an ability to set fruit in early season cool temperatures, although the plants themselves are still tender and require adequate protection.”

Tomato Terms

Just as a quick refresher of tomato terminology. When you hear the term open-pollinated, it means that the plant breeds true (you can save the seeds).

A hybrid, however, is the result of a cross of two distinct varieties. If you save the seed from a hybrid variety, it probably won’t produce the same characteristics as the parent plant.

Heirlooms are open-pollinated varieties that also have history. But there’s a lot of variance in what defines an heirloom variety.

Sometimes the term is reserved for varieties that are pre-1940. Other times it only refers to varieties that have existed at least 50 years, or sometimes only 20 years. And sometimes World War II is used as a defining date. 

The Advent of Early Girl

The interest in early season tomatoes is nothing new. For nearly 50 years, gardeners have enjoyed the produce of the Early Girl hybrid variety, developed in the mid-1970s.

Early Girl burst onto the tomato scene amidst plenty of publicity. It soon found a permanent place in gardens across America.

Gardeners loved the lightning-fast maturity of Early Girl, which readies in a mere 50 days. The breed also boasts good reliability and disease resistance. It’s been a staple in gardens ever since. 

But gardeners are always on the lookout for something new, which in this case is actually something old. As interest in heirloom and open-pollinated varieties increase, gardeners have sought out heirloom varieties with similar characteristics to Early Girl and other early maturing hybrids.

And they do exist!

While the early season varieties aren’t as numerous as the 80-day heirlooms, we still have plenty of options to consider. Here are 10 extra-special, early season, open-pollinated tomato varieties. (How’s that for a mouthful?!)

Stupice

Years ago, when I was new to heirloom tomatoes, Stupice was the first early season variety I tried. It was a good choice. This very nice indeterminate variety produces fruit in as little as 52 to 55 days after transplant. 

I didn’t find it to be hugely flavorful, but flavor is obviously subjective. And many people love the taste of Stupice.

It produces well and is a nice addition to the garden. The variety originated in the former Czechoslovakia and has been in the United States since the 1970s.

“These 2-ounce saladette-type tomatoes have a sweeter flavor and plants can yield plenty of fruits to cook with and share,” Goodspeed says.

(OK, so you’re all wondering: How do you pronounce “Stupice”? Answer: It’s not like you’d think. There doesn’t seem to be a definitive consensus on the exact pronunciation, but my research indicates it’s something like stoo-peet-say.)


Read more: Support your tomato plants using the Florida weave method!


Mexico Midget

If you think that any tomato named “midget” is probably small, you’d be right. But you probably aren’t envisioning just how small Mexico Midget tomatoes are.

These tomatoes grow to approximately 12 inch in diameter. But don’t be discouraged by their small size, because these teeny-tiny tomatoes are top-notch in the taste department. 

Mexico Midget is well known for its incredible flavor, and it’s equally as beloved for its incredible ability to produce (and produce and produce). An indeterminate variety, it’s ready to harvest between 60 and 70 days after transplanting. 

“[This variety] from south of the border forms long trusses that will set copious amounts of small, red, true cherry tomatoes with a fine, true-balanced tomato flavor,” Goodspeed says. “You’ll eat half of what you pick before you get into the kitchen door and have to go back for more.”

Koralik

Once upon a time, I bought a Koralik tomato plant. It’s an early producing Russian heirloom and I thought it might feel right at home in Zone 4a where I farm, in northern Wisconsin.

Koralik produced well all summer, setting plenty of lovely red cherry tomatoes with nice flavor. All in all, I declared the variety a definite success in my garden. 

But the best was yet to come. By the next summer, my garden beds spilled over with volunteer Koralik plants. Where I live in the frozen northern Midwest, tomato seeds aren’t supposed to be able to survive overwinter in the garden.

But nobody told that to the indomitable Koralik plants. They thrive year after year in my garden from the descendants of that original plant.

Koralik clearly mastered the “superhardy” part. But it’s also a reliable producer and well worth a place in your garden. It matures in 55 to 60 days.

Bloody Butcher

If you’d like an early season variety that’s a bit on the larger size, how about Bloody Butcher with its clusters of 3- to 4-ounce fruits? These clusters are impressive, especially considering that tomatoes are ready in just 55 days. And this indeterminate variety just keeps on producing all summer long. 

It’s an old favorite with a lot of fans. According to Goodspeed, Bloody Butcher is an “indeterminate that produces Campari-type, medium-sized, round, dark-red, 4-ounce juicy fruits for salads, small slicers, sauces or salsa.”  

Glacier

In a sea of 2-inch red tomatoes, Glacier stands out, thanks to the light smattering of orange in its otherwise-red skin. People consistently describe Glacier as sweet. This is high praise indeed, considering that early season tomatoes as a group aren’t noted for breaking flavor records. 

In addition to its excellent flavor, Glacier is hardy, produces in less than 60 days and continues producing throughout the season. 

Quedlinburger Fruhe Liebe

How does a 40-day heirloom tomato sound? Quedlinburger Fruhe Liebe is an indeterminate variety that’s memorable thanks to its distinctive name and its incredibly early maturity. 

“[It] is named for the medieval German town in which it’s said to have originated. And the words fruhe liebe translate to ‘early love,’” Goodspeed says. “The 1- to 2-inch, red, round fruits have a rich, complex, slightly acidic tomato flavor. And they set Campari-style on potato-leaf plants like many true heirlooms do.” 

Quedlinburger Fruhe Liebe matures so quickly that the New Jersey Agricultural Experiment Station at Rutgers University classifies it as “very early.” 

Tigerella

I admit it: I have a soft spot for tomatoes with stripes. So it’s no surprise that Tigerella caught my eye with its bright red coloring and yellow-orange stripes. 

It’s similar in size to most of the other early varieties (2 inches) and is an indeterminate variety that matures in approximately 65 days. A fun choice for gardeners who love Green Zebra but want to harvest striped tomatoes before 80 days.

Anna Russian

This one isn’t quite as early season as the others, but it’s still an earlier-season variety. I include it here for a few reasons.

  • No. 1: It’s a beautiful, ox-heart-type tomato.
  • No. 2: It’s pink!
  • No. 3: It’s so much larger than the other varieties discussed here (anywhere from 8 ounces up to a pound).

If you’re looking for a larger tomato that still won’t take all summer to produce, this indeterminate variety might be a good option. 

Anna Russian matures anywhere from 65 to 80 days. 

It’s still snowing outside while I write this. But thanks to these superior early season tomatoes, all of that glorious garden goodness grows closer every day.

May your plants produce abundantly and your kitchen overflow with tomatoes. Enjoy! 


More Information: Other Varieties

Alaskan Fancy

Summers in Alaska are short and fleeting. So any tomato bearing the name of our 49th state is bound to be an early season variety.

Often described as the earliest plum tomato available, Alaskan Fancy fits the bill. Delicious 2-inch fruits ready in about 55 days! 

Sophie’s Choice

Thought you couldn’t have an 8-ounce tomato in 55 days? Think again! Sophie’s Choice, a Canadian variety, produces large, sweet tomatoes in less than 60 days.

A determinate variety with a plant height of only 24 inches, Sophie’s Choice is beloved for its impressive productivity and flavor.

Note: This one performs best in cooler climates, so bear that in mind.

This article originally appeared in the March/April 2022 issue of Hobby Farms magazine.

Categories
Beginning Farmers Crops & Gardening Farm & Garden

All About Tree Guards & Shelters (Plus, A Planning Budget)

If you are planting trees you need to protect them for the first three to nine years against wind, drought, weeds, etc. When most people plant a tree, they think it can fend for itself. It is a tree, after all, and they grow in the wild! 

But this is just not the case.   

Foresting Non-forest Environments

First of all, most of the places we plant are not natural environments. We often forest pasture or urban areas that don’t have the protective canopy of mature trees or the well-developed soil and leaf litter of a woodland ecosystem. 

We can mimic these conditions with shelter plantings of pioneer trees for more shade-lobing species. And copious mulch creates something like soil leaf litter to protect smaller plant roots.  

Also, many of the trees planted are fruit, often grafted and in need of extra care. They have weaker inter-stems and need support in the early establishment years. 

You Need a Tree Guard

When it comes to protecting your trees, the biggest mistake you can make is not using a form of protection. Young and with soft bark easily fall prey of rodents (mice, voles) as well as rabbits and even deer. 

A tree guard or shelter will keep these creatures from hewing through the tender bark and supping on the nutrient-rich cambium layer just below the bark’s surface. 


Read more: Winter tree guards protect your trees against harsh weather.


Two Types of Protection

The two main types of tree protection are tree guards and tree shelters, and they come in many variations. 

Tree Guard

One popular tree guard is the spiral tree guard, made out of a rigid plastic that can twist over the stem of a tree and wrap around up to 12 to 36 inches. 

The height depends on the size of the tree and also the snow in winter.  A mouse will girdle a tree at 24 inches above ground during a winter with deep snow! 

Tree Shelter

Tree protection also can be used to protect the buds and tender young shoots from browsing creatures such as deer. A deer will come around every winter and bite off the years’ growth in one fell swoop. I have seen a 10-year-old tree that still looks like day one because it was eaten back every year.

In this case a tree needs a taller form of protection to go right over the top of the tree. This design provides the further benefit of also protecting against wind and cold. 

These types are often referred to as tree shelters. One popular type of tree shelter is the Plantra tree shelter. This style is mounted to a bamboo stake with ties, wrapping around the entire tree stem, branchlets and all. 

Plantras leave a space between the shelter walls and the tree itself  for sufficient room to grow. 

Installation Tips

No matter the type, you should follow some important tips for installation to make sure they work right. All tree guards should be pushed into the soil 1 to 2 inches to make sure rodents can’t easily push under them. The guards should also go as tall as protection is needed. 

For deer protection this could be as much as 6 feet around a fruit tree whip (tall, pruned fruit tree for orchard establishment). For rodent protection on smaller trees, choose guards that go up 2/3 the height of the tree. You can add more guards later to protect the trees as it grows. 

Some guards, like the tree shelters, need support.  You can use bamboo or wooden stakes or even rebar to help hold these shelters up. Your support could also double as tree support, too, for fruit trees that require it.

Plum trees are particularly susceptible to needing extra support for their wide, weaker root system. 


Read more:Planting trees? Give this handmade measuring stick a try!


Removing Tree Guards

Removing tree guards at the right time is as important as selection and use. Some tree guards can expand and shift as the tree grows, eventually becoming obsolete as the tree expands so much that the guard is no longer fully protecting the bark. 

At this stage the tree is usually safe from rodent damage. But be warned: I have seen an 8-inch diameter trunk girdled! 

However, it is important to note that with some very fast-growing trees (especially if they are being fed with fertilizers like compost), they can outgrow the tree guard and actually strangle themselves on their own guard! Generally speaking, once the tree has grown up above the shelter by more than 24 inches, you can remove it. The deer cannot reach up to eat the growth tip.

They may browse lateral branches, but they won’t stunt the tree by nipping off the top. 

Budgeting the Cost

So, what is the cost?  For any tree you care about surviving and growing rapidly, consider this budget for success: 

  •  Native Tree: $10 to $35 for a 3- to 5-foot whip 
  •  Fruit Tree:  $50 to $100 for a 3- to 5-foot hip 
  •  Spiral Tree Guard: ~$2 per guard for 36 inches 
  •  Tree Shelter: ~$3 for 36 inches
  •  Wooden Stake, or T-bar or rebar: ~$4 to $10 for 7 feet 
  •  Compost: couple shovel-full scoops for $10 
  •  Weed Mat or Cardboard: $0 to $2 per square foot 
  •  Mulch: Chip mulch or straw mulch for $0 to $1 per square foot 
  •  Ties: Scrap drip tape works great, or other ties for $0 

 So here is your recipe for success. Don’t forget your tree guard! 

 Grow On, 

 Zach