Located just outside the city of Philadelphia, Tlush Family Farm is focused on mushrooms, microgreens and edible flowers. Commandeered by husband and wife founders Katie and Jonathan Tlush, the venture was launched by necessity during the early days of the Covid-19 pandemic.
“I was a dental hygienist for 15 years. When Covid hit, my husband Jon and I decided it would be best for me to stay home with our two children,” explains Katie. She adds that the journey to transform from gardeners to professional growers became about combining an “internal fulfillment to the family and producing income.”
Taking a moment out from running Tlush Family Farm, we spoke to Katie Tlush about the benefits of climate-controlled indoor growing and creating the perfect environment for mushrooms. We also touched on turning a passion into a profession.
Tlush Family Farm is an indoor urban venture. “At first, we got the chickens and then spent about six months figuring out what we wanted to grow and how,” says Tlush.
“Here in Pennsylvania we have four seasons. But we’re 100 percent indoor agriculture, so it’s always sunny and 70 degrees in here. And we get to grow all year round. I’m so happy growing this way.”
“Mushrooms are fascinating to grow,” says Tlush, reflecting on the decision to make fungi an essential focus of the farm. “We do everything from cultivation and the lab work and creating spawns and mixing it all together to harvesting.”
Tlush adds that when it comes to creating the perfect environment for growing mushrooms, focusing on temperature, humidity and airflow is key.
“If you can create this perfect storm and get a mushroom to develop in a fruiting chamber, it’s super fun and super cool.”
The farm currently specializes in oyster mushrooms. “What makes it different is that we grow them out to a full flush,” says Tlush. “We get these beautiful large caps, with some as big as my head! It’s just wild.”
Next up: Experiments in maitake and king oyster mushrooms. “Not being a large farm, we have to make sure everything is scaled appropriately,” explains Tlush of the process.
Supplying local chefs with mushrooms that have been harvested barely 24 hours ago, Tlush says that “there’s nothing more fun than watching something you have planted and watched grow and then seeing what [chefs] create from it.”
She adds that versatility is important when it comes to maximizing mushrooms. “You can even use the stems of a mushroom to create broths.”
Looking over the their farm journey so far, Tlush says that she’s grateful to have been able to combine family with work. “It’s so rewarding to take something you’re super passionate about and combine it with the flexibility of being a very present mother and enjoying being able to be there for my kids.
“Plus partnering with my husband on something we’re so passionate about—there’s just nothing better.”
Now that the weather is starting to shape up in Minnesota after an unseasonably cold spring, the temps have me thinking about dinners on the patio and barbeques with friends. That’s why I’m going to share with you one of my favorite homemade condiments: mustard.
If you’ve never made your own mustard before, here is your sign to do it. It’s ridiculously simple to make, and the flavor packs a punch that can’t compare to store-bought.
It’s very versatile too, as it makes a delicious topping on your traditional hot dogs, brushed over grilled meats, mixed into salad dressings, topped over soft cheeses, or just simply added to a charcuterie platter.
Yield: 1 pint
Ingredients
Main
1/4 cup whole brown mustard seeds
1/4 cup whole yellow mustard seeds
1 tbsp raw apple cider vinegar “with the mother”
Brine
2 tsp coarse kosher salt dissolved in 1 cup water
Preparation
Mix together the ingredients and brine and pour them into a clean pint jar. Stir the ingredients together. Wipe off the rim of the jar with a clean dampened towel.
Add a clean canning jar lid and tightly screw on the ring.
Fermentation
This is a three-day ferment. Stir once daily. Ferment at room temperature, ideally between 60 to 75 degrees F (15 to 23 degrees C) and keep out of direct sunlight. Once the mustard has reached an ideal flavor, transfer the jar into the refrigerator.
Fermented mustard, like horseradish, will begin to lose pungency shortly after it is made. That’s why I recommend making small batches that you will use up within a few weeks, versus making a large batch that will likely fall flat before fully enjoyed.
If you want a smoother mustard, before fermenting you can briefly break down the seeds in a spice grinder to crack open the seeds. You can also use a morter and pestle to break down the seeds.
This will make the end product a more spreadable consistency. You could also blend it down after it has fermented.
If you want to add sweetness to the mustard, stir in 1 tsp raw honey once fermentation is complete.
For more information on how to ferment at home, check out the recommended supply list (link above).
I couldn’t believe my eyes. As bold-as-you-please, a rat walked along the inside of my chickens’ run and helped itself to my hens’ food. And it happened in broad daylight.
Never mind that I’d taken pains to fortify the chicken coop and run to keep my hens safe. Something had gone very wrong.
It’s taken me several weeks to fix the problem. In hopes of saving you similar trouble, here’s what went wrong—and what I did to make things right.
Rat Paradise
My first mistakes? Locating my large compost bins too close to my chicken run and falling down on its maintenance. I’d generally kept my compost well-watered and turned—until emergency surgery took me out of commission.
So, for a month or two, food scraps accumulated on top of the pile. This created a potential draw to the chicken run for rats.
I’d also gotten lazy with my chicken feed. Although I kept my opened bag inside a galvanized trash can, I kept additional, unopened bags on my garage floor. Had I been paying closer attention, perhaps I’d have noticed that something had gnawed holes in those bags. A small feast of pelleted food had spilled out.
Assessing the Problem
That I saw a rat at all was bad enough. But that I saw it during the daytime suggested this was a serious infestation. Rats are not only vectors for disease. They’ll also eat young chicks.
Their presence can have a chilling effect on egg-laying, too.
To determine just how pervasive my problem was, I used a trail cam to film inside and around the chicken run. At one point when the chickens were cooped up for the night, I saw three rats inside the run simultaneously. Fortunately, I also saw some of the areas where the rats were getting in and out.
They’d tunneled under my compost bins, around my buried wire barrier, and into the run in a few spots. The rats also moved in along the foundation of my nearby garage.
Fixing these problems would require more than simply removing the rats. I had to make the environment much less inviting to them. Now I store opened and unopened bags of feed in galvanized trash cans inside the garage.
Also I no longer leave the hens’ food out for long periods. Instead, they have regular feeding times. Between feedings, their feeder is safely stowed away.
But there was one other source of food—and shelter—that had to go. I emptied all of the contents of my three-section compost bin onto tarps. I moved the bin itself to a new spot far from the hens and re-filled it with the original compost.
The move revealed a sizable rats’ nest made of shredded plastic, chicken feathers and other found materials. I also discovered a series of tunnels and damage to the foundation of the nearby garage.
I dug out the soil, destroying their tunnels and nest in the process. Before sealing up the damage they’d done, I’d need to remove as many of the rodents as I could.
Eliminating the rats with poison was a non-starter. Because rats are part of the natural food web, poisoning them could result in the inadvertent poisoning of snakes, hawks, owls and more.
I opted for the tried-and-true snap trap instead. Wearing heavy gloves, I baited the traps with peanut butter and carefully set them. Every night for about a month, I positioned some traps along the interior wall of my garage. Others went outside the large hole that the rats gnawed in the exterior of my garage’s foundation.
Additional traps went alongside the breached section of the chickens’ run.
To prevent accidental injury to other nearby creatures, I barricaded my outdoor traps so that only the rats could access them. I also checked the traps first thing—long before letting the hens out for the day.
I caught at least one rat every couple of days around my chicken run. Eventually, my traps remained baited, set—and blessedly rat-free.
And Stay Out!
It was finally time to repair the damage the rats had done and redouble my efforts to keep them away from my chickens for good. While rats can easily gnaw through wood and spray foam, steel wool and hardware cloth are another story.
To create a durable barrier, I stuffed the hole they’d made in my garage foundation with steel wool and spray foam. Next, I covered the hole’s exterior with hardware cloth and topped that with a heavy piece of wood.
I also repaired the breached areas around my chickens’ run with hardware cloth.
As a proactive measure, I now keep a couple of rat traps set inside my garage. I’m also periodically applying a non-toxic, liquid rodent repellent along the perimeter of the garage, henhouse and chicken run.
Like so many other hobby farmers, I’m never really done with my chicken projects. In addition to the regular tasks of making sure they have fresh clean water, ample food and treats, clean bedding and enrichment activities, I’m always looking for ways to improve their environment. I want to make sure that my hens have what they need, are safe and have room to roam.
As such, there is always more that can be done.
In the spring of 2020, my wife and I moved into a new home. I, of course, couldn’t take my chicken coop from my previous home, which was built onto the side of our barns. So not wanting to abandon my hobby of raising chickens, we needed a quick solution for the girls.
We keep a small flock of between three and six birds, which provides us with more than enough eggs and plenty to give away as well. At the time of the move, we had just three chickens, a Black Australorp, a Rhode Island Red and a White Rock.
Creating a Coop
My wife is always looking at reviews and hacks to see how various models of chicken coops have worked for other folks and what they have done to modify them when needed. Based on favorable reviews from other hobbyists with small flocks, we opted on a popular farm-supply setup. This was a quick solution to get the hens someplace where they could be protected.
Once the coop kit arrived, I assembled it. Then I began to make some modifications in preparation of the natural elements it would be exposed to, both weather-related and from the local population of predators such as foxes. The first thing I did to amend the coop was to spray the exterior with a waterproofing solution. I then set about reinforcing the structure itself.
Ch, Ch, Changes
With added protection in mind, I stapled an additional layer of chicken wire over top of the wire mesh in which the coop was manufactured. I then gave the coop some additional support by adding boards to the exterior frame. This gives it more weight and stability.
To prepare the site where the coop now sits, I laid chicken wire on the ground to help prevent animals from burrowing under the coop. As I continued to plan, I decided to put the coop up on a layer of cinder blocks for two reasons.
Chris Bond
Reason 1
The roosting bar on the chicken coop out of the box seemed too low to make the chickens feel safe while perching. The layer of cinder blocks helped to raise this some, though admittedly not a lot. It does not sit the 4 feet or higher they would prefer to perch at in the wild.
Reason 2
I wanted an additional barrier between the wooden frame along the bottom of the coop and the ground. This would help alleviate concerns of rotting wood by keeping the frame out of constant contact with ground moisture.
These hacks allowed me in good conscience to move our little flock into their new home for spring and summer. However, we knew that they would need additional protection and warmth for the upcoming Maine winter.
The Northeast isn’t unique in having a lengthy winter season. Many here joke that there are only three seasons in Maine: winter, mud and preparing for winter.
But really, where we live, winters and cold weather predominate for nearly half of the year. We didn’t want to leave our coop exposed to the harsher weather that would befall us in the coming months.
Unlike the coop from our former home, which had the benefit of being attached to a barn that blocked the colder winter winds and provided some ambient heat, our new coop was free standing and did not enjoy such benefits. The solution, we decided, was to take a lesson from my years as a horticulturist and to put up a greenhouse structure to keep them warm.
Greenhouses are designed and utilized for their very ability to trap solar energy as heat. Light energy from the sun enters the greenhouse. Some of the energy escapes as light, but some of it is trapped and converted to heat energy.
The greenhouse design that we selected was large enough to completely cover the coop with plenty of room to spare. It had a wide opening and six side-ventilation windows to allow for good air flow. By late summer, I had constructed this new greenhouse and put it in place to protect our coop from the winter weather while providing some heat for our flock.
Never content to leave anything be, I then set about adding additional support to this structure as well. I added six 2×4 studs for additional support, expecting there to be some amount of snow load at times. The support studs were set into cinder blocks. I then drilled a hole at the top of each one, zip-tying each to the center frame of the greenhouse.
Angled metal brackets were added to each corner of the greenhouse frame to provide additional stability for the high winds and heavy snow that would inevitably come. I then put rocks around three sides of the greenhouse to weigh down the covering in an effort to prevent cold air from entering and as a further deterrent against predators.
Additional Measures
As additional measures to keep our small flock warm and hydrated over the winter, I added a panel heater and a heated watering base to keep their water from freezing. I suspended the heating panel from the center support of the greenhouse frame and positioned it so that it would provide heat near the roosting bar area.
Their waterer with the heated base was placed outside of the coop in the greenhouse area, to help prevent frostbite on our hens. Keeping it in the greenhouse portion, instead of in their actual coop, also aided in keeping their water above freezing temperatures. Exposed to more light, it absorbed more heat compared to the shade of the coop structure.
Chris Bond
Modifications
The greenhouse stood strong for its first winter. Each day, I would ventilate and close the structure depending on the weather. I would be sure to brush off the snow when it fell so that it didn’t stress the structure. I also wanted to ensure the snow didn’t block sunlight from entering and warming up the greenhouse.
Once the temperatures started to warm up in the spring and early summer, I knew the greenhouse would potentially grow too warm for our girls. So, I then further modified the structure. I cut the covering at each of the corners high enough so that the two longer sides could be rolled up in order to allow air to flow more easily.
I added chicken wire to the greenhouse frame where the plastic sides had been so that the chickens could not wander out and so nothing else undesirable could wander into the coop. Bungee cords proved to be the ideal fastener to hold the rolling sides. We could easily drop them back down if a cold snap occurred, and this would prevent heavy rain from entering their coop space.
We are currently into our second winter at this home and the greenhouse is still standing, doing the job we hoped for. The plastic shows slight signs of wear around the upper frame where it rubs against the metal pipes.
I made an additional modification for this current winter. In addition to reinforcing those weak spots in the plastic with heavy-duty tape, I added foam pool noodles to the upper frame of the greenhouse. This will prevent the screws in the frame pipes from poking through the plastic when snow sits on the structure.
I certainly don’t expect this greenhouse to stand forever. It was after all just an online DIY kit and not meant to be a permanent structure. However, with some continued modifications, maintenance and care, I may get another couple of winters out of it yet.
That is, of course, until we opt to build a much larger and grand structure befitting our increasing number of feathered friends!
More Information
Free-Range Additions
Predators, especially foxes and even bald eagles, are abundant in our area. Anyone who raises free-range chickens knows how difficult it can be to lose one or more of your girls to a predator.
I understand it’s part of the circle of life. Those creatures only do what they instinctively know to do. However, it doesn’t make it any less heartbreaking to find the remains of one of the hens you have raised and whose personality you have come to know and appreciate.
Adapting for Safety
As a result, we made the difficult decision to not let them free-range at certain times of year. Technically the greenhouse structure offered enough square footage per chicken, at least by textbook calculations. But it didn’t seem like enough room to us, especially when they had been able to cover several acres unfettered.
With that in mind, I built a few modular units to create a run for them. This expands their roaming space beyond just the footprint of the greenhouse and coop space. I could easily move the units as needed if we opted to give them some supervised free-range time.
Additionally, if we choose to increase the number of our flock, it’ll be easy to add more of these structures to continue to expand the amount of room available to them.
This article originally appeared in the March/April 2022 issue of Hobby Farms magazine.
Whether you’re turning soil for a new garden bed or preparing a small field for planting, there’s a tiller for the job. Check out these tillers, and get ready to move some earth!
Compact Front Tine Tiller by Yardmax
The self-propelled Compact Front Tine Tiller by Yardmax (above) cultivates soil, turns easily and fits between garden rows. It can be adjusted between 11 and 21 inches wide with a tilling depth of 11 inches.
Sun Joe ELITE Electric Tiller Cultivator
Snow Joe
If the area you’re tilling is close to an outlet, the Sun Joe ELITE Electric Tiller Cultivator may be just the tool you need. At 16 inches wide, this machine can slice soil to a depth of 8 inches. Height-adjustable rear wheels make it easy to maneuver. And collapsible handles make it a cinch to store.
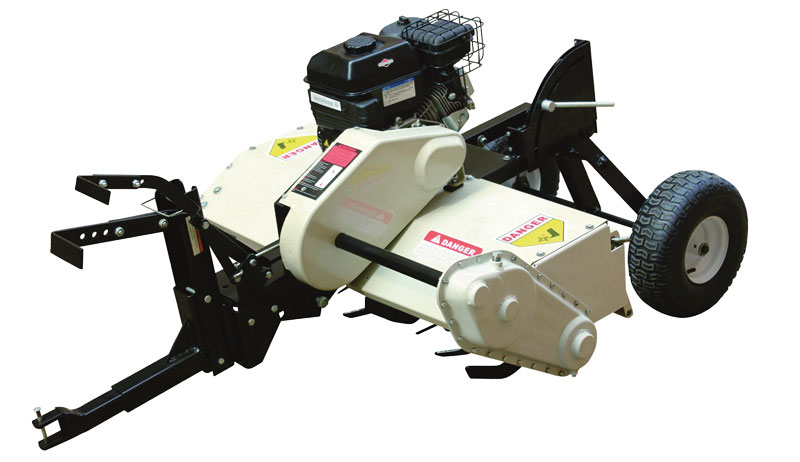
Field Tuff Tow-Behind Tiller
Northern Tool
The Field Tuff Tow-Behind Tiller is easily towed behind an ATV or UTV. And the 208cc Briggs & Stratton engine is powerful enough to rip through compacted soil. Its 24, 12-inch steel tines can be adjusted up to 5 inches from your seat and can reach over 33 inches in depth. The pneumatic turf tires let you work on uneven terrain.
Earthquake VERSA
Earthquake
The Earthquake VERSA front tine tiller cultivator can weed, mulch and aerate soil as a cultivator and also work as a tiller with its high-performance 99cc engine. Prepare wide open spaces of land in the spring, maintain rows in the summer, and do major cleanup in the fall.
Mantis 7940 4-Cycle Plus Tiller/Cultivator
Mantis
The Mantis 7940 4-Cycle Plus Tiller/Cultivator weighs 24 pounds, but can till through sod and compacted soil. Designed for fatigue-free operation, the 9-inch width ensures the tiller works along fence lines and raised beds. The curved tines let it dig up to 10 inches deep.
DR Rear Tine Rototiller
DR Power Equipment
Power-driven wheels and counter-rotating tines give the DR Rear Tine Rototiller the extra power needed to bust sod and churn through the toughest soils—even heavy clay. With a 16-inch tilling width and tilling depth of 11 inches, the pneumatic tires can propel the tiller on almost any terrain.
All Troy-Bilt tillers feature a cast-iron-encased transmission and three shaped bolo tines designed to slice, chop and turn to create finely tilled soil. The Big Red Garden Tiller can till 20 inches wide and 7 inches deep in gardens more than 2,500 square feet, and the “Just One Hand” operation allows you to avoid stepping on freshly turned soil. Highlights include electric start, four forward speeds and maneuver with two reverse speeds and a neutral option.
Rakes are versatile tools, and there are many different types available. Sometimes it seems as though there’s a specific rake for every job. But you know what? Once in a while, the rake you need isn’t the one you’d guess at first glance.
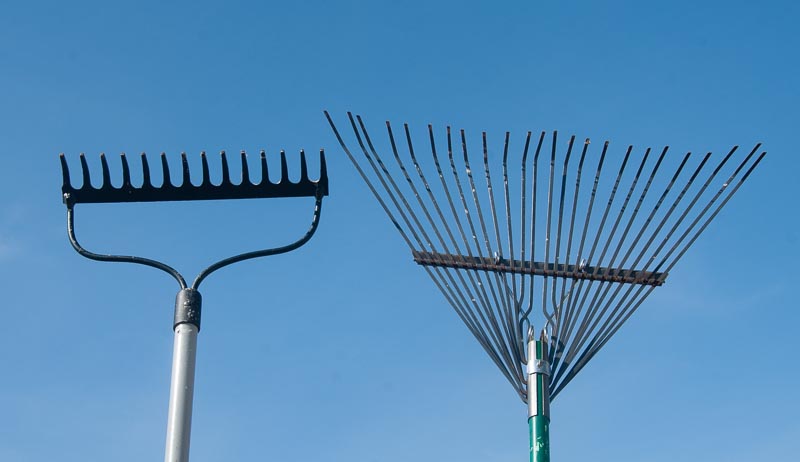
You’re surely familiar with two commons types of rakes: bow rakes and leaf rakes.
Bow rakes are tough metal rakes featuring short, thick tines that don’t budge an inch when raking.
Leaf rakes are made from plastic or metal and typically feature a large number of thin, flexible tines. They’re often wider than bow rakes.
The Job at Hand
A bow rake is considered a garden tool since it’s tough enough to break up clumps of soil, remove weeds and rocks, and spread out loose materials like dirt and compost. In contrast, a leaf rake is designed for yardwork, like cleaning up leaves and grass clippings.
But what happens when yardwork gets serious? Let me share a personal example. Some types of trees are messier than others when it comes to dropping branches during storms.
I’ve found sugar maple trees to be very tidy, which stands in stark contrast to the mess of little branches white pines can put forth. Sometimes I wonder how white pine trees even survive. It seems like a countless number of foot-long branch tips break loose whenever the wind picks up.
Speaking of white pines (and conifers in general), they can also drop lots of needles and pinecones, so maintaining a manicured lawn dotted with or surrounded by conifers requires diligence to stay on top of falling debris. And if a conifer is toppled during a storm, cleaning up the trunk and branches is only step one.
Depending on the variety and time of year, you might also be left with plenty of small branches, bits of bark, pine cones and needles.
So let’s say a storm has left your lawn littered with debris. It’s tempting to reach for a leaf rake. Isn’t it the tool of choice for yardwork?
To an extent, yes. But I argue for thinking outside the box and reaching for a bow rake instead.
A leaf rake is perfect for dealing with lightweight materials like leaves and grass clippings. But heavier debris is less inclined to move under the pull of a flexible leaf rake. Use a leaf rake for a job beyond its means, and you might wind up frustrated while simultaneously running the risk of bending or otherwise damaging the tines.
I’ll admit a bow rake isn’t my first choice for a lot of yardwork. The stubby, inflexible tines are prone to getting caught in the sod, so they can be tiring to use. But if you employ a light touch (don’t go slamming the head down against the ground), a bow rake can work wonders cleaning up tree debris.
Branches up to an inch thick (maybe more, depending on length) will readily rake into neat piles under the command of a bow rake. And a bow rake is also good at battling through thick grass to pull out debris that isn’t readily visible. T
The takeaway? Don’t let the bow rake’s designation as a garden tool fool you. When the going gets tough, a bow rake can effectively serve double-duty for serious yardwork.
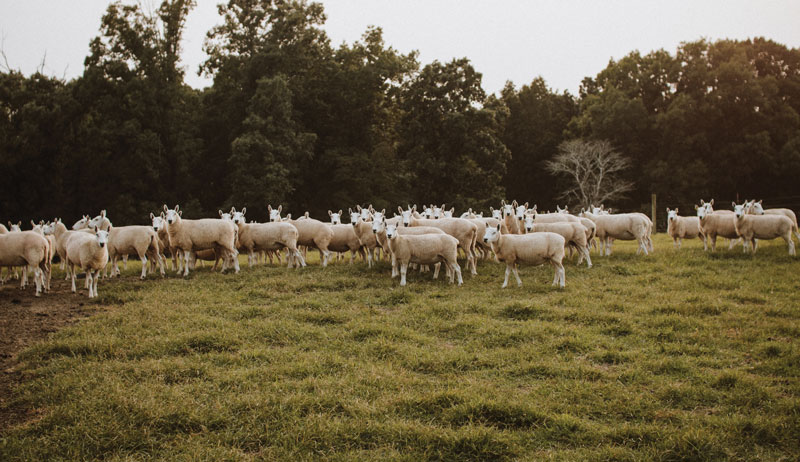
There are obvious benefits to raising sheep and goats. Meat is likely the first that comes to mind. And supplementing your farm’s income stream by producing that meat to meet the demands of a seasonal market is one consideration.
However, you’ll want to think about others as well.
Sheep, for example, can also produce raw wool and wool products, along with milk that can be used to produce personal-care products such as lip balms and soaps. Likewise, goats can also produce milk and cheese. Once you begin to consider this diverse range of products, you may start to think about your would-be seasonal income as year-round.
Selecting Sheep
Bobby and Debby Collier of Pikeville, Tennessee, raise Border Cheviot and East Friesian sheep on their 3 Hills Farm. Bobby is a lifelong farmer and retired agriculture teacher. His profession ignited his interest in sheep.
“I had students that couldn’t afford to show steers and cattle because they were not as financially able to do that,” Bobby says. “They thought they could show sheep. I thought, ‘If I’m going to teach them about sheep, I’m going to need to learn about them myself.’”
What began as an effort to help his students is now a 35-year background in raising sheep.
Business Sheep
Currently, 150 head reside on the couple’s farm, located on the Cumberland Plateau. Their business is multifaceted. For example, the couple chose Border Cheviots for the market lamb, wool and wool products side of their business. They also have other products they produce from the tallow of the Cheviots.
The milk-producing East Friesians supply the needs of the soap the couple produces on their farm.
Because the Colliers strive to meet the demands of a year-round market, they were selective when deciding on which breeds of sheep to raise. They chose Border Cheviots for their suitability to withstand the climate on the Cumberland Plateau, particularly the harsh winter conditions.
In addition, Bobby says less lanolin is produced in the wool of the Cheviots that transfers to improved flavoring in the meat.
“It’s also a personal preference,” he says. “They are beautiful sheep. The wool is quality enough that we can spin it and get wool products out of it.” As the highest milk-producing breed of sheep, the East Friesians were chosen for the volume of milk they produce.
Both the Border Cheviots and the East Friesians are seasonal breeders that breed in the fall of the year with lambs coming around the first of February through March and the first part of April.
“Part of that, especially with the Cheviots, is the genetics of their bodies. Nature has them where they were raised and originated in the Cheviot Hills between Scotland and England that their lambs will have plenty of grass when they hit the milk,” Bobby says.
“That’s the reason they will usually be born in March.”
Raising High-Quality Sheep
The Colliers’ sheep lamb in front of their barn. After the babies are on the ground, they’re moved inside the barn.
“This is for the mamma and baby to bond in lambing jugs or lambing pens,” Bobby says. The ewes and lambs stay in the lambing jugs for a few days before being transferred to a nursery lot for an additional two to three days.
From there, they’re returned to the pasture. The lambs are weaned at the 80-to-90-day mark and from there go to the farm’s feedlot to become market lambs or replacement ewes. The Colliers wait until their replacement ewes are 18-months-old before breeding them for the first time. However, the market lambs are raised to a weight of between 100 and 120 pounds.
Rotationally Grazed
Collier’s sheep are rotationally grazed throughout the summer. On top of that, they receive supplemental commercial feed and as high-quality clover and grass hay as possible. The hay fed to the Colliers’ sheep comes from only their fields.
The Colliers are proud of the fact that their hay is produced with no commercial fertilizers. Instead, other than lime, their fields receive only fertilizer produced from chicken manure from the chicken houses on their farm.
Health Concerns
To raise as high-quality sheep as possible, the Colliers vaccinate their breeding stock against reproductive diseases and their market lambs against coccidiosis. They also closely monitor for acidosis or grain overload. In addition, they deworm their sheep before breeding.
However, the Colliers don’t rely solely on dewormers to fight parasites.
“Our biggest tool that we use in fighting parasites is rotational grazing,” Bobby says. Sheep easily pick up worms because they graze so close to the ground. To combat this, the Colliers rotate their sheep to fresh pasture every four to five days allowing them to keep the grass to about 4 to 5 inches in height.
The Colliers’ entire operation is primarily geared toward a year-round market. It’s a niche market that they have created, and it includes restaurants and retail stores that sell their products. They produce fresh lamb for those markets year-round.
To meet the demand, they separate their lambs according to weights and ages and grow, hold or push to meet those weights.
The American Pride and Produce market in Dayton, the Hummingbird Pastaria Restaurant in Signal Mountain and Edgefield Prime Meat Co. in Dunlap are just a few of the local companies the Colliers have done or currently do business with. They also produce custom meat orders.
In the event they have an abundance of lambs, those are raised to hit the ethnic markets.
Pricing the Meat
The Colliers base the price of meat on current market price but, due to the year-round nature of their business, strive to keep their prices on an even keel.
The market does get high on a seasonal basis. But rather than catering to multiple markets, the couple tries to alleviate that for their customers by keeping their prices consistent.
Processing Wool
As for wool, until recent years Bobby served as the farm’s sole shearer. However, hired shearers now fill this role.
“We try to make sure that all of our wool is processed in the U.S.,” Debby says. “The mills we use are run by small families that have been running their mills for three to five generations. [Our products] go to two different mills for socks or mittens.”
The byproducts are also year-round. “We would tell you to buy wool socks in the summer,” Debby says. “Wool keeps your feet dry. We always advise wearing [the socks] year-round.”
Hope Ellis-Ashburn
Soap & Sundries
Soap is another year-round product. “We try to run sales on the soap year-round,” she says. “The nesting balls and the dryer balls that we do are year-round for us.”
A unique item, the nesting balls are made from belly wool that is traditionally scrap wool. However, Debby stuffs the nesting balls into grapevine balls that can be hung from trees. Birds, attracted to the nesting material, pick it out to line their nests.
Soap is a specialty of Debby’s. Rather than using milk as only an additive, she uses pure sheep’s milk and relies on extensive research to produce it. Soap, lip balm, mittens, yarn, toboggans, ear warmers and batting are just a few of the other year-round items the Colliers produce.
Digital Savvy
In addition to an on-site store, the Colliers partner with thee-commerce site Barn2Door.com that helps the couple set up their newsletters, online shopping, etc. Their daughter, Sarah Hogan, serves as the farm’s photographer and does all of the marketing.
Soap from the Collier farm is currently sold in 18 stores and can be found locally as well as in Ohio. This year it was even available at the North American International Livestock Exposition in Louisville, Kentucky.
The Colliers also occasionally sell their byproducts at local events and festivals.
The retail price for the byproducts is based on the couple’s expenses. They also consult with the mills on current wholesale pricing to help determine what fees they should assign to their products.
The Colliers give credit to God for what they do and consider themselves fortunate enough to be chosen to be stewards of this land and these animals.
Personal Recommendations
For those just getting started or planning to revamp their current operation, Bobby and Debby have these recommendations:
Acreage
A general rule of thumb is that 1 acre of land can support approximately four to six sheep. This can vary by the breed of sheep as well as soil and vegetation. Unlike goats, sheep are grazers and will need adequate acreage to support them.
This Many Sheep
Because you will spend as much time raising two as you will with 10, Bobby recommends eight to 10 sheep when starting out.
Poisonous Plants
Plants that may not be poisonous to other animals are poisonous to sheep. Consult with your county’s extension office to help determine if your pastures contain poisonous plants.
Don’t Sweat Purebred
Because they sometimes sell breeding stock, the Collier’s sheep are primarily registered animals. However, using purebred, registered stock isn’t necessary. Hybrid vigor is produced from crossbreeding, and there is something to be said for its inclusion in a given sheep operation.
On the other hand, if there is a desire for purebred stock, there are breeds of sheep that are uniquely suited for your specific needs.
Research Beforehand
Producing high-quality meat and by-products requires significant investment into veterinary care, equipment, facilities, and even shearing if this is hired out. Barns, while not required purely for shelter, are necessary for ewes to lamb in the dry.
Lambing Season Is Serious
Plan to devote a considerable amount of time to your sheep during the lambing season. From January to May, Bobby gets up three to four times a night so as not to miss a drop.
Do Sweat Predators
Predators such as coyotes and neighborhood dogs are a weighty concern. A perimeter fence, neutered guard dogs and guard animals—such as donkeys and llamas—can help alleviate this concern. Closely monitoring guard dogs for aggressiveness toward people and good public relations between the shepherd and the neighbor all play a role.
Keep Feed Seperate
If you are raising sheep and goats, don’t mix sheep and goat feed. Sheep can’t tolerate the copper found in goat feed.
Perspective on Goats
While sheep and goats have plenty of similarities in the areas of fencing, facilities, veterinary care, parasite and predator control, and, to some extent, feed, there are some key differences. Goats, for example, prefer a coarser stem to graze than sheep, love to browse and enjoy vegetation that grows higher off the ground such as vines.
As a hobby, Jess Wilson raises a small number of Alpine and Nubian cross dairy goats on her farm in Monteagle, Tennessee. “I’m currently considering crossbreeding with some meat breeds that are a little more resistant to parasites,” she says.
Auction Sales
While her goats are primarily used to produce milk and cheese for her family, she also sells goat kids at auction. “The prices are pretty high,” she says.
Wilson offers opportunities for the public to share labor in exchange for products from her farm that aids in educating the public about high-quality agriculture products available in the local community.
Just Kidding
Like the Collier’s sheep, Wilson’s goats produce kids in the spring, usually in April. Her goats are fed a commercial feed and are rotationally grazed.
“I usually let my babies nurse for two months or so,” she says. “Then, while the babies are still nursing, I start milking. After the babies are about a month old, I will sometimes separate them at night and milk in the mornings.”
After weaning, Wilson is usually able to obtain about a quart to a 1⁄2 gallon of milk per day.
On- & Off-Farm Value
While not a steady income stream to her farm, Wilson’s goats do allow her to supply her family with nutritious milk and cheese. She also raises grass-fed purebred and crossbred Gulf Coast Native sheep. Her goal is to raise sheep based on the national organic standards.
Along with breeding stock, she sells meat, available through an online farmers market, and raw wool. To help her price the meat cuts, she uses tools available on the National Center for Appropriate Technology website.
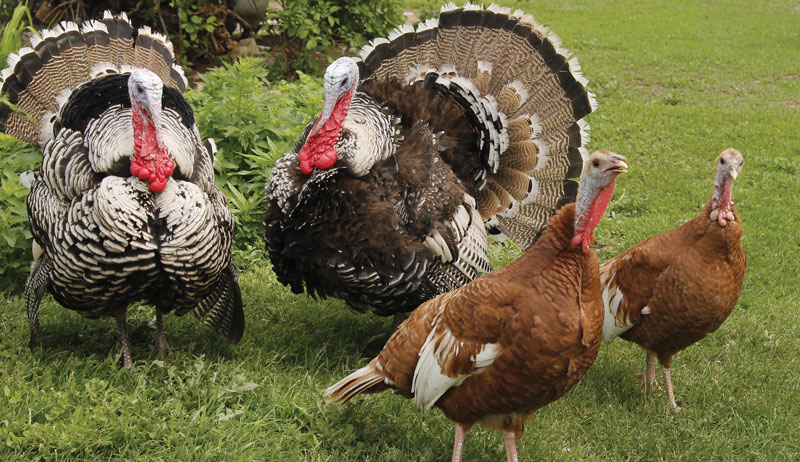
For several years of Thanksgiving and Christmas dinners, the quality of the featured roasted turkey grew more and more disappointing. This was often due to the mass-processing practice of injecting slaughtered birds with water and other additives to boost weight. The early culling of immature birds for selling small turkeys and the ongoing hybridization of various breeds were also to blame.
So my family decided to attempt to raise our own heritage turkeys. Little did we realize what this decision would involve.
With a number of years raising successful flocks of chickens, we made some assumptions based on scale of the animal. We did not, however, take into consideration genetic makeup or behavioral patterns. Our current flock of Rhode Island Reds chickens was still in its prime. The hens laid a substantial daily number of eggs, and the single rooster did great at what roosters do.
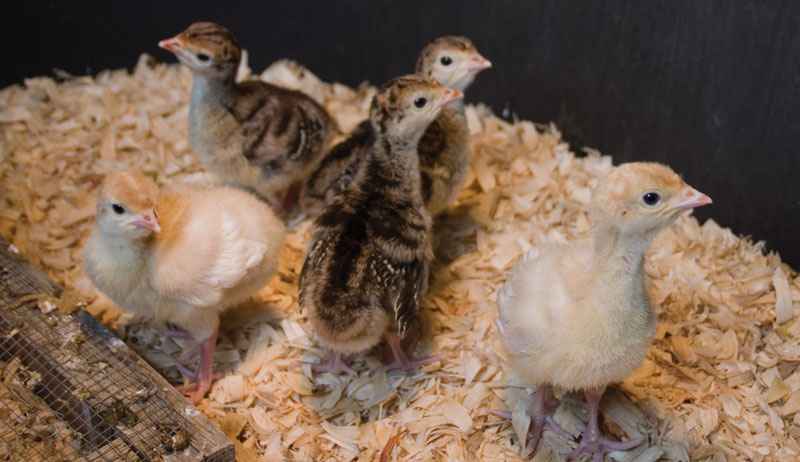
So instead of buying replacement chicks or incubating eggs to replace them, we purchased five Narragansett turkey chicks. We took into consideration the possibility of premature deaths that can occur for myriad reasons, yet having enough survivors to supply us with meat for the year end holidays.
Using a stock feeder to serve as a chick brooder, the chicks settled into their new surroundings. And they thrived.
A Matter of Scale
It turns out that this was really a short-term solution for housing. Within a couple of weeks, they grew quite large for chicks. They feathered out and bounced off the barrier screen that covered the top of the feeder.
The feeder/brooder could accommodate 10 to 15 chicken chicks for up to a month. But the turkey chicks indicated their need for larger facilities.
Luckily, we had a couple of vacant 4-by-4-foot “brooder coops” with 4-by-4-foot screen-topped “runs” attached. Into these went the turkeys.
They could pick at the weeds that grew from the dirt floor, get natural sunlight on warm days and supplement their diet with whatever insects and worms that they could find or dig up.
Yet within a month, they had outgrown these quarters. Their heads almost touched the screen mesh on top of the runs. Future habitation would require a lot of crouching to get around.
Earlier, we sold off our annual supply of roosters, except for one to keep our hens happy. This meant our rooster pen, with an 80-square-foot run and coop outfitted with a feeding station and roosts, sat empty.
It just made sense to relocate them to this pen, with room to roam and explore.
As the months progressed, the chicks grew into pullets. As they got larger, there were indications that this, too, would not work for long-term housing. By now, we couldn’t really call the turkeys chicks, as they took on features that differentiated the sexes.
With the final count consisting of three toms and one hen, and with space to roam disappearing, we realized another move was inevitable.
By the time summer firmly established itself—with a substantial increase in feed consumption, periodic restapling of the chicken wire to the pen’s wooden frame, an ever-decreasing amount of vacant pen space, and the holiday season being months away—it was time for yet another move.
B.P. Lemmon
Move Over, Rover
We had fenced in a large expanse, approximately 2,500 square feet, with field fencing to serve as a dog run to keep our three dogs confined when we were away for any length of time. Well, we evicted the dogs and moved in the four turkeys.
By this time, they had grown substantially, and moving them was no easy feat. A quick swipe in the face from a 25-pound panicked bird’s wing can knock off one’s glasses and leave a red welt. And carrying 20 pounds of flapping fury four times on a hot afternoon really tests one’s patience.
The initial concerns of the birds flying over the 5-foot-tall fencing and escaping were almost immediately dispelled. Aside from initial wing flapping, the turkeys never showed any inclination of trying to lift their girth off from the ground, content to lumber from point A to point B in slow methodical steps.
Now with plenty of room to roam, the hen could get some relief from the slow-strutting toms. And there was plenty of ground to scratch, insects to prey upon and abundant weeds to nibble.
With a covered wooden frame from which to hang a feeder and water font, and a simple three-sided wooden shelter to escape any inclement weather, they settled into their own little world.
And Then It Turned Hot
Spring slipped into summer, with the temperatures rising into the high double digits and then sliding into triple-digit territory. The birds, especially the toms, were rapidly growing to a point where their strut seemed ungainly.
By midsummer, we were well into having to spray all of our poultry with cool water every couple of hours to prevent loss due to heat stress.
We discovered a turkey’s IQ is somewhat on the low end. The species’ “elevator doesn’t necessarily go to the top floor.”
We had heard stories of turkeys drowning in torrential downpours because they don’t have the sense to get out of the rain and actually will stand out in the open with their heads raised to the sky with their mouths open. It became evident that this might be more than a rural legend when we cooled the birds with a water spray.
They would line up and put their heads in the direction of the spray, mouths open and eyes rapidly blinking against the onslaught of cooling moisture.
Party-Time Gone Awry
One morning, we found one of the toms had died. He appeared healthy and active at the morning feeding. However, within a three-hour period, he had keeled over in the middle of the pen.There was no hope of resurrecting him.
It was relatively cool as the heat of the day had yet to develop, ruling out heat stress as a cause.
Fungus Among Us?
Poultry can succumb suddenly for a number of reasons, many of which can’t be determined without post-mortem lab work. Turkeys are sloppy eaters and drinkers, with more feed and water falling to the ground than they actually consume (or so it sometimes seems).
With the water font being close to the hanging feeder, the feed on the ground was damp. We suspected that it could have been moldy food that was the cause. But all of the other birds were just fine and showed no signs of any ailment or negative reaction that might have resulted from an unsanitary feeding area.
We did a thorough cleaning and disinfecting around the feeder area and relocated the water font several yards away from the feeding station. This was to help ensure no further possibility of mold and/or fermentation and another untimely demise. The two remaining toms and the hen were now safer.
With a false sense of security, we began planning for the holidays, which were still months away, trying to decide which birds would be served at Thanksgiving and Christmas, and whether we would have enough freezer space to hold such a big bird in case we had a desire for a turkey dinner during the following spring or summer.
B.P. Lemmon
Dog-Days Afternoon Follies
With summer’s end in sight but not yet gone and temperatures lowering to a more tolerable range, we experienced fewer bi-hourly showers.
One day, there was an egg in the straw bedding of the shelter. The hen had reached a new benchmark in her development, and the toms were becoming more “protective” of her. They placed themselves between her and whoever might enter the pen.
The toms displayed more frequently. They spent most of the day with their tail feathers fanned, wings drooping almost to the ground. They raised their necks and heads upright and pushed back into their fluffed back feathers.
Their neck wattles turned a bright red in color. The hen would subsequently lay an egg every other day, like clockwork.
Stuck on Its Back
One afternoon, a bird was lying on its back in a heap with its wings splayed out and nothing moving. With trepidation upon entering the pen to remove another carcass—this time the hen’s—I noticed the feet clawing at the sky and the head lifted upward in wide-eyed panic with the beak gasping silent screams.
Evidently, she had somehow ended up on her back, whether tipped over by an amorous tom trying to mount her or trying to give herself a dust bath. With her wings splayed out, she couldn’t get the leverage to roll herself back upright. How long she remained in that predicament was anyone’s guess. Without help she would have eventually died.
Luckily, after flipping her over on to her belly and once on her feet again she strutted off as if nothing happened.
Shortly after one of the tom turkeys developed a crooked neck as if somehow he got a muscle sprain of some sort, perhaps in a fight with the other tom. Research suggested that this might be a result of Mycoplasma meleagridis, a chronic egg-borne upper respiratory disease found in turkeys.
Though the tom didn’t exhibit other symptoms of this condition, nasal discharge and difficulty in breathing, we put the bird on an antibiotic. This seemed to help but the wryneck would return once off of any medication for a while.
Aside from having an “S” shaped neck, he seemed to be a healthy bird. He experienced no loss of appetite, no lack of attention to the hen, no coughing, no signs of loose droppings and no weight-loss or listlessness.
Lessons Learned
Though he lived a seemingly normal trouble-free life, the remaining wry-necked tom succumbed, we assume, to his chronic ailment by the second month of the new year. Shortly after the afternoon feeding, at which time all seemed normal and with no indication of impending problems, he was found dead in the pen.
A neighbor had witnessed a lot of thrashing in the pen and was surprised he had expired.
Now alone, the hen provided a steady stream of eggs. As turkeys are reputed to be a very social species and don’t do well alone, she became best buddies with our three goats in an adjoining, though much larger, fenced-in area.
She immediately sidled up to anyone who entered her pen, could be hand-fed and followed the fence line anytime someone walked by the pen.
Heart Attack
Because of the unexpected demise of the two toms, we researched the literature and came up with a possible cause. If you find a turkey dead on its back with legs outstretched to the sky and neck and head stretched upon the ground and no evidence of trauma, you can assume the probable cause of a heart attack.
In butchering the third tom we did observe an inordinate amount of fat in the abdominal cavity.
We adhered to the scheduled transition of one feed to the next as they grew. However, we never transitioned to a lower protein maintenance feed. With the high protein levels in his grower feed increased its fat content, possibly putting a strain on his heart.
So, what lessons has this tale of misadventure taught us? Like every new venture, one needs to experience a learning curve. No matter how much research one has done, it ultimately becomes a “been there, done that” process of maximizing on success and learning from failure.
More Information
Room to Roam
Turkeys need a lot of room to roam, much more than a small flock of chickens because of their size. Up to 50 percent of their recommended dosages of vitamins and minerals come from free-range pasturing.
So just remember, more room means healthier birds.
Harvest Age Notes
The optimal timing for slaughter is between 18 and 28 weeks for turkeys—20 to 24 weeks being ideal. Any younger and the fat deposits are insufficient, resulting in a dryer meat.
Slaughter beyond 28 weeks can result in too much fat and stringier consistency to the meat, especially the breast meat.
Social Scene
Turkeys are a very social species. A single bird doesn’t do well alone and will attach to another species in close proximity. However, a mixed flock of turkeys and chickens isn’t a good idea. Each can experience susceptible to adverse reactions to diseases that each species may carry.
An immunity to a parasite or bacteria that a chicken may carry can harm and even kill a turkey, which has no such immunity. Even housing turkeys in quarters once occupied by chicken flocks can result in sick birds, stunted growth and even death.
This article originally appeared in the March/April 2022 issue of Hobby Farms magazine.
A hügelkultur is a mash-up of a slow/cool compost pile and a garden bed. It allows you to create a foundation using materials that take a long time to compost at the bottom of the bed, such as rotting logs, branches, sticks, woody vines, eggshells and fruit pits. This woody layer is covered with carbon-rich materials and compost. Green waste and manure can also be added, similar to the layers in sheet mulching. The mound is finished with a layer of compost that can planted. The materials in the center of the beds take a long time to break down, so this compost pile is useful as a self-feeding, long-term garden bed. It is beneficial to plant biodynamic or wild plants, which will continue to act as soil fixers, break down the organic matter, and add nutrients to the soil.
Stephanie Rose
A hügelkultur is well-suited to a woodland or forest in order to efficiently use fallen tree branches and create rich beneficial garden beds and soil. This concept can also be created in home gardens as a feature for growing all sorts of annuals, perennials, food crops, and ornamentals. Hügelkultur gardens are very good at holding water and heat as they decompose, so plants will enjoy early crops and longer seasons.
While most compost and mulch systems require the organic material to be in small or chopped up pieces in order to accelerate decomposition, there is huge value in adding large pieces of rotting wood and branches to gardens to hold moisture and encourage beneficial fungi. In new garden beds, this helps to inexpensively fill the space without a need to bring in heaps of new soil while at the same time increasing water-holding ability.
Stephanie Rose
The space around the wood is then filled with compost, organic matter and carbon materials to create a slow compost pile. Top the bed with a foot of compost, and plant directly into it. This type of bed will need much less watering throughout the season and works well for nutrient-hungry crops such as blueberries or potatoes.
More Information:
Make It!
Map out the location that you would like to build a hügelkultur using flour or string. Dig the hole at least 18 to 24 inches deep.
Add rotting logs, sticks and twigs to fill the basin and
create a mound.
Fill in the spaces between the logs and branches with other slow-to-decompose materials such as woody vines, eggshells and fruit pits.
Add a layer of carbon material (such as paper, straw or leaves) over the top of the woody layer.
The top layer can be 6 to 8 inches of compost, which you can plant right into. However, feel free to add more layers to the mound. A layer of green waste on top of the compost will speed decomposition. A layer of well-composted manure will feed the plants while the layers below decompose. If you add these additional layers, then top with a final 6 to 12 inches of compost on top for planting.
Planting Tips
Mound slow-to-decompose materials such as rotting logs and branches, cover with a carbon layer, and then add a top layer of compost that can be planted.
Add other slow-to-decompose materials such as fruit pits and eggshells to the mound. Add more layers on top of the compost such as manure and carbon sources, and then top with more compost and mulch around the plants.
Plant hügelkultur with biodynamic or wild plants.
This article, which originally appeared in the March/April 2022 issue of Hobby Farms magazine, was excerpted and printed with permission from The Regenerative Garden: 80 Practical Projects for Creating a Self-sustaining Garden Ecosystem (Cool Springs Press, 2022) by Stephanie Rose, founder of GardenTherapy.ca and award-winning author and teacher of organic gardening and permaculture.
Land management entails a few different components. And a landholder has a variety of tools available for each of these components.
Take, for instance, fire. Fire is a natural process and was an important part of the ecosystem before humans enacted suppression techniques. And this suppression is, of course, important to our modern safety and well-being, so control is critical to any intentional burning we do.
Controlled Burns
When you’re burning areas on the farm, it’s very important to have and keep an objective in mind. For the burn in the video above, I want to burn winter-cured grass on my Texas farm. My objective for this? To promote growth of cool-season spring grass.
Another benefit: There may be some native seeds in the seed bank on the land. Fire could unleash the potential of those seeds as a result of the burn. Best case scenario would see these native seeds germinate and grow as a result of our controlled burn.
I find it much easier to control a small fire, so I keep the area that I burn to a minimum, too.
Beyond intended results and objectives, though, one must always keep safety top of mind when starting a controlled burn.
First, answer this key question: Is burning legal in my area? If you don’t know, find out before even thinking about starting a burn. Also check with local authorities to make sure no burn bans are in effect.
Second, pay close attention to your weather conditions for the hours you intend to burn. A higher humidity will give you more control over your burn, supporting a slower burn.
Also take note of wind speed and direction. If you significant winds—over 5 or 10 mph—it’s not worth the risk of an out-of-control fire.
Tools for the Job
You want to make sure you have some basic tools, too, to help you keep the controlled burn under control. I make sure to have the following on hand:
Garden rake
Shovel
Leaf blower
Check out the video above to see my burn in action, as well as how I use these tools to control my intentional burn.