“Being immersed in nature is extremely grounding and calming, and horses are amazing healers,” says Jessica Bennie, who runs the indigenous therapeutic Bennie Farm in Ladysmith, British Columbia.
While Bennie Farm helps to provide for Bennie’s immediate family, she prides herself on the way the venture also has a broader impact.
“The most rewarding part about running our family farm is the impact it has not only on our own family but our community,” she explains. “Children enjoy coming here for riding lessons, therapeutic sessions and day camps. And I love seeing the joy on their faces when they are able to connect with the land and animals here.
“Hearing parents say their kids look forward to their time here makes me feel like I’m on the right path to helping others heal.”
Taking a moment out from farm duties, we spoke to Bennie about creating safe spaces through farming and growing the crops your family enjoys the most. We also got up to speed on a resident rooster named Romeo.
Looking back on the first steps of her farming journey, Bennie says that it all began at an early age when she became smitten with horses.
“When I then went on to have my own children, I wanted to teach them where their food comes from,” she adds, connecting the past to the present. “So we started growing a small garden on our apartment balcony.”
Bennie Farm is billed as a therapeutic family-centric venture. In practice, Bennie says that this translates to creating and fostering “a safe space for our community to heal trauma through culture [and] connection to land and animals.”
She adds that “being immersed in nature” becomes a “grounding and calming” experience—and that the farm’s horses in particular bring an extra level of healing prowess to the setup.
When it comes to specific crops, Bennie says that it’s important to “grow what your family consumes the most.” So you’ll find Bennie Farm producing a bounty that’s headed up by potatoes, beans, peas, cauliflower, broccoli, Swiss chard, lettuce, tomatoes, onions, garlic, carrots, apples, raspberries, strawberries and beets.
“It’s really amazing to go out and harvest straight from our garden for our meals when they’re in season,” says Bennie. “With all those veggies, the recipe ideas are endless.”
Nugget is one of two mini-pigs that call Bennie Farm home, along with a Kunekune named Pickles. “They’re extremely bonded and love each other very much,” says Bennie. “Nugget loves to play with the horses through the fence and often shares his shelter with the occasional chicken.”
Complimenting Nugget and the pigs, Bennie Farm also counts on a rooster named Romeo to help things run smoothly. “Romeo has free range of our entire property,” says Bennie. “He is a sweet, docile and affectionate rooster who produces melanized chicks with kind dispositions. We take great pride in our chickens’ gentle temperaments. Romeo loves snuggles and often comes to greet us every time we go outside.”
Beekeeping isn’t quite as by-the-calendar as it once was. In particular, warming temperatures and changing weather patterns have caused some important nectar sources such as dandelions—and many types of trees—to begin blooming sooner.
What’s more, bloom duration and the overlapping of blooming times for different flower varieties aren’t as reliable either. As a result, interruptions in the nectar flow have become more common.
Taken together, all of these changes have made managing honeybee colonies that much trickier but, fortunately, not impossible.
Flower Power?
For his part, Kim Flottum has long used dandelion bloom times to delineate his beekeeping year. “There is ‘before dandelions’ and ‘after dandelions,’” he says. Flottum, a beekeeper and former editor of Bee Culture Magazine, co-hosts the “Beekeeping Today” podcast and is the author of Common Sense Natural Beekeeping.
“If your dandelion [bloom times] have changed, then other things are going to change,” Flottum says. “So, you may have to do some things earlier than you normally would. Or you may not be able to do things earlier.”
Let’s say you put extra supers on the hive sooner than usual in order to coincide with those earlier bloom times. Will you have a large enough bee population built up in time to take advantage of the earlier nectar flow?
And what about interruptions between flower sets? While some plant bloom cycles are triggered by a certain combination of day length and temperature, others react only to day length. “Both of those things are affecting when the bloom date is and whether blooming will overlap,” he says. “If blooms used to overlap, you would get a much stronger honey flow, than if [a flower type] blooms, you have to wait a week, and then something else blooms.”
Blooming changes toward the end of the season are also affecting beekeeper behavior. “My asters and goldenrod are done about a week to 10 days earlier than they were 10 or 20 years ago,” Flottum says. “When things are done earlier and you have a big [bee] population, you’re either going to have to take less [honey] or feed earlier in the fall.”
One of the best ways to cope is to use your winter downtime to connect with fellow beekeepers in your area via social media and your state beekeepers’ association. As you make new contacts, compare notes about changes they’ve observed in local floral bloom times and bloom duration.
Which plants, historically, have been the biggest contributors to the nectar flow near you?
How have they performed over the last 5 to 10 years?
Are any new plants taking their place?
Were certain months especially difficult on other beekeepers in your neck of the woods, and, if so, how did they manage?
Also, if you haven’t already begun one, now’s the time to start a beekeeping journal or notebook. Thanks to some simple record-keeping, Flottum has proof that local bloom times have shifted.
“I’ve got 40 trees on my lot, and probably 38 of them are honey plants. I know when they’re going to bloom almost to the day, and things are definitely earlier now.”
Perhaps more than ever, it’s up to beekeepers to actively provide their bees with long-term nectar sources. After speaking with other beekeepers in your state, you just might discover some new-to-you plant varieties, which performed surprisingly well for them.
Take note of these and incorporate them into your own landscape for next season.
You might also want to use part of your fall season to plant spring-flowering bulbs because these may help to offset other nectar and pollen losses. Plant snowdrops, crocuses, bluebells and grape hyacinths, among others, to boost bees’ access to early pollen and nectar sources.
(Just make sure the bulbs you plant have not been treated with neonicotinoids.)
Lindsay Snow/Shutterstock
Mite Management
The more things change, the more some things stay the same—such as our longstanding battle with the Varroa mite. When and how you combat these potentially devastating parasites depends at least in part on the number of hives you’re managing and your beekeeping objectives.
A commercial, honey-producing or pollination outfit might test for the presence of mites in early spring and apply chemical miticide treatments before the nectar flow has begun. (They also repeat this process after fall honey collection is through.)
But there are plenty of nonchemical means of mite control. “It may be genetics, it may be management, but it shouldn’t be poison,” Flottum says.
He has had good luck with certain strains of mite-resistant Russian honeybees. Bees bred to be more mite-resistant are typically more expensive than, say, your standard Italian stock. But they can provide beekeepers with an edge.
For instance, some mite-resistant varieties are more likely to spot and remove mites hitching rides on the backs of their sister bees. Still others are actually able to detect parasitized brood cells. To fix the trouble, they uncap affected cells and remove the bad brood—mites and all.
These special bee packages are increasingly in demand. Use late fall or very early winter to investigate mite-resistant bee suppliers and pre-order these bees.
Although it’s somewhat labor-intensive, Flottum begins testing for mites in early spring. “I get out there about twice a month [to test] and that’s for most months,” he says. “You’ve got to know what your mite population is, because, if it gets out of hand, you’ve got a dead colony.”
Aside from mite-resistant bees, Flottum also relies on brood breaks and drone brood removal all season long. “You are always treating for mites in the way that you’re managing your bees,” he says. “You are counting mites. And, if you get to a point where you have to do a brood break, you do one of two things.
“You just remove the queen and start another nuc or you cage the queen, depending on how you want to manage it.”
Varroa mites need larval bees in order to reproduce. Arrest the honeybees’ brood cycle, and you’ve also interrupted the Varroa mite’s ability to reproduce. Flottum takes brood breaks several times each year. But, he admits, this management technique isn’t for everybody.
“It decreases my honey production. There’s no doubt about it,” he says. “But you have far fewer mites. … I’d rather do this than put poison in a hive.”
Just don’t expect to be able to clear up a heavy mite infestation by taking a brood break late in the season. “Look at the length of the brood cycle and how long the colony will need to catch up. If your mite count is high in August, your colony is dead,” Flottum says. “You’re either good in August or you’ve failed the season.”
Incidentally, those brood breaks accomplish one other goal: swarm control.
“I break the brood cycle early, and I do that for Varroa control. But it also stops the swarm cycle,” Flottum says. “I’ll make a split and I’ll make another split and another split. I will end up with seven or eight nucs out there for a month or two, and then I put them all back together. It’s good if you’ve got the space and the time.”
You also need plenty of equipment. If you want to try using more nucs in your own apiary, you can use the fall and winter months to build or order extra frames and supers as needed.
Winter Prep & New Beginnings
Careful overwintering is just as important as late-season mite control. As a general rule, hives need about 70 pounds of honey and sometimes more—to get through the winter. If you saved some of the bees’ honey stores during the height of your local nectar flow, you might want to feed some of this back to them beginning in late fall.
And during the winter months, periodically lift one edge of the hive to gauge its weight. If it starts to feel light, your bees may need supplemental fondant or candy board. Some beekeepers choose to feed their bees all winter long, regardless of the hive’s weight.
To make harsh winters a little easier, erect nearby wind breaks in late fall. You can also protect the hive with insulating tar paper or commercially available hive wrap.
“You’re trying to duplicate the inside of a tree trunk with an R-factor of 5 or 6 instead of 0.4, which is what a Langstroth hive has,” Flottum says. “I protect my bees in the winter significantly. I think people should be doing more of that.”
As winter turns to spring and the bees break their winter cluster to take cleansing flights, you can (briefly!) look in on them. And, if you trapped pollen last season, you may want to start giving the burgeoning colony a boost of this about now, too. Finally, when it is warm enough to safely inspect your hives again, be sure to look for the queen and evidence that she’s healthy and laying.”
This article originally appeared in the January/February 2022 issue of Hobby Farms magazine.
As someone who has had chickens in her life pretty much from infancy on, I’ve heard of and witnessed firsthand some incredible stories involving intrepid, curious and adorable hens and roosters. I’ve often considered writing them all down somewhere and publishing them as a book.
Of course, the moment I decide to do that, two roosters start battling it out. Or a hen runs across the lawn cackling or some other distraction occurs, and the creative spark extinguishes until the next time.
I may still write that book someday. For now, here are three of my favorite stories to share with you.
Pepito the Postal Rooster
When I was a little girl, my grandmother’s neighborhood was very close knit—almost a family. The neighbor from across the street would wave and call to us as she hung her laundry out to dry on her rooftop. The older gentlemen who hung out at the corner store always lifted their hats in greeting to me whenever I stopped by for an ice cream with my grandfather.
And the lady next door … well, she had Pepito.
Pepito was a scrawny mixed-breed rooster with a floppy single comb and jaunty yellow legs. All of the residents in the neighborhood, including my grandparents, kept several chickens. But those birds were confined to the backyard and courtyard areas of each home.
Not Pepito. He was permitted to stroll wherever he wanted.
Pepito seemed to know what his barriers were. He never ventured beyond the intersection with the main road, and he always returned home before sunset. From mid morning to dusk, however, Pepito wandered around. None of us, including my grandmother’s neighbor, knew when the rooster would pop up.
I kept some pieces of bread (snuck from my grandmother’s kitchen) in my pocket, ready to offer the little rooster a treat should I encounter him.
The only time that any of us knew where Pepito would be was when the mail carrier arrived. I no longer remember the man’s name. I do remember that he would cheerfully greet every resident by name as he stopped by each gate to deliver letters and parcels he carried in his brown leather bag. And, at his heels, there’d be Pepito.
The scrappy rooster seemed to watch for the mail carrier’s arrival at the far end of the street. He would then trot alongside the man, pausing at each gate as mail was exchanged, then moving along to the next house. When the mail carrier reached the final house, Pepito would crow a perky goodbye to his postal-worker, waiting until the man had turned the corner before scampering off to who knows where.
Actually, one of the neighbors did indeed know where Pepito disappeared to: the woman who lived across from the corner store. Her house was the last house on the street, the last house both Pepito and the mail carrier visited.
One afternoon, my grandmother came home a little out of sorts after paying a call on this neighbor. It appeared that the woman’s three layers had all just hatched nestfuls of chicks. Apparently Pepito had made a special delivery to this trio of hens.
To this day I’m still not certain why my grandmother was bent out of shape about this. I suppose she expected Pepito to only court one hen, not all three!
Pittsburgh-Bound Poultry
A few years ago, several freight trucks arrived in Pittsburgh, hauling loads of gravel from a quarry in Indiana. When the trucks workers unloaded, they discovered a surprise: A little rooster had hitched a ride amongst the rocks.
The rooster seemed nonplussed by his 500-mile trip. He hopped down and began to scratch the ground, looking for food. Whenever one of the workers tried to approach the bird, he’d squawk and dash out of reach, then return to his scratching once the worker backed away.
Nobody knew exactly what to do with the little bird. There was no way to contact his owners back in Indiana. For all they knew, he might not have an owner. He could have been a boy chick released to the wild by a microflock owner prohibited from owning roosters.
The little traveler spent his days exploring around the gravel piles, hunting for insects and soaking up the sun. He’d crow every now and then to remind people that he was still there. He resisted all attempts at capture, and no one quite knew where he sheltered for the night, just that he wasn’t causing any problems.
The owner of the gravel yard finally decided it simply wasn’t a good idea to have a rooster wandering around. Perhaps he was afraid that the poor bird might get mowed down by an oncoming truck. Maybe he was concerned that the rooster would hop onto a truck making a local delivery.
Whatever his reasons, the rooster had to go. The owner called a local poultry farmer, who came and, after a lot of chasing, cornering and grabbing, finally caught the chicken. The rooster became part of the farmer’s flock, his traveling days at an end.
Pepper’s Balancing Act
My friend Chris loves his chickens. He keeps a small flock on his acreage in western Pennsylvania and frequently posts photos of them on his Instagram account. Each bird is thoughtfully named, and Chris can cheerily recount tales of each individual’s antics.
We swapped chicken stories recently and Chris shared the story of his rooster, Pepper. A curious little guy, Pepper had a fascination for anything red. He wasn’t like a bull charging a matador’s cape. Pepper simply loved the color and would gravitate toward anything any shade of crimson.
One day, Pepper was wandering around the yard when he caught sight of a red object he had never seen before. When Chris looked out, to his amusement he saw Pepper perched on top of a bounce ball—the kind sold in supermarkets and department stores—balancing as if he were a circus act.
Pepper laid claim to the red ball. Chris had no problem letting the little rooster have it.
In fact, Chris trained Pepper to do a trick with the ball. Chris would call out, “Pepper, go get your ball!” then toss the ball into the yard. Pepper would then chase the ball down and perch on top of it.
Both Chris and Pepper had great fun with this trick … until the day Pepper gripped the ball with his talons too tightly and punctured it. For the next few days, Pepper would amble over to the deflated heap of ex-ball and poke at it, as if telling his toy to get up and play. Poor Pepper!
Several days later, Chris’ wife came home from errands and asked where Pepper was. When Chris indicated that Pepper was out back in the yard, she headed outside and called out, “Pepper, go get your ball!”
Then, from a shopping bag, she pulled out a brand-new red kickball, the durable kind used in elementary schools and that could stand up to a rooster’s talons. Pepper was thrilled to have a new red ball friend, and Chris—and his wife—could once again enjoy their rooster’s balancing act.
At Virsylvia Farm in the high desert of New Mexico, Tyler Eshleman and his wife raise goats for dairy and fiber; sheep for dairy, meat and fiber; alpacas for fiber; laying hens; and some vegetables. Hear about the realities of regenerative farming at 8,000 feet above sea level, from the challenging growing and land conditions to the cooperative workings of fellow farmers. Learn about Tyler’s innovative marketing means to get more local food into the hands of more people in his area: a year-round pay-what-you-can farmstand for his and other farmers’ products, a multi-farm meat CSA, and a goat- and sheep-dairy herdshare. (Also, when you visit him at the farmers market, you can make your own goats-milk ice cream using a bicycle-powered ice cream churner!)
Listen in for Tyler’s best advice for bringing dairy goats to your farm, from goat breeds to feed sourcing and knowing your state’s raw-milk laws. Tyler also talks about his off-farm work with the Quivira Coalition and New Mexico Coalition to Enhance Working Lands, bringing together agricultural and conservation organizations to support farmers and ranchers who are contributing to healthy soils, clean waterways and vibrant communities. And stay tuned until the end to hear Tyler’s favorite ways to eat goat cheese.
Cellaring, canning, drying and freezing are all easy and trustworthy preservation methods that allow us to safely fill our larders for the winter. However, the ancient practice of lacto-fermentation is often overlooked despite its long history.
This is unfortunate, because this fermenting technique is easy to learn. And with only a few pieces of equipment that you likely already own, you can preserve nearly any vegetable with minimal startup costs.
Types of Ferments
Wines, breads, yogurts and krauts are all products of fermentation—a natural process by which microorganisms convert a complex substance into a simpler one. For example, wine is produced when yeasts convert sugars in fruit juice into alcohol.
Bread is produced in much the same way as yeasts convert sugars into alcohol and carbon dioxide. Carbon dioxide produces the rise so desirable in well-made bread while the alcohol cooks off during the baking process.
However, yeasts aren’t the only organisms capable of producing ferments. Many ferments, such as sauerkraut, are created with the aide of lactobacillus bacteria within an anaerobic environment. Instead of converting sugars into alcohol, the end product is a natural preservative known as lactic acid.
It’s this acid that imparts the tart and tangy flavor common to lacto-fermented foods and also inhibits the growth of Clostridium botulinum and other pathogenic microorganisms.
You can acquire lactobacillus via online sites and brick-and-mortar stores, which now carry varying strains of starter cultures. When making a selection, choose starters according to personal preference on the end product’s taste.
Yogurt is a good example as varying cultures produce anything from mild to moderate to extremely tangy yogurt.
However, the practice of capturing wild cultures is still widely used today and is my personal favorite. With this practice, no starter is utilized. Rather, fermentation relies on naturally occurring bacteria found on the vegetables.
For best results, keep in mind that many conventional methods of farming inhibit the growth of these beneficial bacteria, making local, organic produce a more reliable choice.
The primary drawback to depending on wild cultures, however, is the lack of control over the final taste as the flavor depends on which specific strains of Lactobacillus are present. This unpredictable nature of wild culturing is what many enjoy, as each creation is truly unique.
Equipment/Ingredients
Regardless of the culturing method, equipment and ingredients are essentially the same. You can either purchase an entire system that includes everything needed except for the cutting tools. Or you can create your own setup from items you may already own.
You’ll need a sharp knife, mandolin or food processor, a nonreactive vessel such as a food-grade ceramic crock (slow-cooker inserts work quite well) or various sizes of canning jars.
You’ll also need a weighting system to keep vegetables submerged under a salty brine from start to finish. Plastic zipper bags filled with water or plates weighted down with a heavy jar are excellent weights. Their heft pushes the solids down into the brine, creating an oxygen-free environment.
Finally, you’ll need a cover to place over the vessel to keep bugs out such as plastic wrap, a loose fitting lid or a tightly woven tea towel and rubber band.
Most ferments only require three ingredients: produce, salt and water. When possible, select blemish-free, organic, local produce. Salt is also recommended to keep vegetables crunchy and to assist in preventing pathogenic microorganisms from taking over the ferment and causing spoilage.
Select unrefined sea salt or pickling salt instead of table salt for best results. Use filtered water, if possible. However, dechlorinated tap water will work in a pinch as well.
The fermentation process is almost as easy as selecting ingredients. Simply wash produce in cool water and chop to the desired size. Smaller pieces ferment faster than large chunks. And some vegetables such as cabbage and carrots require a little pounding with a potato masher to release their juices.
Once chopped, mix vegetables, seasonings and salt (if creating a self-brining ferment) in a separate bowl, ensuring salt is evenly distributed. When adding salt, however, be aware that too little will allow the ferment to spoil, while too much nearly stops the fermentation process.
Kristi Cook
A very general rule of thumb is to salt at 1 to 5 percent the total weight of produce, or as some recommend, salt to taste. Again, this is a general rule and is where the art of fermentation comes into play. As always, experimenting is key, especially if not following a recipe.
If using vegetables that release enough juices to create their own brine, such as tomatoes and cabbage, proceed to tightly packing the mixture and all juices into the fermenting vessel, leaving 2 to 3 inches of headspace.
However, in the case of vegetables requiring additional brine such as cucumbers or green beans, instead of mixing the salt with the vegetables, add the required salt to the water and stir until dissolved. Then, tightly pack the vegetables into the vessel and add enough brine to cover by at least 1 to 2 inches, leaving an additional 2 to 3 inches of headspace for gases to escape.
Push It Down
After all vegetables and brine are in the vessel, proceed with adding weights, pushing vegetables tightly beneath the brine. If using a plate and jar, brine should rise on top of the plate. Plastic bags, however, tend to keep much of the brine underneath.
Once weighted down, add a loose fitting lid that can be quickly loosened to allow for the escape of gases.
Next, place vessel in a cool, 60- to 75-degree Fahrenheit room, and wait a few days before peaking or tasting. During those first few days, loosen the lid to allow gases to escape momentarily. It’s during this time that bubbling may occur, which tells you fermentation is occurring.
After three days, begin taste testing with a clean utensil. Once the ferment reaches the desired tartness and flavor, move the container to the refrigerator or root cellar to slow the fermentation down to a crawl. The ferment is now ready to consume and will store well for several weeks, depending on the ferment and storage conditions.
Still Good?
But wait! What’s that floating on my ferment? There are times when a ferment will grow something quite weird on its surface. Often it will be a whitish film, called kahm yeast, that just hangs around on top of the brine.
It’s a perfectly harmless collection of yeast that should be skimmed off as it appears. Otherwise, it can impart a strange taste to the ferment.
Other times, circles of fluffy mold develop, and again, it’s almost always harmless and simply needs to be removed. This cycle can continue throughout the fermenting process and is normal.
Your nose will know if the ferment has gone bad. While it’s true that yeasts and molds on top can have an unpleasant odor, a good ferment will have a pleasantly sour, tangy smell underneath the floaters. If uncertain, allow the ferment to continue for another couple of days as the odor will intensify to gagging level if the vegetables are indeed rotting rather than fermenting. Other signs of spoilage are vegetables turning brown or slimy to the touch. If either occur, compost the ferment and start over.
Crafting fermented vegetables is a combination of science and art. Some ferments will be delightfully tasty while a few will fail in astronomical—and quite stinky—ways.
This, to me, is part of the fun of fermentation. So don’t be afraid to experiment, and don’t be discouraged when something doesn’t work out. And if you happen to have a science nerd in the family, grab the microscope and have a little biology lesson with the floaters.
Recipes
Fermented Pickles
Ingredients
3 pounds small, whole pickling cucumbers, blossom end removed
5 to 8 sprigs of whole dill
6 cloves garlic, minced
1 1⁄2 tablespoons dill seed
1 1⁄2 tablespoons black peppercorns
2 oak or grape leaves (helps keep pickles crunchy)
6 to 9 tablespoons pickling or sea salt
water, enough to cover
Preparation
Tightly pack all ingredients except for salt and water into a gallon-sized fermenting vessel. Make brine and add enough to allow for a minimum of 1 inch of brine above vegetables.
Add weighting system and loosely apply lid. Place vessel in cool location.
Remove gases each day as needed. Remove floaters daily. Begin tasting after 1 week.
Remove to refrigerator or root cellar when ferment reaches desired flavor. It’ll keep for several months.
Sauerkraut
Ingredients
1 large red or green cabbage
caraway seeds, to taste (optional)
3 to 5 teaspoons pickling or sea salt
Preparation
Remove outer leaves of cabbage and slice into quarters, removing the core. Using a mandolin or sharp knife, shred cabbage into small, slaw-sized pieces. Place each quarter in a large bowl, adding 1⁄4 total salt between additions.
With potato masher or other heavy object, press against the cabbage to encourage the release of juices. Continue until all four quarters and salt have been added. (Note: Some cabbages are more stubborn than others at releasing juices, so it may be necessary to make a small amount of brine to add to the mixture.)
Add mixture to fermenting vessel. Apply weights and lid, placing vessel in cool location.
Remove floaters daily. Taste after 3 to 4 days and continue until kraut reaches desired flavor.
Store in the refrigerator or root cellar. It’ll keep for several weeks.
This article originally appeared in the January/February 2022 issue of Hobby Farms magazine.
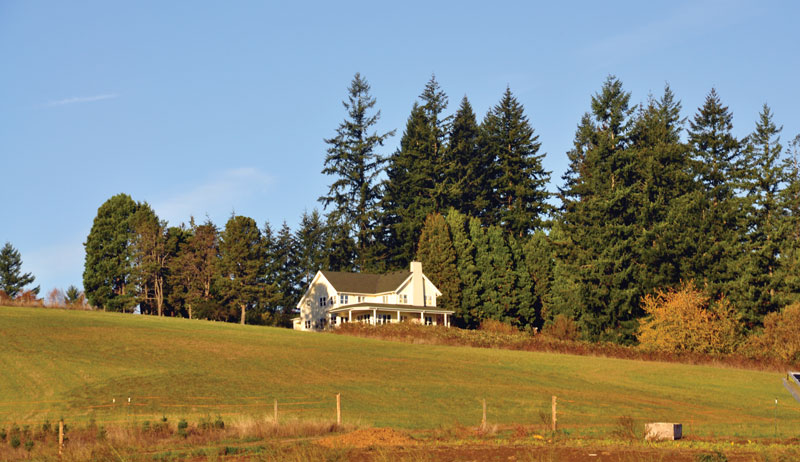
What’s your dream?Ask almost anyone and they might answer with the same idyllic farmland scene: A modest farmhouse, tucked against stately oak trees with a couple of big red barns and a chorus of birds singing sweetly through the open bedroom windows. Fluffy hens dot the edges of the large yard. A flag billows gently in the breeze, and nice raised-bed gardens provide the freshest produce.
Perfect, right?
Growing up in the country, I had the opportunity to see a variety of homesteads and farms around the area. My childhood home was built on a rock hill with a large river running (and sometimes flooding) behind the house. Trees enveloped the backside of the hill. Brome grass carpeted the front.
In later years, I spent some time on my great-grandmother’s farm. While not as active as it once was, it still ran an assortment of cattle and offered plenty of freedom for a child to wander around. A swampy marshland was a good-distanced walk west of the house and held plenty of mystery for anyone with a pinch of imagination. To the south of the farm lied a busy highway and railroad track.
Distant traffic created a gentle hum for anyone listening from the side yard.
While both of those places were different in their charms and offerings to the wanderer, they each served their purpose and raised large families throughout the years.
As you consider where to begin when starting your journey to purchase farmland, begin with a piece of paper. Don’t panic. You don’t need to have everything planned perfectly for how you intend to use the land. But it helps to have a rough idea so you don’t end up in a mess later on from a lack of forethought.
Questions to Ask When Looking at Farmland
Here are some questions to help get you started thinking about buying a piece of farmland:
Do you want to live on the property, or will it simply be a separate location from your home for other activities (i.e. gardening, livestock, orchards, etc.)?
Will you want to raise a garden or livestock? Approximately how large of a plot or how many animals?
What are some features you want in farmland or location where the home will be?
Do you want a fixer-upper for a home, or should it be move-in-ready?
How long do you want to live here? Is it for a short season or where you plan to retire?
How far away is the property from your family or close friends?
What length would your commute to and from work, school or town be?
Even if you don’t plan your garden out by the square foot, you’ll still find it helpful to determine an approximate size of property you want to start looking for. For example, you might not need to buy 10 acres of farmland if you only want a 1⁄2-acre garden and a few chickens.
In this case, an acre or 2 would likely be plenty of ground.
Once you choose the approximate location of where you would like to purchase farmland, check with local officials or county appraisers to find out if there is a minimum amount of acreage that must be purchased. Some places have rules about the number of acres that can be sold or how many splits can be made in a certain size of property.
Up to this point, you might have wondered just what exactly is an acre? This is a particular unit of measurement that is used when determining the size of a piece of property. To give you a rough idea, one average size city lot is about 1⁄5 of an acre. If you were to purchase 5 acres, that would be 25 city lots.
When planning to do a majority of the work manually (without large tractors and implements), 5 acres can be a huge undertaking. If some of the farmland will be put to pasture for livestock, it can make maintaining a larger piece of ground more manageable.
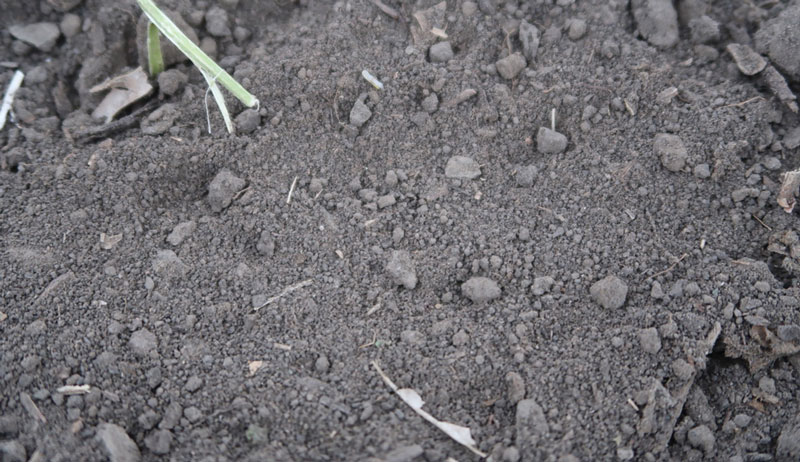
Soil Types
Gardening is generally a large and important part of cultivating a homestead. From raising vegetables or planting an herb garden to starting an orchard and berry patch, these are just a few of the reasons you might want to till up the farmland.
For any of these, though, you’ll want to have good quality soil as it will be the foundation your entire homestead is built on. Without it, you’ll have poor crops and unfruitful harvests.
As you browse through real estate listings or local auction flyers, make note of the different words that are used to describe the land. If it’s a piece of pasture ground, they might call it native prairie grass or brome. If the farmland is being used for crops, the listing may describe the soils as clay, sandy, silty, loamy, etc.
Clay
Clay soil feels rock hard when dry but clumpy and almost sticky when wet. It can be a challenge to get it to drain well.
Ashleigh Krispense
Yet in certain areas of the country, it can grow very good grass.
Sandy
Sandy soil drains and dries out well but doesn’t hold the water well (it runs out too rapidly) and can be a challenge to hold nutrients in. In some places, if watered regularly and fed nutrients on a strict regime, sandy soil can grow tremendous crops.
Ashleigh Krispense
The downside? You’ll need to keep pumping nutrients, money and water into the ground in order to keep growing a crop.
Silty
Silty soil is soft and pleasant to hold in your hands. It typically is rich with good nutrients. When coupled with proper drainage, it can be the best place to plant your crops.
Loam
Loam soil can be a mixture of the three soils already mentioned. It also feels fairly pleasant to hold, has good nutrients and can be worked up easily.
Ashleigh Krispense
Drainage of the farmland (natural removal of excess water) is another important factor to note. If it’s poor, you might end up with an unusable swamp. It will make building a challenge, as well as everyday living and walking around.
Livestock pens should drain appropriately or it can lead to mud that the animals will have to stand and wade or walk around in. For livestock in general an extended period of standing in mud can cause stress and chilling. Horses might even develop cases of thrush.
One simple way to check the drainage of a piece of land is to look for standing water in places. If the water readily drains away into the ground, it probably has decent drainage.
Rock layers can also be another challenge if you plan to construct any buildings or pens at some point. Drilling through rock will usually take a special drill bit on a skid loader or similar piece of equipment.
As I mentioned, my childhood home was on top of a rock hill. This made planting trees, drilling holes for posts or constructing buildings a challenge.
Along with the ground presenting difficultly to work, soil quality often tends to go down in areas with a large amount of rock. While you can supplement organic matter and gradually build up the soil composition, it will be much easier to begin with ground that is already somewhat usable.
Water supply is an important factor to check into. Does the property have rural water running nearby it or will you need to have a well drilled? Is there a current well that is still usable?
If you’re going to be using the water at that property (via a well), consider getting it checked for impurities and quality. Extremely hard water can be tough on your plumbing and appliances as well as your body, if used for showering or drinking.
To test an existing well, pump a large quantity of water from it before letting it settle and have it tested.
Just like you’ll need water to consume, you’ll need to determine where the wastewater will go as well. Things such as lagoons or septic systems will need to be addressed as well.
Depending on how remote the land is that you’re interested in, other utilities such as electricity might be something you’ll need to look into hooking up. This can add extra expense that you’ll want to be aware of and plan for ahead of time.
Mineral Rights
When you hear the term “mineral rights,” someone is referring to the ownership of or right to own the minerals that are within your property.
The right to the minerals within your property (around where I live, they would generally be natural gas or crude oil) can be kept by the seller when the property is sold. Typically, property might not sell as high if the seller withholds the mineral rights
Shahram Khorasanizadeh/Shutterstock
Accessibility
The perfect little cabin tucked away on the side of the mountain might seem like your dream home, but it will have its drawbacks. While you might be far from noise, neighbors and civilization, you can also be far from town, schools and employment.
Planning and determining what your life might look like after you relocate will be helpful. Look at surrounding cities and determine the kind of commute you would have. If you have children, look into the school districts you would be in and distance to those schools.
How about roads and all-weather access to your property? If there is heavy rain or flooding, it might make traveling more of a challenge. In some places, such as Kansas, our mud roads are generally impassible after a rain. In other states, they act more like a hard-packed gravel road and are able to be navigated.
Flooding can also cause issues if you have any streams and bridges nearby. It wasn’t uncommon growing up for us not to be able to reach town on our regular road because the river would be out and flowing rapidly over the fields and roads. Because we lived on a hill, it wasn’t much of a danger to us unless we waded out too far in the backwater to catch fish.
Another thing to be aware of before purchasing is if there are any existing easements on the property. An easement is when permission has been given by the previous property owner to another property owner to cross over their land.
Where to Look
You’ve got money set aside, garden plans drawn up, and you’re rearing to go. But where do you look for this dream property?
Start in the usual places such as real estate websites (e.g., Zillow.com), local real estate agents, newspapers or sale bills (watch for auction flyers), community bulletin boards at the local coop, farm-supply store, etc.
Be patient, and take your time. This is a big decision.
We’ve covered a lot of ground (pun intended), but hopefully you’re a step closer to owning your forever homestead one day! Once you’ve found and purchased your plot of heaven, before you can jump in and start hatching your chicks, get everything finalized and wrapped up in a legal manner.
Cross your Ts and dot your Is. Remember to keep a calm head. Don’t get in a hurry and swept away with the excitement. Before you know it, you’ll be wandering through your own little backwoods!
More Information
Ask Questions
Realtors shouldn’t be expected to know everything about a piece of property, but it doesn’t hurt to ask them some questions they might be able to find out the answers for.
Here are a few things you might consider asking about:
About themselves
Have you sold property in this area before?
Do you have any references I could reach out to?
Are you a part- or full-time realtor?
How many listings have you sold in the past year?
How many clients are you representing right now?
Can I see a breakdown up front of fees to be expected?
About the Property
What do you know about the surrounding community?
Are you aware of any easements given on the property?
Do you know the main water supply?
When was the last time the water was tested?
When was the last time the ground was surveyed?
Are the property lines clear and defined?
Do the mineral rights sell with the farmland?
This article originally appeared in the January/February 2022 issue of Hobby Farms magazine.
I can’t begin to imagine how many branches and small trees I’ve trimmed or cut down with pruning loppers. It’s probably tens of thousands, because loppers are my preferred tool for all applicable jobs. They’re simple to use, quiet (unlike a chainsaw), and quick and effective when tasked with cutting through branches and stems less than 1 1/2 to 2 inches in diameter.
I was recently shopping for a new pair of pruning loppers, since I have a large amount of winter storm debris to clean up this spring. Historically, I’ve always used bypass loppers. But for this particular job, I’m thinking of switching to anvil loppers.
If you’re wondering about the difference between bypass and anvil loppers, let’s explore their advantages and disadvantages.
Bypass pruning loppers operate much like a pair of scissors, with a cutting blade slicing past a stouter lower blade in side-by-side fashion.
There’s a lot to like about this design. For example, it’s relatively delicate on live growth and leaves a clean cut behind. That makes it suitable for removing or shortening individual branches on valuable trees.
Bypass loppers can also leave behind very little branch stub, allowing the tree to heal quicker. Since much of my tree trimming through the years has involved removing branches from live trees, bypass pruning loppers have been the perfect choice.
Unlike bypass pruning loppers, anvil loppers don’t cut like scissors. Instead, a single cutting blade presses down against a relatively flat (but perhaps grooved or serrated) anvil. This creating more of a crushing cut.
It is a powerful way to quickly slice through tough materials, including dead wood, which I’ve found bypass loppers have a harder time cutting. For heavy-duty work, anvil loppers are ideal.
But of course, this power comes at a cost. And that cost is cleanliness. Anvil loppers don’t leave behind as clean a cut (causing more damage to live growth). And the anvil makes it harder to cut branches close to their origin point, so you’re more likely to leave behind branch stubs.
Anvil pruning loppers aren’t the tool of choice for the delicate pruning of valuable trees. But for dealing with the debris of a dead tree, they’re a powerful and effective option. You’re only concerned with quickly getting through the job and don’t have to worry about the quality of the cuts.
Since my goal this spring is to clean up the crowns of a couple dozen windthrown conifers, anvil pruning loppers offer a lot of appeal.
Of course, the performance of individual bypass or anvil loppers can vary depending on their precise specifications. High-end models can outperform overall expectations. For many years, I’ve used a pair of Fiskars bypass loppers with PowerGear technology that increase the leverage I can apply through the handles. I find they’re capable of slicing through thick branches (even dead wood) quite nicely.
But broad guidelines still apply. And as much as I like bypass pruning loppers for most tasks, anvil loppers might be the tool I need this spring. I’d better keep shopping!
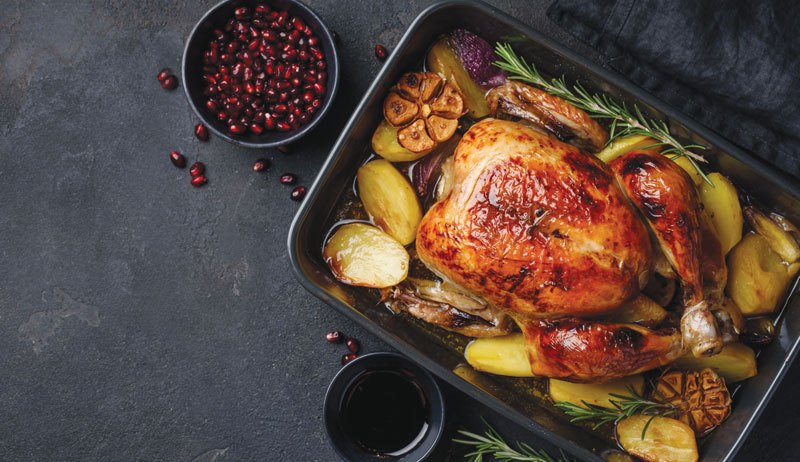
Turkey at Thanksgiving, corned beef at Passover, ham and lamb at Easter…. Our traditions surrounding meat eating at holidays didn’t occur by accident. Before we as humans knew industrial farming, grocery stores and commercial refrigeration, we knew meat as seasonal fare.
“Traditional livestock-rearing was seasonal, with winter the most significant not just because of the expense of keeping animals indoors where instead of grazing they had to be fed, and the necessity of storing food to last over the winter,” says Paul Freedman, Ph.D., author of Why Food Matters and American Cuisine: And How It Got This Way.
Salted, brined and cured meats boasted some shelf life. But fresh meats became available when animals came mature (or in the case of veal, lamb and suckling pig, mature enough) and were slaughtered.
Not all of the U.S. experiences harsh winters, of course. This means seasonality rested less on weather and more on animal physiology in those areas. In Florida, for example, pasture grasses grow strong in the mild weather of January and February. But they go dormant in the heat of July and August.
Still, the length of animal gestation and time it takes for the animal to mature remain the same no matter the climate.
rom_olik/Shutterstock
Religious Concerns
Centuries-old religious traditions also shaped the seasonal timeline of meat consumption. “In Catholic Europe, because there were a lot of fasting days, and especially over Lent, the whole meat industry shut down during the 40 days of Lent except for Jewish or Islamic butchers,” says Freedman, a professor of history at Yale. “At the same time, you have to have your lamb ready for the day, i.e. Easter, when the fast ends.” This added an urgency to seasonal production of livestock.
This break in meat consumption meant a boost to the seasonal fishing industry of the day. It resulting in a lot of salted fish that could be sent inland when needed.
On the farm, today’s pasture-based livestock- and poultry-rearing practices reflect those of pre-refrigeration times. This despite our refrigeration capacity all but erasing from our consciousness the concept of eating meat by the season.
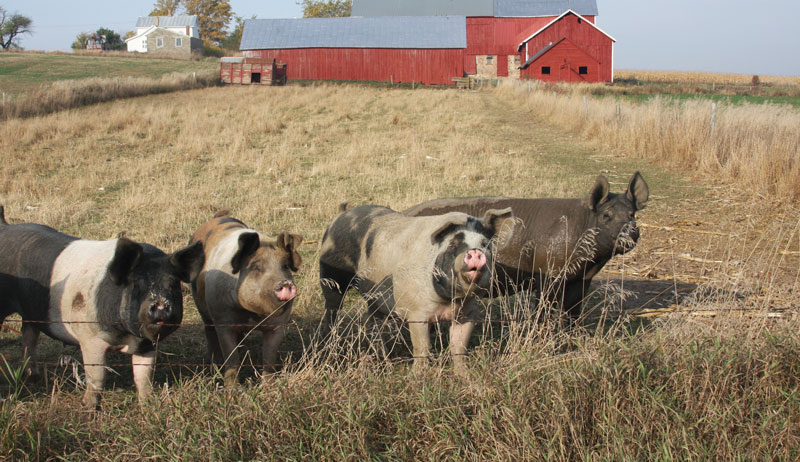
“Historically, the United States has such a large pork-eating heritage because it was really cheap to raise a pig,” says Sarah Wassberg Johnson, a food historian featured in The History Channel miniseries “The Food That Built America.”
“A lot of people, particularly in the 18th and early 19th centuries, their pigs were just free range.”
(Incidentally, Wassberg Johnson points out, this free-ranging caused problems in some cities. In Philadelphia, pigs ran wild into the 1800s.)
Pigs were fattened in the forests and orchards in the fall. During this time, trees released their fruits and nuts. This made fall the ideal time to harvest pork.
“Fresh pork was not consumed on any large scale except for at harvest time,” Wassberg Johnson says. “You also get the seasonality of things like blood sausage coinciding with harvest time.”
Farmers harvested lard for its value in the kitchen and home, curing, smoking, salting and brining the rest to eat all year.
While initially a homesteading chore, meat production began to industrialize in the 1830s and 1840s.
Industrialization
“Meat production in the United States is really influenced by two major changes in American life and industry,” she says. “One is railroads, and one is the ice harvesting industry, which seem like very disparate things. But because you have the ice harvesting industry, you can have refrigerated railroad cards and you can have refrigeration and ice boxes in commercial industry and in the home.
“That means that your meat does not necessarily have to be preserved. And you can keep meat relatively fresh for longer than you were able to historically.”
Around this time Cincinnati became known as Porkopolis. The railroad system made it possible for farmers to herd their animals to the trains and transport them to this central processing point. Salt pork, pickled pork and cured meats came out of Cincinnati and were then distributed by ice-cooled railroad cars and boats to other parts of the country.
Today, pasture-raising your pigs may look like a combination of allowing them to forage alongside a grain ration, and you likely still harvest them before the worst of your region’s weather.
Beef
Raising cattle seasonally is less straightforward than raising pigs this way. Dual-purpose cattle breeds provided meat and milk, making them valuable enough to keep year-round.
Volodymyr TVERDOKHLIB/Shutterstock
Pigs can grow to what we now consider market weight — 275 pounds — in six months or less. But cattle take 24 months to reach their full maturity on forage alone; about half that when grain fed. This means cattle matured over the winter unless harvested at veal stage—4 or 5 months of age.
Consider, too, the slaughtering facilities available traditionally. Cattle are large animals, and it would be easier and less dangerous to harvest and process a 450-pound veal calf than a 1,000-pound mature steer on your homestead.
Then the someone had to decide what to do with all this meat. Without refrigeration, meat had to be cured—corned beef, beef jerky and other charcuteries, the indigenous traditional pemmican, etc.—or eaten.
Changes Down the Line
Here, too, beef consumption changed alongside the railroads and ice-harvesting industry.
“Part of American legacy is the cattle drive—taking cattle to railroad centers to ship to Chicago to process and ship all over the country,” Wassberg Johnson says. “Historically, meat was transported on foot, or the hoof or the claw, I guess, if you’re thinking about poultry. You would have drovers. The production of the meat was more regional and localized because you had to transport it on foot.”
Chicago became the beef-processing center, with manufacturers making beef extract, dried beef and canned corned beef.
“By the late 19th century, meat is not really seasonal anymore, with the exception of poultry,” Wassberg Johnson says.
The last of the mainstream meat animals undergo industrialization, chickens didn’t always carry distinction of meat birds and egg layers common in the poultry industry today. When dual-purpose breeds were the norm—before Cornish-Cross and White Leghorns came on scene—chickens on your homestead supplied your family’s eggs year-round. It was unlikely you’d butcher a chicken in the fall, knowing you had a whole winter’s worth of laying to get through.
(Plus, you have all that pork to eat in the fall!)
“Any kind of industry when you’re looking for one gender of an animal, what do you do with the other gender?” Wassberg Johnson says. “In the dairy industry and in the egg industry, you harvest the male animals pretty young as meat animals. You get veal and you also get spring chicken, which are the young roosters, sometimes called pullets.”
Butchering chickens ahead of winter weather wasn’t as much of an imperative as butchering larger animals at that time. Regional heritage chicken breeds were developed over time for their adaptation to the local climate so they could exist outdoors with minimal infrastructure requirements.
Chickens also have good feed conversion. That means they don’t need a ton of calories to maintain their weight and produce eggs.
While homesteaders cured mammalian meats, they didn’t really process poultry. Wassberg Johnson points to the exceptions of potted pheasant, pigeon or squab. Fully cooked meat went into a container and covered with melted fat to keep out oxygen and act as preserving agent. Homesteaders covered this container and kept it in cool place.
It sounds like a predecessor to pressure-bath-canned meat.
Seasonal Meat Socio-Economics
This article, of course, takes an American-centric look at the seasonality of meat production and more specifically through a New England lens, a tendency of histories. In less wealthy countries, Freedman points out, adopting refrigeration and moving away from seasonal meat production isn’t assumed.
Many places still rely on fresh meat, rather than frozen, whether that’s by tradition or for a lack of home refrigeration. Livestock keepers still practice seasonal meat production around the world.
Much of seasonal meat production then, and now, connected to socio-economic status. “The wealthy could manage to eat meat out of season, so it gave one prestige to serve veal in February, for example,” Freedman says.
If you had the resources and the labor to feed and house animals year-round, you could also eat them year-round.
“If you have a giant plantation where you are enslaving hundreds of people, you’re going to have a lot more access to fresh meat,” Wassberg Johnson says. “You would be able to afford to keep beef cattle fed over the wintertime so you can slaughter them as needed. The same with pigs.”
Most reading this article likely possess modern fresh-food and frozen-food storage capacities. But our land-based livestock and poultry rearing remain rooted in a time before we could pull pork chops out of the freezer for a summer cookout. Understanding the natural seasonality of meat can help us understand our animals and small-farm workings.
More Information
The Seasonal Trend
In the 1850s, no one pointed out to their friends the just-picked apples on the table. Taverns didn’t boast these tomatoes are from the farmers market. Of course produce was just picked from your farm or a neighbor’s.
The global instant-gratification economy hadn’t yet developed.
In fact, serving guests food that had come from afar was the mark of prestige. “It’s no longer a big deal to eat bananas, which are tropical products. It’s been organized in an industrial fashion. They’re cheap, so everyone can afford them. But at one time, a banana was a rarity. So were pineapples, and you would serve them in lieu of seasonal fruit,” says historian Paul Freedman.
“It’s only now that in New Jersey, for example, asparagus that’s seasonal and from New Jersey is much more expensive than asparagus that’s available all year-round from Peru. It is better. There’s no doubt about that, but the prestige accruing to the local product is historically unprecedented.”
The 1970s ushered in the local and seasonal marketing push. “It’s both the zenith of the industrialization of food, from the supermarket to the canned soup industry,” Freedman says, “but it’s also the beginning of dissent, of organic food, [Alice Waters’ famous restaurant] Chez Panisse, seasonality, and that has grown for the last 50 years.”
Fowl Fact
Historian Sarah Wassberg Johnson says that because of the scarcity of meat chickens outside of springtime, you find traditional cookbook recipes for “mock chicken” or “city chicken,” which actually used veal.
Look up some of these recipes. You may find these other meats shaped in the form of a chicken drumstick, breaded and fried!
This article originally appeared in the January/February 2022 issue of Hobby Farms magazine.
With spring upon us, many hobby farms are already seeing new arrivals. Be it calvings, foalings or other four-legged deliveries, here are some basics to help you prepare for the Big Event.
What to Look For
The most consistent sign that cattle, sheep, goats, camelids and horses are getting close to delivery is when they’ve “bagged up.” This means the udder has filled with milk in preparation for the neonate.
However, “getting close” is just as vague as it sounds. Some animals will bag up with a week or more to go. Others will do so and then deliver in a matter of days.
Waxing of the teats is a slightly more precise sign. This means small amounts of colostrum (thick, yellowish/white milk) can be seen either dried at the tip or a small amount is leaking out. This happens usually within a day or so before birth.
Another sign indicating impending livestock birth is when the muscles around the tail head loosen.
After seeing these indicators, the next step is the first stage of labor, which is when the mother acts agitated and separates herself from the herd. Small uterine contractions begin at this point, although those may be difficult to observe among the restless movements.
Twice daily monitoring for livestock birth is adequate once you see bagging up. But after you notice waxing of the teats, move the expectant mother closer to (or in) the barn. Regular and frequent monitoring is now in play—every few hours, if possible.
Once her water breaks, for ruminants, it’s normal for steady progression of the birth to occur over a few hours.
However, for horses, once the mare’s water breaks, birth occurs very quickly. For this species, if birth does not progress over the next hour, call your veterinarian. This is a huge and very important difference between horses and other grazing livestock species.
When to Intervene?
It can be tempting to jump in and help. So when is the right time to do so?
For horses, since birth occurs so quickly, once the mare’s water breaks, if she does not progress rapidly into full contractions with delivery of the foal, veterinary intervention should occur as soon as possible.
In contrast, for other grazing livestock, give them a few hours to birth. If the mother has not made progress by then, it’s time to check out what’s going on.
Safety, cleanliness and lubrication are the three key words when assisting an animal giving birth.
Firstly, make sure the animal is restrained in some manner. For most species, this is as simple as using a halter and having her head tied. It’s very handy to have a cow in a head lock or chute. But if you don’t have access to this level of restraint, typically a halter and head tie is more than adequate.
Next, use warm water to wash her vulvar area. Some dilute chlorhexadine/or iodine in the water is good to use to scrub the outside of the animal and yourself. If you are doing a vaginal inspection, warm water and lubricant is needed. Long, thin plastic gloves called OB gloves are very helpful to keep things clean (your veterinarian will have them) but are not a requirement as long as your hands are clean.
What’s Next?
Once born, there’s no doubt you’ll want to hang around and watch. Newborn livestock should be on their feet in less than an hour after birth and looking to nurse.
Make sure the mother has milk and that the newborn makes attempts both to stand and nurse. Dip the umbilical cord in iodine and let the mother groom and bond with her new addition.
Here’s a final note on examining an animal in labor: Many new hobby farmers are very reluctant to “go in” and feel what’s going on for fear of hurting the mother and possibly the baby. While admirable, it’s unlikely someone with that level of self-awareness will hurt anything.
If you’re comfortable and feel safe doing so, go ahead and take a feel, making sure you are clean and well-lubricated. You may be amazed to realize you can actually quite easily identify a hoof or the head. And describing to your veterinarian what you’re feeling is very helpful.
Who knows, sometimes it’s just a simple re-arrangement of a leg that’s all required to straighten things out. You may be just the help your animal needed.
One of the nice things about living in the country is having kind country neighbors. One of our neighbors was set to tear down a farmhouse down the road from us and let us salvage an old farm sink from the property first.
Granted, the sink is in rough shape. But I knew where I had need for a sink in one of our outbuildings. I also know how I can restore the farm sink.
In fact, restoring a porcelain-covered cast iron sink is pretty simple and requires just four steps.
1. Give It a Good Wash
First, you need to get all the collected grime off of the sink. I used a pressure washer to blast our sink with a stream of water, removing as much grit and dirt as possible.
Make sure you get both sides, too—the porcelain finished side and the bottom. We’ll be refinishing both sides.
It’s not enough to just blast an old, neglected sink with water. You need to really wash it.
For this step, you can use an industrial cleaner. You can also stick to a household cleaner such as TSP or, as we use in the video, good old Comet.
Give the farmhouse sink a good scrub to remove as much dirt as possible. Then dry it off for the next step.
3. Porcelain Paint
Next, you’ll brush on some porcelain paint. A number of manufacturers provide this product, but you can pick up whatever’s at your hardware store. A can usually costs between $30 to $40.
Quickly apply the porcelain paint over the old porcelain finish, as it dries fast. Then you wait three hours and (quickly, again) give it another coat. Give this coat a couple of days to dry and cure.
Flip the sink over and give it a good scrape with a wire brush. Apply some lacquer thinner to clean up the metal even more.
Next, tape off the drain, as well as the sides or any other surface yu don’t want to hit with paint. The back isn’t a big deal—it will be against a wall—but be sure to tape off the newly finished porcelain areas.
Finally, just spray a few paints of coat on the bottom of the farmhouse sink. We used black to contrast with the white porcelain, but you can use whatever color you like.
Check out the video to see the amazing before and after!