Categories
Beginning Farmers Crops & Gardening Farm & Garden Homesteading Urban Farming

Growing In The City—Allotment, Container Garden Or Community Project? (Book Excerpt)

The following excerpt is from Mark Ridsdill Smith’s new book The Vertical Veg Guide to Container Gardening: How to Grow an Abundance of Herbs, Vegetables and Fruit in Small Spaces (Chelsea Green Publishing, March 2022) and is reprinted with permission from the publisher.

growing in containers
The Vertical Veg Guide to Container Gardening  By Mark Ridsdill Smith

For those with itchy growing fingers in flats in the middle of the city, there are often three options: to get an allotment, grow in containers at home, or help out at a community growing project. All three are excellent in their own way and one often leads to another. It comes down to individual preferences, how much time you have, what community projects or allotments are available near you, and what, if any, growing space you have at home, so it’s worth quickly looking at the main differences. 

Allotments are ideal for growing space-hungry vegetables, such as parsnips, Brussels sprouts, potatoes, broad beans, and larger fruit trees. They’re often lovely, quiet spaces to escape to at the weekend and on long summer evenings. Travel there and back can eat into growing time (mine is just a 10-minute walk away, but that’s still a 20-minute round trip) and, with busy lives, many people find it hard to get there regularly enough. Most sites are friendly and welcoming, but check first as stories of allotment feuds aren’t uncommon. 

Community growing projects vary hugely in character, resources and how they are run. The choice of what to grow and pick is usually made by the community, and this may differ from what you’d choose to grow at home. They can be wonderful places to help out, enjoy the community vibe, meet others and pick up local growing tips. If there are any near you, do check them out. 

growing in containers
A harvest from the sunny, south-facing windowsills at the front of the London flat.

The biggest benefit of growing at home in containers is that the plants are on your doorstep. You can enjoy them every day, pop out and tend to them when you have 10 minutes to spare, and pick what you want as you need it (it’s hard to overstate the value of this). Although the community benefits of growing at home are less obvious, they are still significant, as we will see. The potential for growing at home will depend on the size and suitability of the growing space. Many small spaces can be highly productive, but please bear in mind that container gardens are less suitable for space-hungry crops like parsnips and Brussels sprouts and they do need more regular attention than allotments. 

With container growing, you are also in complete control of how many pots you have and can therefore avoid the stress that a large allotment or garden often creates. 

I grow in and love all three of these options. However, if I could only have one, I would grow in containers at home. Simply because I like having plants (and nature) on my doorstep where I can enjoy them and pick from them every day. I also enjoy the opportunity it gives me to meet other people in the immediate vicinity of where I live. 

growing in containers
A container garden does not have to be large to be rewarding. These pots of mint, parsley and chives on a shady windowsill still provided me with fresh herbs nearly every day.

How much food can be grown in a small space? 

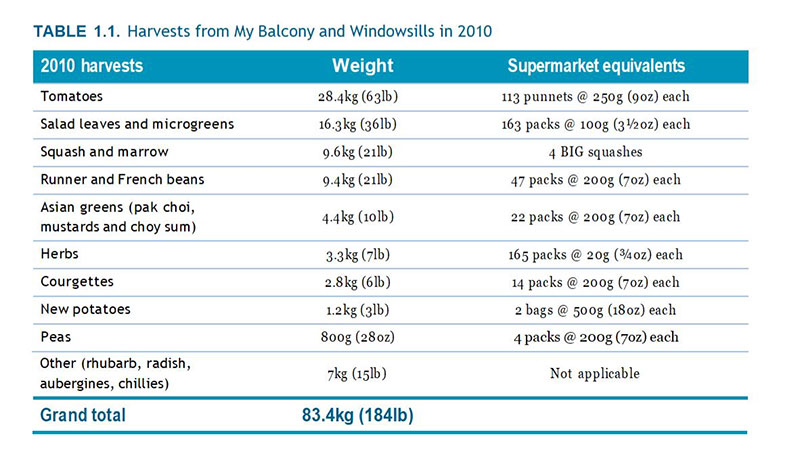
It’s possible to grow more food in many small spaces than is often realized. For example, in 2010, on my northwest-facing balcony in London, south-facing windowsills and a growing ladder outside the front door, I was able to grow 83.4 kilograms (184 pounds) of food, worth approximately £899 (about $1,220) in one year. This value was calculated using premium supermarket prices but justifiably, I think, on account of the quality of homegrown produce. See ‘Table 1.1 Harvests from My Balcony and Windowsills in 2010’ (below) to get a better idea of what we actually managed to produce and the equivalent number of supermarket packs—a lot of salad and herbs as you can see! 

growing in containers

Of course, the amount that can be grown in a space varies hugely, depending on both its size and suitability for growing. Some spaces are sunny and sheltered, and ideal for plants to thrive; others present a challenge such as wind or shade that needs to be overcome first. The shape and design of the space will also affect how many containers can be squeezed in and the weight of soil that can be supported. And size, of course, is very relative. I often talk about my ‘small’, 1.8 by 2.4 meter (6 by 8 foot) balcony, but many flats have less outdoor space and some have none at all. 

It often comes down to luck as to whether your space is good for growing or not. But, even in the least promising of spaces, it’s often still possible to create a worthwhile and rewarding garden, after a bit of trial and error. Container gardens do not need to be expensive, large or highly productive to give joy and change lives. 

Even just a few pots of herbs can be rewarding, add flavour and nutritional value to almost every meal, look pretty and smell wonderful, attract bees and other pollinators, and offer new opportunities to meet neighbours. For example, I once created a small kitchen herb garden with just three pots on a shady windowsill. 


Read more: Check out this video to learn how to make a wicking tub for container gardening!

Categories
Farm & Garden Food Homesteading Projects Recipes

Recipe: Make Savory Homemade Crackers From Scratch

Lately, I’ve been looking for extra ways to reduce the amount of product packaging I bring home. I’m also trying to cut down on artificial sweeteners and preservatives in my diet. Baking my own breads and granola from scratch certainly has helped to make a dent.

But I still splurged on store-bought crackers—complete with too much packaging and some of the very ingredients I’d rather avoid.

I’d been wondering just how tricky making my own crackers could be. Then I came across Crackers and Dips: More Than 50 Handmade Snacks by Ivy Manning. While Manning’s clearly a whiz in the kitchen, I’m decidedly not. Even so, I was able to adapt a simple recipe for homemade crackers with great success.

Want to whip up your own cheesy, savory treats? Here’s how.

Weights & Measures

Whether you try this adapted recipe for homemade crackers or a different one, attention to detail really counts. For best results, measure the dough ingredients by weight rather than by volume. Also, when it’s time to form each cracker, you should use a ruler to ensure uniform thickness.

The equipment and ingredients you’ll need include:

  • mixing bowl and a fork (or a food processor)
  • scale (optional)
  • ruler (optional)
  • parchment paper
  • large, sharp knife
  • baking sheets
  • 255 grams (2 cups) unbleached, all-purpose flour
  • 115 grams (1 cup) grated Parmesan cheese
  • 120 ml (1⁄2 cup) olive oil
  • 2 minced garlic cloves
  • 1 tsp fine sea salt
  • 60 ml (1⁄4 cup) water
  • black pepper (to use as topping before baking)

Read more: These delicious fermented tomatoes would go great with homemade crackers!


Preparing the Dough

First, combine all the ingredients in the above recipe for homemade crackers (except for the water and black pepper) into your mixing bowl. Thoroughly mix with your fork. At this point, the dough will be rather crumbly.

Next, add only the water. Mix just well enough so that the dough is somewhat crumbly but sticks together well.

Separate the dough into two parts. Place the first half of your dough onto a large sheet of parchment paper. Use your hands and the parchment to form the dough into a narrow tube. (See image below for reference.) Ideally, the tube should measure about an inch-and-a-quarter in diameter.

homemade crackers recipe
Susan Brackney

Tear off a second sheet of parchment paper and repeat these steps with the remaining half of your dough. Now, refrigerate both tubes of dough for two to three hours.


Read more: Making snacks for long-term storage? Don’t forget the dehydrator.


Slicing & Baking

Many cracker recipes call for rolling the dough out into uniformly thin sheets. (You may also be able to use a pasta-making press for this.) However, this particular recipe for homemade crackers requires neither of those.

Instead, I pulled the dough tubes from the refrigerator and simply cut them into cross sections. (This is also about the time you should preheat your oven to 350 degrees F.)

To start, unwrap the chilled dough and slice through the end using a back-and-forth sawing motion. (If you try to cut by pressing the knife blade straight down, you’re more likely to distort the shape of the dough.) I found it easiest to cut my dough into quarter-inch slices.

Then I used the side of my knife blade to further thin and flatten each sliced section.

homemade crackers recipe
Susan Brackney

Next, place your disks of dough onto the parchment-covered baking sheets. (Since these crackers won’t rise like other baked goods do, you can crowd them in fairly close to one another.)

Before popping them in the oven, top with a small pinch of black pepper. Gently press the pepper into the dough with the back of a spoon.

Bake the crackers for 15 to 20 minutes. (I turned my baking sheets around halfway through to account for any hot spots in my old oven.) This recipe should deliver golden brown homemade crackers with a satisfying crunchiness to them.

Just don’t expect them to keep as long as their store-bought counterparts. Stored in an airtight container, these crackers should stay crisp for three to four days. Fortunately, you can also make this dough ahead of time and store it in the refrigerator or freezer to bake later.

Categories
Animals Beginning Farmers Chickens 101 Farm & Garden Flock Talk Health & Nutrition Poultry

4 Types of Salmonella You Should Know About

It’s a term that causes grave concern both within the poultry community and amongst the general populace: Salmonella. We hear news stories about food recalls due to Salmonella contamination. Dedicated kitchen cutting boards hang in the chicken just for chicken preparation. We wash our hands after collecting eggs, after cuddling chicks, after handling anything that has come into contact with our birds. All of this—and more!—because of Salmonella.

But there’s more to Salmonella than most people think. For starters, four main types of Salmonella can affect our birds. With the assistance of Dr. R.M. Fulton, D.V.M., Ph.D. and Diplomate of the American College of Poultry Veterinarians, here’s a rundown on these common chicken afflictions.

Salmonella Pullorum

The bacteria Salmonella pullorum causes the deadliest disease known to poultry: Pullorum disease. Also known as Bacillary white diarrhea, Pullorum disease has a 100-percent mortality rate, with peak mortality occurring in the second or third week of life.

That’s not to say that adult birds are immune: Pullorum disease affects chickens of all ages.

Symptoms of Pullorum disease include white diarrhea, pasty butt and lethargy. In adult hens, the disease manifests via eggs with orange-colored egg yolks and triangular egg shells. Because of Pullorum disease’s highly contagious nature, the State Veterinarian will place an entire flock under strict quarantine if even one bird screens positive for the disease.

Unfortunately, the only treatment for Pullorum disease is eradication: the euthanizing of the sick bird or of the entire flock.


Read more: Read up on these 5 dangerous chicken diseases and how to prevent them.


Salmonella Gallinarum

The Salmonella gallinarum bacteria bears responsiblity for another deadly poultry disease: Fowl typhoid. Fowl typhoid shares the same clinical signs as Pullorum disease—diarrhea and lethargy—with peak mortality also occurring at an early age.

In addition, Fowl typhoid severely affects the liver of adult birds, causing this organ to become enlarged and bronze in color. (Fowl typhoid is also known as bronze liver disease.)

As with Pullorum disease, one positive Fowl typhoid screening results in the entire flock being quarantined and, if necessary, euthanized. Fortunately, there has not been a confirmed case of Fowl typhoid in the United States since 1980.


Read more: Spring clean your coop in 10 steps!


Salmonella Arizonae

Also known as Arizona or Paracolon infection, Arizonosis is a poultry disease caused by the Salmonella arizonae bacteria. Primarily a disease affecting young turkeys, Arizonosis can infect other poultry and humans, too.

Symptoms include diarrhea, lethargy, twisted necks and blindness. Adult birds may also display enlarged, swollen eyes.

Unlike Pullorum disease and Fowl typhoid, keepers can treat Arizonosis with such antibiotics as tetracycline, gentamicin and sulfa.

Salmonella Enteritidis (SE)

When people think of Salmonella, they most likely have in mind the bacteria Salmonella enteritidis (SE). SE rarely causes disease in chickens. Birds infected with SE are typically in molt or at the peak of their egg-production cycle.

Laying hens are the prime focus of concern because most cases of SE in humans are associated with eggs and with food products containing eggs. Affected hens typically receive diagnosis when confirmed cases of SE trace back to the source of the bacteria.

Identifying sick hens as the source of SE is rather uncommon, however. Usually, the source of SE traces back to unsafe food-handling practices in food-packaging plants and at restaurants.

Categories
Podcast

Episode 24: Missy Singer DuMars

Missy has been hosting dinners and events for a few years, and she tells us about the evolution of the events and why it’s important to connect people to the source of their food. Find out about Missy’s Women in Food podcast, highlighting women supporting local food cultures everywhere, grew out of her farm events. Missy shares her favorite recipes to come from her podcast guests. (Don’t listen hungry.)

Stay tuned to the end to take Missy’s advice as a business coach for starting your own egg CSA, from “chicken math” to bird health to CSA distribution, because farm-fresh eggs are in demand everywhere.

Categories
Animals Farm & Garden Large Animals

Chasing Chickens: A Deadly Debacle In The Dog Kennel

You should get laying hens,” my 13-year-old niece said in the spring of 2019. I thought about that idea for a while and decided it made sense. On June 3, 2019, I purchased four Production Red baby chickens from L & M Fleet Supply in Detroit Lakes, Minnesota.

When I got the chicks back to the farm, I put them in a blue tub with a netting cover inside my old trailer house. 

The Trouble with Chickens in the Dog Kennel

The chickens were thriving until I decided to clean out their tub. This event happened on June 18, 2019.

First, I put the chickens in a small pet carrier, then, I put them inside a pen inside my dog kennel and opened the door. The chickens squeezed through the wires in this pen, so they were running around inside the dog kennel while I cleaned the blue tub.

After getting the tub and feeders situated back in my trailer, it was time to put the chickens back.

I caught two of the chickens and put them back in my trailer. The third one had escaped from the dog kennel, and I couldn’t find the fourth one. Angel, my Chihuahua, was watching and chased one underneath my trailer. I got Angel out because I didn’t want her to catch the chicken.

After looking underneath my trailer in various places, I couldn’t see any chickens, so I let Angel out again.

chickens dog kennel
Kara Tollerud

Dog Helpers & Important Lessons

At this point, I decided to get a pole to reach between the trailer tires. Before I got back with the pole, Bella, my Beagle, came with a chicken in her mouth. I told her to ‘drop it,’ and I caught it and put it back in my trailer. Chicken No. 3 seemed to be OK, so I put it back with the other two.

After going back to retrieve the pole from where I left it, Bella came with another chicken in her mouth. I also caught this one, but it appeared to be injured, so I put it in a separate place from the others. I put the pole back and did some chores. When I went back to check on the chickens, Chicken No. 4 had perished.

This whole experience with Bella, Angel and the chickens gave new meaning to one of the craft projects I was working on. It was a wall-hanging with the saying “Thank God for Dogs” on the front. I was ready to give up on finding the last two chickens, but Bella and Angel helped me get them all accounted for.

The dead chicken also taught me a lesson. If I had not opened the door to the pet carrier in my dog kennel, my four chickens would all be alive. The next time I clean out the blue tub, I won’t open the pet carrier door.


Read more: Check out these brooder tips for baby chicks!


Finding a New Home

As the three remaining chickens grew, I knew it was time to move them out of my trailer. I tied chicken netting to the inside of the pen inside my dog kennel with twine. The chickens lived in this pen until the weather became cold.

Then, they were put in a pen inside my dad’s barn for the winter.

On Oct. 26, 2019, I discovered two brown eggs in the chicken pen. My chickens had become laying hens. They have laid eggs mostly every day since then.

chickens dog kennel
Kara Tollerud

A Growing Flock

After the loss of some of my pets from November 2019 to January 2020, I decided I wanted more animals to take care of. My parents were supportive of me getting some more chickens. On June 4, 2020, I purchased five White Leghorn chicks from the same place as my brown chickens the prior year.

The white chickens started their lives on the farm in the same blue tub with a netting cover inside my trailer as their brown counterparts. As they grew older and bigger, I put the white chickens in the pen inside the dog kennel.

The tarp roof in this pen didn’t survive the winter, so my father helped me put a roof on the dog kennel. The leghorns fly back and forth between this pen and the dog kennel and have also used the doghouse.

Bella and Angel passed away, and there are two new dogs on the farm. Sparky and Reynbo run around the outside of the dog kennel trying to chase the white chickens. The chickens run around inside the kennel while the dogs are “chasing” them.

Who knew that when I bought my first laying hens that my dogs would be involved in the chicken-raising operation? 

Kara Tollerud lives in Pelican Rapids, Minnesota.

This article originally appeared in the January/February 2022 issue of Chickens magazine.

Categories
Equipment Farm & Garden Farm Management

See & Spray Targets Your Weeds—Not Your Healthy Plants  

Whether you have 2 acres, 10 acres or more, if you grow crops of any kind you’re going to need to deal with weeds. Blanket spraying of any kind of herbicide can negatively affect your soil quality. And if you’re not careful, spraying could target plants you’re trying to grow.

John Deere tackled this problem by developing farm technology that takes the guess work out of spraying. It’s called See & Spray™, and the company recently won a Best of Innovation award at the Consumer Electronic Show (CES 2022) for it.  

What is John Deere’s See & Spray? 

John Deere’s See & Spray looks a lot like a sprayer attachment for your tractor, but it’s much more than that. A robot with advanced technology on board, the See & Spray uses computer vision and deep learning to instantly recognize the difference between your weeds and your plants.  

How does it work? As the sprayer moves across your pasture, a camera will scan the area and detect color in your field. It picks out green plants in fallow land, the sprayer is activated, and it will only target those weeds specifically.

That means it sprays herbicide on a single plant instead of broadcasting it across a wide area.  

According to John Deere, this targeted spraying will mean the average farmer sprays an average of 77 percent less herbicide. The technology helps to reduce herbicide resistance because farmers can mix different products. They can also use more expensive products without as much waste.  


Read more: Do you know the parts of a sprayer? In this video, we break them down.


Spraying Less Helps the Environment 

Like other large companies, John Deere has put an immediate focus on persevering the environment and reducing their carbon footprint. Having a targeted herbicide sprayer with the ability to recognize the difference between healthy crops and weeds will reduce one of the biggest environmental issues farmers face when spraying herbicides—spray drift.  

Spray drift occurs when spray is airborne and the droplets of herbicide move away from the plants you’re spraying. The amount of spray drift you have is affected by

  • how big the droplets are
  • wind speed when you’re spraying
  • distance between the nozzle and the plant you’re attempting to spray

The design of the See & Spray puts the nozzle directly over the plant when the herbicide is ejected. That reduces the likelihood that any herbicide gets picked up by wind or transferred to another plant.  

If you do want to broadcast spray your crops, the See & Spray will let you do that, too. Without even leaving the cab, you can switch from targeted spray to broadcast spray. This gives you the option of covering a larger area.  

Available for John Deere 400 and 600 series  

The See & Spray is designed for larger farms. But if you have a John Deere 400 series or 600 series tractor, you’ll soon be able to use this new technology on your own fields.

It’s slated to be available this summer.  


Read more: John Deere’s new autonomous tractor could be the future of farming.


Pair with the John Deere Self-Driving Tractor  

John Deere has been busy over the past few years. Not only are they launching the See & Spray, but this year they’ll release their fully autonomous tractor, the John Deere 8R. The self-driving tractor has six pairs of stereo cameras and artificial intelligence to scan its environment and navigate without you in the cab.  

Imagine what it would be like to send the John Deere 8R into the fields with the See & Spray. This would eliminate hours of work in a day! And time in a day is one thing farmers always need more of. 

Categories
Equipment Farm & Garden

8 Fun & Easy Farm Projects To Tackle This Year

Running a farm, even a hobby farm, is a lot of work, but that doesn’t mean there’s never time to tackle projects just for fun.

If you’re looking for a change in pace, here are eight fun and easy ideas for farm projects to pursue this year.

  1. Install a Rain Gauge

Curious how much rain your farm receives? Don’t count on the broad weather reports from your area. Get a localized tally from your own rain gauge!

Whether you choose a simply functional or more decorative model, installing a rain gauge in the right location provides you with accurate information about your microclimate, helping you make better decisions when watering trees and plants.

  1. Build Some Birdhouses

Birds can be beneficial on farms, gobbling up insects and reducing the population of pests affecting orchards and gardens. So why not build some birdhouses and provide homes for the species you want to attract?

Aside from the practical benefits, simply watching the birds enjoy the houses is a pleasurable reward. Perhaps you’ll see baby birds take their first flight!

  1. Assemble a Bamboo Pole Planter

A bamboo pole and a clothespin are all you need to assemble a bamboo pole planter designed to prepare specific hole depths for planting seeds. It’s quick and easy to assemble, and what’s better than putting a homemade tool to use in your garden?

  1. Try a Reel Mower

Riding mowers and string trimmers perform great work, but a simple hand-pushed reel mower has its place, too. They’re quiet, they’re simple, they don’t generate smelly engine exhaust, and they produce healthier cuts than other types of mows.


Read more: Interested in trying out a reel mower? Here are some questions to help guide your purchase.


  1. Put up a Wildlife Camera

What kinds of wildlife roam your farm when you’re not looking? Find out with a wildlife camera! When placed in a logical area of high animal traffic, a wildlife camera can record photos and videos of every creature that passes.

Deer, coyotes, raccoons … maybe even a bear or wolf? You never know what you might capture on camera, and that’s half the fun.

  1. Transplant Flowers

Transplanting flowers is always an enjoyable task with beautiful results. Whether you’re moving an abandoned patch of daylilies or transplanting a particularly pretty patch of wildflowers, there’s something satisfying about enhancing the beauty of your farmyard or garden with bursts of flowery color.

  1. Enjoy a Farm Radio

Listening to a radio isn’t a project in and of itself, but it’s a great companion for more utilitarian jobs like cleaning a barn. Durable old radios can be inexpensive, so they can entertain you in the barn or out in a field without much concern about getting dusty and dirty.

And since your listening choices are restricted to what’s being broadcast in your area, you might find yourself tuning in to an interesting program you wouldn’t have sought out yourself.


Read more: Need more convincing? Here are 5 reasons you really need an on-farm radio.


  1. Explore with a Metal Detector

Learning about the history of your farm can be a deeply interesting pursuit. One of the most hands-on ways is to explore your farmyard and fields with a metal detector.

Suppose you find olds coins or a horseshoe? Maybe you locate a piece of an old machine? Every item hints at a broader story—the story of your farm. And hunting for clues is an enjoyable way to spend an afternoon.

Enjoy some fun farm projects this year!

Categories
Crops & Gardening Equipment Farm & Garden Homesteading

We Tried 3 Indoor Smart Gardens. Here Are The Results.

Winter is the perfect time to turn your gardening focus indoors. Indoor gardens go by several names, including smart gardens, indoor gardens, hydroponic gardens, countertop gardens … you get the idea. Whatever you call them, though, benefits of these gardens are many and include

  • year-round food production
  • no concern for weeds and pests
  • no need for land outside to grow

For this article, we compared Aerogarden Harvest, Click and Grow 3, and Rise Personal Garden.  All three of these models grow flowers, vegetables, leafy greens and herbs. All gardens use hydroponic systems, LED lights and nutrients and promise to easily grow year-round.

Looking at their costs, productivity and ease of use will provide an idea of what fits your budget and projected level of required involvement.


Read more: Get the jump on spring with these indoor growing tips!


Cost

The chart below outlines how much you will spend to get a starter kit, as well as how much you will spend in the future to keep it going. It also includes accessories available to diversify what you grow.

Each of these three companies offers multiple gardens with varying seed pods. However these are considered their most basic starter garden models.

Aerogarden and Click and Grow are more similar in price. Rise is almost double, leaving us to wonder if the added benefits are worth the larger price tag.


All gardens can be used to start seeds and come with instructions on how to transfer young plants outdoors. Rise Personal Garden and Aerogarden Harvest offer the diversity to grow microgreens. 

Productivity

Which of these three smart gardens will grow the most? Obviously, the gardens that offer more pods will produce more food.

As for which ones grow the most bountiful plants, there is no clear winner. Four weeks into the growing journey, they all appeared to be at the same size of development, despite being different plants. I used basil as the control plant, growing it in all three gardens.

They all appear to be similar in size. Less does not seem to be more in this case, so if quantity is important to you, choose a garden with more pods. Aerogarden and Rise both grow more plants at once.


Read more: Interested in microgreens? We have advice for getting started.


Ease of Use

All gardens claim to “take the guesswork out of growing” and take “zero effort”. While I believe all the gardens actually do eliminate the guesswork, a little effort is needed.

Rise Gardens

Due to the Rise Gardens app for phones, they are the clear winner for ease of use. Notifications pop up on your phone announcing, “It’s time for care and adding nutrients to your garden! Click here to proceed.”

The app walks you through each step you must take to add the provided nutrients. The app also tracks how often you deep clean the garden, so you know how to keep it healthy.

The garden in the app allows you to name each pod after the plant you plan to grow in that section. When you click on the plant, it tells you what stage your plant is in (Germination, Initial growth, Mid-growth, Harvest, Past Harvest) and what to do to support or harvest your plant at each stage.

The Rise Gardens app truly is amazing. You can also adjust the lights and shop from the main site. 

Click and Grow 3

Click and Grow 3 is also very simple to use due to it app. Once you input what you are growing in your garden, the app tracks the days and age of the plant.

Listed with the plant information are:

  • tips on how to harvest
  • fun facts
  • germination speed
  • sprout and harvest estimated times

You will need to use your judgment on harvesting if leaves start getting too close to the lights or if the water indicator looks low. There are no nutrients to add to this garden because Click and Grow adds all necessary nutrients in their seed pods.

This app also connects you to the store on their site to place orders directly from your app.

Aerogarden Harvest

Aerogarden Harvest does not have an app. However, they have lights on the front of the garden that light up when it is time to add water and nutrients.

The lights are on a two-week cycle to keep you checking water level and adding nutrients every other week. The lights will stay red until you click on the button to reset the time period. No app reminds you which plant is where and how many days to sprout, however their seed pods have the information printed on the top. You will need to note what’s where when you start the garden.

Some people prefer not to keep up with another app on their phone, so you’ll need to decide if that type of technology factors into your decision. Consequently, to learn more about the plants you are growing, you will have to search online. 

The overall expense and ease of use for smart gardens are far less than greenhouses. The comfort of tending to your garden indoors and not having to plan around the weather are two major benefits to indoor gardening.

To decide which of these three smart gardens is best for you, decide whether cost, productivity or ease of use is more important to you.

Categories
Animals Beginning Farmers Farm & Garden Large Animals

9 Things To Know Before Buying Cattle For Your Farm

Freshly churned butter spread over a fluffy biscuit,  topped off with a spoonful of homemade jelly … mmm! This self-sustaining way of life that intrigues so many people sure is richly rewarding. But it can also be quite challenging.

In order to get that fresh butter, you of course had to go through the work of milking the cow and producing the butter. But for the rest of the year, you also had to keep the cow in good condition and healthy. It wasn’t just an hours-long process to get that butter.

That dollop came from months of diligent work and care. 

So before you jump right in to owning your first few cattle or buying that bucket calf, here are some things you should know about raising cattle.

1. Do Your Research

There are differences between dairy cows and beef cattle. While you can enjoy the meat from some breeds of dairy cattle, don’t expect to buy a beef cow and have her produce an excess of milk.

Know your breed before you buy. Find out what local farmers raise near your area, and try to find an opportunity to learn from them. 

2. Buy from a Good Source

While the sale barn can be an exciting place to visit, don’t get roped into the bidding and end up with the meanest cow at the sale.

Unless you have a knowledgable friend to go with you the first time or two, guiding you through the good and bad points of each animal, skip the sale. Instead, try to find a local rancher or farmer that has a few cattle they would be open to you buying.


Read more: Now’s the time to upgrade your cattle herd. Here’s how.


3. Know the Source When Buying Cattle

Once you find an individual you want to buy cattle from, be sure to look at the rest of the herd. Notice the body condition, any sickness or poor confirmation, etc. Look at the facilities or area that your potential animals grew up in.

Ask questions, and be a sponge. Soak up the wisdom and advice shared. Be cautious, though, as sometimes it’s good to learn from multiple sources. 

4. Calves Come, Too

If you decide to go the route of dairy cattle, understand that it’s quite a process. Milk doesn’t just constantly flow from a cow.

In order for a good cow to produce milk, she’ll need to have given birth to a calf. (This is why dairy farms end up with so many baby calves.) The calf will get the first milk and colostrum (essential to the calf’s wellbeing) before the cow is then milked for human consumption. 

5. Selling Raw Milk Can Be Tricky

Depending on what state you live in, selling raw milk can be a challenging business. Some states allow it, and some only allow it on the dairy’s premises. In yet other states, it’s illegal to sell.

If your end goal with raising dairy cattle is to sell the milk (and not just keep for personal use), be sure to check into local laws and see what’s allowed. 


Read more: When it comes to dairy cattle, Jerseys definitely stand out!


6. Beef—It’s What’s for Dinner

Beef cattle can be enjoyable to have around and the babies are adorable. With beef cattle though, it’s more of a one-time harvest with each animal instead of a constant output of product.

Of course it depends on the size, but one beef butchered can generally produce a large amount of meat for a family. Roasts, steaks, ground hamburger and more can come from a single butchering. 

7. Picking an Animal

Some of the same general guidelines apply when looking to purchase beef cattle. While you might look for different body confirmation traits, you still want to find a reputable source to buy from and carefully look at their herd.

Instead of buying cows, you might look more towards steers (castrated male cattle) for butchering beefs. 

8. Have a Plan

Do you intend to raise the animal, butcher it, and then sell the meat? Or is it just for personal use?

Unless you want to butcher it yourself, keep in mind what locker plant you’ll want to take it to when it’s ready.

A while back, locker plants where overwhelmed with people wanting to get meat butchered, and the waiting lists where extremely long to get in. It’s good to have a rough idea of when you’ll be ready to butcher, then call ahead and set up the appointment several months in advance. 

9. Enjoy the Process

It can sound overwhelming or daunting when you think of buying your first cow or beef cattle. So long as you do your research, have a plan (and facilities and space for them), and a trusted friend you can call with questions, it’ll be a rewarding experience!

You’ll come out with more knowledge and a wealth of fresh milk or meat. 

Categories
Farm & Garden Food Recipes

Recipe: Chicken & Vegetable Soup Brings Comfort To Cold Winters

This chicken and vegetable soup recipe is probably the most versatile soup I make. When we serve it, we add noodles, rice or barley, depending on our mood. It also makes a great base for chicken and dumplings; just add the raw dumplings once the soup is heated and let them cook in the hot broth until done.

Yield: 14 pint jars or 7 quart jars

Ingredients

  • 3 pounds boneless cubed chicken thighs or breast, cut into 1-inch cubes
  • 12 cups chicken broth
  • 2 cups chopped onions*
  • 2 cups corn kernels*
  • 4 cups diced carrots*
  • 4 teaspoons noniodized salt
  • 2 teaspoons ground black pepper
  • 2 teaspoons dried thyme
  • 2 teaspoons garlic powder

*You’ll need ~3⁄4 pound unprepared onions, 3 ears of corn and 1 1⁄3 pounds unprepared carrots.

For serving per 1-quart jar
  • 1 tablespoon cornstarch or flour for thickening (optional)
  • fresh thyme or parsley

Read more: New to pressure canning? Here are some basics to get you started.


Preparation

Prepare pressure canner, jars and lids. You’ll need 14 pint jars or 7 quart jars. Fill the canner with a few inches of water, according to the manufacturer’s instructions, and put the canner on the stove over low heat with the jars inside to stay hot. This is a hot-pack recipe, so the water needs to be about 180 degrees Fahrenheit.

In a large stockpot, combine the chicken with the broth and bring to a boil. Boil over medium heat until the chicken is cooked, about 10 minutes.

Add onions, corn, carrots and spices to stockpot. Bring to a boil over high heat, then reduce the heat to a gentle boil. Boil for 5 minutes.

The vegetables will not be fully cooked by the time they are done boiling; they will finish cooking in the jars while being processed.

Remove the stockpot from the heat. Carefully ladle the soup into the prepared jars, making sure to put the solids evenly into the jars and leaving 1 inch of headspace.

Remove the bubbles with a bubble removal tool and recheck the headspace. If you end up short of liquid, top the jars off with boiling water or hot chicken broth. Wipe the rims with a clean, damp cloth. Put the lids and bands on the jars and load them into the pressure canner.

Process the jars, according to the manufacturer’s instructions, at 10 psi for 75 minutes for 1-pint jars and 90 minutes for 1-quart jars, adjusting for altitude if necessary.

After processing, allow canner to depressurize naturally, then remove the jars and let them cool on the counter for at least 12 hours. Check the seals and store the jars for up to 1 year.

For serving, empty a jar of soup into a medium stockpot. Heat over medium heat for 10 minutes, or until bubbling. If you like a thicker soup, thicken with a cornstarch or flour slurry. Serve with pasta, rice, barley or dumplings. Garnish with thyme or parsley.

This recipe for chicken and vegetable soup originally appeared in the January/February 2022 issue of Chickens magazine. It is reprinted with permission from Pressure Canning for Beginners and Beyond by Angi Schneider, Page Street Publishing Co., 2021.