It seems that just about half of everyone I know is either sick right now or just getting over something, so I thought it would be a good time to share my method of making elderberry syrup. Elderberries are used in many natural remedies for cold and flu, and it’s much easier on the pocketbook to make it homemade. Plus, you can tailor the flavor to your liking!
Avoid this recipe if you have an allergy or hypersensitivity to elder or honeysuckle plants.
Yield: 1 quart jar (about 3 cups finished)
Ingredients
1/2 cup dried organic elderberries, or 1 cup if using fresh or frozen berries
4 cups water
1 cinnamon stick
1 tsp. ground ginger, or 1-inch chunk of fresh ginger, peeled (optional)
1/2 tsp whole cloves (optional)
Once finished: 1 cup raw honey (or maple syrup, see “side notes”)
In a medium pot, bring the elderberries, cinnamon stick, ginger, optional ingredients (if you desire) and water to a boil, then reduce to a medium-high simmer for 30 minutes.
Remove from heat and allow the mixture to cool until lukewarm. Then strain through a fine mesh sieve. Reserve the strained liquid in a bowl or measuring cup.
Use the back of a spoon to press down on the berries to extract as much liquid as possible. Once cooled, stir in the honey until dissolved, and store in a clean canning jar with lid securely tightened on.
Store in the refrigerator and use within 6 months.
To use the elderberry syrup, adults can take 1 tablespoon of it daily or up to three times a day when feeling under the weather. Or stir a tablespoon into teas or other beverages.
In place of honey, you can substitute 3/4 cup pure maple syrup. That can be stirred in once the solids have been strained from the syrup. You don’t need to wait until the liquid cools as directed for adding raw honey.
Other ingredients to consider adding are cardamom pods; herbs such as mint, rosemary or thyme; or lemon juice.
This recipe has been adapted from WECK Home Preserving with permission from Skyhorse Publishing, Inc.
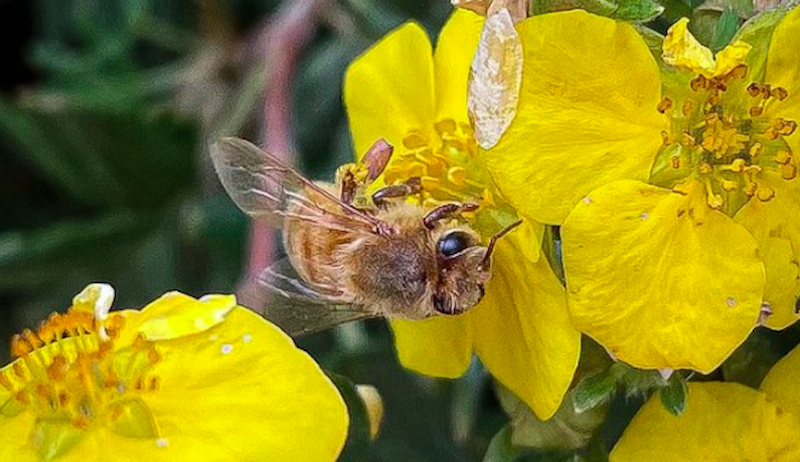
“I was always a bit buggy as a kid,” says Beth Conrey as she looks back on her journey to becoming the owner and beekeeper of the Berthoud, Colorado-based Bee Squared. “I collected insects for years while I participated in 4-H.”
After a detour working in corporate America, Conrey wound up returning to the world of insects after reading a column in the local Berthoud Recorder newspaper by a honey farm owner named Tom Theobald.
“He was a beautiful writer on many fronts but particularly on his love of bees,” says Conrey. “He triggered my interest, and for that I shall be eternally grateful.”
After taking some beekeeping classes, Conrey picked up a couple of hives. She “just kept going” until becoming a proud “bee addict.”
We spoke to Conrey about how to achieve colony success and her company’s award-winning fennel pollen honey. We also touched on the potential for bees to do math.
Bee Squared’s fennel pollen honey recently won an accolade at the Good Food Awards. Conrey says that the idea for the honey came from her old boss, Bob Patrick.
“He has always had a terrific palate, and he began working with me on different flavor profiles for infusions,” she explains. “He put together fennel pollen and honey. I knew he had a winner as soon as I tasted it. The taste is synergistic!”
When it comes to recommended uses for fennel pollen honey, Conrey plumps for pork as a first suggestion. “I’ve been making a pork tenderloin with sautéed fennel and the fennel pollen honey. It is quite delicious,” she says.
“I have also been putting it on a pizza that I’ve been modifying from a restaurant called Origins in Loveland,” she continues. “It has a pistachio cream sauce, Italian sausage, fresh mozzarella and a few other ingredients. I drizzle the fennel pollen honey on it, and it is delicious!”
Conrey adds that she’s taken inspiration from chef Yotam Ottolenghi’s pairing of grilled grapes with burrata and worked some fennel pollen honey into the blend. She also suggests it might be a “fabulous” addition to a gin-based cocktail.
“In Colorado we have over 900 species of bees,” says Conrey as she looks over her hives. “I manage honey bees, which differ from the rest of them because they are a colony insect.
“All the rest of those bees are solitary and, thus, lack the ability to produce honey in quantity. The key to colony success is consensus and, as humans, we would do well to emulate it.”
Reflecting on her years surrounded by bees, Conrey says that she remains “totally fascinated by them. I learn something new from them [and] about them every day.”
Conrey adds that each colony also displays its own personality. “While they are not a pet, I do have favorites,” she says. “Most people don’t think of bees as having personalities—but they do.”
Say you’ve always wanted a greenhouse. (Or maybe you wish you had an even bigger one?) Relying on hot and cold frames can actually help scratch that itch. Both are simple to make—and simply invaluable for earlier spring starts and prolonged fall harvests.
Hot and cold frames can be temporary and portable, extra-sturdy and permanent, large or small. Best of all, you don’t need a lot of expensive equipment to construct them. If you have some old windows, a little scrap wood, or even a few straw bales, you’re in business.
Ultimately, what size and type of season-extenders you choose depends on your gardening goals and your area climate.
Cold Frames
Cold frames act as passive solar collectors. Warmed by the sun’s rays, the temperature inside the cold frame climbs. Ideally, your cold frames should face south, southeast or southwest. And, if possible, locate them so that they can get up to five or six hours of available sunlight per day.
One of the most common cold frame designs is a simple rectangular box topped with an old window or a panel of heavy plastic sheeting. Typically, the backside of the box is taller than the front, so that the glass panel rests at an angle.
This helps to maximize the amount of sunlight collected.
You can use a cold frame to help toughen up young seedlings in preparation for transplanting them into the garden. Cold frames are also suitable for starting some kinds of seedlings early. And, when erected around late-season tomatoes or cold-tolerant veggies like kale, you can use them to prolong your harvest into late fall and early winter.
Cold frames can even help shelter fall garden seedlings during the heat of late summer. For this use, however, you need to put your cold frame in a shady spot and keep it moist.
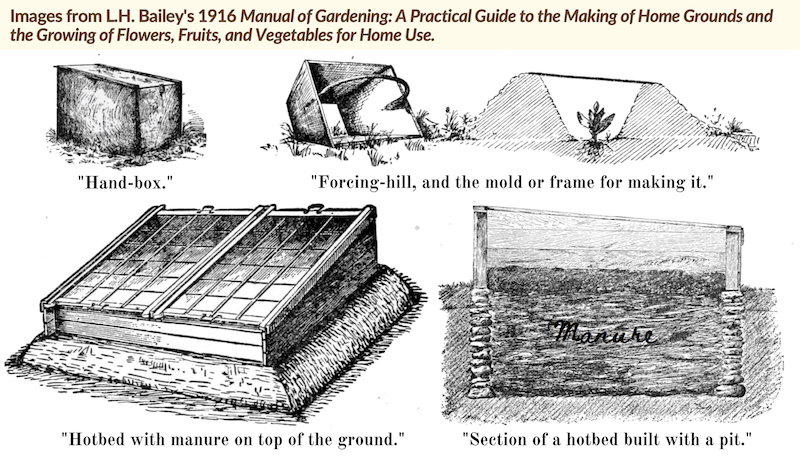
Besides the usual cold frame designs, you might opt for some of the lesser-known and much smaller types. Originally published in 1910, L.H. Bailey’s Manual of Gardening showcases an impressive array of “forcing-hills” and “hand-boxes.”
One type of “forcing-hill,” a hand-box enables gardeners to plant (and protect) a seed directly in the garden three or four weeks early. “[The hand-box] is a rectangular box, without top or bottom, and a pane of glass is slipped into a groove at the top,” Bailey explains. “The earth is banked up slightly about the box, in order to hold it against winds and to prevent the water from running into it.”
He continues, “After the plants are thoroughly established in these forcing-hills, and the weather is settled, the protection is wholly removed, and the plants grow normally in the open.”
Although not so practical for large farm operations, hobbyists could use these to give a few special plants an extra-early start. (For instance, I plan to build some hand-boxes to give my Skyscraper sunflowers extra in-garden growing time this year.)
Hot Frames
In addition to the sun’s heat, hot beds make use of alternate, radiant heat sources. They’re especially helpful for getting an extra-early start on warm-weather crops like peppers and tomatoes.
Provided you’re able to supply power to the area, you can bury special, thermostat-controlled heated coils along the bottom of the hot bed. (Here are some plans for one such bed.)
Or you can go really low-tech—with a thick layer of fermenting manure. Bailey notes, “The pit should be a foot wider on either side than the width of the frame. Upon the ground a layer of an inch or two of any coarse material is placed to keep the manure off the cold earth. Upon this, from twelve to thirty inches of manure is placed. Above the manure is a thin layer of leafmold or some porous material, that will serve as a distributor of the heat, and above this is four or five inches of soft garden loam.”
Manure-heated hot frames can remain hot for two to three months.
Whether you create hot or cold frames, you’ll likely want them to go the distance year after year. If you’ve used old windows, keep the glass clean and make sure all window glazing is intact. For season-extenders made with plastic sheeting, check for holes or tears and repair or replace as needed.
You’ll also want to keep any wood—used in windows or box frame walls—painted to protect it from the elements.
Finally, to make sure your plants don’t overheat, keep a thermometer just inside the frame (but out of direct sunlight). Provide adequate water and, on really sunny days, prop up the frame’s top slightly to allow for extra air circulation.
In a perfect world, our chickens would go through life happily and healthfully. Sure, they might get a pecking-order peck every once in a while or a cut from a sharp rock. But aside from these minor types of injuries, our birds should enjoy long, content lives dustbathing, sunning, scratching and snoozing.
Unfortunately, as we are all too aware these days, illness exists in the world. And our flocks are sadly not impervious to microbes.
Mild varieties of rhinovirus—yes, a chicken can catch a cold—are the most common malady affecting sick birds. But there are many fungal, parasitic and viral diseases that target the avian population. For these reasons, it is highly recommended that poultry keepers practice backyard biosecurity—doing everything possible to protect your flock from disease.
According to Dr. R.M. Fulton, DVM, PhD, a Diplomate of the American College of Poultry Veterinarians, this includes:
limiting outside exposure and restricting access to your flocks
keeping your coop and run clean
vaccinating your birds (when possible) against such viral diseases such as Marek’s, Coccidiosis, Newcastle, Infectious Laryngotracheitis (ILT) and Infectious Bursal Disease (IBD).
However, Dr. Fulton notes that vaccines do not prevent infection. They prevent most clinical signs and death.
“Viruses will typically infect vaccinated birds,” Dr. Fulton explains. “The virus will multiply and be shed, but at a lower titer than non-vaccinated birds.” In other words, vaccines will help protect your chicken flock but will not necessarily keep them from becoming sick.
Fortunately, most of the illnesses that affect chickens have similar symptoms. So it is relatively simple to tell that a chicken is sick.
Unfortunately, because these symptoms are common to multiple illnesses, it’s difficult to determine exactly what is affecting our chickens. If you find yourself concerned that a chicken might be sick, common clinical signs to look for include:
Lethargy
Drop in egg production
Diarrhea (possibly bloody or green)
Drooping wings
Tremors in the head and neck
Loss of appetite
Coughing/sneezing/gasping/nasal discharge
Paralysis/lack of movement
Preventing the Spread
Since chickens roost in close quarters, the possibility exists that, if one bird is sick, the rest of the flock may also carry the infection. Still, it is vital to control the contagion of whatever disease afflicts your chicken.
If you have a chicken that exhibits any of the symptoms listed above, take immediate steps to isolate the sick bird well away (at least 100 yards) away from the rest of your flock and away from any other animals you may have.
Your “hospital” does not have to be elaborate. You can use a pet crate, a Rubbermaid tote or a sturdy cardboard box. Ensure your bird’s comfort—after all, she’s not feeling well—by providing plenty of clean bedding, water and food (even if you haven’t noticed her eating or drinking), and a safe heat source to keep her warm.
When you do your morning and evening chicken chores, save her for your last stop so that you do not carry any microbes back to your other chickens. Make sure to put your work clothes in your dirties hamper. Disinfect your shoes, too, since bacteria and viruses can travel on clothing and footwear.
Be sure to wash your hands thoroughly, especially if you’ve handled the ailing bird.
Should your chicken not show any sign of improvement after 24 to 48 hours, you may wish to contact an avian or poultry veterinarian. If you live in a rural area, chances are that your local veterinary hospital has on-staff doctors that treat livestock and can assist you. If not, contact your local veterinarian.
They should be able to refer you to an avian or poultry veterinarian in your area.
Other options include contacting your local agricultural extension office or your state’s veterinary diagnostic laboratory. (Do an Internet search for your state’s name plus “veterinary diagnostic laboratory”.)
You can also contact the US Department of Agriculture (USDA) Veterinary Services Office, which operates a toll-free hotline staffed by veterinarians. There is no charge for this service. After all, it is in the USDA’s best interest to conduct a disease investigation to ensure that no serious poultry disease exists in your area.
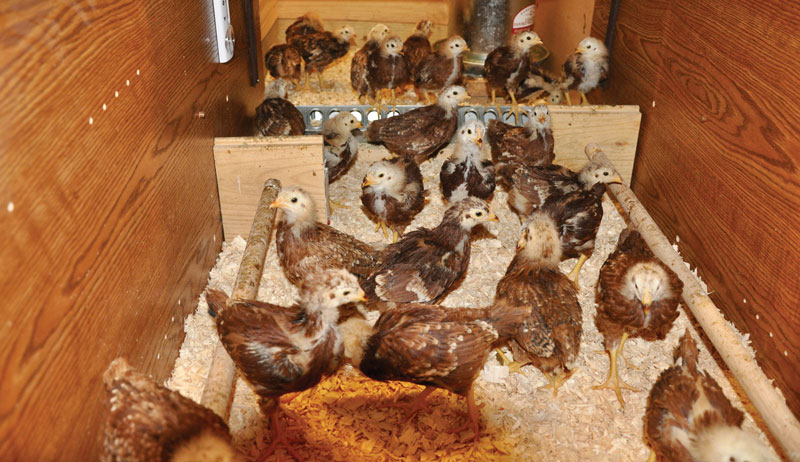
Raising day-old chicks to create or expand your backyard flock is an extremely fun and rewarding experience. However, you need to prepare for the job.
Once your baby poultry arrive, they’ll require frequent monitoring and care for the first six to eight weeks. Someone needs to be available for them daily during those critical first weeks. But it’s easy to successfully raise them. You just need the right equipment and to follow the practices outlined here.
Bringing Home Babies
Raising baby birds is a relatively inexpensive and easy way to get started with chickens. They’re typically much cheaper to purchase than older birds. And you’ll find several large, reputable hatcheries in the U.S. that specialize in shipping day-old chicks.
These hatcheries will ship just a few birds of one breed or combinations of different breeds if you want variety in your flock. You can also typically order straight-run (both male and female) chicks or just female chicks if you don’t want roosters.
When possible, it’s best to order birds from the nearest hatchery to minimize stressful postal system shipping times. The hatcheries will ship the chicks to your local post office, where you can pick them up.
Many feed-supply stores also sell locally hatched, day-old chicks in the spring. Buying locally hatched birds is usually safer. They won’t suffer the stress of shipping.
However, breed selection options are normally quite limited compared to the hatcheries. Of course, if you already have chickens, you can always hatch your own eggs to raise.
schankz/Shutterstock
Setting Up the Baby Room
Baby chickens need a constantly warm and draft-free environment. They also need to be protected from predators. And they create a great deal of dust plus droppings.
Consider carefully when choosing where to raise them.
If you raise them indoors, it’ll be easier to keep them warm and protected. But select a location where dust and dirt won’t be a problem. If you choose an outdoor location, the mess isn’t such an issue. Keeping them warm and protected, however, is.
Choosing when to raise them is also important. The first time we raised day-old chicks, we started them in the fall in an outdoor barn stall. The barn was great for dealing with the mess; however, because temperatures were falling at night, it was very difficult to maintain a constant temperature in their brooder with a heat lamp.
If raising them outdoors, it’s much easier to raise them in the springtime as temperatures are rising. That way, you don’t need to adjust the heat source as frequently. By the time they’re 6 to 8 weeks old, it’s warm enough that they don’t need the heat lamp.
A container that provides good ventilation is generally used as the brooder to raise baby poultry. Initially, it should be sized to provide about 1⁄2 to 1 square foot per chick. But they grow quickly. The brooder will need to increase to about 2 square feet per chick as they grow.
The wall height of the brooder is also something to consider. Baby chicks fly well by 2 or 3 weeks, so the walls should be pretty high. Or, you can plan to use screening over the brooder to keep the chicks inside.
Finally, the brooder doesn’t need to be anything fancy. It’s going to get dirty and dusty. Cardboard boxes, old furniture or plastic storage containers are commonly used.
An Example
As an example of sizing, we used a discarded television armoire set-up in a barn stall for our first brooder. We took the drawers and shelves out and laid it down on the ground to create the container for the chicks.
Initially, it was 3-by-5-foot and 2-foot high for 30 chicks. But we had to extend it to 8-foot by the third week. The chicks could also fly out by that time, so we added screening to the top.
By week five, we released them into the entire 10-by-10-foot barn stall so they’d have sufficient room.
Keeping Chicks Warm
Day-old chicks need to be kept at a constant 95 degrees F their first week, 90 degrees the second week, and so on (reducing the temperature 5 degrees per week), until they’re 6 to 8 weeks old and have feathers to keep themselves warm.
A 250-watt, red infrared heat lamp suspended over the middle of the brooder is typically recommended as a heat source to achieve this. The red light helps prevent pecking issues and is less stressful to chickens than white.
It’s critical that the chicks are kept warm 24/7. So it’s a good idea to have a spare heat lamp bulb on hand.
Lesa Wilke
Monitoring Temps
By placing a thermometer on the floor of the brooder underneath the heat lamp, you can monitor the temperature and adjust accordingly. If the temperature in the brooder is too cool, then adjust the heat lamp down a bit, and vice versa.
When the chicks are cold, they’ll huddle under the heat lamp. When they’re hot, they spread out and avoid the lamp. By monitoring the thermometer, you can make sure they have the proper temperature for their age.
They can also huddle together or spread out as they find necessary.
Age Matters
As the birds get older, it’ll be obvious that some chicks are developing faster and can tolerate colder temperatures.
By watching the thermometer, you can maintain the recommended temperature in the middle of the brooder for the slower birds. Bigger birds can find their comfort zone by moving away from the lamp.
Watering the Chicks
The first thing that day-old birds need when they arrive is water. Thus, it’s important to have appropriate chick waterers.
Baby chicks can easily drown or hurt themselves if inappropriate waterers (too large) are used. There are simple, inexpensive watering bases available that screw onto mason jars and are recommended for baby chicks.
In regards to watering, veterinarian Melissa Holahan, creator of Goat Melk Soap Co. and owner of Chubb E. Acres Farm says one of the top problems she sees is dehydration. “I like to use 1 to 2 teaspoons of sugar or honey added to the water. And I use lukewarm water for the first few days,” she says.
The chicks will put pine shavings in their waterers, so you will need to clean and refill them several times daily. Elevating the waterers by placing them on blocks can help keep out the pine chips. But be sure not to elevate it so high that the birds can’t reach the water.
Remember not to place the chicken waterers directly under the heat lamp. The water will get too hot for the chicks if you do.
Lesa Wilke
Feeding The Chicks
There are also feeders sized specifically for chicks. Again, disasters can happen if the right equipment isn’t used. So it’s best to utilize properly sized feeders.
For feed, either medicated or unmedicated “chick starter” feed is recommended for the first eight weeks. These feeds have been formulated specifically to give growing chicks everything they need.
Holahan recommends using medicated feed to prevent coccidiosis. “I always feel that prevention is way better than treatment,” she says. “Since the chicks are growing babies, they should get as much of the starter feed as they want, but shouldn’t get too many treats.”
It’s a good idea to get everything set up and running the day prior to receiving baby chicks. That’s the time to get the brooder organized and the temperature inside stabilized at 95 degrees F. When the chicks arrive, immediately move them into the brooder, and make sure they’re finding the water.
If none of the babies drink, pick an energetic chick and carefully dip its beak into the water. The others will learn by seeing chicks drinking.
Follow the same procedure to make sure they eat.
Check for Pasting Up
Once all your chicks appear to be eating and drinking, they should be checked for “pasting up.” This is a condition where their droppings cake over their vent area, preventing them from passing more droppings.
The condition is fatal if not remedied. Therefore, it’s important to check the chicks daily for the first week.
You can remedy “pasting up” by taking a paper towel, dunking it in warm water and gently using it to remove the caked droppings. It’s important to do this gently. It’s easy to rub off their fuzzy down, then other chicks may peck on the area.
If the blockage doesn’t want to come off, dunk the chick’s back end in warm water until things loosen up.
Sad Reality
In each batch of day-old chicks, no matter how good the care is, it’s likely that a few won’t make it. It’s critical that they’re kept at the right temperature, have clean water, get a proper diet and are protected from predators.
But even with the best care, typically some losses occur. Some chicks simply are not hardy at birth.
However, the rewards for putting in all the work involved with raising day-old chicks are healthy, friendly, sociable chickens in your backyard that will provide you with high-quality eggs and years of entertainment.
More Information
Roosts For The Chicks
Roosts for baby chicks aren’t absolutely necessary, but providing them does help keep the waterers and feeders clean. If you give them roosts, they may hang out there rather than on a feeder or waterer.
A simple roost of whatever length needed can be constructed by taking two 4-by-4-inch, 1-inch-thick boards, drilling a 1-inch round hole in the middle of each, and inserting a 1-inch round dowel between the boards.
Even easier, find appropriately sized branches outdoors and add them to the brooder as roosts.
Socializing Your Sweeties
As your chicks grow, it’s a good idea to socialize them by handling them daily and giving them a few treats. (They tend to love grapes!)
That way, as they reach maturity, they’ll be familiar with being handled and will run toward you rather than away. Over time, it makes taking care of them much easier.
And friendly birds are just more enjoyable!
Bedding for The Brooder
A highly absorbent bedding material is needed inside the brooder. Chicks grow so quickly and create so much waste. (The brooder needs to be cleaned out frequently, too.)
Pine shavings are a popular bedding choice. However, the day the chicks arrive, they often confuse the pine shavings for food.
Veterinarian Melissa Holahan, creator of Goat Melk Soap Co. and owner of Chubb E. Acres Farm , advises using paper towels for the first two to three days. “Once they figure out where the feed is, switch to large style pine chips,” she says. “Paper towels aren’t a good long-term solution—not absorbent enough—but it works for the first several days.”
Sand, newspaper and cedar shavings should generally be avoided for chicken brooder bedding. Cedar fumes can damage chickens’ delicate respiratory systems, sand gets very hot under a heat lamp—plus, they tend to eat it—and newspaper is too slippery and not sufficiently absorbent.
This article originally appeared in the January/February 2022 issue of Chickens magazine.
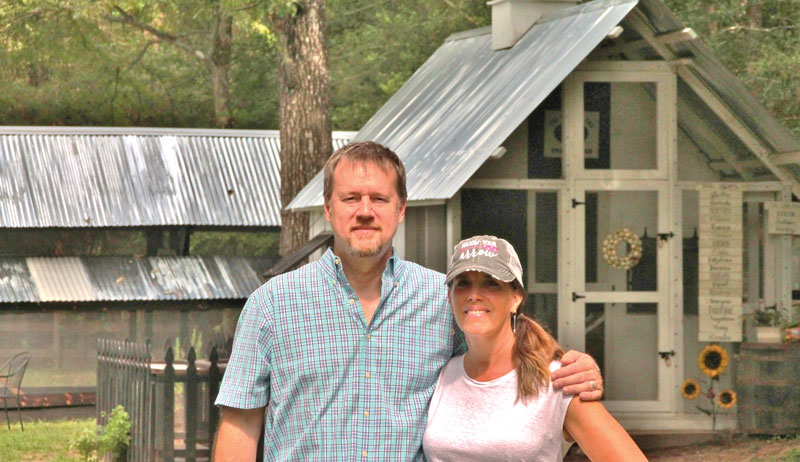
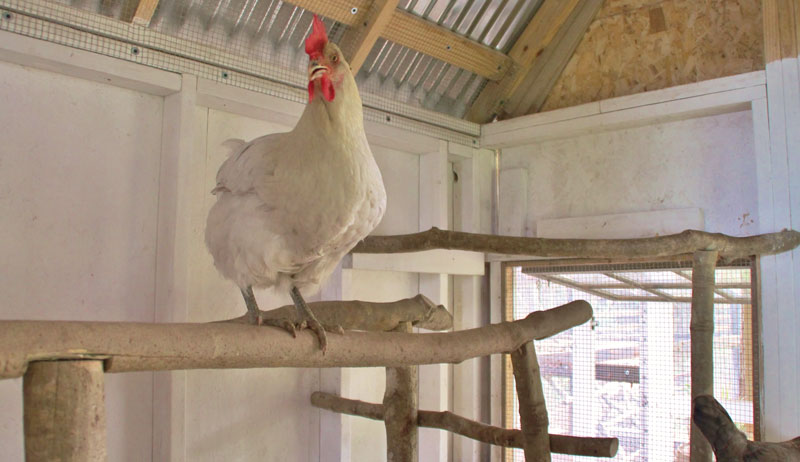
Nestled into Chrissy and Chris Doolen’s acreage, a retreat-style guest cottage emerges from the forest. No! What? On closer inspection, it’s a chicken coop!
As DIYers, the Doolens started with a 30-by-40-foot garden in 2011. Then in February 2012, Chris built Chrissy’s 13-by-13-foot art studio. A metal smith, Chrissy is a professional artist who uses torches.
“Chris was really interested in getting me out of the house,” Chrissy says with a smile.
The 2020 pandemic’s food shortages alarmed the Doolens. They needed to feed themselves and their growing family of rescued cats and dogs. They had the garden but needed a protein source for themselves and their animals.
And Chris was thinking ahead, considering a food shortage might repeat itself in the future.
Eyes on Eggs
Chicken eggs seemed the ideal protein. But the Doolens live in the East Texas Timberland Region, which hosts more-than-can-be-imagined wildlife, including a diversity of raptors such as bald eagles. Herds of deer are everywhere.
The San Jacinto River Basin has lakes, creeks and swampy areas, too. So even alligators are on the prowl.
The host of predators required the hens be confined, and Texas weather necessitated sturdy chicken breeds. Plus, ever-the-artist Chrissy wanted a diverse, feathered flock, with a rainbow of colorful eggs.
She studied websites for ideas to design an artsy coop.
“We had four to five coop design evolutions before we came to the intersection of ‘yes, I can build that,’” Chris says. “It was all Chrissy’s idea. But if we were going to do this, I wanted to have fun. The chickens provide a sustaining, healthy food source for Chrissy, myself and our dogs and cats. It’s also satisfying that we accomplished this working together both from the design and fabrication perspective.”
And who wouldn’t want a post-and-beam-style barn in their backyard?!
“Chickens have facial recognition,” Chrissy says. “They are rewarding and fun. But it’s also a commitment, hard work and difficult. And they come with a lot of poop and spiders.”
Of Chris, she never thought she could find someone who hears her and can translate her ideas into a tangible reality. “We went overboard,” she says. “But knowing the chickens are safe makes all the extras worth it.”
To deter wildlife, a 5-feet-tall fence surrounds the organic garden, and 10 raised beds also help. Organically-approved products ward off bugs.
Chrissy grows herbs with natural antibiotic properties, calming properties and overall health benefits for chickens and eggs: oregano, thyme, rosemary, lavender, mint and basil.
“I also use herbs around the coop and in the girls’ nesting boxes,” she says. “And I grow all sorts of vegetables for our family, plus watermelon.”
Chrissy gives the hens daily garden and leftover treats. When it’s scorching hot, she gives them watermelon or frozen treats to cool them down and encourage drinking water.
A Complete Setup
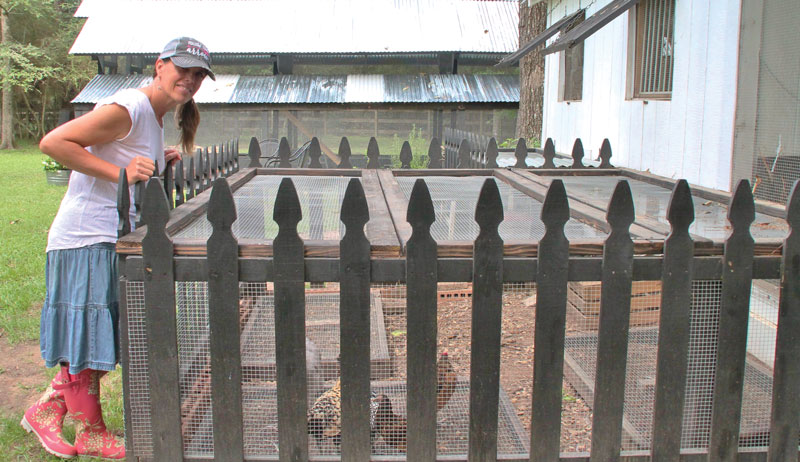
The smaller 400-square-feet chicken run includes a chicken swing and other playground equipment. When Chrissy calls a chicken’s name, that chicken runs to her. She has approximately 14 chicken breeds and not quite 20 cluckers.
Days begin about 7 a.m. with chicken chores. Chrissy spends two to three hours daily with the chickens, but it really takes about 45 minutes to care for them. Nearby compost bins contain black soldier fly larvae that digest organic compound before the waste starts decomposing and leaves no odor and limits chances of disease in the bins.
Mechanically Engineered
With a degree in mechanical engineering, Chris’ career involves fluid power motion control systems. He drew architectural plans to match Chrissy’s vision, building the chicken coop (on the right) and two runs. He constructed the larger run by partially using post-and-beam style.
At just under 500 square feet, the four main support frames fit together with mortise and tenon slip joints, then held firm with lag bolts. Chris built the first frame, then laid out the second on top of the first, third on top of the second, etc., stacking them so they were all as identical as possible.
“I took them all apart and moved them from the garage to the run location,” he says, “and reconstructed them and installed the lag bolts to hold the frame joints together. We erected the four main frames and leveled them, set in concrete.
“We used cardboard tube collars around the posts to give an extra 6 inches of concrete protection to the post beams from the chickens kicking up dirt and mud—hopefully to prevent wood rot.”
Once leveled and set, standard 2-by-4s connected the frames together, to complete the walls and roof sections. They screwed on the roofing and roof flashing cover, then covered the walls and gaps with mesh wire. It took lots of staples from the pneumatic stapler gun and some patience, fighting with the mesh wire to get it as flat as possible.
Fun Run
Inside the chicken coop, chickens are busy. “You don’t want your chickens bored and miserable,” Chrissy says.
“Giving them something to do keeps them happy, entertained and healthy! It was fun building all their swings and ladders! I laugh watching them climb across their balance beam and swinging with each other.”
Going Out
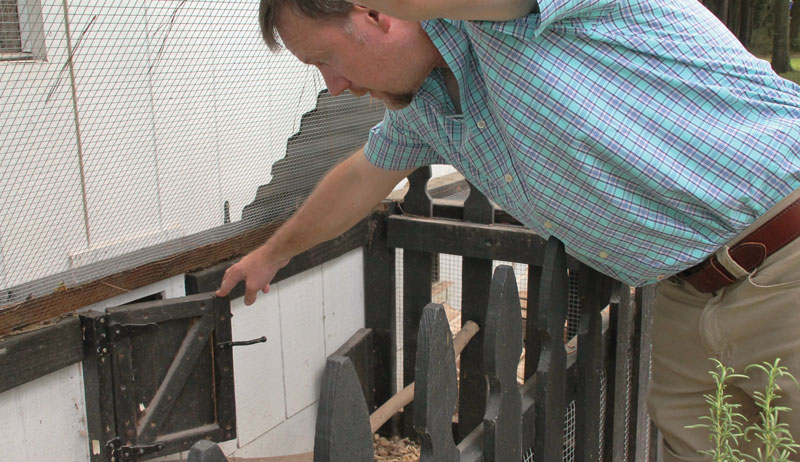
This door allows chicks out of the brooder box into the grow out pen. Chris created chicken-sized doors everywhere, but whether doors for chickens or people, every door has a latch and lock.
Hens use plastic tubs for nesting boxes that sit in a vintage armoire. Electric fans are mounted all over the place. Running electricity to the area proved cost prohibitive.
Instead, four 100-feet-long 10/3 extension cords string from the house to the chicken coop.
“It is 325 feet from our house to the coop, and far enough away to keep flies and smells at bay, and to give me a reason to walk more each day,” Chris says.
“It’s in a shaded area among the trees and a high point in our yard which keeps the runs and coop dry when Texas experiences torrential rains.”
Keep Out!
Besides snakes, four-legged predators populate the area.
“Some predators will stop at nothing to eat chickens,” Chris says. “Wire, run along the ground, keeps predators from digging under and into your run or coop. It is regular welded wire with a plastic coating to keep the wire from rusting and failing.
“It is 4 feet wide and goes under the cinder blocks at the bottom of our run. It’s held in place with landscape pins. The grass grows up to hold the wire down for good.”
Safe & Secure
In the chicken garden, Chrissy plants seeds in mesh-
covered grazing boxes. The chickens eat the greens, but they can’t pull up the plants through the mesh.
On the right are several coop windows. Because bobcats will rip open screens, Chris installed bars over all of them. All the windows are open during the summer. Besides fans, there’s also an air conditioner. When it’s steaming hot, the Doolens turn it on, cool things down and turn it off.
During winter, the windows are closed. The chickens stand in front of heat plates to warm up.
The chicken coop is well ventilated, and everything is well caulked.
“Chickens like temperatures from 65 to 75 degrees Fahrenheit. But they wear feather coats. They puff up, huddling together to stay warm. I worry about them being too hot, rather than too cold,” says Chrissy, whose great-grandmother was a farmer from Opelousas, Louisiana.
Reuse & Reflect
A Buff Orpington, Harriet, enjoys the rocker inside the larger chicken run, which also has a ladder and wagon wheel. All furnishings were roadside pick-ups, from resale shops, scraps or from social media.
Chrissy chose chicken names, drawing from her long-ago-country ancestors, and other sources. “Their names give you a certain feel of the past, of days gone by,” she says.
This article originally appeared in the January/February 2022 issue of Chickens magazine.
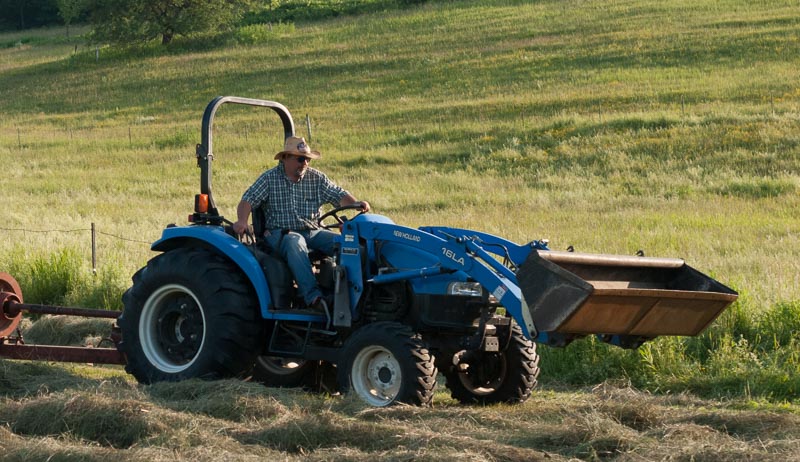
A front-end loader is one of the most useful attachments a tractor can have. They’re suitable for a wide variety of tasks (moving compost and manure, clearing snow, etc.) and can save a lot of time and effort.
But just because a front-end loader is a great tool doesn’t mean every farmer needs one. Sure, a front-end loader can tackle a lot of tasks. And augmenting the bucket with other tools (like forks or a grapple) can further expand its usefulness.
But if your farming projects don’t frequently require the use of a front-end loader, the expense of such an attachment might be better invested elsewhere.
When You Might Not Need a Front-End Loader
Let’s ponder some examples. A front-end loader isn’t a prerequisite for baling hay. The required implements (mower/conditioner, tedder, hay rake, baler, etc.) are typically towed behind the tractor. They receive power as needed from the PTO and hydraulics.
You don’t need a one for mowing and brush hogging, either. Or for plowing fields.
Many of the most stereotypical farming tasks involving field cultivation do not need the service of a front-end loader, aside from the possibility of the loader counterbalancing the weight of heavy rear implements on a small tractor.
But a similar effect can be achieved with weights mounted on the front of the tractor.
Even if you can envision a use for a front-end loader, it’s fair to ask, is the job manageable to complete by hand?
Let’s say you have a garden and fill a few raised beds per year with compost from an old manure pile. It would certainly be fast and easy to fill the beds with a few scoops from the bucket of a front-end loader.
But if you’re only filling a few beds, it doesn’t take much longer to shovel compost by hand into boxes. Then you can pull them via wagon to the garden site.
Sure, this does require more effort. But it can also be a more thorough approach, since it provides an opportunity to pick weeds and roots out of the compost before it enters the beds. It’s difficult to be choosy when moving compost by the bucket load with a front-end loader.
You may have to clean weeds and roots out the beds after you’ve filled them.
Now, the point here isn’t to give the impression front-end loaders are overrated—they’re certainly not. Instead, it’s to argue that—in some cases—a front-end loader isn’t as critical as you might think.
Many tasks are unaffected by the absence of this attachment. And others you can accomplish through manual labor if you just put in the time and effort.
Ultimately, it comes down to scale. If you’re debating whether to purchase a front-end loader for your tractor, make a list of every project you can envision tackling that would benefit from the loader (or the forks, or the grapple).
Then carefully ponder the scope of each project. Are you going to move a small wagonload or two of compost for your garden beds each year? You can probably manage it by hand.
But 50 wagonloads? If the scope of your project is expansive enough, then a front-end loader—expensive or not—might be the right investment.
Jacob Sheep have graced the large estates and country homes of England for many centuries. Their impressive horns, black-and-white faces and spotted bodies no doubt contributed to their popularity and survival.
Their actual origins aren’t known. However, documentation throughout history indicates that the spotted or pied sheep may originate in the land now known as Syria some 3,000 years ago. Pictorial evidence traces movement of these sheep through North Africa, Sicily, Spain and England.
A Storied Sheep
You can find many romantic stories about the Jacob Sheep. One holds they are direct descendants of the flock acquired by Jacob during the time he worked for his father-in-law as mentioned in the Bible (Genesis 30). Another story states they washed ashore from shipwrecks during the attempted 1588 invasion of England by the Spanish Armada during the reign of Elizabeth I.
Jacobs differ from other British and Northern European polycerates (sheep with multiple horns).
They also differ from other primitive breeds in that they have a medium-fine fleece and no outer coat. Other primitive breeds are double-coated, having a fine inner coat and a coarser, longer outer coat.
Importation of Jacob Sheep to the United States and Canada has occurred in small numbers since the early 1900s. These have been dispersed all over the continent, and many were crossed to other breeds.
Some refer to these crosses as Jacobs, even though many bear no resemblance to the breed except that they exhibit spots and multiple horns.
Other breeds of sheep do produce spotted lambs and/or polycerate offspring. Spots or multiple horns don’t necessarily indicate a Jacob Sheep.
American Jacobs are old world sheep, with a primitive body shape and more slender bones. Unlike many other old world breeds, Jacobs haven’t undergone improved breeding and outcrossing to satisfy the commercial marketplace.
Jacob Sheep provide a flavorful, lean carcass with little external fat. Compared to the more improved breeds, the breed boasts a high carcass yield from hanging weight to freezer.
Due to finer bone structure and less body fat, you can stock more of these sheep on pasture than the modern breeds, with 25 to 50 percent increases reported. Ewes require less supplemental feed during times of increased nutritional need.
Jacob Sheep also lamb easily, usually with no assistance. The lambs rise up and nurse vigorously without help.
Many English shepherds include Jacob ewes in commercial flocks in due to their hardiness, ease of lambing and strong mothering instincts. Rams and ewes both keep easily, with a resistance to parasites and foot problems.
The fleece is soft, open and light in grease. These qualities make it highly sought after by handspinners.
The Jacob Sheep is highly marketable as breeding stock. Farm gate sales of freezer lamb, tanned pelts, handspinners’ fleeces, horns for walking sticks and buttons bring the breeder financial return as well as the pleasure of seeing this handsome breed on the farm.
The Livestock Conservancy recognizes North American Jacobs as different than British Jacobs in that most ancestors of the American variety were imported before British breeders selected more for size and uniform appearance for commercial markets. This is why Jacobs are on TLC’s Conservation Priority List.
OK, full disclosure: I don’t lamb in the winter, so I don’t have to worry about hypothermia during lambing. My lambs will hopefully come along in April or early May. However, many of my friends with sheep do lamb in the winter. My Facebook page and text messages are filling up with lamb pictures!
I did start to wonder how the winter lambs fared, especially in places where the temperatures drop to the low teens or single digits on a regular basis.
To find out more, I talked to Denice Rackley, a sheep producer in Indiana. Denice has raised sheep for nearly 20 years and has a flock of 80-plus North Country Cheviots.
Denice said she used to lamb in the winter, but switched to spring lambing as it was easier on her to have the ewes give birth out on pasture, as opposed to inside a barn. It really depends on your setup, she added.
Another reason people might have lambs in the early months of the year can be a seasonal market for lamb from restaurants. And others might want lamb for holiday festivities throughout the winter, too.
Hypothermia during lambing is the leading cause of death in lambs.
But if you do decide to pursue lambing in colder months, Denice warns that hypothermia (low body temperature) during lambing is the leading cause of death in newborn lambs. Originally, I had thought that simply making sure the lambs were in a warm, draft-free place was all you had to do. That is important, of course.
But there are many things sheep owners can do to prevent their lambs from becoming hypothermic even before birth.
First, the condition of a ewe and her nutrition are important throughout the pregnancy. This is even more so the case in the last six weeks before giving birth. Ewes that are too thin or very old may have trouble during this time, when udders develop and colostrum production begins.
Denice also points out that fetal health can be affected to a great degree during the last six weeks of gestation if the ewe does not receive adequate nutrition. It’s during this period that brown fat is deposited around the fetus’s heart and kidneys. This brown fat sustains the lamb through the first hours of its life!
Lambs that are premature, or lambs that are born to older or very thin ewes, often don’t get this protection.
Of course, having the right environmental conditions is important as well. For winter lambs, it’s vital to have an indoor area dry and free from lots of drafts. Even if you engage in late winter/early spring lambing, you should make sure the ground temperature is somewhere around 45 degrees F if you rely on the ewes to give birth outside.
The first sign you may see: a lamb lying for long periods on its side, head down.
Young lambs may lie like that if they are out in the sun. But for the most part they will have their head up. You will need to go nudge it with your hand or foot and see if it will get up. A healthy lamb will stand up and stretch, then go find its mother to nurse a bit.
If your lamb does that, they are probably just fine. If not, you may need to do a bit more.
One thing you can and should do immediately is take the lamb’s temperature. A normal temperature for a lamb is about 102 degrees F. If it’s at 100 degrees F or less, your lamb is most likely suffering from hypothermia.
When lambing, keep watch for other possible signs of hypothermia, too, including:
weakness
an inability to get up
crying excessively
I recommend that, before you encounter this during your lambing, read up on how to treat hypothermia. And if it happens in your flock, call your vet.
Being able to recognize the signs of hypothermia in your lambs very quickly could mean the difference between life and death. If you are lambing in the next few months, I wish you the best of luck. I’ll definitely report back on my own experience later in the spring.
Looking to freshen up your garden this year, but uncertain what to grow? Check out these National Garden Bureau 2022 Green Thumb Award winners!
National Garden Bureau is a 100-year-old non-profit organization that promotes gardening on behalf of the horticulture industry. This year’s winners of a 2022 Green Thumb Award include four outstanding new plant varieties and one new gardening product.
Winners of the 2022 Green Thumb Awards were chosen based on these four criteria:
uniqueness
technological innovation
ability to solve a gardening problem or provide a gardening opportunity
appeal to gardeners
Winners were selected by a panel of National Garden Bureau members.
“The Green Thumb Award is an exciting program that aligns well with NGB’s mission to Inspire, Connect and Grow,” said NGB Vice-President Jeannine Bogard from Syngenta. “Our members are proud to evaluate and provide our ‘thumbs-up’ to the outstanding new garden plants and products.”
The Green Thumb Awards program was created in 1998 to recognize the best new plants and gardening products available each year. The Green Thumb Awards were originally created by the Mailorder Gardening Association, which later changed its name to the Direct Gardening Association.
This is the first year these awards are sponsored by National Garden Bureau.
Sweetshrub Simply Scentsational (pictured above) is a Calycanthus shrub that produces fragrant blooms with the smell of pineapple and bubblegum. Selected and refined over an 18-year period by plant breeder Tim Wood at Spring Meadow Nursery, Sweetshrub Simply Scentsational flowers are deep maroon and appear in abundance through late spring and summer.
This shrub is a North American native that will grow throughout USDA zones 4-9. It will reach a mature size up to 6 feet tall and 4-5 feet wide.
Developed by Spring Meadow Nursery and available at local garden centers and provenwinners.com.
Perennial: Sedum ‘Back in Black’
Sedum ‘Back in Black’ is a new succulent with an upright growing form that features leaves that are nearly black. In late summer, the striking dark leaf foliage is joined by flowers with deep garnet centers and cream-colored petals.
Sedum ‘Back in Black’ offers a great way to add distinctive dark color to a flower bed or border. The plant will reach 18-24 inches tall, and it is hardy throughout USDA zones 3-9. This award-winning plant looks great all year long.
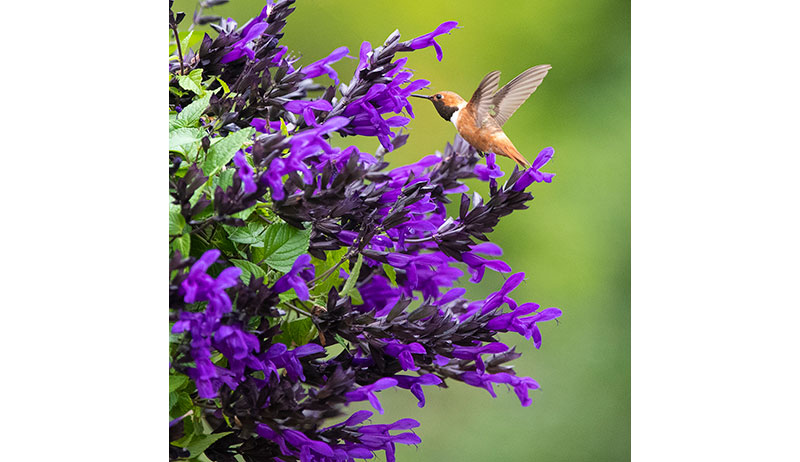
Salvia ‘Hummingbird Falls’ is a groundbreaking plant in the Salvia genus.This heat-tolerant, trailing plant is perfect for growing in a hanging basket. It produces an abundant supply of vivid blue flowers and shiny black calyces that continue all summer. As the name ’Hummingbird Falls’ implies, this salvia is a natural hummingbird magnet and can be used as a hummingbird feeding plant in the yard.
Salvia ‘Hummingbird Falls’ is the first-ever cascading salvia in the guarantica type. A natural hummingbird magnet, this plant has been an absolute favorite in trial gardens across North America with a profusion of hummingbirds visiting at every site. It is cold hardy to USDA zone 8.
This plant was entered by Plant Haven International and will be available at local garden centers in Spring 2022.
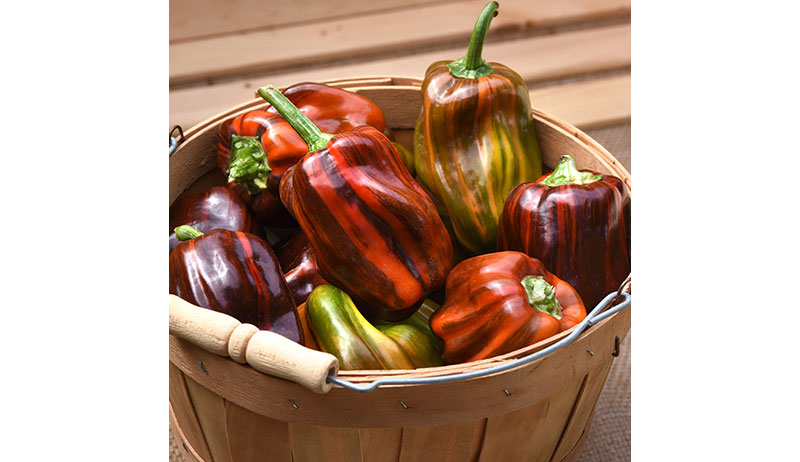
Pepper ‘Candy Cane Chocolate Cherry’ stands out from other plants in the vegetable garden with peppers that are a feast for the eyes as well as the taste buds.As this early mini bell pepper matures, its green fruit with a unique yellowish stripe changes to orange-green striping and then to full chocolate-cherry red.
The peppers have a sweet flavor and crisp texture, making them perfect for fresh eating at any stage of ripeness.
But it’s not just the uniquely striped fruit that makes this pepper special. The variegated foliage of Sweet Pepper Candy Cane Chocolate Cherry will stand out among all other vegetables in your garden.
This variety was developed by Pan American Seed and seeds are available from several NGB members.
The Garden Soxx ® Mesh Containment Systemis an efficient growing system that’s a revolutionary alternative to raised bed gardening. The GardenSoxx is a three-dimensional tube made of breathable mesh that can be filled with organic compost. A GardenSoxx can be used anywhere to grow vegetables, fruits, herbs and flowers using 70 percent less water.
Simply place GardenSoxx on bare soil, concrete, decks or patios. They are simple to use and deliver higher yields, and the mesh keeps weeds out. A GardenSox growing kit includes a 25-foot roll of 8-inch diameter mesh (which yields about 16-20 feet of planting space when filled), an EZ Filler cardboard tube, and a 25-foot drip irrigation kit with fittings for a one-row layout. Available from gardensoxx.com.
This article was written and provided by the National Garden Bureau, a nonprofit organization founded in 1920 with a mission to disseminate basic instructions for home gardeners. NGB publishes and sponsors the “Year Of” program annually featuring flowers and vegetables, including new introductions that are especially suited to home gardens.