Even though winter officially started only a few days ago, I started what I refer to as my “winter practices” on the farm the day after Thanksgiving. December days on my southwest Ohio farm can be sunny and mild one day, then cold and gray the next. And that pattern continues on through March.
Since I have to be outside for daily livestock chores anyway, I’ve outfitted myself with warm clothes and boots, gloves and hats. As such, I’m able to do farm work outdoors comfortably during the winter. I can spend a good hour or even two before a really cold day drives me inside to household chores.
And I hate household chores!
Smaller Chores Add Up
My favorite and most productive outdoor winter farm activities are not major projects. Rather, I prefer smaller practices that produce big results. These include tree/woods management, frost seeding pastures and clearing invasive trees and shrubs.
Bare branches make it easier to cut invasive small trees and shrubs like Asian bush honeysuckle, autumn olive, callery (Bradford) pear and multiflora rose. All of these non-native invasive species grow in my woods, fence lines and pastures.
I prefer not to use herbicide to control these plants (with one exception—see below). A sturdy pair of pruning loppers and a sharp pruning saw can make short work of the smaller growth.
For medium-sized shrubs and small trees, a battery-powered chainsaw is easy to manage and works on a charge for a couple of hours. Leafless trees makes it easy to cut and/or drag fallen tree limbs into piles in the woods.
I don’t recommend burning. These smaller trees and shrubs break down and rot away in a year or two to feed a plethora of good microbes in the forest soil. In the meantime, the piles provide shelter for wild animals, birds and insects.
The exception to my herbicide rule? Asian bush honeysuckle. This plant is the most invasive of all the non-native trees and shrubs on my farm. It sets leaves early in the spring and is the last to shed its leaves in the fall.
In December the Asian bush honeysuckle is the only plant still holding its leaves. (Though, admittedly, this late in the month they may be gone.) So early winter is the best time to effectively kill Asian bush honeysuckle around the farm by spraying the leaves with a very light application of glyphosate herbicide.
Use no more than a 3 percent solution of glyphosate in water in a backpack or other sprayer. You will not notice any major change in the plant until spring. Glyphosate is a very dangerous herbicide and if you choose to use it, wear full protective clothing so it does not come in contact with your skin or is breathed.
Even the Nature Conservancy follows these guidelines. See this factsheet for more information.
Frost seeding begins the middle of February in zone 5 and 6. This method of seeding pastures is a good routine method for insuring a diverse mixture of pasture grasses without using any major equipment.
I order pasture mix from my local feed store around the end of January. It comes in 50 pound bags. The feed store manager can help you determine how much to buy for your fields.
You can also buy mixes for specific types of livestock.
By the middle of February the days are usually above freezing but nights are generally in the low to mid 20s. A natural heaving of the soil helps the seed work into the ground.
I frost seed no more than 5 acres at a time and I walk it with a hand-cranked broadcast seeder. On a cold sunny day or a milder overcast day it’s pleasant exercise.
The holiday season is well underway here in late December. The winter solstice has just occurred, and we are turning to increasingly longer days in the northern hemisphere, on our way to spring.
And it’s almost time to welcome the new year and new beginnings.
Maybe you’ve already given all your gifts, or perhaps you have a holiday gift exchange in the coming days. Regardless, I believe there’s never a wrong time to give something to make someone else happy!
It’s a good idea to celebrate family and friends in the colder winter months. And since this is also the right time to get in your seed orders and plan for spring growing, perhaps you’d like to give the gift of growing with gardening gifts!
When you give the gift of seeds or a good garden tool to a loved one, it shows not only that you care about them but also that you care about good food, grown locally!
Here are some great ideas for gardening gifts that much better than something random off the shelf. These gifts that biodegrade, don’t come in lots of packaging and can build a resilient future! I’ve put these in order of cost, lowest to highest, though some can be produced or made yourself.
1. A selection of heirloom vegetable seed packets
Pick up a few packets (or more) of your favorite vegetables. Consider what the person loves to eat. And perhaps choose varieties that you know how to grow so you can share knowledge on how to grow them.
Some seed companies have mixed seed collections, too. Or you can cherry pick a custom arrangement. Seed packets can even be a wonderful item to set into the tree like ornaments.
Hint: Organic and open-pollinated seeds from your garden make great gifts too! Also, some seed companies give discounts for early or bulk ordering in larger quantities. So consider ordering a bigger bag of seeds, dividing these into 10 portions and using small envelopes that you (and maybe the kids) can decorate to send to friends and family.
If you have trees on your land or access to a woodlot, you could cut custom trellis stakes. Find a coppice of trees with stems around 2 inches in diameter. This might include sprouts from a weedy tree species whose main stem was cut a few years previous. Or it could just involve thinning out a hedge or finding understory trees in your forest land on the homestead acreage.
Anyway you saw it, you can cut multiple stems to 4-, 6- or even 8-foot length with a hand saw. You can sharpen the tips or leave them blunt.
These can be dried inside until spring to help trellis tomatoes, pees and more. As funny as it sounds, bundles of six, 12 or 24 stakes make nice gifts for anyone who loves gardening.
Hint: You can also buy 2x4s and cut them down to 2×2 stakes if you don’t have access to a woodlot.
3. A good ergonomic shovel
Never underestimate the need for the quintessential garden tool. Look into your friend or family member’s shed and see if they have a great garden shovel.
Most people pick up a $15 to $30 shovel. But I can tell you that once you get into the $75 range, looking carefully at the quality and style, you can find truly useful tools that can last years and years.
Keep an eye out for a strong, well-made shovel, with a step for your foot to help you dig into the ground.
Hint: A really good garden store (not a big box store) is the place to find quality shovels.
4. A subscription to a CSA basket program for 2022
For those friends and family members that don’t garden or may not have access to land, consider sharing the cost with others to get them a seasonal CSA basket.
Community Supported Agriculture (CSA) subscriptions provide individuals and families with a basket of fresh veggies, fruit and sometimes even meats, eggs and other edibles on a weekly basis during the summer and fall, often even through the winter. This is an amazing gift for those who love good food and contributing to a truly meaningful way of changing the face of our landscapes and societies through local food action.
Hint: You might also be able to find gift certificates to farmers markets!
Christina Robinson says that she and her husband always knew they wanted to add chickens to their homestead. So when they came across someone who had six chicks that needed rehoming, they couldn’t say no.
“Our first project at the house became working on the coop to move the girls in as quickly as possible since they had grown quite a bit,” recalls Robinson, after purchasing property in New York. Since taking in that initial batch of chicks, the expanded brood’s adventures have gained a following on social media, where Robinson posts under the handle Linguini Beans.
We spoke to Robinson about the therapeutic nature of living with chickens and the benefits of humanely-sourced eggs. We also found out about some of the mischievous pranks her poultry enjoy pulling off.
Looking back on her decision to add chickens to the homestead, Robinson says that it started with “the idea of knowing where our eggs come from.” Robinson adds that she appreciates “knowing they came from a humane source. And if you ask me, these girls are pretty spoiled.”
Robinson says that another factor behind her sizable peep at Linguini Beans is the goal of keeping animals out of the shelter system.
“This past summer we adopted two hens from different shelters, both that were found wandering the streets of a city alone,” she says. “Now I’m excited to say we’re adopting eight more this weekend—a senior Silkie and seven that are about a year old.
“I didn’t mean to be that crazy chicken lady,” she adds. “It kind of just happened.”
“It has become almost therapeutic to sit out with them,” says Robinson when asked about the most rewarding part about being around chickens on a daily basis. “It’s a nice break from work and life. They each have their own personalities. They’re quite entertaining.”
One of the stars of the Linguini Beans social media accounts is Henrietta. “This girl beats her own drum,” says Robinson. “She’s the adventurous type and always has to know what you’re doing.”
Blessed with wandering tendencies, Robinson adds that she will often have to carry Henrietta back to the coop after she saunters off on her daily escapades.
“They get into everything they can!” says Robinson when asked about a recent Instagram post involving chickens and Christmas lights. “They dig up garden plants, chip away at the house paint, pick up a shiny thing and run—you name it!”
Anointing Henrietta as chief trouble maker, Robinson adds that a frozen pond recently offered up new opportunities for hijinks. “We have a large pond with two fake ducks in it,” she explains. “I turn my back for two seconds and who do I find standing on the pond next to the ducks? Henrietta!”
“Reduce, reuse and recycle” has been the green-living mantra for decades. And, more recently, “rethink” and “repair” have begun to gain the traction they deserve, too. Many are now forgoing cheaply made goods in favor of higher quality items that are built to last.
And, to give items some extra life and keep them out of the landfill, many folks are repairing what they can as well.
Although it may seem like a little thing, salvaging those holey socks and sweaters can make a difference. (In 2018 alone, more than 9 million tons of clothing and footwear ended up in U.S. landfills!) You don’t need much in the way of talent or fancy equipment to be able to darn a knitted item. And you can get a surprising number of extra miles out of a well-mended sock.
Getting Started
Even the most carefully knitted socks wear out eventually—usually at the heel or, occasionally, the toes. The trickiest part of mending these is maintaining the sock’s shape and the right amount of stretch as you go. Some people simply slip one hand inside their sock during repair, but I’ve not had good luck with this method.
Instead, I use a wooden darning “egg” for this purpose. It looks a little like a miniature maraca, and I use it to fill out my threadbare sock’s heel. You could just as easily use a racketball, a lightbulb or maybe even a hard-boiled egg for this purpose. Experiment until you find an object that adequately supports the area as you work.
You’ll also need darning needles. (These tend to be thicker and have larger eyes than regular hand-sewing needles.) Finally, you’ll need yarn or embroidery floss. Choose something that matches your sock’s material type and weight as closely as possible. (For instance, repair heavy wool socks with wool yarn. Darn lightweight cotton socks with a lightweight cotton thread or embroidery floss.)
You don’t have to wait until you have a complete blow-out to repair a sock. In fact, you’re likely to get more life out of it if you shore up a threadbare patch before it goes completely holy.
For relatively unobtrusive repairs, use a matching yarn color and turn your sock inside-out before you begin. With a few washes and wears, the darned area eventually will blend in. But, depending on the location and size of the patched spot, newly darned socks can take some getting used to.
Because comfort is more important to me than aesthetics, I usually use whatever yarn colors I have on hand. And I often darn my socks right-side-out. That way, I’m less likely to feel the mended area’s change in thickness or texture.
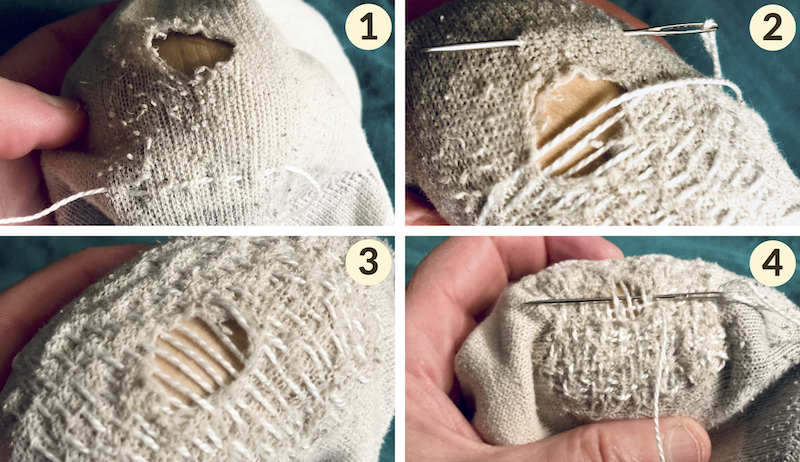
The image below corresponds to the following steps.
Susan Brackney
Step 1
Turn sock inside-out. Insert darning egg (or similar object) to support the holy (or threadbare) area. Thread your darning needle with a long length of yarn.
Using small, running stitches, begin stitching 1 or 2 inches below the hole. (Be sure you’re working on a portion of fabric that’s still in good shape. After all, these exterior stitches will help to anchor your final repair.)
Step 2
Stop 1 or 2 inches beyond the edge of the hole. Turn your needle and head back in the opposite direction. Again, use tight, running stitches to create a set of parallel rows. Keep these rows as close to one another as possible. Alternate the stitches in each row to create a brick-like pattern.
Once you reach the section of sock with the hole, span the yarn across like a bridge. Pick up sewing with running stitches again when you reach the intact fabric along the hole’s outside edge. Again, keep the rows in this bridged area as close together as possible.
Step 3
Once you’ve spanned the hole with rows of yarn, keep sewing with running stitches. Stop once you’ve reached a point that’s an inch or two above the hole.
Step 4
Turn the work and begin sewing another tight set of rows perpendicular to the first. Again, you’ll use small, running stitches. This time, however, incorporate the first set of rows, sewing an over-under-over-under basket weave pattern as you go.
When you reach the bridged hole, keep basket-weaving each perpendicular row. (Essentially, you’re weaving a new patch of fabric here.) Once you’ve finished basket-weaving over the hole, keep sewing with running stitches. Sew with the over-under-over-under basket weave pattern until you’ve incorporated all of the remaining rows.
Backstitch to secure your work, snip the excess tail, and your darning is done. You can use this same technique to repair sweaters and other knitted items.
Your backyard poultry are of great interest to you, providing delicious eggs and meat, as well as garden fertilizer, pest control and daily enjoyment to you and your family. But unfortunately, your chicken coop is also quite interesting to other creatures, including coyotes, cats, dogs, foxes, hawks, minks, weasels, owls, opossum, rats, raccoons, skunks, snakes and many other predators.
Raise poultry long enough, and you’re likely to lose one now and then to predators. However, if you take the protection of your poultry seriously, losses can be kept to a minimum.
The list of predators that can attack our poultry is long, and air and ground attacks can occur day and night. If something is attacking your poultry, the first step you need to take is to find out which predator is to blame. In many cases, predators will leave signs and tracks behind as evidence.
When these signs are not present, much can be inferred by how the birds are attacked. Different predators are active at different times of the day, and their hunting and feeding behavior differs. Once you know which predator is attacking your poultry, you can secure the chicken coop and take action to prevent future issues.
What Hunts When
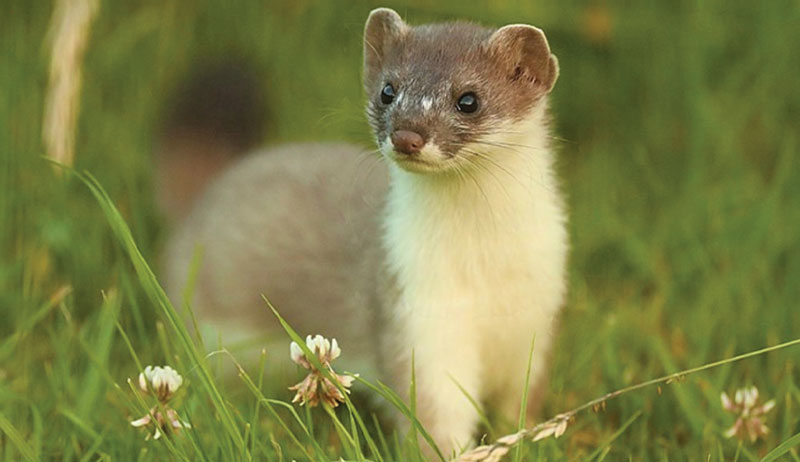
Bobcats, coyotes and foxes prefer to hunt after dark, and they usually take birds away to eat elsewhere. Overnight, raccoons and weasels are also significant threats. Raccoons will often pull a bird’s head or legs through a wire fence and leave its body behind, while weasels sometimes kill many birds by biting them at the backs of their heads.
Birds of prey can also be very serious predators. Large hawks will attack birds from above during the daytime hours and eat them in place, as evidenced by scattered feathers. Great horned owls are also known to take birds at night, either carrying them away or eating them on the spot.
Dogs and cats can also be a very big problem in urban areas. Skunks and opossums will eat eggs and sometimes birds, while black bears will occasionally recognize poultry as food.
Wildlife cameras can be used to help find out the predator. Because motion sensors activate them, cameras can also be used at night. While they can’t prevent predators, the knowledge they can provide is beneficial in preventing future issues.
GS23/Shutterstock
Regardless of which method you choose, knowing your enemy is critical if you expect to win the war against predators.
Protection Priorities
Once you have identified which predator is attacking your chicken coop, you can take actions to prevent future issues. Probably the two most important parts of protecting your flock from predators are correct housing and fencing. Whether you buy it ready-made or build your own, there are a few simple things you need to know to keep your poultry happy and safe.
Fencing
Quality fencing is the foundation for effective predator control. Fencing is almost always a necessity, especially if your birds are allowed to range and forage outside the chicken coop. A quality fence will keep the flock confined to an area of your choice, prevent difficulties with neighbors and keep out practically all predators (if constructed properly).
Several types of wire mesh (welded wire mesh, poultry wire, hardware cloth, electric netting) with openings smaller than 1 inch tend to work best.
Make sure that your fence is tall enough to prevent predators from entering. Coyotes, for example, can easily jump over a 4-foot fence.
If possible, consider covering the top of the pen with netting or wire mesh, as well. This will protect your birds from air predators, such as hawks and owls. A top is also highly recommended because it protects from air predators and will also help keep wild birds from entering the pen or chicken coop and interacting with your poultry.
Wild birds can carry diseases that may be harmful or even fatal to poultry. Thus, the less contact that occurs between your birds and wild birds, the better. The fencing material should be long enough to turn outward from the pen on the ground and bury the bottom 6 to 12 inches so that predators can’t dig under the fence.
It’s a great idea to keep your birds locked up in a chicken coop secured against predators every night. If your birds have a fixed outdoor area (run), the fence should go at least a foot into the ground and then turn 90 degrees outward for at least another 8 to 10 inches to prevent predators from digging.
By having the wire turn outward, predators will dig into the corner of the wire and will not be able to dig any further, preventing them from entering.
If the coop’s windows aren’t made of glass, you’ll need to cover them with wire netting to keep predators out. If you open the windows, a predator-proof wire cover is required. Window screens do not stop most predators.
Movable housing is an increasingly popular choice for small flocks. When using this form of housing, it’s very important that the structure’s edges are in contact with the ground to make it predator-proof. Additionally, many poultry keepers that use movable housing keep their poultry in pasture areas that are surrounded by a fence (often electrical) to provide them more protection against predators.
Electric netting made for poultry can work well for containing the flock and offer some protection against predators, provided an adequate charge is maintained throughout the whole fence line.
Safety Tips
I am a professional small-scale poultry farmer and am well acquainted with many predators. I’ve tried many methods and techniques, and only after three years of living with my chickens, as well as ducks and geese, did I completely get rid of predators.
So here I have included several useful tips to protect your poultry from predators, successfully tested in my own experience.
Raise It Up
Raising the coop off the ground on stilts is a great way to prevent most predators from entering the chicken coop. Just make sure the chicken coop floor is secure and that any holes that snakes or rats can get through are repaired.
Seal Holes
Make sure you regularly check your chicken coop for any access holes. When you feed your birds, clean them up, close them at night, and make sure you regularly check the chicken coop for any access holes.
It is very simple but very important. Every small hole can be used by predators to gain access to your birds. A weasel, for example, can easily squeeze through a 1⁄2-inch hole. You’ll be surprised at how easy it is for small predators such as snakes and weasels to crawl into the coop and eat eggs, and, in some cases, even chicks.
Bring ’em Home
Train your flock to return to their coop every evening and make sure to close it up. After allowing your birds to range for the day, they’ll naturally return to their coop to lay eggs and roost at night. Just make sure to close it up in the evening once the birds have settled.
Hire a guard
Within the towns and city limits, there are usually restrictions on having roosters, as they can be a little bit noisy for neighbors. There aren’t too many people who like to be woken up at the crack of dawn by a rooster crowing. However, if you live in the country, it’s usually OK.
On the contrary, waking up at the crack of dawn by a rooster crowing is even pleasant and a big part of country life. The importance of keeping a rooster is very simple. A good rooster will protect the flock and will become an excellent guard.
As a great guard, you can also use a guardian dog. This dog will do the same job as a rooster, only better.
Michael Feldman
A dog can range farther away around the coop or fence and the scent of a dog is very disturbing to most predators. This is a very tried and tested method of protecting your poultry from predators. Guardian dogs work well at deterring even birds of prey.
The most important part of this method is to make sure that the dog is friendly with your birds before leaving your poultry and dog unattended.
It’s advisable to choose dogs that are guardian breeds, such as Great Pyrenees, Anatolian Sheepdogs or Maremma Sheepdogs. Llamas, alpacas and donkeys are other interesting options for guardian animals.
Create a bad environment for predators by cutting down any tall grass, bushes or overgrown areas around your chicken coop. Almost all predators are uncomfortable crossing an area without cover.
If you want to create a little shade for your birds, you can plant some plants or bushes inside the chicken run. I have tried it with my birds and they really love the shady spot and nibbling on the leaves.
Use Objects with Motion
Another very simple and easy-to-install method is to put around the chicken coop some moving objects that will scare away most predators. Flags, pinwheels, CDs on a thin wire and everything that moves in the wind can be used.
This method is very simple, but you can’t even imagine how effectively it works.
Moreover, this can even delight your birds. Most poultry, such as ducks and chickens, are very curious and, therefore, they’ll be very happy to see something that is colorful and moving.
Install Motion Sensor Lighting
A night light (motion-sensor-activated) or a set of predator-
deterrent lights flood the chicken coop with light after dark. This will keep most nighttime predators away from your chicken coop.
Whichever method you choose, winning the war against predators is the responsibility of every poultry farmer. With the ammunition in this article, you should be ready to defend.
More Information
Regional Predators
You can find out the predator attacking your poultry by knowing which predators live in your area. It’s not very effective, but it’s worth a try.
Bears: in the heavily forested areas of the following: the Northeast from Maine to Northern Georgia, the northern Midwest, the Rocky Mountain Region, the West Coast, Alaska and parts of Florida, Missouri and Arkansas
Birds of Prey: throughout the U.S.
Bobcats: throughout the U.S., except Michigan, Ohio, Indiana, Illinois, Connecticut, New Jersey, Rhode Island, Delaware, Maryland, and parts of Minnesota, Iowa, Missouri, Wisconsin, Kentucky, Colorado, California, Virginia, and the very northern and southern parts of New York and Pennsylvania
Cats: throughout the U.S.
Coyotes: throughout the U.S.
Opossums:from New Mexico and Texas to as far north as Nebraska and throughout all the east to New England and Florida. Also, on the western coast of California to Washington
Raccoons:throughout the U.S., except parts of Wyoming, Colorado, New Mexico, Arizona, California, and most of Utah and Nevada
Red Foxes: across North America, except most of the southwestern U.S. and Mexico
Rodents (Mice & Rats): throughout the U.S.
Skunks: throughout the U.S., except in parts of California, Nevada, Louisiana and North Carolina
Snakes: throughout the U.S.
Weasels & Minks: throughout the U.S. except most of Arizona and small parts of New Mexico and Nevada
Wolves: northern Wisconsin and Minnesota, as well as Western Montana, Northern Idaho, North-western Wyoming and parts of Arizona, New Mexico, Washington, Oregon and North Carolina
All Signs Point To
You can find out which predator is attacking your poultry by the signs they may leave.
Coyote: whole bird missing, with scattered feathers;
often dig into runs
Cat: chickens or young birds missing
Dog: birds usually mauled but not eaten
Fox: whole bird missing, with scattered feathers
Hawk: bird eaten on site, lots of feathers
Mink/weasel: dead birds neatly piled, back of head and neck eaten
Owl: head and neck eaten, loss of feathers, sometimes whole birds missing; happens at night
Opossum: whole birds consumed feathers and all,
sometimes leave only the wings or feet
Rat: chickens or young birds missing, partially eaten chicks
Raccoon: breasts and entrails eaten, backs bitten,
scattered feathers
Skunk: entrails eaten but not muscles or skin, lingering odor
Snake: egg or young birds are missing
This article originally appeared in the November/December 2021 issue of Hobby Farms magazine.
Listen as Rasheed Hislop, a Master Composter, offers you his best tips for small-scale vermicomposting. Get your worm bins ready!
Hear about how this Brooklyn-raised farmer’s grandparents, in the Hudson Valley and in Trinidad and Tobago, instilled in him an interest in food production by way of gardening, fishing and cooking from scratch.
Rasheed talks about his work supporting farmers, first with urban farmers and community gardeners through NYC Parks GreenThumb and now with farmers in California’s Central Valley, particularly Black, indigenous and farmers of color, through Community Alliance with Family Farmers and African American Farmers of California. He also gets into the racial equity and planning work being done behind the scenes at nonprofits like CAFF. (Plus, this is your chance to make plans to attend, virtually or in person, the CAFF conference, coming up Feb. 27 to March 3, 2022!)
Learn about the Black Zocalo cooperative’s efforts to teach about growing food, planting native plants and fostering farm-related businesses, including Rosalba Lopez Ramirez’s (Rasheed’s wife’s) Dau Butter skincare line and Rasheed’s seed production for Truelove Seeds. All of this is ultimately to create a movement toward a Black and Indigenous-owned land-based learning center.
Also put in your listening queue Rasheed’s “Farming in Color” podcast, highlighting the work of his BIPOC farming friends and creating an archive for Black Zocalo’s work.
When it comes to ornamental chickens, it’s hard to beat the Onagadori (Japanese for “honorable bird”) breed. What makes this uber-rare Japanese breed so special? For starters, the roosters possess remarkably long tails, with reported lengths reaching as long as 27 feet.
Breed History
The Onagadori chicken is a Japanese breed, originating in the 17th century in Kōchi Prefecture, on the rural, mountainous Shikoku island in southern Japan.
History doesn’t provide too much detail on the bird’s origins. For years, common belief held that the Onagadori derived from crosses of two ancient long-tail breeds, the Shokuku and Totenko. Some held that another long-tail chicken, the Minohiki, also played a part in development.
Recently, though, study of this royal fowl’s genetics led researchers to posit that the Onagadori was, in fact, one of the long-tail foundational breeds. At any rate, the chicken became a hit across Japan in the late 19th century, when farmers, taken with its striking plumage, gladly raised the ornamental fowl.
The breed’s popularity grew to truly special status in Japan. Officially recognized in the early 1900s, Japan declared the Onagadori a Special Natural Treasure in 1952—the only chicken breed to earn this “special” designation. At this time, Japan banned export of the breed’s eggs to other countries.
In recent decades, however, this once-popular bird grew rare to the point of near-extinction. As poor egg layers with specialized demands, the Onagadori can only be considered an ornamental breed, with limited appeal to most modern poultry-keepers.
Some believe that, today, pure Onagadoris may only number around 1000 globally. In the U.S., where the breed isn’t recognized by the American Poultry Association, only small numbers of the bird exist, with only a handful of breeders or clubs State-side.
As such, the Onagadori is considered one of the rarest chicken breeds in existence.
Joanna Starkey
Onagadori Details
A large breed typically weighing in at 3 pounds for hens and 5 pounds for roosters, Onagadori are calm and friendly birds best kept for exhibition purposes.
The hens will lay only between 50 to 100 eggs a year. Hens don’t go broody, but if you hatch the eggs, they make good mothers to the chicks.
Both male and females have bright red combs and wattles, with white earlobes. You’ll find feather types in in four colors: Black-breasted Red, Black-breasted Silver, pale Black-breasted Golden (called Goishi in Japan) and White.
Onagadori possess willow-colored legs, and chickens have four toes.
Now about those tail feathers. While hens molt normally, roosters do not lose their 16 to 18 tail feathers under optimal conditions. Because of a combination of genes (the “nm” gene in particular), this results in spectacularly long, flowing tail plumage.
These feathers are remarkable, but they’re also the reason this rare breed is best raised by expert keepers. For starters, the birds require close protection. Their trailing feathers make them an easy grab for everything from predators to dogs to even children.
Ideally, they’re raised in secure captivity, away from other animals and chickens breeds.
Furthermore, their tail feathers make for clumsy flying. But, because of their tails, they do need high perches to keep tails display-ready.
Breeders commonly roll up and secure their Onagadori feathers in silk ties.
Finding Onagadori
Onagadori chickens aren’t common outside of Japan due to their rarity and the mid-century export ban. But you might find birds online from a few select providers.
Feather Lover Farms, in particular, breeds long-tail birds. Though, as of this writing, hopefully buyers will encounter an almost year-long waitlist.
Have you ever thought about adding an ATV or UTV to your arsenal of farm equipment? No matter where you live and no matter what your needs, these small but versatile machines are useful for a wide variety of farm operations.
Perhaps you own a full-fledged utility tractor, but you’re looking for something smaller and more convenient for making quick trips with a few supplies around the farm. Or perhaps you’re a hobby farmer on a budget, looking for a relatively inexpensive tractor alternative that can handle a mix of lightweight farming assignments.
In either instance, an ATV or UTV might just fit your needs. But hold! Don’t head to the local dealer and purchase the first model that catches your eye just yet! We’ve got 20 buying, maintenance, safety and trail-building tips to help you make informed decisions when purchasing (and using) an ATV or UTV.
Buying Advice
Before your start shopping, consider your needs. Are you looking for a lightweight vehicle perfect for driving around a few tools and supplies without rutting up your yard? Or do you need a heavy-duty machine capable of cultivating fields?
Make a list of projects (both current and future) that you plan to tackle. Then ask yourself the following questions.
ATV or UTV?
Though similar, ATVs and UTVs have a few key differences. An ATV (which stands for all-terrain vehicle) is typically a small, one-person machine designed for traversing challenging terrain and carrying small loads.
A UTV (utility task vehicle or utility terrain vehicle, also known as a “side by side”) is a larger machine that seats multiple people while carrying larger loads. When enhanced with attachments and implements (such as snow blowers, tillers, harrows, etc.), ATVs and UTVs are capable of performing light farm work.
But farmers are generally advised to pursue the extra strength, stability and safety offered by a sturdy UTV.
Daniel Johnson
Gas, diesel or electric?
Many ATVs and UTVs run on gasoline. But some models feature diesel engines, and still others are electric.
As a broad rule, diesel-powered models are strong and durable, designed for hauling heavy loads and handling attachments and implements. You might not get the same speed and sport performance as you would with a gasoline-powered model. But this usually isn’t a concern for farmers.
Electric models offer several advantages compared to gasoline and diesel engines, including reduced noise and maintenance. No oil filters, air filters, fuel filters and spark plugs. That’s appealing, right?
But heavy-duty farm work may drain the batteries quickly. And if you run dry in the middle of a project, recharging isn’t nearly as fast or convenient as filling a tank with gasoline or diesel fuel.
2WD or 4WD?
Just like cars, some ATVs and UTVs offer two-wheel drive (2WD). Others offer four-wheel drive (4WD).
Two-wheel drive vehicles are generally lighter and less expensive. They are also more likely to get stuck in muddy or otherwise challenging terrain. And they don’t climb or descend steep hills as well.
Four-wheel drive machines tend to be stronger, heavier and more stable. This increases safety while allowing you to tackle tougher conditions.
Clearing snow, for example, is a task where four-wheel-drive vehicles offer a meaningful performance boost.
How strong is the engine?
Depending on the model, the engine strength of an ATV or UTV might be measured in cubic centimeters, horsepower or both. The two ratings aren’t directly comparable. In both cases, though, higher numbers represent more power.
Other factors (including torque and rpms) can influence the capabilities of a machine. But a powerful engine is a good place to start if you’re planning to tackle tough tasks.
Maybe you can get away with doing light field cultivation on a machine with 20 horsepower. But jump up to 30 horsepower, and you’ll be able to handle larger implements more effectively, and with less strain on your machine.
Chain drive or shaft drive?
How does the machine transfer power from the transmission to the wheels? Many small ATVs use chain drives, which employ a chain (quite like a bicycle) to get the job done.
They’re lightweight and less expensive than shaft drives, which use shafts and joints to transmit power. But chain drives need more maintenance (including lubrication). And they aren’t considered as durable as shaft drives, which are better suited to heavy-duty farm work.
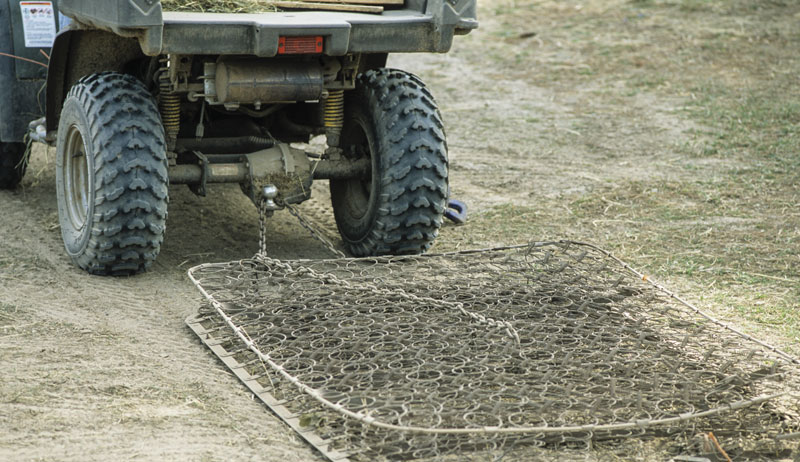
How much can it tow?
Sometimes, you need to transport more than your ATV or UTV has space to carry. That’s when it’s nice to hook up a yard cart or utility trailer and haul a larger load.
If you plan to do a lot of heavyweight hauling, check out towing capacities before making a purchase. A small ATV might be rated to tow just 500 pounds, which includes the weight of the trailer. A stronger UTV might be able to handle 2,000 pounds or more.
Daniel Johnson
What are the specifications of the bed?
A heavy-duty UTV is practically a miniature pickup truck, complete with a rear bed for hauling supplies. But bed dimensions (measured in cubic feet) and payload capacities vary widely. So consider how you might use the bed before choosing your machine.
If you want to carry around a toolbox and the occasional bale of hay, a small bed might be all you need. If you want to haul loads of rocks around, look for a bed rated to carry 1,000 pounds or more.
Consider also whether the bed is a hydraulic dump bed designed to facilitate easy unloading of heavy materials, or whether the bed has sides that fold down to convert into a flatbed when needed. Both features are highly useful.
What bonus features does it offer?
A bare-bones ATV or UTV can accomplish a lot. But lots of extra features are worth looking for if you can afford them.
Some UTVs boast enclosed cabs with heat and air conditioning, allowing you to work comfortably in all kinds of weather. You might also find a model offering power take-off (PTO) for powering attachments, a nice alternative to using self-powered attachments designed for machines without PTOs.
ATVs and UTVs require regular maintenance to stay in tip-top shape. To avoid accelerated wear and tear—and to keep your machines in safe working order—follow a regular maintenance schedule highlighted by the following steps.
Change filters as needed.
Assuming your machine isn’t electric, you’ll need to regularly clean and/or replace the filters for air, oil and fuel. Neglecting the filters can reduce performance and even damage the engine.
Consult the user manual for instructions on how often to maintain the filters.
Keep the oil fresh.
Oil serves to lubricate and cool the engine for maximum performance and durability. But over time, oil breaks down and accumulates various bits of debris, reducing its effectiveness.
Oil changes are critical to extending the life of your machine. Drain and replace the oil on a regular basis, as outlined in the user manual.
Give your machine a good cleaning.
The user manual might not specifically instruct you to “Clean Your Machine Every 25 Hours,” but taking the time to remove mud, dirt and grime from your vehicle will keep it looking spiffy and help prevent parts from wearing out prematurely.
Grab some wet rags, buy some degreasers and cleaning solvents, and take some time every now and then to give your ATV or UTV a thorough inside-and-out cleaning.
Consult the manual for other maintenance tasks.
Exact ATV and UTV maintenance requirements vary from model to model. The user manual may provide a thorough checklist of maintenance tasks, which can include (but may not be limited to):
checking tire pressure and tread depth
replacing spark plugs
lubricating the fittings
checking/adding coolant
checking driveline tension
inspecting wiring and cables
tightening bolts and connections
Safety Suggestions
As with any vehicle, some inherent danger exists in operating an ATV or UTV. Safety should always come first, so minimize your risk of injury by adhering to the following safety advice.
Wear a helmet.
Just because you’re driving around your own farm doesn’t mean you can neglect basic safety. Wear a helmet when riding, especially if you’re negotiating uneven terrain.
And consider wearing eye protection if you’re riding without a cab through woods or other areas where brush and low-hanging branches might catch you by surprise.
Consider weight limitations.
Don’t overload your machine! ATVs and UTVs have payload capacities, with the weight of rider(s) and cargo counting toward the total. If your machine has a payload capacity of 400 pounds, a 250-pound rider leaves just 150 pounds left over for cargo. Overloading your ATV or UTV can strain and/or damage the machine and its shock absorbers.
In addition to the overall payload capacity, consider how much weight the racks and/or cargo bed are rated to carry. Just because the entire vehicle can carry 500 pounds doesn’t mean the front rack can hold this much. It might be rated to carry just 100 pounds.
Distribute weight across both racks.
When loading up the racks of an ATV with cargo, don’t pile it all on the front or all on the back. This can throw off the balance of the machine and increase the risk of tipping forward or backward.
Instead, split the load across both racks. If the rear rack is designed to hold twice as much weight as the front rack, put 2 pounds of weight on the rear for every pound on the front. You’ll stay safer and your machine will perform better if you take care in distributing the weight.
Stay off roadways.
ATVs and UTVs are designed for off-road use, so driving on paved roads (if allowed by local ordinances) can be dangerous, especially if operating at high speeds.
With their off-road tires and high centers of gravity, these machines can be unstable and difficult to control on roadways, increasing the likelihood of an accident. At the very least, driving on paved roads will wear out your tires, so aim to operate only on your own property and designated ATV trails.
Planning the routes you’ll regularly drive with your ATV or UTV is important for minimizing erosion, rutting and soil compaction. Plus, a heavily used trail is bound to take a beating. So if aesthetics matter to you, consider where you would (and would not) like a well-worn path to appear.
Whether you’re carving a trail through your woodlot for harvesting firewood, or simply planning a route from the garage to the livestock paddocks, the following tips can help you achieve the most satisfactory and pleasant-to-drive results.
Daniel Johnson
Beware of low ground.
Just because your machine can handle all terrain doesn’t mean you should tackle all terrain on a regular basis. If a low spot in your trail tends to get muddy during wet weather, driving an ATV or UTV through the mud is only going to tear up the ground, increase erosion and worsen the problem.
Consider rerouting your trail around the muddy spot if possible. Otherwise, adding gravel or improving drainage can reduce the issue. Installing geosynthetic materials such as geotextiles or geocells can be an effective long-term solution if you’re willing to invest some capital and bring in experts.
Watch out for slopes.
When planning the paths your trails will follow, pay special attention to sloping ground. If possible, avoid driving on steep slopes since they’re more likely to degrade and suffer erosion (from water runoff, for example) than flat terrain. They can also make for dangerous driving conditions, so if you must negotiate sloping ground, aim to have the trail run straight up or down the slope rather than across. This will reduce the risk of your machine tipping over.
Consider also how you plan to use the trail. An ATV might struggle to pull a wagonload of manure up a steep slope, so if you’re trying to reach a remote compost pile, perhaps you should seek a flatter avenue to the area.
Repair potholes.
There’s no reason to beat up your machine (and your body) by riding over a pothole-riddled trail. Scrape away loose material from within the pothole, getting it back down to a firm surface. Then add gravel (a heaping load higher than the surrounding ground) and pack it down tightly.
The tamper end of a digging bar can give you a good start. After you’ve done your best by hand, repeatedly drive over the filled pothole with your ATV or UTV to pack down the gravel even better.
If necessary, add more gravel until the hole is completely filled and satisfactorily smooth.
Keep branches & brush pruned back.
Driving along and ducking underneath low-hanging branches isn’t just annoying. It can be dangerous. Rather than plunge willy-nilly through an overgrown woods trail, prune back branches and brush to create a well-defined path.
Trim branches high enough so you can walk or drive underneath without issue.
A chainsaw and pruning loppers will handle much of the work, though you may need a pole saw to tackle higher branches. For best results, consult a guide to pruning tree limbs. Keep in mind that wet or snow-laden branches tend to hang lower than dry branches, so you may have to trim higher than you expect.
Annual touch-up pruning may also be required to maintain the trail as upper branches grow longer and sag lower.
Choosing the right ATV or UTV requires time and effort, as does getting the most out of your machine through proper maintenance, safety and trail-building techniques. But the reward of a trusty, durable and versatile farm machine is well worth the commitment.
Have fun working and riding!
This article originally appeared in the November/December 2021 issue of Hobby Farms magazine.
Name any hand-operated tool you can think of, and chances are it has an electric or gasoline-powered counterpart. The screwdriver has the electric drill. The hand saw has the chainsaw. The ax has the log splitter.
It’s easy to assume a high-powered model is better than one relying on human power. But that’s not always the case. The truth is, hand tools and power tools each have their pros and cons.
The right tool for one job might not be appropriate for another.
Since I’m a big fan of hand tools, I’m going to explore the broad pros and cons of hand tools vs. power tools, if only to highlight some of the ways hand tools can come in “handy,” pun intended.
Hand Tools
Pros
The biggest advantage to hand tools? Their simplicity. They don’t require a power source aside from your own strength. So they can be operated anywhere, anytime.
Unlike gasoline tools, they can be used indoors, because they don’t put out exhaust fumes. They’re generally lightweight compared to powered alternatives, and often quieter in operation. Certainly a hand saw is quieter than a gasoline chainsaw, a big benefit if you’re concerned about bothering neighbors or disturbing sensitive livestock.
Oftentimes, hand tools require more effort to operate and aren’t as fast or efficient as power tools. Cutting up a fallen pine tree with a chainsaw is relatively brief and effortless compared to tackling the same feat with a hand saw.
Power Tools
Pros
Speed and strength are the main benefits offered by power tools. Cutting down hay with a mower-conditioner is certainly faster and easier than swinging a scythe, right?
Power tools allow busy farmers to accomplish much more in less time. Projects you might not have time to tackle with hand tools (like sawing up half a dozen windblown trees) become feasible with the right power tools.
Power tools need a source of power, whether gasoline or electricity. Gas is convenient, but engines require regular maintenance, and they can’t be used indoors.
Electric and battery-powered models are simpler and more versatile. But corded models must be used within reach of an outlet, and cordless models work best if you invest in spare batteries and keep them charged.
Power tools also tend to be heavier than their manual counterparts.
The pros and cons of hand tools vs. power tools point toward a couple of key takeaways. If there’s a lot of hard work to be done, and you need to complete it as quickly and efficiently as possible, power tools are the way to go.
On the other hand, if you’re tackling a smaller project on a more leisurely basis, hand tools can be the perfect choice. There’s a certain satisfaction gained from completing a hard job with your own muscles, rather than the power of a machine.
And the peace and quiet compared to running a noisy gasoline engine makes for a refreshing atmosphere.
We take for granted our relationship with chickens. After all, more than 23 billion chickens live on the planet right now. And, globally, we consume more than 65 billion chickens each year. That doesn’t include the more than 800 billion eggs we eat every year.
In fact, more chickens exist in the world than any other domesticated or wild vertebrate species in number and biomass. They provide us with food at multiple levels from mega farms to humble backyards all over the world.
Village poultry (i.e., “backyard” chickens in Africa and Asia) are an essential source of protein and income for millions of people.
The ubiquity of chickens wasn’t always so, though. In fact, until the recent African swine fever outbreak in China in 2018, pigs were the most consumed animal protein on the planet.
The point is that the scope of chicken meat and egg consumption wasn’t always at its present level. So why is this so?
Independent birds/Shutterstock
Rise of Village Poultry
From a historical perspective, humans have only lived in villages—as opposed to being hunter-gatherers—for approximately 10,000 years. And chickens have been with us as domesticated animals for approximately 7,000 to 8,000 of those years.
However, the reasons we brought them into our villages are probably different than what we might guess thousands of year later.
Specifically, chickens were domesticated not for dinner purposes but for status, religious ceremony and entertainment (i.e., fighting). In fact, the best fighting birds were often buried with the high-status elders.
From a more practical perspective, roosters were also used as timepieces. Crowing roosters proclaimed the hour of dawn.
Once established in the culture of these emerging societies, various cultures then spread them via migration, trade and territorial conquests to various locations including Europe in 3000 B.C. and South America in 1200 A.D.
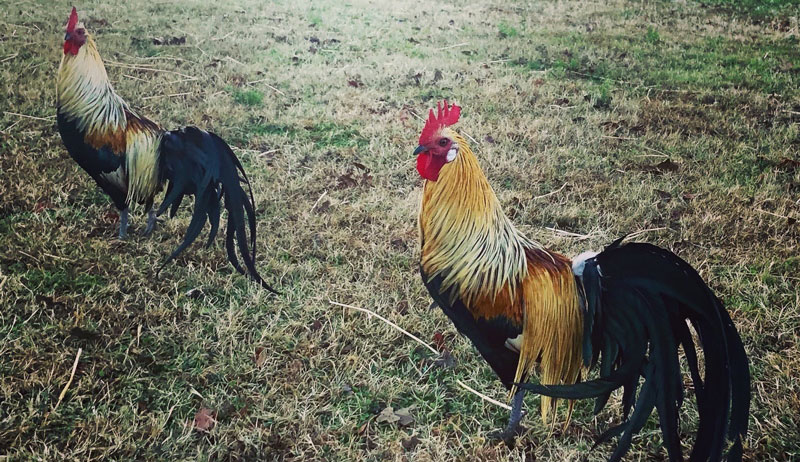
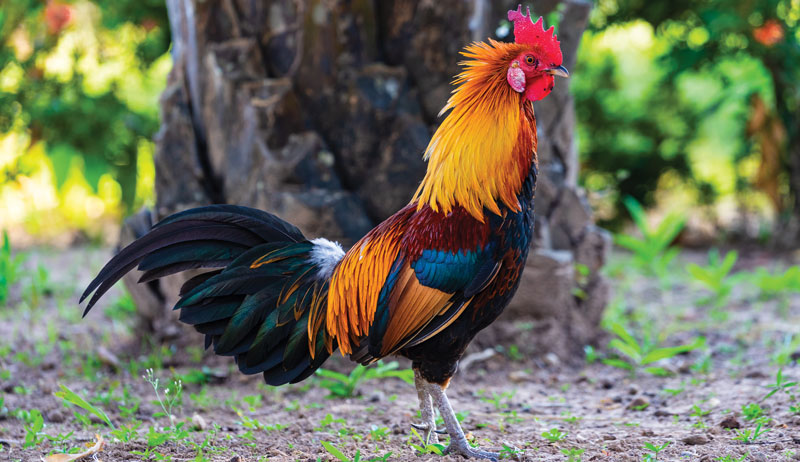
One of the reasons chickens were largely ceremonial as opposed to dinner is their appearance. The humble chicken wasn’t so humble back then. It was a smaller, flightier bird with long, colored, beautiful feathers.
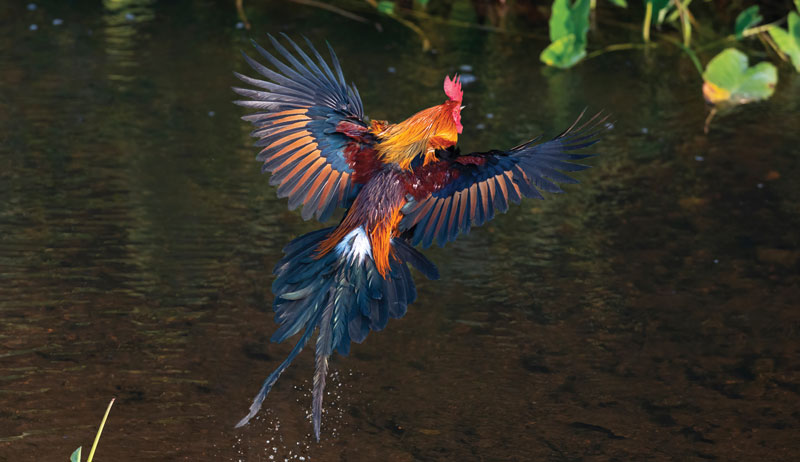
In other words, you’d want to show it off as opposed to stick it in a barn. You can see the living ancestors to modern chickens—red jungle fowl—with a trip to modern-day India, Bangladesh or Sri Lanka.
Based on how stunning red jungle fowl appear, it might make more sense why humans would prefer to hunt wild animals. And why they’d keep farm-domestic animals, such as sheep and goats, for milk and meat instead. It somewhat explains why a culture would learn how to farm grains on the same plot of land, too.
That way, they could just “show off” their chickens.
There isn’t a lot of research on this, but slowly but surely chickens—and their eggs—were used as sources of protein and fertilizer. One thing that helped the red jungle fowl become the humble chicken is that it became a prolific egg producer—compared to other birds.
Most birds don’t lay eggs year-round. As an example, ducks only lay eggs in the northern hemisphere between mid-March and July.
In contrast, a chance mutation in the jungle fowl led to hens that can lay eggs close to year-round. This, of course, depends on the breed and amount of light. Interestingly, societies that domesticated jungle fowl were largely equatorial. Hence, a constant amount of light was present year-round to facilitate year-round egg production.
In addition, at some point someone figured out that chicken poop makes an effective fertilizer. As humans were learning to farm, farmers likely figured out that their crops were more productive on fields that contained some level of manure.
Village poultry in Asia and Africa represent an interesting bridge between jungle fowl and the highly domesticated breeds we typically keep today on our farms and in our backyards. The concept of village poultry—indigenous chickens highly adapted to their environment—is a highly established part of life in most of Africa and Asia.
The village breeds aren’t as productive as conventional breeds. But they’re typically tougher from a disease-resistance and heat-tolerance perspective. In addition, the heavier commercial breeds often have problems escaping predators, are poor scavengers for feed and show poor broodiness, which is an essential step for creating replacement stock for village poultry.
James Karuga/Shutterstock
As backyard-poultry owners, our purpose for having chickens is likely different than what I’ve just described. But it’s a useful exercise to understand how other societies—past and present — use chickens. Check out these interesting observations:
They’re Very Diverse
Village poultry have incredible diversity. And, from a genetic perspective, they offer an important genetic reservoir/library.
Conservation of jungle fowl and their genetic diversity is a big issue in Southeast Asia for cultural and scientific purposes. Many of these birds have genetics that make them less susceptible to various highly infectious diseases, including avian influenza and virulent Newcastle disease.
Traditional Caregivers
Women & childrenare often the primary caregivers for village poultry. Many microfinance investors prefer to invest in small village-poultry women-run businesses. They’re typically more successful and less likely to default on their microloans.
Advantageous Livestock
Village poultry have many advantages in mixed farming systems. They’re small, reproduce easily, don’t need large investment and can scavenge for food.
Highly Economical
Village poultry typically scavenge for their food and rarely, if ever, receive commercial rations. While this makes them less productive, it does make them highly economical.
A Common Challenge
Access to veterinarians who treat poultry is a challenge in Asia/Africa (just like in the west).
In some ways, we may learn that we’re more like our ancestors and our fellow international poultry owners than we think. Backyard birds are similar to village breeds. We use them for decoration/status, food and, unfortunately, fighting. (Fighting is illegal in the U.S. but largely legal and acceptable in many non-Western countries.)
Many of our challenges are similar. Hopefully, the scientific, cultural and historic value of village breeds and jungle fowl will provide valuable insights for all chickens, including our humble backyard birds.
This article originally appeared in the November/December 2021 issue of Chickens magazine. It was written by Maurice Pitesky, D.V.M., and faculty at the UC Davis School of Veterinary Medicine in Northern California.