Whether it’s a chilly winter morning or a warm spring afternoon, nothing is more enjoyable than watching a pasture full of tiny, new calves wobbling through the grass towards mama. It’s often too easy to overlook such simple pleasures in life.
Cattle are amazing creatures, with their ability to withstand dropping from inside a 100 degree cow to a 40-degree dirt bed as a newborn. And nobody needs to tell the cow to start licking the mucus from her calf’s nose and face!
An uneventful calving is what every rancher hopes for. Yet there can be times when extra hand may need to intervene.
Gather Your Supplies
As calving season draws closer (whether fall or spring calving), having your supplies gathered up and ready to use will make an emergency situation run that much smoother.
If calving in an open pasture, you’ll hopefully have planned for it earlier that year. You left time for the pasture to sit empty, clearing parasites and disease from cattle that previously grazed there. By this point, you should see clumps of tall grass for the cows to bed down their calves in and use as a windbreak during calving.
Set up and repair your head gate (and other pens or buildings) so you can use it at a moment’s notice. Hang a halter and rope on a nail nearby in case you need to tie up a cow. Put a lariat rope in the truck in case a cow or calf needs caught (provided someone knows how to throw it!).
A calf puller will come in handy if a cow struggles to push the calf out of the birth canal. Consider intervention one of the last resorts, but keep the tool on hand and ready to use should the situation present itself.
If you find you will need to use it, follow the cow’s lead by pulling when she pushes and resting when she rests. We’ll cover calf pulling more in future articles. But part of being prepared is educating and making yourself familiar with the method of pulling a calf before you actually have to do it.
Bagged Colostrum
You want to keep bagged colostrum on hand during calving season in case a calf cannot nurse on the cow right after birth. If the calf gets too cold and cannot suck on a bottle, a drench bag with a hose on one end will be vital to getting warm colostrum inside of them.
It is more effective to warm a calf from the inside out rather than from the outside in. For this reason, you can skip the warm bathtub method and replace with a drenching of warm colostrum (made with 104 degree F water) and a toasty place to rest (such as inside a heated well house).
Keep a kit full of smaller supplies in your calving shed, work truck or wherever it’ll be the handiest to grab and run. Items to pack include:
Elbow-length gloves
Ear tags
Ear tagger
Medicine
Syringes
Nose hold (in case the cow needs to be restrained better)
Lariat rope
If running water is not present, round up some jugs of clean water, antibacterial soap, disinfectant, etc. in case a problem arises.
You may end up needing to contain a cow inside a pen for a period of time. For this reason, keep a bale of good hay near the pen and a bucket or small tank for water. Also stock up on any extra feed you might supplement her with.
Don’t forget to keep a record book handy throughout the season to track all of the changes in your herd. Say a prayer for safety and sanity as you enter into the calving season, and do your best to have things lined up in case a need arises.
Keep your vet’s phone number handy, as well as a number for a trusted rancher or cattleman. What one person might not be able to help you with, the other just might!
In my previous article, I talked about how Permabeds can benefit community gardens. The primary benefit we looked at was organization. As community gardeners often seek to do a lot with a little space, Permabeds help keep plots organized for maximum efficiency.
On a macro scale, Permabeds can also help keep the overall space organized, too. And they offer much in the way of building and maintaining soil health.
But when it comes to working within garden plots to grow food, Permabeds bring additional benefits to both the grower and the soil.
Management Benefits
When an entire community garden is divided by raised beds that run the full length of the community garden land, organized Permabeds allow much more efficient layout and use of material, supplies and techniques.
For instance, a single irrigation header along one end of the bed can provide a water source for each Permabed. And you could use tarps to regenerate plots easily, spreading them across an entire bed or an entire triad.
And you can even bring the efficiencies of market gardening to the community garden. For instance, beds could be turned over with a two-wheel tractor, operated by a laborer communally paid for the seasonal job of preparing all the beds.
How do you apply Permabed System Design on a Community Garden?
This is a simple process. Here’s an example.
Say your total available space is 50 by 100 feet. You can divide this space into exactly 12 Permabeds 4 feet wide and 6 inches high.
You can even put a chip-mulched perimeter alley around the entire plot. The size could range from 3 to 6 feet wide, depending on space available and access requirements. In this scenario, each bed offers 400 square feet.
Need more room to grow? Advanced growers could apply for an entire triad—three beds totaling 1200 square feet.
Seasonal Organization
Before the first growing season, install an irrigation transport line at one end of the community garden. Positioned thusly, the line offers each bed water access with heavy-duty, releasable drip lines.
When the end of a season arrives, a professional community gardener could come in and apply cover crops and tarps, as well as perform any other seasonally appropriate jobs. This, ideally, would be assisted by community growers.
In spring, the community could bring in specialized labour with equipment know-how to ready the garden for another growing season. Paid for by membership fees, this work would help improve yield and long-term garden success. Less weeds, less disease, improved soil and fertility.
Another huge benefit of using Permabeds in community gardens is the feasibility of an overall, whole-garden crop rotation plan. You can easily execute whole-garden crop rotation by designating beds (or even whole triads) to grow certain crop families.
Here’s one scenario you could consider. When one applies to be part of the community garden, they will see what type of crops an available Permabed plot allows. By growing within the designated crop family, this grower’s crops be a part of the community garden’s overall crop rotation plan.
A bit of foresight and organizational design would do any community garden a world of good. When next year a grower’s plot rotates, they will be able to learn experience growing another selection of crops.
What if you want tomatoes, but your Permabed plot is designated to grow a different plant family? Gardeners can barter and trade to ensure each table has what it needs. All the while, growers will gain new skills and, in ensuing years, offer sage advice to their fellow community gardeners.
This model, of course, won’t be everyone’s cup of tea. But for those communities that want to grow in a serious way, uplift their food security and gain high growing efficiency, a Permabed layout, market garden principles and overall crop rotation design could transform community gardening for the better.
Sauerkraut is one of the most well-known fermented foods out there. It is a staple of many cultures all over the world. When people tell me they don’t like sauerkraut, they are most often referring to the mushy jarred stuff found at the grocery store..
That is not at all what fresh homemade sauerkraut is like.
I’ve converted hundreds of people into kraut lovers by giving them a taste of the real sauerkraut and I recommend that, if you’ve never tried it, you make a batch and see for yourself.
Remove the outer leaves from the cabbage and discard. Wash the cabbage with cold water. Cut each head in half lengthwise and remove the core from each half.
Shred the cabbage into thinly sliced shreds, about 1/8 inch thick. You can also use a mandolin or cabbage shredder for this step if you have one. Try to keep the shreds uniform in size so that it ferments evenly.
Collect shreds in a nonreactive bowl, such as glass, plastic or solid stainless steel. Once all cabbage is shredded, mix in the salt. Use clean hands (nail polish and jewelry removed, or wear food safe gloves) to mix the salt with the shredded cabbage, squeezing and mashing with your fists to tenderize the cabbage.
You can also use a wooden tamping tool for this process. But be intentional about not over mashing the shreds or it will turn into a mushy ferment.
Massage the cabbage until you can pick up a handful and squeeze liquid from your fist. Once liquid accumulates, you can transfer the cabbage shreds into a clean quart jar. Leave 1 to 2 inches of headspace (room from the cabbage to the rim of the jar).
Use your fist or cabbage tamper to tightly fill the jar. Pour in any excess liquid from the bowl in the jars as well. This liquid is the brine that the sauerkraut will ferment in.
Once the jars are filled, there should be enough brine to cover the shreds. If there is not enough liquid, check again in the morning. More often than not, there will be enough.
You will need some sort of weight to keep the cabbage pushed under the brine. Keeping the shreds submerged under the brine is the key to a successful ferment. There are weights specifically made to fit jars, but you can also get creative—see the notes section below on alternative options.
Wipe off the rim of the jar with a clean dampened towel and add the canning jar lid. Tightly screw on the ring.
Fermentation
This is a longer ferment, ranging from two to six weeks. The temperature in the space where you are fermenting in with decide how long it takes. The warmer a room, the faster it will ferment.
Ideally ferment between 60-75 degrees F (15-23 degrees C) and keep out of direct sunlight.
Burp the jar daily, especially at first when the ferment is very active. Unscrew the lid briefly, and tighten it back on to allow any built-up gas to release.
At least once per day, you’ll have to use a clean utensil to push down the weight and submerge the cabbage again. Scoop away any pieces of food floating on top of the brine to avoid mold.
Taste test the ferment after week two. If it still tastes of raw cabbage, allow it to ferment another week and taste again. Some people prefer a very sour and soft sauerkraut and therefore will ferment closer to the six week range.
Once fermentation is complete to your taste, transfer the jar into the refrigerator, with the brine and all.
Fermentation does not stop once the ferment is transferred to the refrigerator. However it does slow the process way down. The taste and texture will continue to change, therefore it’s best enjoyed ideally within six months.
We enjoy sauerkraut with many meals in our household. View it as a finished veggie side dish that can be added to a variety of meals. It’s not just for bratwursts and porkchops.
If you do not have a glass jar weight, you can improvise by using an easily removable small food-grade glass dish that fits inside the jar. Or, if you have a smaller glass canning jar that can fit into the mouth of the jar you are fermenting with, you can use that to keep the produce pushed under the brine.
You may substitute fine sea salt instead of coarse kosher salt if you prefer. Consult a salt conversion chart.
Consider substituting one head of red cabbage for one of the green ones to make a beautiful pink kraut!
Expect foam-like bubbling, at least in the first week of this ferment. It’s completely normal.
This recipe has been adapted from Can It & Ferment It (expanded 2020 edition) with permission from Skyhorse Publishing, Inc. For more sauerkraut recipes, check out WECK Small-Batch Preserving, and WECK Home Preserving by Stephanie Thurow.
Bushel And A Peck Homestead (@bushel.and.a.peck.homestead)
When the COVID-19 pandemic caused Courtney Shorr to be furloughed from her teaching job, she followed a love of “getting my hands dirty” and jumped wholesale into the homesteading lifestyle.
“We only live on one-sixth of an acre. But we added everything we could afford to our homestead at the time,” recalls the Utah-based Shorr, who broadcasts her adventures via the Bushel And A Peck Homestead Instagram account. “I became beekeeper, started raising Coturnix quail, planted a micro orchard and tore out a third of the grass in our backyard to expand our garden.”
Looking back on the period of change, Shorr says, “It not only kept me busy during a stressful time. But it all made me happier than I’d ever been.”
We spoke to Shorr about how to avoid food waste and the joys of teaching children to appreciate nature. We also got the scoop on adding quail to your suburban homestead.
“There is something so special about eating the food you grew, raised, baked and worked so hard for,” says Shorr. “It gives you a connection to your food and health that is hard to find when buying the things you eat.”
Shorr adds that she’s noticed how her children become excited to “eat the things they planted and watched grow.”
Embracing the joys of old fashioned methods is a key part of Shorr’s homestead. Case in point: When Shorr and her kids bake bread together, she’s noticed how they “get to feel that pride that comes from working on a skill that people have been living by for thousands of years.”
Minimizing the amount of food that goes to waste is something Shorr is passionate about. “Besides loving our compost pile, we always try to save our vegetable scraps to make stock,” she explains. “As we use various vegetables in our regular cooking I freeze the extra bits in our freezer until I’m ready to make a batch of bone broth or chicken stock. It’s a great way to add flavor with the parts of the plant that most people typically waste.”
Shorr and her family live in a suburban neighborhood that’s subject to homeowner association (HOA) rules. So she and her family can’t raise backyard chickens.
“But I was determined to add an egg food source to our home,” says Shorr. “So I did a lot of research and discovered that there are no regulations in my area against Coturnix quail. Win!”
Talking about raising quail, Shorr characterizes her “wonderful little birds” as a great egg source that doesn’t take up an abundance of space. “They are quiet, healthy and easy to care for too. We think they are the perfect addition to any suburban homestead if you’re looking for an alternative to chickens.”
“There are so many things that I truly love about our homesteading journey. But I think the most rewarding part for me is seeing the change it has brought to my children,” enthuses Shorr. “They are less interested in the digital world and have become true lovers of nature.”
Summing up the benefits of their homestead setup, Shorr adds, “We love living an old-fashioned-on-purpose-lifestyle. And we are all excited for whatever comes next!”
Lately, one of my favorite forests has been flush with oyster mushrooms. So that I can store them long-term, I’ve been drying them with a food dehydrator.
In this video, you’ll see some of the identifying traits common to oyster mushrooms. I’ll also offer some harvesting and field-cleaning tips.
Oyster Mushroom Basics
There are many kinds of oyster mushrooms. In the wild, they commonly range in color from whitish-cream to tan to brown. But, if you purchase oyster mushroom-growing kits, you’ll see vibrant blue, gold and even pink oysters.
Nevertheless, oyster mushrooms do share some traits. They:
grow on non-coniferous wood. (And, no, you won’t find them growing directly out of soil.)
are usually fairly large and have a thick, rubbery texture. Take a whiff and you might also catch a hint of licorice.
grow year-round, but they’re more common in the fall.
may have no stalk at all or, more likely, they’ll have a very short, stubby stalk. (Also, it will be off-center from the mushroom’s cap.)
have gills that are thin and white. They also run down the length of the short stalk, if one is present.
produce spore prints that are white to pale lilac.
Ask an experienced mushroom collector to help you confirm your mushroom ID. Once you’re certain about your find? Use a sharp knife to remove the mushroom from its host wood. (And don’t disturb the delicate mycelium living beneath the surface!)
I like to carry my foraged oyster mushrooms in mesh produce bags. These help spread the mushrooms’ spores, and this could mean even more mushrooms later.
To field-clean mushrooms, use your knife’s tip to gently scrape off any debris. Also, look closely for insect activity.
It’s easy to shoo away a stray beetle. But, if a mushroom contains insect larvae or eggs, leave it behind. That goes for mushrooms beginning to liquify or yellow, too.
Before drying, cut your oyster mushrooms into uniformly thin sections. I sliced off and halved my stems. Then I halved or quartered the remaining caps, depending on their size.
Although high temperatures reduce overall drying time, a slow-and-steady 115 degrees F is better. Dehydrate for several hours at this temperature to preserve flavor and nutrients.
Once your mushrooms are dry and have cooled completely, pack them into clean, dry, airtight containers. Last but not least? Carefully label with mushroom type, as well as your harvest and packing dates.
Chickens can be an absolute blast to observe. Toss a few worms or chicken treats out and watch them dance! Although a chicken will eat just about anything, you need to watch what treats get thrown into the scrap bucket.
Some things you might want to share with them can be harmful and even deadly. In this article, we’ll be checking out a few foods that are safe to share, some to avoid and a couple of fun chicken treat ideas you can put together to entertain your flock as well!
Pulling Hen’s Teeth
You might have heard the expression “like pulling hen’s teeth,” which refers to something impossible to do. Chickens don’t have any teeth. Rather, they simply consume their food whole and use their tongue to help push it to the back of their throat.
Because of their lack of teeth (and swallowing the food whole), chickens need small rocks or gravel in their gizzards to help break up the food. After the food is eventually ground up, it can pass on through the rest of the digestive system.
Before you start giving your birds extra chicken treats or table scraps, make sure you’ve worked out a properly balanced feeding plan for them. Their needs will vary depending on their age, kind of chicken (layer, fryer, etc.) and environment. Once you’ve made sure they have a regularly balanced diet, you can start to supplement and add a few extra treats in every now and then.
As the seasons change, so can your treat-feeding habits. During the winter, it’s good to focus on high-energy food that will keep your birds busy and warm. When summer rolls around, look for treats higher in water content to help keep them hydrated.
During the hot summer days, it’s fun to make a few frozen fruit cups for your birds. You can offer a mixture of leftovers from your fridge or expired produce from a local farm stand. Call around at the end of the growing season and see if anyone is about to dispose of leftover fruit or vegetables.
I once got several 5-gallon buckets full of cantaloupes from a local farmer, simply by making a phone call. Those were some affordable chicken treats!
Table Scraps
Animals are fairly intelligent about not eating things that can harm them, but still stay cautious and avoid throwing out chicken treats that could be toxic. If you’re rummaging through the fridge, remember you can slice up leftover apples or pears to share with your flock.
Bananas or other fruits with a peel should be peeled and then fed. Leftover strawberries, raspberries, blackberries, etc. make great options to scatter around at snack time, too!
After a cookout or summer BBQ, don’t let the watermelon rinds be tossed in with the rest of the trash. Set out a 5-gallon bucket to collect them and feed to the chickens later. (The best ones are the rinds with a little pink left on them!)
The same kind of recycling can take place in the fall when people begin to discard their pumpkins or jack-o-lanterns. If they haven’t been covered in glitter, paint or anything else, ask around your neighborhood for any leftovers. Birds will enjoy this festive chicken treat.
Another fun snack for your hens is the occasional handful of popcorn. Just make sure it’s unsalted and left plain before sharing any with them, as too much salt can be damaging.
If you happen to have some raisins close by, feel free to scatter some of them around, too. Hens will love the extra little bite of something sweet!
What kitchen scraps should you avoid? Rhubarb is something you should never feed your hens, as it contains the toxin oxalic acid in the leaves. If you have this growing nearby your chicken’s roaming area, try putting a sturdy cage over it covered with chicken wire. You don’t need to banish the plant from your farm, just give it some special protection.
Onions and avocados are two more things to avoid feeding your flock. Onions are thought to cause a weird taste in eggs, and avocados contain the toxin persin in their pits and skins. While the flesh of the avocado might be safe for chickens, I just play it safe and avoid feeding avocados entirely.
Ashleigh Krispense
A Chicken-Friendly Garden
So what about some greenery from the garden? Lettuce for your birds doesn’t just have to come from the bottom of the bag in the fridge. If you raise a garden, make it a point to plant some chicken-friendly scratch greens.
This could be a blend of lettuce (any kind), spinach or kale. If cooked before feeding, chickens can also have green beans from your garden. (Avoid feeding your flock any dried beans though. They can cause serious health issues and even death.)
You can also create a garden that allows your birds to free-range directly in the patch. All you need to do is situate the coop next to the garden plot and erect fencing around the garden to keep them inside (unless your birds can free-range anywhere they please).
Remember to plant only chicken-friendly plants. Besides a large plot of scratch greens, you can also raise fresh peas, carrots or beets, as chickens will love their green tops.
If you’d like to have a garden you and your birds can enjoy, one thing that will help is to let them out of the coop later in the day. Allow for an hour or so of roaming time—just enough that they can scratch and peck around the dirt or greenery but not destroy entire plants.
This way, you both will have a chance to get something from the garden!
Unfortunately, though, if a chicken decides it greatly enjoys a particular plant, they can be pretty destructive. It’s best to either not get too attached to anything in your garden or make sure you put a chicken-proof barrier around the particular plant you want to save.
A sturdy tomato cage wrapped in chicken wire can keep out those pesky beaks, though!
Avoid Planting These Plants
As you incorporate plants in your garden and landscaping, remember to watch out for ones considered toxic. In the garden, these would include any plant deemed a nightshade, meaning that it contains solanine. This includes tomato plants, peppers, eggplants and potatoes (peels and unripe, green potatoes). Both ripe, red tomatoes and peeled, cooked potatoes are fine to feed chickens, though.
Cabbage on a Hook
This is a fairly popular idea for simple chicken treats. Awhile back, I decided to conduct an experiment with a head of iceberg lettuce and a cabbage to see which the chickens preferred. Gathering supplies, I carefully twisted an eyehook into the bottom of each head.
Ashleigh Krispense
I didn’t need to predrill a hole or measure twine. The hook screwed in nicely and seemed especially solid in the head of cabbage. I took some old baling twine and eyeballed a nice length to hang the heads from the top of a clothesline pole.
The clothesline runs right next to the garden and chicken coop, where a majority of the birds like to spend summer days. Decades-old lilac bushes fill the fenced-in run as chicks and other poultry playfully dart around the pen. A fluffy, golden-colored Buff Rock hen has dutifully taken on the role of mother to seven black little jellybeans. Rouen ducklings scuttle around as she comes over to investigate where the lettuce and cabbage hang.
Once the discovering something cool and delicious, she began clucking in her motherly voice and the ducklings popped up around her feet. She pecked off a piece or two and the lettuce fell to the ground.
Before long, a whole group of hens (and a turkey or two) gathered around. The lettuce hung, haphazardly getting pecked to shreds, while the cabbage nearby didn’t get a second glance.
Later, I went back out to see the birds’ progress. The lettuce, now just a small clump, lay on the ground. The cabbage showed just one hole in a leaf. If we decide to serve this treat again, the choice offering certainly won’t be a head of cabbage!
Frozen Tomato + Cucumber Cups
The next project we undertook: making some frozen little cups of fresh tomatoes and cucumber for the poultry. I gently rinsed a fresh cucumber and five Roma tomatoes under a cool faucet.
Ashleigh Krispense
Taking the ’cuke in hand, it was sliced lengthwise and then chopped into small pieces, as were the tomatoes. After gently stirring them together, I spooned them into a muffin tin until just level full, then filled each muffin cup with water just to under the brim. Then we set them flat in the freezer until frozen solid, waiting patiently to share with our feathered friends.
Later that afternoon, the cups were frozen, and we headed outside to see what the birds thought of them. The previously mentioned cabbage was found still fairly intact, the lettuce had been eaten almost to the core and the chickens were game for another food tasting. I tossed a frozen veggie cup out to the girls and the excitement began. Soon, hens were running and pecking, ducklings were dabbling. Even the geese questioned what they were missing out on.
You could also mix up cups with an assortment of berries or other fruit. Just fill them level with fruit, top it off with water and freeze. This is a great way to get some extra fluid in your birds during a hot season.
Here are some chicken treats so simple they might be overlooked (and even free, depending on where you live)—freshly dug earthworms! You can even delegate this job to the kids if they’re bored and looking for something to do outside.
It’s a very easy task. Just find a few rocks to turn over and then take a small trowel and dig a little. If this doesn’t turn any little wigglers up, pour some water over a shady area of soil, wait an hour or so, then start digging.
If there is a stream or pond nearby, go work up an area of soil on the bank near it. Gather up the wriggling creatures, then share them with your grateful hens. (This is even more fun for them if you dig in their pen or nearby so they can peck and scratch at the dirt as you turn it up!)
The longer you’re a chicken-keeper, the more you’ll learn about what works to feed your flock and what doesn’t. Keeping an eye out for anything that could be harmful, experiment a little and see what they enjoy the most.
If you get a little extra time and want to design an entire garden full of chicken treats for your feathered friends, send us a picture! I’d love to see your poultry-paradise.
More Information
What About Dairy?
Maybe you’re wondering if dairy safe to feed your chickens? According to author and chicken-keeper Gail Damerow, in The Chicken Health Handbook, liquid milk is made up of 87 percent water, with the rest being protein, fat, carbo-hydrates, vitamins and minerals.
It’s considered fairly safe to give to your chickens as a supplement in moderate amounts. Avoid giving too much though. It could lead to fat laying hens or other health issues.
Sprouting Grain
If you’re looking for a fun project to get the kids involved (or just need a little extra greenery in your windowsill), try sprouting some grain for your chickens! It’ll provide them with a great snack and something different—especially during winter. You can sprout a variety of grains at home, but we’ll just be focusing on wheat for today.
To get started, rinse and then soak your wheat overnight in warm water.
The next morning, drain and set the wheat inside another container with small air holes poked in the bottom.
Leave it open on top to allow for plenty of airflow.
Rinse two to three times daily, allowing several hours to drain between each rinse.
Within two to three days, your homegrown chicken treats should be sprouted, but you can wait up to five or six days before feeding it.
This article originally appeared in the November/December 2021 issue of Chickens magazine.
“Surf’s Up” was my life’s backdrop having lived within walking distance of the Pacific Ocean in Southern California, surrounded by friends and family who lived for the perfect wave. Long days at the beach turned into endless choices of live music at night. So after shaking the sand out from between our toes, we headed to all the venues popular in the entertainment mecca of Los Angeles.
The Sunset Strip offered up little-known bands that later became famous—Mötley Crüe, Van Halen and countless others—telling us what we already knew: SoCal was the place to be! I secured my career in the entertainment industry. Today, however, my favorite group is a flock of chickens!
A 20-year deal my husband and I made about leaving Southern California was playing out. It was time to escape the neverending bumper-to-bumper traffic and head to Northern California. Here we have access to the beach as well as beautiful lakes and hiking trails. We also enjoy the quirkiness of our new home in the gold rush town of Placerville, where everyone knows your name and the local coffee roaster always brews the perfect cup.
We packed up our bulldog and turned the page to our new adventure in October 2018.
I had wanted to raise backyard chickens for a few years prior to our move to Northern California. And I did as much research as I could before we took the plunge. We decided that we wanted to select a variety of breeds and celebrate their individuality. And, with it, we wanted to keep it light-hearted and fun.
My daughter and I decided that we’d name the chickens after the female characters from the I Love Lucy television series. A bit of Hollywood still remained with us in our new home. We roared with laughter imagining these fluffy beauties running to the sound of their new names.
Enter Lucy Ricardo (Red Sex-Link), Ethel Mertz (Buff Orpington), Mrs. Trumble (Naked Neck), Betty Ramsey and Caroline Appleby (Easter Eggers), and our newest littles, Mrs. McGillicuddy (Rhode Island Red), Marion Strong (Barred Plymouth Rock) and Cynthia Harcourt (Barred Plymouth Rock).
“The Tropicana” was open for business!
Lisa Wilson
Home, Sweet Home
Watching our girls is one of the greatest pleasures. They’re comical and communicative and reward us with funny antics on a daily basis. We’ve learned how they alert one another when our bulldog (who believes they are his chickens) is near, when the treats are coming and when one is annoyed with a coop-mate. They curiously tilt their heads to get a better look at our faces when we squat down to talk to them.
To enjoy the wonderful bounty of eggs they bestow upon us, we keep them busy with chicken activities, healthy fruits and vegetables and a coop clean enough I’d even settle in for a nap! They’re living their best lives. Though they can’t know what that means, it’s enough to see them thrive the way they do.
We believe in life’s experiences that keep us discovering that, despite the world’s challenges, our lives continue to build richness in memory. This is what led us to Northern California and to our eventual flock of chickens. The age-old question of “where do you see yourself in five years?” keeps us daydreaming in positive ways.
Our girls remind us that we all have a path to follow. And we’re so grateful that these little darlings have come to roost on our path.
Take the plunge! If it’s not the plunge you were thinking of, swimming to the side always gives you time to reassess.
Lisa Wilson is a lactation consultant and perinatal educator. Her love of live music continues as does her passion for English Bulldogs, craft coffee and her new granddaughter. She can often be found talking nicely to her new vegetable beds while munching on doughnuts and planning her next hike.
This article originally appeared in the November/December 2021 issue of Chickens magazine.
ATVs and UTVs are highly capable machines, especially when enhanced with attachments and implements. Hobby farmers in particular can benefit from an ATV or UTV. They’re less expensive than a full-fledged utility tractor, but can still handle a wide variety of farming tasks.
In a perfect world, you would keep your ATV or UTV running year-round. But this is easier said than done if you live in a region with significant winter snowfall. For example, parts of Wisconsin average more than 100 inches of snowfall per year.
That makes it difficult to keep farm roads clear and machines operational.
But on the bright side, the right enhancements can turn your ATV or UTV into an all-season vehicle ready to assist when the going gets tough. A snow plow or snow blower attachment can make all the difference for keeping driveways and paths clear.
Here are five more ATV and UTV enhancements to consider installing before winter.
ATVs and UTVs are meant for off-road use. But deep snow and ice can foil even the toughest machines if they’re not properly equipped to handle the conditions.
Tire chains can go a long way to increase the traction of your ATV or UTV in winter weather. That’s a big plus, because getting stuck isn’t just frustrating. It’s a major time drain.
Who wants to be digging out a UTV when it’s -5 degrees F outside?
Weights
Adding weights to your ATV or UTV can also increase its traction, helping the tires dig into the snow rather than spin helplessly. Whether you’re attaching wheel weights or loading up the front and rear racks, every extra pound can make a difference.
Just be sure to distribute weight appropriately and avoid overloading your machine.
If you’re going to spend a lot of time operating your ATV or UTV in cold weather, it’s nice to have heated grips and/or a seat heater to keep you warm.
These add-on features run off the vehicle’s battery and require installation. But once they’re up and running, you’ll be better prepared to ride in cold weather.
Windshield
Tired of having cold winter air blast across your face as you drive your ATV or UTV? A windshield might be just the enhancement you need.
Not only do they literally shield you from the wind, they can also help when you’re operating a snow blower. This provides at least some protection from airborne snow blowing back in your face.
Cab (Ideally with Heater)
The ultimate enhancement for a winter-worthy ATV or UTV is a full cab enclosure. If you’re operating under the protection of a cab, you can block out wind and snow entirely, a big benefit if you need to clear your driveway halfway through a multi-day snowstorm. UTV cabs in particular can be excellent quality, complete with heaters to warm the entire enclosure.
With winter enhancements like these, you might even enjoy operating your ATV or UTV in sub-freezing temperatures!
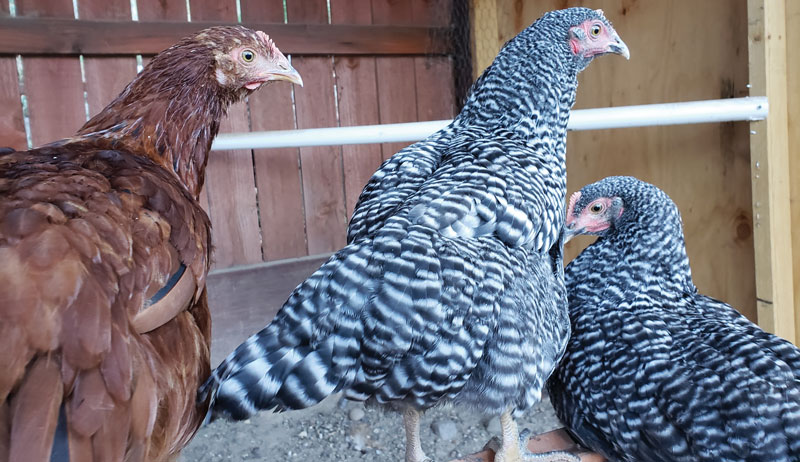
If you’ve had chickens for any length of time, you know they shed feathers. The occasional feather dropped around the yard is normal, with heavier feather loss occurring during the fall molt.
Most flocks recover from molting without a hitch. But there are those who appear to refuse to regrow their feathers. Additionally, other things can keep them from completing this all-important task before winter, such as mites and cannibalism.
These naked chickens find themselves in a heap of trouble when cool fall days and nights suddenly turn cold and dreary with the onset of winter.
Keeping these unfeathered fowl warm throughout winter can be challenging at best. However, it’s not impossible. With a little know-how as to the causes and solutions, you can aid them in their quest to keep warm.
Causes of Feather Loss
To ensure the rapid growth of new feathers, the flock owner must first determine the cause of feather loss. Here’s a rundown of the most common causes of feather loss.
Molt
The most common cause of feather loss is the annual molt. Fall’s reduced daylight hours and lower intensity sunlight triggers the loss of old feathers and growth of new ones.
Beginning at the head and working its way down, natural molting often makes chickens look as though they had a run-in with a blind barber, while others merely experience minor balding. If you gently pull the remaining feathers back, you’ll find a patch of pinfeathers pushing to the surface to cover bare spots, with complete replacement taking place within six to 16 weeks.
However, stress from disease, lack of water/feed (even for only a few hours), getting chilled or sudden removal of coop lighting can cause unseasonal or abnormal molting. This stress-induced feather loss may not follow the head-to-toe sequence of annual molting and often results in slower or nonexistent development of new feathers unless the stressor is removed.
The reduced speed of feather replacement, or the lack thereof, leaves chickens especially prone to injury or death as the mercury drops. It must be remedied as quickly as possible while incorporating significant measures to keep the flock warm.
Cannibalism
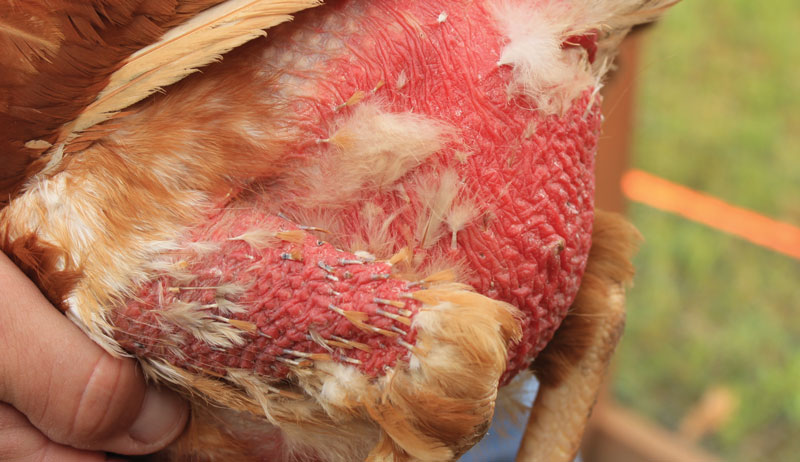
Many chicken caretakers, particularly newbies, misdiagnose naked or patchy chickens as being in molt. However, close inspection of the flock’s daily activities often reveals a mild, but not harmless, form of cannibalism known as feather picking.
Victims usually have bare patches, which at times may be severe, out of sequence with molting with little to no pinfeathers present. Should pinfeathers begin to push through, you’ll find they quickly disappear. Given enough time, chickens can lose so many feathers they are virtually ready for the oven.
Feather picking is usually caused by bored, confined or crowded chickens—and the occasional bully—that discover the hidden joys found in plucking another’s feathers. Others find themselves drawn to a flock mate’s feathers (or their own) in an effort to obtain much needed protein when the daily protein ration is insufficient.
Even mice and rats are attracted to protein rich feathers, nibbling the ends or entire feathers while chickens roost at night. Therefore, vigilant rodent removal, adequate space, a well-balanced protein-rich diet, foraging and bully removal are essential to avoid/correct cannibalism.
Andrew Goodsell/Shutterstock
Love Bites
While technically not a form of cannibalism, let’s not forget the love embraces of a lively rooster. While most roos cause no harm to their harem during mating, some become overzealous and pluck or pull large quantities of a hen’s feathers.
Should the unlucky lady be his favorite, she’ll likely not only be wounded but bald in the head, neck or shoulder regions and need to be removed or saddled until feathers are replaced.
Parasites
Mite and lice infestations also result in feather picking as chickens seek relief from irritation and itchiness. While mites are often difficult to see, close inspection will reveal dark red, black or tan specks crawling around the vent area and/or along the body, particularly around feather shafts.
Some mites prefer to hide in the coop during the day, so a nighttime visit with a flashlight in hand to inspect the birds may be necessary. If you can’t make a coop visit at night, you may be able to see small specks of blood-filled mites crawling along the roost or hiding in nesting boxes during the day.
Lice, on the other hand, spend their entire lives on hosts and can be readily discovered by gently brushing feathers back and looking for tan or white lice crawling along the body. You’ll also see lice eggs, or nits, attached to the base of feathers.
Left untreated, infestations lead to significant feather loss and weakened, sickly and even dead birds. Approved treatments regularly change and depend on whether chickens are show birds, meat birds or layers. So a trip to your local veterinarian is your best option when selecting insecticides.
Feathers consist of approximately 85 percent protein, so feather growth creates a protein deficit when molting chickens (or any chicken actively growing feathers) are fed the typical 16 percent protein layer ration. Most birds compensate for the higher protein demands by either reducing or completely halting egg production until plumage is completely regrown.
However, you can help your flock along by switching to an 18 percent protein feather grower feed for both hens and roosters over the age of 16 weeks. For many hens, this small increase is all that is needed to speed along feather growth while allowing better egg production throughout the process.
You can return to layer feed once the flock is feathered out.
In addition to switching to feather grower feed, don’t overlook allowing chickens to supplement their own diet, when possible, by foraging for worms, grubs and other protein-rich snacks. Offering mealworms, nonpoultry meat scraps, night crawlers, small amounts of cat food or other animal protein also works well.
Add Some Warmth
Once you’ve determined the cause for feather loss and made adjustments, your work really begins, as I quickly discovered with my first flock. My pullets decided feather picking was great fun just weeks before our winter turned unseasonably cold with record snow.
Not only did I have no idea what the cause was, I found myself scrambling to provide protection when the temperature suddenly dropped to 19 degrees F. So make plans ahead of time and acquire necessary materials to keep your naked chickens warm through winter.
Many of these birds may not be able to replace sufficient feathering until spring arrives.
SusImage/Shutterstock
Through Feed
To stay warm, chickens require more calories during cold weather than during warmer months. When significant portions of plumage are missing, their energy needs are even higher. To help them meet these needs, always allow free-choice food and heated water.
Supplement with a handful of scratch grain an hour or so before your flock goes to roost. The added heat created during digestion will help warm them during the night.
After my chickens go to roost, I like to throw several handfuls of scratch near their feed and water to get the warming effects of digestion going again as soon as they wake in the morning, as well.
However, only provide enough to get them moving and digesting food. You want them to eat primarily from their higher protein, feather-grower feed and forage for any available bugs or worms they can find, if possible.
Providing supplemental heat has always been, and will continue to be, a controversial subject among chicken owners. It’s my own opinion that, in the case of compromised birds such as these, supplemental heating is necessary, as they have almost no feathers with which to envelope heat around their bodies for protection.
However, to be used properly and safely, a few pointers need to be kept in mind.
Purchase red-coated infrared lamps, as they tend to hide red, irritated skin. Chickens love to pick at red things.
Select lamp fixtures with reflectors and wire guards to reduce the likelihood of fire should the fixture fall into a bed of litter.
Attach fixture securely at two locations, approximately 2 feet above the roost. This way, should the lamp become dislodged, the second catch should keep the lamp from hitting the floor or a bird and starting a fire.
Keep all wiring, including extension cords, out of the reach of pecking chickens.
Keep a large, easily read thermometer inside the coop at all times. And learn how warm the coop gets depending on outside conditions to avoid overheating your birds.
Don’t turn the light off and on at various times, which can cause further molting. Use a timer or leave on 24 hours at all times.
Kristi Cook
Deep-Litter Method
If you haven’t discovered the deep-litter method, you’re in for a treat. Not only does it create wonderful material for the compost/garden by spring, it also generates extra heat inside the coop as material decomposes.
In late summer, lay several inches of litter, such as pine shavings, across the coop floor including under the roost. As litter becomes packed and droppings build up, add a few more inches across the entire area. Keep fluffed with a pitchfork or throw a bit of scratch around and let the chickens’ pecking and scratching do the work for you.
Continue this process until you reach a foot or more by winter. Remove any litter that becomes soaked from leaks or entryways, and repair problem areas. Properly managed, there will be no ammonia odor/buildup or dustiness.
Once you have the inside set up, focus attention outside. As with any coop design, you should have adequate ventilation along the upper edges of walls. However, close ventilation holes along the north side in cold weather while keeping southern-facing vent holes open except during extreme wind, blowing sleet, snow or ice.
All windows should remain closed in cold weather, although south-facing glass/Plexiglass windows should remain uncovered to allow solar heat to pass through panes into the coop.
While insulated coops used in conjunction with other methods may offer sufficient protection to roosting flocks, many coops are uninsulated and require at least temporary weather barriers. Run areas also need protective measures as flocks usually roam outside during the day despite bitterly cold conditions.
Adding insulation need not be expensive or pretty, just effective. Use what you have on hand whenever possible, as these measures are usually temporary.
Even after you get your flock safely through the winter with bright new feathers, continue to monitor daily activities closely. Chickens with a taste for feathers and coops with a history of parasites often attempt to return to their destructive ways, creating yet another vicious cycle of feather loss.
More Information
Insulation Ideas
An effective and inexpensive way to add insulation is with hay bales, plywood and tarps. To protect the coop, stack hay bales as high as possible along northern walls as a barrier against the cooling effects of wind, rain and sleet. To create a windbreak for the run, stack bales at least two high against the outside perimeter of fencing.
If your run is small, as with most chicken tractors, drape the run top to bottom with heavy tarps and anchor securely at ground level to protect against blowing wind and precipitation. However, don’t forget to provide a few inches of ventilation along the top of the southern fence wall to allow moist air and ammonia fumes to escape.
On cold-but-sunny days, pull the top of the tarp back to allow warm sunshine into the run. Don’t forget to close it back during inclement weather.
To keep the tarp from ripping away from anchor points during strong wind, secure plywood or stack hay bales along the fence perimeter 2 to 3 feet high against the tarp. This added protection also provides a stronger windbreak for birds, because wind won’t tunnel through the tarp as easily.
This article originally appeared in the November/December 2021 issue of Chickens magazine.
If there’s a pig in your barn or pasture, sooner or later it will happen. The freezer or the smokehouse will start looking kind of empty. And your pig, grown large from all the on-farm nutrients you feed, will start looking more and more like a walking pork chop!
But custom slaughterhouse butchering dates are hard to come by (especially in these uncertain days). Maybe it’s time to learn how to process your own animals.
Butchering large animals can be intimidating at first.Although there is a real art and science to breaking down a carcass, keep in mind that, however accurate (or inaccurate!) your cuts, the end product is going to taste delicious.Cutting big animals just takes more muscle than small ones. Invite some adventurous friends to help you and plan a butchering party.
Make Time to Take Your Time
First, leave yourself plenty of time.Back when we started our large-animal butchering adventure, we had to allow three days for processing four pigs. And that was with lots of help.
While it didn’t always take that long, we were glad not to have to hurry. Having plenty of time meant we could focus on care and cleanliness—always good things.
Opening up that long a space on the calendar also gave us time to assist and instruct the children and volunteers who helped and who had even less skills than we did! The fun of a harvest event with so many friends kept everyone’s attitude positive, even when we felt overwhelmed.
Nowadays, though, we can have two pigs cut and wrapped in a few hours. (And our children’s skills are greater than our own.) I guess you could call that a success!
To help everyone enjoy the process of learning and harvesting, and so that the final outcome—farm-raised food—is the best it can be, you’ll want to plan ahead.That way you can be pretty sure your butchering day (or days) will be as successful as your pig-raising has been.
So here are some tips for a good butchering experience.
Even large-animal butchering (like cattle, pigs, sheep and deer) can be done with tools as simple as some really sharp knives and a meat saw (like a hack saw, but for bone).And if you own a good reciprocating saw, it can speed up the job of splitting the carcass!
But if you think you’ll be doing significant pig butchering in the future, some more specialized tools may be in order.
Remember that any power tools you choose to buy should be built so you can easily disassemble and clean them. You don’t want bits of meat and bone dust clinging to inaccessible parts of your machine.
And be sure to buy quality—but don’t assume you need commercial-grade equipment. A small meat grinder, if it is well-built, can be perfectly adequate. The chunks you feed it will just have to be a little smaller.
Shawn and Beth Dougherty
Chill Out
While it’s nice to have access to a walk-in refrigerator or chilling room, it’s not necessary. Folks who live in areas with seasonally cool weather can wait until winter to do their butchering. In fact, it’s traditional.
For those of us who raise our animals’ feed, winter pig butchering usually coincides with a shortage of spare calories anyway.And who will miss hauling water to the barn in freezing weather?
A Weighty Matter
Hoisting an animal that weighs hundreds of pounds may pose a challenge, too. Make sure, if you try it, that the structure you intend to hang it from is actually strong enough for the job!
Folks with a tractor that features a bucket loader may do their lifting with this mechanical aid. But in any case, hanging the carcass is not indispensable. A butchering ‘cradle’ is easy to build and store, and allows you to do your gutting and skinning in a horizontal position.
Even very large animals can be managed in this way.
Other items you’ll certainly want on hand include:
sharpening stone or steel for regularly honing the edges of your knives as you work
a ready source of hot water
lots of clean food-grade buckets and clean-up rags
butcher’s paper, freezer tape and indelible markers
a clean table for wrapping and labeling
aprons for all your helpers
You’ll find many good websites and videos for the beginning butcher, and these can be a great assist during an uncertain moment!You might want to locate one that you feel comfortable with and have it queued up on your phone or computer.Similarly, a break-down chart like the ones in a good cookbook can offer guidance for getting basic cuts right.
And do have a good first aid kit well-stocked with adhesive bandages. While you may not need it, better safe than sorry!
Better Than the Best
Home pig butchering is a natural next step for those who are raising their own meat, keeping costs down and stray nutrients on the farm.
So what if some of your cuts look, well … original?There’s no butchering error a grinder can’t hide! So keep your thinking positive and remember that, no matter what shape the pieces end up being, this is your own fabulous, home-raised meat. It is going to be delicious.
Adding home butchering to your skills just means your food sources are getting more secure every day. Enjoy!