After successfully hosting a pair of bluebirds and their multiple broods, my bluebird nest box needed some TLC. In the video below, you’ll see the steps I’ve taken to ready the box for the birds’ return this spring. (And you’ll get a glimpse of last spring’s feathered guests!)
Interestingly, soon after I put away my ladder and tools, some area bluebirds materialized. A male displayed himself atop the roof and even popped inside the house for a time. Turns out, bluebirds sometimes do this in late fall.
They’re not actively mating. Instead, they may just be strengthening their pair-bond and doing some early house-hunting. They may also be looking for potential winter shelter.
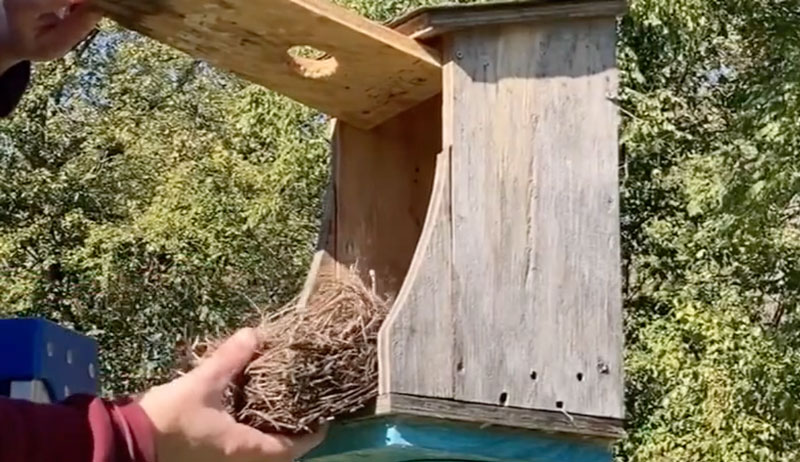
Have your own bluebird boxes or other types of birdhouses to maintain? At minimum, you’ll need a clean, stiff-bristled brush, some dried grass or similar material and a screwdriver. (If you’re short like I am, you might need a ladder, too.)
You might also want some new paint, stain or water sealant and paint brushes, masking tape or plastic.
To spruce up my nest box, I used a Philips screwdriver to open the clean-out door. Then, I removed and discarded all of last season’s nesting material. (Since old nests can harbor insects and pathogens, I like to give the birds a fresh start.)
With a dry wire brush, I scraped out the remaining nesting material. I paid special attention to nooks and crannies around the inside bottom of the box.
(It isn’t necessary to use water or disinfectant when cleaning out bluebird boxes.)
My bluebird house sits on top of a tall metal post—the paint on which had started to flake. So, I scraped away the loose paint and touched things up with a bit of spray paint. (I used a large plastic bag to protect the birdhouse itself from errant spray.)
And, although it originally sported a coat of water sealant, the nest box also clearly needed a touch-up. I applied extra water sealant to the outside of the box, taking care to avoid the box’s interior.
Next, I added a couple inches of dry pine needles inside the bottom of the nesting area. This will provide a head-start in spring, but it also helps to insulate the compartment during winter. (Birds sometimes hunker down in nest boxes during especially harsh winter weather.)
Finally, I screwed the clean-out door shut to guard against predators.
Crafting herbal gifts is an easy way to share the bounty of the homestead with your loved ones this holiday season. You can use herbs from your garden, or even your spice cabinet, to make a fun assortment of herbal infusions and body care products.
Herbal Infusions
Herbal vinegars make great gifts and can be made from either fresh or dried herbs. They can be used in the kitchen, as salad dressings or even as an ingredient in a handcrafted, non-toxic cleaning product.
Try herbs such as rosemary, sage, thyme or parsley to add flavor to your meals, or add pungent herbs such as garlic or cayenne peppers for a spicy kick!
Consider infusing your vinegar with citrus peels or peppermint to craft a refreshing and cleansing room spray.
Just add the herbs to a container of your choice, top it off with vinegar and allow it to infuse for two to four weeks. You can use whichever type of vinegar you prefer, such as apple cider or white wine vinegar.
An herb-infused liqueur is a fun way to share the holiday spirits with your adult friends! Just add some herbs to vodka, gin or brandy, allowing the mixture to steep for a couple of weeks. Some great herbal combinations to choose from include rosemary and lemon or ginger and cinnamon!
Herbal body care products are easy to create and make great gifts. A sugar scrub can quickly be made by combining equal parts sugar and olive oil. Add some crumbled peppermint leaves to the blend for a refreshing take on this classic handmade gift.
Customize your sugar scrub by choosing different oils, such as hempseed, flax or jojoba. Alternatively, you can substitute salt for the sugar to make a detoxifying exfoliant scrub.
Herbal Home Fragrance
A handcrafted herbal sachet is the perfect stocking stuffer for the herb enthusiasts in your life. Simply fill a small muslin bag with fragrant herbs such as lavender, chamomile, cloves or rosemary, cinch them up and share them!
It’s also quite simple to make an herbal smudge stick. Gather together sprigs of strong-smelling herbs like sage, sweetgrass, lavender or pine, and tie them snugly together with sewing thread. Once dried, these herbal wands can be burned to fill a room with their fragrant incense.
Make the most of this year’s garden bounty. Get creative and give the gift of herbs.
Four-season farmer Michelle Howell works at the intersection of farming, health, art and equity. In this podcast episode, hear about how Michelle has woven these aspects together at her family’s diversified Need More Acres Farm in Scottsville, Kentucky.
Michelle walks us through what a week looks like on the farm, beginning with their harvest day, working with 20 to 30 different produce items, year-round. Learn from their creative, community-centric marketing approach (some customers get 80 percent or more of their food from the farm!) and the ways they’ve created new opportunities to put their food into the hands of more people, including through the HOTEL, INC food pantry, Community Farmers Market and a brand new meal-kit service.
She tells us how she and her husband, Nathan, have encouraged all five of their children to be involved in the farm—the oldest having just decided he wants to farm full-time—and how that’s benefited not just the kids but the whole community.
Finally, get tips from Michelle about growing diverse crops year-round, not just for your own home use but as a marketing outlet in itself.
It started with two Rhode Island Reds and two Pekin Ducks that our son brought home after work one night in March of 2020. He was working at a local farm-supply store and had purchased these chickens and ducks on a whim.
When he arrived home, he grabbed some wood from the garage and fashioned a tiny makeshift chicken coop and run for them.They lived in that modest abode in our garage for a few weeks and, well, of course we fell in love!
Our family discussed how and exactly where we would house and care for them, did some research, asked questions and began our adventure. We converted our sons’ old playhouse into a chicken coop and added a run.
We have four boys that enjoyed this playhouse for many years when they were younger. They often defended the fort, walked the plank of a pirate ship, slew dragons as brave knights, blasted off into space or tried to camp out all night until the coyotes’ howls sounded just a little too close. Often between 1 and 3 a.m., the pitter-patter of fort defender and little pirate feet made their way to their bedrooms to finish the night in the comfort of their own beds.
Now, this space would breathe life again as we converted it into our “Little Red Coop” for our new little feathered pirates.
Missy Carter
Poultry Needs
The chicks and ducks needed a few different accessories than the boys once did. We used buckets positioned on a wooden frame for nesting boxes and added some roosting bars. We cut a hole in the bottom of the coop and added a walk plank for entrance into the coop.
Next, we added a run to the side of the coop and placed netting over the top to create a safe space from overhead predators. We first used chicken wire to contain the birds, then realized we needed more secure wire to keep predators out.
We built a duck house at the back of the run so they could safely have their own separate place. Our chickens had the upstairs penthouse and the ducks had the condo at the back of the run.
Then we, as every good chicken parent does, added a few more chickens, then a few more. Soon we realized the meaning behind chicken math! Boy that happened quickly!
Missy Carter
A New, Egg-citing Adventure
We now use their eggs to feed those same young men that used to roam this playhouse area several years ago. While those little astronauts and dragon slayers might have grown up on us, we now create new projects with our young adult boys and make memories with our chicks and ducks in their new home.
As we continue to learn and grow, make changes as needed, our coop dreams have been a grand family adventure.
—Missy Carter, Madisonville, Tennessee. You can follow Missy’s farm on Instagram and Facebook or visit redcoopfarm.com.
This article originally appeared in the November/December 2021 issue of Chickens magazine as a “Cool Coop” feature. Have a cool coop you’d like to share? Email us a short write-up (~250 to 500 words) about your chicken coop along with a few images to chickens@chickensmagazine.com with the subject line One Cool Coop, and include your name and mailing address. Check out Chickens magazine for current prizes and contest rules.
Happy Thanksgiving, hobby farmers! I’m delighted to say 2021 has been a memorable year on my farm, and since we can never spend too much time counting our blessings, I’m eager to share a handful of farming successes I’m thankful for in 2021. If you feel like joining in, please do so and share your lists with us online!
To start the ball rolling, I’m thankful for…
My Successful Corn Crop
Just for fun, I experimented with planting a raised garden bed full of corn this year. I’m happy to report the project was a resounding success. The corn grew beautifully, ripened to perfection, and provided my family with all we could eat for four days.
It was absolutely delicious!
I had never previously grown corn, so I enjoyed watering the plants diligently and watching them develop over the course of summer. I’ve since built four more raised beds and plan to plant significantly more corn in 2022, staggering the plantings so they ripen over the course of several weeks. It’s hard to beat the taste of freshly picked corn!
Effective deer fencing can be hard to come by, since it requires a combination of serious construction efforts and at least a little cooperation from the local deer population. But I’m thankful the perimeter deer fence surrounding my young orchard withstood all challenges in 2021.
It protected 35 fruit trees and a couple of tiny chestnuts from deer damage.
Since constructing the fence in 2019, I’ve steadily made improvements. This year, I reinforced the weakest points with additional T-posts and multiple layers of black plastic fencing.
At this point, I’m confident in its durability, so I was able to remove the temporary fencing from around each individual tree this summer. This improved the appearance of the orchard and made it easier to care for the trees.
It’s always encouraging when farming successes turn out exactly like you hope!
Professional Repairmen
I love a good DIY project. And through the years I’ve surely accumulated meaningful savings by performing my own maintenance and repairs and machinery.
But once in a while, it makes more sense to let professionals take over.
During the summer, I took a small riding lawn mower into town for repairs and a complete tune-up. It was a super-busy time of year, and I was impressed when I reviewed the bill and noted the repair person had completed all the required work in just 2 1/2 hours.
It would have taken me far longer just to research and purchase all of the necessary parts and fluids. And I don’t even know how long I would have spent actually performing the maintenance and repairs.
Under the circumstances, I thought the bill was a great tradeoff for the time I saved and spent on other high-priority farm projects. The lawn mower has been in perfect working order ever since. Let’s give a big “thank you” to professional repair people!
It’s great to stay busy and productive. But once in a while, it’s also nice to slow down and enjoy the view.
When fall rolled around and things began to quiet down on my farm, I spent several afternoons relaxing in an Adirondack chair at the top of my orchard, looking downhill upon the young fruit trees.
I watched wildlife. I worked on writing projects. And I enjoyed the perfect autumn weather. Talk about times to be thankful for!
Are there any farming successes you’re thankful for this year? let us know!
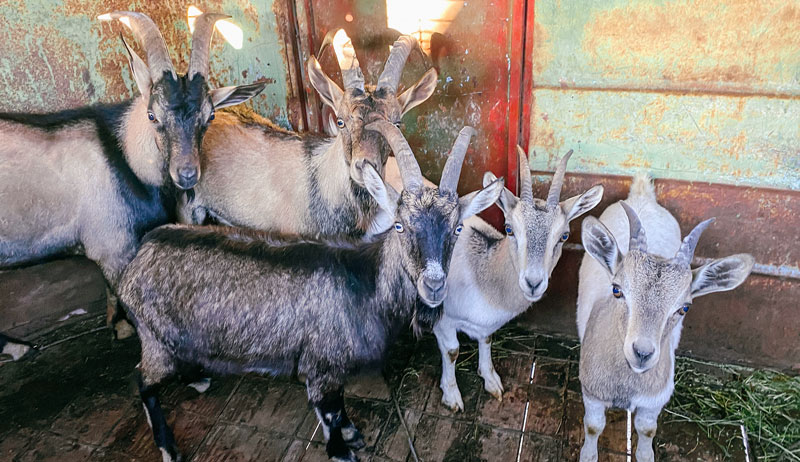
Humans respond to stressful situations by releasing cortisol and adrenaline. A large amount of these levels in your body alters your immune system and suppresses your digestive system. Goats experience stress in the same way, especially during shipping.
Shipping goats creates stress for them because their nervous system goes into high alert due to their perceived imminent threat, resulting in what’s known as a very broad diagnosis of “shipping fever.”
Signs of Shipping Fever
When animals are transported long distances (especially while traveling with animals from different sources), shipping fever can result in a variety of problems.
Pink eye from bacteria spread through the air
Diarrhea or scours from change in feed
Coccidia scours from stress
Mastitis from their mammary gland being exposed to a dirty environment
A number of other diseases occurring from challenges to the immune system
In essence, environmental stress compromises the immune system. As a result animals fall victim to ailments either already present or in the new environment.
“Often shipping fever begins as a viral infection that turns into bacterial overgrowth,” explains Dr. Lionel J. Dawson,(BVSC., MS DACT), a professor at both Langston University and Oklahoma State University specializing in small ruminant animals.
Typical symptoms include: change in behavior, depression, lethargy, going off feed, hyperventilation, increased rectal temperature, coughing nasal discharge and diarrhea.
Dawson gives helpful field assessment advice. “Goats are actively alert animals. If they appear to isolate themselves, keep their head down or their tail is down, they are stressed and something is going on.
“Watch their side move as they breathe. If the respiration or rib cage moves more than 25 to 30 times per minute, they are stressed. Check their temperature, which should read between 101.5-103.5 degrees F.
“Pull down their eyelid and check the membranes around the eye ball, which should be a good healthy pink color.”
If you suspect your animal is not healthy, call your veterinarian.
Dr. Dawson recommends taking the following steps to prevent shipping fever when animals are traveling over four hours. The same applies to livestock traveling with animals from different farms.
Make sure the goats are healthy.
Confirm they have received CD/T vaccinations against Clostridium perfringens type C and D (overeating disease) and Clostridium tetani (tetanus).
Treat the goats with an intranasal vaccine used in cattle before shipping
Ensure the animals are well hydrated.
Boost their immune system with supplements such as Nutri Drench.
Give the goats good quality hay to eat during travel (not grain).
Provide roomy travel accommodations and clean to eliminate dust and bacteria.
Once the animals arrive at their new home, quarantine them for two to four weeks so you can easily observe them and treat any problems before they spread to your current herd.
Treat the goats with a long-acting antibiotic when they are in quarantine (if they did not receive an intranasal vaccine).
You can’t always prevent shipping fever, but taking proactive steps can definitely help your new goats. If you notice symptoms of shipping fever, early treatment guarantees the best results.
Each season brings its beauty and hardships with it. While summer can be a challenge with the lack of rain and heat, winter has its own set of challenges. Last year, we had such a cold spell in Kansas that the guys could be found out driving through the cattle pens unrolling straw bales. Before they even finished unrolling them, the cattle already bedded down in the straw to enjoy the insulation it offered.
About this time of year, I start making a mental list of things that need to be taken care of before the bitter cold hits. For me, they’re usually tasks around the home and smaller jobs. But you can do several things to make sure your cattle will make it through the colder months.
Preparation
This really applies to about any area of your homestead. But staying prepared for the upcoming seasons can be a lifesaver. When the snow or cold is so bitter, you want to be outside as little as possible!
A few basic things that can help your operation include:
A working, ready-to-use generator for when the power goes out and you need to pump some water or use heaters.
Gas, propane or diesel fuel in a fuel tank to run a tractor, generator, vehicle, atv, heater, etc.
Extra heat lamps and bulbs.
Good fences—fixed, tightened and repaired. You won’t want your animals getting out during nasty weather!
Check watering systems and heating elements in your waterers. Make sure they all work properly.
Sometimes, you need to replace well components ahead of time so you won’t have trouble with them during the bitter cold of winter.
Stock up on any hay or feed you can store safely and will use during the upcoming months. You can’t grow hay during the winter. And you might just avoid some higher prices if you buy when it’s readily available during the summer!
Medicine that can be safely stored in a fridge might be helpful to have on hand if your cattle start to come down sick over a weekend. Talk to your local vet to see what you should buy ahead of time.
Body condition when heading into winter is extremely important for your cattle. If you have cows that will be calving later in the winter (spring calving), it is especially critical that they go into the colder months well conditioned.
Watch to make sure they don’t go into the colder months too thin.
Acclimation
One of the hardest seasons for cattle to handle is the transition from fall to winter. The days are warm, and the nights are cool—if not cold. This back and forth between hot and cold wears down their immune systems and can make them much more susceptible to sickness.
While there is not much you can do to change the weather, just keep on top of treating any animal that looks like it might be on the edge of getting sick. And don’t overfeed them at this time. Do your best to keep them comfortable and offer plenty of fresh water.
Feed & Water
Cattle can only eat so much feed, so during the winter it’s important to make sure their feed ration is filled with even more nutrient-rich food to get all the calories into them you can. Just like people, it takes more energy to keep a body warm when it’s bitter cold outside. Cold air, moisture, snow, etc. can all add extra stress that we don’t typically have during summer. Corn silage and grain are both good options to supplement their feed with.
Even though it’s cold, you’ll still want to make sure the cattle have plenty of fresh, clean water to drink.
Kansas winters can include a bitter North wind that will cut right through a person. Cattle stuck out in these winter elements can’t add another coat or curl up under a wool blanket. So they rely on us to help offer them options to get out of the wind and bitter cold.
A windbreak can be a three-sided building that faces away from the wind, a group of trees, round bales, or a fence that is lined with tin that they can stand against.
Bedding
If your cattle are very stressed or it’s extremely cold out, you can bed them down with a nice layer of straw to try and help mitigate the stress. New calves brought in from a very warm climate to a much colder climate can get especially stressed.
If cattle are coming from a climate that’s much colder than yours, however, make sure to offer plenty of fresh water and shade.
Overall, do your best to work ahead and make sure you have extra supplies, plenty of feed and options in case it gets bitterly cold. You can’t plan for everything that might happen, but as the saying goes, if you fail to prepare, prepare to fail!
The terms “cover crop” and “green manure” can easily be confused. But you can also simplify the terms by stating the purpose behind each. Technically a cover crop is a crop whose purpose is to block out and smother out weeds. A cover crop also protects the soil from bad weather extremes.
A green manure is grown more to add fertility and organic matter to the soil.
Other times we grow plants because of chemical properties that can harm pests in the soil, such as specific mustards green against nematodes. Or we may grow them because they trap bad insects or attract good insects.
The fact is, plants have many more ecosystem services than just providing food. For this article cover crop is catch-all term for beneficial plants with specific services above and beyond edibility.
A Variety of Options
When it comes to cover cropping, everyone has their preferences of varieties, seasons and rotational timings within their home or market garden. Indeed, the cover crops you choose have a lot to do with the climate you grow in and local selection of varieties.
In colder climates, many people grow rye and vetch. Buckwheat works well for mid-season cover cropping because it is frost-sensitive. You can seed rye and vetch, on the other hand, in the summer and into fall.
In more Mediterranean climates, you will also find folks using fava beans and other cold-sensitive plants both early and later in their season. Indeed, when it comes down to it, a cover crop is really any plant that works into your rotation and helps to improve the production.
It is important to start to think of many less-understood plants as being cover crops.
For example, consider the following plants that seldom make it into the traditional lists of recommended cover crops.
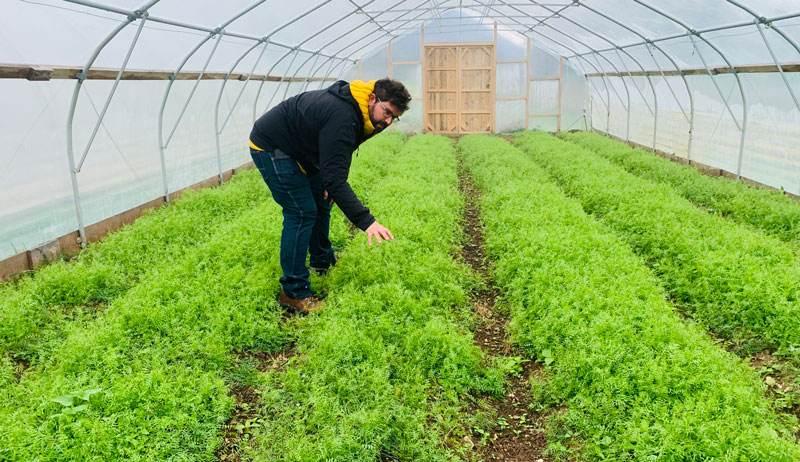
You can plant the actual vegetable crop you already grow. I call these “crop cover crops” or 3C cropping.
With 3C cropping you maximize the capacity of the vegetables you already grow. They become a cover crop after you have harvested the edible portion. This can be particularly powerful when you have a short season and have limited time to remove the previous crop and seed a cover crop into your rotation.
As an example, consider that after two to three cuts of salad mix or arugula you can let these greens bolt (go to seed). This will create towering foliage full of nitrogen and organic matter. The growth will continue to open soil with already established roots.
An extra two to four weeks of growth from an established crop can yield significantly more benefits to your garden than a newly seeded cover crop in the same period of time. You can then follow this cover cropping phase with an additional cover crop. Or you can return to a later season crop.
Zach Loeks
Annual Weeds
Sometimes it is best to let the annual weeds grow. Really—they often balance certain conditions in the soil. This is why they dominate the rhizosphere’s germination profile.
Perhaps they grow well in response to an excess of nitrogen. Weeds can help fix and store this in the form of immobile organic matter. Later, it will release this nitrogen through flail mowing and decomposition.
Or perhaps weeds thrive due to compacted conditions that they can dominate over less tough crops. In this case, they will loosen and open the soil for other plants with aggressive roots.
Cover cropping with weeds helps burn up excess seeds in your soil’s seed bank. It can provide many of the typical benefits of traditional cover crops. You can easily manage stands of germinating weeds even in diversity (say primarily a single species, like lamb’s quarter) with a timely flail mowing before they go to seed again.
But either way, when it comes to a lower tillage style management, you can allow weed seeds to germinate as part of a pre-weeding cycle. Then you can fry them with silage tarps. You can also burn them with a flame weeder or simply eliminate with shallow cultivation.
In essence, don’t fear annual weeds. But don’t use aggressive perennial weeds—thistle, grasses and such—for “weed cover cropping” in an annual vegetable garden.
Many varieties of perennial plants can grow adjacent to and within gardens and market gardens and used as cover crops. Leaves from broadleaf perennials like rhubarb make a wonderful sheet mulch in garden paths. And, in the fall, you can rake leaves from oaks, maples, pears and plums as mulch over garlic or broccoli.
Other herbs such as thyme, lemon balm and sage work as well to integrate into the mulching and composting processes of your garden.
I mention mulching here rather than cover cropping. But it is a similar process. We cover the soil and then work these materials in with a shallow tillage. Or we can allow them to rot on the soil surface by planting more crop through them or over-sowing new cover crop seeds.
Ultimately cover crops provide many ecosystem services for the farm or homestead. Looking outside the box, we find many more “cover crops” that can benefit the vegetable production rotations and systems.
When time is short, cover crops make good use of pre-established plants. When weeds are abundant, use them to help balance soil conditions. And when perennial agriculture is integrated with annuals, many new mulching materials are available in-situ for use in the garden.
This sweet and citrusy cranberry ferment is full of flavor. The deep red cranberry color of the finished fermented relish will surely brighten up any holiday plate. Incorporate this versatile relish into your meal as a side dish, or consider it as a condiment for turkey or pancakes/waffles, or even enjoy it over a soft cheese on a cracker or crunchy bread.
It even makes a great sandwich spread for holiday leftovers.
Yield: 1 pint
Ingredients
3 cups whole fresh cranberries
1/2 tsp. organic orange zest
2 tbsp. fresh squeezed orange juice
2. tbsp raw honey
Use a strainer to rinse cranberries well and discard any damaged, soft or unripe berries (pink or green colored). Use a food processor and pulse the cranberries until they are finely chopped. This will only take 2 or 3 seconds.
Transfer the berries into a clean pint canning jar, and stir in the orange zest, juice and honey. Mix together well.
Wipe off the rim of the jar with a clean dampened towel to make sure to remove any food particles form the rim. Add the canning jar lid and tightly screw on the ring.
This cranberry relish is a short 3-day ferment. Ferment at room temperature, ideally between 60-75°F (15-23°C), and keep out of direct sunlight.
“Burp” the jar as needed (as the pressure builds). Unscrew the lid briefly and tighten it back on to allow any built-up gas to release. Once a day, stir mixture and pat it down compactly with the back of a spoon in the jar. Replace the lid and tighten ring.
Taste test after three days to determine if the flavors have melded together and transformed into a bright and flavorful fermented relish. If not, let it go another day or day and a half and taste test again.
One sign that ferment is ready to eat is when the relish turns bright red. Once fermentation is complete, store the jar to the refrigerator. This ferment is best enjoyed within 2 weeks.
Frozen cranberries are not recommended for this recipe. Fresh is best.
Feel free to experiment with flavors by stirring in a tsp. of fresh grated ginger, 1/4 tsp. of ground cinnamon or 1/4 tsp. ground clove before fermenting.
Stir in your preferred chopped nut before serving the fermented cranberry relish.
Topical salves are a great way to harness the healing power of herbs. They can be made with limited equipment, using just a few ingredients. And you can easily toss an herbal salve into your purse or backpack to take on the road for whenever you need relief.
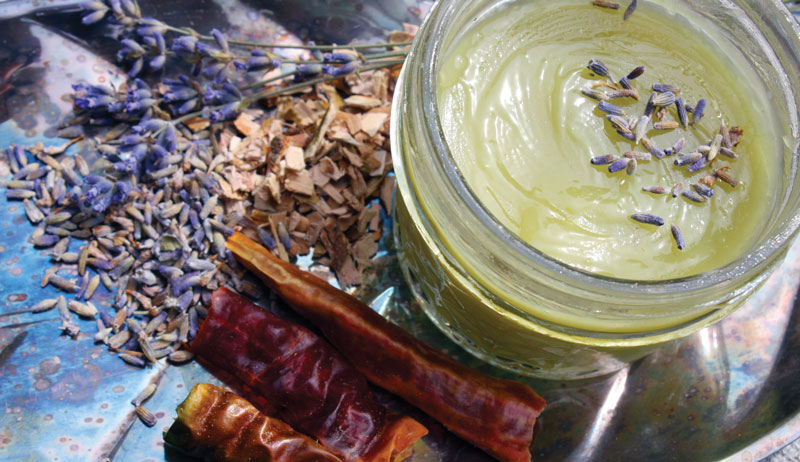
This particular salve is perfect to ease tired and sore muscles and to relieve the pain caused by inflammation, stiff joints and arthritis.
In our recipe, we’ll be using lavender flowers, white willow bark and cayenne peppers. It’s recommended to use dried herbs when creating a salve. The moisture in fresh plant material will encourage mold growth and spoilage of the final product.
We’ll infuse our herbs in oil, and we all know that oil and water don’t mix!
An Herbal Powerhouse
Lavender flowers may be most well-known for their calming effect. But they also offer analgesic and anti-inflammatory properties. That’s why we’ll make them the main ingredient in our muscle and joint pain salve.
White willow bark contains a compound known as salicin. Salicin is similar to what is used to make aspirin and considered a powerful inflammatory.
Together, these three herbs will make a potent and useful salve that you can apply whenever needed to bring relief from a wide variety of aches and pains.
The first step in making a salve is to create an herb-infused oil. This is a as simple as placing the herbs into a jar and covering them with the oil of your choice. Then just cap off the jar, label it and place it away in a cupboard or other cool, dark location to steep for four to six weeks.
During this time, the fat-soluble chemical constituents of the herbs will be extracted into the oil. You’ll often notice that the oil will pick up the colors and scent of the plants you are using. This means your extraction is working!
Once your herb infused oil is ready, you’ll strain out the plant material using a cheesecloth, coffee filter or fine mesh screen. Put the infused oil into the top of your double boiler and add your beeswax.
If you don’t own a double boiler, use a stainless steel bowl placed over a pot of boiling water. But be very careful, as the bowl will get quite hot!
Heather Cohen
Turn the heat to medium and gently stir the oil to ensure the beeswax blends well as it melts. Once the beeswax is completely melted, turn off the heat. Then gently pour the oil into your container.
As it cools, the beeswax will solidify. Your handcrafted herbal salve is ready!
This article appeared in Healing Herbs, a 2021 specialty publication produced by the editors and writers of Hobby Farms magazine. Healing Herbs includes herb profiles, projects such as this one, directions for foraging herbs and more. You can purchase this volume, Hobby Farms back issues as well as special editions such asBest of Hobby Farms and Urban Farm by following this link.