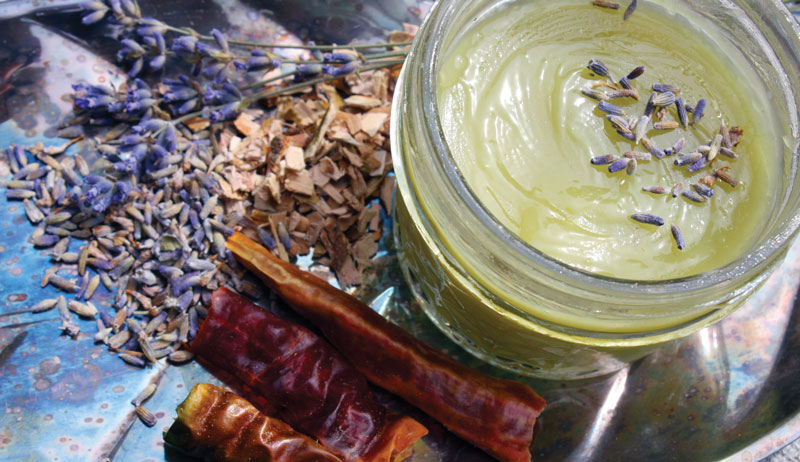
Topical salves are a great way to harness the healing power of herbs. They can be made with limited equipment, using just a few ingredients. And you can easily toss an herbal salve into your purse or backpack to take on the road for whenever you need relief.
This particular salve is perfect to ease tired and sore muscles and to relieve the pain caused by inflammation, stiff joints and arthritis.
In our recipe, we’ll be using lavender flowers, white willow bark and cayenne peppers. It’s recommended to use dried herbs when creating a salve. The moisture in fresh plant material will encourage mold growth and spoilage of the final product.
We’ll infuse our herbs in oil, and we all know that oil and water don’t mix!
An Herbal Powerhouse
Lavender flowers may be most well-known for their calming effect. But they also offer analgesic and anti-inflammatory properties. That’s why we’ll make them the main ingredient in our muscle and joint pain salve.
White willow bark contains a compound known as salicin. Salicin is similar to what is used to make aspirin and considered a powerful inflammatory.
Together, these three herbs will make a potent and useful salve that you can apply whenever needed to bring relief from a wide variety of aches and pains.
The first step in making a salve is to create an herb-infused oil. This is a as simple as placing the herbs into a jar and covering them with the oil of your choice. Then just cap off the jar, label it and place it away in a cupboard or other cool, dark location to steep for four to six weeks.
During this time, the fat-soluble chemical constituents of the herbs will be extracted into the oil. You’ll often notice that the oil will pick up the colors and scent of the plants you are using. This means your extraction is working!
Once your herb infused oil is ready, you’ll strain out the plant material using a cheesecloth, coffee filter or fine mesh screen. Put the infused oil into the top of your double boiler and add your beeswax.
If you don’t own a double boiler, use a stainless steel bowl placed over a pot of boiling water. But be very careful, as the bowl will get quite hot!
Heather Cohen
Turn the heat to medium and gently stir the oil to ensure the beeswax blends well as it melts. Once the beeswax is completely melted, turn off the heat. Then gently pour the oil into your container.
As it cools, the beeswax will solidify. Your handcrafted herbal salve is ready!
This article appeared in Healing Herbs, a 2021 specialty publication produced by the editors and writers of Hobby Farms magazine. Healing Herbs includes herb profiles, projects such as this one, directions for foraging herbs and more. You can purchase this volume, Hobby Farms back issues as well as special editions such asBest of Hobby Farms and Urban Farm by following this link.
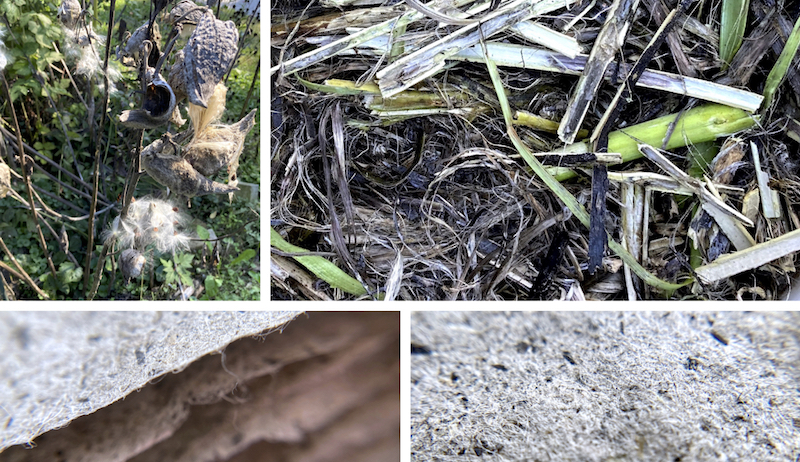
It’s a host plant for monarch butterflies. It’s an important nectar source for pollinators. And, growing about 5 feet tall, common milkweed has great paper-making potential, too.
The secret? Stringy fibers sandwiched between the stalks’ outer skin and inner woody cores. The fiber’s strong enough to form attractive, sturdy handmade paper.
Getting Started
I frequently make recycled paper from junk mail, and making milkweed paper follows a similar process. To start, you’ll need several large milkweed stalks as well as a large bucket, crockpot and washing soda. You’ll use these to help break down the raw milkweed fibers.
To make the paper pulp, you’ll also need scissors, an old (but working) blender, and some corn starch. (The corn starch helps your finished paper uptake ink more smoothly.)
Forming your paper sheets requires a papermaking mold (screen), deckle (frame), and a container large enough to accommodate them. You’ll also need a loose sheet of screen mesh and some drying cloths.
Finally, you’ll need two heavy boards and C-clamps or weights for pressing your paper flat as it dries.
To harvest the milkweed fiber, first remove leaves, flower heads and seed pods from the stalks. Next, break stalks into two or three pieces.
(As you break these, you’ll see some of the long fibers that you’ll be harvesting.)
Susan Brackney
The numbered images (above/below) correspond to the following numbered steps. Steps 1 and 2—Pack the stalk pieces inside your bucket. Cover with hot water. Let soak for several days.
Step 3—Once the stems have softened, you can strip the fiber from between the stalks’ outer skin and inner woody cores. Separate and save as much fiber as possible. (Depending on the size and thickness of your paper sheets, 2 to 3 cups of processed fiber can make roughly six to 12 sheets of paper.)
Step 4—Rinse the fiber well, removing any non-fibrous debris as you go. Place this in the crockpot with the washing soda. (I added one part washing soda per every two parts fiber.) Set the crockpot on high for three to four hours. Stir occasionally and check to see whether the fiber has begun to soften. (If it has, you should more easily be able to tear it apart with your fingers.)
Break It Down
Step 5—Rinse fiber again thoroughly. To break it down further, use scissors to cut it into smaller sections. Place small handfuls of this material in the blender. Add 5 cups of water and a teaspoon of cornstarch. Pulp these ingredients in the blender.
You should end up with a cloudy, opaque liquid. (If you can still see many long fibers in the mixture, keep blending.)
Step 6—Pour a few batches of pulped fiber into the large paper-making container. You want the pulp liquid level to be deep enough that you can easily submerge your mold and deckle. (Don’t have these? You can use a window screen and an empty picture frame to form your paper sheets.)
Agitate the pulp bath with your hand to evenly distribute its contents. Then, holding the mold and deckle together, dip into the container.
Susan Brackney
Step 7—Keeping the mold and deckle together, move them from side to side as you slowly bring them up. (This motion helps to lock the paper’s fibers together.) Allow excess water to drain through the screening.
Steps 8 and 9—Place the mold and deckle upright on a cloth to catch drips. Next, remove the deckle from the top of the mold. Top the wet paper with your loose sheet of screen mesh. Use a cloth to blot excess water through the screen mesh. Now, remove the screen mesh.
Step 10—Lay one of your boards on a flat surface and cover with an absorbent cloth or several layers of rags. Next, place the mold with the just-blotted sheet of paper face down. Blot the back of the mold’s screen with a dry cloth. (This loosens the sheet so you can release it onto the dry surface.)
Step 11—Remove the mold. Make sure the wet sheet is lying flat. Place another dry cloth on top, smoothing out any wrinkles you notice.
Keep sandwiching these sets—dry cloth, new paper sheet, and additional drying cloth—as you go. Once you’ve finished making milkweed paper, top with one more dry cloth and the other board. Apply uniform pressure to your paper-and-cloth sets with weights or C-clamps.
If you like, you can speed their drying by periodically replacing some of the wet cloths in the stack with dry ones. And, once the milkweed paper is dry—or nearly dry—you can smooth its surface with a cool iron.
Step 12—You have finished sheets of milkweed paper!
The Australian Shepherd excels at controlling large and/or slow-moving flocks of sheep and herds of cattle. When used as a stock dog, the breed enjoys high regard for its superior ability to effectively manage livestock in tightly confined spaces.
The Australian Shepherd: A Capable Working Dog
Originally developed in the American West as a general- purpose ranch and farm dog, the Australian Shepherd is powerful and intense by nature. If you choose to use one, it will easily learn the appropriate force and distance needed when working a particular breed of livestock.
Utilizing a loose-eyed approach to livestock, a working Aussie will often display wear, grip and/or an authoritative bark. The careful, observant dog will also keep a close eye on animals and recognize when it may need to step in and handle its stock.
Learn More at the Australian Shepherd Club of America
The Australian Shepherd Club of America was established as the parent club for the breed in 1957 and incorporated as a nonprofit corporation. Increasing interest in competition led to the development of performance programs.
Today, these programs provide certification and titles in:
Picking up a cheap welder can save you a lot of money. You can quickly repair gates, fences and machinery without hiring someone to do it or allowing it to get more damaged.
The most common welding method used on farms is stick welding. It offers a few key advantages such as cost and portability.
However, stick welding isn’t right for everyone. And some farmers prefer to use a wire welding process such as metal inert gas welding or flux-cored arc welding.
Stick Welding
Stick welding (shielded metal arc welding, aka SMAW) is one of the most popular welding processes. It’s a simple procedure that is popular with outdoor welders due to it not being affected by wind. (For a stick welding how-to, check out this link.)
SMAW Pros
Easier setup. It’s simple to set up, and you don’t need to connect a gas cylinder.
Portability. Stick machines can be very light and portable. They’re easy to carry around.
Suitable for windy conditions. Stick doesn’t require shielding gas. Welding processes that use shielding gas won’t get good results in windy conditions because the wind will interfere with the gas.
Cheaper. Stick machines are some of the cheapest welders on the market
Rusty metal. Metal doesn’t need to be clean before stick welding. So it’s good if your metal has bits of rust or paint that you don’t want to clean off.
SMAW Cons
Unable to weld thin metal. Stick welding is very hot and isn’t suitable for welding 18-guage sheet metal.
Cleanup time. SMAW doesn’t produce clean welds, and there is a lot of spatter. If you want to reduce cleanup time, stick isn’t for you.
Skill level required. Stick is a harder process to learn, as you need to learn to strike the arc.
Slow process. Stick welding is slower because rods need to be changed. Wire welding, however, uses a continuous spool of wire.
SMAW Farm Tips
Wet or damp electrodes make it more difficult to lay a strong weld. Store electrodes in a cool dry place.
Don’t hold the rod at 90 degrees to the metal. For best results hold it at approximately 75 degrees.
Don’t hold the electrode too far away from the metal. Arc length should not be greater than the diameter of the electrode.
Moving the electrode too slowly can cause too much metal to be deposited and a weaker weld with a convex bead. Similarly, a fast travel speed will create a narrow concave bead with low penetration.
Metal Inert Gas (MIG) welding (also known as GMAW) is a really popular type of welding that’s frequently used for welding low-alloy steels. It is well suited for welding auto-body parts and home-
repair projects.
Photos courtesy kingsofwelding.com
MIG Pros
Better quality welds. MIG welds produce less spatter so cleanup time is reduced.
Suitable for thinner metals. MIG is versatile and will easily weld 18-gauge steel.
Continuous process. You don’t need to change rods like you do with stick. You use a wire spool so you can weld near continuously.
Easier process. MIG is easier and more reliable. Once you’ve set up the welder, you basically need to hold the gun at a certain distance from the metal and press the trigger.
MIG Cons
More expensive setup. MIG welders are typically more expensive. Plus, you need a gas cylinder as well, which can add up.
Not suitable for windy conditions. MIG requires shielding gas to protect the weld from contamination. In windy conditions, the wind can interfere with the gas and cause the weld to be contaminated.
Not portable. MIG welders are typically heavier than inverter stick welders. You’ll need to transport a gas cylinder as well.
Need to clean metal before welding. If you have metal that has rust or paint on it, you’ll need to clean this off before you can use MIG.
MIG Farm Tips
Listen to the sound the arc is making. If you hear a sound like you’re frying bacon, then you’re doing it right. If it hisses, then your voltage might be too high. And if it’s loud and crackly, it might need turning up.
The stickout is the length the wire sticks out from the MIG gun. Keep this short at around 1⁄4 inch for a more stable arc.
In MIG welding, you only need to use one hand to hold the gun. Use your second hand to steady and support your hand holding the gun for extra precision and comfort.
Have the arc positioned at the front of the weld when pushing forward. This will help for better penetration.
Flux-cored arc welding (FCAW) and MIG welding can both typically be performed with a standard MIG machine. The key difference: MIG requires use of a gas bottle; FCAW doesn’t.
FCAW Pros
Continuous process. FCAW uses a spool of flux wire so you don’t need to stop and change rods.
Portable. FCAW doesn’t require shielding gas because the wire contains a flux which protects the weld from contamination. You don’t need a gas cylinder.
Can be used in windy conditions. The lack of shielding gas means FCAW can be performed in windy conditions without threat of interference.
Basic operation. Similar to MIG, FCAW is a basic process and even easier than MIG because you don’t need to connect a gas cylinder.
Rusty metal. FCAW is forgiving on metal that has rust or isn’t clean.
FCAW Cons
Produces lots of fumes. Smoke and fumes are released from the flux coating. So you’ll need to be in a well-ventilated area, ideally wearing a respirator.
Requires cleanup. In addition to fumes, high amounts of spatter are released.
Not suitable for aluminum
Not suitable for thinner metals. The thicker wire and higher temperature makes FCAW unsuitable for welding thin-gauge steel.
More expensive wire. FCAW has a cheaper start-up cost than MIG. However, wire is more expensive and can add up overtime.
FCAW Farm Tips
MIG uses DC electrode position (DCEP), but FCAW uses DC electrode negative (DCEN). Make sure you have the right settings.
Flux cored wire is softer than MIG wire and is more likely to get tangled or birdnested. To avoid birdnesting, use knurled V-drive rollers.
If the tip of the electrode touches the weld pool, it can fuse the hollow wire shut and break a good weld. Keep the tip away from the metal.
Here in northern Wisconsin, snow fences are a common sight along roadways. The idea is to create windbreaks that prevent snow from drifting severely where maintenance crews will have to clear it away to keep traffic moving.
But snow fences can also be put to good use on farms, whether you’re trying to keep your driveway clear or guard a livestock pasture from unnecessarily deep drifts. The key is to install snow fences correctly, so you don’t wind up creating worse drifts than you had before.
These four tips can help you build the most effective snow fence for your farm.
Carefully consider the height and placement of the fence.
The most important element of installing an effective snow fence is making sure the height and placement are correct. It might seem logical to install the fence right up alongside the area you want to protect.
But this is a poor strategy. A snow fence only controls drifts. It doesn’t eliminate them.
A snow fence can deposit drifts on its leeward side across an area 35 times longer than its height. So if you want to protect your driveway with a 4-foot fence, you’ll want to install it 140 feet upwind of the driveway.
Prevailing winds in the U.S. generally blow from west to east. The windward side will be to the west of the area you wish to protect.
A snow fence is supposed to act as a windbreak, not a wind stopper. The idea is for the wind to be slowed by going through and around the fence, not stopped in its tracks. A solid snow fence is less likely to survive the buffeting it receives from winter winds.
Instead, a snow fence should be porous, with perhaps 50 percent of its surface area open so the wind can pass through.
Snow fences made of plastic mesh are widely available. Rolls of wooden slats held together by wire, however, are also available and a common sight in my area.
Use sturdy materials and deep posts.
Since a snow fence is meant to stand up in the face of heavy winter winds, it needs to be sturdy enough to withstand harsh conditions.
Posts should be set so at least 1/3 of their length is below ground, or even 1/2 to be on the safe side. For example, a 6-foot T-post can be installed with 2 feet below the ground to create a 4-foot fence with 1/3 of the post height below ground.
The spacing of the posts is also an important consideration. Eight feet between posts is considered the maximum suitable for a snow fence. The fencing material itself should be attached securely to the posts.
Means will vary depending on the materials you use. But don’t skimp in this department.
Consider attaching the fencing materials to the windward sides of the posts, so the wind will push the fence against the posts rather than away from the posts. This can lessen the strain on the attachment points.
Leave a gap between the ground and the bottom of the fence.
In order for the snow fence to function correctly, it’s important to leave a gap between the ground and the bottom of the fence. This helps keep the fence from getting buried by snow. The gap should measure at least 5 inches, if not more.
One useful rule of thumb is to make the make the gap 10 percent as tall as the fence. If the fence is 5 feet (60 inches) tall, the gap should measure 6 inches.
By following these tips, you’ll be well on your way to constructing a suitable snow fence for your farm. Good luck!
Every issue of Hobby Farms magazine, our editors search for items that are useful to hobby farmers, whether they’re heavier equipment such as tractor attachments, useful tools, innovative helper items or accessories for livestock management.
So have a look at the things we found that can help your farm run better or keep you and your animals safer.
2. The AcuRight Wireless Indoor/Outdoor Thermometer with Humidity Sensor features 12- and 24-hour weather forecasting, indoor and outdoor temperature and indoor humidity, and a wireless range of up to 165 feet. 3. The JumpSmart can jump start up to an 8-cylinder, 5.0-liter engine, enough to jump most cars, trucks, ATVs,lawn mowers and more. The unit also includes an LED flashlight and power bank.
4. The American-made LogOX 3-in-1 Forestry MultiTool combines the utility of a cant hook and timberjack with the back-saving LogOX Hauler to optimize operating a chainsaw, log splitter or portable sawmill. The set includes the LogOX hauler, cant handle extension and T-bar attachment, which are constructed from hollow-frame American steel and guaranteed for life. The Hauler’s design allows the user to quickly engage, lift and move log rounds or load a log splitter without the strain, pain and wasted energy of continually bending over.
5. The 4-inch capacity FC400 Chipper is designed to handle brush materials and small tree limbs.
6. The Manplow is a pushable tool with an extra-wide blade that is available in 42- and 62-inch models, the EZ Glide Edge can clear snow from aggregate, broken concrete and gravel surfaces but won’t scratch or gouge wood or composite decking.
7. The Buttermilk Holstein Calf Coat is constructed with a rip-stop, water-repellent outer shell and insulated with Hollofil, and has adjustable straps and a Velcro front closure.
8. The Horizontal Winter Roost nesting box provides small wild birds a place to perch and rest.
This article originally appeared in the September/October 2021 issue of Hobby Farms magazine. Want more products? Check out previous Farm Storehouse offerings!
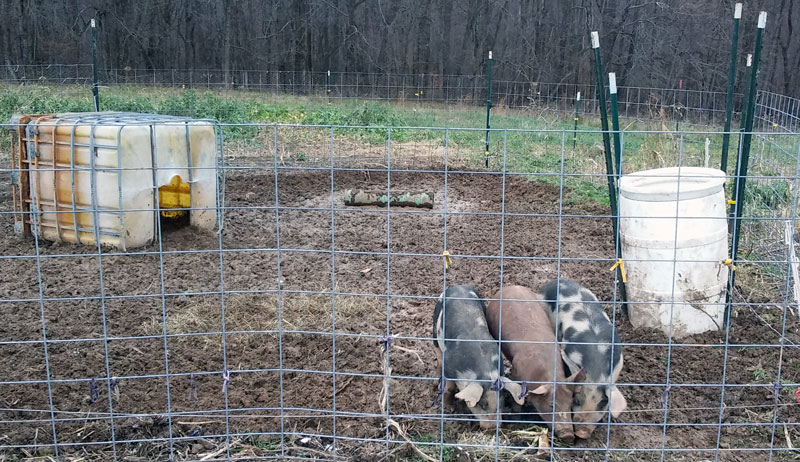
On the independent or low-inputs farm, preparing the pigs for winter is more than just ordering in a pallet of pig feed!Keeping hogs in cold weather calls for some forethought and planning.
Hardy animals, pigs still need some help to thrive in the cold season. Everyone will be happier if winter finds us all prepared.
Shelter
Most obvious when the snow begins to fly is the need to provide our animals adequate shelter from the elements. Although pigs can generate a lot of warmth, they need us to provide the right environment so they can stay comfortable in cold weather.
A dry corner out of the wind is most important, whether the animal is out on pasture or in the barn. If your pigs are in a pen, block up any holes that let in a significant draft. And make sure the drainage in the pigs’ area is adequate.
A wet pig is a cold pig!
Pastured pigs need special consideration. Commercial pig shelters, or hutches, are portable pig houses designed to keep precipitation and breezes out. But also make sure, if you have a hutch in the field, that it backs to the prevailing winter winds.
Usually, but not always, winter winds come from from the north and/or west.
Alternatively, an inexpensive, homemade, draft-free hutch can be made by flipping an IBC (aluminum-framed water cube or water tote) on its side. Just cut out a door sized appropriately for the animal you intend to house in the tote.
Toss in some hay or straw. Or you can just deliver bedding to the pasture and let the pig make her own nest.
Another way to make pigs comfortable on winter pasture is not only simple, it’s biodegradable!Park a round bale in the field where pigs are to spend the cold season, and watch them burrow their way in.
Be sure you’ve removed any twine, netting or wrap first.They’ll make themselves a regular pig-loo, insulated with hay and heated by slow composting. We have neighbors whose sows farrow in the field, winter and summer, in just such lovely nests of round bales.
Keeping fluid water in front of our pigs in the winter can be a real challenge! In sub-freezing weather, water lines can freeze solid and troughs ice up. While the urgency of always-available drinking water is less in the cold weather than when temperatures are very high, it is important to make sure pigs can get a good drink regularly.
Using a simple trough is one possibility. But the water must be kept open, either by breaking the ice daily, or with the use of electric tank heaters or deicers.
If you choose to use these, make sure any heaters (and their cords) are out of reach of inquisitive porkers by using submersible heaters or tanks with the heater built in. Livestock seem to love chewing on electrical cord!
In regions where unheated tanks freeze regularly, durable rubber tanks may be easier to flip and empty. They’re also less likely to crack or split than plastic or galvanized metal.
One way to deal with tanks that freeze solid is to keep two tanks.Fill one and keep breaking the ice and refilling until the tank is solidly frozen. Then fill the second tank and flip the first tank over. (Note: This is not a one-man job!)
On the first sunny day, the black rubber tanks will heat up, releasing ice from the upturned tank and letting you put it back into use when the second tank freezes up.
Going into the winter, we want to make sure that our pigs are healthy and getting the most out of their ration. In a conventional ag setting, pigs are regularly dosed with a chemical wormer. But often the small, traditional farmstead can provide the same service naturally.
Fall garden surpluses can include many items from the family Cucurbita, which includes melons, squashes, pumpkins and cucumbers. The seeds of these fruits contain cucurbitacin, an effective natural wormer. So while your pig is turning extra produce into pork chops, he can be self-medicating as well!
Living on native pastures, pigs may find many anthelmintic (worm-fighting) plants among their forages. This gives them the opportunity of self-regulating their gut biome by natural means.
Toxic plants like horse nettle, white snakeroot and milkweed have gut-worm fighting characteristics, as do the acorns pigs love to devour in the fall. And there are many more such! With a natural pharmacopoeia always available, you may never see a sign of worms in your animals.
If your farm is finding spare nutrients even in the winter (in the kitchen, root cellar and barn) then there’s a job for pigs! And keeping him through the winter just isn’t that difficult.
More Information
IBC Hutch
An IBC hutch is a great in-pasture shelter for one large or several smaller pigs. Wind- and water-proof, it provides the necessary conditions of dry and draft-free.
To maintain these conditions, keep fresh bedding regularly available so your pigs can make their beds comfortable. It may also be necessary to drill some small drainage holes in the side of the IBC that (since the tote is on its side now) is functioning as the bottom.
This will let out any rain or snow that blows in.
How Dry Is ‘Dry’?
A pig’s bed doesn’t have to be as dry as the one you sleep in! Provide clean, dry hay, straw or some similar small-particle, high-carbon bedding. Offer more when Porka’s sleeping place starts looking soggy. As long as the material remains fluffy, don’t worry if it becomes somewhat damp.
Moisture initiates the biological breakdown better known as composting, so slightly damp bedding can actually generate some of its own warmth. Pigs will sometimes even urinate in their bedding (although they mostly do their business in other parts of the pen or pasture) to start this composting process going.
When harvest season arrives, the many months of hard work that gardeners and farmers have put in throughout the year finally come to fruition. As autumn approaches and the temperatures drop, it’s time to collect the crops before the season changes yet again.
Nothing is better than cooking up wholesome meals for those you love, sharing the abundance of homegrown goodness with friends and family and donating the excess to those in need. However, don’t forget to preserve a bit of the harvest, too.
Preserving allows you to enjoy food at its peak flavor, all throughout the year. Preservation is a smart solution to avoiding food waste. And preserving stocks the pantry with nutritious food for months to come.
Not to mention, homemade preserves make a unique and special heartfelt gift!
Different Methods
There are several safe ways to preserve food from the comfort of your own home, including the most popular methods: cold storage, freezing, dehydrating, water bath and pressure canning, curing and smoking, and fermenting.
Cold storage is an effective way to store root crops, such as beets, turnips, carrots and potatoes as well as many other fruits, vegetables and other food. Cold storage keeps the temperature cool and the environment humid.
Freezing is ideal for fresh vegetables, fruits and meat. It can extend the life of the food by up to a year, if packaged properly.
Dehydration is an excellent option for drying herbs, fruit, vegetables and meat. Removing moisture from the food so that it can’t spoil preserves the food.
Pressure canning is used for preserving low acid food with a pH above 4.6, such as meat and vegetables.
Water bath canning is the method used for preserving pickles and fruit, and other acid food with a pH of 4.6 or lower.
Curing & smoking is most commonly used for making cured meats, such as ham, salami and bacon (also often smoked). Curing primarily uses salt or sugar to draw moisture from the food. Once cured (or brined), the food is then cold or hot smoked, which requires specific temperature control for extended periods of time.
Fermentation preserves food, makes it more nutritious in many ways and offers healthy-belly bacteria, commonly known as probiotics.
Here are 20 of my top tips for preserving the harvest this year.
kuvona/Shutterstock
Keep Clean
Before preserving with any method of food preservation, always clean your food prep space and supplies with warm water and soap. Pull your hair back and change into clean clothes.
Be aware of cross contamination when handling food. Food borne illnesses are completely avoidable when the proper precautions are taken.
Jams & Jellies
When making jams and jellies, a good tip is to use 1⁄4 underripe fruit and 3⁄4 fully ripe fruit. Underripe fruit has a bit more pectin and acid than fully ripe fruit. Pectin is naturally occurring in fruit, and pectin is what helps gel the preserves.
This tip is especially helpful if you don’t want to add commercial pectin to your jam.
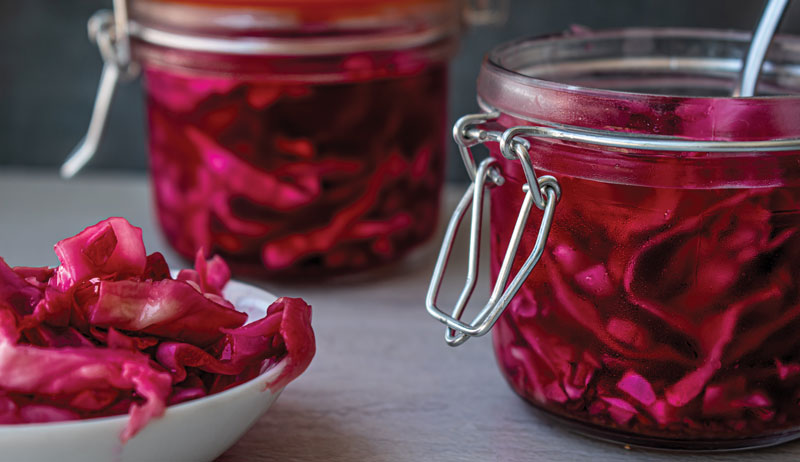
Pickles
To make crunchy pickles when canning or fermenting, use freshly harvested produce and preserve within 48 hours of harvest. The sooner the better.
Also, cucumber varieties specifically grown for pickling keep crunchier once pickled. For optimal crunch, use pickling cucumbers 3 to 4 inches (or smaller) in size.
To help prevent mineral build-up on the interior of your canning pot and keep the white powdery residue off your canning jars after processing, add a couple tablespoons of white vinegar to your water bath canning pot when heating it up. The white powder that sometimes accumulates is simply mineral deposits from the water.
It’s totally harmless and will rinse right off once jars are fully cooled, though it can be avoided with a little splash of white vinegar. The same trick works when preserving with pressure canning as well.
Wash Your Produce
When water bath or pressure canning produce, be sure to scrub the produce well to remove any debris and peel the veggies (if applicable). It’s important to remove as much dirt and bacteria as possible to lessen the risk of spoilage.
Gauge the Gauge
When using pressure canners with dial gauges, remember to check the gauge annually for accuracy. Dial gauges can usually be checked at the local hardware store or local extension office. Otherwise, you can send the gauge to the manufacturer for an inspection (varies by brand).
Weighted gauges don’t need to be tested.
Before pressure canning, also check the control valve or petcock and steam pressure gauge to make sure the steam can vent and clean it out if need be. Additionally, always remember to inspect the rubber seal to check for damage, stretching or shrinkage. Replace if needed.
When Pressure Drops
When pressure canning, if the pressure ever drops below the required level, turn the heat back up to the target pressure and reset the timer for the full processing time. Even if the pressure drops at the end of the directed time, you must start completely over, get to the target pressure once again and reprocess for full time per the recipe.
No Tilt!
Despite what you see all over the internet, it’s not recommended to tilt your canning jars when adding them to the canner or removing them after processing. Jars should be kept upright, as tilting the jar could cause food to spill into the sealing area of the lid, which could ultimately lead to the jar not properly sealing and ultimately spoiling.
Also, be sure not to touch the lids or rings of your hot jars. I see this all too often, where people are eager to wipe away the water from the jar lid or want to test if the lid has sealed, and accidentally push down the canning lid.
That’s a big no-no. Leave the jars to completely cool, without touching them for 12 to 24 hours, as directed per the recipe you are following.
Study Salinity
When fermenting vegetables, occasionally recipes will reference the salinity of the brine. To figure out the salinity, a quick method is to weigh your water in grams, then multiply it by the salinity desired.
For example, if I were trying to obtain 3 percent salinity with 1 cup of water (approximately 236 grams), I would multiply 236 grams by 0.03, which equals 7.08. I’d need to add approximately 7.0 grams of salt to my one cup of water to obtain 3 percent salinity.
Below the Brine
When fermenting produce, it’s important to keep the fruits and vegetables below the brine level. Anything above the brine is susceptible to mold. As long as everything is held below the brine (usually with assistance of a fermentation weight or other food-safe weight alternative), it will be safe in the anerobic environment.
Through the process of lacto-fermentation, also known as wild fermentation, small air bubbles are created which can push the produce above the brine level. This is common when fermenting sauerkraut.
Therefore, it’s very important to check on your ferments every couple of days to make sure everything is still submerged below the brine. If not, use a clean utensil or a washed hand to push it back down below the brine.
A couple fresh grape leaves added to your pickles when fermenting will help to retain the crunch. Grape leaves (as well as horseradish leaves, bay leaves, oak leaves, raspberry leaves and black tea leaves—just to name a few) contain tannins.
Tannins are naturally occurring and help inhibit the enzymes that soften the pickles. Only one to two leaves is recommended per quart jar of pickles. Adding too many leaves can have the adverse effect and make the pickle soft.
Note: Different leaves offer different flavors to the outcome of your pickle ferment. For leaves that do not add additional flavor, use grape, oak or raspberry leaves.
Stay Current
Current approved methods for safe home food preservation are always changing. Be sure to reference the National Center for Home Food Preservation website for revisions and the most current approved methods for preserving food.
Rings & Jars
Before storing homemade canned goods, remove the canning ring and clean the jar to remove any food particles. Label the jar contents and date when it was made. It’s not recommended to leave the rings on the jars or stack the jars when storing.
The reasoning is because if a jar of food were to spoil by leaving the ring on or stacking the jars, you are forcing the lid on and therefore would miss signs of spoilage.
If the ring is removed from the jar and they are not stacked, on the off chance that something spoils, the lid would be able to push off the jar and you’d immediately know to discard the jar of food.
Be Cool
Store canned goods in a cool, dry, dark space for best food quality. Keep out of direct sunlight. Light could cause discoloration and damage the quality of the preserve.
According to the National Center for Home Food Preservation, the best temperature to store your canned goods is between 50 to 70 degrees Fahrenheit. A basement, pantry, bottom level of a kitchen cupboard or even the bottom shelf of a closet would be ideal.
I’ve even heard of people storing their canned goods under their bed.
Stay Cool
If you have the space, freezing is a great alternative to canning food for preservation. Freezing food retains much of the original flavor and preserves most of the nutrition.
One tip to minimize ice crystals on your frozen food is to chill the food in the refrigerator prior to freezing. Remember to always label and date packages prior to freezing.
Humidity Control
If storing fresh produce in the refrigerator, keep in mind that vegetables require higher humidity conditions than fruit. If your refrigerator has crisper drawers with controls, adjust them accordingly for optimum storage.
Have a root cellar for storage? Straw, hay and wood shavings are great options for insulation. However, avoid any materials that have been treated with pesticides.
Dry Herbs
Herbs are quick and easy to dry and store for year-round use. Not only are dried herbs terrific for cooking with, they’re also great for making homemade teas, soaps and salves.
Yala/Shutterstock
Harvest herbs when they are young and tender. They will have more flavor and aroma.
Drying can be done in a dehydrator or in an oven, or can even be air dried. When air drying, hang small bundles of clean herbs in a dry, airy place, out of direct sunlight. Herbs are sufficiently dried and ready for storage when they are crisp and brittle.
Two Is Better Than One
Two thermometers should always be used when smoking meat. One thermometer monitors the smoker temperature. The other monitors the temperature of the product you are smoking.
Nothing is more satisfying to me than spending an afternoon in the kitchen preserving. It’s especially meaningful when a friend or family member offers to lend a hand. We make memories, share stories, and teach future generations invaluable life lessons through the process.
Happy Preserving!
More Information
Handle Pressure
Always preserve with safe recipes that are written based on tested USDA-approved methods for preserving food at home. When water bath canning, always remember to adjust your timer based on your altitude.
Atmospheric pressure is lower at higher altitudes, so water boils at a lower temperature. Therefore, time will need to be adjusted per the altitude you are at. When pressure canning, higher altitudes will require an increase in the pressure.
Reference the altitude adjustment charts included in your recipe books.
Dry Salting
When fermenting vegetables, dry salting refers to massaging or mixing salt into fresh produce to draw out the liquid from the produce naturally. The liquid that is created through dry salting is the natural brine you will ferment with.
To make a brine when fermenting refers to dissolving salt in water, which will be used to submerge the produce in. Starter cultures are living microorganisms that help to kick off fermentation, usually called for when making dairy ferments such as yogurt or cheese.
Starter cultures are not required when fermenting vegetables. You may use various types of salt when fermenting. Just reference a salt conversion chart to see how different grains measure.
This article originally appeared in the September/October 2021 issue of Hobby Farms magazine.
By the end of summer, your fence rows (those you don’t keep weed free) bloom with a variety of pollinator-friendly native perennials. Wildflowers such as goldenrod, white and purple asters, boneset, black-eyed Susans and ironweed all put on a big fall show. They readily attract many bees and, especially delightful, Monarch butterflies.
You think back to spring and summer when those fence rows were just weedy and decide to actually plant a three-season pollinator garden. You check online and at your local garden center for the best native perennials for your area, but the prices are daunting.
Not to worry.You can successfully grow a large variety of native perennial wildflowers from seed all while saving tons of money. And you’ll enjoy a really outstanding pollinator garden next spring, summer and fall.
A Matter of Seed
Successfully growing from seed is important. And growing native perennials from seed outdoors is much easier than growing annuals under lights in your spare room.
First you need some seed. You may have friends who can collect some seed for you from their established gardens. Or you can buy seed online.
Some of the easiest native perennials to grow from seed are:
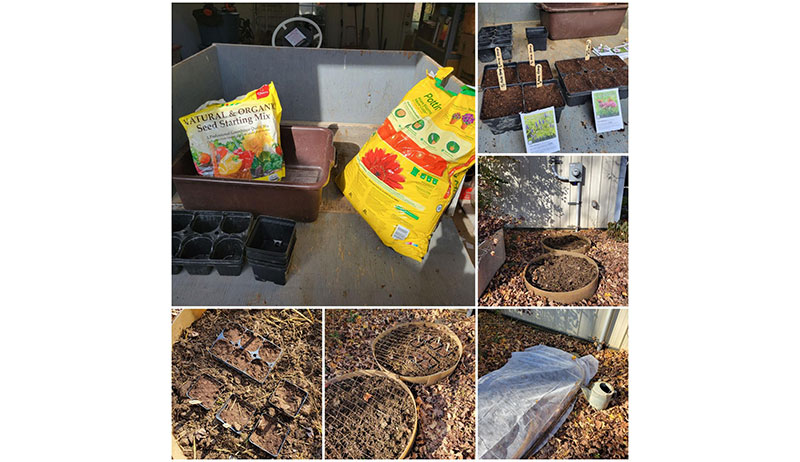
You will also need a south-facing, well-protected prepared garden bed. (A raised bed is ideal).
You’ll also need to gather:
2- to 4-inch plastic pots
good quality potting soil and seed starter mix
wooden sticks (and a pen for writing on the sticks)
some floating row cover with supports
Victoria Van Harlingen
Cold Is Key
You also need cold weather. Some seeds need a month of cold weather (low 30s) to successfully germinate. Others require two months or more, while some need none at all.
In November or early December, before the ground freezes, plant your seeds in the pots per the seed packet’s instructions. Make sure you sterilize your pots first in a solution of 2 tablespoons of bleach per 1 gallon of water.
Fill your clean pots with a mix of two parts potting soil to one part seed starter. I put four seeds per 4-inch pot, two seeds in 2-inch pots.
Be sure to identify the seeds using the wooden sticks.
Sink the pots in the prepared bed so the top of the pot is even with the top of the soil in the bed. Water carefully and gently, and cover with floating row cover weighted down with stones or boards (or whatever is handy).
The row cover needs a little support. Old fence wire bent to form a low tunnel works well. Don’t worry about rain, snow or frequent watering. You just need cold weather.
Start checking for seedlings to emerge by the end of March in zone 5/6 (earlier or later per your planting zone). When their first true leaves appear, transplant your seedlings to prepared beds. This is typically late April or early May but, again, depends on your planting zone
You can mulch plants to help control weeds and moisture. You will also want to make sure your plants get regular watering all through their first year.
Soon you will be rewarded with beautiful native perennials! Their blooms will attract bees and butterflies to your garden in spring, summer and fall.
As the seasons change and cold weather comes in, temperatures are going to start to drop which means frost, and eventually a hard freeze. There are a number of things that we can do to prepare our homestead, garden or hobby farm for the inevitable winter weather.
Prepare Garden Beds
If you have any garden structures such as bean poles and tomato trellises, you’ll want to dissemble and get them cleaned up. Pull any t-posts from around the hobby farm and put them away for the winter.
Some plants, like tomatoes, should be removed from the garden as well. I recommend burning them. Leaving tomato plants in the garden all winter, or putting them into your compost to break down, may transfer diseases into next year’s garden.
Consider planting a cover crop of winter wheat, rye or vetch. This will help prevent erosion over the winter and will also add nutrients to the soil. This is also a good time to add compost or manure to your garden beds.
Bring Frost-Sensitive Plants Indoors
Consider bringing in your frost-sensitive plants for the winter. This would include tropical plants and herbs such as rosemary, aloe, bay etc. If these plants are growing in your garden beds, dig them up. Put them in containers and keep them indoors in a south-facing window.
Some plants that we might grow as annuals, like peppers, are actually perennials. These will continue to produce throughout the winter if we bring them inside.
Get out into the gardens for one last harvest of frost-sensitive crops like tomatoes, peppers, eggplants etc. A cold snap will ruin these crops. So be sure to gather one last round of tasty summer fruits before it’s too late.
More cold-tolerant crops such as cabbage, kale and Brussels sprouts won’t mind the cold temperatures and will actually taste sweeter after a light freeze.
Harvest Your Herbs
Just like with your veggies, you need to harvest the last of your herbs before that winter weather hits. Some herbs are more cold-tolerant. But others, such as basil, can’t handle cold temperatures and will need to be harvested right away.
Gather, dry and process your herbs and you’ll be able to enjoy them all winter long.
Collect Seeds
While you’re out in the gardens harvesting your vegetables and herbs, don’t forget that it’s also time to collect seeds for planting next year. The seeds for many of our garden crops will be ruined by a hard freeze. It’s important to gather them up before that happens.
As the plants mature, and the seeds ripen and dry down, simply gather them up. Clean any debris from the seeds and store them in a cool, dark place until next spring.
Plant Garlic & Wheat
Even though winter is approaching, there is still some planting around the hobby farm that can be done! Some crops, like flower bulbs, garlic and winter wheat need to be planted in the late fall to be enjoyed the following year.
When planting garlic, be sure to mulch the area well. This will protect the young sprouts to ensure their survival in the garden throughout the winter.
We want to be sure we’re prepared to keep our homes warm throughout the winter, too! If you heat with wood, you’ll want to make sure that you have enough of it split and stack to get you through until spring.
If you use propane to heat your home, this is a great time to check your tank and have it refilled if necessary.
Clean up the Yard
Take a walk through your yard and gardens and collect any tools, toys or other things that haven’t been properly put away yet. Leaving your garden tools out all winter will cause them to rust.
Also gather up any flower pots and put them in the shed before they’re buried under the snow. Freezing temperatures could cause your flower pots to crack and break. Put them in the garage or in a shed to help avoid this.
This is also the time to unhook and put away any hoses and to drain your rain barrels. These can easily be damaged during the winter if not properly taken care of.
Check on the Animals
We also want to be sure to take good care of the animals on our farm. Adding some extra straw to their coops or in the barn will help keep them warm during the cold winter nights. Consider using a heating element to keep their water supply thawed as well.
Plan for Next Year
After winter hits and the gardens are covered in snow, there’s still work to be done: planning next year’s garden! While the memories of his year’s successes and failures are still fresh is the best time to start making plans for next year.
Spend your winter flipping through seed catalogs, making lists and dreaming about everything you’d like to do and grow next year. Remember, your hobby farm can be fun, even in the winter.