“I felt that farming would allow me to give to my community and give to my people in the most influential way,” says Kamal Bell, the founder of Sankofa Farms. Based in North Carolina, the locally-focused venture aims to improve the lives and welfare of people in need who find themselves living in food deserts.
Alongside helping to feed the community, Sankofa Farms also offers educational workshops. These include beekeeping initiatives and an agricultural academy that benefits students.
We spoke to Bell about taking the plunge and growing tomatoes, plus the dynamics of giving back to the community. We also got the scoop on how a student helped introduce bees to Sankofa Farms.
Bell says he decided to pursue a farming life while working on his undergraduate degree in college. The potential to help his community in a direct way was a huge influence.
“I was sitting in my science class and looking at what my contribution to my community was,” he recalls. “I feel like it’s our duty to give back to people when we’re in a position to do so. We all have the capacity to give. I think that idea just stuck with me.”
Alongside feeding the community, the farm runs programs that target younger residents. “We have a youth academy, and we’re working with kids to educate them how to solve problems using agriculture,” explains Bell. “There’s a natural curiosity there, so it’s providing them with a platform to pursue that interest.”
The decision to add bees to Sankofa Farms originally resulted from student feedback.
“I was terrified at the time. But a student told me that if we got bees it would help keep him at the farm for a longer period of time,” says Bell. “So his curiosity … got us into bees, because I wanted to keep him engaged at the farm.”
Looking back over this year’s bounty, Bells says that he’s most proud of the tomatoes the farm produced.
“This was our first year, and I was fearful of growing them,” he admits. “But one of our farming mentors helped us out with the process and we were able to grow tomatoes this year.”
As for advice on growing tomatoes at home?
“Just make sure you prune the plants once a week,” says Bell.
There’s nothing more soothing than a hot cup of peppermint tea on a cold winter day. But this sweet and refreshing herb can be used to bring relief to sore muscles, too. It can also add a flavorful twist to your favorite meals.
Originally native to Europe and southern Asia, mint is now widely distributed around the world. Since hybridization between species can easily occur, it is difficult to determine exactly how many species exist. But it is estimated that at least 20 to 25 distinct species can be commonly found.
The most common mint, peppermint (Mentha x piperita), is a hybrid resulting from a cross between water mint (M. aquatica) and spearmint (M. spicata). It’s used as a flavoring in candies, toothpastes and beverages. It’s also included in some shampoos and soaps to add fragrance.
Spearmint is a common ingredient in both culinary and cosmetic products, as well. This species is one of the oldest recorded types of the herb, dating back to at least the first century.
Its use was mentioned by Pliny the Elder. References to spearmint can even be found in the Bible!
In the Kitchen
Enjoying a cup of mint tea is the easiest way to utilize this cooling herb in the kitchen. But the plant, specifically spearmint, is used as an ingredient in a handful of other well-known beverages including mojitos and mint juleps, a cocktail seemingly ubiquitous at the Kentucky Derby.
Mint traditionally accompanies lamb and poultry dishes, especially when crafted into jelly. It is also widely used in Middle Eastern and Greek cuisine. Try it in soups, salads and sauces or whenever you’re looking to add a fresh, bright flavor to your food.
The fresh herb is typically preferred to dried for cooking. Many chefs will keep a small pot growing on the kitchen windowsill to ensure that they always have a ready supply of the herb for their recipes.
Mint has a long history of use in traditional folk medicine and is considered helpful for a wide variety of ailments.
A simple tea brewed from peppermint leaves is an excellent treatment for stomach upset and digestive complaints. A tea made from the leaves is also considered to be an antipruritic. This means it’s useful as a topical wash to alleviate the itching and discomfort associated with sunburns, eczema, psoriasis and insect bites.
We can also use mint topically to relive sore and tired muscles. Simply infuse the herb in oil to extract its analgesic constituents. Then use this herb-infused oil to craft a pain-relieving salve or lotion.
Mint is easy to grow in all temperate climates. But due to its aggressive spreading nature, it’s often recommended to cultivate the plant in pots to help keep it contained. This herb spreads through underground rhizomes and can quickly take over an area once established.
This aggressive growth habit also makes for easy propagation through root division. All you need to do is dig up a chunk, separate it into clumps (each with some roots still intact), and replant. It’s just that easy!
Mint is a vigorous perennial that prefers moist, but well-draining, soil. It loves to grow near water. The plants thrive in full sun but also do quite well in partial shade.
Once established (which doesn’t take long at all), your mint patch will provide you with bountiful harvests that will add their cool and refreshing flavor to your life for years to come!
Celize Christy talks poultry keeping with Hobby Farms Presents: Growing Good host Lisa Munniksma. Listen in for her tips for homeopathic care for our home flocks and the secret to the brightest egg yolks. Hear about her work with poultry farmers in Uganda and Rwanda and her thinking on the intersection of livestock and livelihoods.
Through her work with Practical Farmers of Iowa, Celize organizes farmer-mentorship, land-link and Spanish-language farmer education projects, and she tells us how you can take advantage of these innovative programs.
As a people person who grew up without a farm background and felt the isolation of being unlike others in her early farming education, Celize has taken on the role of supporting folks not always represented in food and farming systems in her community work. She shares with us some success stories coming from small-scale farmers, women farmers and farmers of color in Iowa.
The day I dread every single fall finally arrived this week. Peeking through the blinds a few days ago, I saw a field full crystalline glimmers sparkling in the morning sun. Oh, sure, it looked very pretty. Pretty frosty!
My dramatic groan woke my husband, Jae. He turned away and pulled the covers over his head when he heard why I was upset. “This happens every year!” he grumpily reminded me from beneath the blankets.
Winter Woes
Autumn may be my favorite season. But as a Michigan poultry farmer, I can’t say that the sub-zero temperatures, bone-chilling winds and drifting snow it heralds are favorites of mine.
As much as I’m averse to winter, our chickens dislike it even more. During the winter months, our chickens rarely leave the comfort of their coops—I can’t blame them!—unless we physically take them out and plunk them down on paths we’ve snowblown for them. The ducks will venture out of their house, only to spend the day hunkered down in the snow.
Over the years, I’ve had to defrost duck wings, treat frostbitten chicken combs, and revive a seemingly frozen-to-death hen. Our family has learned that proper preparation at the first sign of frost paves the way for an easier winter for humans and birds alike.
This past weekend, the kids joined Jae and me in prepping our poultry farm for the weather to come. If you live in the northern United States and/or have a small or backyard flock, perhaps the steps we take can help prepare your birds—and you—for the months to come.
Ana Hotaling
Set Up the Winter Brooder
Our pole barn is home to a large wooden brooder that we use during the spring and summer for broody hens, baby chicks and injured birds. During the winter months, however, it is home to our more delicate breeds, the chickens we feel or know wouldn’t survive our severe winters.
In years past, the brooder has housed our Seramas and Japanese Bantams. For the past 10 years, however, it’s been winter quarters for our Silkies.
We adore our sweet-natured fluffballs. Their loose feather structure, however, does not help these bantams retain their body heat when faced with freezing temps. When frost arrives, our Silkies become snowbirds and move to the warm, cozy brooder. There they’ll stay until the temperature consistently stays above 40 degrees overnight, with occasional excursions to their run on those rare warm-weather days.
To prepare the brooder for winter, we completely scrub out the interior and line it with a heavy-duty tarp. Then we add 2 to 3 inches of flaked shavings.
Next come the freshly sanitized feeder and waterer, elevated on stands that Jae built to keep the chickens from kicking shavings onto their water and rations. We check that the ceramic heating panel we installed on the brooder wall directly behind the birds’ perch is functioning correctly, to keep the Silkies warm at night.
Finally, we hang a caged heat lamp with a fresh bulb over the brooder’s hardware-mesh food panel. We use this on those nights when the temperature plummets below -10 degrees.
Our Silkie flock spends a great deal of time in the brooder during the summer, hatching and raising chicks. So moving in for the winter is like coming home for these chickens.
Ana Hotaling
Put up the Winter Panels
Jae designed our smaller coops with hardware-mesh wall panels to allow for maximum ventilation during the spring and summer months. If we left these mesh walls uncovered during the winter, our birds would become chicksicles in no time.
Instead, when the frost arrives we cover the hardware mesh panels with exterior siding panels. These keep the inclement weather out and the birds’ body heat in.
The coops still have long mesh strips along the tops of the opposing side walls to allow for cross ventilation. This prevents the build-up of moisture within the coop during the colder months.
Once the danger of frost is gone in the spring, the panels come off and get stored until falls rolls around again.
None of our henhouses are equipped with electricity. During the summer, electricity is unnecessary. The coops’ vents keep the fresh air circulating and the birds spend most of their time outside.
During the chillier months, however, our coops need electricity to power the heated waterer bases we use to keep the chickens’ waters from freezing solid. We learned early in our poultry-rearing careers that we truly despised hauling five-gallon buckets of hot water out to our coops every winter morning to thaw out the waterers.
Our electric base heaters were a solid investment that keep the birds’ water from freezing. They also keep me and my son Jaeson from having to play the haul-and-thaw game every day.
The catch is that the waterer bases require power. When the frost hits, Jae runs heavy-duty outdoor-gauge extension cabling from our house out to the coops. The cables are woven through the run fencing to keep them off the ground and away from the coming snow.
Their connections illuminate at night so we can tell at a glance that the power is indeed on.
Ana Hotaling
Bring on the Shavings
Because the birds spend so much time indoors during winter, their litter becomes soiled much more quickly than during the summer months. We use the deep-litter method to help heat our coops naturally. So an important part of our winter prep is to stockpile sacks of flaked shavings.
We also put down more litter—about 3 inches instead of 1—to help insulate the coop floor against the chill. We used to carefully spread the shavings out in each coop, creating an even floor surface to help prevent bumblefoot. (This occurs more frequently during the winter.)
However, we stopped doing this after our second winter, when we discovered that the chickens would scratch and dig up the entire layer of shavings the moment we finished and left them alone. Now we’re not so exact with how we put down the shavings. And we sprinkle some scratch grains in so the chooks have something to find after all that scratching.
Other Tasks
None of these preparatory steps would amount to much if we didn’t make the basic repairs necessary to get our coops through the winter. We check each structure for drafts, putting down fresh caulk as needed.
The lids to our nest boxes take a beating from constant use throughout the year and are often ragged around the edges by fall. Jae replaces these battered lids with newly cut panels. He also cuts fresh perches if we discover that any are splintered.
The pop and human-access doors to each coop are also inspected to see how tightly they shut, since the last thing we want is a gappy door that for allow the cold, snow and predators access.
Last but not least, we check our feed storage containers. These are kept inside our pole barn. We’d rather not feed the chipmunks and other furries that bunk down in there for the winter.
If you live in a rural area with self-sufficient neighbors around you, chances are you’ll often hear the whining drone of chainsaws in the distance, felling trees and processing the timber into firewood. Perhaps you’re interested in purchasing a chainsaw and harvesting your own firewood as well. But chainsaws can do even more than that around your farm.
As an almost universal homesteading tool, chainsaws can help with pruning, take down unwanted trees, aid with storm cleanup and even find use in construction projects or farm fencing. (How else should you shorten a 6-by-6 post when you’re out in the far reaches of your property?)
Chainsaws can do all of this in addition to maintaining that all-important woodpile for the chilly winter evenings to come.
If you’re interested in getting onboard for all of the chainsaw fun, you’ll need to do a bit of research to determine the exact type of saw you need for your tasks. We’ll take a look at the two major classes of chainsaws (gasoline and electric), as well as some other important factors when it comes to shopping for the chainsaw that will be the workhorse of your property for years to come.
Gas-Powered Chainsaws
This is the traditional type of machine that everyone thinks of when they hear “chainsaw,” and there is a lot to be said about them.
Positives
Heavy Duty
Gasoline-powered chainsaws are strong machines, capable of revving up quickly and putting out a lot of power in a hurry. This is partly because two-stroke engines, which—pound for pound—deliver more power in a lighter package than four-stroke engines, drive them.
Two-stroke engines aren’t as fuel-efficient as their larger four-stroke cousins. But it’s a necessary trade-off to keep the chainsaw at a manageable weight.
Power for All Day
Gasoline chainsaws are a necessity for professional loggers and landscapers. And they’re important for any homesteader who owns a woodlot or processes their own firewood.
The reason is that gasoline chainsaws can truly last as long as you can—even all day if needed. As long as you have fuel on hand to keep filling the tank, your saw won’t let you down.
Versatile
You’ll be able to find a gasoline chainsaw in just the right size and engine power you need for the job.
All things being equal, your gasoline chainsaw needs more upkeep than an electric chainsaw. It’s nothing that a confident DIYer can’t handle. But you do need to know how to mix a proper fuel/oil ratio for the two-stroke engine, change the occasional spark plug, and clean the fuel and air filters.
Electric chainsaw maintenance is limited to things such as managing chain tension and sharpness.
Loud
No question, gas-powered chainsaws make a lot of noise, and you’ll need proper ear protection rated to the decibels that your machine puts out.
Weight
A serious gasoline chainsaw with the power and length to tackle big projects is a heavy machine that can be fatiguing to use after a while.
Expense
Initially, the cost of a gasoline chainsaw is higher than some electric versions.
Electric Chainsaws
Electric chainsaws are another viable option. While some of these models are tethered with a power cord, the advent of strong and long-lasting lithium-ion batteries have made cordless electric chainsaws a possibility as well.
Electric chainsaws have some very good positive benefits, and few downsides as well.
Positives
Clean
Electric chainsaws don’t emit exhaust, so they’re a bit more environmentally friendly (at least locally) than two-stroke gas chainsaws. You won’t see or smell chainsaw exhaust in your immediate vicinity while using an electric version.
Easy to Use
While it’s not particularly difficult to start a properly-maintained gas chainsaw, electric chainsaws are easy to start. There is no cord pulling, no primer bubble nor a choke switch. Just attach a battery (or cord), and flick the switch.
Lightweight
A heavy-duty gasoline chainsaw is also heavy to hold and use. Electric chainsaws are generally smaller and lighter, good for beginners or for long periods of easy work.
Good for Light Work
Speaking of easy work, electric chainsaws are great for pruning, trimming, cutting small logs and doing light construction jobs.
Quiet
Well, perhaps quiet is too strong a word. “Quieter” might be more appropriate. But electric chainsaws definitely make less noise than gasoline models.
Daniel Johnson
Negatives
Limited Run Time
Lithium-ion batteries aren’t inexpensive, so you likely won’t have more than a couple on hand. And when the batteries are exhausted and you don’t have another one to swap out, you may find yourself waiting on charging times before you can complete the job.
Corded versions can eliminate this, but then you have limited mobility.
Less Power
You’re probably not going to be hiking to the woodlot and felling large trees with an electric chainsaw. And you won’t be processing a winter’s worth of firewood or doing heavy construction work with an electric. There just isn’t the horsepower for those types of jobs.
Even after you’ve decided on the type of chainsaw, you still have some shopping decisions to make.
Bar length
The bar is the part of the chainsaw that the chain rotates around. Its length dictates (to some extent) what jobs the chainsaw can do.
For major tasks involving felling trees and cutting through large logs, look for a bar length about 16 inches or longer. Professional chainsaws may reach well past 20 inches in length.
For a smaller, more general-use chainsaw that can still handle the occasional tree or log, perhaps something around 12 to 14 inches will get the job done for you. Anything shorter than that puts you firmly in the pruning/shrub category, and you might seriously look at an electric chainsaw in that length.
Your chainsaw’s bar should be at least 2 inches longer than the width of your log or tree. So to safely manage a 10-inch log, it would require at least a 12-inch chainsaw. The chainsaw’s power rating and bar length tend to go hand in hand.
Engine Power
The power of a gasoline chainsaw is often measured by a “cc” rating, which stands for “cubic centimeters” and refers to the volume of space the piston displaces. Generally, the higher the cc rating, the more power the engine has.
For light-duty chainsaws, about 32 cc is adequate. For the average homesteader, a 45-to 55-cc engine may be adequate. Pro models may feature engines as high as 65 cc.
Motor Power
For electric chainsaws, volts and amps are important factors for comparison and work in tandem to determine the saw’s capabilities. As with a cc rating, “more is better” certainly applies here.
Another key shopping point for electric chainsaws is the amp hour rating of the battery. This key measurement determines the capacity of the battery and how long it can run between charges.
And if you can afford an electric chainsaw with a brushless motor, go for it! The brushless motor may help reduce friction and give your saw an extra edge.
In the end, the type of chainsaw you select will primarily depend on the type of work you intend to do with it. In fact, there’s a good chance you’ll want more than one! For example, a working setup might include:
a solid, hardworking gas chainsaw in the 45-cc (or higher) range for serious homesteading work, with a bar perhaps 14 to 16 inches long
a handy electric chainsaw on hand for quick and light jobs
a pole saw as something of a supplemental chainsaw to tackle the hard-to-reach places but not as a substitute for the other two
Remember to always stay safe with your machine. Follow the manufacturer’s guidelines and wear ear, eye, head, hand and limb protection (your limbs—not the tree’s!).
Understanding how the saw works is key, as is the knowledge of how trees and logs react under different circumstances—a branch under tension, a leaning tree or a log laying over a hump or across a depression. You can’t be too careful, and you’ll enjoy years of productive and safe work on your homestead with your new chainsaw.
More Information
Basic Chain Maintenance
Besides maintenance for the engine or batteries, all chainsaws need some general care to keep their actual chains cutting like new. You’ll want to check the chain’s tension frequently, and sharpen or replace the chain when it becomes too dull.
If you don’t, the machine’s performance will begin to suffer.
Try not to saw into the ground, as this can rapidly dull the blades! You’ll also need to keep the chain lubricated (this oil is in a separate reserve from the fuel). For pruning purposes, you might try a vegetable oil-based chain lubricant that is healthy for living trees.
Pole Chainsaws
Standing 8 feet high on a ladder while trying to balance a chainsaw—and yourself—is a very bad idea. Instead, opt for a pole chainsaw for hard-to-reach branches.
Daniel Johnson
Pole chainsaws are also available in electric or gasoline models, and typically feature a fairly short bar (often less than a foot long). They generally don’t have the power of a standard chainsaw, but they can get through branches for easy and safe trimming.
Keep both feet on the ground and let the pole saw do the heights!
This article originally appeared in the September/October 2021 issue of Hobby Farms magazine.
Winter is rapidly approaching on my northern Wisconsin farm, which means it’s time to start prepping my young fruit trees for the coldest months of the year. While they’re busy dropping their leaves and heading into winter slumber, I’m busy strengthening their protective perimeter deer fence and—just as importantly—wrapping their delicate trunks with tree guards.
Installing tree guards is an important step to protect the trunks of your trees from winter girdling by hungry critters—rabbits, mice, voles, etc. It’s disappointing to see a beautiful tree you’ve carefully tended emerge from winter with potentially fatal bark damage. To avoid this upsetting possibility, installing tree guards on young fruit trees is a high priority on my annual winter prep checklist.
Tree guards come in a wide variety of styles and materials, and some are more suitable for specific needs than others. But for the purpose of protecting in winter (when the trees are dormant and not adding girth to their trunks), I’ve found that a combination of corrugated plastic guards and versatile cloth wraps serve my needs perfectly.
Corrugated plastic guards are effective for guarding branchless portions of the lower trunk. They are tough and durable—no critter is going to chew through the plastic, at least not easily!
They’re also fast and simple to install. This is useful if you’re wrapping dozens of trees on the last nice day before a giant snowstorm. Been there, done that.
Cloth Wraps
Cloth wraps might not present quite as formidable a barrier against hungry critters. But they’re useful for wrapping portions of the trunk from which branches are growing.
The cloth wraps I use come on rolls and measure about 3 inches in width. Io installing them requires wrapping the cloth in overlapping spirals up and around the trunk. This means you can leave small gaps in the wrap coverage to let branches through, allowing you to protect most of the trunk while still accommodating branches.
For young trees with branches very low to the ground, this is a helpful alternative to corrugated plastic guards.
It’s also possible to wrap curving branches with cloth wraps. Ever since one of my young apple trees suffered sunscald on the south sides of its branches one winter, I’ve taken to wrapping the lower portions of its main branches with white cloth.
I do this in order to reflect sunlight and protect the delicate bark. So far, I’ve been happy with the results—no more sunscald!
But whether you use corrugated plastic or cloth guards on your tree trunks, you’ll need some way to secure them in place. For this purpose, I’ve taken to using black electrical tape. It seems to hold its stickiness well over the course of winter.
Everyday packaging tape, I’ve discovered, is more likely to let loose when faced with winter weather.
Even short strips of black electrical tape tend to stay in place when adhered to plastic. To be on the safe side, though, I wrap long strips all the way around the tree guards so the tape can seal back over itself. This forms a complete loop that rarely gives way.
I’m happy to say my fruit trees are already wrapped for the coming winter. I’m confident my efforts will protect them from hungry critters. Now I’m just counting down the days until spring blossoms emerge!
Run-in shelters, also called loafing sheds, are great for livestock, especially horses, that spend most or all of their time on pasture. With the weather turning cold and wet in many parts of the U.S., it’s not too late to get your run-in shelter in tip-top shape for your animals with the following considerations.
Clean Out
Depending on how often your animals use your run-in shelter, the space can fill with manure and old hay. In preparation for potentially heavy use in colder, wetter weather, give your run-in a thorough clean out. Toss soiled substrate and take a good look at the foundation.
Has there been uneven wear?
Are there indications of drainage issues?
Any holes, ruts, or other damage?
Also examine the bottom of the walls of the structure once debris has been cleared away. Are there any sharp edges that need to be fixed or loose panels that could snag a hoof?
While you likely shouldn’t have to get on top of the run-in shelter, take a good look at the roof from the inside.
Are there signs of leaks?
Is there any light peeking through, indicating cracking?
From the outside, does anything appear loose?
Depending on the design, many run-ins do not have gutters. But if yours does, when was the last time they were cleaned? Are there trees near by that would contribute leaves or blown branches?
In wet weather, observe where and how the rain runs off the roof. If it pools excessively in a certain spot, consider installing a downspout to divert the run off or a rain catcher to inhibit the creation of large pools that will convert to icy patches when the temperature dips.
Space Check
Has the size of your herd grown recently or since the last time a run-in was used? If animal numbers have increased, evaluate whether they will all have space in the run-in at the same time.
Space requirements in a run-in aren’t as large as for a barn and depend on the species. Talk with an agricultural extension agent if you’re concerned about spacing issues for your particular needs.
Wall Check
From the inside of the run-in shelter, look for any popped nails or screws. Is there any brittle or broken siding? Splintered or cracked wood?
Bring a hammer or drill and tighten down anything that looks slack. Weather from the outside and the rustle of animals on the inside can easily turn a mildly loose board into a broken or missing board in no time.
Electric Check
Many run-in shelters are simple structures without water or electricity. But if yours has lights or heating elements, double check the wiring.
Frays, chew marks, long and dangling wires, or anything else out of the ordinary should be repaired before heavy use in the winter.
Now’s the time to tear down those old fly strips from the summer and check for empty hornet nests. Clean these out now so you don’t have to worry about them in the spring. Also take a peek for rodent issues as well as termite damage.
Obstacle Check
Is your run-in shelter near any trees with branches that may potentially fall in strong wind or with ice? Are there any trees that may need trimming before the weather turns? Is there anything that may get in the way of reaching the run-in on foot or via vehicle?
Making sure animals and humans have easy access to the shelter in all kinds of weather can ensure your herd has the protection it needs this winter.
Growing sweet potatoes a colder-climate garden requires some attention to detail. This food plant is popular in Polynesia where the temperature and humidity of summer helps it yield copiously and cure generously. Likewise, production in the U.S. is primarily in more southern states.
This delicious tuber is actually native to tropical South America. And its journey to Polynesia (way before the “Age of Discovery”) is something of a delicious mystery!
In the American Northeast, Europe, Canada and more temperate climates, we must mimic the conditions this tuber enjoys. Specifically, sweet potatoes require heat and moisture all season. If we provide this, the plants will generate the quantity and quality we need for sweet potatoes to grow as a steadfast crop in the garden or on the farm.
First, like many crops whose days to maturity is longer than the average frost-free period in your region, you should transplant sweet potatoes. Sweet potato “slips” can be produced from pieces of last year’s garden harvest or purchased from a nursery that grows out these starts.
A potato is grown from pieces of last year’s tuber, cut to have a minimum of three “eyes.” But a sweet potato slip is a shoot that sprouts from the original sweet potato tuber. This shoot can be transplanted into a 3-inch pot and grown out to be a transplant.
You should plant sweet potato slips in the garden after the last frost date has passed. Plant sweet potatoes in raised beds with good drainage and rich, well-worked soil.
Crops that yield below ground need loose soil to grow in. If the soil is loose, the potatoes will grow to be more uniform in shape. Sweet potatoes can grow to look like every organ in the body if the conditions are not right! Some of these shapes can be quite hilarious.
Zach Loeks
Planting Out
We plant our sweet potatoes in raised beds with two runs of drip tape on either side of a single row of plants. We plant the slips about 20 inches apart in our 48-inch Permabeds.
The vines will fill the entire bed and path, so we use Alternate Maturity Patterning (a method I detail in my book, The Permaculture Market Garden) to ensure the beds adjacent have early maturing crops that won’t be in our way come harvest time.
Next, we cover each side of the bed with weed barrier up to the row of plants. This will preserve moisture and provide heat. We use this zipper bed technique instead of planting them in plastic mulch. It allows us to keep the weed barrier intact (without cutting holes) and reusable for many crops over many years.
We enjoy the added heat, moisture retention and weed suppression this provides. With so many jobs on the farm, this is a win in a northern climate.
Zach Loeks
Frost Signals Harvest Time
Using floating row cover can also help to keep frost away and add extra heat in the early season.
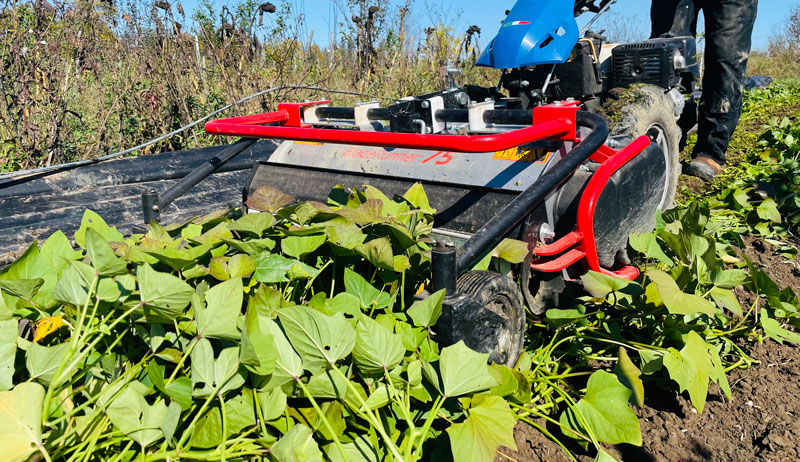
Harvest sweet potatoes from the garden when the threat of frost is imminent. We pull back the weed barrier, pull out the drip tape, then mow the sweet potato leaves with a flail mower on our walking tractor.
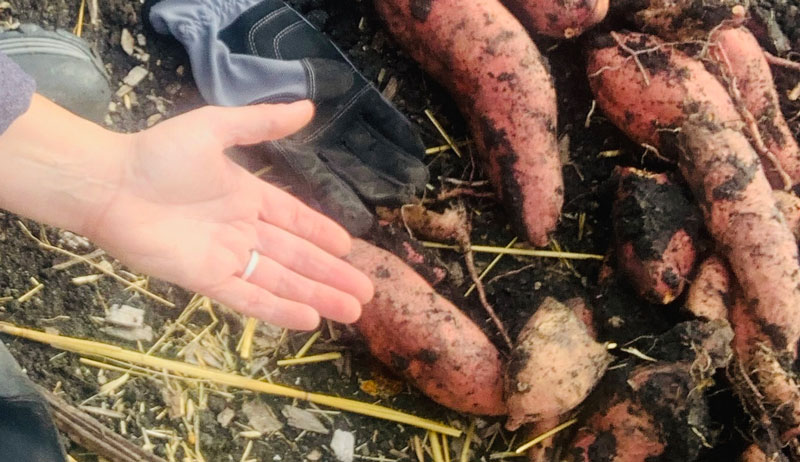
Next, we start digging. Use a garden fork, but start far out from the center of the planting to avoid cutting and breaking the tubers. That being said, most cuts and nicks can be cured properly ,and these tubers will still store decently. After curing they will be much firmer.
If some didn’t make the cut (soft or rotten), you should toss these.
Zach Loeks
Curing Sweet Potatoes
Curing sweet potatoes requires high humidity and high temperatures. One method is to put them in a humid greenhouse in harvest crates and cover them with weed barrier.
We increase the humidity by running a hose underneath the weed barrier, placing the crates on top of this weed barrier. Then we run another layer of weed barrier over the crates. It’s similar to how gardeners will often grow leafy vegetables in reusable grocery bags with holes punched in them. Placed in a sunny location, the plants enjoy a kind of greenhouse effect.
Primary curing takes about two weeks at 85 degrees F and 90 percent relative humidity. Further curing occurs by keeping the tubers at about 55 degrees F for an additional five to six weeks.
Once fully cured the sweet potatoes will store up to six to eight months in a cool, ventilated and dark space with about 50-60 percent relative humidity. A pantry situation works well, as would a drier root cellar.
In addition to winter storage, curing also helps make the sweet potatoes “sweet.” A sweet potato eaten fresh from the field isn’t actually all that tasty. But wait, be patient and enjoy the sweet treats all winter!
This is the quickest and easiest applesauce recipe you’ll ever make. It’s a unique fermenti-twist to the classic canned version and has the added benefit of probiotics. Be sure to blend up a quick batch of fermented applesauce before apple season is over.
Yield: 1 pint
Fermented Applesauce Ingredients
3 organic small apples (about 3/4 pound), cored and rough chopped
1/8 tsp coarse kosher salt
1/2 tsp ground cinnamon
Put the apples chopped in a food processor and puree until smooth. It’s up to your personal preference to leave skins on or remove them before pureeing. Removing the skins, though, will result in a silkier applesauce.
Transfer the pureed apples to a clean pint jar, leaving at least a 1/2-inch of headspace (room from the puree to the rim of the jar). Stir in the salt and cinnamon. Mix well.
Wipe off the rim of the jar with a clean dampened towel. Add the canning jar lid and tightly screw on the ring.
This is a short 3-day ferment. Ferment at room temperature, ideally between 60-75 degrees F (15-23 degrees C) and keep out of direct sunlight. The cooler the space, the slower the process of fermentation will happen.
Burp the jar daily. Just unscrew the lid briefly and tighten it back on to allow any built-up gas to release.
After 3 days of fermentation, taste test the applesauce to make sure it has reached a fermented flavor of your liking. If it still tastes raw, allow it ferment another day or two. Then taste test again.
Once the ferment has reached an ideal flavor, transfer the jar into the refrigerator.
Fermentation does not stop once the ferment is transferred to the refrigerator. It does, however, slow the process way down. The taste and texture will continue to change.
This fruity ferment is best enjoyed within 2 weeks.
Feel free to omit the cinnamon for a plain flavor for your fermented applesauce. Alternately, feel free to add 1 tsp of raw honey for a sweeter version, or a tsp of lemon juice for a more acidic blend.
Any variety of apples will work for this recipe.
Feel free to sub sea salt for kosher salt.
This recipe has been adapted from Can It & Ferment It with permission from Skyhorse Publishing, Inc. Find more recipes for apple preserving in Stephanie Thurow’s other books, WECK Small-Batch Preserving and WECK Home Preserving.
Oysters make a perfect reward for the novice forager: They’re easy to spot and identify, and they taste great, too. You may be able to find cultivated oyster mushrooms at your farmers market and get a good look at them before foraging for wild ones.
When a friend wanted me to teach him to forage, we walked across the road from his property into some woods. Less than 50 feet in, oysters greeted us on a big fallen beech tree. We grabbed double handfuls to bring home and spent more time preparing and eating them than we spent foraging.
You may not always find oysters so quickly, but they’re very common in the woods.
Most edible mushrooms grow on the ground, where they may be small, few in number, obscured by leaves and difficult to find. An oyster mushroom, on the other hand, may only be a few inches across, but oysters often grow in clumps the size of a soccer ball. And they’re up off the ground, making them among the easiest mushrooms to find.
Feasting
This one is gourmet, though unfortunately, oyster mushrooms get their name from their appearance, not their taste or texture. The dense, white flesh has a straightforward mushroom flavor, although some people detect a mild licorice scent on the fresh ones. My wife isn’t fond of the texture of mushrooms generally, but I found a cooking method that had her asking for seconds of oyster mushrooms.
Oysters can be dried and stored in jars, but their reconstituted texture can sometimes be leathery. More reliable results can be had by cooking and then freezing them. Don’t thaw. Just throw them into a hot skillet.
Farming
Perhaps the easiest mushroom for novices to grow, they can be grown on coffee grounds (the heat has sterilized the substrate!) in a bucket in the kitchen.
Some Crepidotus species, such as C. applanatus, look somewhat similar but are smaller, have no stem, appear often as individuals, and have a brown spore print. Angel Wings (Pleurocybella porrigens) are thin and white, but grow on conifers. Neither look-alike should be eaten.
Two lookalikes to avoid: Pleurocybella porrigens (left) and Crepidotus applanatus (right) (RandyBjorklund/Shutterstock; BarboraBatokova/Stockadobe)
More Information: Know Before You Eat
What, Where & When
decomposer on live or dead deciduous trees, standing or fallen
clustered, overlapping rows
white to pale lilac spore print
throughout North America
Oysters grow year-round, even in snowy winters. In warmer weather they grow fast, get buggy, and pass their “harvest-by date” pretty quickly. So best harvested in cooler weather.
Field ID Checklist (all must be correct)
They project out from a deciduous tree trunk or stump.
Caps the size of your palm to fully outspread hand, sometimes larger.
Each individual mushroom overlaps two mushrooms below it, like shingles on a roof.
Gills continue along the stem.
Gills are white.
Stubby stem doesn’t rise to meet the center of cap as with most gilled mushrooms; it comes off from the side.
Smooth cap color ranges from bright white to gray to brown, making them stand out from the darker bark of the deciduous trees they grow on.
This excerpt from Frank Hyman’s How to Forage Mushrooms without Dying originally appeared in the September/October 2021 issue of Hobby Farms magazine.