Poison hemlock, poison ivy and other nuisance plants have been gaining ground over the last several years. In some cases, they’re also becoming more potent. “As the climate is changing, there’s a lot of change in migration of where a particular plant will grow,” says Dr. Lewis Ziska.
Ziska is an associate professor in Environmental Health Sciences at Columbia University’s Mailman School of Public Health. He’s also the author of Agriculture, Climate Change, and Food Security in the 21st Century: Our Daily Bread. “I look at the plant biology parts of climate change,” he explains. “That’s everything from pollen and allergies to poison ivy to pesticide use.”
He continues, “Poison hemlock tends to grow in open, sunny areas, fields, vacant lots and so forth. So, it’s fairly common—particularly in disturbed areas.”
If poison hemlock follows the path that other opportunistic, invasive species have lately, it will likely head northward. In part, that’s due to warming temperatures.
However, increasing disturbances to our landscapes from wildfires, flooding and other extreme weather events also contribute to the problem.
“If it’s a natural disturbance like a hurricane that goes through and removes all of the normal vegetation, that provides an opportunity for these species to come in,” Ziska says.
Extra Poisonous Ivy?
Besides warmer temperatures and more landscape disturbances, climate change is bringing rising carbon dioxide levels, too. In some cases, that boost in CO2 has affected the toxicology and chemistry of certain plants, including poison ivy.
“With poison ivy, the primary chemical that causes contact dermatitis—rashes—is urushiol, which is an oil that poison ivy produces,” Ziska notes. “Urushiol basically binds with your skin cells and turns them into a foreign body that’s recognized by your immune system as being foreign. Because it’s recognized as being foreign, your body starts to attack it.”
“We’ve seen that poison ivy urushiol can be affected by rising CO2,” he adds. “We think it’s related to what’s called a ‘resource use hypothesis.’”
In other words? “If you provide something in the soil or in the air that’s essential for the plant to grow, then the plant will adapt to that change,” Ziska says.
“So, for example, if I add a lot of nitrogen in fertilizer to my backyard, then you’ll see the plants will start producing chemicals that are high in nitrogen. It’s just their way of being able to utilize that additional resource.”
And when you add more carbon to the air? “Urushiol and other compounds that are high in carbon tend to go up,” he says.
According to Ziska, there’s a flip side to all that extra carbon. “[Plant] compounds that require a lot of nitrogen—such as proteins—may start to go down,” he says.
That means important dietary staples like rice and wheat could lose some of their nutritional value. To try to mitigate the problem, crop scientists could try selecting for crop varieties that don’t exhibit strong declines in protein. Planting a wider variety of crop types could also make a difference.
Closer to Home
More noxious weeds increasingly may take hold, but you can protect yourself and your homestead. For smaller properties, you can conduct regular walk-throughs. For much larger areas, you may want to map what’s growing with the help of a drone.
“You basically want to keep track of how the demographics are changing in your plants,” Ziska says. “If you see something new that you’ve never seen before, there’s software online now that you can use to identify it.”
Once you’ve identified any new arrivals, you can get a better sense of the risks it may pose to you, your pets and any livestock.
“Keeping an eye on what is coming in and how it comes in is, first and foremost, the most effective means of making sure that these things don’t get established,” he adds.
A Competitive Field
You’ll likely notice that some parts of your land are more vulnerable to opportunistic weeds than others. “If you have marginal areas that are prone to flooding and that constantly get disturbed, that’s where you need to look out,” Ziska says.
And, possibly, install a rain garden. That’s because areas with healthy, established plants are much less vulnerable to weedy takeovers.
The bottom line? “With greater disturbances associated with climate change, they’re going to provide greater opportunities for these kinds of opportunistic weeds to become established,” Ziska concludes. “Vigilance is key to fighting that.”
Earlier this year, product shortages were showing up across the supply chain as the COVID-19 pandemic continued to interfere with shipping, demand, supply and many other areas of the global economy. Chicken, whether it be at the grocery store or on the menu at a fast-food restaurant, is in short supply. This drives up prices and causes a general difficulty in meeting demand.
To compensate, some restaurants have even taken meals such as chicken tenders off the menu entirely.
In addition to the supply shortage, many Americans have undergone a change of perspective brought about by long months in quarantine. With the idea of circumventing shortages, the extended months in isolation saw numerous Americans planting a garden, some for the first time. Others looked to begin or refresh their skills in raising meat animals.
Raise Your Own Meat Chickens
The combination of the two issues has made a shortage of chicken a very real issue. In short, there has likely never been a better time to learn chicken processing for yourself.
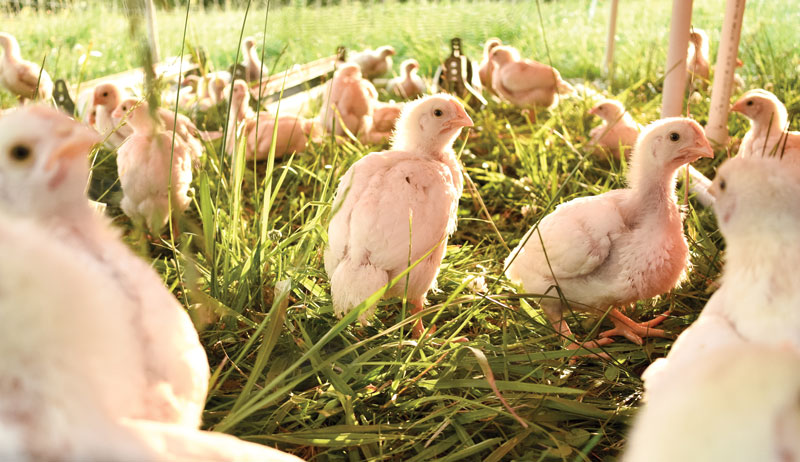
However, long before the pandemic began, producers John Kolenda of KC Farms and Greg Nance of Sweet Grace Farm raised their chickens to supply meat and eggs to family, friends and others. Kolenda shares his method of how to process chickens while Nance weighs in on packaging.
Before the process even begins, Kolenda first advises to select male chickens in a sexed batch, if possible. Straight-run, also known as mixed batches, will also work. But female birds typically don’t produce as much meat.
Secondly, to avoid having feces or food in the digestive tract at the time of processing, withhold feed for approximately eight to 12 hours before beginning. Nance sells his live birds before processing for an exercise more about processing birds with a friend than selling the bird after it has been processed.
Both producers recommend watching one or more chicken processing videos to thoroughly familiarize yourself with the techniques you’ll be using during processing.
Processing cones mounted on a wood frame. Purchase the size appropriate for the bird you’ll be processing and a sufficient number to accommodate the number of birds you’ll be working with.
Knives. You’ll need at least two—one for use by the killing cone(s) and one for your processing table.
Knife sharpener
Two (2) 30-quart boiling pots with lids, one mounted on a gas burner for use during processing. The second pot will be used for packaging.
Thermometer
Rubber glove
Chicken-plucking machine or drill attachment. This is optional, as plucking can be done by hand, but extremely useful.
Pliers for removal of any remaining feathers missed by the chicken plucking machine
Processing table with sink
Strawberry corer or another gutting tool
Poultry or meat shears
Three (3) 5-gallon buckets for feet, livers, hearts, guts
Two (2) large coolers. Fill one with water and some ice for rinsing the processed bird and bringing down its temperature. The second, fill with mostly ice to further reduce temperature. The coolers also keep the processed birds from spoiling until packaging begins.
Poultry shrink wrap bags
Zip ties
Pro Tips
Set up near sources of electricity and water that are also easy to clean up.
Grassy surfaces or concrete pads work best.
The thickness of each bird’s feathers and skin will determine how often you need to sharpen your knife blades. A good rule of thumb is to do so at the first sign of difficulty in making a quick, clean cut.
As you may not wish to process chickens outdoors in cold weather, time of year plays a role. Cornish and Cornish-cross chickens grow out in around six to eight weeks. Order your chicks so that you’ll be ready to process on days with comfortable temperatures.
Chicken Processing: Step 1
After securing the bird by the feet, place it upside down in the processing cone. You may need to hold the body of the bird with your left hand while using your right hand to gently pull and position the head and neck through the opening at the bottom of the cone.
Chicken Processing: Step 2
With one hand holding the head make the incision directly behind the ear, cutting about halfway through the neck. Birds with heavier feathering or thicker skin due to age may require more pressure from the knife. Once the incision has been made, pulling and placing downward pressure on the head and neck will result in a faster bleed out.
To speed up the process, a second incision may be made on the opposite side of the neck. Bleed out takes only minutes. For example, if processing four birds at a time, your first bird will typically be finished by the time you complete the fourth.
Pro Tips
To expedite the process, move your knife along with you from station to station.
Start water to boil before processing begins. Your thermometer can help you to make sure that you are maintaining the correct temperature. You can add cold water to reduce the temperature of the water that has gotten too hot while a lid can help keep the temperature steady. More expensive thermostatic systems can also be used that keep the water at a constant temperature.
Pull the bird out carefully so as not to allow the water to extinguish your flame.
Chicken Processing: Step 3
Grasping the bird by both feet, lift it up and out of the processing cone. With a gloved hand to protect against the hot water and steam, dip the carcass approximately three to four times into the 30-quart boiling pot.
The ideal temperature is 150 degrees F. A water temperature of 130 degrees will take longer for the bird to reach the plucking stage.
Temperatures above 150 degrees will damage the bird’s skin. While still edible for the family, birds with damaged skin may not be suitable for resale. You will know that your bird is ready when you can easily pull out a few wing feathers.
Chicken Processing: Step 4
Transport the carcass by the feet to the chicken-plucking machine. Once the machine is on, periodically add a small amount of water.
Hope Ellis-Ashburn
After just a few minutes in the machine, the bird’s feathers will be almost completely removed. Birds that don’t defeather well can be dipped back into the hot water and run through the machine a second time.
Sometimes the machine will break the bird’s legs. As with any skin-damaged carcasses, these birds are often better suited to piecing up for family consumption rather than selling as whole birds.
PRO TIPS
Feathers will need to be periodically cleared from the machine to avoid clogging it.
Any feathers that remain on the carcass once the bird has cleared the machine can be plucked by hand using a pair of pliers.
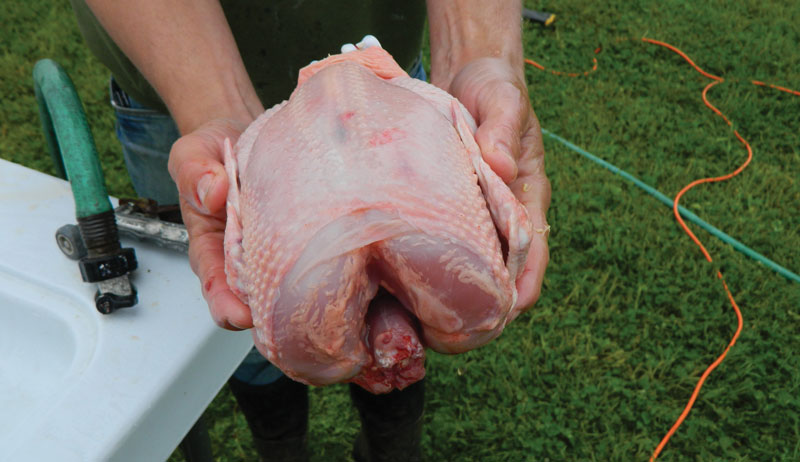
Chicken Processing: Step 5
Lifting the bird by the feet, carry it to the processing table. The first step in processing involves using a sharp knife to remove the feet. For the ideal cutting location, use your thumb to search for the valley located between the foot and the leg.
If desired, discarded feet can be placed in a separate bucket for later dehydration and use as dog treats.
Use poultry shears to remove the head and neck. For ease of packaging, cut the neck as close to the body as possible. You can, if desired, save the neck for stock.
Hope Ellis-Ashburn
Place both index fingers inside the hole created by the removal of the neck and head. Pull in opposite directions to allow for the widening of the hole. This will aid in the location and removal of the esophagus and windpipe.
Using your thumb or thumb and finger, dig up under the windpipe and pull until it pops loose, allowing for ease of removal out the back of the bird. Repeat the process for the windpipe and crop.
These organs are slimy and can be difficult to work loose.
PRO TIP
Sharpen your knife as often as necessary to achieve ease of cutting between birds.
Next, use the palm of your hand to press down on the breast of the bird to make the skin in this area tight. Use a sharp knife to make a small slit directly below the vent. Be careful not to cut too deep. You could pierce and cause leakage from the intestines or other organs located here.
As with the neck incision, insert both index fingers on the top and bottom of the incision, pulling in opposite directions to widen the hole. When the hole is wide enough, insert your hand using a scooping motion to secure the innards in your hand, then pull back out of the hole.
You may need to repeat this step more than once, cutting the organs free with a knife once they are out of the bird.
Remove the tail using a sharp knife. Then check for any remaining internal organs such as the heart and lungs. The strawberry corer is an excellent tool to peel organs away from the ribs and aid in getting those remains out the back of the bird.
Finally, use a hose to rinse out the gutted carcass. For presentation purposes, you can make a slit in the extra skin at the back of the bird and use it to secure the feet.
Hope Ellis-Ashburn
Chicken Processing: STEP 6
First place processed birds in the cooler containing mainly cold water with some ice. As this cooler becomes full, the first birds processed can be moved over to the cooler containing mostly ice.
Packaging
Once all of the birds have been processed, it’s time to bring them indoors for packaging. A pot of similar or identical size to your scalding pot works well. The water temperature should be brought up to around 200 degrees and can safely exceed this temperature until it reaches the boiling point.
Before packaging, giblets can be bagged or wrapped and placed inside of the bird’s body cavity. Then, the entire bird is placed inside of a shrink-wrap sleeve or bag. Once bagged, twist the wrap tightly to remove as much air as possible.
Dip the bagged bird in the scalding water, which allows the wrap to shrink to fit the bird. Next, zip tie the twisted end to seal the bag closed.
Once packaged, the bird should be weighed. Record this information, along with the date processed, on a label attached to the wrap. Selling prices will vary by region, but Nance sells his for around $3.95 per pound.
cost considerations
Pricing the birds for profit can be a struggle. “Chicks cost around $3 each after you pay for shipping,” Nance says. “Once the chicks are home you can expect up to a 10 percent loss.
“Then there is keeping them warm, fed, watered and clean for about four weeks in a shelter, then relocating them to a field in a chicken tractor, continuing feed, water and moving the tractor daily for the next four to five weeks, keeping predators away, etc. It’s quite an investment.”
This list doesn’t take into consideration the cost involved with killing and processing.
Making use of the entire bird was an important factor for both producers. Chicken feet, for example, can be dehydrated and fed to dogs. Necks make good stock. Organs get composted for use in the garden.
With practice, processing a chicken takes less than 10 minutes from start to finish. Despite the work and costs involved, it can be a fulfilling exercise in self-sufficiency in which the entire family can take part.
This article originally appeared in the September/October 2021 issue of Hobby Farms magazine.
As the golden-auburn foliage of fall starts to color our landscapes, we chicken owners turn a sharp eye towards our coops. We know that, when the leaves begin to fall, frosty weather isn’t too far behind. Here in southeast Michigan, for example, we’ve already dropped to 39 degrees F at night despite sunny days in the high 60s/low 70s.
Those of us with sturdy, insulated coops know that our winter preparations might involve some quick repairs. Perhaps they need a bit of caulking and some fresh bedding, and we’re good to go.
Unfortunately, not all coops are created equal. Many eager newcomers to chicken keeping purchase ready-to-assemble coop kits online or at farm-supply stores. The building blocks of these coops are typically pressed wood, plastic or thinly cut softwoods. These lightweight materials are easy to handle and inexpensive to ship.
The resulting coops can be quite attractive, practical and perfect for housing birds during the warm spring and summer months. When it comes to standing up against a brutal, snowy winter, however, prefab poultry houses offer minimal protection.
If your flock inhabits a kit coop, don’t panic. There’s plenty to do in order to make your choice of chicken housing habitable during the snowy months. This week, we’ll examine the steps you can take to shore up your henhouse’s nest boxes, ceiling, floor and location.
Location, Location
Even the best-insulated home loses some heat during the winter months. Put that lost heat to use by moving your kit coop as close to your house as possible (check your local ordinances for any distance restrictions).
Heat emanating from your house help keep your coop warmer during the winter than if it were out in the open. And the actual building itself will also help block gusting winter winds and snow, further protecting your coop and the flock within.
Another option for those who have large garages, sheds or pole barns is to move the kit coop completely within one of these outlying structures for the duration of the cold season. Drawbacks to this include limited air flow and the potential to attract mice and other vermin. Also, there’s the mess of dust, feathers and droppings that will await your clean-up in the spring.
But this may be a small price to pay for the security of knowing that your birds will be out of the direct cold during the year’s chilliest months.
Most nest boxes on chicken coops, whether they’re assembled from a kit or are custom built, extend outward to avoid taking up the coop’s limited interior space. Because of this, cold air strikes them on all three sides as well as on the bottom.
If that isn’t bad enough, because nest boxes attach to the main coop, they are often constructed of materials that are lighter—in other words, thinner—than the rest of the structure. As a result, nest boxes are often the coldest part of the coop.
You’ll therefore want to discourage your birds from bunking down inside a nest box. This could be potentially life threatening for a solitary bird on a sub-zero day.
The Blanket Solution
To do so, hang an acoustic blanket (also called a soundproof or noise-dampening blanket) so that it blocks the nest box entrance and drapes down to just a couple of inches above the coop floor. You will most likely need to trim the blanket to the right size.
Most acoustic blankets come with built-in grommets for easy hanging. This sturdy, thick barrier will keep your birds from overnighting inside a nest box. It will also serve as an insulator, keeping most of the nighttime chill from entering the main coop.
When you open up every morning, you will need to pin the blanket up to allow access to the nest box for laying. But the benefits of this insulating barrier outweigh the minor inconvenience.
Temporarily Permanent
If your hens cycle naturally during the winter—in other words, if no artificial lighting is used inside your coop—you may want to consider blocking access to your coop’s nest boxes in a more (temporarily) permanent way. Once your hens cease laying for the season, tack down the acoustic blanket along all four sides to seal off the nest box entrance.
You can also use plywood or an exterior panel as a barrier if you prefer. Simply screw or nail this in place and remove it once the dangers of winter have passed.
Floor Treatment
The deep litter method remains a very popular way of creating coop heat during winter through litter decomposition. But it may not be a very practical approach given the cozy interior square footage of a kit coop.
For those wishing to give deep litter a try, simply add an inch or two of fresh shavings to your coop’s litter as it grows soiled, covering the existing litter completely with the new. It is crucial to have proper ventilation in your coop should you choose to use the deep litter method. Decomposition results in the release of gases that can adversely affect your chickens.
If you decide against the deep litter method, make sure to rake out soiled litter every week and replace it with at least two inches of fresh litter. And keep the floor surface even to help prevent such conditions as bumblefoot, which tends to occur more frequently during the colder months.
Not many chicken owners consider the ceilings of their coops as a potential source of heat loss. Since heat rises, preventing heat from escaping overhead is the best way to help retain that heat for your chickens.
Most coops, regardless of whether they constructed from a kit or custom built, have support beams or rafters that jut downward towards the floor of the coop. The surface of these beams, if covered, creates a pocket of space approximately 1 to 3 inches deep between the ceiling and the covering material.
This pocket of space is the perfect location to add actual insulation to your coop.
Multiple types of insulation exist. A visit to the insulation section of your hardware or home-improvement store can give you an idea as to what might work best for your coop.
Whether you decide to install spray foam, fiberglass roll or soundproof insulation, make sure to cover the entirety of your new insulation with a thin wood such as plywood, creating a new coop ceiling. This new ceiling will keep the insulation from falling out over your birds. And itwill prevent the birds from pecking at the insulation.
Remember that these suggestions are steps to take beyond the basic winter coop preparation. Fresh litter on the floor and a well-insulated roof don’t go far if your roof leaks or if there are holes in the walls. Same if the roost is splintering or mice share the shelter.
Perform your routine maintenance on your coop. Then take these steps to ready it for winter. We’ll cover how to winterize the walls, windows, and doors next and discuss one final option for readying a summer coop for winter.
Heating accounts for the top energy use in your home, according to the U.S. Energy Information Administration. If you use electric heat, compare your January utility bill to your April bill, and this becomes clear. In off-grid living, heating with renewable resources is an efficient and economic bet.
Living in a small home in Kentucky, I heat solely with a woodstove, and I use about two cords of wood each winter, which costs about $300—or less, if I were to cut it myself. Compare this to when I lived in a slightly larger but more well-insulated home and had an electricity bill of $200 each month throughout winter.
Also consider that Kentucky has a gray and sometimes interminably long winter season. But it’s nothing compared to what folks farther north experience.
In 2020, I shopped for a new woodstove with efficiency in mind. I looked at dozens of models from big-box stores, specialty hearth retailers and manufacturers’ websites.
In this article, I’ll tell you about my experience. I’ll also offer advice from a few experts on purchasing the best woodstove for your hobby farm home-heating needs.
Heating by the Square Foot
When sorting through woodstove web pages and glossy brochures, look past the idyllic photos with perfectly clean floors and meticulously painted walls. Rather, pay attention to how well that stove is going to heat your actual setting.
Cal Wallis, who cofounded the Canada-based Wood Heat Organization in 1999, suggests some skepticism when reading manufacturers’ square-foot-heating claims. “What will heat 1,500 square feet in Kentucky would heat half or less square feet in Ontario—in U.S. terms, Wisconsin,” he says.
Likewise, the BTU output means little. It’s easy to create the conditions for maximum BTU output in a controlled factory setting. More difficult, however, is doing so in a home with varying wood sources and user ability.
Instead of judging a stove’s heating ability by the manufacturers’ square-foot claims or the BTU output, John Akerly, director of the Alliance for Green Heat, says the size of the firebox, which may range from 1 to 4 cubic feet, is a better indicator. He says a 2 1⁄2-cubic-foot firebox can reasonably heat at 1,000-square-foot space, give or take. And Wallis says no home woodstove will heat beyond 2,000 square feet of space.
Pipas Imagery
Things to Consider
Considerations in addition to the firebox size include the following.
Your home’s insulation. The more well-insulated it is, the more heat you’ll keep inside.
Placement of the woodstove in your home. Heat is better distributed throughout your home by a stove in the center of the space—as opposed to a stove along an outside wall.
Your area’s climate. Colder areas require more heat—pretty straightforward.
Your skill and comfort level in operating a woodstove. The better you are at building and maintaining a fire, the more efficiently your stove will run.
Whether your stove is your sole heat source or a supplemental heat source. Building fires in the evening because you enjoy them? You perhaps don’t need as large of a stove as if you’re heating your whole space.
The wood available to you. The wood you burn is a large variable. Green wood—wood that has a high moisture content—and softwoods won’t burn as efficiently and will burn cooler than seasoned wood and hardwoods.
“An experienced installer can assist with stove size selection to ensure you receive the most heat and comfort,” says Mark Shmorhun, a technology manager in the Bioenergy Technologies Office of the U.S. Department of Energy.
“[Environmental Protection Agency]-compliant stoves are available over a range of prices, low to high,” says Shmorhun, who’s been heating with wood for five years. “Beyond that, the cost of a stove will increase with specialty features, such as design, automated controls, addition of fans, material of construction (e.g., cast iron vs. steel) and finishes.”
Many features are cosmetic. A gloss finish usually costs more than a cast-iron finish. You may be able to choose from a woodstove model with legs (standard price) or with a base that extends to the floor (add-on pricing).
A glass door may be a different price than a solid-steel door.
One feature many off-the-grid folks want is the ability to cook on the woodstove. Models with specialty cooktops and warming shelves may be pricier than those without.
Other features impact how you interact with the woodstove. For example, I chose to add an ash drawer to mine, thinking this would make ash removal easier. It hasn’t, in my experience, though I’m told some models’ ash drawers are better designed.
The Wood Heat Organization doesn’t recommend woodstove fans. Akerly says a good quality fan can be a worthwhile accessory. I use a ceiling fan to move heat around my home.
In a larger home, I used box fans. They were, however, noisy and cumbersome to navigate around.
Ariel Celeste Photography/Shutterstock
Other Accessories
Read reviews and talk with others about their experience with the accessories before you make your choice. There are also accessories that come independent of the woodstove that may be useful, such as the following.
Humidifier, whether that’s a stove-top steamer or a separate unit. Wood heat zaps moisture from the air.
Ash rake and shovel
Heatproof hand broom and dustpan
Coal hod. This is the tightly lidded metal bucket for disposing of ashes.
Heatproof gloves. You’ll wear these after your first burn.
Woodshed. Even a hastily built plywood roof under which you can store wood will help to keep rain and snow from making your wood more wet.
Moisture meter. Akerly recommends spending $15 for this tool at a hardware store to gauge the moisture content of your wood. Ideally, this will be lower than 20 percent for an efficient burn.
Splitting ax or wood maul. The difference between wood-splitting instruments is worth an article in itself. Even if you purchase already-cut wood, as I do, you need a tool to split the wood to your preferred size and to create kindling.
What’s It Going to Cost?
Woodstoves typically run $500 to $2,000 for the stove itself. Additional costs include the stovepipe and chimney, hearth pad, tools and accessories. This is an investment.
“If you spend too little, you get a little,” Wallis says. “If you spend a lot, you may not get a lot more, but probably.”
As with all consumer goods, brand names carry a price tag. Yet for home-heating brands, longstanding brands have earned their price points on reputations of safety, durability and efficiency.
Woodstoves are 20-year investments, after all.
“If you’re putting one in a cabin that you’re only using a couple times a year, you can get a cheaper stove. But if you’re using it every day, you should invest in a good stove,” Akerly says.
Maybe a top-of-the-line stove is out of reach but the brand you like has a value-priced stove. Good-quality woodstoves from top manufacturers can be had if you’re willing to sacrifice some of the bells and whistles.
The woodstove I purchased last year, for example, was not the least expensive model I considered. I would call it middle-of-the-road. I chose the value-priced model from a reputable home-heating brand.
Also regarding the economics of a woodstove purchase, installation is not the place to skimp. I know someone who lost their home to a fire inside the walls and another who had a chimney fire. Don’t mess around with shoddy installation.
An improperly installed woodstove, stovepipe or chimney poses a fire danger at multiple points:
inside the home from the stove or the stovepipe
inside the walls of your home
in the chimney
Besides physical danger, your homeowners or renters insurance may not cover damage from a fire if the woodstove was improperly installed. An improperly installed stovepipe or chimney can also cause drafting issues. This makes it hard to start a fire and can allow smoke to enter your home.
“Self-installation is really problematic and a huge fire danger,” Akerly says. “Easily 50 precent of self installs are substandard and potentially dangerous.” A qualified installer will ensure the woodstove is the proper distance from the wall, the hearth pad is adequate, the stovepipe and chimney are the proper height and thickness, and more.
In the end, I ended up purchasing a whole new home-heating system, including new stovepipe and hearth pad. I purchased direct from a hearth dealer.
Buying direct from the dealer cost me more, but they delivered, installed the stove and pipe, and advised on my DIY hearth pad. I am confident in my ability to heat my home with wood safely, and I am glad for all I’ve learned about wood heat along the way.
More Information
Woodstove Resources
Learn more about burning wood and operating a woodstove for the best wood-heating experience. These resources are a good place to start.
Everything you ever wanted to know about wood heat safety, woodstoves and firewood. thickness, and more.
New To You
Used woodstoves are out there, and they’re sold for less than the cost of new woodstoves. However, they’re not necessarily a bargain.
A woodstove can last 20 years or more. New stoves must meet U.S. Environmental Protection Agency emissions standards, meaning they’ll burn wood more efficiently and may be easier to use. Saving money in the upfront purchase of a used woodstove can cost more money and effort in the wood you burn and in the general upkeep of the stove over time.
Another downside to a used woodstove is that your purchase will not qualify for the 2021 federal incentive program. That’s a 26 percent tax credit with the purchase of wood and pellet heaters with a 75 percent or higher EPA high heating value efficiency rating. Your state may also have an incentive program to encourage the use of efficient home-heating systems.
This article originally appeared in the September/October 2021 issue of Hobby Farms magazine.
Traditionally, farm and yard tools like mowers, string trimmers, leaf blowers, chain saws and more have been powered by gasoline engines. But technology rarely stands still. And improvements in batteries have led to the development of capable electric tools suitable for many farming needs.
Whether corded or battery-powered, electric tools and machines offer many advantages compared to gasoline models. But there are also disadvantages to keep in mind—at least until electric models develop to the point where they can stand on equal footing with gasoline models from a pure power perspective.
Are you interested in investing in electric farm and yard tools? Let’s explore some of the primary pros and cons offered by ever-improving gasoline alternatives:
Pros
No emissions
Gasoline engines put out exhaust containing pollutants like carbon monoxide. But electric tools don’t release emissions while operating.
The air around you stays cleaner while working. And you don’t need to worry about breathing fumes.
Reduced noise
Electric tools tend to be quieter than their gasoline counterparts. An electric chainsaw, for example, doesn’t make any noise at all when it’s not actively cutting. Your ears (and your neighbors) will appreciate the diminished volume.
A huge advantage of electric tools is the reduced maintenance requirements compared to gasoline models. An electric motor doesn’t need oil changes, spark plugs or various filters. As much simpler machines, they save time for busy farmers.
Easy starting
The pull-cord starters often found on small gasoline engines can be difficult and frustrating to use. Fortunately, electric tools don’t need them!
Picture the ease of flipping a light switch. That’s the beauty of electricity, available at the push of a button.
Cons
Less power
Electric tools continually show improvement, that’s true. But as a general rule, they still lack the strength and power of gasoline models. These models may struggle under challenging circumstances (such as mowing an overgrown field or cutting a huge hardwood log into sections).
When using electric power, you may have to allot more time (and battery charges) to complete power-intensive projects.
Greater cost
While there are certainly exceptions, it’s generally accepted that quality electric tools will be more expensive than comparable gasoline counterparts. However, you may be able to offset this added upfront cost through reduced maintenance expenses in the long run.
May require extra batteries
When a gasoline engine runs out of fuel, you fill up the tank and it’s ready to go again. When a battery runs dry, it needs to be recharged. And that takes time.
To avoid running out of power in the middle of a project, you’ll need to keep multiple batteries on hand. You’ll also need to pay attention to keep them charged.
Some electric tools are corded and draw their power from an electrical outlet. And that limits their portability.
Depending on the specific tool and project, this might not be an issue. But it’s hard to take a log splitter out to your woodlot if it’s a corded model designed for use near an electrical outlet.
The next time you’re ready to invest in new farm tools, consider whether electric options might suit your needs. If the advantages outweigh the disadvantages, why not give it a go?
Kathleen Sterling, owner of Black Sheep Farm East in Virginia, developed Harlequin Sheep about 40 years ago. A variety of breeds were used to develop the Harlequin, including:
Karakul
Tunis
Corriedale
Lincoln
Border Leicester
Romney
Montadale
Southdown
Breeders continue to improve on the size and look in accordance with Sterling’s vision. Farms across the United States and Canada produce healthy, hardy lambs yearly toward the achievement of 500 American Purebred Harlequin sheep.
Once the registry reaches that number, the breed will close to outcrossing with registered Babydoll Southdown Sheep. And it’ll continue improving the breed through the current seven generations.
As of 2020, there were only 16 American Purebred sheep in the registry. This represents a tremendous growth opportunity for breeders to get in early as Harlequins take a prominent role in the miniature sheep world.
Considered a miniature sheep, with shoulder heights at or less than 23 inches, Harley weights range from 80 to 120 pounds for ewes. Rams weigh in at 90 to 150 at maturity.
Their compact size, lower weights and lack of horns (naturally polled) make them easy to handle.
Known for its fine, medium-staple length wool, Harlequin fiber is similar to Babydoll Southdown fiber. Babydoll/Harlequin crosses, in fact, represent the first outcrossing to increase bloodlines. These animals often sport a rich, dark, brown fleece at birth, sometimes with a white spot on the head or chest.
When processing a tricolor fleece, you’ll get a beautiful gray roving. The fleece of most mature Harlequins can be separated into off white, brown, gray and tan to produce roving in those colors individually.
Despite relative rarity, Harlequins are affordable. Considering Harlequins to obtain or maintain an agricultural exemption on your land (or purchasing for your kids or grandkids as a 4-H or FFA project)? You’ll find they are truly worthy, due to their versatility.
With October comes the time of year that I need to think about breeding my ewes for next spring. This will only be my second year of breeding and then lambing. So everything is still pretty new for me.
Something I have read about is ensuring your ewes and your ram are in good condition. So, how do you even tell whether your sheep are in tip-top breeding condition?
I found a good explanation on the Penn State Extension web page called “Breeding Season Preparation for Sheep Flocks.” There are some excellent pictures that you can use to evaluate your own flock.
Rating Sheep Body Condition
So here’s my takeaway: You need to evaluate each animal on a score from 1 (a too-thin, emaciated sheep) to 5 (a really fat, overweight sheep). An ideal sheep body condition score is a 3.
Run your hands across the back half of the sheep’s back, near the loin and hip area. The spine and ribs should not be prominent or easily felt. If your ewes look like that, their body condition probably is a 1.
So, it’s time to get some extra grain and high-quality hay in them. Ideally, you would start that a few months before breeding.
A body score of 3 is what you are looking for. It means that you don’t necessarily see the spine and hips but can feel them if you press down just slightly on them. Those sheep are well-filled out and have good muscle tone in their back legs.
The sheep who score a 5 are probably pretty easy to pick out. They are fat—and, no, it’s not the extra wool they have grown over the summer! You have to search pretty hard to find the spine and hip bones and can feel pads of fat on their loins and even over their dock.
I find it difficult to evaluate the body condition of my sheep without actually feeling them. They really have regrown a lot of the wool that we sheared off earlier in the year. If you have hair sheep, it may be easier to evaluate your ewes if they have not grown their hair after shedding.
You also need to consider prior issues that may have caused problems before putting your ram out with the ewes. For example, did any of your ewes reject their lambs or have issues with lambing or producing milk?
Those types of issues are considered problematic. It’s not recommended that you continue to breed these ewes, as you would probably expect more trouble next lambing season as well.
It’s a good idea to keep records of things like this (as well as records of your vaccination, worming and other medical issues). If you are like me, you’ll forget everything by the time the next breeding season comes around.
I actually keep notes on my iPhone so I have a handy record with me every place I go!
Given the above criteria, I’ve chosen 10 of my 14 ewes to breed for the season. The other four will most likely go to the sale barn. It’s just too expensive to feed a large farm animal that is not producing something!
Over the summer, my flock was either on pasture or eating grass hay. Then, about six weeks ago, we switched to a higher-quality hay with alfalfa in it that should provide improved nutrition for the mothers-to-be.
I will most likely start the ewes on a little bit of grain as well before we put everyone together in mid-November.
Given that ewes have an estrous cycle of about 17 days, we hope to have lambs mid- to late-April. Of course, even the best plans don’t always work out. But if you go into the breeding season with at least some idea of what kind of shape your flock is in (and which ewes have the easiest lambing), you’re far more likely to come out ahead.
Kate E. Richards is a chicken-keeper, gardener and a self-proclaimed “professional drinker.” She combined her favorite hobbies into a new book, Drinking with Chickens: Free-Range Cocktails for the Happiest Hour, filled with wonderful pictures of chickens and fun cocktails to toast a hard day’s work.
Courtesy of Running Press, an imprint of Hachette Book Group Inc.
Now, don’t be confused. She doesn’t mean you should drink with your chickens. That is really just her metaphor for life. She also adds a disclaimer on her website, drinkingwithchickens.com:
“Do not let chickens on, near, or in your drinks or food. They are filthy animals, and they will get you sick. Use common sense and sanitize surfaces and hands after coming into contact with poultry, other animals, and frankly, a lot of people.
“Furthermore, we definitely do not condone feeding chickens or any animal alcohol. It is bad for them. Drink it all yourself. Do it for the chickens. This site is intended for entertainment purposes only. Don’t take it so damned literally.”
So after a stressful day, make yourself a nice, refreshing cocktail, grab a lawn chair and sit outside sipping while watching your chickens do their thing. Kate says so!
Have you ever stood beneath a blossoming citrus tree, breathed in that heady fragrance and wished you could bottle it up? We’re going to do that and mix it with some frozy (yes, I said frozy) white wine. Do you have to have actual orange blossoms to make this cocktail? Nope. Not in the slightest. Is it extra cool if you have them and use them to make a glorious simple syrup? Why, yes; yes, it is. But you will get by just fine without.
Ingredients
11⁄2 (750-milliliter) bottles dry white wine, such as sauvignon blanc, frozen in standard ice cube trays (fills about 3 trays)
1⁄2 (750-milliliter) bottle dry wine (the leftover from your two bottles), chilled
4 ounces Orange Blossom Syrup (See recipe below)
2 ounces elderflower liqueur, such as St. Germain
organic citrus blossoms or other edible blooms (for garnish)
Preparation
Freeze wine into cubes ahead of time, allowing at least 4 hours to fully freeze.
Place wine ice cubes, chilled wine, Orange Blossom Syrup, and elderflower liqueur in blender and blend until smooth.
Divvy up mixture among four chilled coupe glasses. Garnish with orange blossoms or other edible blooms.
Orange Blossom Syrup
Servings: makes 3⁄4 cup
Ingredients
1⁄2 cup water
1⁄2 cup granulated sugar
1⁄3 cup organic orange (or other citrus) blossoms, petals only, or 1 tablespoon orange blossom water
Preparation
Combine water and sugar in a small saucepan over medium-high heat.
Bring just to a boil, lower heat, add either orange blossom petals or orange blossom water, and simmer for 5 minutes.
Remove from heat and set aside to cool.
Strain away petals from mixture (if applicable), and store in an airtight container in the fridge for up to 2 weeks.
My family and I have kept chickens for a number of years. It wasn’t long after my wife and I started gardening with gusto about a decade ago that we decided to purchase a quartet of Golden Buff pullets from Meyer Hatchery. We added these fine ladies to our corner-lot suburban growing space and enjoyed both their eggs and the entertainment they provided.
About a year later, we were living on a farm in central Kentucky with Berkshire pigs, Dexter cattle and a whole mess of chickens—layers and meat birds. But that’s a story for another time.
The point is, we’re no spring chickens when it comes to keeping … er, chickens. We’ve moved off the farm in recent years, to another suburban plot we’ve filled with flowers, fruits and veggies. Also, we have six Australorps in a sizable backyard run.
Some things never change. But having chickens around is fun, filling and—even raising thousands of birds—educational.
But I don’t tend to spoil my birds. My wife and kids might disagree with this claim (the hens have a heckin’ swanky handbuilt coop, a swing, deluxe feeders, plenty of toys, etc.), but compared to some keepers, I’m pretty bare bones. I take care of my chickens so they continue to take care of breakfast.
But they don’t come into the house and watch TV with us or anything.
Treat Time!
To make up for their confined life in a well-maintained run (we have a lot of hawks, so free-ranging is a no-go), I do offer my hens the occasional handful of black soldier fly larvae. And when we work in the garden on the weekends, they know to expect armloads of greens and the occasional wriggly bug.
Our Australorps might consider me stingy with the chicken treats, though. So when I was contacted by the people at CoopCrate, offering a review box of their product, I was intrigued. With a few of our ladies undergoing a grueling hard molt, now could be the exact right time to spoil the flock with a few extra somethings.
What is CoopCrate, exactly? Well, as a product, it’s a box filled with chicken stuff: treats for your hens, treats for chicken-keepers and products that make chicken-keeping easier and more fun.
Here’s what was in my review CoopCrate box. (Note: Per the company, all products are exclusive to CoopCrate.)
Black Soldier Fly Larvae from Stella’s Famous Flock Spoilers (As noted, I had some BSF larvae, but during molting season, extra protein is welcome.)
Heavenly Hens Almond Crumble Feed Mixer (Containing raw almonds for extra nutrients)
Chia Seed Super Food Supplement from Healthful Hen Organics (I added this when I refilled their pellet feed, and they seemed to love it. And we love the boost of omega-3 and other nutrients they’re getting.)
An egg scrubby, for cleaning eggs (I’m actually going to use this later today.)
A feather brush, with soft bristles for pampering birds (I … haven’t used this. My birds aren’t lap hens, and I’m especially not handling then during molting season, when growing feathers can be painful. But my kids like to pet the chickens, so I suspect they’ll enjoy the occasional brush.)
A sticker that says “Keep Calm & Love Chickens.”
“Chicken Feet” Gummies and Cinnamon Hen’s Eggs from Crazy Chicken Lady Candy Company. (Candy treats for the chicken-keeper. Warning: The “chicken feet” actually kind of look like hen toes, which is fun but kind of unsettling at first.)
A plush, stuffed chick (My youngest likes it.)
A “CoopTips” informational card with helpful chicken nutrition facts
Keep the Fun Going
As a box of chicken stuff, CoopCrate strikes a nice balance between chicken treats, human treats and handy sundries. For the chicken-keeper in your life (or a nice treat for yourself), it’s a nice one-time gift.
But if you’re inclined to keep the fun going, CoopCrate is offered on a subscription basis with an auto-renewing charge of $32.99. (You can cancel this at any time.)
A CoopCrate purchase is a great way to show your chickens you care. But you can also care about chickens beyond your own coop when ordering.
That’s because CoopCrate sales support poultry rescue facilities, too. And each box includes a fun sticker with a picture of the chicken helped by that month’s purchases. My sponsored chicken was named Daisy, and her picture was included in the box.
Rodney Wilson
So if, after purchasing your feed, bedding and essential coop supplies, you have some money left in the chicken-keeping budget, you may consider a CoopCrate purchase. Each box contains a range of extras to support your hens’ health.
And the extras are fun little gifts to remind you that you’re part of a special chicken-keeping community.
Noah Young didn’t grow up on a farm. But living in Nebraska, he came up around an agricultural environment.
“One in four people are farmers, so I was kinda surrounded by it,” says Young of his home state. After gaining a degree in agricultural business, Young duly went on to launch The Shiloh Farm, a self-sustaining family venture that mixes up bountiful heirloom crops with African geese.
We spoke to Young about how the Nebraska climate and terrain affect The Shiloh Farm’s crops. He shared his tips for keeping chatty geese quiet. And we got into the joys of cooking a chicken noodle soup literally produced from scratch.
Young studied agricultural business in college. But in the early wave of the COVID-19 pandemic, he decided to go ahead and start a family farm.
“During COVID, when all the shelves were empty, that was the moment for me where I thought, I need to start growing some food!” he recalls of the roots of The Shiloh Farm.
Young says that the climate and the terrain in Nebraska play a large role in determining how he farms.
“I have a lot of friends down in Texas where they grow 52 weeks of a year,” he explains. “But where I’m at, we don’t have that season. So I’m really focused on producing as much as I can during a short window, then storing that.”
Young adds that he learned to view the wintertime as an apt period to prepare for next year’s spring and summer seasons.
African geese make up some of the standout residents at The Shiloh Farm. And Young says that the eye-catching waterfowl really like to talk.
“I film a lot of videos of the geese, and you can hear them in almost every single video!” he says with a laugh. “They’re loud, but they’re fun. They like making sure people know they’re around.”
When it comes to keeping African Geese quiet, Young recommends sneaking off out of sight behind the back side of a building. Then, strategically place a pile of grain for them to discover and busy themselves with.
If you scroll through The Shiloh Farm’s Instagram account, you’ll come across some super vibrant looking carrots dubbed “the Cadillac of carrots.”
It turns out the striking root vegetables in question are an heirloom variety called Longue Rouge Sang. Young originally sourced them from Baker Creek Heirloom Seeds in Missouri.
“I’m always interested in growing different things,” says Young. “As far as the flavor, they’re incredible. And a lot of our customers say they’re the craziest carrots they’ve ever tasted.”
Highlighting the nourishing nature of running a family farm, Young says he takes immense joy in sitting down to a supper he and his family prepared from top to bottom.
“There’s nothing like making chicken noodle soup and knowing we’ve got the noodles that we made with our own flours, the carrots and celery that we grew and the chicken that we raised ourselves,” says Young. “There really isn’t anything better.”