Categories
Animals Chickens 101 Farm & Garden Flock Talk Homesteading Poultry

Ease Chicken Stress With These Hen-Calming Tips

From installing houses for bluebirds and even owls to leaving my fall leaves alone, I do a lot to attract area wildlife. So, it shouldn’t have come as a surprise when a family of hawks set up a nest in a nearby tree.

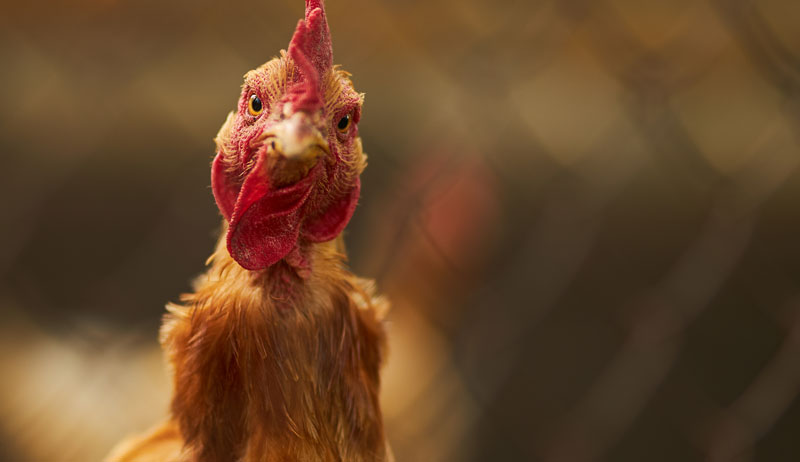
The one thing I hadn’t counted on? Eventually, the hawks and their offspring began doing low flybys directly over my outdoor chicken run. When their shadows passed overhead—and when, invariably, they made their unmistakable calls—my alarmed hens would scatter.

At least at first, the hawks probably thought they had a pretty good shot at a chicken dinner. But I had completely covered the top of the chicken’s run with netting and also reinforced some areas with extra chickenwire. Still, my hens didn’t necessarily understand that they were actually safe.

Egg Effects

Fortunately, the area hawks eventually stopped buzzing my chicken run. But, if they hadn’t? The added stress could’ve taken a toll on my hens’ health and affected their egg-laying. Stress can negatively affect an egg-laying chicken.

“The process of releasing the yolk, the yolk passing down the oviduct and putting on the egg whites and the shell membranes and the shell—it’s all a very routine process,” says University of Florida College of Veterinary Medicine Professor Gary Butcher. “But when there’s any kind of stress, hens can become irregular in their egg production and can decrease egg production. You may see some eggs where the shell is only partially formed.”

He adds, “If there’s a large enough population, you’ll find some that even—whenever they release the yolk into the body cavity—it’s not even picked up. They start to accumulate some egg yolks in the body cavity, if they are stressed out.”


Read more: What can you tell from an eggshell? A lot, in fact.


Sources of Stress

Not all sources of chicken stress are as obvious as hawks flying overhead. “If you put [your chickens] into a secure coop at night, they get to have nice, restful sleep at night,” Butcher says.

At least they should be able to rest easy. “Let’s say there are predators coming around all night long, and you don’t even know that they’re there,” he continues. “Maybe there are flickering lights in the henhouse. Or rats running around scaring the hens all night long. There could be dogs outside barking all the time. Or there are raccoons scratching and trying to get in.

“Those all can cause hens to be distressed. And, when hens are distressed, anything that interrupts their normal pattern can be a problem.”

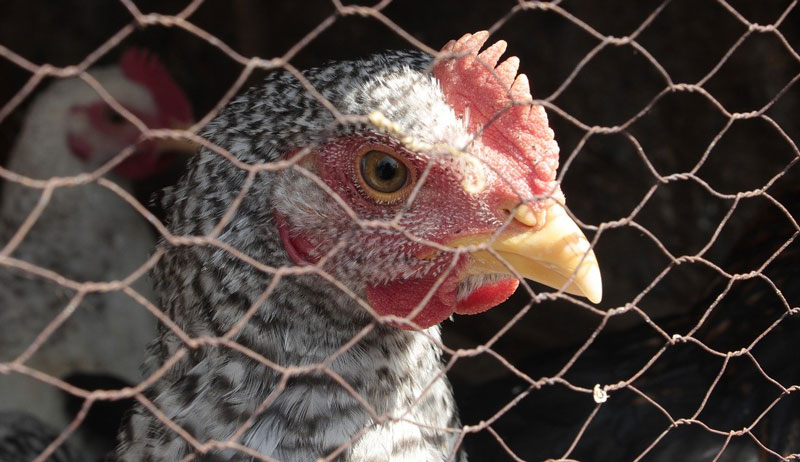
Other sources of stress may include too much disturbance from people, the effects of disease, or even mite infestations.

“I’ve seen situations where … all night long, these mites jump on them,” Butcher notes. “They suck [the hens’] blood and crawl all over them. Then, the hens are really nervous and they don’t sleep comfortably.”

chicken
Susan Brackney

Extra Protection

Eliminating mites and other possible health issues is one obvious way to reduce chicken stress. Dissuading would-be predators, so that they simply mosey along, pays dividends too.

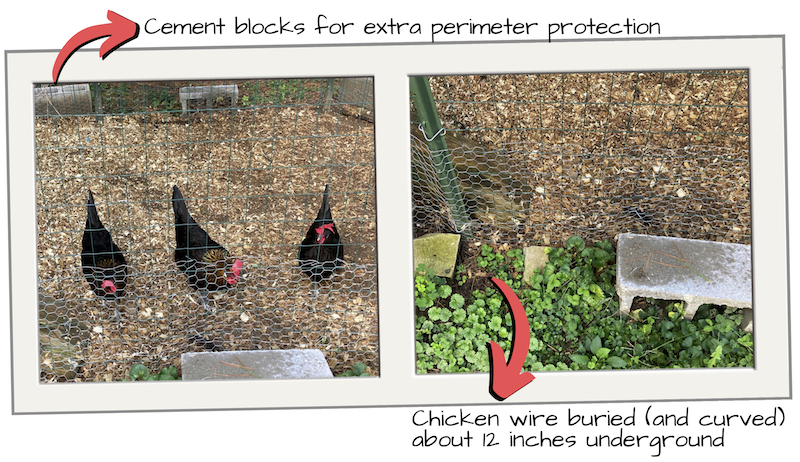
Just how can you make the henhouse and outdoor runs virtually predator-proof? First, I buried chickenwire about 12 inches below the soil line all the way around my outdoor chicken run.

“When you bury your wire, make sure that it curves away,” Butcher recommends. “You want to curve it because a lot of these predators will start to dig down. If the wire is [buried] straight down, they can get to the bottom and then go underneath it.

“But, if they go down and it starts to curve away when they hit that, they don’t think about digging backwards and going under. They keep on trying to dig straight down and then they realize that they can’t get in.”

As for the fencing you choose? Make sure its mesh size is small enough to thwart especially grabby critters. Before he had reinforced one of his own chicken runs, Butcher lost some of his hens to raccoons.

“Somehow, they would convince those chickens to get near the fence,” he recalls. “And then they would reach in and grab the chickens’ heads and try to pull them through. It was horrible.”

Raccoons also may be able to get underneath raised cages and grab your chickens’ feet.


Read more: These 15 tips will help you predator-proof your chickens.


Above & Beyond

In addition to my buried chickenwire, I’ve also spaced cement blocks around the perimeter of my run. And, I topped the run with a couple of layers of bird netting. To keep the netting in place, I wired it to the top and sides of my fencing at 3-inch intervals.

Finally, I spaced strips of white cloth along the top of the netting. (This has helped to keep area wild birds from accidentally getting caught in the hard-to-see netting from above.)

Categories
Crops & Gardening Farm & Garden

From The Herb Garden: Thyme Is Terrific! 

The small, delicate leaves of this pungent, peppery herb can enhance the flavor of many dishes. But thyme also offers a buffet of healing benefits for the herbal apothecary.   

The common thyme, Thymus vulgaris, is native to Southern Europe and the eastern Mediterranean. It is a member of the mint family and has been used since antiquity for a wide range of purposes.  

In ancient Egypt, the herb was used for embalming. In ancient Greece, it was burned as an incense in temples. That practice was modified by the Romans, who used the smoldering herb throughout their households as well as at public events, believing that the smoke purified and cleansed the air.  

You’ll find dozens of cultivars of common thyme, as well as more than 300 different species of Thymus, to choose from. All are considered edible, although some are considered more palatable than others.

Additionally, many of the types grown as ground covers have very small leaves. These are generally regarded to be too much effort to harvest in any useful quantities.  


Read more: Grow these culinary herbs for your chickens! (You can use some, too.)


Thyme in the Kitchen  

Thyme is widely used in a number of cuisines and is possibly the most widely used herb in kitchens around the world. It shows up commonly in Spanish, French, Italian and Turkish dishes.  

The herb can be used either fresh or dried and has an earthy, slightly lemony flavor. This lemon flavor is even more pronounced in lemon thyme cultivars that have become more widely available in recent years.   

The list of uses in the kitchen is almost endless. Use the leaves in beef, pork, poultry and seafood dishes, or drop on roasted vegetables, beans and lentils, rice dishes or even eggs.

Try adding the herb to soup stocks, marinades and sauces.  

Thyme is often included (along with savory, rosemary and oregano) in a culinary herb blend known as Herbs de Provence, which has become a signature flavor in foods from the Provence region of southeastern France. 


Read more: These DIY herbal bath and body products bring the garden to the tub.


Thyme in the Apothecary 

It’s quite likely that thyme was utilized for its medicinal qualities long before it was ever enjoyed in the kitchen. One of the most traditional uses was to quiet a dry cough. And like many other members of the mint family, it is used to relieve indigestion. 

A strong tea brewed from the dried leaves of thyme is beneficial for both of these ailments, as well as to ease a sore throat. Brew 1 tablespoon of thyme in 6-8 ounces of hot water and allow it to steep for 10 to 15 minutes.

Try blending the herb with mint or rosemary for additional benefits, and add a bit of honey to sweeten. 

Learn more about the medicinal befits of Thymus vulgaris in my book The Artisan Herbalist. 

Growing Thyme 

Thyme is a low-growing, hardy perennial that will thrive in your garden once established. The herb loves full sun but will still do well in partial shade. It is also quite drought tolerant.

You’ll find many interesting thyme cultivars to choose from, including some with variegated leaves. Some plants have a more erect growth habit, while others are low-growing, ground cover plants.

Adding a few different types of thyme to your garden will allow you to enjoy its many forms, colors and flavors. 

Growing thyme from seeds can be tedious, as the seeds germinate quite slowly. Consider purchasing a young plant from a nursery. Or ask a friend for a cutting of their thyme plant to get you started.

The herb propagates easily from cuttings or root division.  

Space your plants between 12 to 24 inches apart to give them room to spread. Thyme also does quite well in containers and is a great choice for gardeners with limited growing space.  

Pollinators love the flowers, so bees, butterflies and other beneficial insects will visit your garden all summer long. Whether you plan to enjoy it in your kitchen or your herbal apothecary, or if you’re just growing this herb as an attractive, pollinator-friendly companion plant, be sure to make time for thyme in your garden this year! 


Categories
Poultry Recipes

“Creepy” Chicken Offal Recipes, From Comb To Claws

Around Halloween time, it’s not unusual for those who celebrate the season to spookify their homes with cobwebs, jack-o’-lanterns, skeletons and all sorts of unearthly decor. No part of the house is exempt from the eerie embellishments, not even the kitchen. But would you expect to see ovary of hen and comb of rooster on the prep counter instead of eye of newt and wing of bat? The answer, for those who appreciate chicken offal, is a resounding yes!

Offal has long been regarded as the unwanted leftovers once an animal (such as a chicken) has been butchered for its meat. It is typically discarded or processed into other foods for human or animal consumption. But many cultures throughout the world consume these “variety meats” as part of their regular diet.

The stomach, intestines, brains, tongue and kidneys of animals such as cattle, sheep and pork are common ingredients in the cuisines of Italy, France and the United Kingdom, as well as throughout Asia. Chicken offal, such as livers, hearts, gizzards, and even feet, has been part of the American culinary scene for generations.

With the popular nose-to-tail trend of using an entire animal, however, more of the chicken is showing up on the dinner plate.

Trying new dishes with outlandish (offbirdish?) ingredients is not for the faint of heart. And that makes this the perfect time of year to give this trio of chicken offal recipes a try. Contact your butcher well ahead of time for these special ingredients. Then prepare and serve them up at your Halloween festivities.

Who knows? Your friends and family might find them “offally” good and request them at any time of the year.


Read more: You can make and preserve your own chicken bone broth. Here’s how.


Rooster Testicle Stew

Region of Origin: Eastern Europe
Servings: 4

My paternal grandmother, Margaret Balzar, brought a lot of recipes with her when she immigrated to the U.S. I specifically remember her palacinka, sweet cheese crepes, Hungarian goulash and her  patience attempting to teach her daughter-in-law (my mom) to cook these Eastern European favorites.

Ingredients

1/4 cup extra-virgin olive oil
1 large sweet onion, diced
2 teaspoons minced garlic
3 tablespoons sweet paprika
1 pound rooster testicles (have your butcher clean them for you)
1/2 cup red wine or sherry
Kosher salt and freshly ground black pepper

Preparation

In a large stew pot or Dutch oven, heat the olive oil over medium heat. Add the onions and garlic, then cook until translucent, stirring frequently (about six to eight minutes).

Blend in the paprika, stirring continuously to coat the onions evenly.

Add the testicles, then turn the heat to medium high and cook, stirring frequently, until the testicles are browned (about seven to eight minutes). Add the wine, lower the heat to medium-low, and stir well to blend it into the seasonings.

Once the wine is incorporated, lower the flame to a simmer. Cover the pot and stew the ingredients for approximately 25 minutes or until the testicles are tender and the sauce has thickened, stirring occasionally.

Season to taste with salt and pepper. Serve over rice.

Chicken Wattle and Cockscomb Ragout (Cibreo)

Region of Origin: Italy
Servings: 4 to 6

My maternal grandfather’s family, the Malaspinas, can trace their origin back to 12th century Italy. Cibreo may not have existed back then. But this chicken offal recipe is said to have been a favorite of Catherine de Medici in the 16th century.

Ingredients

1/2 pound chicken wattles and combs (have your butcher clean them for you), rinsed
3 cups chicken broth
1 pound chicken livers, rinsed
1 stick of salted butter
1/4 cup all-purpose flour
1 shallot, minced
1 1/2 cups white wine
1 cup chicken stock
2 large egg yolks
1/4 cup heavy cream
Salt and pepper to taste
Bowtie pasta (farfalle), prepared according to the package
2 strips of bacon or slices of pancetta (optional), fried and drained on paper towels
1/4 cup chopped flat-leaf Italian parsley (optional)

Preparation

Place the wattles and combs in a large pot. Add the 3 cups of chicken broth, then bring to a boil. Reduce the heat to a simmer, and continue cooking for 25 minutes.

Remove the pot from heat. Allow to cool to room temperature.

Using a slotted spoon, remove the wattles and combs from the stock. Allow them to drain on paper towels until dry. Discard the used broth (or save it for a treat for a pet).

Using a sharp knife, carefully remove the outer layer of skin from the wattles and combs. Chop these and the chicken livers into bite-sized pieces. Then pat with paper towels to remove any lingering moisture.

In a Dutch oven or large pot, melt the butter over medium heat. Toss the pieces of wattles, combs and livers in the flour until well coated, then add to the butter. Fry the meats, stirring occasionally, until brown on all sides.

Add the shallots and stir, cooking for another two to three minutes or until the shallots take on some color. Sprinkle the mixture with 1 teaspoon of the flour, stirring well to incorporate. Add the wine and cook, stirring frequently, until the liquid is reduced by half and well thickened.

Add the chicken stock, stirring well to blend. Continue cooking until the liquid reduces to the consistency of a thick sauce. It should coat and cling to the back of your cooking spoon. Remove from heat, then add the two egg yolks. Stir immediately to incorporate the yolks into the sauce.

Next, add the heavy cream, blending it into the sauce. Season the sauce with salt and pepper to taste. Spoon over bowls of bow-tie pasta. If desired, top with crumbled bacon or pancetta and parsley.


Read more: Process your homegrown chickens!


Chicken Ovary Soup

Region of origin: New York
Servings: 4 to 6

Whenever I visited New York City, my former in-laws made it a point to take me to eateries such as Yonah Schimmel’s and other Jewish restaurants in Manhattan’s Lower East side so that I could sample the flavors of their culture. This soup was their answer to any ailment that I or my sons came down with.

Ingredients

1 whole chicken
4 quarts (16 cups) cold water
1 large yellow onion, chopped
1 pound carrots, peeled and cut into 1/2-inch slices
4 stalks celery, chopped (including leaves)
1 bunch fresh dill, chopped (not the stems!)
Kosher salt and freshly ground pepper to taste
4 garlic cloves, peeled
1/2 pound chicken ovaries (eyerlekh)
Fresh parsley sprigs

Preparation

Place the chicken breast side down in a large stew pot or Dutch oven. Pour the water over the chicken until the water level is about 4 inches from the brim of the pot.

Add the chopped onion, sliced carrots, chopped celery and sliced dill. Bring to a boil, then lower to medium heat. Simmer for 90 minutes uncovered.

Skim the fat from the top of the cooking liquid.

Add the garlic cloves, then simmer for another 90 minutes uncovered. Using a large sieve, strain the broth from the rest of the ingredients. Place the broth in a large pot or Dutch oven.

Place the cooked chicken on a plastic cutting board, and remove the skin and bones. Chop the chicken meat into bite-sized (or larger!) pieces. Add the chicken meat and the vegetables back into the broth. Heat to a simmer.

Carefully remove the largest yolks from the ovary membranes and add them to the soup. With a sharp knife, slit the ovary membranes to release the other yolks. These will range in size from pea size to almost regular yolk sized. It’s okay if some membrane gets in the soup.

Allow the yolks to gently poach in the soup. Cook the yolks through to your desired consistency—soft or hard cooked. Serve topped with fresh parsley sprigs.

Are these chicken offal recipes not creepy enough? Consider trying celebrity chef Chris Consentino’s infamous recipe for candied cockscombs with cherries and vanilla rice pudding. Or venture outside of the henhouse to another type of poultry with this recipe for deep-fried duck tongues.

Categories
Equipment Farm & Garden

A Handmade Measuring Stick For Planting Trees

Sometimes, the best tool for a job isn’t one you purchase from a store, but one you craft yourself to suit a specific need.

Such is the case with a handmade measuring stick I use for planting trees. The design is elegantly simple, and this simplicity is what makes the measuring stick perfect for its assigned purpose.

A Tree Task

I wish I had been clever enough to design the measuring stick myself, but I owe its creation to my father. It was in the fall of 2018 that I decided to plant a new orchard, using seven apple trees and three plum trees as the foundation.

I purchased them in pots averaging 7-10 gallons in size. And since the root balls were fairly heavy to work with, I wanted to be sure of digging suitably sized holes before lowering the trees into place. I didn’t want to wrestle a tree into position, realize the hole was too shallow or deep, and have to lift it back out to make adjustments.


Read more: Planting a new orchard? Don’t forget your graph paper!


Custom & Handmade

At first, I made do with a regular tape measure to determine the dimensions of the holes. But my father—always quick to see better ways of doing things—concluded I needed a simpler, more durable tool. So to replace the tape measure, he prepared me a measuring stick: a piece of 1×2 lumber measuring four feet in length. Each inch was indicated by the ink of a permanent marker.

The benefits of this handmade measuring stick were immediately obvious. Imagine you’re plotting the diameter of a hole that you’ll dig in the middle of a grassy area. A tape measure with stiff metal tape, expanded and locked to the appropriate length, is terribly uneven in its weight distribution.

The heavy end where the tape rolls up tends to sink into the grass. This causes the expanded portion of the tape to flail about in all directions.

A cloth tape measure is similarly tricky to use, since it’s hard to keep the tape taut when you’re not actively using it. Tape measures simply aren’t inclined to sit happily and hold their measurements while you dig holes around them.


Read more: What’s the difference between a spade and a shovel?


The Exact Right Tool

In contrast, my measuring stick is perfectly even in its weight distribution. And when I plop it down on the ground, it stays in place.

If I want to dig a 3-foot hole, I lay down the measuring stick, cut the sod at the 0-inch and 36-inch marks, pivot the measuring stick 90 degrees, and repeat.

The perimeter of the hole is marked in no time. Then I can start digging.

My measuring stick has other advantages, too. It’s tough and durable, so I don’t have to worry about clogging it with dirt or leaving it outside. And when combined with a regular tape measure, it helps provide highly accurate measurements of hole depth.

The measuring stick doubles as an ordinary 4-foot 1×2. I can lay it flat across the hole and use a tape measure to gauge the distance from the center of the measuring stick to the bottom of the hole. That’s helpful when trying to match the depth of a hole to the height of a root ball.

Best of all, if my homemade measuring stick eventually wears out, a new one is just a length of 1×2 and a permanent marker away!

Categories
Farm & Garden Food Recipes

Recipe: Shirred Eggs With Brussels Sprouts & Bacon

Shirred eggs, or baked eggs, make an easy breakfast or brunch that can be prepared in individual servings. In this version, the eggs are topped with shredded, cooked Brussels sprouts and crunchy bacon, turning the eggs into a hearty meal.

Depending on the season, the Brussels sprouts can be substituted with chopped asparagus, broccoli or spinach. 

Servings:  4

Ingredients

  • 8 large eggs
  • 4 tablespoons heavy cream
  • 34 teaspoon fine sea salt
  • 12 teaspoon ground black pepper
  • 2 garlic cloves, minced
  • 4 green onions, thinly sliced
  • 12 cup shredded cheese such as white cheddar or Monterey jack 
  • 3 slices bacon, chopped
  • 2 cups shredded brussels sprouts
  • butter for greasing ramekins 

Read more: Travel by taste with these international egg recipes!


Preparation

Preheat the oven to 375 degrees F. Grease the inside of four 12-to-14-ounce ramekins well with butter, and place on a baking sheet.

Add two eggs to each ramekin, being careful not to break the yolks. Pour 1 tablespoon of cream over the eggs. Divide 14 teaspoon of the salt and 14 teaspoon of the black pepper by adding a pinch to each ramekin.

Top each with equal amounts of garlic, sliced green onions and cheese. 

Bake for 12 to 17 minutes, until the eggs reach your desired doneness. Softer eggs and runny yolks should still jiggle a bit when moving the ramekin. For fully cooked eggs, they’ll remain firm in the middle with no jiggle when the ramekin is moved. 

While the eggs bake, cook the bacon in a medium nonstick skillet over medium-high heat. Stir often for 4 to 5 minutes, until the fat is rendered, and the bacon begins to brown with crisp edges. 

Reduce the heat to medium, and add the Brussels sprouts. Cook until they reach your desired tenderness, 5 to 7 minutes. Stir in the remaining salt and pepper. 

To serve, spoon an equal amount of Brussels sprouts into each ramekin while still warm. 


More Information: Shirred ’Splanation

According to Aimee Tucker from Yankee Magazine, the word “shirred” refers to the flat-bottomed dish, or shirrer, in which the eggs were traditionally cooked, similar to the French oeufs en cocotte, or “eggs in a pot.”

“Ramekins or custard cups are today’s most common cocottes for individual baked eggs,” she writes, “but muffin tins are a handy alternative for shirring en masse if cupboard space is at a premium.”

This article originally appeared in the September/October 2021 issue of Chickens magazine.

Categories
Animals Farm & Garden Large Animals

Pigs Will Upcycle Almost Anything Into Nutritious Food

We all know pigs as bacon and sausage—and what better reason could there be for keeping pigs? But these friendly omnivores have so much more potential! The greater our knowledge of the basic nature of this traditional farm animal, the more valuable it can be for our farms. 

There’s no animal superior to the pig at converting surplus nutrients into dense, living flesh. You might call pigs on-the-hoof food storage.

Many of us already know how efficiently a pig can turn a bag of corn-and-soy crumbles into pounds of pork. As little as 2 pounds of feed makes a pound of live hog weight.

But if we feed only purchased feeds, we’re missing the boat! Pigs, like humans, are omniovres; they eat just about anything. This quality makes them one of the most useful animals on the farm. Take a look at this list of potential pig foods, many of which are probably already growing on your farm.

Weeds

How many bushels of weeds do you take out of the garden every week during the growing season? Many of them are highly nutritious! 

Carry those weed piles over to the pig pen and throw them in. Then watch your pigs devour them.  

Grass

Lawn clippings, for example, make great feed. If your mower bags clippings, just dump them right in the pig pen and let Porka dig right in. 

Grass—as well as dandelions, clover, plantain and all the ordinary lawn ‘weeds’—is great food for pigs. Do you cut the tall grass in the fence rows or ditches? Rake it up and feed it to Piggie. She’ll be delighted! 

Hay

Hay is good pig food, too. Give it to them straight from the bale, or offer the leavings from the horse, cow or goat manger. And don’t think they won’t eat the stuff that has fallen on the floor. Other animals may be too picky, but the pig will like it just fine. 

Animal Bedding

Yes, really. Traditionally, soiled bedding from cows, goats, sheep, horses and chickens gets thrown into the pig pen. What isn’t eaten makes great bedding for the hogs. 

Don’t worry about parasites, either. These are almost always species-specific. 

Food Scraps

Many, even most, food scraps are appropriate calories for pigs. If you’ve been throwing your fruit and vegetable peels, rinds, seeds and skins on the compost pile, take a hint and feed them to the pigs instead.

(Ed: Make sure to check with your state’s laws regarding feeding pigs table scraps, especially if you sell or share your pork products.)

Passed through a pig’s interior, wastes such as these become good, solid pork. And what doesn’t become pig flesh is digested and mixed with the pig’s bedding, where it becomes the basis for excellent compost.


Read more: Pigs love scraps, but you should be careful what you give your swine.


Garden Extras

Whatever is overripe, underripe, surplus or spoiled—all this finds a welcome in the pig pen. Windfall fruits, cracked tomatoes, giant zucchinis, stringy green beans, starchy ears of corn: These may not be quality enough for your table, but give them to a pig and he’ll turn them into tasty chops.

Stems, rinds, peels, seeds, cores, stalks and vines of almost any garden vegetable can be thrown into the pig pen and they’ll be very welcome. Our garden vegetables work hard to collect sunlight for us and turn it into digestible nutrients. But there are lots of plant parts that don’t end up on the table. 

Don’t send these right to the compost pile. Let them do dual service as pig food, first.  

Spare Dairy

Do you keep a dairy animal? Then you almost certainly find yourself with spare dairy products and wastes: surplus skim milk, buttermilk and whey, for example. 

This is the highest quality kind of pig food. There’s almost no such thing as more milk and milk by-products than your pig will eat. Think of pigs as your partners in dairying, and enjoy two milk harvests instead of just one.


Read more: Do your ferment your pig feed? You may want to consider the practice.


Apple & Pear Tree Prunings

You’ll be amazed at how excited your piggy will be about the leaves, twigs and small-to-medium-sized branches from your fruit tree prunings. 

Note: Wilted leaves of stone fruits like cherry, plum and peach can be toxic to livestock. To stay on the safe side, keep such trimmings out of their reach.

With so much potential pig food already coming from the farm, and a little work on our part, we can raise bacon hogs with next to no purchased feed. 

Free bacon and sausage—what a great reward for our homesteading efforts!

Categories
Crops & Gardening Equipment Farm & Garden

Harvest Crates, Bins & Trays Are Must-Haves For Small Farms

When it comes to harvest time, there are a number of different containers you can harvest into.  Here are my top three containers and why. 

Crates

Most agricultural supply stores will sell versions of a harvest crate.  Most are roughly 20-inches by 16-inches and 8 to 12 inches high. 

Different Types of Crates

You can buy types that are stackable—you can set them on top of each other to form tall stacks in the barn, root cellar or back of the truck. You can also find nesting crate models that, once emptied, can fit inside each other for storage. 

There are also collapsible crates that can fold down upon themselves after a market or for storage.   

Common Features

Regardless of these features, all crates are designed for air flow.  Proper air movement ensures products don’t mold and can even allow you to use crates for partially curing items like garlic. 

For instance, I cure my garlic in large trays and by hanging it. But I place the the finished bulbs in black crates that still allow enough air flow to finish the curing process. 

These crates also allow water to flow through. You can use them to hold carrots after being washed, as they allow produce to drip dry. 

The most common job for these crates is, of course, at harvest. I find they work great for harvesting anything dirty. The dirt can fall through the cracks a bit. And airflow helps wick away excess moisture on root vegetables, like carrots and potatoes, but also cucumbers, delicata squash, peppers and more—for these, airflow also helps dissipate field heat.

The versatile standard black mesh side harvest crate is a must have in the market garden and homestead tool shed. 


Read more: Check out these 9 tips for an efficient fall harvest.


Trays

Another great container for harvest, curing and washing is the tray. And, honestly, a standard bread tray works great. 

You can often find used bread trays for sale online. These are literally the trays that deliver breads, bagels and pastries around your region every day.  They are shallow, wide and stackable and often will have collapsible handles too to allow for better storage. 

Protect the Delicate Produce

This design allows you to efficiently stake small, fragile products. 

For instance, we harvest cherry tomatoes right into pints, which we then place on bagel trays. The trays can stack these ready-to-sell tomatoes in a truck to transport to market without bruising.

Great for Curing

Also, bagel trays are the hidden secret for garlic curing. It is super easy to stack trays full of garlic bulbs tall. Then you can set up fans for fast, efficient curing. And, again, the fragile garlic is left unbruised. 

Here’s another great secret of bagel trays. Lay trays in a line on a wash counter, and set your bunches of carrots, beets and radishes on top to effectively spray wash them. You can easily move your trays around as needed to sort cleaned and dirty piles of produce. 

When spray washing, the dirt drips right away, leaving nothing but clean produce on the tray.  


Read more: Improve your farm’s wash area with these 5 tips.


Bins

The standard storage bin is a great go-to solution for many products. I use these in my cold storage to help lock in moisture! 

Many vegetables need to be stored at high humidity (95 percent) and very cold temperatures (34 to 38 degrees F). If you put carrots,  beets and radishes in black harvest crates in a dry cold storage, they will dry out and become limp. As many cold storages on small farms are built with CoolBots and air conditioners, this dries out the air. 

You can go ahead and store your dry products in the cold storage. But you can also store your humidity-loving crops in there when they’re safely tucked into bins.

Distribution Day

These bins are also great for distribution days, whether you’re heading to market or on a CSA run. Why? The same principle—you can keep in valuable moisture for the duration of your transportation. 

However, mind this word to the wise: If you leave produce in a closed storage bin set out in the sun, it will rot. So keep the produce-holding bins in the shade, and add some ice for long market days.

Using a few simple tricks, you can easily distribute $1000 worth of produce to market in this simple, affordable and easy-to-find bin. 

 However, you stack it (and whatever the colors), bins, crates and trays are standard and versatile containers for all your harvest, storage and distribution needs. 

 Grow on! 

 Zach 

Categories
Podcast

Episode 15: Tara Rodríguez Besosa

How does a farming community recover after a disaster? By coming together. Tara Rodríguez Besosa talks about Puerto Rico’s agricultural and economic situation, including the role that the US plays and, more importantly, the neighbors providing for one another in Puerto Rico’s food system. 

Hear how they started their own food journey when their mother left the city to become a farmer, then sold sprouts they grew in their city apartment at the farmers market, and then started big-picture thinking about how to support farmers on the island with the business that they cofounded, El Departamento de la Comida. In its earliest iteration, El Depa aggregated local produce for a multi-farm CSA, then became the only restaurant in Puerto Rico serving all Puerto Rican-produced foods. El Depa’s transition, after the 2017 hurricanes, into a nonprofit collective has allowed the entity to support farmers and food projects with the facilitation of work brigades, the sharing of tools and knowledge, and now a commercial kitchen. 

Tara offers their knowledge about how each of us can design a resource library for tools, seeds and education in our own farming communities. (Spoiler alert: It starts by asking your fellow land stewards about their needs!)

Finally, hear about the OtraCosa queer land collective and what it’s like to reinhabit a home and 8-acre property that’s been abandoned for 30 years.

LINKS

The Jones Act

National Tool Library Group

Up Beet! Seed Libraries Forum

El Departamento de la Comida website

El Depa on Instagram

Tara Rodríguez Besosa on Instagram

Categories
Farm & Garden Food Recipes

Simple Fermented Pickled Jalapeños Preserve The Pepper Harvest

If you’re growing hot peppers in your garden this year, you’re likely swimming in them at this point. Here is yet another super simple way to preserve them this fall: fermented jalapeños!

This recipe is written for jalapeños, but any hot pepper of your choice will suffice.

Yield: 1 pint jar

Ingredients

  • 2 cups jalapeños, sliced 1/4 inch thick
  • 4 cloves garlic, crushed
  • 1 grape leaf or other leaf with tannins (optional, helps to keep the pepper slices crunchy). See “side notes” for more info on leaves with tannins.
  • (For the brine) 2 tsp. coarse kosher salt, dissolved in 1 cup water

Read more: Bring the heat to your garden with these super hot peppers!


Preparation

Add the garlic to the bottom of a clean pint canning jar and tuck the grape leaf on the side of the jar. Pack the jar with the sliced jalapeños while being mindful not to crush or damage the slices.

Leave 1 1/2 inch of headspace (room from the top of the peppers to the rim of the jar).

Once the jar is filled, mix up the brine. Pour the brine over the peppers until they are completely submerged by at least 1/4 inch of brine. If you have a small fermentation jar weight, add it to the jar to hold down the slices under the brine.

Remove any small pieces of food (or seeds) that float up to the top of the brine. (Produce above the brine will increase the risk of the ferment spoiling.) Wipe off the rim of the jar with a clean dampened towel. Add the canning jar lid and tightly screw on the ring.

Fermentation

This is a five-day ferment. Ferment at room temperature, ideally between 60 to 75 degrees F (15-23 degrees C) and keep out of direct sunlight. 

Check on the ferment daily to make sure that the brine covers all the produce. If the produce has floated above the brine level, use a clean utensil to push it back below the brine. 

Burp the jar daily. Unscrew the lid briefly and tighten it back on to allow any built-up gas to release. (You’ll also avoid possible jar breakage and the ferment overflowing).

After five days of fermentation, taste test a jalapeño slice and see if it has the garlicky, tangy, fermented flavor that it should have once your jalapeños have fermented. If it tastes too much like a jalapeño in the raw form, replace the lid and ring and allow it to ferment another couple days and taste test again.

Once the ferment has reached an ideal flavor, transfer the jar into the refrigerator, with the brine and all.

Fermentation does not stop once the ferment is transferred to the refrigerator. However it does slow the process way down. The taste and texture will continue to change, therefore this ferment is best enjoyed within six months.


Read more: Chili peppers are fun to grow and useful in both the kitchen and apothecary.


Side Notes

If you do not have a glass jar weight, you can improvise by using an easily removable small food-grade glass dish that fits inside the jar. Or, if you have a smaller glass canning jar that can fit into the mouth of the jar you are fermenting with, you can use that to keep the produce pushed under the brine.

More about tannins: If you do not have access to grape, oak or raspberry leaves, you can also use horseradish leaves or bay leaves. The flavor from the leaves, however, will alter the flavor of the fermented pickle. If you do not have access to fresh leaves with tannins, you can make the recipe without them. However, expect that the pickle could be less crunchy after fermentation.

If you are unsure if your water is safe for fermentation, you can boil it and allow it to cool to room temperature before stirring in the salt to make your brine.

The brine will turn cloudy during fermentation. It’s also likely you will see white sediment on the pickles and at the bottom of the jar. This is completely normal and a sign that your fermented jalapeños are proceeding as they should. 

This recipe has been adapted from WECK Home Preserving with permission from Skyhorse Publishing, Inc.

Categories
Beginning Farmers Crops & Gardening Farm & Garden Food Urban Farming

Wild Dog Farms Blesses The West Oakland Community With “Microgreen Confetti”

When Tchell DePaepe was 10 years old and living in a “tiny town” in Utah, she started growing pumpkins to sell to the local kids in the community. “That was my first entrepreneurship, you could say!” recalls DePaepe.

Since relocating to West Oakland years later, DePaepe now runs the Wild Dog Farms microgreens urban farm, where she specializes in producing vibrant “microgreen confetti.”

We spoke to DePaepe about her introduction to the world of microgreens and the challenges of farming in urban environments. We also got the scoop on her most potent tasting microgreens.

Embracing Small Space Farming


View this post on Instagram


A post shared by @wilddogfarms

“At the time I wasn’t really familiar with microgreens,” admits DePaepe, looking back at the roots of Wild Dog Farms. “But the more I did research on them, the more I saw this was a great new opportunity and something I could do in a small space.”

DePaepe adds, “I’ve always enjoyed running my own business. So it was a perfect opportunity to do something that was really healthy and in a very urban place like West Oakland.”


Read more: Interested in growing microgreens? Here’s some advice from an advocate,


Spotlighting Microgreen Confetti


View this post on Instagram


A post shared by @wilddogfarms

DePaepe has playfully tagged the vivid array of bijou produce she grows as “microgreen confetti.”

She spotlights amaranth as the most eye-catching of microgreens in her collection. “It’s almost a fuchsia color,” she says. “It doesn’t grow very tall. I use it in my rainbow mix, which also has purple cabbage and radish in it. Amaranth makes it very fun to look at. It’s a beautiful topping for a lot of chef dishes.”

Looking Beyond the Salad


View this post on Instagram


A post shared by @wilddogfarms

When it comes to incorporating microgreens in cooking, DePaepe says that it’s important to look beyond the assumption to simply incorporate them into a salad.

“I’ve seen chefs put them on pork chops and in soups,” she explains. “Basically, you can top anything with microgreens. It’s kind of an education I have to give people. Like, it’s not just salads—it can be for tacos and burgers.

“Anywhere you’d use iceberg lettuce, you can use microgreens. But of course iceberg lettuce has [almost] 0 nutrients! With microgreens you’re eating basically the entire broccoli plant, but it’s only an inch and a half tall.”


Read more: Want summer lettuce? Here are some tips for beating the heat.


A Full-on Spice Attack


View this post on Instagram


A post shared by @wilddogfarms

Asked about the boldest tasting microgreens that Wild Dog Farms produces, DePaepe spotlights wasabi. “It’s very spicy. You can feel it right up your nose! Some people have told me it’s too spicy to use, but other people love it.

“The wasabi definitely packs a powerful punch.”

About a Name


View this post on Instagram


A post shared by @wilddogfarms

Looking back on naming Wild Dog Farms, DePaepe says that the silhouette of a canine featured in the company’s logo is actually a friend’s rescue named Rocko. “I just kept the name, and I thought it was wonderful,” she explains. “Everyone likes dogs.”

Follow Wild Dog Farms at Instagram.