If I had it to do over again, I would’ve had a farm emergency plan in place long before I needed it. (Fortunately, I’m ready for most anything now—and you can be, too.) See, I recently found myself faced with emergency surgery and a relatively lengthy hospital stay. Once I was finally home, I would also have a pretty lengthy recovery period ahead of me.
In my absence, who was going to water the sweet potatoes and gourds I’d been tending all season? Who would let the hens out in the morning and put them back in again at night? (And who would make sure my favorite old hen—who happens to be blind—gets plenty to eat and drink every day?)
Where would my dog stay? What about collecting my mail and mowing the yard?
So what if you—or other essential members of your farm or homestead—were hit with a similar health crisis? Your to-do list might look something like mine. But let’s say you have multiple kinds of livestock and many more crops. Or even a full-fledged commercial operation with employees and regular customers.
How well would your day-to-day operations fare without you?
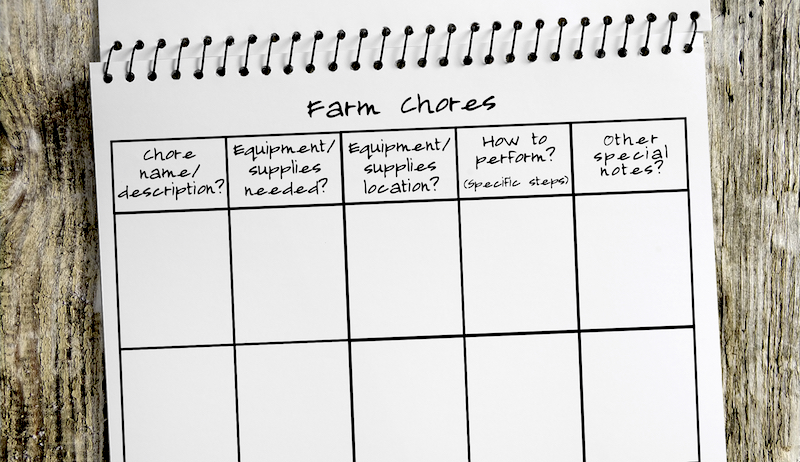
To make a workable emergency plan, start by listing all of the farm chores you regularly attend to. What do you do each day? What do you do every few days? What do you do weekly? Monthly? Of these, which are essential and which, if any, could you stop for the time being?
(In my case, for instance, I decided to let my compost piles go temporarily unattended.)
Next, consider each of the essential chores you’ve identified, one at a time. List any equipment or supplies you use to complete individual chores, and explain exactly where you store these items.
Finally, write out the specific steps necessary to complete each chore—including any important warnings. (One of mine? The latch on the chicken run is tricky—don’t accidentally get locked inside!)
If you run a commercial farm, you might want to make digital and hard copies of all of this information available. That way, your employees and managers can easily access it—and act on it—if necessary. (You might also make sure your customer contact list is easy for certain employees to find.)
Susan Brackney
Who Can Help?
After you’ve identified your essential chores, you’ll know how much assistance you’ll need. For your next step, create a separate list of potential helpers.
Consider friends, neighbors, family members, current employees, or even temporary hires. And do you belong to a local church or synagogue? What about a sewing group or book club? Extra help also may come from wider social circles like these.
I was pleasantly surprised by the number and variety of people who volunteered to help me while I was away. Luckily, I had just enough time to meet with them in advance and show them how I handled each task.
Ideally, though, I also would’ve given them more formal instructions, so they could refresh their memories as needed.
Time permitting, you can email notes about specific chores to each of your helpers. You could also print and post hard copies of your instructions in relevant spots around the farm. (This definitely would’ve helped in my case—just before being readied for surgery, I received a frantic text: CAN’T FIND CHICKEN FOOD DISPENSER?!)
The people who volunteered to help me during my surgery and hospital stay didn’t necessarily know one another. As such, I also provided a master contact list to everyone. It included all of the volunteers’ names, what they were helping me with, their phone numbers and, if available, their email addresses.
Beyond just being nice to have, such a list comes in handy for troubleshooting. For example? Say the person mowing my yard had noticed a problem with my hens. Using the contact list, he’d be able to alert my hen caretaker accordingly.
Your master contact list could also include emergency numbers. Have a specialty livestock veterinarian? Adding his or her name, address, phone number and hours of operation could make all the difference.
And in the event that one of your farm helpers has an emergency of their own? You might also include the names and numbers of some additional, potential volunteers—just in case your helpers need a little extra help themselves.
Of course, here’s hoping you’ll never actually need to use emergency plans like these on your farm. But if you do? You’ll likely be grateful to have made them in advance.
I’m admittedly a crazy chicken lady. I swear it’s in my DNA. I’m adopted, and I’ve always been drawn to chickens and farm life even though I was raised in a suburb of Cleveland, Ohio. Thankfully, my husband, Gary, and I escaped to the country when we were raising our three children. That’s where our wild Ohio chicken adventures began.
Strikes One & Two
We tried to raise our first batch of day-old white Leghorns from a local feed-supply store. It was spectacular … until a raccoon found our do-it-yourself pallet coop and slaughtered all six of our young pullets.
Our second try was half-hearted. I noticed our neighbors had ducklings and one baby chick in their barn. So I inquired about them and was offered the chance to have them.
We took two of the mallards and the solo chick and raised them for about 12 weeks. Unfortunately, our unknown-breed pullet ended up as a fox’s main entree one evening. So my family said enough is enough, no more raising chickens.
We were heartbroken at yet another loss of a sweet-feathered friend.
When 2020 came around, I’d been considering a third go-round with chickens. Once the pandemic hit, I was determined it was now or never. On my wedding anniversary, I told my husband all I wanted was a secure coop and some chickens. I just wanted to get to the laying phase!
Funny enough, years ago I tracked down my birth parents, and I learned that my mother’s side was from Slovakia and were chicken farmers! I could do this!
I found a hatchery based in Ohio that I could order chickens from online and decided to roll the dice. We ordered 10 hatchery-choice rare breeds, heritage breeds, brown layers and rainbow assorted, along with my picks of a partridge Rock, two Dominiques and a barred Plymouth Rock rooster.
I was so excited to drive the 42 minutes to meet my day-old hatchlings! I wanted my babies the day they hatched. My kids and I were thrilled to get these brand-new babies! My husband built me a Fort Knox coop. And we’ve been having an amazing time thus far.
Michelle Jester
My Flock
The hatchery gave us some amazing chickens and even added two freebies.
Dumpling: a white Leghorn that’s the highest in the pecking order and my No. 1 layer
Tuck: a docile and sweet white Cochin
Nugget: freebie No. 1, one of two buff Orpingtons
Mango: freebie No. 2, the other buff Orpington
Turbo: a family favorite Welsummer that lays beautiful brown, speckled eggs
Nutmeg: a stunningly beautiful partridge Rock, and a dependable layer
Stella: a true blue Cochin that’s the biggest, most gorgeous hen we have and very kind
Sammi (short for “Sam I am”): a shy green Queen that was hard to identify because of her feathered legs, black feathers, five toes and late developing beard/muffs and pea comb
Mica: one of two Dominiques
Flick: the other Dominique
Lava: a barred Plymouth Rock that is easy to differentiate with the feathering and comb
We live on 22 acres of wooded property. And it’s been amazing to spend time watching, studying and learning everything chicken.
I’ve learned that white Leghorns, with proper handling when young, aren’t flighty and are mad foragers; that chickens love, love, love scrambled eggs; and that happy hens truly will lay all winter!
My flocks eats high-quality feed, has access to free-choice grit and oyster shell, and gets a smorgasbord of treats, including:
scrambled eggs
cheese
dried fruit
black soldier fly larvae
sunflower meats
I also make them fresh “magic water,” five days a week. This consists of:
1 teaspoon salt
2 cloves of minced garlic
1 teaspoon blackstrap molasses
1 tablespoon apple cider vinegar (from the mother)
I just mix it all together in a gallon of water.
Happy, Healthy Ohio Chickens
My flock has plenty of access to freedom outdoors with a guard rooster, a guard dog and a human on patrol, as well as proper dust-bathing areas. I even use essential oils in their nesting boxes inside the coop.
The results are a happy, healthy flock of chickens here in Ohio that provides me with unbelievable and amazing eggs. I give dozens away, and people marvel at the size, color and shell thickness, along with how rich the yolks are.
I’ve had quite a lot of time to bond with my new feathered friends, and I couldn’t pick just one. They’re all gorgeous, friendly and unique! Every family should own at least three chickens, for eggs and meat as well as for teaching responsibility, kindness and relaxation.
Michelle Jester thanks her husband, Gary, for encouraging her backyard pandemic hobby gone wild and for continually working on the coop and run.
This article originally appeared in the September/October 2021 issue of Chickens magazine.
If this article caught your attention, you’re a true homesteader at heart—no matter how small your flock. If you have a self-propagating flock, this will play to your advantage: Excess roosters are an excellent source for chicken bone broth.
The 48-hour cooking process softens their flavorful—but typically firm—meat. What a comfort to have precooked, homegrown, free-range chicken bone broth canned and at the ready for long winter days!
Why Chicken Bone Broth?
There are numerous health benefits from consuming quality bone broth. But this article isn’t written to belabor them.
We’re here to discuss canning equipment preparation (you can skip this part if you’re already experienced), prepping your broth/stock and canning jars, and … drumroll … the mysterious pressure canning process! (It’s really not that hard.)
A small caveat, however: If you’ve never canned before, I strongly recommend working through several batches of applesauce, jam or tomatoes before attempting to can meat. I’ll explain why in a minute.
But first, here’s some canning vocabulary. (Not dictionary definitions—just for the purposes of this article.)
Processing: the procedure by which filled jars are heated in boiling water and subsequently vacuum-sealed. Necessary processing times vary by size of jar and ingredients.
Water bath: a boiling pot of water with an unlocked lid
Pressure canner: a specially designed, airtight pot with locking lid (utilizing a rubber gasket), air escape valve and specially manufactured weights to place on the air escape valve in order to sustain perfect pressure on the packed jars during processing.
Packing jars: Unlike vacation suitcases, food needs space. To pack a jar for canning, precooked foods must be loose to:
allow any air bubbles to escape
ensure adequate heat penetration during processing. Densely packed foods aren’t recommended for home canning and aren’t covered in this article.
Water Bath Vs. Pressure Canning
Many hobby canners put up fruits as jams, jellies and preserves. Some put up pickled vegetables, relish or sauerkraut. These are all high-acid foods.
As a general rule, high-acid foods may be safely processed in a simple boiling water bath.
A boiling water bath is a pot of water in which sterilized filled jars are processed, but with a simple lid atop. This boiling process, when done correctly, sanitizes the contents of the jar and the cooling process seals the jars as the temperature lowers.
By contrast, meat and most garden vegetables are low-acid foods. This includes green beans, potatoes, onions, even spices and herbs. If processed in only a boiling water bath, these foods are subject to spoilage and scarier things, such as botulism.
Low-acid foods must be processed in a pressure canner.
A pressure canner also boils the contents but—surprise—under pressure. The pressure is raised by sealing the lid and capping the air vent with a weight specifically designed for the purpose. During processing, steam builds pressure inside the pot until the gauge lifts.
This lift of the gauge then reduces the pressure to the point where the gauge falls back down, and the process repeats. When the pot is holding at the correct pressure, this process happens so quickly that the weight rattles. (It’s kind of cool, actually.)
I like to use extra roosters for chicken bone broth. For flock maintenance, it’s usually best to cull birds at the end of summer. Standard breeds hatched in spring are usually full-size by about 5 months old, but you don’t have to wait. The younger the bird is, the more tender the meat.
When picking a new breeding rooster, I let the batch reach 1 year old before culling. This way, I can determine the best breeding stock.
I’ve heard many people eschew harvesting their older culls. They protest there’s no way to cook them with positive results. Oh my, but there is!
The secret is in long, slow cooking. The 24- to 48-hour chicken bone broth cooking process is a perfect fit.
The following recipe provides a great introduction to making chicken bone broth. I recommend trying it for a delicious chicken dinner before attempting a giant batch for canning purposes.
Slow-Cooker Chicken Dinner x2
Ingredients
1 fresh (or frozen and thawed) whole chicken. Note: If you have a 4-quart slow cooker instead of a 6-quart, you may need to cut up the chicken and reduce the vegetables for it to fit.
1 teaspoon (3 cloves) garlic, minced
1 teaspoon whole rosemary
salt to taste
1 small onion, quartered
1 stalk celery, diced
chopped potatoes and carrots to fill pot around chicken
2 cups cold water (to start)
cold water to fill pot (day 2)
noodles or rice, dry or precooked. Dry will yield a richer flavor, but less soup (day 2).
Preparation
Rinse chicken. Sprinkle garlic, rosemary and salt inside the body cavity. Add onion.
Place breast-down in slow cooker. Surround with chopped vegetables. Add 2 cups cold water. Cover and cook on low setting until meat falls off the bone.
Remove vegetables and debone chicken. Serve warm.
Return chicken bones to broth in pot. Fill pot with cold water and continue cooking until total cooking time has reached 48 hours, or bones are hollow. Strain broth and return to pot. Discard bones.
Your chicken bone broth is ready to eat!
Meal No. 2
To make chicken soup: Add 1 cup noodles or rice, 1⁄2 cup small chopped carrots (if desired) and any leftover meat from the chicken. Cook on low until additional ingredients are tender.
Add salt and/or additional spices, as desired. Enjoy!
Now that you’ve made and enjoyed a batch of chicken bone broth, you should be ready to tackle a large-scale batch for canning.
Cooking Chicken Broth
Four standard-breed chickens should yield enough broth for roughly 7 quarts of canned bone broth stock. (A full standard canner will hold seven quart-sized jars.)
I specify “standard-breed” as opposed to a Cornish Rock hybrid meat bird, which has a much beefier carcass. You may of course use Cornish Rocks, but I encourage using the cull roosters.
If free-ranged or at least kept on pasture, their meat is more flavorful. Besides, you’re mostly interested in the bones.
Unfortunately, four chickens won’t fit in a slow cooker. So, plan your broth-making days for a weekend when you are off work and can monitor the stove top.
I use a 3-gallon stockpot in addition to my slow cooker for making large batches of bone broth. (Once I start canning, I want to make it worth the bother of pulling all the equipment out of the cellar!)
What You’ll Need
• 4 chickens, plucked (You may use skinned birds. The broth may be slightly less rich.)
• water to fill and continually refill pot—lots of water!
• salt (optional)
• very large stockpot (3-gallon recommended or use multiple smaller pots)
• lid for stockpot (optional, but very highly recommended. The resulting steam will reduce liquid much faster without a lid.)
• large slotted spoon
• hot pads
• strainer (not essential but recommended)
Preparation
Fit chickens into the pot any way that they’ll stay below the water line. Fill pot with water, and set on low heat to simmer. You may use high heat for the first hour to help the pot heat up. But then set a very low flame for the duration of the cooking time.
(I have an older gas stove, and use a cast iron heat diffuser on the burner underneath my thick-bottomed stockpot. From time to time, I’ll raise the heat to high for about 5 minutes just to keep the heat diffuser good and warm. Then I return it to the lowest flame.)
If the chickens float above the top of the waterline (they will, at first), reach in with the slotted spoon and rotate them from time to time to keep them cooking evenly on all sides. A few times a day should suffice. A lid on the pot helps keep the exposed chicken from drying out and cooking unevenly.
You may find that the pot loses a lot of water even with a lid on top. Add more as needed to keep the water level high. You’ll want to monitor the pot through the night, as well. It’s a great time for a movie marathon, or a camp out on the kitchen floor!
After 24 to 48 hours of cooking, your stock is ready for the next step.
Remove the chicken from the broth and place on plates to cool just enough for handling. Strain broth into smaller pots, then pour back into the big one and return to heat. If you don’t have another large container into which to strain, sift the pot with your slotted spoons until all inedible debris are removed.
Debone chicken and discard all but the meat.
If you want to include the meat in your bone broth, return to the pot.
If you’d rather keep your broth as is or use the meat for other purposes, put meat in the refrigerator for later use.
Jacy Dean
Canning The Broth
Let’s check your progress.
Your finished broth—with or without meat—is keeping warm on the stove.
You’ve cleaned up your mess, discarded scraps from deboning the chicken and wiped down the countertops. (I’m serious. Clean up your mess first. You’ll thank me later.)
All of your equipment is clean and nearby.
Now, we’re ready to start canning!
Materials List
canning jars
canning lids
canning lid bands
water
pressure canner, all components (See manufacturer’s instruction booklet for your model.)
small saucepan
ladle or measuring cup
magnetic lid wand (optional but worth it!)
canning funnel
clean plate
bubble freer (plastic food- and heat-safe bladeless knife)
canning jar lifter tongs
clean washcloths for wiping lids (several as they can get sticky)
heat pads
large amount of clean counter space near the stove (probably double what you think you’ll need)
clean kitchen towels or a plethora of hot pads (for countertop heat protection)
Jar Prep
Wash, rinse and sterilize all jars. Many people sterilize in a boiling water bath for 10 minutes. The method my mother taught me: Place the clean, rinsed, wet jars upside-down on a top oven rack. Turn the oven on to 250 degrees Fahrenheit.
Allow to sterilize for a minimum of 10 minutes after reaching boiling temperature at 212 degrees. Once sterile, turn off the oven. Leave the sterilized jars upside down on the oven rack until immediately prior to use.
Remove jar lids from box and separate from each other. Place in saucepan. Cover with warm water, turn burner on low and allow to simmer lightly until use.
Jar lid bands don’t touch food, so they don’t need to be sterilized. Wash and rinse them all.
Pressure Canner Prep
If your pressure canner has been in storage, wash and rinse all parts thoroughly.
Check the rubber gasket to ensure it’s in good condition.
Set the pressure canner on the stove, put in the base rack, and set the lid on top. (Don’t lock into place.) Set the gauge nearby.
Put about 2 quarts of water into the pot and simmer on medium heat. (Note: Different sizes of canners require different amounts of water. See your manufacturer’s booklet for specific details. I currently use a Mirro 22-quart canner with a 7-quart capacity.)
If processing less than full capacity at seven quart-sized jars, add an extra pint of water.
Checkpoint
You should have the following ready to go.
finished bone broth simmering in its pot
pressure canner simmering nearby
ample clean counter space around stove
warm, sterilized jars still upside-down in the oven (or upside-down on the counter, if you used the boiling water method)
warm, sterilized lids simmering on the stove
clean lid bands for jars
clean canning equipment
clean counter space by the stove
Once you’re all set, take a quick breather, if you need it!
The Canning Process:
Packing the Jars
Flip a sterilized jar right side up near the pot of broth and put the canning funnel in its mouth. Fill the jar with broth (and meat, if desired) to 1-inch from top. Caution: Don’t overfill.
Remove canning funnel, and set aside on clean plate dedicated to the purpose. Run bubble freer around inside of jar to remove trapped air.
With a clean, wet (preferably hot) cloth, thoroughly wipe rim of jar, taking care to leave no trace of grease. Fat or grease is a major contributing factor to badly sealed jars of meat, leading to broken seals and spoilage. Take extra care to ensure a perfectly clean jar rim.
Using the magnetic lid wand, pull a sterilized jar lid out of the simmering pot and place on the filled, clean jar.
Screw a band down tightly onto the lid, utilizing hot pads as necessary. Place jar into the open pressure canner to keep warm.
Repeat process until canner is full or you run out of stock.
Jacy Dean
The Canning Process: Processing
With all jars now inside the canner, check the water level. Add water if necessary.
Make sure the rubber gasket is inside the pressure canner’s lid. Settle the lid down onto the pot and rotate to lock in place.
Place the 10-pound weight gauge on the steam valve.
Turn up the heat to high or medium-high (depending on your range).
Stay nearby to monitor the canner, so that you catch when it starts to rattle. Processing time starts the moment the correct pressure is reached inside the pot. Overprocessed jars can break or explode from excessive pressure, so it’s important to note when the correct pressure is reached for processing time.
Process quart jars for 90 minutes at 10 pounds pressure.
Once processing time completes, turn off the burner, but leave the pressure gauge on top. (Pressure will be very high!) Wait at least an hour for the pressure to reduce before attempting to remove the pressure gauge. Take care not to get burned by either the pot or residual steam.
If in doubt, wait. Remove gauge when safe to do so.
Removing the Jars
When you observe the steam stop hissing from valve, do the following.
Make certain pressure inside pot is at dead zero before attempting to open the lid.
Open the canner’s lid away from you, using it as a shield. (In case any jars break on contact with the air or any other reason!)
Check the seals. Carefully remove jars from pot with jar lifter tongs, keeping upright. Don’t allow the inner liquid to touch the upper part of the jar, where the lid seal is. Set on a kitchen towel on the countertop in a cool spot until cool to the touch.
Once the jars are cool, twist off the bands, if desired. (I’ve found canning lid bands are less prone to rust if kept in a box or kitchen drawer rather than on the jars.)
Post-Processing
Using a clean, damp cloth, wipe off any mineral residue. Use a permanent marker to write “Chicken Bone Broth” and the current date (month/day/year) on your jar lid.
Set the finished jars neatly in your pantry or cellar and take a photo as you admire your handiwork.
Congratulations! You’ve done it. You actually canned bone broth!
As with many other worthwhile things in life, pressure canning can present a bit of a learning curve. I’ll say from personal experience, though, it’s a great feeling to know your harvest is beautifully displayed on the pantry shelves, not dependent on the freezer.
More Information
Troubleshooting Tips
So, maybe your canning attempt didn’t go quite as planned. Here are some possible problems and suggestions as to what might have gone wrong:
Broken jar(s)—Some possible causes are overprocessing and/or defective jars. While it’s disheartening to open up your canner after a good day’s work and see a jar in pieces with contents spewed all over the pot, don’t despair. Sometimes a jar had an invisible weakness. Of course, if it was due to overprocessing … well, learn your lesson and move forward.
Jars not sealed—Some possible causes are grease or chips on the rim or defective or damaged lids. Remember to wipe down jar rims thoroughly before placing the lids on top. Make sure the cloth is very clean without residual grease.
Did you check each lid before you placed it on a jar? Or did you attempt to reuse old lids? It goes without saying that if you try to reuse single-use canning lids, they’re not likely to work the second time around!
Altitude Answers
In Gardening for Food and Fun: The Yearbook of Agriculture 1977, Nadine Tope, specialist-in-charge of extension foods and nutrition, wrote a section titled “Pressure Canners, Vital for Low-Acid Foods.” In it, she wrote that atmospheric pressure is like the thickness of frosting on a cake.
“Where it is thickest, it weighs more per square inch than where it is thin,” she wrote. “At sea level, where the atmosphere is the thickest, it is heavier than atop a mountain.
“As altitude increases, atmospheric pressure or its weight per square inch decreases. Altitude affects the boiling point of water. Where altitude is least, at sea level, water boils at 212 degrees Fahrenheit. As altitude increases, the boiling point of water decreases.
“The same is true in a pressure canner. Under 10 pounds pressure at sea level, water boils at 240 degrees. As altitude increases, the temperature in a pressure canner at 10 pounds of pressure is less than 240 degrees. This difference is enough to affect the safety of canned products at altitudes above 2,000 feet.”
Notable Notes
Different vegetables, herbs and spices require different processing times for storage safety. The general rule for varying ingredients is to look up the correct processing times for each one, and process your new recipe for the longest time needed for any listed ingredient.
While these instructions are specifically for chicken, the general procedure for making bone broth is the same for all meat bones. (I.e., cook on low heat until the bone marrow releases into the broth, yielding hollow bones). However, if you wish to can other species’ bone broth, research the specific procedures and processing times.
For further study on your own, I highly recommend the top-notch book Putting Food By from authors Janet Greene, Ruth Hertzberg and Beatrice Vaughan. It contains a wealth of information on food preservation.
This article originally appeared in the September/October 2021 issue of Chickens magazine.
Looking for a small and convenient, yet versatile and capable farm vehicle suitable for handling a wide variety of tasks? You may need an UTV. When enhanced with attachments and implements, a heavy-duty UTV can fill in for a tractor on many farming projects. And one of the key features of any UTV is its cargo bed.
A cargo bed is designed for hauling supplies and materials through challenging conditions.
It’s a feature farmers can easily put to good use. So if you’re currently shopping for a UTV, keep these four UTV cargo bed features in mind.
How big is the bed?
Let’s start with the dimensions of the bed. You can use the width, length and depth to determine its volume, often measured in cubic feet.
Knowing the cubic capacity of a bed is useful if you intend to haul loose materials (like dirt, sand, compost, etc.). But it’s just as important to also know the length and width of the bed.
Will a hay bale measuring 18 inches wide by 40 inches long fit comfortably in the bed? Can you fit two side by side?
Consider the items and supplies you would like to carry in the back of your UTV, including tools like shovels and rakes. Determine if they’ll fit suitably. If not, you might need a bigger bed.
Just as important as the dimensions of a bed is its payload capacity.That’s the amount of weight it’s rated to carry.
In most cases, you probably won’t come close to overloading a heavy-duty UTV. Some are rated to haul more than 1,000 pounds. But if moving a big load of rocks/bricks/etc., you’ll want to stay careful not to overload the bed and damage your machine.
Is it a hydraulic dumping bed?
Sometimes you may need to quickly empty the cargo bed. If you’re transporting loose materials like manure or compost, it’s nice to have the option to back right up to the desired location (a manure pile, a garden bed, etc.) and dump the load exactly where you want. That way, you don’t have to do any shoveling by hand!
If this sounds appealing, you’ll want a UTV with a hydraulic dump bed, which makes it easy—effortless, even—to quickly empty the bed while letting the machine do the work.
A deep bed with sides comes in handy for keeping loose material and random tools contained. It can prevent them from spilling out as you drive.
But sometimes, the items you want to haul (say, lumber for building raised garden beds) are too long or unusually shaped to fit conveniently in a typical bed. In this instance, it’s helpful if your UTV allows you to fold down the sides of the bed. You can easily convert it into a flatbed better suited to hauling oversized items.
In short, if you can find a large, hydraulic dumping bed with a lofty payload capacity and the ability to convert into a flatbed … congratulations! You’ve hit the jackpot of UTV dump beds. You should be ready for just about anything.
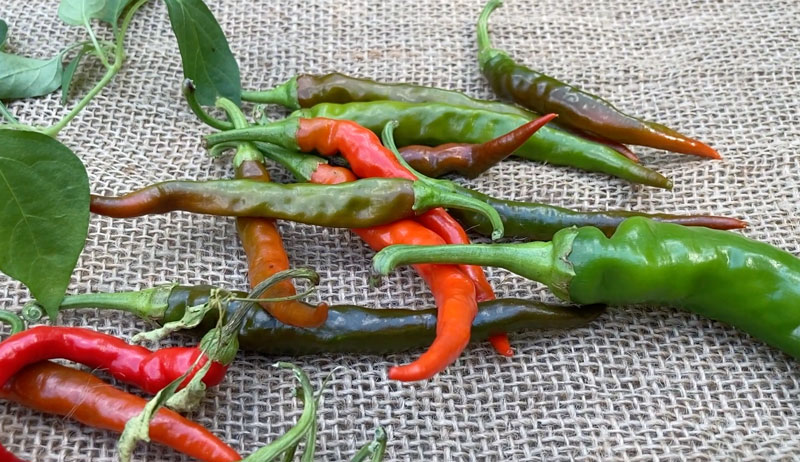
Sweet or spicy, the chili pepper is a garden favorite. The plant originally hails from South America, in the region now known as Bolivia. While we are familiar with peppers of all shapes and sizes, the original chili peppers were much smaller than the peppers we are used to today.
A Brief History of Chili Peppers
It’s likely that chili peppers first migrated from their native habitat thanks in part to birds. They would consume the ripened fruits and then disperse their seeds as they flew to other areas.
One interesting note: Birds are not affected by capsaicin, the chemical that gives peppers their heat. Therefore, they have no problem snacking on they tasty chilis in the wild.
Chili peppers have been a staple ingredient in indigenous diet for thousands of years. But they didn’t find their way into the cuisines of the world until the Spanish brought peppers back to Europe sometime in the 1500s.
Since then, peppers have been developed into hundreds of different varieties. These include sweet bell, jalapeno, poblano and cayenne.
Most chili peppers are spicy. Their level of heat is measured by what is known as Scoville Units.
The sweetest peppers register as a ‘0’ on the Scoville scale. The world’s hottest pepper, the Carolina Reaper, has been measured at more than 2 million Scoville heat units!
Peppers’ Purpose in the Apothecary
Peppers are a useful kitchen ingredient, adding flavor and spice to many dishes. But they are also valuable to the herbalist for their medicinal benefits.
The same capsaicin that gives a chili its heat is also harnessed by the herbalist to craft pain relieving topical ointments. These can bring relief from joint pain, inflammation and sore, achy muscles.
Growing peppers in your garden is pretty simple. But there are a few things to keep in mind to ensure a successful harvest.
Be sure to plant your pepper seeds early. Peppers need a long season to mature. So plant to start your seeds indoors, under lights, around six to eight weeks before your last expected frost date.
The addition of a heat mat under your planted seeds will also speed up germination. Pepper seeds perform best at temperatures around 75 degrees F.
Transplant your peppers into a full-sun area of your garden once they have established at least two sets of true leaves. Also make sure any risk of frost has passed.
Seed Saving for Peppers
Once you find a pepper variety that you enjoy enough to want to grow again next season, I always recommend saving your seeds from your harvest to replant next year. Select fruits from the best performing, healthiest plants. Once the peppers are ripe—a very important note—simply cut them open and remove the seeds.
Peppers tend to change color to signal their ripeness. This is often a change from green to red, but this may differ depending on the specific variety you are growing.
Place the seeds out onto a paper plate to dry for around five to 10 days. Make sure to label the plate with the variety name so you don’t forget!
Once the seeds are well-dried, package them up in a coin envelope or small baggies and store them in a cool, dark place until next year.
Chili peppers are so much fun with all of their different colors, sizes shapes and flavors. They are easy to grow, useful in the kitchen as well as the apothecary. There’s no reason not to enjoy chili peppers in your garden every year!
Mid-October and it’s sunny with a chilly breeze rushing across the lush, green field where cattle are scattered. Leafy tops of turnips and tillage radishes reach for the last bit of warmth from the setting sun. This field boasted a bountiful wheat crop earlier this year. But now it has been drilled with a variety of plants to create a cover crop that the cattle can graze on during the cool days.
The benefits from planting cover crops are twofold:
As the turnips and radishes grow the cattle will eventually be turned out onto them to graze and enjoy the supplement to their feed. Underneath the ground the turnips will grow large. The radishes burrow deep into the dirt, breaking soil up as they mature.
Later in the season, plants die. They will leave behind a cavity in the ground (which helps to loosen up the soil). They’ll also leave organic matter and nutrients from the rotting plant.
When deciding what mixture of seed to plant, consider the Rule of Three. A good practice is, for each seed mix, include grasses, legumes and brassicas (such as turnips or radishes).
This isn’t a necessary rule to follow. But it can be helpful in attaining a good balance in the variety of plants in the field.
The particular blend that we plant includes:
turnips
tillage radishes
triticale (a cross between rye and wheat)
Our resident agronomist, Klayton Krispense, explained to me some of the ins and outs of the seed mixture we plant. He prefers to keep a mix of brassicas and grasses. The two crops make good companions.
Oats are another common companion crop. They would be considered grass in the Rule of Three.
He pointed out that if one of your main reasons for planting a cover crop is to graze cattle on it, you should make sure to include a good selection of grass in the seed blend. Grass tends to grow and establish itself quicker. It will spread faster over the ground than just turnips and radishes.
We planted our cover crop just days ago (mid-September). It will be ready for the cattle to graze on around mid-October. Here in Kansas we wait about a month to plant the cover crop.
Our main purpose is to use it as a mulch and drill the primary crop into it.
What Do Cover Crops Do?
We plant cover crops to help shade the ground and prevent the onset of many weeds. But they also help to retain water.
In the spring, after the cover crop has grown to about 2-3 feet tall, we will drill the primary crop (such as soybeans) straight into it. As the cover crop dies, it will create mulch, which holds water into the ground.
An added bonus: We can graze cattle on the cover crop. The feed is already out there, can be considered fairly cheap, and allows for a summer grazing experience during the later fall/winter.
The cover crops supplement daily feed rations for the cattle. And when we go to sell the animals, they will be considered “grass cattle.” That should fetch us a higher price.
On the days cattle are turned out, they’re fed a small morning feed ration (so that they won’t go out and founder themselves on the rich greens). They get herded through the yard and into the fenced-off field, where they will spend the rest of the day grazing.
As dusk draws near, four-wheelers can be heard rumbling to life and beginning their trek around the outside perimeter of the pasture. As we gently herd them towards the gate, they meander through the yard and back into their pen for the evening.
Fencing Considerations
When choosing a field to allow cattle to graze in, stay mindful of your fencing options. A majority of farmland with a crop won’t have a fence. So, on our farm, we put up a hotwire (electric) fence.
For temporary fencing, this is probably the most cost-effective option for keeping cattle contained. We typically build a single-strand hotwire fence. Once the cattle understand how it works, they do just fine.
In order to accustom them to an electric fence, we typically set up a small portion in their pen for a short period before they’re turned loose onto the cover crop. We usually encounter some trial and error. But after a few sniffs, they understand not to play with the wire.
If you’re considering adding cover crops to your crop rotations or cattle grazing opportunities, consider the Rule of Three (grasses, legumes, and brassicas). And spend some time studying the best seed mixes for your area and desired purpose.
Don’t forget, if you plant a mixture of brassicas, you never know what might “turnip”!
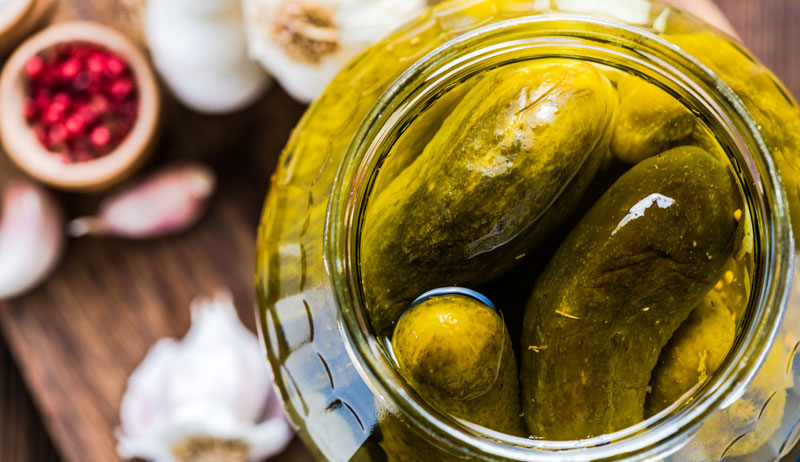
Quick! Before the season ends, get some pickling cucumbers and make a batch of sour fermented pickles to last through the winter. They are obviously good with anything you’d enjoy a vinegar pickle with. But they are also great for mixing into salads and sauces.
Even the brine from the fermented pickle makes a delicious dressing or marinade. The tangy sour of the fermented pickle offers a unique flavor to meals that you cannot otherwise obtain.
I prefer the smaller pickling cucumbers, 3 to 4 inches in size. The smaller they are, the crunchier they will remain. It is also important to use only freshly harvested cucumbers, ideally preserving them within 48 hours of harvest.
Though you can use a quart jar for this recipe, it’s much easier to make fermented pickles in a fermentation crock or larger jar, such as a half-gallon canning jar. This recipe is written to yield one 1-quart jar of pickles. However, if you have a half-gallon jar accessible, just double the recipe.
Yield: 1 quart jar
Ingredients
General
1 lb. freshly harvested pickling cucumbers, 3 to 4 inches in size
10 cloves of fresh garlic
Fresh dill, at least 2 sprigs (more if more dill flavor is desired)
2 fresh grape leaves, or oak leaves or raspberry leaves. The naturally occurring tannins in the leaves aid in keeping the pickles crunchy after they’re fermented. (See notes below for more info.)
Brine
1 tbsp. coarse kosher salt, dissolved in 2 cups water
Scrub cucumbers, removing any dirt. Discard any soft or damaged pickling cucumbers. You do not need to trim ends as you do with water bath canning. In fact, leaving the ends on helps keep fermented pickles crunchier.
To pack the jar, begin by adding the dill and garlic to the bottom and then proceed to add the pickling cucumbers. Carefully fit them in as snug as possible, without bruising or breaking them.
If you are adding hot peppers and grape leaves (or other leaves with tannins) to this ferment, add them within the cucumbers while packing the jar.
You should be able to fit two levels of pickling cucumbers if you have small 3 to 4-inch cucumbers. Once the jar is filled with cucumbers, pour the brine mixture over the produce until the brine covers the top of the cucumbers by at least 1/2 inch.
Leave at least 1 inch of headspace so the ferment has room to bubble without overflowing.
If you have a small fermentation jar weight, add it to the jar to hold down the produce under the brine. Remove any small pieces of food that float up to the top of the brine. Anything above the brine will increase the risk of mold and spoil the ferment.
Wipe off the rim of the jar with a clean, dampened towel. Add the canning jar lid and tightly screw on the ring.
This is a 7-to-14-day (or more) ferment. Ferment at room temperature, ideally between 60-75 degrees F (15-23 degrees C) and keep out of direct sunlight.
Burp the jar daily. Unscrew the lid briefly and tighten it back on to allow any built-up gas to release. (You’ll avoid possible jar breakage and the ferment overflowing, too.)
Check on the ferment daily to make sure the brine covers all the produce. If any produce has floated above the brine level, use a clean utensil to push it back below the brine.
Taste test the pickles after one week. If the pickles still taste raw and do not have the sour tangy flavor you are trying to acquire, allow them to ferment another week and taste test again.
It may take up to four weeks or more for them to obtain the sour flavor you want. Once fermentation is complete, transfer the jar into the refrigerator, with the brine and all.
Fermentation does not stop once the ferment is transferred to the refrigerator. However, it does slow the process way down. The taste and texture will continue to change, though. So this ferment is best enjoyed within 6 months.
Notes
If you want spice, add a couple halves of your favorite spicy pepper within the cucumbers when packing the jars.
If you do not have access to grape, oak or raspberry leaves, you can also use horseradish leaves or bay leaves. However the flavor from the leaves will alter the flavor of the fermented pickle.
If you do not have access to the fresh leaves with tannins, you can make the recipe without them. However, know the pickle could be less crunchy after fermentation.
The brine will turn cloudy during fermentation. It is also likely you will see white sediment on the pickles and at the bottom of the jar. This is completely normal and a sign that fermentation is occurring as it should be.
You may substitute fine sea salt instead of coarse kosher salt if you prefer. The measurement will remain the same for this recipe.
Because this is a longer ferment, a jar weight greatly increases the chance of success. Keeping everything under the brine is crucial for the success of a brined vegetable ferment.
If you do not have a glass jar weight, you can improvise by using an easily removable small food-grade glass dish that fits inside the jar. Or, if you have a smaller glass canning jar that can fit into the mouth of the jar you are fermenting with, you can use that to keep produce pushed under the brine.
If you are unsure if your water is safe for fermentation, you can boil it and allow it to cool to room temperature before stirring in the salt to make your brine.
This recipe has been adapted from Can It & Ferment It with permission of Skyhorse Publishing, Inc.
Nathan Harben is a farmer at Local Forage Farm in Glenora, British Columbia, a 2-acre homestead that grows ethically raised livestock, fruits and vegetables. He also works with the food recovery team of Cowichan Green Community, a non-profit organization that has focused on environmental sustainability in Vancouver Island’s Cowichan Region since March 2004.
Listen in as he talks about farming in extreme heat and meeting water needs during times of draught. Learn about local food security measures and how COVID impacted food access for many (and measures to feed people during troubling times). Hear aboutmethods farmers in areas with short growing seasons do to extend their seasons and grow food year-round. And share in some of his small-farm antics, from chickens laying eggs on the bed to falling in love with fresh asparagus!
For the past few installments of this column, we’ve looked at how to build a first-year garden. We talked about linking “tricks” to maximize efficiency and growing success. We discussed how to lay out Permabeds, as well as proper tillage techniques. And we looked at how to prepare and irrigate our Permabeds.
Now we’re ready to get to work in our beds as we ready them for their first year of productivity.
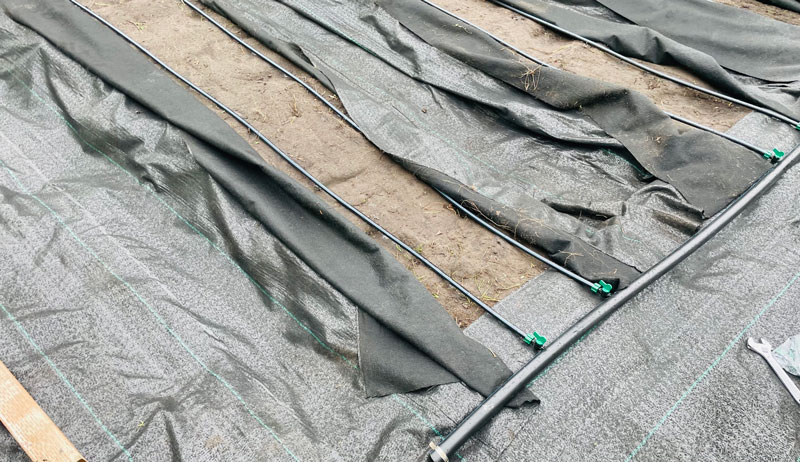
Using Zipper Beds in Your First-Year Garden
Next, we’ll tackle two birds with one stone.We’ll prepare good garden soil by thoroughly removing aggressive weeds through pre-weeding techniques. And we’ll ensure we have a good weed management strategy for our first year of growing.
We did this using a zipper bed model and selecting proper crops for a first-year garden.
Zipper Beds? This model represents a strategy for managing garden weeds using two pieces of weed barrier. These are lined up from the middle of one bed top to the middle of the next bed top.You then can plant between the two weed barriers that line up on any given bed top. This allows you a productive, weed-free growing space.
You can cover the entire garden surface and still efficiently plant by choosing to grow single-row crops like melons, zucchini, squash, tomatoes and corn, which need the space.
Not only do zipper bed exclude weeds that occur annually, but they also fry out lasting perennial weeds—such as grasses, thistles and burdock—that persist in the first year of gardening. Nearly every grower makes the mistake of planting two or three row crops in their first-year garden in year one. New can’t easily grow carrots, lettuce or peas because they simply have too many weed seeds and perennial weeds.
It takes time to prepare garden soil and remove all the weeds. But with zipper beds and proper crop selection, you are actually able to grow a garden in year one while also frying out those first-year weeds.
The space along the zippered edge in the bed top needs some extra mulching. So we used old hay.
This holds the zipper down against wind. (Row bags work, too.) But it also further blocks out any light from reaching weeds that want to take advantage of this narrow row of opportunity.
We simply applied a 12-inch line of hay mulch to each bed top.
Plant Your Guild
This garden will be planted next year in the four sisters planting method: corn, climbing beans, squash and sunflowers.
We’ll transplant plants into each zipper bed every 12 inches in the following arrangement
squash
corn and beans
corn and beans
squash (we keep the squash 3 feet apart from each other)
Every other bed will be planted with this guild. The beds in between will be planted with early mixed transplants: head lettuce, spinach and beets. These we will plant every 6 inches, since we are only using one row per bed. They will get lots of room before we harvest them to make room for squash to sprawl over adjacent beds.
Mixing early maturing vegetables in one bed and late maturing vegetable in another is called alternate maturity patterning. It represents a very efficient use of space.
By the end of the season, growers have a bountiful and beautiful garden that requires no weeding. They can efficiently water crops and enjoy easy access to water for cleaning in the field. And, most importantly, the soil is ready to grow fine-seeded crops the next year, like carrots, seeded lettuces, radishes and more.
We started this series by discussing how to string together a series of pro grower tricks to make a successful first-year garden. As you have seen, my friends and I did just this while establishing their new garden. We used:
Layout strategies
Permabed-building methods
Irrigation systems
Pre-weeding
Zipper bed techniques
Four-sisters guild design
Alternate maturity patterning
Consider these different pro grower tricks and see how they can be applied in your first-year gardens. Also think how they can be used in other situations. Are you re-building an older garden plot that has gone into a very bad weedy state? Can you do so without losing it production potential for a whole year?
Maybe zipper beds could help. Or perhaps you’ve learned other strategies along the way that you could incorporate to maximize growing success.
You might find a Chicken of the Woods as a single shelf of a few pounds or a cluster of shelves weighing as much as 50 pounds, or anything in between. It might be growing high enough to require a ladder or on the ground at the base of the tree. The color varies but is always striking: panic orange, cadmium yellow or, less commonly, a pastel salmon color.
If you’re lucky, you’ll find it at its most tender: still growing and slightly dewy. In most cases, you can grab a shelf with both hands and gently wiggle it until it releases from the tree. Otherwise, cut the tender portions away from the tree (L. sulphureus) or the ground (L. cincinnatus) with a knife.
I’d heard many times that the mushroom called Chicken of the Woods tasted like chicken. I wanted to know the truth.
I got my answer at the Asheville Mushroom Club’s big annual weekend of forays and feasts some years ago. Someone handed me a small plate with bite-size pieces of Chicken of the Woods in a luscious tomato-cream sauce.
At the first bite I knew the truth. If someone had told me with a straight face that this was a plate of chicken, I would have swallowed that story as fast asI could fork up another bite. It had the very same taste and texture. My advice to nostalgic vegetarians? Cancel the Tofurkey and order Fungicken instead.
This is a gourmet mushroom. Rinse it under the faucet while hand-shredding it into bite-size pieces. (It tears like cooked breast meat.) Serve well cooked in a soup, stew or sauce. Or let it cool and prepare as you would chicken salad. Tear it into bigger pieces if you want to grill it, slathered in marinade. Or bread it and fry it. And then invite your friends over for dinner.
Preserving
The texture becomes chewy when dried and rehydrated, so sauté first and then freeze. Then don’t thaw it out, just cook it.
Can be cultivated by inoculating stumps or large logs outdoors.
Look-alikes
There are no poisonous look-alikes on deciduous trees, but similar-looking species growing on evergreen trees (conifers and eucalyptus) may be inedible, cause gastrointestinal distress, and/or have resinous flavors.
Sidebar: Chicken of the Woods
Laetiporus sulphureus
Meaning of the Latin name: bright pores, yellow color of sulfur
Also known as: Chicken Mushroom, Sulfur Shelf, Spring Chicken (when found early in the season), Chicken of the Hood (when found inside city limits)
Comparable species: L. cincinnatus (named for Cincinnati)
This excerpt from Frank Hyman’s How to Forage Mushrooms without Dying originally appeared in the September/October 2021 issue of Chickens magazine.