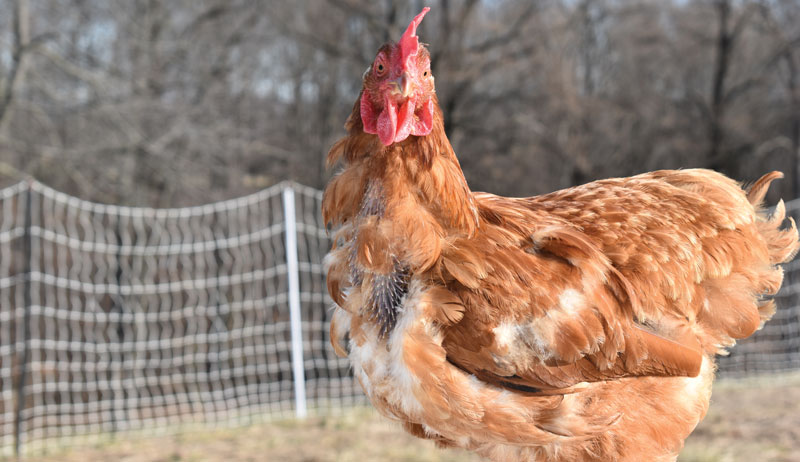
Kristyn Mader is a proud egg-slinger who presides over a fine troop of chickens, ducks, rabbits and peafowl at Mader’s Coop in Corrales, New Mexico.
“I grew up with chickens as a child,” recalls Mader, whose family farm also featured geese, horses and goats. “Any time I would have a bad day I would go sit in my favorite spot that I carved out of the haystack.
“I would sit there and watch the chickens, talk to them, hold them and instantly feel better. Ever since my childhood I have longed to have a farm again.”
Taking a moment out from running her own Mader’s Coop farm, we spoke to Mader about the dynamics of raising peafowl and the mischievous nature of Silkie chickens. We also got the story behind the popular Tubby Chickens Tuesdays social media hashtag.
Along with chickens and ducks, peafowl play a crucial role at Mader’s Coop. Generally describing their personality as being “docile and very timid,” Mader says that one of her adult male peafowl is an exception to the rule.
“I hand-raised James, and he is different,” she explains. “James loves to be scratched and petted. He’s very tame, curious and affectionate. James is very special to me.”
When it comes to the way the peafowl at Mader’s Coop interact with other animals at the farm, Mader says that she mostly keeps them separated.
Well, with the exception of James.
“He free ranges with the chickens and ducks from time to time, and they all get along very well,” she says. “James loves to show off for the hens. My rooster doesn’t dare challenge him. I think he knows he wouldn’t win that battle!”
Beyond James, the rest of the peafowl at Mader’s Coop dwell in a large enclosure, in part to ensure that a sense of wanderlust doesn’t kick in and tempt them to fly away.
Mader highlights a tiny Silkie chicken named Bugsy as being among the most mischievous of animals at Mader’s Coop. “She’s the smallest chicken in the flock and has the biggest attitude!” she says. “Bugsy will challenge any animal big or small—no peacock, duck or rabbit can scare her!”
In terms of Bugsy’s attack tactics, it seems she favors sneaking up behind her victims in order to steal their snacks. “If they even attempt to chase her, she will turn around and go after them,” says Mader. “They run away every time. It’s hilarious!”
Some of the most popular posts on the Mader’s Coop Instagram account involve the #TubbyChickenTuesdays hashtag.
“My daughter and I love chubby chickens!” says Mader as she breaks down the origin of the series. “The fatter, the cuter in our book!”
Mader says that originally she wanted to create a hashtag that enabled people to showcase their “adorably plump chickens”—and that Tubby Chicken Tuesdays “just stuck.”
Detailing the sort of attributes that the ideal tubby chicken possesses, Mader says that they would “be the largest in the flock, usually the last one to leave the food bowl and the one that eats up every last crumb off the ground.” She adds, “They usually wobble when they walk and have no problem running over any hen for a piece of bread.”
When the days start getting shorter, you may walk out to your coop to find feathers everywhere! Worried, you take a head count and find no one is missing. There are a ton of feathers and you notice a few of your birds are bald.
You think to yourself: “Surely a predator did this!”
While a predator could be likely, what is also likely is that your flock has begun their yearly molt. Now this is a little overdramatized. But right at 18 months of age, a flock will lose a majority of its feathers over an 8-week period.
After your chickens finishing molting for the first time, it’ll continue annually. New feather growth can take up to 16 weeks to complete.
Molting looks different on different chickens. There are many factors that play a role in how a bird molts and how quickly they bounce back from it. The first sign that molting has started is chickens will start to look a bit dull, as feathers lose their sheen.
After that point, you can have a chicken that goes through a hard molt and blows off all their feathers at once. These chickens look bald.
You can also have a bird you hardly notice is molting—with an old feather here, a new feather there. You’ll especially notice roosters because some tend to lose their tails during molt. Molting starts with the head and works its way down to the tail feathers.
Growing FeathersInstead of Laying Eggs
When chickens are molting, they regrow their feathers. An old feather falls out and is replaced with a pin feather. This pin feather is covered in a protein sheath. As the feather grows, the sheath falls off.
You’ll notice a few things happening with your flock during a molt other than the multitude of feathers. Egg production will drop off tremendously, and you may not even get any eggs at all.
Molting and the combination of lost sunlight are factors that play into the sudden decrease of eggs from your chickens.
Molting chickens have to conserve their nutrient reserves. Growing those feathers and the protein sheaths is a lot of work! Especially when their feathers are 85 percent protein.
Weight loss may also be a factor.
During a molt, your flock is hard at work making sure new feathers will offer just as much warmth and protection as old ones. Your normally sweet birds may be standoffish or even mean during this time.
Molting can be a very painful and stressful time for your chickens.
There are so many methods and tricks to help your flock’s molt go smooth and less stressful. Some are very mainstream, and some I will discuss are tools I employ within my own flock.
At the first sign of molt, start boosting treat time on top of their regular diet. Your most helpful treats are as follows.
Eggs
Scrambled or boiled eggs are going to be a great treat that is chock full of protein.
Cottage Cheese
Cottage cheese is high in protein and is easily digestible for chickens. It also has a low fat content so you do not have to worry about overfeeding.
Yogurt
Yogurt is an excellent source of calcium and beneficial bacteria for your flock’s intestinal health. This treat must be monitored. Feeding too much can cause diarrhea
Broccoli
Broccoli has many nutritional beneficial properties and also contains some protein!
Tuna & Sardines
Tuna and sardines are also full of many nutrients that are beneficial during molt. Be careful with this one also. Any additives may cause intestinal upset. Fresh is best over processed. If you can’t find fresh, tinned is fine, but stay away from added salt.
Pumpkin Seeds
Pumpkin seeds are high in protein and a great treat! Every year, my flock gets a few whole pumpkins cut up in quarters. They eat them down to the rind and absolutely love it.
Mealworms
Mealworms are always going to be a flock favorite. Being that they are also packed with protein to help through molt, keep some on hand to help when molt time hits.
Maggie McManus/Shutterstock
Sprouted Lentils
Sprouted lentils are an excellent treat that is very easy, inexpensive and full of protein, too! You may have to DIY your lentils but it’s worth it.
Sunflower Seeds
Black oil sunflower seeds are easily available, cheap and full of nutrients! If your birds start having weight loss, this is an excellent treat for them. The oil will also help those new feathers come in shiny and soft.
Dog Food?!
This next item may seem controversial to some, but it has helped many of my hard molt birds through their molt. I only give this treat in emergency situations. If you notice one of your birds isn’t doing well, at the first sign I give mine moist high-protein dog food. It is packed with protein and will definitely boost your bird’s nutrient intake.
Please keep in mind that none of these treats listed here should replace or outweigh your flock’s regular dietary feed. It’s not best practice to give all these treats year around. Reserve most of these treats for hard winters and molting season.
Molting can also be painful for chickens. I know we all fear sunburn when we have that one hen that goes bald on the back. But forego the chicken saddle and push off handling your birds until their molt is almost completed.
If you break these new feathers, they can bleed. Even accidentally touching these feathers can cause pain. In turn, that will stress your birds.
It’s the same with putting on a chicken saddle. The pin feathers have a vein-filled shaft and can end in a point. If those feathers somehow get hung in the fabric of a chicken saddle, they can break and again start bleeding.
If possible, I would separate all roosters during this time. They can cause damage to those feathers as well while mounting the hens. Especially not having the added protection of a hen’s feathers during this time, the rooster’s spurs can cause some open wounds on the skin.
S.Reed/Shutterstock
Keep Them Occupied
Chickens are already very stressed while molting. Their nutrient deposits take a hard hit, leaving them vulnerable. And you may notice they aren’t as active as they were a few weeks ago.
They’ve shed feathers, which also leaves their skin vulnerable to the elements and pests. Skin sores can develop, and your chickens will be grumpier than usual.
Keeping their environment during this time as stress-free as possible will help them recover quicker. Never move your flock members during molt. This will take a tremendous toll on them. Personally, I coop up my whole flock during this time, .
My roosters are put into a bachelor pad away from my hens to keep them from fighting. They are given areas that provide shade. And to keep them from picking on each other or becoming stressed out, I give them boredom busters that incorporate treats to help with their molts.
Here are my favorites:
DIY Chicken Swing
This one is pretty easy. All you need is a sturdy 2-inch branch and some twine. Tie the twine on either side of the branch and attach to something sturdy in their pen or you can build a stand.
Hay Ball
A regular hay ball with a large head of broccoli will keep your birds busy for quite some time.
Whole Pumpkin
Simply place a whole pumpkin with a few holes cut into the sides. You can also hang it up if you would like. Chickens are curious, and once they realize it won’t hurt them, get ready for some funny antics.
Live Crickets
Releasing live crickets into your chicken pen will give your flock some exercise while they get the reward of a tasty treat packed with nutrients that they need.
Treat Bottle
This is a good way to recycle those plastic bottles you no longer use. Put some 1⁄2–inch holes in a plastic bottle. Fill it up with treats and place inside your pens. Use more than one bottle to keep fighting down.
Sprout Lentils
This will give your birds a good nutrient boost and is also simple to do. Get your lentils and put them in a container. Let the lentils sit overnight in water. Drain the water the next day. Every 12 hours cover the lentils in water and drain. Repeat that process until you get to your desired size! Typically that is around four days if you are sprouting a lot of them.
These boredom busters should be introduced slowly and gradually over a course of time. Introducing all of these at once may stress your chickens, and that is the last thing we want to do while they are molting.
The busters that include treats should also be done in moderation and should not replace your flock’s feed or primary nutrient source.
The first time you see your flock molt can be worrying, but with the above tips I’ve used over the many years of having my flock, you all will pull through just fine. While molting may look like a serious issue the first time you see it, it’s very natural and will occur every year.
Sidebar: Build a Bath
The final tool that I implement during molt is adding a few things to my flock’s dust bath. Dust bathing helps during molt by helping keep pests at bay and also helps those loose feathers come out. Don’t be alarmed if you come out one day and their dust-bathing area is full of feathers.
Outside of molt season, my flock’s dust bath is the following:
25 percent wood ash
25 percent diatomaceous earth
50 percent dry dirt
This is just my personal practice with my chickens, but once molting season kicks off, I change the dust-bath formula to:
25 percent wood ash
25 percent sand
25 percent dry dirt
5 percent diatomaceous earth
5 percent dried & crushed lavender
5 percent dried & crushed lemon balm
5 percent dried & crushed mint
5 percent dried & crushed chamomile
Sidebar: Birds of a Feather
Molting doesn’t apply to only chickens in the avian world. Every avian of every species has some type of molt. Quail, ducks, geese, swans and even wild birds have an annual molt. If you keep any of these other species, most of the tips above still apply!
Waterfowl and quail need a heavy protein boost, just like chickens. Most ducks will have two molts a year, while geese and swans will have one annual molt. Quail will have one to two molts a year, depending on the species.
Ensuring that your waterfowl has plenty of fresh, clean water available to swim in will play an important role in helping their molt along. Your once-very-friendly duck or goose will be irritable during this time. Molt affects them the same as chickens regarding how the feather grows and that it can be painful.
This article originally appeared in the September/October 2021 issue of Chickens magazine.
Our neighbor Bob started his chicken flock shortly after moving to our township five or so years ago. He was very excited to leave the city for life in the country. Bob couldn’t wait to fix up the property’s rundown coop and keep hens of his own.
It wasn’t long before we saw Bob’s flock contentedly foraging on his lawn. Bob eagerly embraced his new lifestyle and his new hobby of poultry keeping. He’d stop by every now and then to tell us about his girls’ antics and to ask advice about feeders, layer rations and supplements.
He enthusiastically joined dozens of online chicken groups. Frequently, he waxed poetic about the exotic breeds he hoped to own one day.
I was therefore surprised to unexpectedly find Bob parked in my driveway when I came home from errands late one morning. I was even more shocked to discover he was very visibly upset … and cradling a towel-wrapped bundle in his arms.
Inside the towel was a young hen, her wattles and comb very bloodied. The blood matted the feathers around her face. She held her eyes tightly shut. This poor girl looked like she’d been on the wrong end of a street brawl.
It turned out that I wasn’t too far off in my initial evaluation. Bob explained that a member of his online chicken groups had decided to sell off his flock of Swedish Flower Hens. Bob jumped at the chance to own one of his dream breeds. He bought a year-old hen and arranged to have her shipped overnight.
Eager to add her to his existing flock, he waited until it was dark and his birds were asleep, then slipped her into his coop. When he went to release his flock in the morning, he was horrified to find several of his hens’ beaks streaked with blood. The poor little newcomer cowered in a nestbox, battered and bleeding.
I cleaned up the poor hen as best as I could, then placed her in a cardboard carton with plenty of shavings, a small dish of food, and a canning-jar waterer doctored up with electrolytes. Once she finally relaxed and settled down, I sat down with Bob, who was somewhat calmer now that his prize pullet was resting.
As gently as I could, given the poor guy’s emotional state, I went over a few crucial points regarding introducing a new bird to an existing flock.
Do the Pre-Lims
Before you consider adding a chicken to your flock, especially one that was previously owned, make certain you ask as many questions as possible to determine the health and condition of the hen in question. This is particularly true if you are buying a bird sight unseen from an online source and won’t have the opportunity to examine it in person for yourself.
Consider asking the following:
Where and when was the bird hatched?
Is the bird a purebreed or a mixed breed? If the latter, which breeds?
Was the bird vaccinated against Marek’s, Newcastle and other diseases. If so, when?
Has the bird ever had issues with worms, lice, mites or other parasites?
When did the bird reach point-of-lay? How often does she lay?
Has the bird ever been injured or sick?
Has Marek’s ever been confirmed on your farm?
Having the answers to these questions will give you a better idea of what you’re actually buying. Don’t forget to request photos or a video clip of the bird in question. Walk away if the seller refuses to provide any visuals.
Ask for referrals to ensure your seller is reputable. If the seller lives in another state, check your own state’s National Poultry Improvement Plan (NPIP) requirements to ensure your purchase does not violate any laws.
Mandatory Isolation
Even if you get assurances that your bird is the healthiest chicken around, it’s crucial that you keep your new bird separate from your existing flock for at least 30 days. Housing for your newcomer during this isolation period should be at least 30 feet away from your established coop and run to prevent contamination by airborne agents.
A one-month isolation period will give any illnesses your new bird may have brought along time to manifest. Introducing a newcomer any sooner can run the risk of infecting your flock with an imported condition that might jeopardize their health … and lives.
Once the isolation period is over, your new bird is ready to join your flock. But your flock may not be ready for a new member.
Anything unfamiliar can be very disruptive to the existing social order of an established flock. Furthermore, if your birds are territorial or if you have a rooster, the newcomer may be seen as an invader and dealt with accordingly by your flock.
Meet-n-Greet
The most successful method of introducing a new chicken is by first getting the birds accustomed to each other visually. Set up a temporary pen close to your flock’s run so the birds can see each other on a regular basis.
After a week or so, move the pen into your flock’s run. This allows the chickens to be closer together, on your flock’s home turf. But it also maintains protection of the newcomer.
After another week, remove the temporary pen so that the new hen can spend the day with your flock. But be sure to return her to her own pen every evening.
Eventually your new girl will be fully integrated. At dusk, she will follow your flock into their coop—now her coops as well—for the night. This might take anywhere from a day to a couple of weeks
Avoid Bad Advice
In his excitement to add a Swedish Flower Hen to his flock, Bob forewent most of these preliminaries. Worse, he followed advice he’d seen in one of his online groups: sneak a new bird into your coop at night and, in the morning, the other birds will treat her as if she’d always been there.
He—and the little hen—sadly experienced the consequences of that advice first hand.
Fortunately, the Swedish Flower Hen, whom Bob named Petal, recovered completely. And after Bob followed my advice regarding a slow integration, she became a content member of his flock. So did several other hens he added after her.
The following egg experiments aren’t cheep tricks! They provide an excellent opportunity to spark curiosity about the natural world in children (and curious grownups) while also explaining some of the principles of physics and chemistry.
There are many different STEM (Science, Technology, Engineering and Math) projects that can be done using eggs. Here we present a few more of our favorites that use materials you likely already have around the house.
So grab an egg carton, and let’s see if these science experiments are all they’re cracked up to be!
The Incredible Shrinking Egg
For this experiment, you’ll need the following:
a hard-boiled egg, cooled and peeled
a glass bottle with a mouth that is about 1 1⁄2 to 2 inches wide (slightly narrower than the egg)
a match
a small piece of paper
a responsible adult
Use some water or vegetable oil to make the mouth and neck of the bottle a bit more slippery. Then, have an adult use the match to light the strip of paper and drop it into the glass bottle.
Quickly place one end of the egg on the mouth of the bottle and wait. The fire will go out soon, and the egg should drop into the bottle!
How does this work? The fire causes the air in the bottle to heat up and expand, but some of this air escapes from the bottle, past the egg. When the fire goes out, the air left in the bottle cools off and contracts.
This creates an area of low air pressure inside the bottle. Air from outside tries to enter and pushes the egg into the bottle.
Float It
Put an egg in a cup of water, and watch it sink to the bottom. This happens because the density of the egg is higher than the density of the water.
However, if you add enough salt to the water, the egg will float back up to the surface. Adding salt increases the density of the solution. The salt increases the mass without changing the volume very much.
When enough salt is added to the water, the saltwater solution’s density becomes higher than the egg’s. This will cause the egg to float.
Next, let’s examine the science behind two popular uses of eggs in cooking and baking. First, how do eggs change when they’re cooked?
Eggs contain large amounts of proteins, especially in the egg whites, which are about 90 percent water and 10 percent protein. These proteins are folded-up molecules made of chains of smaller building blocks, called amino acids. Amino acids are kept folded by weak bonds between different parts of the protein.
When an egg is fried, the heat breaks the weak bonds. The protein chains unfold in a process known as denaturing.
These unwound proteins now can form new bonds with each other and create a web of connected proteins that prevents water molecules from flowing freely. This results in egg whites becoming solid.
Unlike the white, the yolk is about 50 percent water, 30 percent fat and 20 percent protein. The fat in the yolk slows the breaking of protein bonds and formation of new webs of proteins. As a result, the yolk cooks slower than the egg white.
Africa Studio/Shutterstock
Fluffy Foam
Next up in our egg experiments, let’s examine a way to separate the yolk and egg whites. Then we’ll learn how to whip egg whites to create fluffy foam.
To separate the yolk from the egg whites, we can use air pressure to our advantage. By taking a plastic water bottle and squeezing it, we reduce the amount of air in the bottle. Then, if we place the mouth of the bottle on the yolk (without breaking it) and stop squeezing the bottle, the air pressure in the bottle decreases.
Air attempts to rush in, drawing the yolk up in the process.
Now, we can take the separated egg white and whip it into fluffy foam. Whipping the egg whites unfolds the protein chains, just like heat. It introduces air bubbles into the mix as well.
The unfolded proteins form new bonds with each other, creating a web that holds air bubbles inside the foam. This new arrangement of proteins causes the egg white foam to become more solid. The air bubbles trapped inside are what cause treats that contain whipped egg whites to be light and fluffy.
If you really want to make this experiment yummy instead of plain old fluffy foam, you can make a meringue! Additional ingredients include sugar and cream of tartar. Sugar makes it taste good (of course) while the cream of tartar (an acid) stabilizes the egg whites and keeps the proteins in them from sticking together.
This is what gets you that nice, fluffy, airy mouth feel.
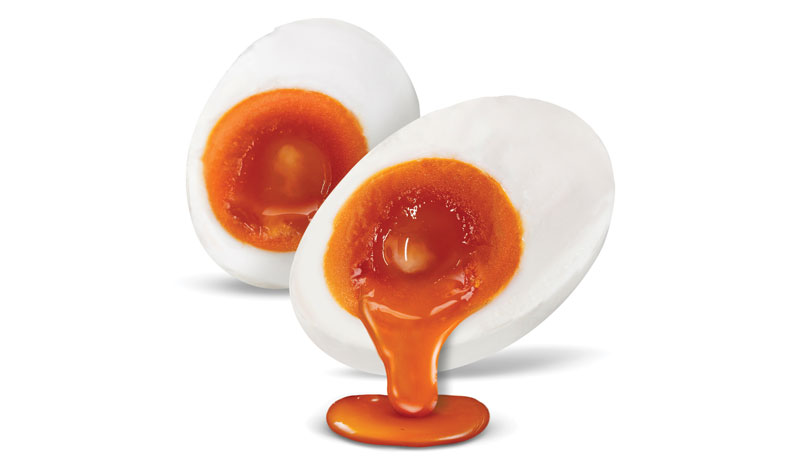
This is one of our more impressive egg experiments. You don’t need to wait until April Fools’ Day for a good practical joke. You have to keep your family and friends on their toes throughout the year! A great way to do this is to make your chicken eggs have red-colored yolks.
The same principle that makes egg yolks yellow can also make egg yolks red. Big picture: Yolk color in laying hens is primarily determined by the content and profile of pigmented carotenoids (yellow, orange or red pigments that dissolve in fats present in plants) in their feed.
Yolk color doesn’t correlate with any specific nutritional benefits. But in many parts of the world, including the United States, consumers usually prefer to eat eggs that have darker colored yolks.
But dark yellow isn’t the only color they can be!
To give your hens red-orange-colored yolked eggs, feed them red chili peppers at a concentration between 1⁄2 to 2 percent for about two weeks.
Note: Birds don’t sense “hot” or “spicy.” This is why you can add cayenne pepper to your birdseed to discourage squirrels from eating the seeds. Now, if there was only a way to make the yolk purple with pink polka dots!
Thank you for checking out this issue’s batch of egg experiments and science. We hope you were thoroughly hen-tertained! Check out our original batch on experiments here.
Sidebar: Did You Know?
Eggs are about 105 degrees Fahrenheit when laid. According to the Iowa Egg Council, as they cool, the liquid inside contracts. An air cell forms between these two layers at the large end.
Eggshells aren’t completely solid and contain as many as 7,000 to 17,000 tiny holes—1⁄1000 of an inch across—which allow for the input and output of oxygen, carbon dioxide and moisture.
The white and yolk are close in terms of protein. But the yolk has much of the egg’s omega-3 fatty acids, vitamins B6 and B12, folic acid and all of the A, D, E and K vitamins.
Chickens don’t produce one egg at a time. Instead, hens normally have several eggs in various stages of development.
This article was written by Alec Michael a Ph.D. student in epidemiology at UC Davis and Maurice Pitesky, D.V.M. and faculty at the UC Davis School of Veterinary Medicine. It originally appeared in the September/October 2021 issue of Chickens magazine.
I was standing in the checkout line in my local big box home improvement/garden store recently when I noticed stacked next to me shoulder high bags of lawn “weed and feed”for fall application.
Pictured on the front of the bags was a fist full of dead dandelions.I cringed.
Ever since I read Anita Sanchez’s book, The Teeth of the Lion, I’ve been in love with dandelions.In her small (121 pages) book, Sanchez, a senior environmental educator at the New York Department of Environmental Conservation, makes a compelling case for, if not loving, then highly respecting the common dandelion.
Dandelions love sun. They will tolerate some dappled shade, but they need sun to thrive.
One good reason to love dandelions is their bright, cheerful flowers after a long winter. Bees and other insects are hungry for nutrient-rich nectar as they emerge in the early spring. The dandelion is one of the first flowers to bloom, providing them much needed food.
The dandelion’s flower is really a cluster of many individual flowers. Each has its own seed, providing a feast of nectar within each flower head.
You will be glad you left your dandelions alone when the native bees and other insects show up in your garden to pollinate flowers and vegetables. They survived to work for your benefit in large part because they were well fed by dandelions.
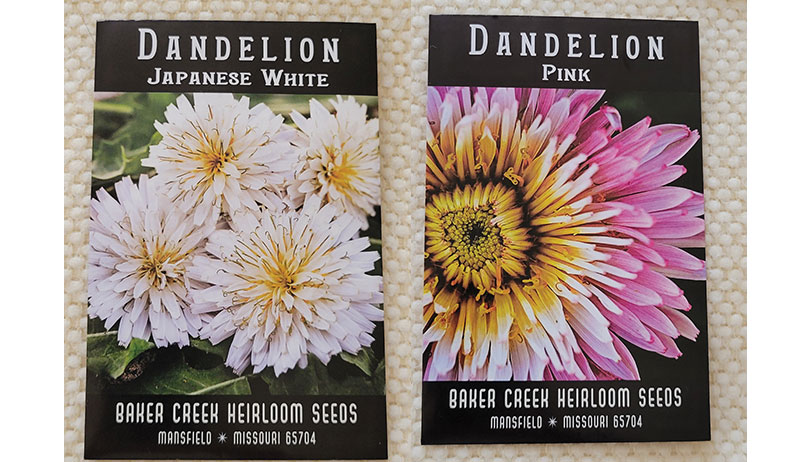
Did you know that back in the 19th and early 20th centuries our grandparents planted dandelions for show? They even exhibited them at county fairs and other garden competitions.
In Japan growers love their dandelions so much they bred them in colors of pink, white and red. Today, several companies specializing in rare seeds offer the white and pink dandelion seed as well as a French culinary dandelion seed that claims to produce less bitter greens.
Vicki Van Harlingen
Dandelions Are Vitamin Powerhouses
Another reason to love dandelions is for their use to humans.Dandelions are not native to North America.They were brought here by Europeans who knew their value as a medicinal plant.
Dandelions can be found on every continent of the world except Antarctica.
Early man didn’t know dandelions housed a vitamin powerhouse. The plant holds more Vitamin C than tomatoes, more Vitamin A than oranges, and tons of vitamins D, K and B complex. Dandelions are also a great source of protein, iron, riboflavin, calcium and thiamine.
Bt what our forebears did know from long experience was that, even before the snow melted, the dandelion put up a rosette of green leaves and deep roots. So they made a spring tonic made from those leaves and roots to heal a variety of possibly fatal late winter health issues (think scurvy and jaundice to name just two).
Your great great grandparents may have survived long enough to have children because they grew dandelions in their gardens.
One of the very best reasons to love dandelions is their value in our ecosystem.
Dandelions are also a seral species. Seral species are hardy plants that quickly move into disturbed soils to begin the renewal of an ecosystem after a fire, flood, insect invasion or other natural or manmade disaster.
Imagine a forest after a major fire. Nothing remains of the forest but ash and skeletal tree trunks. The dry, hard dandelion seed, just 1/8 inch long and covered in microscopic barbs, is born on the wind via its puff ball “parachute” to the blackened soil.
It glides to earth, parachute intact above it, swaying gently in the breeze. The swaying action helps the barbed seed drill into the soil to begin the process of germination.
With just a little bit of moisture, the seed quickly germinates. The plant develops not only a deep tap root, but a web of tiny rootlets searching for nutrients to power the dandelion’s first set of leaves.
In the process these roots “till” the soil. They open the ground for other seeds to germinate and begin the forest’s renewal process.
That first set of dandelion leaves decomposes and fertilizes the barren soil.Grasses move in, then shrubs and finally trees, which shade out the dandelion. With the shade of the new forest, the dandelions’ work is done, and it slowly fades away.
If you have had sheep for any amount of time, you may be aware of one of the most talked-about health issues—worms. At least, that is my impression after talking with friends who own sheep and reading group messages from sheep farmers online.
One big problem that many sheep owners face? Drug resistance to various types of worms—including the barber pole worm.This particular worm has small teeth that latch on to the stomach wall and cause bleeding. The worm then feeds off the blood.
It’s not surprising to find that long-term, large infestation with the barber pole worm can cause your animals to become anemic.
But you don’t need to feel not helpless against the parasite. The FAMACHA scoring system will help you keep your sheep healthy.
FAMACHA?
In a nutshell, a FAMACHA score involves looking at mucosal tissue of your sheep, like that around the lower eyelid. Your observations help determine the presence of anemia in animals.
The scoring shows five levels of eyelid color. You give the lowest number to the most healthy, pinkest skin. The highest, five, goes to the most pale color, which indicates anemia.
According to the ACSRP site, use the FAMACHA score to only treat the animals that are in the three through five range. The sheep that have pink lower eyelids do not need treatment, according to the ACSRP instructions.
Why? It seems that parasites like some worms can become resistant to the worming medicine … but not all. So if you worm all of your sheep, you’ll kill the worms that aren’t resistant but leave the ones who are not affected by the wormer.
And when those worms breed, you’ll have “super worms”—not something you want to aim for!
But by only treating the sheep who are being affected by worms, the other animals are left with both kinds of worms. The resistant and non-resistant worms interbreed, thus diluting the gene pool with worms that are more susceptible to the worm medicine.
The ACSRP calls it “parasite refugia.” And that increases your chances of killing worms in the future.
Helpful Guidance
One benefit of tracking your sheep flock’s FAMACHA score? You will use far less wormer medicine. It’s estimated that 70 to 80 percent of the infections only occur in 20 to 30 percent of the animals.
From that, you may even want to make decisions about which sheep you will breed (or not breed) in the future.
Another fact to pay attention to is that recently weaned lambs and nursing ewes can be particularly susceptible to worms. So if you have any doubts about a lamb, worm it.
For those who are interested, there’s an online FAMACHA certification class through the University of Rhode Island. It’s free, but you do have to do a bit of work. For example, you’ll make a video of yourself testing one or more animals with the proper recommended techniques.
By the way, the ACSRP has a ton of information for owners of small ruminants. I bookmarked their site and plan to go back and read more about parasite control later.
Our gardens are home to many natural predators, from the familiar ladybirds and spiders to the less familiar rove beetles and parasitic wasps. These natural predators, or ‘beneficials’ as they are called, are your first line of defense.
Natural predators are important in all habitats, natural and artificial. In nature, the populations of wasps, ladybugs, spiders and birds have long regulated the abundance of pests. For example, in a stable forest ecosystem, predators keep 90 percent of the arthropod herbivores below outbreak levels. Spiders control Douglas fir tussock moth caterpillars and birds will prey on gypsy moths. Under normal conditions, predators can prevent outbreaks when pest numbers are low to moderate, but problems can arise when there is a change in the weather or a natural disaster, such as a fire, flood or drought, which causes the balance between the prey and predator to be disrupted.
The Predator-Pest Balance
Much research has been carried out on pest-predator relationships and it is clear that systems with a low biodiversity are particularly vulnerable to pest outbreaks. This is what we must try to avoid in our gardens. In my own growing space, I am aiming for a mosaic of habitats in order to attract a wide range of beneficials to prey on different types of pests. Over the last 10 years, I have seen a steady increase in biodiversity and now it’s not unusual for me to wander around the garden and spot a variety of predators. I still have pests, of course. In order for these predators to thrive, there must be some prey animals, so I have had to learn to live with low levels of pests to keep my beneficials fed! A key challenge, though, is to make sure that there are enough predators around early in the growing season to control the problem aphids, whitefly, red spider mite and various larvae, so that their numbers don’t spiral out of control. The peak season, as far as pests in the garden are concerned, is early summer, so you need the beneficials to multiply rapidly to take advantage of the food bonanza, and this needs to continue through mid-summer. You can achieve this by understanding their life cycles and dietary requirements as well as providing the right plants and over-wintering habitats to enable them to thrive. Clearly, it’s also very important to be able to identify predators at each stage of their life cycle.
It’s important not to overreact when you see pests. For example, you might notice that your broad beans are smothered by black fly and decide that you need to do something quickly to prevent serious damage to the crop. But this is where you have to be careful. If there are lots of prey around, it is likely that you already have increasing numbers of predators, as the predators will lag behind the prey in the population stakes. If you are tempted to ‘take the nuclear option’ and use a chemical spray, you may well take out both prey and predator and, in doing so, you will destroy the natural cycle and won’t then have any chance of being able to get back some natural control. It is best, if you can, to be patient, let nature takes its course, and wait for the predators to ‘kick in’. If you can’t wait, check carefully for any predators on the plants before using an organic product or simply use your fingers to remove or squash the pests.
Parasitic Predators
I once read an article that described the actions of the parasitoid wasps as being far worse than any science-fiction movie! The scene of the creature bursting out of its living host in the film Alien may seem far-fetched, but it is happening every day in your garden, albeit on a much smaller scale. There’s a vast range of parasitic predators, or parasitoids, in the garden. The adult lives a normal, independent life, but their larvae hatch inside another living organism, consuming it and growing. This benefits our gardens if the host is a pest species. Usually, the host dies as or before the parasitoid emerges to live their adult life. Among the most common parasitoids in the garden are parasitic flies and wasps. Some parasitize a range of hosts, while others seek out specific hosts. The larvae feed on the host and then pupate, either inside or out, before emerging as an adult. The adults generally feed on nectar and pollen.
Parasitic Flies
These are not the annoying houseflies and bluebottles, but bristly flies that are mostly grey-black in color, with short antennae and huge eyes, but no biting mouth parts. They lay their eggs on leaves, so the host either eats the eggs or the newly hatched larvae as it feeds. They parasitize hosts such as caterpillars, sawfly larvae and leatherjackets. Once the host dies, the larvae continue to eat the remains before pupating and over-wintering. One of the UK’s largest flies is Tachina grossawhich parasitizes caterpillars; it is so large that it is often mistaken for a black bumblebee.
Parasitic Wasps
Wasps and bees belong to the order Hymenoptera: insects with two pairs of wings and a distinctive narrow waist. There are honeybees, bumblebees, solitary bees and social wasps, but remarkably, of the UK’s 7,761 species of Hymenoptera, around 6,500 are parasitoid. Parasitic wasps vary enormously in size, ranging from a millimeter to 30mm (1¼in) long. Many females have an ovipositor, a sting-like attachment at the end of the abdomen, which is used to pierce the body of the host and lay eggs. Their hosts are mostly butterfly and moth caterpillars and pupae, and sawfly larvae.
It’s easy to spot the larger Ichneumonids, but the small wasps tend to go unnoticed. Both inhabit our gardens. Like parasitic flies, the parasitic wasps can attack the eggs, larval and adult stage of the host. Once the parasitoid egg hatches, the larvae feed on the host’s body tissues, taking the fat stores and non-essential organs first, as they don’t want the host to die too soon. Once their larval stage is complete, they pupate. Some will pupate outside the dead host, others inside. Among those most commonly found in gardens are the tiny braconid parasitoid Cotesia glomerata that looks like a flying ant and parasitizes the caterpillars of the large white butterfly.
Chalcid Wasps
Chalcid wasps (pronounced ‘kal-sids’) are just 3–9mm (⅛–⅓in) in length. You can identify them from the swollen femur on the hind pair of legs and their glossy metallic colors. Because of their size, the number of chalcid wasps is often underestimated, but they are incredibly useful. They lay their eggs in the eggs and larvae of flies, beetles, moths, butterflies, leafhoppers, thrips and scale insects. Occasionally, you may spot one tapping leaf surfaces with its antennae in search of their host’s ‘scent’, but the presence of sick or dead hosts is a sure sign you have a healthy population of chalcids. Many of the smaller parasitic wasps are used as biocontrol in glasshouses.
Social Wasps
Not the most popular of insects, but we need to encourage this insect because it’s such a useful predator! There are eight species of social wasps in the UK, and they are both pollinators and predators. Their life cycle starts in autumn, when a mated queen hibernates in holes while the rest of the colony dies. She becomes active in spring, finds a nest site, and starts building the nest and laying eggs. Four weeks later, the first generation of workers emerges. The workers hunt for insects, especially caterpillars, to feed to the larvae, while the workers themselves feed on the sugar-rich secretions of the larvae. Social wasps are valuable predators in the garden, as they help to control the numbers of insect pests. But, by late summer, there is a decline in the number of wasp larvae and the supply of food for the workers dries up. Then they have to seek out sugar, which results in damaged fruits and conflict with people.
Spiders
Spiders are generalist hunters and have a varied diet. One important fact is that they tend to kill more prey than they eat, so they are incredibly useful in spring when they can limit their prey’s early population growth and generally exert a stabilizing effect. A garden can have a surprising diversity of spiders, which is important since the failure of one species won’t affect pest control if there are others to take its place. You can boost spider diversity by covering the soil with mulch, especially straw, and building log piles and bug hotels.
Centipedes
The fast-moving centipede is found in leaf litter, under pots, logs and in the compost heap. Centipedes use their jaws to inject a paralyzing venom into their prey. It’s easy to distinguish between the centipede and the closely related millipede, as centipedes have a single pair of legs per segment while millipedes have two. Even millipedes are not harmful; they mostly eat dead and decaying matter, which is why they are found under the bark of rotting logs and in the compost heap, so they have a useful role to play. It’s only occasionally that they will be tempted to feed on seedlings.
Earwigs
This invertebrate has a poor reputation but, on balance, it is broadly beneficial and adds to the predator diversity in the garden. Many gardeners trap earwigs with upturned clay pots on sticks stuffed with straw, especially around dahlias because they can damage the flower buds, but their benefits far outweigh their disadvantages. They are scavengers, predators and pollinators. They feed on dead and decaying matter, for the most part, but they will also prey on aphids, snails and other small pests and help to control codling moth on fruit trees. If earwigs are causing a problem around your young crops and flower beds, use live traps and move them to a log pile.
Amphibians
Toads prey on slugs and snails, grasshoppers, ants, flies and other invertebrate animals. They live away from water as an adult, digging out a shallow burrow in which to shelter and overwinter in deep leaf litter and log piles. You will also find toads in compost heaps, so it’s essential to do a toad check before you stick your fork in it. Frogs are similar in many respects to toads but are more agile, and they eat a similar range of prey. They hibernate over winter in pond mud or under piles of logs, stones and leaf litter. Both frogs and toads need water to breed so, if you want to encourage frogs and toads, then building a small pool is the answer.
Reptiles
If you live in a more rural area, it’s not uncommon to find grass snakes, slow worms and lizards in the garden. I have found grass snakes under piles of compost in the hoophouse, and gardeners frequently report seeing them under sheets of metal and finding their eggs in compost heaps. Grass snakes are useful predators, eating insects and small mammals, but they do take frogs and toads, which make up the bulk of their diet. Slow worms emerge from their shelters at dusk or after rain, to prey on insects, slugs, snails, worms and spiders.
To encourage reptiles, you need to provide an open sunny spot where they can bask in the sun. I put down corrugated metal sheets and broken pieces of slate, which grass snakes and slow worms can sun themselves on or shelter under. Lizards enjoy a sunny wall or pile of rocks in a sunny spot. The heat of a compost heap will attract the reptiles, too. Think about hibernation places as well, such as an undisturbed pile of rocks, log pile or pile of leaves.
Every once in a while a book comes along that you can’t believe hasn’t already been written. The idea is so obvious (and important) that it feels like someone must have published it already.
Well, Josh Volk beat all of us small farmers to the punch with his new book, Build Your Own Farm Tools.
Projects for Real Farmers
Fundamentally, the book delivers on its name. Build Your Own Farm Tools is a detailed guide to numerous building projects that will help your farm operate more efficiently.
Unlike the majority of other “farm DIY” books I’ve read, Volk’s builds aren’t at all gimmicky. Rather, many of the projects in the book are items that I myself have tried to build over my years of market gardening.
Let’s just say I would have benefited immensely from having Volk’s guidance back then.
Generally, the plans in Build Your Own Farm Tools are for pieces of equipment that are easy to overlook but have the potential to help growers operate with more ease and efficiency. Some of my favorites are his designs for a germination chamber, a hoop bender (for constructing DIY low-tunnels) and a winder for drip irrigation.
Although these kinds of projects might not be the most glamorous farm-builds, that’s not the point. What they are is extremely practical and rooted in Volk’s experience as a market-gardener. The designs are also immensely thorough, easy to understand and beautifully illustrated.
Part of what makes Build Your Own Farm Tools such a valuable resource is the fact that tools for the small-scale farmer are frequently hard to come by (especially on the domestic market).
This has changed some over recent years as farmers like Eliot Coleman, Conor Crickmore and others have designed tools specifically meant for small farmers. Still, there’s a substantial lack of supply and ever-increasing demand for tools specifically made for small-scale growers.
In light of this lack of supply, many small-scale farmers still adapt tools meant for much larger operations. Or, they resort to making their own tools without a blueprint to guide them. I’m certainly guilty of the latter.
Build Your Own Farm Tools, however, saves growers from either of these fates. With Volk’s guidance, they can channel their DIY spirit into creating tools specifically designed to work for their farms.
For growers looking to keep their costs under control (which includes most every farmer I know), Build Your Own Farm Tools is worth the $20 investment. Building some of your own equipment from Volk’s designs is sure to save you substantially relative to buying the same tools.
A commercial germination chamber, for instance, can easily cost several thousand dollars. The cost of Volk’s design comes in pretty far under that.
Plus, building your own tools comes with a satisfaction that’s hard to buy at the store.
The elder tree has long been considered sacred throughout Europe and the ancient Druids believed the shrub to be a gift from Mother Nature. Considered both a magical plant as well as a healing panacea, the many legends of this ancient tree were penned by Shakespeare himself and in modern times by the well-known author, JK Rowling.
Elder is a name commonly used to describe multiple species of the genus Sambucus. The most widespread species in North America is S. canadensis, although this elder is oftentimes considered a subspecies of the European elder, S. nigra.
The name Sambucus is said to be derived from the Greek word ‘sambuce’, an ancient wind instrument. You can easily remove the pith of an elder stem, leaving a hollow tube perfect for crafting into a traditional flute.
One can use the berries and flowers of Elder in a wide variety of applications, but note that the leaves, stems, roots, seeds and unripe fruits can be toxic. Additionally, people typically cook the ripe berries to make jams, jellies and syrups, straining out seeds to ensure product safety.
The most popular use for elder in the kitchen is crafting elderberry wine, a beverage made famous by many pop culture references including a song by Elton John and a skit by the British comedy group Monty Python.
You can also use the flower umbels of elder to make a delicious, savory fritter. Try this quick and easy recipe at home:
4-5 large heads of freshly picked elderflowers
1 large egg
½ cup all-purpose flour
1/2 cup ice-cold water
Pinch of salt
oil for frying
Gently shake any dirt or insects off flower heads. Cut the stems leaving 1 inch of stem for handling.
In a bowl, beat the egg. Add half of the water, pinch of salt and mix until well combined.
Add the flour and whisk until smooth. Add remaining water.
Heat 1/2 inch of oil in pan over medium heat. Holding the elderflowers by their stems, dip each elderflower into the batter, then drop them into the pan with the hot oil, flower side down.
Fry until lightly golden. Remove from the oil and drain briefly on a paper towel.
Elder berries and flowers are both considered useful in preventing or treating cold and flu symptoms. The berries are often crafted into a syrup that can be taken straight or added to teas or other drinks for medicinal benefits.
Here is a classic elderberry syrup recipe:
2 cups dried elderberries
4 cups water
2-3 tsp. dried ginger root
1 cinnamon stick
1 cup honey
Combine elderberries, water, ginger and cinnamon in a pot and bring to a boil.
Lower heat and simmer for 30 to 40 minutes.
Remove from heat and let steep for one hour.
Strain out berries and herbs using a stainless-steel strainer or cheesecloth. Be sure to squeeze out any remaining liquid!
Add honey and stir until well blended.
Pour into bottles using a funnel.
Growing Elder
Species of elder grow wild across much of eastern North America, and the shrub can easily be grown in any area offering full to moderate sun. Elder tend to prefer moist areas but will still grow well in drier soils.
Elder are very easy to propagate from cuttings. Simply clip off a stem of fresh green growth, preferably in the early spring. Trim off two thirds of the leaves and place the freshly cut stem into a jar of water. Leave the jar outside, away from direct sun for four to six weeks making sure to change the water on a regular basis. By the sixth week, roots will have developed all along the submerged part of the stem. At this stage, they are ready to transplant out into your garden to be enjoyed for years to come!
“Living off the land felt like a life we were both really drawn to,” says Lauren Bishop, who runs the start up permaculture-focused hobby farm Mandleman Manor in Queensland, Australia, alongside her partner, Tyler.
The roots of Mandleman Manor stem from conversations Lauren and Tyler had while engaged in a long distance relationship.
“We have both always shared a passion for sustainability and spoke at great length about our desire to live as sustainably as possible, in all aspects of our life,” Lauren recalls. “I was inspired to produce our own food after my weekly trips to the farmers market in the city, where I started to learn about the benefits of creating my own broths, fermenting and baking.”
We spoke to Lauren about turning eggplants into chocolate brownies and the importance of zone planning. We also found out about the farm’s resident Dorper lamb, Buttons.
Embracing best permaculture practices is key at Mandleman Manor. Lauren points to establishing and planning specific zones as an essential element of running the farm.
“The more accessible we make things, the more we will use them— it’s just human nature,” she explains. “Zone one, which is located around the house, has our greenhouse, water collectors, composting bays and kitchen garden, which homes our herbs and salad greens.
“Zone two, which is located only seconds from the house, homes our native bee hive and a wide variety of seasonal fruit and vegetables that require more space and less attention.”
Lauren adds that zone three hosts the barn yard where the animals dwell and graze. In the near future, Mandleman Manor will establish a new zone four for use as an orchard.
Along with farming, Mandleman Manor also provides a meal planning service. In a bid to minimize waste when it comes to extra bountiful crops, Lauren advises that preservation just makes sense if you find yourself with an abundance of one particular vegetable.
“An example of this is chilies,” says Lauren. “We have serval different types of chilies which I use to make curry pastes, chili-infused oil, chili jam and dried chillies for garnishes, sauces, soups and stews.”
“When a harvest is extra successful and you are inundated with a specific fruit or veg, finding different ways to experience one ingredient can be an exciting process.”
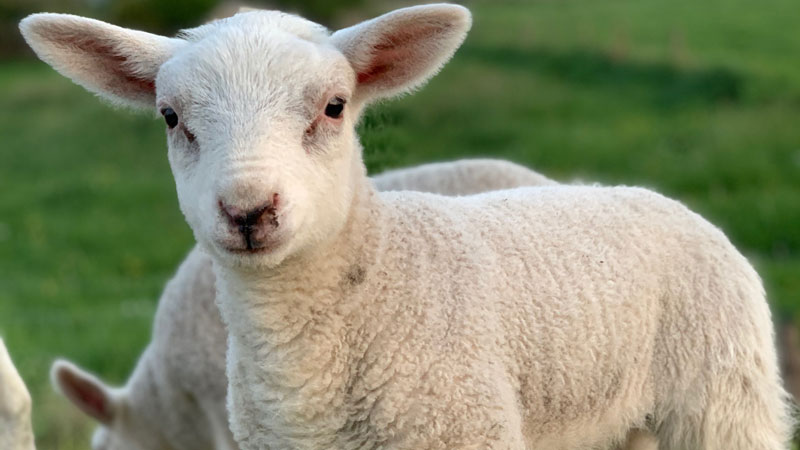
One of the stars of Mandleman Manor’s Instagram account is a fetching lamb named Buttons. The little ruminant experienced a hardscrabble start to life.
“Buttons is a neglected Dorper lamb,” explains Lauren. “Like most orphan lambs, they can be very demanding. This can pose challenges when integrating them with other animals.
“Buttons has a beautiful nature and is very affectionate. And whilst I do miss having her by my side all the time, I thoroughly have enjoyed watching her fit in with the other animals seamlessly.”
Reflecting on the Mandleman Manor journey so far, Lauren says that nurturing animals and produce has felt immensely rewarding.
“We love knowing that the foods we consume have no artificial processing, chemicals, preservatives or harmful ingredients added,” she says. “We both share a love for creating meals that are handpicked and harvested from our garden.”