Categories
Food Homesteading Recipes

How To Make Flavorful, DIY Nut Milk At Home

Enjoying nut milk doesn’t have to mean that you’re restricted to a dairy-free diet. But if you’ve tasted those available in your supermarket, you might see no reason to continue exploring them. They tend to be watered down and lack flavor. This is largely a result of the mass production necessary to create commercial nut milk. 

Crafting your own at home is simple. And more importantly the minimal effort results in a creamy beverage full of flavor. It’s surprisingly enjoyable and something you likely thought impossible for a beverage squeezed from nuts. 

Nut Milk Varieties

There are reasons why you don’t see a huge variety of nut milks on the market. One is the price of the nuts. The more expensive it is to source the base of your milk, the less appealing it is to make that milk.

The cost will have to be passed on to consumers.

For example, most people would rather enjoy a handful of macadamia nuts than pay a similar price to have it turned into a high-quality milk. 

The second is the characteristics of the nuts themselves. When handled in large quantities in a factory setting, it becomes difficult to control the bitterness of nuts such as hazelnuts or walnuts without a lot of hands on, time-consuming labor. 

Making nut milk at home is so appealing because it’s better quality but also because you can craft any type of truly delicious nut milk you want. Nearly any nut is fair game. If you want to stick to a lower priced option, your almond milk will have a much more assertive flavor.

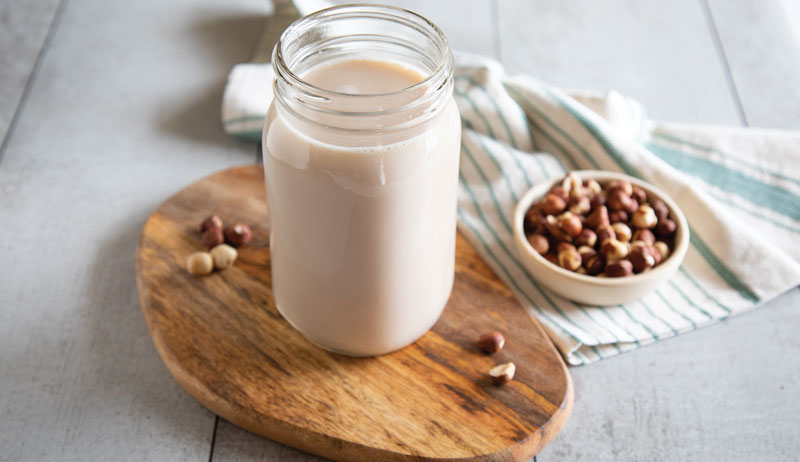
If you want to splurge a bit, creamy hazelnut milk is my very favorite. It’s the nut milk I’ll walk through making in this article. 


Read more: Grow your own nuts! Here’s how to get an orchard started.


Selecting Nuts

If you enjoy eating a type of nut, chances are you’ll enjoy a nut milk made from it. I think that dry-roasted and unsalted whole nuts—or halves, if using pecans or walnuts—are the best choice. 

This is especially true for hazelnuts because dry roasting removes some of their bitter skin but not all of it. It creates a better balance of flavor in the milk. The same tends to happen with whole dry roasted almonds.

But don’t worry if you can only find raw nuts. They make great milk, too. 

Soaking Nuts

The nuts need to soak for 2 12 hours so that they soften and can be blended into the water to create the milk. Keep in mind that the water you use is the base of your milk. 

If you don’t like the taste of your tap water, use filtered drinking water.

Any temperature is fine. I find that room temperature or even slightly warm, but not hot, water helps to extract the flavors of any whole spices you add to the mix. 

make nut milk DIY recipe
Lori Rice

Adding Flavor

In addition to the different types of nut milks you can make are the limitless flavors you can also create. Whole spices can add hints of seasonal tastes and gourmet twists to a nut milk, making it even more enjoyable to drink. 

The hazelnut milk here will be made with green cardamom and cinnamon. But star anise, black cardamom pods, whole cloves, allspice berries, coriander and even pink peppercorns allow you to craft some intriguing flavors. You can also use vanilla bean pods that have already been scraped for use in baked goods.

If you are using a lot of small spices, such as peppercorns or cloves, place those in a tea steeper or a small sachet of cheesecloth so that you don’t spend so much time fishing them out of your liquid. Whenever possible, though, I do like for the whole seeds or pods to come into direct contact with the soaking water.

They typically float, so it isn’t too difficult to get them out with a spoon before blending the nuts. 

You can use ground spices if you like, but overuse can cause grittiness in the milk. These should be added once you’ve strained the milk instead of when soaking the nuts.

This is also when you’ll add any sweetener. It can be sugar, but a syrup made with honey and water or pure maple syrup make better choices because they add sweetness and a complex depth of flavor.

Straining the Milk

Once nuts are done soaking, if you used any whole spices, those should be removed. Then the liquid and the nuts get transferred to a blender. There, they are pureed until the nuts are finely chopped and the liquid looks like a thin, cloudy smoothie. 

You can use either cheesecloth or a nut milk bag. Nut milk bags are convenient if you make a lot of your own nut milk, and I have used them before. But if you are like me and tend to have cheesecloth around for other kitchen or craft projects, it’s just as easy to cut off a large piece of it to make your milk.

There’s no need to get caught up in the grade of the cheesecloth. Anything between 10 and 90 will work. When working with cloth closer to 10, I layer two pieces to ensure no sediment from the nuts gets through. You’ll be able to judge this once you see what you are working with after blending the nuts and liquid. 

For the nut milk we’ll make here, a 14-inch square of cloth is plenty big. But you do want it to extend over the sides of the colander. If you are using a large colander, cut your piece a little larger. 

I prefer a mesh colander, but any type will do. Set it over a bowl. Drape in the cheesecloth, and secure it on the sides. Then pour the ground nuts and liquid over the cheesecloth.

Let that drain for about 5 minutes. Then gather the cheesecloth around the nuts, tie it at the top, and it’s time to get to work. Remove the colander, and, working over the bowl, squeeze and squeeze and squeeze.

Work all of the liquid out of the nuts. 

Once you are satisfied that all the liquid is out, you can sweeten your nut milk and add ground spices if you are using those. The best way to incorporate both is to transfer the milk to a quart-sized canning jar, add them and give it all a good shake. 

Step-by-Step, DIY Nut Milk 

This recipe is for hazelnut milk with cardamom and cinnamon. And we’ll take a look at how to make it, step-by-step. You’ll end up with 3 1/2 to 4 cups of milk, depending on how long and hard you work the liquid out of the nuts. 

This version is unsweetened. If you’d like to sweeten it, I’d suggest using a tablespoon or two of maple syrup and shake it in well. Also, don’t forget that pinch of fine sea salt just before serving. 

What you’ll need:

  • two bowls
  • colander
  • blender
  • 14-inch square piece of cheesecloth, two if it’s closer to grade 10
  • quart canning jar with lid for storing

For the milk

  • 1 cup dry-roasted, unsalted whole hazelnuts
  • 4 cups filtered water, room temperature or slightly warmer
  • 10 to 12 whole green cardamom pods
  • 2 large or 4 small cinnamon sticks

Read more: Black walnuts can be a tasty (and profitable) forage crop.


Step 1: Soak the Nuts 

Place the nuts in a large bowl and pour over the 4 cups of water. Add the cardamom pods and the cinnamon sticks. Let sit for 2 1/2 hours. 

Stir the nuts gently a couple times during the soaking time if possible.

Step 2: Blend the Nuts

Remove the whole spices from the water. Transfer the nuts and liquid to a blender. Puree on low for 30 seconds, then increase to high for 15 seconds.  

The nuts will be very finely chopped in a thin, cloudy liquid. 

Step 3: Prepare for Straining

Layer one or two pieces of cheesecloth over a medium-size mesh colander. Secure the sides of the cheesecloth so that they don’t fold in when you pour in the liquid. 

I use clothes pins. But an extra set of hands to hold it work as well. Set the colander over a bowl. 

make nut milk DIY recipe
Lori Rice
Step 4: Strain the Milk 

Pour the liquid from the blender into the colander and let the milk drain into the bowl below. Let sit for 5 minutes. 

Step 5: Squeeze out the Milk 

Gather the cheese cloth tightly around the remaining nut pieces and tie it off. Squeeze as much liquid as possible out of the bag. 

You can discard the ground nuts. Depending on the type you used, they still might have good flavor and are still edible. Some uses for them include stirring into yogurt or oatmeal, spread into the filling for cinnamon rolls, or blended into cookie dough. 

Step 6:  Transfer for Storage

Pour the milk into a quart canning jar. If you’d like to add a sweetener, you can do this now. Secure the lid, and give it a good shake. Chill well in the refrigerator and use within four days. 

So how do you use it? You can drink a glass of it, of course. But I find myself using nut milk for so much more.

It can add new tastes to otherwise bland cereals such as bran flakes. And it makes creamy overnight muesli or overnight oats.

You can also use it to create cocktails that call for a splash of cream or milk. It can be added to warm drinks such as coffee or tea. But, due to its lack of fat, it likely won’t froth up nicely if you try to use it in something like a latte.


Sidebar: Secret to Success

A pinch of salt brings out so much flavor in nut milk, especially if you plan to enjoy it alone as a beverage. It doesn’t have to be, and really shouldn’t be, a lot.

Just a pinch of fine sea salt that will easily dissolve works well. I think it’s best stirred or shaken in just before serving. 


Sidebar: Storing Nut Milk

How long your nut milk will last may depend on the type of nut you use. But I typically keep mine for up to four days without any problems.

Again, a canning jar is the best storage option because the milk may separate some as it sits. You can easily shake it before serving.

This article appeared in Hobby Farm Home, a 2022 specialty publication produced by the editors and writers of Hobby Farms magazine. You can purchase this volume, Hobby Farms back issues as well as special editions such asBest of Hobby Farms and Urban Farm by following this link.

Categories
Chickens 101 Poultry

Hen Or Rooster: Can Egg Shape Predict A Chick’s Sex?

Fate’s fickle fingers dealt our poultry farm a series of unfortunate hands these past few years. We lost 90 percent of our show-quality Silkie flock to a persistent predator. The creature ignored our baited traps and, from what we could tell, continually rammed the Silkie coop’s pop door until it lay in splinters.

And our trio of male Anconas, a heritage breed under observation by the Livestock Conservancy, decimated the females of their flock with their randiness until only one girl remained.

Time to Restock the Roost

We desperately needed to restock our flocks. Over the next couple of weeks, we carefully collected the cleanest eggs laid by Olivia, our last Ancona girl and by Natalya, our last Silkie girl. Since we were hatching, we figured that, since our Orpington girls were getting of age, why not hatch a few Orpington chicks while we were at it?

We loaded the duck eggs into our incubator. Then we gave Natalya her own three eggs plus three Orpington eggs to set. And we hoped for the best.

One month later, Natalya was the proud mom to three adorable blue Orpington chicks. Sadly, the Silkie eggs had not been fertile. Natalya truly was the last of our breed.

At least she was no longer alone. She settled right into her role as Mama Hen, caring for those three little peeps as if she herself had laid them. As for the incubator bunch, we were now the proud “parents” of a half dozen Ancona ducklings.

We were thrilled! Nine new babies was definitely a step in the right direction.

Until it wasn’t.


Read more: Interested in starting a custom hatching business? Here are some tips. 

Too Many Roos!

It took three months to verify that all three Orpington chicks were cockerels. Two—CJ and the one I had named Margie (short for Margarine, to match her mother, Butters—had started crowing. Or, rather, they sounded like the squeaky toys cockerels tend to sound like when just starting to crow.

The third cockerel, TJ—or Tiny, as I nicknamed him—was affected by dwarfism. But he definitely displayed enough male characteristics to confirm he also was a boy.

This masculine trio brought our Orpington rooster total to five. And that’s three more than we needed for a healthy balance between male and female. But that was just the tip of the iceberg.

As the months progressed, every single duckling grew curly tail feathers. Yep … they were also all males.

So I shared the story of our gaggle of guys with my social-media followers and in my poultry groups. And two responses, both regarding egg shape, came up quite frequently:

  • Why did I hatch pointy eggs?
  • Why didn’t I choose rounded eggs?

The people who posted these remarks meant well. And I appreciated the intent in which their advice was given. I do feel, however, that it’s important to shed some light on what’s myth and what’s misconception when it comes to hatching eggs.

Here’s the Myth…

The old farmwives’ tale, believed by poultry raisers across the country, is that the shape of the egg indicates whether the resulting hatchling will be a boy or a girl.

Eggs that taper to a pointy tip will supposedly yield cockerels. And more rounded eggs will supposedly hatch pullets.

This belief is not news to me. My grandmother shared this nugget of information with me when I was a little girl, assisting her with egg collection. Back then, I accepted everything Grandma said as truth, never doubting her sagacity.


Read more: Incubating chicks? These are the conditions you need to watch out for.


And Here’s the Reality

As an adult chicken farmer, I know that passage through the oviduct can affect the shape of an egg, regardless of whether it’s a boy egg or a girl egg.

You know how some human babies are born with perfectly round heads and others emerge with a slightly conical skull? Eggs also can become torpedo shaped or elongated—or as round as golf balls—during the 24 or so hours they spend traveling from the ovary to the vent.

Here’s the truth. The shape of an egg has nothing to do with the gender of the potential chick within and everything to do with the laying hen’s reproductive anatomy.

According to Dr. Richard M. Fulton, DVM, PhD, professor of poultry science at Michigan State University and a Diplomate of the American College of Veterinary Pathologists, there’s a 50:50 chance a chick will be male or female.

“Egg shape does not determine the gender of a chick,” noted Dr. Fulton.

But Wait! (A Possibility)

So, egg shape does not disclose the gender of the chick inside. But there may be a way to slightly improve that 50 percent chance of hatching a female chick.

According to an article published in the Australian Journal of Agricultural Research, hatching eggs that were stored at 40 degrees F and 70 percent humidity for up to a week prior to incubation resulted in a higher rate of pullets hatching.

According to the abstract written by M.W. McDonald, there was no difference in the ratio of male:female chicks hatched from eggs stored at 60 degrees F. The same held true for eggs stored at 80 degrees F.

Eggs stores at 40 degrees, however, resulted in a 54.6 percent pullet rate versus the typical 50 percent ratio.

If you are looking to increase your flock’s male:female ratio, this possibility is definitely worth investigating! I know that we’ll be giving this a go next spring with the hopes of adding some homegrown girls to our flocks.

Categories
Crops & Gardening Farm & Garden Homesteading Urban Farming

These Herbal Bath & Body Products Bring The Garden To The Tub

When the first bathtub was installed in an American home in 1842, it was reserved for brief plunges in cold water to relieve illnesses ranging from congestion to cholera. The idea of relaxing in a hot tub was not just uncommon, it was discouraged. 

Bathing to cleanse the body didn’t become popular until the 20th century. Now, bath products are a booming industry. You can buy products at supermarkets, specialty retailers, and craft and farmers markets. Or you can make your own using healing herbs and pretty flowers growing in your garden. 

“The idea of growing things [to use in all-natural bath products] is about more than making great products that are nontoxic,” says Kris Bordessa, author of Attainable Sustainable: The Lost Art of Self-Reliant Living. “It’s a fun thing to do to say you started growing these flowers and incorporated them into products.”

Bordessa suggests using flowers that haven’t been treated with synthetic pesticides or fertilizers. Also, forage in areas that haven’t been sprayed or exposed to exhaust fumes on roadways.

If you want to grow the ingredients to use in bath and body products, add the following eight plants to your garden.

Calendula  

The brightly colored flowers and long bloom times make calendula (Calendula officinalis) a popular garden annual. Different varieties of calendula, also known as pot marigold, produce single and double daisylike flowers in a range of hues from light yellow to deep orange. 

bath herb body products recipe
n_defender/Shutterstock

Cultivated around the world for medicinal use, calendula is anti-inflammatory and antimicrobial. It’s used to calm an upset stomach, alleviate heartburn and acid reflux, ease a sore throat and combat respiratory infections. 

Calendula blooms from May through August. Removing dead flowers can encourage subsequent bloom. Harvest flowers and use them to make infused oils that are the base ingredients in lip balms, lotion bars, lotions and cold-pressed soaps. Or dry the petals to add color and interest to bath bombs and bath salts.


Recipe: Calendula Infused Oil

This recipe can be easily adapted to other herbs and oils. Follow the same instructions, swapping out calendula for other fresh or dried herbs and flowers and olive oil with sunflower, castor, grape-seed, avocado, jojoba or sweet almond oils.

Ingredients
  • 1 cup dried calendula flowers
  • 1 cup olive oil
  • 12-ounce glass jar with lid
Production

Add the dried calendula flowers to the jar.

Pour olive oil into the jar, ensuring the flowers are covered.

Stir well and screw on the lid.

Place the jar in a sunny windowsill, shaking at least once per day.

Let the jar sit for 4 to 6 weeks.

Strain the oil into a sterilized jar through a cheesecloth (toss the flowers).

The infused oil can be stored in a cool, dark location for up to six months.


German Chamomile 

The word “chamomile” is of Greek origin and means “apple on the ground.” The herb was named for its applelike aroma and flavor. Chamomile (Matricaria recutita) has a sweet, apple flavor with mild sedative properties that aid in relaxation. The soothing herbal ingredient is often recommended as a sleep aid and is reported to help with colds and flu, headaches and stomach upset. 

The flowers, with yellow centers and white petals, bloom from June through August. Dried flower heads are used to make chamomile tea but can also be added to bath salts and bath bombs. You can also use them to make infused oils that add a fragrant, soothing touch to soaps, lotions, balms and salves.

Roman chamomile (Chamaemelum nobile) is a more petite chamomile variety and can also be used in “farm to bathtub” products and in teas. 


Read more: Rosemary’s fragrant leaves provide a healthy boost for the body, mind and spirit!


Recipe: Big-Time Bath Bombs

This relaxing recipe makes five to six medium-sized chamomile bath bombs.

Ingredients
  • 2 cups baking soda
  • 1 cup citric acid
  • 1 teaspoon of chamomile-infused oil
  • 1 teaspoon chamomile essential oil
  • dried chamomile flowers
  • spray bottle filled with distilled water
  • bath bomb molds
Preparation

Mix the baking soda and citric acid together. Use a large sealed sandwich bag to keep the particles from getting airborne.

Once the dry ingredients are well mixed, transfer to a mixing bowl and add the chamomile-infused oil and chamomile essential oil.

Add a few spritzes of distilled water so the mixture is the consistency of wet sand. Less is more when it comes to water. If bath bombs are too wet, they will expand out of the mold and fail to hold their shape.

Add a few pinches of dried chamomile to one side of the bath bomb mold.

Use a measuring cup to scoop the mixture into both sides of the mold. Overfill the molds slightly, then press together firmly and hold.

After a few seconds, release the bath bomb from the mold.

Leave to harden overnight.


Rose 

More than 100 species of roses belong to the genus Rosa. Roses, often cultivated for their beautiful flowers, come in a range of colors and fragrances. Some roses climb, others trail and most have thorns on their stems. 

Regardless of the varieties, roses can be temperamental. Most varieties are susceptible to a host of disease and pest issues. Organic controls are advised if rose petals will be used in bath and body products.

Dried rosebuds and petals can be used to add color and a subtle floral fragrance to bath salts and bath bombs.


Recipe: Beautifying Bath Salts

Combine rose and lavender for a luxurious bath salt. This recipe makes four 8-ounce jars.

Ingredients
  • 1 cup Dead Sea salt
  • 12 cup pink Himalayan sea salt
  • 12 cup Epsom salt
  • 14 cup baking soda
  • 1 tablespoon rose-hip-infused oil
  • 1 teaspoon lavender essential oil
  • 18 cup rose petals
  • 18 cup dried lavender
Preparation

In a large bowl, whisk all dry ingredients together until well mixed.

Add lavender and lavender essential oils, and stir until incorporated.

In a large glass jar, layer rose petals, add bath salts until half full, add another layer of rose petals, fill with bath salts and add a final layer of rose petals on the top.

Store in a sealed jar in a cool, dry location.


Rosemary 

Rosemary (Rosmarinus officinalis) is one of the most popular culinary herbs. It’s prized for the strong aroma of the thin, needlelike gray/green leaves and hailed as a natural health powerhouse that aids in digestion, enhances cognitive function, reduces inflammation and improves liver function. 

bath herb body products recipe
svitlini/Shutterstock

Leave the leaves on the stems to make infused oils that can be used in soaps, lotions, balms and salves. You can also use a mortar and pestle to turn the leaves (stripped from the stems) into a powder that makes a fragrant addition to bath bombs and bath salts.

Recipe: Super Sugar Scrub

Rosemary and lemongrass make a wonderfully easy sugar scrub.

Ingredients
  • 1 12 cups organic cane sugar
  • 12 cup coconut oil, melted
  • 2 teaspoons dried rosemary powder
  • 10 drops lemongrass essential oil
  • 5 drops rosemary essential oil
  • 5 drops vitamin E oil (as a preservative)
Preparation

Melt the coconut oil in a double boiler.

Add organic cane sugar, dried rosemary powder, lemongrass and rosemary essential oils and vitamin E oil. Mix well.

Scoop into glass jars with lids.

The recipe will make three 4-ounce glass jars.

English Lavender 

Although Provence, France, is famous for colorful fields of lavender, the fragrant perennial is not native to France. And despite its name, it isn’t native to England either. English lavender (Lavandula angustifolia) hails from the Mediterranean.

(French lavender, Lavandula dentata, is also from the Mediterranean.)

There are several different varieties of the herbaceous perennial:

  • ‘Hidcote’ is known for its dark purple flower spikes. It has a fruitier flavor than other lavender varieties
  • ‘Lavenite Petite’ hails from New Zealand and produces pompomlike flower spikes.
  • ‘Miss Katherine’ is one of few pink lavender varieties that has elegant sprays of deep pink blooms.

All lavender varieties can be used in bath and body products.

Lavender is prized for its fragrance, making it a popular ingredient in soaps, bath oils and perfumes. Thanks to the healing effects of the essential oils, the plant has a long history of use for ailments ranging from insomnia, depression, chronic pain, muscle spasms, digestion, inflammation and stress. 

Like other herbs and flowers, lavender can be used to make infused oils. The flowers, when dried, also add amazing color and fragrance to bath bombs and bath salts.

Peppermint 

Peppermint (mentha x piperita) might be mistaken as a species all its own. But it was developed by crossing water mint (Mentha aquatica) and spearmint (Mentha spicata). The result is an herbaceous perennial with robust mint flavor and fragrance.

The leaves have a strong scent and, when dried, can be added to soap, bath bombs and bath salts.

Peppermint grows up to 2 feet high and 2 feet wide. It grows aggressively. Plant it in containers to keep it from taking over the garden. 

Lemon Balm 

The name is a little misleading. While the perennial herb has a lemon scent and citrus flavor, lemon balm (Melissa officinalis) is a member of the mint family. Both the fragrance and the flavor are best described as mild.

The dried leaves are a great addition to bath products ranging from soap to bath bombs.

Lemon balm spreads like other mint varieties, making it best confined to a container where it won’t take over the garden. 


Read more: Here are some tips for growing and using herbs for profitable products!


Dandelion 

Dandelions (Taraxacum officinale) are among the first signs of spring. Their bright yellow flower heads pop up between blades of grass, between cracks in the sidewalk and along roadsides.

These “weeds” are a staple of Chinese medicine. Tinctures made from the roots, leaves and flowers are used to make restorative tonics. 

Dandelions can be harvested in the wild—look for places off the beaten path where chemical weed killers are not apt to be sprayed. Use the yellow flowers to make infused oils that can be used in lotion bars, salves, cold pressed soap, lip balm and other bath and body products. 


Recipe: Dandelion Lotion Bar

The number of lotion bars this recipe creates depends on the size of the silicone molds.

Ingredients
  • 12 cup dandelion-infused oil
  • 12 cup shea butter
  • 12 cup beeswax
  • 10 drops of orange essential oil
  • silicone mold
Production

Using a double boiler, melt the beeswax and shea butter until it’s liquid.

Add the dandelion-infused oil and essential oil, and stir well.

Pour the melted liquid into silicone molds. Leave them to harden.

To use the lotion bar, rub it across your skin. Your body heat will lightly melt the ingredients and provide a layer of moisture on your skin. Store in a cool, dry location. 

There are numerous ways to turn products you grow and raise on your hobby farm into natural skincare products, from adding honey to cold-pressed soap and using tallow as a moisturizer in balms, to incorporating dried flowers and herbs into bath bombs and lotion bars.

If you want to grow the ingredients to use in bath and body products, add these eight plants to your garden.

This article appeared in Hobby Farm Home, a 2022 specialty publication produced by the editors and writers of Hobby Farms magazine. You can purchase this volume, Hobby Farms back issues as well as special editions such asBest of Hobby Farms and Urban Farm by following this link.

Categories
Equipment

Professional Repair Work Can Be A Good Investment

I’ve often written how hobby farmers tend to be do-it-yourself types keen to tackle any task and handle complex projects on their own. Put up that new fence line? No problem! Build a toolshed? Bring it on!

If you’re willing to invest time and effort, a DIY attitude can reduce expenses and give you a fine feeling of self-sufficiency.

But as I’ve said in the past, there are some instances where it’s better to let the experts take over. Perhaps you lack the skills or equipment to handle a potentially hazardous task.

Or perhaps the project is theoretically manageable, but the time you’ll lose completing it isn’t worth the money you’ll save by doing it yourself.


Read more: When it comes to tree removal, sometimes it’s better left to the pros.


Can Versus Should

Let me give you an example. Earlier this summer, I decided to haul in a small riding lawn mower for a professional repair job. I had stopped using the mower a couple years prior because a variety of issues had popped up.

For reasons unclear, the machine was struggling to start, even with new spark plugs and a fresh battery installed. Also, the mower was no longer cutting properly. Belt issues in the deck appeared to be the culprit.

After a couple years of sitting unused, I knew the mower needed a complete tune-up in addition to the repairs. It wasn’t anything I couldn’t have handled myself, given enough time and effort.

I could have scoured small machine forums in search of tips for improving the reluctant starting. I could have taken the mower deck apart, identified the problematic belt, and purchased a replacement.

And along the way, I could have searched the user manual for part numbers and replaced the air, oil, and fuel filters.

The Value of Professional Help

But instead, I decided to let a professional handle the job. At any given time, on any given farm, there might be half a dozen (or more) tasks and projects demanding your attention. Sometimes, you have to pick and choose your battles.

I knew restoring the mower myself would have required many hours of diligent research and effort—time that was perhaps better spent in areas where I have more experience and expertise.

So that’s what I did. I loaded the mower onto a utility trailer, hauled it to a professional, and left it for repair. Not long after, I picked it up practically good as new. The mower deck had been repaired and general engine maintenance performed.

And best of all an adjustment had been made to the choke and throttle control. This eliminated the starting issues.


Read more: These 20 tractor maintenance tips will keep your machines in shape.


A Matter of Investment

When I looked at the bill, I marveled at how the expert completed all this work in two and a half hours. I would have been lucky to identify and purchase all the necessary replacement parts in that time, let alone perform the repairs and maintenance.

And who knows how long it would have taken me to zero in on the choke and throttle as the source of the starting issues? Viewed through this lens, I concluded the expense of letting a professional repair the mower was a wise investment, freeing up a huge chunk of my time to spend on other projects instead.

That’s not to say this approach is right in every instance. To the contrary, I encourage all hobby farmers to learn basic engine maintenance and perform routine servicing (such as oil and filter changes) on their own. Most tasks don’t take very long.

But for more challenging and time-consuming maintenance and repair projects, calling an expert might be the way to go.

Categories
Animals Large Animals

What You Should Know Before Buying Your First Horse

The first step anyone in the horse market should ask—regardless of if this is your first horse or fifth—is what are your goals in buying a horse and why? There is no right or wrong answer here. But it’s certainly deserving of some thought.

There is a function for every horse, even if that is to simply be a pasture companion. No one horse is capable of fulfilling every single unique need. 

Jot down some of the “jobs” you need a horse to do. This could be a trail mount, devoted companion or a child’s first riding buddy. You can have more than one. The purpose of this exercise is to profile what your ideal horse should look like.

You can have some breeds and preferences in mind. But the horse’s personality and training levels need to significantly trump all else. 

What’s Your Experience Level?

Another point you need to immediately be honest about is your experience level. Experience doesn’t need to mean training in a specific riding discipline. Rather, think of it as a way to measure your overall familiarity with horses and ability to handle certain situations. 

Before purchasing any horse, invest in some sort of riding lessons or horse management program. Doing so will teach you the basics of ownership and help you discover what you’d like to have in a horse of your own. 

With that stated, riding doesn’t even need to be a goal. Pasture ornaments are well and good, but you need to be honest about your prior experienceor lack thereof in horse handling and evaluate what you are and aren’t capable of taking on. This is why having, at the very least, a close friend or professional mentor with equine experience who is able to guide you is a crucial element.  

Some Practical Considerations

Let’s not overlook some of the practical considerations. Your budgeting doesn’t end with the initial purchase price. You also need to consider housing, feed costs and veterinary care that will need to be covered every year. 

There are lots of resources out there to help calculate what this might look like. Remember, depending on what you have at your disposal in terms of housing or feeding, the cost of horse ownership could be drastically different than for your friend or neighbor.  

Start with the basics. Can you house a horse on your farm? If so, do you have a reliable pasture and shelter and horse-safe fencing, or will you be boarding? Do you have an idea of annual hay and feed costs in your area? Do you have a relationship with a good vet? 

With this penciled out, remember that what you spend when buying a horse can impact your expenses down the road. Price is, of course, no indicator of horse quality. But trying to save on a vet check or a horse that needs some behavioral correction, for example, will likely hit your wallet down the road. 

buying first horse purchase
Chen’s Photos/Shutterstock

On the Hunt 

There is no shortage of places to find horses and sellers. Craigslist and Facebook groups have become staples for finding private sellers in the equine world. You may also use horse-sale specific websites, such as dreamhorse.com or equine.com. 

Where should you not look? Auctions and commercial dealers (or “horse flippers”) aren’t recommended for the inexperienced and first-time purchaser. So many unforeseen issues might come from an animal without full background disclosure that it’s not worth taking the risk even if it might save you a few bucks. Instead, look for private sellers with horse experience or reputable stables. 

Consider going to a 501(c)(3) horse adoption or rescue. Reputable ones have extensive vet exams, riding assessments, additional training and history on adoptable horses and strive to match you to the very best horse for your needs.  

If you’ve formed a good relationship with a trainer, riding instructor or mentor, you might start there. Often, they’ll have leads on specific horses and places to look. However, a better option is shopping with a horse-knowledgeable friend who doesn’t charge a commission. You know you’re getting real unbiased advice.  

Likewise, you’ll want to lean heavily on this person as you do your shopping. Having an experienced and unbiased set of outside eyes is a great way to avoid a host of first-time mistakes. If possible, have this person accompany you as you test ride or visit. 


Read more: Keep these 5 things in mind when buying farmland.


What to Look For

With that same mindset, train yourself to be on the lookout for the right seller. Pay attention to the initial ad. Is ample information given? Do they use the proper terminology? For example, “spirited” or “forward” might mean “crazy!” A knowledgeable horse person is the best resource for evaluating ads and reading between the lines.  

Consider how long they have owned this particular horse and their experience in that time frame. A good seller will be more than happy to be upfront with you and answer all your questions even before you set up an appointment. Avoid sellers who seem to lack knowledge, are reluctant to share information or seem pushy. 

First Looks 

Setting an appointment to view a horse you could end up buying is an exciting step! Arrive open-minded so you avoid disappointment and letting your emotions take over. 

Visiting a horse in its normal environment is the only way to gauge its temperament in real life and can be far more telling than a conversation or video. See how the horse interacts upon approach. You want a horse that is receptive to people without any immediate signs of behavioral issues. 

The basics of how the horse leads and stands for you and/or the seller are small but key indicators of that animal’s training and personality. If you can, have them saddle the horse for you and do some basic groundwork. Take note of the overall interaction. 

Afterward, work with the horse yourself in a controlled environment with the seller present. Go through all the basics of brushing, leading and other routines. 

Have the seller (or your trainer or horse- knowledgeable friend) ride first. You don’t want to be the first one, just in case. If you are a rider, try the horse under saddle as well. Your trainer or mentor might also want to ride or watch you on yours.

Don’t feel rushed to try the horse in all environments and situations at once. Just start with the basics and see how it responds to your cues and surroundings.  

Communication Is Key

Remember, purchasing a horse should be a process. Be honest with the seller. If you are still interested after the initial visit and need time to consider, let them know. It isn’t uncommon to come out for a second or even third evaluation as well.  

Doesn’t seem like a good fit? Be upfront about that, too. If you’re working with a good seller, they’ll be happy to keep in touch and give you time to consider the terms of the sale. 

buying first horse purchase
Horse Crazy/Shutterstock

The Sale 

After a visit or two and rigorous research, you may have narrowed down your search to a final candidate or two. What are the next steps?  

Vet Check

A vet check (or prepurchase examination, aka a PPE) before the sale is always recommended. If possible, have this done with a veterinarian you personally know and trust to ensure you are getting an unbiased opinion.

Never use a veterinarian recommended by the seller. If you’re from out of the area, ask around or find a vet on your own.  

This exam is a standard procedure for most equine practitioners and looks at all the most common issues that a horse may have. While it’s an upfront expense for a horse you haven’t even purchased yet, this is well worth the effort before buying and bringing home an animal that may have thousands of dollars in unknown issues. 

Close the Deal

With the vet check completed, the next step is closing the final deal with the buyers. The formality of the exchange will vary greatly depending on whom you are purchasing from. However, there are a few things you want to establish before handing over any cash. 

The first is having information on and possible copies of veterinary records within the past year including vaccinations and deworming and any procedures and dental work done. You also want to confirm the purchase price and terms. 

Sometimes you may be able to negotiate a lower price usually due to troubling findings in the PPE or get an add-in with some of the more expensive tack and gear (any equipment used to ride a horse, such as saddle, bridles, blankets, etc.).

Or, you may have a lease-to-buy type of agreement or return policy in the event the horse doesn’t work out in its new home.  

Whatever your final offer and sale price, keep in mind that no animal is considered sold until some money has exchanged hands. In other words, even if you’ve verbally committed to buying the horse, there is nothing to hold it until you’ve made some form of payment. Don’t trust word-of-mouth agreements to keep a sale for you. 

Keep the seller’s contact information on hand, too. Always have both parties sign a simple bill of sale, and each of you retains a copy. These last few details are some of why first-time buyers are highly encouraged to do everything in-person.  


Read more: Looking for a challenge? Adopt a wild horse or burro on your farm!


Moving Day

Once you’ve made transportation arrangements and set a pick up date, you can move onto the more fun part: getting your new horse! 

Remember, moving environments is a stressful process for any horse. First-time horse-buyers are often overeager to work with and acclimate their new purchase to their new homes. It isn’t uncommon for even very well-mannered animals to be a bit nervous or out of sorts in the first several weeks or even months after moving to a new farm. 

Use this time to slowly introduce yourself to your new horse. Time spent grooming, doing light groundwork and just casual interactions in the barn are great ways to start building a solid foundation. Your trainer or mentor can be a big help guiding you and your horse through the transition. 

The journey to getting that first horse is unforgettable, and one well worth the time and effort it takes to do properly. Be patient. Enjoy the time and lessons you’re learning.

One thing is a given: Your first horse is one you and your family will certainly never forget!  


Sidebar: Cost of Horse Ownership

How much does it own to cost a horse? That depends on several factors, from where you live to how you plan to keep your horse.

Calculating costs can be complicated. Horse board or housing costs are typically the biggest expense associated with horse ownership. Hay and feed bills are also among the highest costs and can fluctuate based on weather and other factors.

To find out how to budget and learn about the cost of owning a horse, check out this article.  


Sidebar: Make No Assumptions 

Don’t assume that because you’re searching for an off-the-track Thoroughbred that it will be high-strung. Don’t assume that because you are getting a draft cross that it will be sound. And don’t assume that because you are buying from an Olympian that the horse will be trained.

We all know the cardinal rule about assumptions. So brush up on “The Dos and Don’ts of Buying and Selling Horses.”


Sidebar: Buyer Mistakes 

The top mistake to avoid when buying or selling a horse is not taking at least two trial rides. We all know that horses have good days and bad days.

Buyers, you want to be sure you are OK with both before purchase. Sellers, you want to make sure the potential buyer can handle the naughty days.

For five more mistakes to avoid, read “Top 6 Mistakes to Avoid in Buying or Selling a Horse.”

This article originally appeared in the July/August 2021 issue of Hobby Farms magazine.

Categories
Animals Large Animals

Use Pigs To Improve Your Soil & Landscape

There can be lots of debate around the pros and cons of keeping pigs on pasture. Some folks say they’re too hard on turf, while some swear their own breed doesn’t root. But you’ll find there is little argument when it comes to using pigs for deliberate landscape alteration. 

Pig pressure is a fast way to make some real changes to the topography. And you can do so without the expense and trouble of bringing in earth-moving equipment. 

Plowing with Pigs

Take plowing, for example. John Seymour was a well-known pioneer of homesteading in the mid-1900s. He considered the pig the best garden-site preparation tool known to man. 

Fence your piggies on the proposed garden plot, throw down some shell corn (he called it “Indian corn”), and stand back! Watch the animals plow up sod, dig out roots and grubs, and turn up rocks and buried trash ready for removal. 

A season of pig pressure, and the garden site is ready.


Read more: Pigs make great compost!


Reclaim Overgrown Land

And for a fast change in ground covers, bring in a pig—or a whole herd of them! Jake of Broken Aspen Farm in Pennsylvania used his pastured porkers to convert a field overgrown with pokeweed into nutritious pig pasture. 

Pokeweed can be toxic, but pigs are smart about what they eat. Jake’s herd wiped out the giant weed while maintaining perfect health.

Meanwhile, keeping the pigs in rotating paddocks gave grass a chance to grow in and cover the bare soil. Now chefs pay premium for Jake’s gourmet pork.

Prickly invasives like multiflora rose can be a real trick for the homesteader to fight without large, expensive equipment. Bring on the pigs, though, and see how fast they’ll dig out these deep-rooted briars. They eagerly make room for recovering native and naturalized pasture species.

Plant Some Forage Crops

One way to increase pigs’ impact on a chosen piece of ground is to plant forage crops, then let the pigs do their own harvesting. How about a crop of roots like turnips, mangel-wurzels (fodder beets), Jerusalem artichokes or daikon radishes?

Their long taproots will puncture the subsoil, followed by rooting pig snouts. Thus, you could net an improvement of soil tilth as well as a harvest of bacon. 

A planting of beans or peanuts will keep pigs busy in one spot for an extended period of fertility-boosting. And a dense cover crop of buckwheat, followed by grazing pigs, goes a long way to wipe out invasive weeds like wild carrot and Canada thistle.


Read more: Want to raise pigs? Here’s what you’ll need.


Things to Keep in Mind

When using pigs for landscape alteration, there are some important points that must be borne in mind, though. 

Topography is significant. On a steep slope, any large-scale change in ground covers may cause unintended erosion problems. Bare soil washes away. Whole hillsides may become unstable when their anchoring roots are destroyed.  

Likewise, soil composition should be taken into consideration when you are thinking of using pigs for earth moving or significant landscape changes. While a loamy or sandy soil can absorb pig pressure without damage, a clay soil may be so compacted that it takes years of rest to recover. 

In fact, one way to seal up a dug pond is to pen some pigs on it for a time and let them wallow. So stay aware of your own farm’s individual characteristics, and make sure your choices are appropriate.

Pigs aren’t just walking bacon. They’re powerful dirt-movers, potential partners for many farm-building projects. What’s the use of leaving some of our best tools in the barn? 

Next time you have an earth-moving project, maybe you need to fire up your pig!


Sidebar: Rest & Safety

On homesteading pioneer John Seymour’s friable British soil, pigs could be kept in the same place for an entire year. They turned the soil, eating slugs, grubs, and perennial weeds. All the while, they added their own valuable contributions of fertility in the form of manure and urine. 

In the spring he moved the animals to a new site and planted his garden. 

Today, we’d probably plant a good cover crop or green manure and “rest” the soil for a season before planting food crops. In this way, we avoid the possibility of passing parasites from pigs to humans.

Categories
Beginning Farmers Crops & Gardening Equipment Farm & Garden Permaculture

Tips For Starting First-Year Garden Beds (Part Two)

In my last article, I started a three-part series on establishing a first-year garden bed from scratch. We talked about choosing location and planning out plots. We also covered primary tillage and determining Permabed layout.

Now we’ll look at the next steps my friend and I took while preparing her first-year garden.

Building Paths 

Garden paths are important for obvious reasons. They allow the gardener easy navigation through the growth. Paths also protect crops from getting trampled during weeding, watering and casual strolls through the garden.

I used the Ridger attachment for the BCS walk-behind tractor to furrow out paths, lining up the wheels to straddle the fresh line marking each.  Driving with the tractor centered on the line centered left a nice furrow. 

Because the soil was very sandy, we still needed to go in and hand-shovel the extra soil out of the paths.  Each path’s material was shoveled onto the adjacent left-hand bed, resulting in an 8-inch high Permabed with a 12-inch wide path.

first-year garden BCS
Zach Loeks

Rake the Bed Top

Now it was time to rake the bed tops. Using a 36-inch wide rake, we worked up and down the raised beds, raking them smooth and allowing the soil to fall into the paths little by little to form a more gradual shoulder. 

We raked the bed top until it was the width of the rake (36 inches) along the entire length of the bed.

Apply Compost

Next, we applied compost 1 inch thick across the tops of all the beds. Adding compost and fertility at this stage is critical to bring up the soil organic matter in the top inches of your bed. Compost also improves the fertility for those first-year crops. 

Now our soil is loose, fertile and well organized!


Read more: You need these 7 tools for handling manure and compost.


Perimeter Weed Barrier

Because this garden was fit in a tight spot and not easy to mow around, we opted for a 4-foot-wide run of weed barrier to go around the entire garden perimeter. We topped this with wood chips to make a clean, weed-free perimeter. 

This allows good access to the garden. It also provides clean spaces to set tools and harvest bins, and to organize irrigation. 

Everything gets lost in the weeds, which grow very quickly along the edges of gardens. So if you can’t mow on a regular basis, use this strategy! 

first-year garden irrigation
Zach Loeks

Multi-Connector

Irrigation is important for any garden, and it’s an important consideration in a first-year garden. Often, our growing spaces need multiple types of water available, too. 

We built a simple multi-connector using brass 3/4-inch fitting, Ts, nipples, elbows and shut-offs. We adapted the system to accept an input from a normal garden hose, with three shut-offs adapted to male 3/4-inch garden hose ends.

This multi-connector was mounted on a T-bar at the corner of the new plot. 

The three-connector shut-offs allowed for:

  • a house hook-up for a small wash station
  • a hose connection to water in the adjacent greenhouse
  • a direct line into an irrigation system

Read more: Check out this DIY rain collection and irrigation system!


Irrigation System

The irrigation system consists of the following:

  • a pressure gauge to monitor incoming water pressure
  • a filter to keep water lines clean and drip lines clog-free
  • a pressure regulator to make sure the drip system receives correct pressure  

We assembled this unit in the shop, then brought it to the garden site where we mounted it to the T-bar and connected a 1.5-inch oval hose. 

The oval hose is a standard irrigation “header.” This will allow the grower to transport water a far as they need along the head of the plot. It punctures easily for the installation of small connectors and shut offs for each bed’s drip tape. 

We ran this header a length of 25 feet in our 6 by 48-inch beds—that’s 24 feet with 6 inches at each end for wiggle room. We ended it with a 1.5-inch plug to stop the water. And we used large hose clamps to tighten all fitting against drips. 

Next, we used a normal irrigation hole punch. We punched holes in the oval hose at exactly 6 inches from the center line of each Permabed for shut-off valves. These valves have a small 1/4-inch barb at one end, which we just pushed right into our holes.

Running Drip Tape

We ran two 25-foot runs of drip tape per bed and tied their ends off with a double knot. Then we connected these drip tape runs to the shut-off valve’s 5/8-inch barb:

  1. First, we ran a little water through the header hose to open the valves.
  2. Then we screwed back the swivel nut and pressed the drip tape against the end.
  3. Water filled the drip tape, expanding it and providing good leverage to press the drip tape over the 5/8-inch barb.
  4. Finally, we screwed the swivel nut tight over the drip tape.

And voilà—efficient water management!

In our next and final article in this series, we’ll look at the final steps in our first-year garden beds!

Categories
Podcast

Episode 13: Anita Ashok Adalja

Listen as farmer Anita Ashok Adalja lets us in on what it’s like to grow okra in the Southwest, including how to “convince” neighbors to try a new-to-them vegetable.

Learn about the Not Our Farm farmworker visibility project, telling the story of and celebrating folks who are non-farm-owning and working on others’ farms. Find out how to have your own story told and hear about the farmworkers guide that’s about to be released.

Dig in to food safety for your small farm with advice from Anita’s place as a farmer as well as a food safety educator. Spoiler alert: If you think about food safety from the perspective of healthy community care, it’s a much less intimidating concept—and you’re likely already doing it.

Tune in to Anita’s hope for the concept of revisioning how sustainable farming fits into our lives.

Stay tuned to the end to learn Anita’s trick for cooking okra so it’s not slimy! And add her favorite okra recipe to your upcoming meal plan.

Not Our Farm website

Not Our Farm on Instagram

National Young Farmers Coalition

National Young Farmers Coalition Food Safety Library

Cornell Cooperative Extension Food Safety (Produce Safety Alliance)

University of California Small Farms Food Safety

Categories
Food Recipes

Fermented Bruschetta Makes Delicious Use Of Summer Tomatoes

When growing your own tomatoes, it seems that they take eons to ripen. However, once they do, it’s game on! It’s as if they all ripen at the same time and suddenly, you’re overwhelmed with tomatoes.

It’s a fight against time to figure out how to use them up and/or preserve them before they spoil. 

In our household we make tomato soup, spaghetti sauce, salsas, BLT sandwiches, tomato sandwiches and tomato salads. We eat them sliced and salted for snacks; we roast tomatoes. Tomatoes go on or in pretty much anything and everything else we can think of.

But one of our very favorite recipes to make with the abundance is bruschetta. My daughter will gobble up a bowl with crunchy toasted baguette before I even sit down at the table. 

As I was making batch number 526 of bruschetta this summer, it occurred to me that it would probably make a delicious ferment, and boy was I right. Fermented bruschetta is really easy too! 

Yield: 1 pint

Ingredients

  • 2 cups diced tomatoes, any variety you have (mix it up)
  • 2 tbsp. chopped fresh basil
  • 2 cloves garlic, finely minced
  • 1/2 tsp. sea salt
  • 1/4 cup fresh lemon juice

Mix prepared ingredients together and transfer to a clean pint canning jar. If you have a small fermentation jar weight, add it to the jar to hold down the produce under the juices.

Wipe off the rim of the jar with a clean dampened towel. Add the canning jar lid and tightly screw on the ring.


Read more: Save seeds from your garden tomatoes! This video shows you how.


Fermentation

This is a very short ferment, with the duration being between 24 to 48+ hours. The bruschetta is delicious after it’s mixed together. But as it ferments, the flavors grow and meld together.

Ferment at room temperature, ideally between 60 to 75 degrees F (15 to 23 degrees C) and keep out of direct sunlight. 

Taste test after 24 hours to determine if the fresh flavors have transformed enough to your liking. If not, let it go another day or day and a half and taste test again. Once fermentation is complete, transfer the jar to the refrigerator.

This ferment is best enjoyed within 2 weeks.

Side Notes

Enjoy this fermented bruschetta as you would any regular unfermented bruschetta. Spread on a grilled crunchy baguette, mix into pasta or pile over a protein. 

Consider stirring in parmesan cheese, balsamic vinaigrette or a little red wine vinegar before serving. 

Categories
Beginning Farmers Farm & Garden Urban Farming

Keney Park Sustainability Project Spreads Excitement About Urban Agriculture

“Getting community members to support the organization and the efforts was one of the biggest early obstacles because sustainability and urban agriculture are not as much interest to folks who are in survival mode and trying to meet their basic needs,” says Herb E Virgo, the founder and executive director of Keney Park Sustainability Project.

Situated in Hartford, Connecticut, the Keney Park Sustainability Project aims to educate and empower local residents to take steps towards self-sustainability through initiatives like on-site classes and home garden kit projects.

Taking time out from duties at Keney Park, we spoke to Virgo about the challenges in running a locally-focused initiative and the importance of letting people experience the process first hand. We also got the inside story on some chickens who have proved a hit on the theater stage.

The Roots of Keney Park Sustainability Project

“Our organization was originally called the Family Day Foundation and we were responsible for organizing an annual festival in Keney Park called Family Day,” says Virgo as he recounts the origin of the Keney Park Sustainability Project.

“After a while we started thinking about how we could better impact the community and create more opportunities and better serve the park. So the sustainability project basically came out of that brainstorming session.”


Read more: Tiffani Thiessen talks urban chickens, sustainable living and more.


An Urban Agriculture State of Mind

Virgo says that he experienced a couple of early challenges when launching Keney Park Sustainability Project.

“Finding resources to start the program was one,” he explains. “Then we also had to try and work out a way to get people in the community to think differently about urban agriculture activities.”

Experiencing Agriculture on Your Doorstep

When it came to drumming up interest and support in the local community, Virgo says that a key part of the process was simply “getting people into the space.”

He adds, “Getting people into the garden, getting people into the park, that was key. Just having them exposed to bees and chickens and hydroponics.”


Read more: Start a water garden to grow hydroponic chicken treats!s


Introducing the Home Garden Kit Program

One of Keney Park Sustainability Project’s biggest successes has been the organization’s home garden kit program. “That’s something we started during Covid-19. Everybody was sheltered in place, and we wanted to give people the opportunity to grow at home. We offered the option of a 4-by-4 or an 8-by-4 raised bed, hydroponic kits and grow bags.”

Virgo adds that during the first year of the home garden kit project initiative, they gave out over a hundred kits. Here in the following year, they’ve already hit 275 kits.

Spotlight on the Chickens!

The resident chickens at Keney Park Sustainability Project recently moved from the coop to the center stage when they snagged a role in a production of the play Walden.

“They took to the stage very well!” says Virgo. “Everyone was very shocked because they started to learn the routine of the play based on lights. So they knew when to perch or when to roost and when to come out. I saw one production and when the actors were close to the coop they were extremely active—more active than I’ve ever seen them!”

Follow Keney Park Sustainability Project at Instagram.