Crafting a homemade lotion may involve a few more steps than other handcrafted herbal products. But this soft and soothing chamomile body butter is well worth the extra time and effort!
Chamomile is loaded with powerful antioxidants that help regenerate the skin, tighten pores and reduce blemishes and redness. Adding this aromatic herb to our lotion creates a versatile product that will moisturize and soften the skin while smoothing wrinkles and clearing up acne.
What You Need
3 ounces oil of choice
1 1/2 ounces coconut oil
1/2 ounce (by weight) beeswax
2 1/2-ounce chamomile infusion
1 teaspoon vitamin E oil (optional)
essential oil (optional)
immersion blender
medium-sized glass or metal bowl
double boiler
Step 1: Brew the Infusion
The first step is to brew our chamomile infusion. This can be made with either Roman chamomile, Chamaemelum nobile, or the German, Matricaria recutita.
These two plants are certainly different species. But they offer many of the same benefits and are often used interchangeably in commercial skincare products. Feel free to use whichever species of chamomile you have available.
We’ll make our infusion by pouring 1 cup of boiling water over 3 tablespoons of dried chamomile flowers. Allow to steep for at least 15 to 20 minutes. Use a tea ball or reusable teabag, or strain out the flowers using a sieve after the water is well infused.
This will produce more than enough chamomile infusion for use in our lotion recipe.
Next, combine the oil, coconut oil and beeswax in a double boiler over medium heat. Stir occasionally until the beeswax is melted and the mixture well blended.
Then pour the oil and beeswax mixture into a glass or stainless-steel bowl to let cool.
Once the oils have cooled to room temperature and begin to solidify, you can add the vitamin E oil. This step is optional, but the vitamin E will act as a preservative, extending the shelf life of the lotion.
This is valuable because of the use of water in this product. (Water can often promote bacterial growth.)
This would also be the stage that you would want to add any essential oils to the lotion. Lavender would be an excellent addition to this recipe, but feel free to experiment with oils that you may already have at home.
Anywhere from 5 to 15 drops of essential oil should be plenty.
Step 3: Combine Everything
Now, add the chamomile infusion, mixing continuously until the lotion emulsifies into a smooth, creamy consistency. You could do this by hand with a whisk. Using an immersion blender, however, will make the job much easier!
It’s important that the infusion is also at least room temperature or warmer when you add it to ensure proper emulsification. If you don’t have an immersion blender, a table-top blender will work but will be a bit more difficult to clean.
Use a rubber spatula or similar tool to move the chamomile lotion into jars for storage. Now you have fragrant and soothing body butter that your skin will thank you for!
This article appeared in Healing Herbs, a 2021 specialty publication produced by the editors and writers of Hobby Farms magazine. Healing Herbs includes herb profiles, projects such as this one, directions for foraging herbs and more. You can purchase this volume, Hobby Farms back issues as well as special editions such asBest of Hobby Farms and Urban Farm by following this link.
These unconventional chicken coop designs treat the chicken coop like the hybrid structure it is—part outbuilding, part outdoor furniture, part sculpture. They are also completely functional, sometimes serving multiple purposes at once.
SYM
SYM (pictured above) is much more than a chicken coop; it’s a symbiotic urban farming system. It sits above two worm compost bins that are fertilized directly by the chickens’ manure. The chickens can eat insects that are naturally attracted to the compost and come in through the mesh floor, as well as worms taken from the bins and fed to them. The rooftop collects rainwater.
Coopsicle
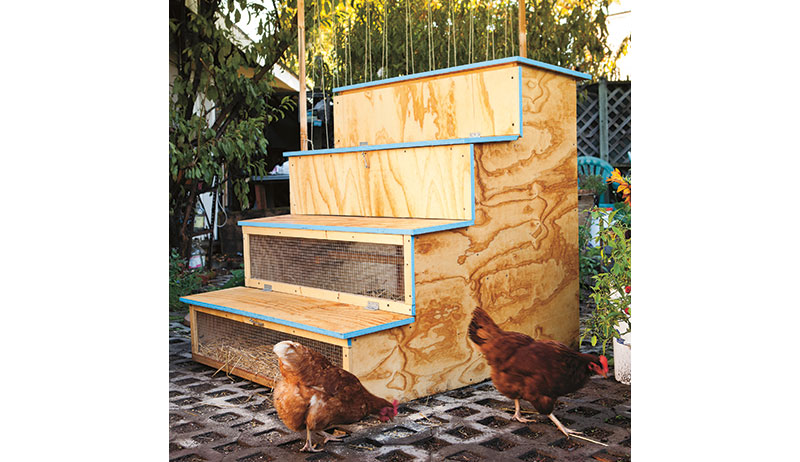
The floor of this tree-house-inspired coop sits 48 inches off the ground, allowing for easy human access and cleaning. The spiral staircase leads to the coop through a hatch door cut into the floor.
Is it possible for a chicken coop to be a gathering place? Instead of a utility structure in exile, what if a coop could be a place to commune, hang out and even sit on?
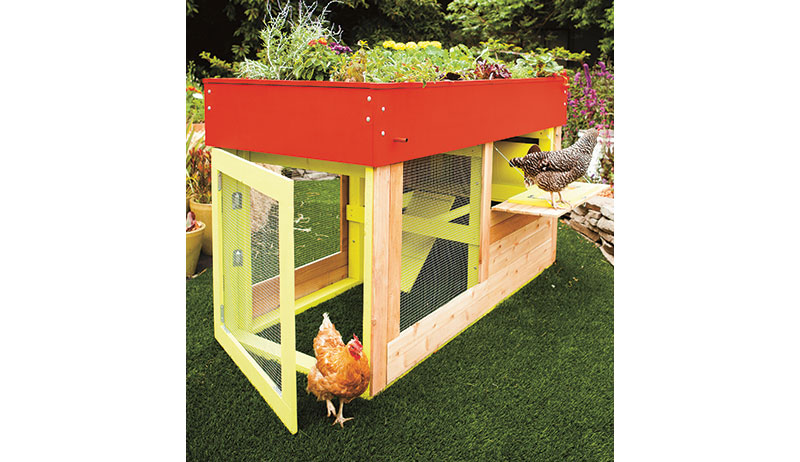
Kippen House Garden-Roof Chicken Coop
If you lack the space for a garden and chicken coop, why not have two in one? This coop has a garden bed for a roof, which also acts as an insulator that helps keep the coop interior cool in summer and warmer in winter.
Chick-in-a-Box
This coop features a butterfly roof and post-and-beam-style joinery. The roof is angled such that rainwater is collected and funneled down to the chickens to drink.
Kevin McElroy & Matthew Wolpe are authors of Reinventing the Chicken Coop: 14 Original Designs with Step-by-Step Building Instructions. This excerpt originally appeared in the January/February 20201 issue of Hobby Farms magazine.
As a chicken farmer, I belong to—and moderate—quite a number of online poultry groups. My responsibilities are typically limited to approving new members and posts, deleting inappropriate comments, and shutting down heated debates.
I participate in discussions as much as time allows, which I readily admit is not too often these days. One recurring theme that keeps popping up since this spring, however, intrigued me: offering chickens wet food. In all my years of raising poultry, I had never heard of this practice.
One poster commented that her veterinarian told her that offering chickens wet food is like offering cats and dogs wet food. It’s just as nutritious and more enjoyable than dry pellets and crumbles.
I disregarded this post, thinking it was a fluke. But the theme kept coming up every couple of weeks—not in one but in four of my online groups.
Those singing the praises of feeding chickens wet food were people of all ages and genders, scattered throughout the U.S. After yet another post last week lauding wet food for chickens, I could no longer hold back my curiosity.
I contacted several veterinary experts and did a lot of research. Here’s the scoop on offering your flock wet food.
Wet Food to Hydrate Chickens
Extreme heat can be life threatening for chickens, as they do not have the ability to sweat in order to regulate their body temperature. Instead, they release body heat via their combs and wattles and by panting.
But these methods become increasingly inefficient as temperatures soar, often resulting in heat stress.
Early signs of heat stress are not obvious. Other than heavy panting and wings raised away from the body, a heat-sick bird behaves normally. Unfortunately, a chicken can quickly deteriorate, becoming lethargic, listless and unconscious.
Offering your flock a mash of feed mixed with cool water is one way to hydrate your birds on hot days. This method, however, is inefficient. The moisture in the mash will also react to outdoor heat and lose its refreshing chill. It will evaporate, causing the mash to thicken to a concrete-like consistency.
To help your flock stay cool, add shade to your run by attaching sheets or tarps to your fencing. Consider buying a misting garden hose and place this inside your run, where the cooling mist will refresh your birds all day long. Add another waterer and keep the water within chilled with ice packs.
I use bottles of frozen water. Once the water inside the bottles thaws out, I simply clean and refreeze the bottles, then use them again.
Pet owners know that an easy way to get a cat or dog to take prescriptive medicine is to hide it in their food. Some flock owners apply the same principle to their poultry. They mix up a mash of water and feed, then add such medications as electrolytes, antibiotics and deworming agents.
Providing medications this way is not only ineffective but can be dangerous. There is no guarantee that the sick birds will get a sufficient dose of their needed medicine, states Dr. Michael Hoffman, an Army Veterinary Corps veterinarian based in Alamagordo, New Mexico.
Most poultry medications are formulated to be administered via the birds’ water. When providing medication to your flock, always follow the directions specified on the box or bottle.
Benefits of Wet Feed
Despite not being a means to hydrate or medicate your birds, wet feed does have its advantages. According to J. Michael Forbes, a poultry scientist at the Centre for Animal Sciences at the University of Leeds, a wet mash is more easily digested due to its being in a semi-liquid form.
A chicken’s digestive juices break down the wet food particles much more swiftly, allowing for the nutrients to be more quickly absorbed.
Offering your flock wet feed instead of dry feed encourages more rapid growth in your birds, especially if you are raising birds for meat. Another bonus is that providing wet feed instead of dry reduces the amount of dust inside a coop.
Offering your chickens a wet feed is not without its problems. Wet feed tends to cling to the feathers surrounding a bird’s beak. This causes clumps that are not only unsightly but can cause discomfort and attract insects.
Wet feed results in wetter droppings, too. This will require you to clean your coop’s litter more frequently.
To safely offer your flock a wet feed, you will need to invest in livestock feed bowls. You can’t use gravity poultry feeders. The wet mash hardens inside the feeder, creating a cement-type blockage that prevents the food from getting out.
You’ll also need double the number of feeders you already have. Why? Feed bowls must be thoroughly washed regularly to prevent the build-up of mold, mildew and fungus, which can lead to stunted growth and death if ingested by chickens.
Finally, you’ll need to budget for more feed when offering your birds a wet mash. Not only will your birds’ food intake increase (wet feed is more swiftly digested), but also wet feed must be properly discarded—away from your birds—at the end of every day.
According to Dr. Jacquie Jacob from the University of Kentucky, wet chicken food is a main source of Clostridium botulinum, the bacteria that causes botulism. Offering your birds wet feed from a previous day is a surefire way for them to become very sick very swiftly.
How to Offer Chickens Wet Food
If you’ve never given your chickens wet feed but are curious to see whether they’d like it, do a quick test. Purchase a small heavy-rubber livestock bowl from your farm-supply store. Then mix up a small amount of wet mash using your chicken feed plus fresh water.
The mash should be the consistency of porridge. Aim for watery but not soupy.
Place the bowl in your chicken run, away from your gravity feeder and waterer. After that, let your chickens discover it for themselves. It might take a day or two—in which case, mix up fresh mash each time—but your birds will eventually find the bowl and happily slurp the slurry down.
Every issue of Hobby Farms magazine, our editors search for items that are useful to hobby farmers, whether they’re heavier equipment such as tractor attachments, useful tools, innovative helper items or accessories for livestock management.
So have a look at the things we found that can help your farm run better or keep you and your animals safer.
1. EZ Step-In Posts
EZ Step-In Posts can be used for plant and tree support, fencing, livestock containment, trail-marking and other applications without digging, hammering or pounding. Heavy-Duty EZ RING, made of military-grade polymer with UV-stabilizer, attaches to the EZ Step-In Post, or an existing post support (between 3⁄8– and3⁄4-inch in diameter).
2. Haulz-All
With three lengths designed to fit any truck bed, the Haulz-All has slatted sides for airflow and rear butterfly gates to aid in moving goats, sheep and other stock.
3. Sure Split Wedge
The tapered design of Estwing’s Sure Split Wedge starts cuts, and fins add extra wedge action below the wood line.
4. 3 Point Carryall
The Titan 3 Point Carryall allows you to carry hay, wood, feed, tools and more on the nonslip, 5-foot platform. Built with 2-by-2-inch tubular steel, the platform can connect directly to a category 1, three-point hitch or to a pallet forks attachment.
5. 90 Proof Pole & 90 Proof Rail
Make a paneled paddock, stall or turnout any size you want with the Trio Ranch 90 Proof Pole and the 90 Proof Rail. A pole clamp allows for a secure horizontal-to-vertical connection while the rail connects horizontal bar to horizontal bar. It’s often used to divide stalls in half.
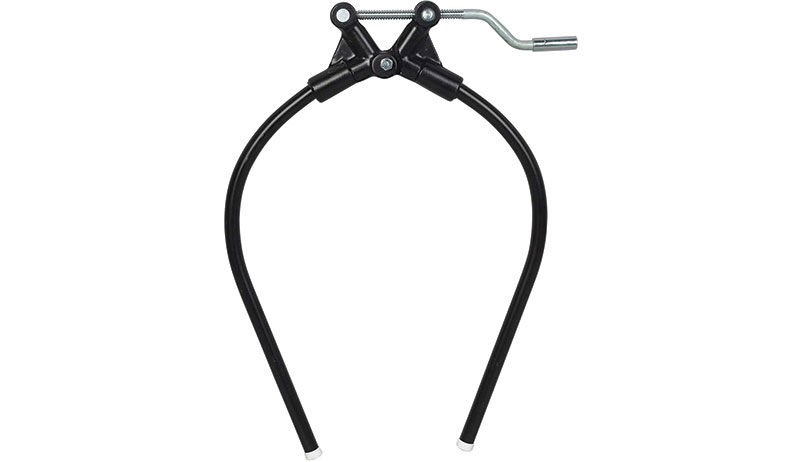
6. Kow Kant Kick
To assist helpers in staying safe, slip the Kow Kant Kick over the affected animal’s back and crank tight to depress the muscles that control kicking. It immobilizes the rear legs only and works on any size animal.
7. Safecrate
Store or move canned goods with a Safecrate, a protective, stackable, translucent plastic storage container that holds 12 pint or quart canning jars.
8. Canine Safety Vest
This canine safety vest from Carhartt (above) is fully adjustable with large swaths of reflective tape to make sure your dog is highly visible in low-light areas.
9. Blanket & Sheet Repair Kit
The Tough 1 Blanket and Sheet Repair Kit allows for repairing blankets and sheets with a bottle of glue and four pieces of waterproof fabric.
10. Fence Alert
The Speedrite Fence Alert is visible up to 1 mile away. The warning light begins flashing if the fence voltage is too low. This device can be used on any type of electric fence, including all wire and poly products. No ground wires or external power sources required.
This article originally appeared in the July/August 2021 issue of Hobby Farms magazine.
Fall is my favorite farming season. As temperatures cool down, the hectic pace of spring and summer tends to slow a little. This leaves time to catch up on projects sitting on the backburner.
But at the same time, it’s important to stay attuned to the approach of winter. On my northern Wisconsin farm, winter is a big deal, lasting for as many as five or six months. Thus, I spend much of fall preparing for winter, making sure everything is in order before the longest, coldest season settles in.
If you’re new to the experience of winter on a farm, here are four tasks I recommend pursuing during the fall in order to get ahead of schedule and set yourself up for success.
Wait—why would you add fresh compost to your gardens beds if they’ll soon get buried under snow and ignored until spring? Well, spring tends to be a very busy time of year, and adding compost to garden beds takes time.
So why not shift the chore to fall instead?
Once your beans/pumpkins/etc. have run their course, clear the beds of vegetation and refresh them with compost right away. That way, when spring rolls around, the beds will be ready to go and nothing will delay you from planting as soon as the frost danger is past.
Clean up brush piles and similar messes.
Sometimes, we start projects, but don’t quite finish them. We cut up the fallen red pine tree, but don’t get around to cleaning up all the branches. Or we gather stones to edge a walkway, but get distracted by a more pressing project and wind up leaving the stones in a pile by the farmhouse.
Don’t feel bad—hobby farmers have a lot to juggle. But I recommend cleaning up any farm messes like these before winter arrives. This way, they won’t be a distraction in the spring, when there’s so much to do.
And if you clean up random assortments of rocks/debris/etc. before winter, you won’t have to worry about hitting them with a plow or snow blower. Been there, done that!
Many pieces of farm equipment are seasonal in nature, and it’s a good practice to put them away when not in use. Whether that means parking the hay baler in a garage bay or storing garden tools in the toolshed, make an effort to stash your farm equipment away so it won’t sit out in the elements all winter.
At the same time, think about preparing machines that will see use during the winter. Pull out your snow blower to change the oil and perform other routine maintenance tasks. Install weights and tire chains on your lawn mower, ATV and/or tractor for improved winter tractions.
Make a list of everything you need to prepare. Aim to check off all the items before the first snowstorm hits.
Ready your winter clothes and gear.
The extent and severity of winter weather varies considerably across the U.S., but pretty much anywhere you live, colder temperatures can be expected. Whether your definition of cold is 25 or -25 degrees F is less important than acknowledging you may need special winter gear to handle the conditions.
Warm clothes, gloves and boots should be brought out of storage (or purchased anew, if your old gear is worn out) before it’s needed. That way, you won’t be caught unprepared when a sudden cold front brings the chill of winter to your farm.
Nobody needs frostbite, right?
Preparing for winter should be a primary focus for any farmer during the autumn months. And once you’re ready, you can relax in the confidence that comes with feeling ready for anything.
So, you’ve bought, begged or borrowed some new land in the country and are ready to begin a homestead. Congratulations! Now, whether this new land is the perfect farmette with fenced green pastures, new barns and in-ground water systems or the roughest of neglected, damaged or abused land on poor soil thick with weeds and briars, the two things any homesteader wants to begin doing immediately is growing food and growing fertility. Fortunately, you can start to do them both right away with pasture permaculture.
We don’t mean just throwing a fence around the farm and shoving animals in there. We mean ecologically sound, planned grazing of native and naturalized plants. All good homestead management (and this includes management of pasture) absolutely requires the kind of attention, restraint and respect for natural systems that are at the heart of permaculture.
And all good permaculture absolutely requires animals! Pasture permaculture is a match made in heaven.
Pasture + Permaculture
What is permaculture? Well, the word itself is revealing. “Permaculture” is a contraction of the words “permanent” and “agriculture.”
There should be a special emphasis on the “culture” part: Permaculture is particularly about how people dwell in a landscape, to the mutual benefit of everything living there. At the heart of permaculture is the conviction that human beings belong to the natural world and have a beneficial role to play in it.
And when we’re doing our job, the whole system works better — much better.
A Different System
Permaculture is very different from the present Western commercial farming model, a model based on nonrenewable petrochemical energy and fertility. A permanent agriculture—one we can reliably expect to extend into the future—can’t be essentially dependent on imported, finite energy sources.
Neither can it generate wastes, which eventually build up to be pollutants and nutrient deficiencies. All the results of permacultural farming must become feedbacks into the system.
Instead of an energy flow of machines, petroleum and annual commodity monocrops, permaculture directs natural forces such as gravity, rainfall, sunlight, shade and long-living biological communities, in such a way that the resulting healthy, stable landscape supplies all the needs of its living populations—including humans—for the foreseeable future.
We can’t think of a better description of really good grazing.
Along with an upsurge in permaculture practices, the past several decades have seen a real development of the principles of regenerative pasture grazing. This is the management of grazing animals in imitation of natural herds, so that they become a dynamic force for moving an environment or an ecosystem toward a stability of abundance.
Good grazing builds soil, biodiversity and fertility, as part of the very act of eating. So, when we manage our animals to feed ourselves, we’re also planning meals for future generations.
The principles are pretty basic. In nature, large herds of grazing animals tend to move in migratory swings, impacting a given area relatively severely—but only for a short time—and then moving on. The move is necessary because of the severe trampling and dunging that happens where there are large herds.
Grazing animals won’t eat near their own feces. Manured forage is distasteful to them. And that’s a good thing, because avoidance of their own manure helps keep their internal bugs in healthy balance.
Forage Recovery
Another good thing is that when herds graze and move on, grazed forage gets a chance to recover. Complete regrowth and recovery between grazings is important so that plants renew their root resources for future growth. Not only that, the manure, urine and even the trampling of the herd cause beneficial impact, depositing nutrients and driving seeds into the earth.
This additional biomass builds a healthy soil. Recovering plants can grow bigger, stronger, healthier and more nutritious before animals graze it again.
Cloud5683/Shutterstock
Pasture Permaculture Requires Rest
A long rest completes the cycle. Plants recover fully. Parasite larvae die for lack of an appropriate host.
Manure incorporates into the soil, and germinating seeds grow and establish themselves. By the time the grazing animals return to this spot, a new banquet will spread out before them, ready in its turn to nourish the herd and receive nourishment from it.
You’ll run into a lot of opinions about what good grazing should be called—rotational, holistic, intensive. But good grazing, by any name, is pasture permaculture. It honors the character of the land.
And—good news!—the land, the climate and whatever grows there will teach you how to do it.
Getting Grounded
Learning pasture permaculture doesn’t require that you take any special courses or buy a whole lot of books. There are many excellent learning aides out there. But before these will mean a whole lot to you, you need experience.
And, fortunately, experience is easy to get. You just begin!
Adding a grazing animal or two to your homestead pasture will teach you a great deal very quickly—especially if you keep in mind the principles of permaculture.
First, Observe
Our first move on coming to any piece of land must be to observe what is already happening there and begin to interact with the land and the living community. What presently grows here?
First among our renewable resources are the plants in this wild pasture or field—the native and naturalized plants that are already growing. Without any human assistance, they already work to capture and store at least two kinds of energy:
solar energy, in the sunlight they convert to biological energy in plant tissues
kinetic energy, in rainfall held in soil and roots, rather than running away downhill
Sunlight and retained precipitation are two more of the renewable resources this land will offer you.
Here are the makings of a food system that costs nothing to run. The problem? You can’t eat most of the stuff. Fortunately, however, your animals can. And they can convert the energy to forms available to the whole farm.
You can work with what presently grows on your land. Keep in mind that these native and naturalized plants grow there because they want to. And the conditions of nature, climate and topography encourage this particular kind of growth.
So, it doesn’t take any energy—human or petrochemical—to keep them growing.
You can’t be sure the same would be true of any good forage plants you might think would make better pasture. Even if what’s already there isn’t, properly speaking, “pasture” at all, no problem. It’s breakfast for somebody.
If we bring in the right species, we can start harvesting solar energy right away.
For Goats
Briars and underbrush call for some goat impact. Tethering goats where they can reach aggressive undergrowth is the best way we know to begin moving very wild land toward a more human-friendly landscape.
All of the impacts are beneficial. The briar load diminishes and sunlight gets through for growing grass. Goats also press down soil for better seed contact, adding their own potent fertilizer to the mix to boot.
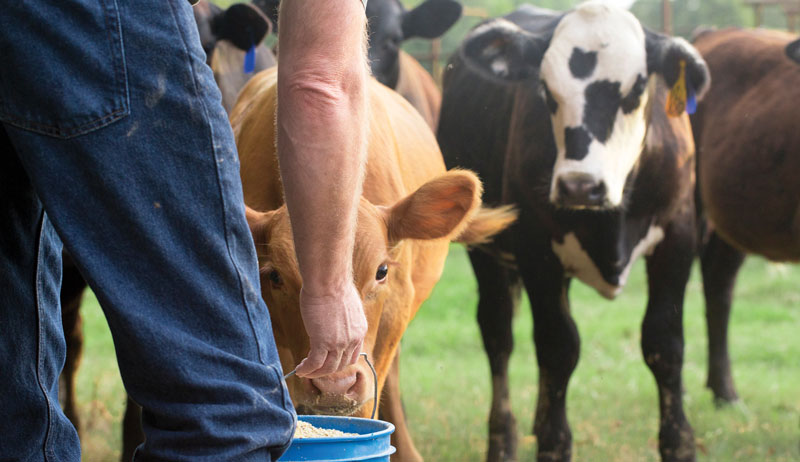
For Sheep & Cows
If the pasture is mostly dense weeds such as Queen Anne’s lace, ironweed and goldenrod, that’s the perfect dinner for sheep. Two or three strands of temporary electric fence will keep in a small flock.
Outline a small area and see how fast your ovine helpers demolish the weeds, bringing sunlight down to the level of the soil. Frequent moves and long rests before you bring the sheep back to this spot will let grass start to take a bigger role in the pasture composition, for even more efficient solar-energy harvest.
Just plain grass, or grass and weeds, makes a good dinner for cows and sheep. With proper management—grazing small areas and then moving on, not returning to an area until it’s completely recovered—the pasture will grow denser, with more nutritious forage, much faster than you might expect.
Waste or Resource
No matter what kind of ruminant you graze, they’ll deposit manure and urine. In a confinement setting, concentrations of animal wastes are at best a job—and at worst a pollutant.
But good pasturing automatically produces no waste.
Pastured animals deposit urine and dung where soil life can carry them below the surface to feed the next flush of forage. So instead of building up to contamination levels and breeding pathogens, these deposits of captured sunlight, nitrogen and carbon—more renewable resources—become part of your soil bank.
Self-regulation and feedback are the heart of good grazing on pasture, just as they’re essential in any good permaculture. Instructed by nature, the regenerative grazier applies animal impacts around the farm, directing these natural forces where his or her observations and deductions say they’ll do the most good.
Erosion is checked when planned grazing eliminates overfrequent impact on vulnerable banks and slopes. Forage is harvested during the stage with the most nutrition. Old plant material gets removed before it begins to smother new growth points.
Ben Kerckx/Pixabay
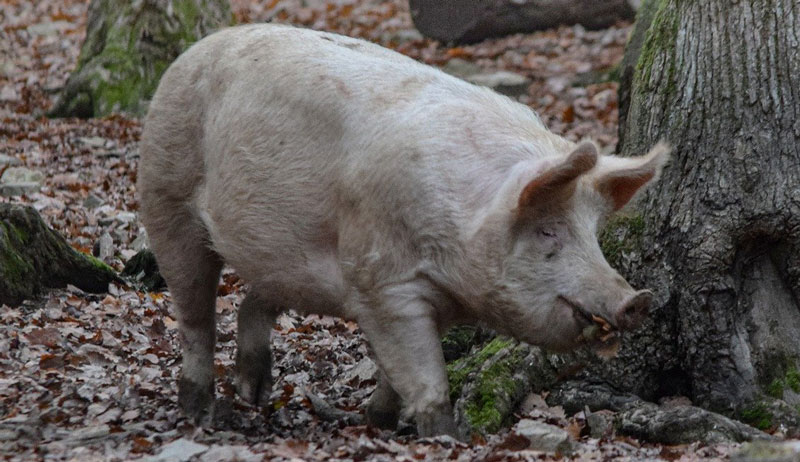
Pigs in the Woodlot
Pigs come into their own in a woodland setting. When we pasture pigs in the edge of the woods, we design from pattern to detail. That is, we use a trick from nature’s book.
While pigs aerate the forest litter and eliminate some underbrush, they harvest nuts, fungi and leaf mast, cycling nutrients for the next harvest. Using animal impacts to alter landscapes is something nature continually does. And the permacultural grazier uses animal forces to raise her farm ecosystem to new levels of health.
When so much of the life of any ecosystem is microscopic, it’s not surprising to find that little things matter—a whole lot.
Small grazing paddocks mean short-duration impact. This leaves time for large-scale recovery. You’ll have a lot more grass than you ever imagined!
Instead of imposing a whole new pattern on your land, you’ll invite the collaboration of all the life that’s there. Each individual impact is tiny, but the overall effect is transformative.
Minimizing permanent fence, a common aspect of regenerative grazing, means animals, plants, even topography remain parts of an integrated whole. Without permanent fence lines, you can access every place on the farm.
You can include lane verges, orchard floors and forest margins paddocks. This increases available forage and gives animals access to nonforage plant species. These are plants not normally appreciated as food species but include a host of medicinal varieties.
Power in Restraint
Good grazing, like good permaculture, is at least as much a matter of what we don’t do as what we do. Humility is at the heart of permaculture in the pasture. Although we may have some marvelous visions for the piece of nature under our care, land—and the living things that call it home—responds better to suggestions than to orders.
The restraint we associate with well-conceived permaculture is echoed in the patterns that characterize regenerative grazing: Through the mouths and feet of our animals, we propose small alterations to the living community. The long rest and recovery we build into the system allows time for the environment to respond to our suggestions.
With so much time to observe results, we come to each decision with greater understanding and patience.
Respecting Natives
Grazing native or naturalized plants—rather than eradicating whatever grows on our land and replanting with forage species—leaves successful wild species in place and capitalizes on their success. So, we match our grazing animal to the type of forage that is already there: Cows and sheep to grass and weeds, goats to brush and briar.
Alternate grazing and recovery keep soil protected and active. Well-armored soil protects the watershed.
In this way, native diversity is preserved and actually enhanced. Native animal species continue to enjoy their habitat. And the livestock and humans eat well
Nowhere is permaculture more comfortable than plants and animals together make a natural guild—a community of interdependent, mutually beneficial species. And grazing animals and pasture plants benefit one another as well as benefiting us.
When we manage our pasture with the respect and restraint of a permanent agriculture, it will offer us food, fertility and a future in this place. You might even call it home.
Sidebar: Permaculture & Pasture Principals
Twelve principles have been identified as the rules governing a healthy, ongoing human impact on an ecosystem. They are the same rules that govern regenerative grazing. With these principles informing your plans, you can be sure your homestead is going to start out on a good footing with the local biological communities.
Observe and interact; watch and manage your animals.
Catch and store energy; grass is the largest terrestrial solar collector.
Obtain a yield—grazing turns solar energy into milk, meat and manure—and more animals.
Apply self-regulation and feedback; let the farm teach you how to graze.
Use and value renewables such as sunlight, grass, rainfall and manure.
Produce no waste; in a pasture setting, everything goes back into the soil.
Design from pattern to details; all decisions must imitate nature.
Integrate, don’t segregate, like mixed herds and native perennial pastures.
Use small, slow solutions; grazing happens one bite at time!
Use and value diversity; more species means more natural services.
Use edges and value the marginal; graze banks, understories and verges. Everything has value.
Creatively use and respond to change; good grazing lets nature, not human plans, take the lead.
This article originally appeared in the July/August 2021 issue of Hobby Farms magazine.
Today we finish our three-part series on livestock hoof health with an overview of one of the most common hoof ailments in our cattle, sheep and goats: foot rot. For a deeper look at laminitis—a common and serious hoof condition seen mostly in horses—hop over to last month’s post.
And for a refresher on “normal” hooves, look here.
One of the most common causes of lameness in cattle, sheep and goats is a disease called foot rot. But let’s stop right there and take a closer look at the difference in this disease between species.
Foot Scald & Foot Rot in Sheep & Goats
In sheep and goats, there are actually two clinical diseases, one called foot rot and the other called foot scald. Although usually treated in the same manner, their causes are different (but related).
Confused yet?
Foot Scald
Foot scald is diagnosed when the interdigital tissue—a fancy name for the skin between the two hooves—becomes pink, raw and irritated. Initially, it truly does look like skin that’s been scalded.
Foot scald is caused by an environmental bacterium called Fusobacterium necrophorum.
When this bacterium proliferates in the moist tissue between the toes (what a perfect location for bacteria to grow!) it results in infection. As the disease progresses, the foot becomes very tender. It may have a foul smell and sometimes discharge due to tissue death.
The species name necrophorum says it all, as “necro” means death.
Foot Rot
Here’s where the next step occurs. If foot scald isn’t caught early, it can progress to foot rot. This occurs when another bacterium called Dichelobacter nodosus gains entry to the foot via the already-damaged tissue courtesy of F. necrophorum.
Partners in crime, you might say. Goats and sheep with foot rot, however, say, “OUCH.”
With foot rot, not only does the tissue between the toes grow inflamed, but the tissues on the sole of the hooves begin to weaken and degenerate. This is extremely painful. A common sign of sheep and goats with foot rot are animals grazing on their knees because their feet are too painful to stand on.
Now compare this disease process to cattle, who don’t really get foot scald but jump directly to foot rot with nasty lesions seen typically between the toes.
Again, this painful condition results in pretty severe lameness. Infections can become so bad that an animal may get a fever and not want to eat.
Typically, you treat foot scald/rot in sheep and goats by hoof application of either copper or zinc sulfate, administered via foot bath. However, before treatment, it’s important to cut away diseased hoof tissue and then carefully sterilize your hoof trimmers before using on different animals to prevent spread of bacteria.
Cleanliness here cannot be stressed enough. For a severe condition, your veterinarian may recommend systemic antibiotics, as well.
For cattle with foot rot, your veterinarian will likely immediately prescribe antibiotics along with a thorough foot cleaning. Sometimes, they may also prescribe pain medication. If the animal does not respond to antibiotic therapy within a few days, your vet may want to re-check.
With severe infections, bacteria may invade the deeper hoof tissues and possibly infect the joint. If this occurs, surgery (one-sided hoof amputation, also known as claw amputation) may present the only option to get rid of the infection.
Prevention of these bacterial hoof diseases is via good hoof hygiene. For sheep and goats, keep hooves trimmed on a regular basis. For all livestock, try your best to keep animals from standing in wet, severely muddy areas as best you can.
Minimize their walking on tough terrain such as spiky brush or large gravel areas, especially during cold weather. This can help decrease micro-damage to the hooves in which bacteria gain entry and set up infection.
Having said that, please do keep in mind not all cases of foot scald/rot can be prevented given how ubiquitous the bacteria are. So don’t be too surprised or upset if it occurs in your herd.
Quick diagnosis and initiation in treatment, however, will greatly impact how your animals overcome this common hoof condition.
Just imagine it: A juicy hamburger topped with melted cheese and sandwiched inside a toasted bun. Or maybe even a thick steak, grilled to perfection and dotted with seasoned butter. You savor each bite, knowing exactly what you’re eating because you raised the animal yourself.
Raising beef cattle is not rocket science, but it does take patience. You also need understanding of what is required to end up with the best meat you’ve ever tasted.
Breed Between the Lines
There are many different breeds of cattle around the country, so you’ll want to research some and learn what traits interest you most about the different ones.
When it comes to the meat, Angus is known to be well-marbled, which means that it has flecks of intramuscular fat throughout the meat. This is what makes it so tender and desirable.
Our family personally enjoys the leaner meat from Holsteins or even the sweeter beef from Jersey cattle. If you aren’t sure what kind you like, find someone nearby that raises beef cattle and ask them some questions.
Maybe even try sampling meat from different breeds to see which appeals to you most.
When selecting the size of animal, you will have a wide range of options. Some people might prefer to buy a larger animal (350 to 500 pounds), while others prefer the commitment of raising a bucket calf. One benefit of raising a bucket calf is that it will be tame and used to being handled. This is important when keeping the animal around your family or farm.
Cattle are herd animals and will be calmer when kept together. As they relax and graze more, you’ll find they even grow better from it.
Before you head out to pick out your first animal, be sure you know the basic terminology.
A bull is a male that has not been castrated, while a steer is a male that has been castrated.
A heifer is a female that has not had a calf, and a cow is a female that has had a calf.
A lot of people tend to call cattle in general “cows.” But it will benefit you when you go to buy one if you can know (and tell) the difference.
As you look to buy, you’ll have two main options: a local sale barn or a private seller. If you’ve never been to a live cattle sale in person, I suggest that everyone go at least once. The rhythm of a good barn is something to experience.
The startlingly fast chant of the auctioneer, movement of the cattle and handlers in the pen, the observant eyes of the audience and the hum of bids being placed are sights to behold.
One word to the wise: Be cautious of two things when you visit the sale barn:
No. 1: Have a price in mind ahead of time, and don’t get swept away in the excitement.
No. 2: Keep your hands in your pockets unless you want to haul that critter home!
Until a person reaches a point that they are fairly knowledgeable (and comfortable) with judging an animal by merely looking at it, check around to find a reputable private seller. Someone who is honest and willing to teach you things can answer questions and offer you quality cattle.
Before you even purchase your animal, carefully look at it and the rest of the cattle around it. This will give you a good idea of what yours could eventually look like. If half of the herd is snotty and coughing and the other half is lame, turn right around and head back home.
While the animal you chose to raise and butcher doesn’t have to be show quality, there are a few things you might want to be aware of when looking for good conformation. Check to see if the animal has some width between the front shoulders and hindquarters (indicating good muscle development) and a straight back; the tail is not high-set; and that there is no potbelly.
TFoxFoto/Shutterstock
Facilities Needed
Before you bring your new purchase home, make sure you have the proper facilities ready to go. Some things you can get by without, such as a stock trailer—you can just hire someone to haul your cattle home. But you need the following things, so plan accordingly:
a pasture or appropriate space for them to graze in
a building to shield them from the elements
a feeder
a water trough
any other equipment you might want to use to tend to health issues
The majority of the time, you can avoid larger purchases, such as a squeeze chute or newly constructed working facilities.
During your time as a beef cattle owner, never feel like you’re in it alone! Reach out to experienced people around you. You can depend on your trusted local veterinarian, cattle buyer, butcher, county extension agent or even large-scale producers when you run into a question or problem.
Chances are that they’ve already seen it and can offer some insight on how to proceed.
Figuring out what to feed your herd can be a bit of a challenge for someone new to raising beef cattle. A few things that all cattle need include:
fresh, clean water
a source of roughage (hay and/or green grass)
an energy source to fatten them (grain)
a good source of protein (which can somewhat depend on the time of year and the quality of grass already being provided).
Here in central Kansas where I live, about 3 to 3 1/2 acres of good grass would be needed to sustain one steer. The number of acres needed varies across the country. When it comes to sources of protein, alfalfa, cottonseed meal or soybean meal would all be sufficient options.
Should you decide to try your hand at raising alfalfa to feed, you could sufficiently provide for one steer by planting 2 to 3 acres of alfalfa.
Questioning whether the animal receives enough protein in their diet? Take a stroll through their pen. If the cow pies are “stacked up,” they’re doing fine. If they simply “make a pile,” they’re lacking in protein and you’ll need to up it in their ration of feed.
(A ration is the daily portion of mixed feed that is offered to an animal, composed of a variety of different feeds to meet the animal’s nutritional requirements.)
Make it a point to schedule when you feed. If cattle get too hungry and then eat too fast when finally fed, the grain could upset their stomachs and cause them to bloat and even die. (We’ll cover bloating in a bit.)
Be sure to check them often and keep on top of their regular care and maintenance.
The longer you raise cattle, the more chances you’ll have to end up with a sick one. Read up on the most common ailments ahead of time in the chance that you have to deal with a problem in your herd.
A two-prong approach should be taken toward the health of your beef cattle:
Preventative care to maintain the best possible health for your animals
Reactive care in response to any illnesses or injuries
Having good nutrition practices, minimizing stress when handling animals, staying on top of parasite and pest control, and keeping facilities clean and sanitary will greatly improve your experience raising beef.
P Maxwell Photography/Shutterstock
Herd Health Basics
As with all animals, a vast number of problems could plague your cattle. Here are three of the most basic to watch out for:
Bloat
Bloat occurs when cattle are unable to pass the gases produced during the fermentation process in the stomach. This leads to a distention of the rumen (a part of their stomach compartment).
Basically, the gases build up and, due to an obstruction in the esophagus, they’re unable to burp and remove the gas. Thus, the stomach fills with gas. If not treated, this can eventually lead to death.
You’ll be able to tell if the animal is bloated by looking at it from behind. If the stomach appears to be protruding out on the upper left side, it’s probably bloated. This isn’t something to play around with. If you believe you’re dealing with a case of bloat, call your veterinarian.
Some ways you can work to avoid future bloating in your herd include:
not overfeeding grain
keeping to a regular schedule for feeding
allowing plenty of roughage (i.e., chopped hay) in the ration of feed
Foot Rot
Foot rot is a common problem for cattle and is caused by bacteria picked up through a cut or wound. Something as simple as getting a cut while walking through a field of stubble or on loose rocks can provide opportunity for the bacteria to get inside.
You can identify foot rot by the swollen area between the toes, at the heel, and/or right above the hoof.
Wherever the wound is will likely be the most swollen. Depending on how severe the case is, the animal might become lame and reluctant to put weight on the foot. Antibiotics can be used to treat foot rot, but check with your vet to get the right medication.
Keep in mind whether you will still want to butcher the animal after treating with antibiotics. If so, look for a medication with a short withdrawal period.
(A withdrawal period is the time needed after an animal is treated with an antibiotic before it’s safely out of the body and the animal can be butchered without danger of harming those that consume the meat.)
Pneumonia
Pneumonia is an infection of the lower respiratory tract that focuses on the lungs. If the lining of the windpipe has been damaged or irritated enough, it can let in such infections.
Some factors that can also cause pneumonia include stress from extreme changes in temperature or weather, or overcrowding during transportation.
Cattle with pneumonia might appear depressed, quit eating and just lie around. Their ears might droop when standing and their breathing be labored. Cattle don’t have excessive lung capacity to start with, so something that limits respiration even more can have deadly consequences.
You can use antibiotics (or even sulfa, if the animal isn’t dehydrated) to treat and slow the progression of pneumonia. But check with your vet to choose the best course of treatment.
Sometimes just a quick phone call can give you the information you need.
Basic Bovine Butchering
What weight you butcher your beef cattle at depends on what your goal is behind having them. Keep in mind that the bigger they are, the more marbling and fat they will have. So shoot for between 800 to 1,400 pounds.
One of the most important things to do before butchering an animal is to ensure they are long past the proper label withdrawal times if they’ve been given any antibiotics in the past. Read the back of your medicine bottles, and keep track of which animal got a shot and when.
Most locker plants only require a phone call to set up a date to drop off your cattle. They’ll do all of the work of putting the animal down and then processing and packaging it.
In the Cut
At some point, they’ll eventually call you to ask for cutting instructions. This means that they would like to know how you want your meat cut and packaged.
Do you prefer your ground hamburger to be in 1- or 2-pound packages? Do you want any stew meat, brisket, ribs, etc.? Or would you rather it all ground into hamburger? How thick do you want your steaks cut? How many steaks per package?
Tell your butcher if it’s the first time you’ve had beef processed, and feel free to ask questions to understand what the difference is between different cuts of meat.
Pickup Prerogatives
When your meat is ready, the locker plant will contact you. Depending on how large the animal was and how much of it you’re keeping yourself (sometimes people will sell 1⁄4 or 1⁄2), you’ll want to make sure you have room in your freezer, an empty trunk in your vehicle and plenty of coolers or cardboard boxes to transport it in.
Pay attention to the outdoor temperature as that will affect how you transport the meat. The last time I picked up a beef from the locker plant, it was so cold outside that I was able to leave some of the meat in the car for a while.
It might have been colder outside than in my freezer!
Raising your own beef is a rewarding and enjoyable experience. There might be things that cause you to step outside of your comfort zone, but you will grow and learn from these experiences. Beef cattle can be a great addition to your farm. I’d also be willing to bet that you’ll enjoy that first cheeseburger a whole lot more knowing that you raised it than you would have if it came from a fast-food drive-thru!
This article originally appeared in the July/August 2021 issue of Hobby Farms magazine.
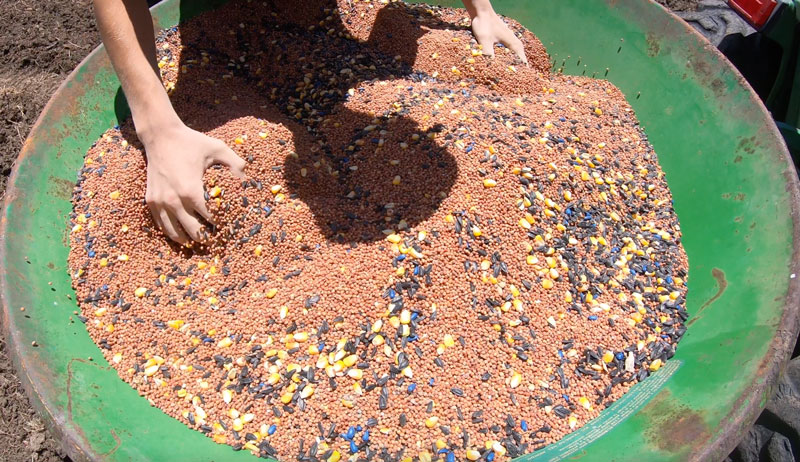
With fall on the way, I decided to plant some fields to feed wildlife here on our Texas farm. I bought some sacks of milo, deer corn and black oil sunflower seeds off the shelf of my local farm store. With rain falling frequently, this mix should make nice stands for wildlife to forage when the weather turns.
These fields aren’t a financial investment, so I’m not inclined to pull out the seed drill as I would when planting a cash crop. Also, with the frequent rains, I want to quickly get fields seeded between showers. So I pulled out my secondhand broadcast seeder instead, which runs off my tractor’s PTO to spread seed around the fields.
Before running the seeder over the field, my son and I first plowed the ground. Then, we ran over that plowed soil with a harrow to break up big clods of dirt.
If you have tight, clayey soil like I do, you’ll benefit from dragging plowed soil, too. It breaks up clods into good, fine dirt without robbing moisture the way over-plowing would.
Spread Seeds with a Broadcast Spreader
When you broadcast seeds the way we are, you simply spread the seeds on top of prepared soil. The broadcast spreader simply controls distribution so that we get a good seed-to-soil contact. But as it will throw seed about 30 feet out, it allows us to seed a field quickly—between rain showers, for example.
One downside of using a broadcast spreader is the amount of seed required. Because the method yields a low germination rate, I have to use a lot of seed compared to what I’d use with a seed drill. In this task, for example, we broadcasted 250 pounds to cover 3 acres.
Broadcasting seeds this way, we simply mimic Mother Nature. In nature, plants drop a bunch of seeds, only some of which germinate. When we broadcast, we do the same thing.
After spreading your seeds, drag the field again. This helps the seeds find their way into the prepared soil.
Mother Nature was on our side with this project. We received a few long, slow rains after seeding that helped break down the soil even more.
And as you can see in the video above, I got a good germination rate from spreading my seed with the broadcast spreader. True, it’s a random process compared to a row-crop style. But for wildlife feed (and, later, organic matter to till into the soil)—not a harvest crop—the broadcast spreader was the right tool for the job.
Herbal tonics are simply water infusions, very similar to tea, but steeped for longer periods of time to create a more potent and effective medicinal brew. Unlike an herbal tea, which you can make in as little as 3 to 5 minutes, tonics infuse for multiple hours, or even in the refrigerator overnight.
This allows time for the water to extract all of the beneficial constituents from the herbs.
You can enjoy these revitalizing beverages cold, over ice or even reheated to imbibe just like any herbal tea, perhaps with a bit of honey or agave to sweeten the drink. Herbal tonics restore, tone and invigorate the body while promoting general health and well-being.
This recipe includes herbs renowned for their anti-inflammatory benefits and immune-boosting qualities.
Ingredients & Their Benefits
The main ingredient for this herbal tonic is stinging nettles, Urtica dioica. Anyone that’s ever brushed up against these plants will know why it’s called “stinging.’ The fine hairs along the stems and underside of stinging nettles’ leaves contain formic acid, a chemical that causes itching, redness and, sometimes, a burning sensation on the skin.
This is one of the plant’s defense mechanisms. But when you dry or heat the herb, the chemical dissipates, making it safe to touch and consume!
Nettles, as a nourishing herb, makes the perfect ingredient for our tonic brew. It’s a great source of micronutrients and antioxidants and is high in vitamins A and C.
The tonic infusion also includes echinacea, sage and ginger, herbs known to support our immune system. For this recipe we’re using Echinacea purpurea leaf. But if you have echinacea root available to you, feel free to substitute with equal amounts in the recipe.
This herb is considered to be a potent antiviral and anti-inflammatory that is often used to combat or prevent oncoming cold and flu symptoms. Sage, or Salvia offficinalis, is also considered antiviral and is commonly suggested in formulas to boost the immune system and promote healthy brain function.
The final ingredient of our herbal tonic, ginger root, will add a warming essence to the brew while also strengthening our immune response. It can improve circulation and calm any stomach upset or nausea.
Brewing this tonic is a simple matter. Collect the herbs into a quart jar. Fill the jar with boiling hot water, then cover and place into the refrigerator to steep overnight.
You can fill a reusable tea bag to brew the tonic. Or just leave the herbs loose in the jar and strain them out the following morning. are
Enjoy the herbal tonic throughout the day. You can keep any unused portion refrigerated to extend its shelf life. But discard any tonic that hasn’t been drunk after 48 hours.
This article appeared in Healing Herbs, a 2021 specialty publication produced by the editors and writers of Hobby Farms magazine. Healing Herbs includes herb profiles, projects such as this one, directions for foraging herbs and more. You can purchase this volume, Hobby Farms back issues as well as special editions such asBest of Hobby Farms and Urban Farm by following this link.