My early-bearing black raspberries have finished fruiting for the season. As summer advances, they’ve been putting much of their energy into growing new branches for next year’s crop. This new growth is long and thin, stretching far beyond the parent plant’s initial location.
The new branches grow so long, in fact, that they eventually bend down to the soil line. Once the tips of these new berry canes make contact with soil, they’ll eventually root to form a new berry plant.
This is just one of the many ways that brambles naturally multiply. And, as it happens, you can easily take advantage of this process and put it to work for you.
Raspberries Propagate Via an Asexual Process
You may be used to starting most plants from seeds. For their part, seeds are the result of successful pollination of the plant’s flowers. Unlike that process, this kind of plant propagation is asexual.
In other words? Male and female flower parts don’t play a role when you propagate black raspberries.
Instead, extra plants are propagated from the vegetative parts of existing plants. For both tip layering and simple layering, you’ll use existing plant stems and leaves to propagate more of the same.
Incidentally, raspberries, blackberries and other types of brambles aren’t the only plants that respond well to this kind of asexual propagation. It works with woody shrubs like witch hazel, magnolias, and forsythia bushes, too.
Want to give it a try? First, make sure you won’t run afoul of any plant patent laws along the way.
Rather than start my new plants directly into nearby ground, I like to use individual pots when soil layering brambles. This provides me with many more options once the new plants take root. For instance, when I propagate black raspberries, I can more easily give the extras away or decide to start a whole new berry patch elsewhere.
You’ll need these items for your own tip layering project:
some large pots
a mix of potting soil and mature compost or worm castings
landscaping pins
Step by Step
Fill one of the pots with your amended soil mix and water well. Next, choose a healthy new branch—not one of your old canes which has already fruited. Locate the very end of the branch.
If you look closely, you might already notice the beginning of root growth here.
If you see that roots have already started to sprout at the tip, simply pinch off a few sets of nearby leaves. (See step 1 in image below.) Be careful not to damage or remove any of the fine root hairs which also may be present here.
You should be left with 2 to 3 inches of bare stem with some roots at the very tip. (See step 2.) Bury this entire section in your soil-filled pot and water thoroughly. (Steps 3 and 4.)
To make sure the branch tip remains planted in the pot, use a landscaping pin to secure it at the soil line. (Step 5.) Meanwhile, the rest of the branch will remain tethered to its parent plant. (See Step 6.)
Keep the potted branch portion moist. Over the next few months, healthy roots and new plant growth will develop. (If need be, you can partially bury the pot to help insulate it during colder weather.)
Finally, with a quick snip, you’ll eventually separate the potted branch from the parent plant.
Susan Brackney
Propagate Raspberries with Simple Soil Layering
Let’s say you’ve located a healthy new branch that doesn’t appear to have any root activity along its tip. In that case, you’ll leave the last 3 or 4 inches of the branch’s leaves intact. Now, carefully pinch off nearby leaf sets within just the next inch or two.
Using your fingernail or a clean, sharp knife, make a shallow scrape along the underside of this leafless stem portion. Use a landscaping pin to push this section of stem against the moist soil in your pot.
Don’t be afraid to bend the stem slightly with this step when you propagate black raspberries. Small wounds and bends in bramble branches will help to spur rooting.
Now, bury just the pinned section with a little more soil and water well. Ultimately, you’ll want both the leafy branch tip and the rest of the tethered branch to remain above the soil line. Once healthy roots and new plant growth have developed, you can separate the potted branch from the parent plant.
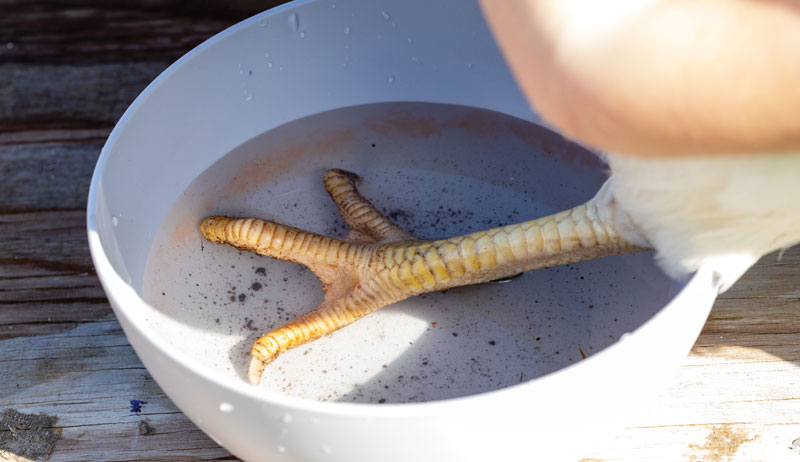
Bumblefoot is a problem many backyard chicken-keepers have heard about and have fears they may encounter it in their own flock of chickens. But what is this disease? Where does it occur? How does it happen? What can a chicken-keeper do to prevent it from happening?
Also known as pododermatitis, bumblefoot is an inflammatory condition affecting a bird’s foot. This disorder can be seen in any avian species but is common in chickens, particularly our backyard flocks. Lesions vary in severity, but in order to understand them better, it helps to understand the anatomy of the chicken’s foot.
About Chicken Feet
The foot of a chicken is made up of similar components to other animals, with slight variations that make it unique.
Chickens are considered to be anisodactyl. This means that they have three toes pointing forward and one toe pointing back. The toe pointing back is considered to be digit No. 1, while digit No. 2 is the inner most front digit. Digit No. 3 is the middle front digit, and digit No. 4 is the outermost front digit.
A layer of scaley, typically featherless skin composed of a thick epidermal layer and a thin dermal layer covers each foot. Deep to this, there is a thin layer of connective tissue called the subcutaneous.
It’s very minimal compared to nonavian species such as mammals. Under this are the muscles and tendons of the foot. Finally, just below these are the bones and joints.
Levels of Severity
Bumblefoot has various levels of severity in chickens, ranging from mild redness and thinning of the scales to ulcerations and damage to underlying muscle, tendons and bone. Different grading schemes have been created to allow a more universal understanding of the extent of a lesion in a particular individual.
Grading schemes are either on a “I to V” or “I to VII” scale. But for the purposes of this article, we’ll describe the “I to VII” scheme. As the grade increases, so does the level of severity.
Grade severity is determined as follows:
I: The surface skin cells (epithelium) become thinner, and there are pink, shiny areas of skin with peeling or flaking.
II: The surface skin cells become even thinner and almost translucent to where the subcutaneous tissue is visible but not exposed.
III: The surface skin cells have an ulceration through them such that the subcutaneous tissue is exposed.
IV: Necrotic tissue is present within the ulcer.
V: Swelling of the soft tissue of the foot is present around the ulcerated and necrotic tissue.
VI: Tendons become involved in the lesion and can be swollen or damaged.
VII: Bone is affected.
Karla Ferro/Shutterstock
Watch Your Step
Bumblefoot can start as a result of various underlying contributing factors affecting your chickens. Perches, substrate, nutrition and trauma have all been linked to this disorder. Sometimes the reason for the disease is obvious in one individual, while it may not be as clear in another.
Additionally, sometimes multiple issues are present. And all contribute to its development.
Problematic Perches
To start, let’s look at perches. Although chickens may not spend a lot of time on branches to the same degree that other avian species will, they do like to roost on perches while resting. If the perches are all the same diameter, this can lead to pressure being placed on the same part of the foot all the time.
This constant pressure on the same site can lead to sores, calluses or thinning of the skin at the contact points between the foot and the perch.
If there are splinters on the perch or areas of damage, this can inadvertently injure the foot, leading to the start of an ulcer, puncture or cut. This can lead to the beginning of an infection if bacteria is introduced into the wound.
Additionally, if chickens perch on inappropriate items, such as wires, this may also result in more trauma to the feet. For some birds, if the perches are placed too high or they jump off perches onto firm surfaces, this may lead to injury.
Keep perches no more than 2 1⁄2 feet off the ground. Additionally, do not add firm substrate to the ground chickens walk on.
To discuss substrate further, it’s important to know that various types of substrate can be appropriate for chickens. Wood shavings, hay, fine gravel and sand are all soft enough for the feet of chickens and don’t necessarily contribute to bumblefoot when kept clean.
Depending upon your location, you may choose one of these substrates over another for your flock. Consider factors such as humidity levels and temperature, too.
Substrates that are inappropriate and can contribute to bumblefoot in chickens include flat surfaces, concrete or coarse, large rocks. Avoiding these can help a chicken-keeper avoid bumblefoot.
Cleanliness Matters
Another factor to consider regarding the substrate is the cleanliness of the area where a chicken stands. Surfaces soiled with feces mean that a chicken’s foot could come into contact with waste products, such as ammonia, that can damage the skin.
Substrates that trap and hold moisture may also cause a problem and lead to the growth of potential pathogens. If there is a break in the skin for any reason and chickens are standing on contaminated substrates, bacterial organisms could enter more easily and lead to infections.
Diet Decisions
Nutrition can also play a role. One problematic nutrient? Vitamin A, which can contribute to the development of bumblefoot in chickens. If vitamin A is deficient in the diet, it’ll cause a change at the cellular level to the surface epithelial cells of the foot.
The cells can change shape and become thinner. This contributes to the first grade of bumblefoot developing.
The good news is that if you are feeding your bird a commercial pellet or crumble diet, vitamin A is appropriately supplemented in the mixture. Additionally, several scrapes that people provide to chickens are great sources of vitamin A, such as kale, bell peppers, carrots, squash and sweet potatoes.
Providing one of these as a snack a few times a week is another way to ensure adequate levels of this nutrient are available.
Overweight chickens are also more prone to the development of bumblefoot. Too many calories in the diet, without enough exercise, means a bird can become obese. If a bird is obese, even greater forces and excessive weight bear on the feet.
If ulceration develops, that excess pressure on the foot can interfere with blood flow. Impaired blood flow means poor healing. And that means the bird suffers longer and may not even heal.
Therefore, providing chickens appropriate amounts of feed and getting them the right exercise can help prevent bumblefoot.
C5 Media/Shutterstock.com
Treatment
Treatment will vary depending on the grade of bumblefoot present. You could possibly manage milder cases, such as grades I and II, with anti-inflammatories, changing substrates and providing padding to the feet.
The cause of bumblefoot matters, though, and will determine the best treatment. More severe lesions could require antibiotics, debridement surgeries, special wraps and even amputations of digits if the underlying bone is involved.
Often, some form of a bandage to protect the bottoms of affected feet is required. Bandages may be light covers or specialized wraps that relieve pressure on certain parts of the foot. There are commercially available booties that pet owners can purchase for chickens to cover the feet.
These provide a cushioned surface that protects the foot pad and supplies comfort for the bird.
These are really great for birds that have foot injuries and help prevent bumblefoot from developing on the uninjured foot. These booties are also really nice because you can take them off to apply topical medications or clean wounds.
Additional treatment modalities can also include laser therapy and medications that dilate blood vessels in the feet. Encouraging exercise can also enhance blood flow to the feet. This may help obese birds lose weight and relieve some pressure on the feet.
Cleaning the bottom of the foot and soaking it in disinfectants like chlorhexidine 4 percent or diluted iodine solutions can help as well. Sometimes keepers will soak a chicken’s foot in Epsom salt to help reduce inflammation.
Bumblefoot is a painful condition that can involve some problematic bacterial organisms. Backyard farmers have occasionally attempted to perform surgeries at home, but this isn’t recommended. At-home lancing procedures may remove the infectious material in a foot, but they don’t address the pain a bird can feel and can leave a bird in a debilitated state.
Additionally, a veterinarian should select appropriate antibiotics so that you avoid antibiotic resistance issues. A veterinarian can also discuss ways to avoid drug passage into eggs. People with sensitivities to antibiotics need to stay cautious if they consume eggs from a bird treated with antibiotics.
Contact an avian veterinarian for help with all medications, special bandages and necessary surgeries.
Bumblefoot can develop into a serious, even life-threating, disease so check your birds’ feet regularly. You want to address the problem when it’s in the early stages rather than risk only noticing it when it’s severe.
Also, consult your avian veterinarian when you discover problems. He or she has the experience needed to guide you through an appropriate treatment plan.
This article originally appeared in the July/August 2021 issue of Chickens magazine.
Sidebar: Tips to Avoid Bumblefoot
As the old saying goes, an ounce of prevention is worth a pound of cure. It’s always better to prevent bumblefoot than to be stuck treating this potentially serious disease. Once it begins, bumblefoot can be time-consuming to treat and take weeks to months to resolve. Additionally, some patients will have chronic problems secondary to bumblefoot and attempting to avoid this situation will leave a backyard chicken-keeper happier with their flock.
Perches for chickens should be variable in their size and thickness so that birds don’t have to put pressure on the same part of their foot all the time. These perches should also be routinely inspected for splinters or damage and have any issues addressed immediately.
Wrapping perches with protective covering, such as a self-adhesive bandage, can also provide a softer surface for the bird’s foot to contact.
Chickens should be prevented from perching on wires or objects that provide minimal support for the foot.
Make sure perches are no more than 2 1⁄2 feet off of the ground and the substrate that they are standing on is soft, clean and appropriate.
Lastly, providing appropriate nutrition and being mindful of trauma to the feet are necessary to avoid bumblefoot from occurring.
Sidebar: Trauma Can Be a Factor
Trauma is another problem that can lead to the development of bumblefoot. This can occur in a couple of different ways.
One way is that trauma to the foot can incite an opening on the bottom of the foot which can lead to inflammation, secondary infection and the start of damage to the soft tissues, bones and joints of the foot.
Additionally, if a bird injures one foot and it causes them to shift pressure off of this foot, all the bird’s weight then gets put on to the uninjured foot. This increased pressure on the uninjured foot can lead to the same problems that we can see with obesity. Therefore, if a bird does have an injury to a foot, sometimes a soft, padded wrap on the uninjured foot is necessary as well so that the bird has less pressure against hard surfaces to try and prevent bumblefoot.
The pungent aroma of basil evokes thoughts of Italian cuisine, but this herb is grown and enjoyed around the world for its flavorful and fragrant leaves.
Basil’s native range reaches from Central Africa to Southeast Asia. And this ancient herb has been cultivated for culinary and medicinal purposes for nearly 5000 years.
The most well-known variety of basil is Genovese, which is also sometimes referred to as sweet basil. But there at least 60 varieties that can be grown, each offering unique flavors, aromas and colors for the herb garden.
Basil Varieties
Some of the most popular cultivars of Ocimum basilicum include:
Licorice basil: A flavorful variety of basil that grows into vibrant green plants with hints of purple on the foliage.
Cinnamon basil: Sometimes called Mexican basil, this variety has a flavor reminiscent of cinnamon and narrow, dark green leaves with reddish-purple veins.
Dark opal basil: With its deep purple leaves, this beautiful basil is both decorative and delicious.
Lettuce leaf basil: A specialty type with very large, crinkly, bright green leaves.
Globe basil: A perfect basil for growing in containers; short, compact and packed full of flavor.
Thai basil: A spicy variety with small, narrow leaves, purple stems. This is the preferred basil for cooking as it can withstand extended cooking times better than other sweet basils.
In addition to these varietals, there are other basil species and hybrids available to choose from such as:
African blue basil: A beautiful purple variety. One of the few perennial basil types.
Lemon basil: This hybrid variety has a strong lemon scent and flavor popular is Asian cuisine.
Holy Basil:Ocimum tenuifloru is an aromatic perennial wildly used for tea that is also cultivated for religious and medicinal purposes.
The potent flavors and aroma of freshly harvested basil just screams summertime. This tasty herb is a must-have ingredient in tomato sauces, on pizza and, of course, in pesto. Make an easy pesto at home with just a handful of ingredients:
2 cups freshly harvested and washed basil leaves
1/3 cup toasted pine nuts (or substitute walnuts or sunflower seeds)
2 tablespoons lemon juice
1/4 teaspoon sea salt
2-3 garlic cloves
1/4 -1/3 cup extra-virgin olive oil (more oil will make a smother pesto)
1/4 cup grated Parmesan cheese (optional)
Simply combine the basil, pine nuts, lemon juice, garlic and salt into your food processor.Run until well chopped and combined.
While the food processor is running, slowly drizzle in the olive oil until well combined and smooth. Add the Parmesan cheese if desired and pulse one last time to blend.
Basil in the Apothecary
Basil is a member of the mint family, Lamiaceae. Like other mint family relatives, it is useful to calm an upset stomach. Brewing a tea of basil leaves is the easiest way to utilize this herbal ally.
This brew is also useful for easing a sore throat or to relieve a headache.
Fresh basil leaves can also be crushed and applied to a bug bite or bee sting to reduce itching and swelling similar to how one would use plantain leaves.
Although typically considered a culinary herb, basil has a long history of use in the apothecary. You can learn more about using basil’s medicinal benefits in my book The Artisan Herbalist.
Basil is an easy to grow herb. Just remember that it is a warm season crop and will not tolerate frost or freezing temperatures.
You can start your seeds indoors and plant them out after any chance of frost, or direct seed your basil right in the garden. Overnight temperatures should consistently be above 50 degrees F before your place your plants outside.
Plant seeds only 1/4 inch deep and keep them moist until they germinate. Once your plants reach a height of around 6 inches, pinch off the uppermost branches of the plant to encourage branching, thus producing a bushier basil.
Be sure to pinch off flower buds as they appear to increase the life of your plant. But consider allowing some of your basil to go to seed if you’d like to try harvesting seeds for next year’s garden.
Give your plants plenty of sun and you’ll be guaranteed a flavorful harvest of basil leaves all summer long!
We all know about encouraging garden plants to climb trellises for support. Whether peas, roses or grapes, trellises provide the support climbing plants need to thrive.
Some trellises are ornate, crafted of wood or metal and designed to add a pleasing aesthetic to the garden. Others are more utilitarian in nature, constructed from a few T-posts with twine tied between them. The one rule is that trellises are normally installed before the plants take root, so the support is there as the plants grow … but truth be told, this is a rule that can (and should) be readily broken under certain circumstances.
The truth is, trellises aren’t only useful for supporting climbing plants. They can play just as important a role in supporting tall, gangly plants struggling to stand under challenging circumstances.
And for this purpose, trellises can be installed virtually anytime and anywhere, saving the day when something goes awry.
Let me give you an example. You might have a bed of sunflowers, boldly reaching for the sky, but planted in a location that receives a fair amount of wind. Without protection, these tall flowers might be blown and buffeted until they break.
Add a trellis to the mix, and the sunflowers have something to lean on for support.
Here’s another possibility. You’ve planted a bed full of squash, with their big, broad leaves spreading upward and outward to catch the sunlight. But there’s a strong thunderstorm in the forecast, and you’re concerned the heavy wind and rain will beat down the leaves and break their stalks.
A homemade trellis of sorts that weaves twine under and among the leaves might just provide enough support to protect the plants from damage.
Garden Trellises Don’t Have to Be Complicated
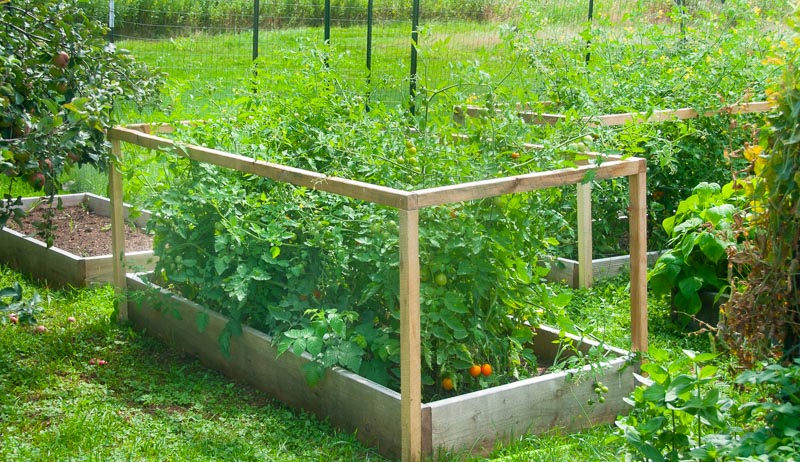
Trellises like these don’t have to be complicated. Do you have a raised bed of tomatoes where the plants are outgrowing their cages and threatening to fall over from the weight of their branches and fruit? Install a wooden post at each corner of the bed, to a height just shorter than the tomato plants.
Then run horizontal boards between the posts to give the tomato plants “guard rails” to lean on.
Other techniques and materials are just as effective. Twine can be a gardener’s best friend, being both effective in supporting plants and practically invisible when viewed from a distance. T-posts and other metal stakes can be readily installed and removed as needed.
No matter the details, all shapes and sizes of trellises can be constructed by anyone with the materials and a little bit of DIY ingenuity.
Using Garden Trellises to Deal with Environmental Challenges
I’m speaking from experience. My garden has met with several weather-related challenges this year. These include inconsistent rainfall (too little, followed by too much) and lots of wind.
Supporting plants under these tricky circumstances has required lots of effort (and creativity) on the trellis front. I’ve even had to prop up apple tree branches with homemade wooden stakes crafted from maple saplings.
But hey—there are worse things to do than spend time in your garden building trellises and getting to know the nuances of every plant, right? That sounds like a fun afternoon to me!
Hot weather is here, and so are the insects. No matter the size of your farm or the livestock you raise, when the weather gets warmer, flies become a bother. Let’s talk a little about fly control—why you should care about controlling these six-legged pests and how to do it.
Different Kind of Flies
Most people are more than familiar with the common house fly. But you might be surprised to know that many other fly species exist. What flies you see, in fact, can depend on the particular livestock you raise.
Cattle Flies
Fly control is necessary for reasons that depend on the insect species. Horn flies and face flies are some of the most common flies that affect cattle.
The horn fly has a painful bite, and infestations can result in weight loss because they cause excessive agitation and stress.
Face flies don’t bite but instead feed on eye excretions. It’s little wonder, then, that this particular insect spreads a bacterial disease in cattle called infectious bovine keratoconjunctivitis, more commonly known as pink eye.
Sheep Flies
Fly control applies to sheep, too. One particularly nasty ovine condition is called fly strike. This occurs when flies lay their eggs in damp wool.
As the eggs hatch, their larvae (also known as maggots) begin to infest the animal’s skin. Understandably this can spread infection and cause significant harm to the sheep.
Horse Flies
Horses get their own fly named after them: the horse fly. These large, feisty fellows pack a wallop of a bite and don’t just have a taste for horses. Humans, cattle, dogs—almost any mammal will do.
Other types of flies pester horses as well. They can cause watery eyes and skin hypersensitivity that may manifest in welts, itchiness, and hair loss.
Loss of livestock production, animal welfare and disease control—now that we know the major reasons why flies of all types are no good for the barn, how do we go about controlling them? This is the tricky part.
The most important thing to understand about proper fly control is that you need a multimodal approach. Unfortunately, there isn’t one action that will continuously eliminate flies all season.
But fortunately, this gives you some options with which to tailor fly control to best fit your own operation.
Environmental Control
Many fly species feed on and lay eggs in manure and other waste. So keep your manure/composting area as far away from your animals as possible. If you keep animals in barns at any point during the summer, make sure their stalls and paddocks stay clean and dry.
Keep trash and human food picked up and placed in tightly sealed containers. Commercial animal feeds with molasses and other sweeteners are also very attractive to pests of all kinds.
Additionally, for animals spending time in the barn, air circulation is key to fly control. Stagnant air is a prime landing and feeding environment for flies. When possible, have aisle doors and windows wide open to facilitate a natural cross breeze.
For the dog days of summer when no breeze is available, invest in some heavy-duty fans. Your animals will thank you.
Fly Tape & Traps
Fly tape is an old-school remedy also known as flypaper or fly ribbon. Who hasn’t walked into a barn and seen dozens of sticky strips hanging from the ceiling covered in flies?
Although these do work for fly control, their success is directly proportional to how often they are replaced. A full fly tape is an ineffective fly tape.
Fly traps are another method and less conspicuous. These contraptions lure flies in and don’t let them back out. Fly predators are another nifty invention; tiny parasitic wasps (a kind that doesn’t sting humans) can be released in a barn periodically to decrease the resident fly population.
There is also a chemical arsenal to help fight flies. The kind you choose can depend greatly on the types of animals you raise. Ear tags containing fly repellent can be very effective in cattle, while horse owners are very familiar with fly sprays, fly sheets and fly masks.
Fly rubs can also work for livestock other than horses. Placed in a low hanging doorway, animals are forced to rub underneath it, unsuspectingly dispensing their own dose of fly repellent.
No matter how you do it, controlling flies on your farm is key for improved livestock health and welfare. Constant vigilance and a multifaceted control program are key. Fortunately, with some trial and error, farmers can find the right fit for their animals.
This article previously appeared on hobbyfarms.com and has been reformatted and updated by our editors to better serve your summer livestock needs.
Last year, as I was helping my friend Denice (who is my sheep mentor as well) fence off a new pasture, she told me to make sure there was no poison hemlock inside the electronet fence.
“I’ve had sheep die from it,” she said.
That stopped me cold. Really? From a plant they eat? The answer is yes. Poison hemlock is bad news—from the roots and stems to leaves and even flowers—for people and animals.
And believe it or not, I actually did find some poison hemlock on her property!
According to the US Department of Agriculture, Poison Hemlock (Conium maculatum) grows throughout the United States. It’s not native to the U.S., but it has been around a while.
As part of the parsley and carrot family, you’ll find it along roadsides, fences and other areas that may have been recently cleared or worked.
Apparently in the last year or so, this hazardous plant has crept into more populated areas as well, which makes some conservationists mighty nervous.
One reason for the surge this year in the Midwest is the large amount of rainfall. This has made for the moist ground that poison hemlock likes.
But it’s always a good idea to check for poison hemlock in your pastures and other areas where your sheep have access. This way, you can make sure this plant is not growing anywhere on your property.
Be on the Lookout
When we put up a fence for a new pasture earlier this year, I scoured every foot of the land to make sure we did not have any of this invasive plant.
It is a biennial plant, which means that it will not flower the first year. But it will the second year. So, you need to know what all parts of the poison hemlock plant look like to protect your sheep.
The most likely time sheep may eat poison hemlock is in the spring, when the leaves are tender and young.
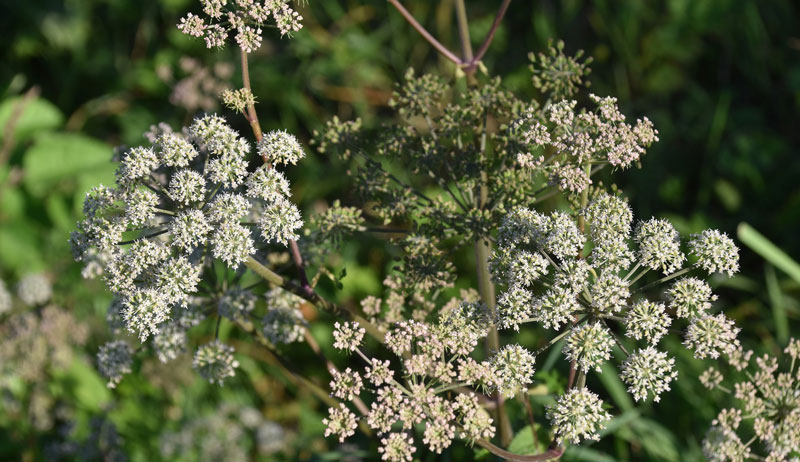
However, right about now is when the plant is largest and most noticeable. And it’s also the time that you’ll see a tall stalk with lacy white flowers that looks a bit like Queen Anne’s Lace from far off.
Those pretty (and pretty deadly) white flowers can produce up to 30,000 seeds to spread far and wide.
But here’s how to tell the difference. The poison hemlock stalk is mottled purple and green, which is what sets it apart from Queen Anne’s Lace and other plants that might look like it.
Sheep can be poisoned–and frequently die–when they have eaten as little as 4 to 8 ounces of the hemlock leaves. They will show signs of respiratory paralysis in a few hours. By then, it’s too late to do anything.
And even if eating poison hemlock does not kill your sheep, it can cause birth defects if eaten at certain times of a ewe’s pregnancy.
If you think you have poison hemlock on your property, the best way to deal with it is to contact your local county extension agent. It’s not a plant to be taken lightly. Sven contact with your skin can cause a real reaction.
Make sure you get expert advice before you try to eradicate this noxious plant. But getting out to look for poison hemlock right now is one of the best things you can do to keep your sheep healthy and safe.
Sometimes it is helpful to think of how we grow in a new light, from a new angle, in a different way. Here, we will discuss seeing the grower as similar to an action sport athlete, say a snowboarder, skater or soccer player.
I know—this isn’t a normal analogy for a farmer who deals with potato yields and blight on tomatoes as factors of success. But hear me out! There is something to be said for looking at our gardens in this way.
Gardening as Sport
Consider these questions:
Aren’t we racing against time with a limited growing season?
Don’t we have goals to achieve using the supplies, land and equipment we have?
Couldn’t we look at our various farm projects and give them some sort of relative rating of success?
Don’t we have different tricks of the trade that we apply to garden crop production?
This last statement is the crux of this point of view. Namely, professional growers are great at what they do because they have mastered specific gardening concepts by applying various tools and energy to a specific practice.
Or, in other words, they have their garden tricks.
Of course, professional athletes learn tricks too, and they apply them in a string of events when they engage in their sport.
The snowboarder will take a run down the hill to the bottom while carving, jumping and spinning. Or the soccer player will run along the field towards the goal while dribbling, stalling and passing.
This is similar to how a grower starts out the gate in spring and must make it to their last CSA drop off or final farmers market by applying their best tools and techniques to help them succeed! Each farmer has a run on the “street course” of their fields, where they can apply their skills as a series of tricks.
A successful run is one that utilizes great tricks and techniques and minimizes falls and fumbles. Yields are high, quality is up and energy is efficient.
In the recent Olympic events, it was fun to watch skateboarders compete for the first time.I showed my kids how these athletes strung together a series of maneuvers as a “successful run.” Skaters that used great tricks and style with minimal mistakes scored the highest. When approaching different obstacles such as ramps, quarter pipes, or handrails, each skater applied an appropriate trick based on the obstacle and available strength, equipment and knowledge.
Similarly, growers encounter different obstacles during a growing season and can turn them into opportunities with the right trick.Just as a ramp becomes a launch spot for a 360-degree spin, a wet year with properly spaced crops for air flow (coupled with well-drained raised beds) becomes one that doesn’t require irrigation.
Farming is all about running up against obstacles and making the best of it.
Breaking Down the Tricks
The concepts and techniques we apply to growing a market garden, from understanding season-extension to succession planting, can be further broken down into effective tricks of the trade.
So, what is a trick for a gardener or small farmer? One example could bestale seeding your Permabed before seeding weed-sensitive crops like carrots. By understanding the needs of the carrot crop and the concept of pre-weeding (literally weeding an unplanted bed) we can apply stale seeding as a great trick!
Here the grower prepares an ideal garden bed, then waits a week. Next they weed it quickly without any crop to go around and then seed!
Another great trick is alternate maturity patterning (see my book Permaculture Market Gardenfor more on this). In this, crops of a different maturity are preferentially planted in adjacent beds to maximize space sharing.
Take squash, for instance, planted in a middle bed between beds of spinach and lettuce.Here the squash can mature and sprawl over adjacent beds after salad greens have been harvested.
Yet, there are many ways to apply this alternate maturity patterning trick. And perhaps, to continue our earlier sports metaphor, this is similar to trick variations an inline skater may perform.
For instance, the inline skater might do a straightforward Miszou grind on a rail. Alternatively, this inline skater might do a 180 spin up to the rail and then the grind. Or further still, they might approach the rail while skating backwards, jump and then do the grind backwards.
When we learn great grower tricks like using row cover to prevent frost damage, we can apply them in different ways, such as
sealing the edges with soil for a better seal
using row sand bags for a quicker covering
using galvanized wire hoops to keep plant leaves unweighted so as not to bend more fragile stems
Or we can link these tricks all together by putting in the galvanized hoops for the tomatoes, dropping row bags to quickly hold the row cover against the wind and then later sealing the edges with soil when a cold night approaches. When we know garden tricks and their variations, we can apply them appropriately in different circumstances and link them together as effective systems.
Catalog of Tricks
The point of this analogy is to liken a successful growing season to a successful “play” or “run” in a sport like soccer or skating. We do this because, when we learn great tricks of the trade and truly understand them, often the only missing element is stringing them together in a successful manner, with minimal fumbles or falls.
Every year I learn new tricks or variations of techniques that help me grow more efficiently and effectively. And often what I find is that, when something goes wrong, it is not because I didn’t know the right trick. Rather, I didn’t actually use the trick or didn’t have enough rhythm in my season to use it correctly.
Can it help us as growers to catalogue the tricks we know? By better defining the tricks I know and the variations I sometimes need, I can be prepared for changing environmental pressures or economic opportunities.
I give my farming tricks solid names. As as result, they become familiar to me. In gardening, I use succession planting and stale seeding. These names are similar in usage to a kick flip, “Bio 540” or even a slam dunk.
And like a skater performing a run, in a successful season we string together gardening tricks. We just need to determine when a trick is appropriate and the correct order of operations for a particular variation.
We can feel confident that we have what it takes for a great season no matter what ramp, slope or other obstacle comes along.When growers move through the seasonal motions rhythmically, approaching each obstacle with a known solution, we will succeed.
And, sometimes we’ll find a top notch trick—like a triple-axle in ice skating. These we must practice, learn and perfect to become champion growers!
This kimchi cucumber recipe is a twist on the kimchi recipes that I share in my cookbooks. Kimchi is the ferment that got me interested in the world of fermentation in the first place. As a little girl, my grandpa would bring home kimchi that was made by his co-worker’s wife.
His wife was from Korea and made kimchi traditionally, and boy was it incredible! I couldn’t get enough. I’d gobble it up as soon as it hit the plate, and that’s where my obsession began.
In my early 20s I started to make kimchi with my good friend Michelle. She was my only friend that enjoyed kimchi growing up. Michelle’s mother was born in Saipan, so Michelle was familiar with kimchi as well.
She especially loved kimchi cucumbers. That was the first time I heard of kimchi cukes.
Flash forward a decade to when I was visiting the Big Island of Hawaii with my husband and daughter. We rented a condo right above the famous Da Poke Shack in Kailua-Kona. What a treat that was!
We ate there more times than I’d like to admit in the one week we stayed at that condo.
We’d watch the fishermen bring in giant freshly caught ahi tuna straight from the ocean early each morning. Once prepared, the doors would open for business. When all the food sold out, the shop closed until the next morning.
In addition to tuna, the shop also sold lau lau and kalua pork, with various sides including wakame seaweed salad, hot potato salad, crab salad, and of course, kimchi cucumbers. My husband quickly became a fan of kimchi cucumbers. Since then, each summer—once pickling cucumbers are abundant—I make him a jar of his very own kimchi cukes.
Yield: 1 quart jar
Ingredients
2 lbs. freshly harvested pickling cucumbers (3-5” in length), sliced into ¼- 1/8” coins
2 tbsp. coarse kosher salt
Kimchi Paste
3 cloves garlic
1/2 small yellow onion
Fresh ginger, 2-inch chunk, skin removed and rinsed
1 tbsp. Red Boat Fish Sauce or other preservative-free fish sauce (optional ingredient)
Wash cucumbers and gently scrub away any dirt. Discard soft or damaged cucumbers. Slice into 1/4 to 1/8-inch coins.
Once sliced, transfer to a large non-reactive bowl such as glass or stainless steel and sprinkle the kosher salt evenly over the cucumber slices. Use a wooden spoon to mix well.
Allow the cucumbers to sit in the salt for three to four hours, stirring once at the half way point. After several hours, you should see that the natural brine has released from the cucumbers. Strain the cucumbers from the brine, reserving 1/4 cup to mix back into the cucumbers.
Using a small food processor, blend the garlic, onion, ginger and fish sauce (optional) to a puree. Transfer to another bowl and stir in the gochugaru.
When thoroughly blended, mix together with the salted cucumbers, evenly coating cucumbers with the pepper paste. Once mixed well, transfer the kimchi cucumbers to a clean quart-sized canning jar.
If you have a small fermentation jar weight, add it to the jar to push down the produce (careful not to bruise or smash the cucumber slices). Wipe off the rim of the jar with a clean dampened towel. Add the canning jar lid, and tightly screw on the ring.
Fermentation
This kimchi cucumbers recipe is a short 24 hour to 3 day ferment. Ferment at room temperature, ideally between 60 to 75 degrees F (15 to 23 degrees C), and keep out of direct sunlight.
Check on the ferment daily to make sure that the brine covers all the produce. Initially the cucumbers likely will not be covered by the brine in the jar. However within 24 hours there should be enough brine to cover all the produce.
Taste test the cucumbers at the 24-hour point to see if you are pleased with the flavor. If not, allow them to keep fermenting.
Burp the jar daily. Unscrew the lid briefly and tighten it back on to allow any built-up gas to release.
Once fermentation is complete, transfer the jar into the refrigerator, with the brine and all.
Fermentation does not stop once the ferment is transferred to the refrigerator. However it does slow the process way down. The taste and texture will continue to change, therefore this ferment is best enjoyed within six months.
If you don’t have a food processor, finely chop the garlic, onion and ginger for your kimchi cucumbers.
Using freshly harvested cucumbers is key to keeping the crunch. Try to use produce that has been harvested within 48 hours.
If you don’t have access to gochugaru, you can use an alternate fresh hot pepper, finely minced. This will change the flavor, but will still ultimately be a delicious ferment.
To add additional spice, mix 1/2 tsp. cayenne powder to the paste.
Whether you’re concerned about a zombie apocalypse or another unprecedented pandemic disrupting the supply chain, prepper pantries help prepare you for unforeseen events that can cause a very real concern over food shortages at local grocery stores.
Having extra food, water, toilet paper and other everyday necessities on hand is a resourceful way to stay prepared for any crisis, large or small. Prepper pantries are relatively simple to create but take a bit of planning and routine management to ensure you always have enough supplies to meet your family’s needs.
What Is It?
Essentially, a prepper pantry is a specific area where you store basic supplies, primarily food, for emergencies. There are two distinct types of prepper pantries, but you might combine elements of both to better suit your space and personal preferences.
The bare minimum of prepper pantries is a working pantry, the easiest and least expensive to start. It’s usually small but larger than the average kitchen pantry. Working pantries are only intended to provide basic supplies for a few weeks to a month or two, depending on their size.
Working pantries typically contain only the items you normally use, and you’ll continually rotate these items in and out as you prepare daily meals and replace the items removed while grocery shopping. Rotation is essential in a working pantry to ensure all food is used before it goes bad.
If you garden or farm and regularly home can excess produce, you may already have a working prepper pantry and not even realize it.
Long-term emergency food-storage pantries are the ultimate in prepper pantries and quite extensive. These pantries are intended to hold enough food and supplies to last your family for several months or even a couple of years.
These pantries contain large quantities of nonperishable foods that last a long time, which may include MREs (meals ready-to-eat) and bulk items such as sealed, 5-gallon buckets of flour/rice/beans and oversized canned goods (sometimes referred to as #10 cans). Items in long-term pantries are saved until needed and aren’t for everyday use such as working pantries. It’s important to keep long-term pantries organized, pest-proofed and temperature-controlled to fully protect your stored items.
Moira K. McGhee
Why Have One
Prepper pantries are highly useful when big emergencies occur, such as natural disasters, economic collapse and stay-at-home mandates that may cause food hoarding. They can also come in handy for small crises, such as a sudden illness or job loss that cuts into your grocery budget.
Being prepared gives you peace of mind because you know you’ll have extra food available until whatever emergency or crisis passes.
“Life is unpredictable,” says Shelly Maynard, the blogger behind Lynchburg Mama. As a wife and mom in Lynchburg, Tennessee, she keeps busy trying to stay one step ahead of caring for her family’s current and future needs, and maintaining a prepper pantry is one of the ways she accomplishes this.
“Being prepared for any unplanned event that life throws at us can help give us at least a small sense of peace during the turmoil. It’s also great to have a backup for general, everyday use.”
“Food prices continue to rise, supply-chain issues continue to be at the forefront, and grocery stores have only two to three days until they’re cleared out. It mitigates fear to know you have food for your family,” says Scott Hunt, the owner of Practical Preppers. He is also known by many people as Engineer775 on YouTube. He holds a Master of Science degree in mechanical engineering from Rensselaer Polytechnic Institute in Troy, New York, and is an expert sustainable living design engineer specializing in off-grid water and energy systems.
“Regardless of whether you’re a family of one or a family of 10, a prepper pantry can be a life-saving resource,” Maynard says. “By having staple goods, you have ingredients on-hand to create a meal that will be fulfilling and sustain your family in all situations. Not only can your family benefit, but you can help others during difficult times.”
Once you’ve decided to start your own prepper pantry, location is crucial to ensure the space helps prevent spoilage and pest infestations. If your home has a large basement that doesn’t flood, you could be set, but if you have limited space, you need a little creativity.
Some highly important things to keep in mind are: High temperatures and moisture content speed up spoilage, and direct sunlight can zap the vitamins and nutrient content out of food.
“The first thing you’ll want to decide is where your pantry will be located,” Maynard says. “Your pantry should be placed in a cool, dark space that’s free of pests and moisture. This will keep your food stock from going bad earlier than it should. When stored properly, you’re not wasting money nor putting your health at risk.”
When it comes to size, it’s to your advantage if the space is large enough to accommodate shelves to make organization much easier and more efficient. Lack of space is a common roadblock for many would-be preppers, but it’s possible to convert nearly any unused space into a food storage area as long as it’s “a secure, cool, dry place,” Hunt says.
“And those words explain why!”
Zigzag Mountain Art/Shutterstock
Start Small
It’s perfectly OK to begin with a small stockpile of food and increase it a little at a time. Many people can’t afford to spend hundreds of dollars on the fly to fully stock a large food pantry, and there’s usually no need to do this unless you know a major emergency is in the very near future. Otherwise, set aside a small part of your grocery budget to dedicate to stocking your pantry and take advantage of sales, coupons, etc.
A two-week to three-week supply of food will get you through most smaller crises and doesn’t take too long to amass, then you can concentrate on compiling a food supply that’ll last three months or more for longer-term emergencies.
Hunt recommends that you stockpile enough to take care of your family for 90 days. He also suggests doubling up on what you’d normally buy during a “buy one, get one free” sale as an easy way to get started on your prepper pantry.
“Canned goods you like turn into B1S1 [buy one, store one],” he says.
It’s also a great way to begin prepping your pantry on a budget. To help you determine how much to start with, Maynard advises people to first decide how many people they’ll need to feed and water and make a list of their ages and personal needs.
Then, consider your available space and decide how many days/weeks/months-worth of supplies you have room to store.
“Don’t plan to stock your pantry all at once,” Maynard says. “Decide what staples your family will use and make a plan to purchase no more than a day or two at a time. You can build your pantry bit by bit with each weekly trip you make to the grocery store.”
When you begin collecting food for your pantry, choose items your family will actually eat or you’ll wind up wasting space and money. Granted, your family may eat something they wouldn’t normally eat if it’s the only thing available, but familiar foods are more comforting during stressful situations.
It’s important to not upset your family even more than they already are, and stocking foods you normally use makes rotating stock much easier.
Besides an abundance of satisfying foods, also stock basic shelf-stable pantry staples that last the longest without refrigeration. Think dry nonperishable items such as flour, rice, canned goods and dehydrated products. These items offer more bang for your buck because they won’t go bad as quickly and don’t require as frequent rotations as perishable foods.
Maynard’s top five must-have items are:
grains (oats, rice, flour pasta)
beans (any you like!)
oil (canola, coconut, lard)
canned/dried produce
water
“One of my favorite ways to supply my pantry is by growing a garden,” Maynardsays. “I love canning in jars as well as dehydrating items, such as peppers to use for seasoning/spices.
“The most important item you’ll want to make space for is water. Store at least 1 gallon of water per person in your family for each day.… You can also purchase water purifying tablets or small filters. Actual food storage needs vary depending on the age and nutritional requirements of your family members.”
Hunt recommends 2,200 calories and 2 gallons of potable water per person per day. His go-to supplies include salt, proteins and good fats. Don’t forget vitamins, supplements and condiments—as much nutritionally dense food as you can afford.
Moira K. McGhee
Organization Is Key
Organizing your prepper pantry is just as important as what you put in it, to fit as much as possible in the space you have available. You’ll find numerous storage container options that provide airtight seals to prevent moisture and bugs from getting inside. These containers are also available in various sizes to fit an array of spaces.
Although Mylar bags are some of the more expensive options, dry foods such as beans and grains can last decades when stored correctly, and bags take up less space than buckets. However, buckets are much less expensive, and it’s easier to remove partial amounts from these containers and reseal them.
“Buy containers that best fit the space,” Hunt says. “For example, #10 cans stack from floor to ceiling, or 5-gallon pails. The container size should also be appropriate to the portion size to the number of people accessing the pantry. So, #10 cans might be too big for a grandmother but perfect for a growing family of six.”
“Use 5-gallon buckets to store supplies you need more of, such as grains,” Maynard says. “Package items in similar-sized containers to easily stack. Vacuum-sealed bags will also help create more space.
“When using shelving, don’t overload them, and always place heavier items toward the bottom.”
Keep It Fresh
Restaurants and grocery stores use FIFO for a reason and so should you. If you’re unfamiliar with FIFO, it stands for “first in, first out,” and it ensures stored foods are properly rotated to promote freshness and prevent waste.
To keep your FIFO system organized, create an easy method to keep track of which foods have been stored the longest, which are the ones that were first in, and should be used next, or first out.
“I label everything where it can easily be seen without moving everything,” Maynard says. “In my emergency binder,
I have a list that includes when I purchase items and expiration dates. I start moving items into my working/functioning pantry to use them before they go bad and replace as needed.”
“We use an Excel spreadsheet,” Hunt says. “All inventories are laborious to set up. You just accept that and use a method you like. We keep a clipboard and pen next to storage in case anyone takes an item. It’s updated monthly.”
Maynard adds that “when rotating your stock, be sure to check the condition of the packaging and storage containers you’re using. If they’re damaged, replace them as soon as possible. If you won’t be able to use the large quantities on time, donate them!”
Final Words of Wisdom
When asked what her best advice would be to someone who knows absolutely nothing about prepper pantries, Maynard says to, “research, research, research!”
“There are a lot of prepper resources available online and at your local library,” she says. “You may even be able to find someone local to you who can help offer some advice. Use what works for your family. Over time, you may find a new way to organize your stock, and that’s perfectly fine!”
Hunt wants people to understand that a prepper pantry is an insurance policy for hard times and “as you prepare for your family and friends, don’t forget to set a small amount aside for charity. You might end up saving someone else’s life!”
Because the whole point of a prepper pantry is to be prepared, you should store other essential items along with your food and water. These items include basics you regularly need and use, such as the all-important toilet paper.
Having certain necessities set aside in your prepper pantry ensures you know where they’re located when you need them.
Scott Hunt, a mechanical engineer and the owner of Practical Preppers, recommends a nonelectric cooking method, such as a solar oven or wood cook stove—plus, fuel appropriate to the method, fire starter, etc.
Shelly Maynard, a food and sustainability blogger, suggests creating an emergency binder containing important documents, such as birth certificates, social security cards, pictures of family members and pets, etc. Plus, a first-aid kit, personal hygiene items, kitchen/cooking supplies, fuel, pet supplies, vitamins and medications.
Other prepper pantry items to consider storing include:
cookware
eating utensils
reusable food storage bags and/or containers
trash bags
aluminum foil and plastic wrap
hand-crank can opener
scrub pads/wash cloths
all-purpose cleaners
hand soap/sanitizer
diapers/pull-ups for babies/toddlers
baby wipes and other baby essentials
pet foods, treats, medications, etc.
deodorant, razors, shampoo, toothpaste/brushes, and other personal hygiene items
OTC drugs such as pain relievers, allergy pills, cough syrup/drops, heartburn medicine, etc.
alcohol wipes, bandages and other first-aid supplies
candles, lanterns, flashlights, batteries, etc.
battery/solar-powered radio
money
This article appeared in Living Off the Grid, a 2021 specialty publication produced by the editors and writers of Hobby Farms magazine. Living Off the Grid includes stories on permaculture, growing plants without seeds and long-term produce storage. You can purchase this volume, Hobby Farms back issues as well as special editions such asBest of Hobby Farms and Urban Farm by following this link.
Tasha Trujillo’s journey to beekeeping started when she worked at a science museum in Miami, Florida. “They have an amazing exhibit on honey bees that featured an observation hive,” recalls Trujillo, who founded Palm Pike Apiary, a farm featuring bees and flowers, alongside Jovany Rodriguez.
Trujillo admits that she was “actually terrified of bees” at that point. But she found herself becoming fascinated by the exhibition.
After spending work breaks by the exhibit, Trujillo began to study environmental sustainability and discovered the vital role bees play in the food system. “It turns out that my partner and I had met someone at our rock climbing gym that kept bees and needed to give a hive away,” she recalls. “We got the hive and the rest was history!”
Taking time out from running Palm Pike Apiary, Trujillo took a few minutes to tell us about the hierarchy of the colony and how adding flowers to her enterprise has benefited the bees. We also spotlighted flowers that resemble the brain.
“Many people assume the queen makes decisions and is the ruler of the colony,” says Trujillo when asked about the most fascinating thing she’s discovered about bee behavior.
“However, it is actually the worker bees that make decisions together. If the queen isn’t laying enough eggs or becomes sick, they will kill her and replace her with a new queen.”
Alongside bees, Palm Pike Apiary has transitioned into growing flowers. Trujillo says there were a couple of reasons behind the decision.
First, she admits that beekeeping can be an intensive pursuit. “Imagine being in a suit while dealing with stinging insects in the heat and humidity of South Florida? It definitely took a toll on me after the first year.”
Secondly, while gardening is an “outlet for me and my mental health,” Trujillo found herself studying up on farming. She discovered that “there was an incredible need for flower farms in the United States.”
So after trialing a few flowers in her garden, Trujillo decided to “take the plunge by growing at the apiary like a real flower farmer.”
Trujillo’s early forays into growing flowers led to her learning that each growing region is unique. And she discovered there was a dearth of information available about producing flowers in subtropical environments.
“I just needed to go for it and I always say the same to new growers!” she recalls. “Just try and try again. Don’t be afraid of making mistakes because mistakes just mean you’re trying and learning.”
“My favorite flowers this season would have to be my cockscomb celosia. I call them brain flowers because they resemble a brain,” says Trujillo.
She adds that zinnias have proven to be the flowers most popular with her customers. “I was able to grow giant zinnias towards the end of the season. They were a huge hit with florists!”
Reflecting on the rewarding nature of caring for bees and growing flowers, Trujillo says she appreciates “seeing all the different pollinators enjoy my flowers.” She highlights that her apiary isn’t just filled with honey bees. It also includes “hundreds of native bees and butterflies” that fly and flutter from flower to flower.
Trujillo also takes joy from seeing her customers’ happy faces. “It’s something you can’t make up,” she says, “seeing someone get as excited about the flowers you worked so hard to grow!”