North America has experienced an onslaught of extreme weather these past few months. From torrential rain causing severe floods to record highs causing shellfish to be cooked alive on Pacific-coast seashores, Mother Nature has hammered at us almost nonstop. Most of us humans have the option to retreat to the comfort of an air-conditioned, dehumidified home. But our chickens aren’t as lucky when it comes to heat.
Sunny’s Bad Day
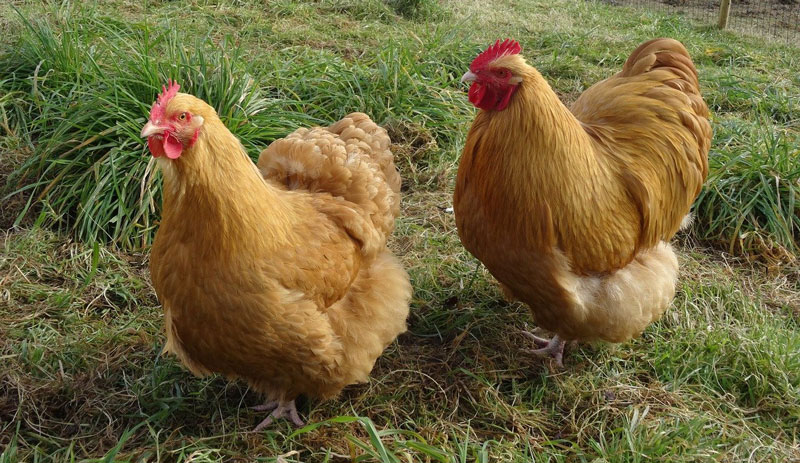
Case in point: my friend Kara contacted me last week, asking for help. One of her neighbors, a friend who had started his backyard flock earlier this year, has a hen, Sunny, who was acting sick. Of course I bombarded her with questions to pass along:
Was Sunny isolated from the rest of her flock?
Did anyone else exhibit symptoms?
Was she eating/drinking/pooping/laying normally?
Was there discharge from her nostrils?
What did her throat look like?
What behaviors was Sunny exhibiting?
From the answers: yes, isolated; no other chicken was ill; no discharge; throat clear; not laying; just sitting alone, ruffled, droopy, not really eating/pooping/laying, and actively gasping.
After a quick check at the forecast in Kara’s part of the country, I concluded that poor Sunny was suffering from heat stress. That’s the chicken equivalent of heat exhaustion.
Mind you, I’m not a veterinarian. But I have raised chickens for a long time and have seen for myself what happens during the often sweltering Michigan summers.
Heat stress occurs when extreme heat and humidity make it almost impossible for chickens to regulate their core body temperature. If left untreated, it can result in death. If your chickens exhibit symptoms of heat stress, consider taking the following four steps.
Many chicken illnesses manifest the same symptoms:
droopiness
fluffed-out feathers
listlessness
For the sake of the rest of your flock as well as for your ailing bird, isolate your sick chick. Use a kennel, a hard-sided animal carrier, a chicken tractor, even a large cardboard box inside a cool area of a barn or garage and give her plenty of clean shaving to nestle down in.
To encourage rest and to buffer her from disruptive sights and sounds, drape her temporary quarters with a large towel or sheet. In the evening, when it’s cooler, offer her a small bowl of layer crumbles or a warm mash, which will be easier to eat than pellets.
If you have an old stuffed animal — not a scary one! — put that in to keep her company.
Offer Electrolytes
Provide your bird with cool, fresh water mixed with poultry-specific electrolytes. These are available at your local farm-supply store or through online sites such as Amazon. Follow the instructions carefully to offer the correct dosage for the amount of water.
Electrolytes replenish essential minerals such as potassium, sodium, phosphorus and magnesium, which chickens lose when suffering from heat stress. Continue offering her electrolytes for several days.
To be safe, offer the rest of your flock cool, fresh electrolytes on—or right before—days of extreme heat and humidity to help protect them from heat stress.
Increase Ventilation
Being out of the heat will make a big difference in your ailing chicken’s condition. Should she not show any signs of improvement after 24 hours, check the air temperature and humidity inside the building temporarily providing her shelter.
You may need to open windows to create air flow and add fans to get the air circulating. Evaluate the air flow in your chicken coop, too. You may need to add more ventilation to help dissipate the heat and humidity inside the henhouse.
Take a long, hard look at your chickens’ run … and at your yard, should you free range. Are there any shady spots in which your birds can seek relief from the sun? An easy way to add shade to a run is by planting shrubs or trees within or outside the enclosure.
A weighted table—one that won’t blow over on a windy day—is another alternative.
Several of our chickens escape the heat by snoozing under the table in their run, which doubles as a shelter for their feed. Shade can also be created by securely attaching a small tarp or wooden panel to the run’s fencing.
Just make sure you are not interrupting the flow of air when you install these.
Kara reported back a few days later that my “prescription” worked and that Sunny is back to her old self and back with her flock, which was great news! We’re not even halfway through summer, however, so I hope Kara’s friend —and all of us chicken owners — will be prepared for more weather extremes to come.
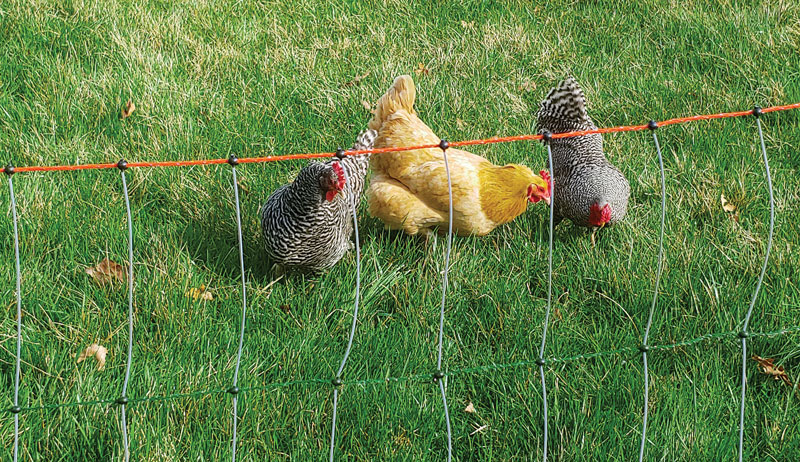
Whether you keep chickens in the city or the country, your primary role as chicken caretaker is to keep your flock safe. This (sometimes difficult) task often means keeping them out of trouble and protecting them from predators. Though there are myriad predator protection methods, one of the most popular methods involves using electric fencing to protect chickens.
For an electric fence to function properly, the solar charger (or “energizer”) must provide voltage that is powerful enough for the shock to jump from the charged wire to the animal’s skin. The shock travels from the energizer, down the fence wire, through the body of the animal, into the ground through the animal’s feet (or hooves), to the grounding rod and back to the energizer. This completes the circuit and shocks the animal, causing its muscles to contract.
How the animal receives the shock depends on three things:
animal’s bodyweight
amount of the shock
length of time it lasts
Electric Advantages
The exact predators your flock faces depends on your geographic location. But, regardless, electric fencing is a popular predator deterrent, and it also helps contain chickens.
These fences can be plugged into an electric outlet to receive their charge. Or you can hook one to a solar charger, commonly used when chicken coops and runs are far from a building or electric box.
An added perk: Electric fencing is generally simple to set up as well as to move, should you wish to rotate your chickens around the farm or yard. Additionally, the cost of a movable electric fence is significantly less than more permanent fencing options.
There are three primary types of electric fencing that can be used with chickens:
Single Strand
Single strand is typically strung about 5 inches off the ground; this type of fencing is generally good predator deterrent
Double Strand
Double Strand is generally placed and 5 and 10 inches off the ground; this type of fencing is generally good for both deterring predators and keeping chickens in one specific area
Netting
Netting, also called poultry fencing, is flexible and easy to install with multiple strands of electrified wire. This type of fencing is helpful for many types of predators (it’s more visibly substantial) as well as for keeping wandering chickens contained.
Sarah E. Coleman
What You’ll Need
Once you’ve decided on the type of electric fencing you’ll use to protect your chickens, you can begin gathering your materials. You will need:
Fence, either wire, tape or netting that is long enough to enclose the area you wish to use
Solar charger with enough strength to electrify the length of fence you’re using. The batteries on a solar charger must be completely charged before the charger is asked to power the fence, and it must be in the off position while charging. Be aware that obtaining a full charge can take up to three days; check the model’s manual for details.
Metal or wooden posts (even when using netting with built-in step-ins, a few posts may be necessary)
Grounding rods (typically between two and three), which are often made of galvanized steel and should be at least 4-feet long. No matter what material you use, that the same material should be used for the ground rods, wire and clamps
Grounding wire, properly insulated for the amount of electricity you will be using
Solar chargers utilize a panel to collect and convert sunlight to energy, which is stored in a battery. The battery supplies the current to the charger. A wire connects to the fence wire and to the grounding rods, allowing one pulse of electric current per second to travel down the fence.
An electric fence doesn’t need to hook back to itself to work effectively.
To begin, clear the area.
Before installing the fence, it can be helpful to mow a path or drive around the perimeter of where the fence will go. This can help ensure that lines are straight and that no vegetation will touch the wire or netting, which can affect its ability to provide a shock.
Determine the best location for the solar charger.
A crucial part of fence installation is ensuring that the solar charger is placed in an area that is not completely covered in shade; the solar panel should face the sun when it is directly overheard. In the Northern Hemisphere, this is due south.
Lay out the fence posts and fencing near the track.
For poultry netting, this will mean untying the ties that hold the roll together. Then you’ll unclip the metal clips to release the roll.
Install end and gate posts using a sledgehammer, posthole digger or T-post pounder.
If you’re using tape or wire, install corner posts as well. These can be metal stakes or heavier-duty, wooden posts depending on how permanent the fencing is meant to be; if the fencing is permanent, using wooden posts that are at least 6 inches in diameter and placing them at least 3 to 4 feet in the ground will help them endure the added stress in these locations. Additional bracing may be necessary.
Corner posts may also be necessary with poultry netting to prevent it from sagging as it turns the corner. You can tie netting step-ins to these stronger posts with any nonconducting material. If you’re planning on using wooden or metal posts, ensure there is at least 2 inches of space between the netting and the post so the fence can remain electrified.
No matter which type of fence you choose, if you’re using any permanent posts, it’s imperative you contact utility companies to have the lines marked before any fencing begins.
Put up the fence posts if using tape or wire.
Posts are generally spaced about 12 feet apart. But they may need to be closer together if the terrain is especially undulating.
Mount tensioners and insulators for wire and tape on the wood or metal posts.
Installation instructions will vary by brand. If you choose to use more than one strand of tape or wire, start at the top. Work your way down the posts so the wire or tape doesn’t get in your way.
String the wire or tape as tightly as possible.
Multiple tools are available to help tighten both electric wire and tape. If you’re using poultry netting, simply stand it upright and use the step-ins to install it. If you need multiple sections of fence, simply tie the ends together with the provided ties (connect the electric components later).
It’s important to keep the tape, wire or netting from sagging—especially important if there is vegetation in contact with the fence as well. This can affect the amount of electrical output the fencing can produce and potentially endanger your chickens.
Mount the fence charger.
Mount the charger on on a wooden post or wall by placing a screw or nail through the hanger hole. The charger should still be in the off position.
Sarah E. Coleman
Install the grounding rods.
The majority of electric fences need between two and three grounding rods, which act as a large antenna. One rod should be placed within 20 feet of the fence charger. All the rods should be 10 feet apart from each other.
You can install these rods with a sledgehammer or T-post driver. Place them as deeply in the ground as possible, with just a few inches sticking out of the soil on which to clamp the wire.
Hint: Placing the grounding rod at a 45-degree angle is easier than installing it straight up and down if you have rocky soil. Additionally, if the ground is hard and dry, pouring water on the area where you will install the rod can ease installation. Ground rods should not be installed near telephone lines, water lines or utility grounding rods as each of these can pick up stray voltage.
Connect the grounding rods.
Connect them to each other (but not to the fence) using wire and clamps rated for electrical fence use. Most solar fence chargers include wiring harnesses that include this wire.
Attach the negative wire (black) to the end grounding rod closest to the charger and the positive post of the fence charger. Attach the positive wire (red) from the fence charger to the fence.
If you’re using poultry netting, you’ll attach the lead wire from the fence terminal of the energizer to the top clip where the netting begins. Attach the ground wire from the ground terminal of the energizer to the grounding rod.
Connect two rolls of netting together, if using more than one roll.
Always connect the top clip to the top clip and the second clip to the second clip. These will easily clip together. At the end of the netting, attach the clips back to their respective wires (positive clip to positive wire and negative clip to negative wire). Don’t let them simply hang.
To test that the fence is working, select the DC current setting on your voltmeter. Attach the black lead to the grounding rod and the red lead to the electrified portion of the fence. (Note that the specific pieces of fence that are electrified may differ depending on the brand of fence.)
Voltage on a newly installed fence should exceed 3,000 volts. It should never drop below 2,000 volts, or the fence may not keep predators at bay.
It’s important to regularly check fence lines to ensure that no tall grasses or objects come into contact with the fence, which can markedly decrease its shock value or even short out the fence entirely.
Each spring, it can be helpful to turn the fence off and take apart the ground rod connections and scrub them with a wire brush to remove corrosion. Corrosive buildup can also reduce the ability of your electric fencing to conduct a charge and leave your chickens vulnerable to attack.
Sidebar: Choosing Fence Energizer Size
Most electric fence energizers are measured in joules generated. A joule is the international term for a unit of energy (similar to the kilowatt-hour).
A joule equals 1 watt per second, not 1 watt per hour. So the smaller number on fence chargers should not be a turnoff. A solar charger that produces 2 joules of energy can electrify many miles of fence. This shock will prevent predators from visiting your fields.
Remember that the number of joules a company says its energizer creates comes from ideal laboratory conditions, not out in a field surrounded by animals and objects. Check the voltage a fence produces regularly to ensure your flock stays safe.
This article originally appeared in the July/August 2021 issue of Chickens magazine.
Did you know a rain gauge is one of the simplest and most practical tools a farmer can have?
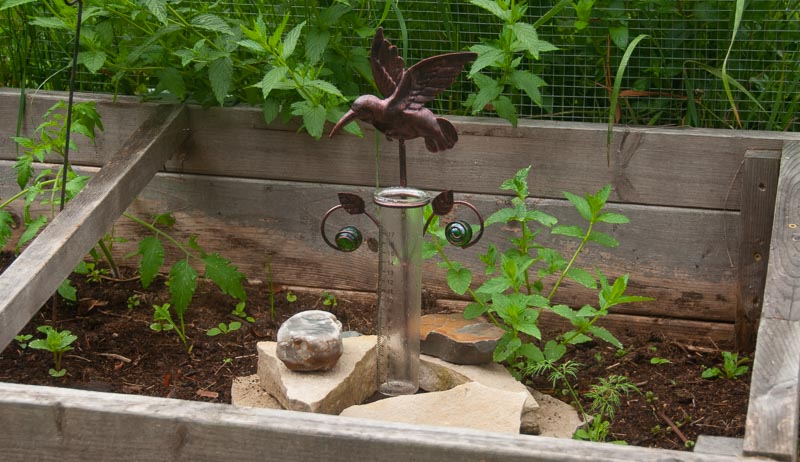
A rain gauge is exactly what its name suggests—an instrument used to gauge rainfall. While rain gauges come in many different sizes (and even designs), the simplest rain gauge is a glass or plastic tube adorned with the marks of a ruler to indicate just how much rain has fallen.
If, after a heavy rainstorm, the gauge contains 1 inch of water, you know the area your farm is in received 1 inch of rain. Generally speaking, the wider the diameter of the rain gauge, the more accurate the results.
You might wonder why you need a rain gauge when online weather services can tell you how much rain falls during any given rainstorm.
The problem is, online services aren’t as area-specific as your own rain gauge. Precipitation amounts can vary widely across relatively small regions. So the amount of rainfall your town or city officially records might not match the amount your farm receives.
Measuring rainfall is important for a farm growing thirsty gardens, orchards, etc. So having your own rain gauge is a good way to measure super-localized precipitation and determine when (and how much) you need to water your plants.
And the most inexpensive rain gauges can be purchased for a few dollars. So there’s really no reason not to have one on hand.
Location, Location, Location
But using a rain gauge isn’t as simple as sticking it on the side of a building and waiting for rainfall to accumulate. Installing a rain gauge requires placing some careful thought into finding the right location. Otherwise, you risk receiving inaccurate results.
The main consideration is to find an open area far away from large objects. So, installing a rain gauge on the side of your barn is out.
Such objects can influence how much rain reaches your gauge. A widely used rule of thumb instructs that the distance between a rain gauge and a large object should be twice the height of the object. If your barn is 30 feet tall, the rain gauge should be installed at least 60 feet away.
On the other hand, rain gauges provide the most accurate measurements when they’re protected from heavy winds. Installing one in the middle of a 20-acre field isn’t the best choice either.
The most ideal location is a clearing protected on all sides by wind-breaking obstacles. If your barnyard is surrounded by windbreak trees, that might be the perfect choice. You just need to find a spot far enough away from each building and tree.
Once you’ve found the right location on your farm for a rain gauge, installing it is a breeze. While some simple rain gauges are designed to be inserted directly into the ground, you’ll get better results by installing a post in the ground to hold the rain gauge.
This will ensure the gauge stays level (important for accurate measurements) while also elevating the rain gauge above the ground. For best results, the top of the rain gauge should sit several feet above ground level.
For a hobby farmer hoping to gauge local rainfall, achieving accuracy to the 100th of an inch isn’t necessary. Don’t be too concerned if you can’t find an absolutely perfect location.
Just do your best, enjoy the results … and remember to empty the gauge after each rainfall!
Dense, tender and rich with egg, this savory scallion pancake with a sweet soy dipping sauce is a modified version of a traditional Korean-style pancake. Serve it as a snack or appetizer to be shared around the table.
The firm wedges are filled with softened pieces of scallion, and it pairs well with a slightly sweetened soy sauce for dipping.
Stir together all sauce ingredients in a small saucepan. Warm over medium heat, stirring until the sugar dissolves, about 5 minutes. Remove from the heat and pour into a serving bowl to cool.
Place the flour in a medium mixing bowl. Pour in the eggs and stir well. It will be thick and lumpy. Add the garlic, salt, and crushed pepper. Pour in the water about a 1/4cup at a time, and stir well to create a thick batter.
Pour 2 tablespoons of the oil into an 11-inch skillet. Heat over medium-high for about 90 seconds. Drop a tiny bit of batter in the oil. If it sizzles, it’s ready.
Pour in half of the batter. Sprinkle the top with half of the scallions, distributing them evenly on the surface. Cook for about 3 minutes, until the edges become browned.
Carefully flip the pancake. Cook for 3 to 4 more minutes, until both sides are golden brown and the pancake is firm in the center.
Transfer to a plate covered in a paper towel and pat the top with another paper towel to absorb any excess oil.
Return the skillet to the heat. Add the remaining 1⁄2 tablespoon of oil and repeat the process with the rest of the batter.
Cut each scallion pancake into 6 wedges. Serve warm with the dipping sauce on the side.
Let’s hear it for the small farm!Big farms and big equipment may enjoy certain advantages when it comes to mechanical efficiency. But for productivity, beauty, health and enjoyment, the family-scale farms have it.
Even in the area of true efficiency, tiny farms excel in making every detail count. Like the old saying goes, ‘Waste not, want not’!
The Pig Is Essential
Which is why every small farm and homestead needs a pig! For thousands of years, pigs have been one of humanity’s traditional partners in turning soil and sunlight into a healthy, stable, resilient food system.
As omnivores, they will eat almost anything and turn it into solid flesh and valuable compost. Pigs are four-legged food storage units, happy to eat whatever we have to give them, in whatever quantities. And they are ready for harvest in less than a year!
The pig is truly necessary homestead livestock.
So why is it that so many of the instructional books, pamphlets, bulletins and videos on raising hogs tell us homesteaders to raise our hogs just like commercial hogs, only on a smaller scale?
Confinement, commercially compounded hog pellets, farrowing crates, lots of pharmaceuticals—these may be best protocols in large-scale pig production. But the small farm can aspire to better things.
In our own journey, from city-dwellers to independent homesteaders, we’ve asked a lot of questions about traditional small-farm pig management, including:
What was the traditional role of pigs on the farm?
What did they eat?
How were they managed?
Finding answers hasn’t always been easy. This valuable knowledge has almost been lost in the last 70 years, with the commercialization of farming and loss of small family farms.
Traditionally, of course, pigs ate what the farm produced. Feed stores are a modern invention.
It’s true that pigs can get along fine on a small ‘maintenance’ ration. But when there’s plenty of surplus to eat, they’ll just, well … pig out!
On the diverse homestead this can mean:
garden surplus
canning and other food processing wastes
cull vegetables
dairy surplus
grass, weeds and hay
With good planning, at certain times of the year a homestead pig can harvest food for himself. In autumn he can be turned into the woodlot to forage wild edibles like acorns and nuts. Pigs used to be a common site in the homestead orchard, where they cleaned up windfall fruits, ate grubs and stirred soil for better aeration and percolation.
And they can forage in the garden after the main harvest, rooting out perennial weeds and gleaning overlooked vegetables. On many homesteads it’s possible to feed your pig entirely from what your homestead has to offer.
Pigs as Farm Workers
Pigs are more than walking appetites. What about using pigs as earth-movers and compost builders?
In the commercial farm setting, pigs are just bacon and sausage. But the homesteader can take advantage of the whole animal. Pigs’ stout noses and instinct for digging means they can plow up a new garden site. Or let them turn and aerate the compost pile.
There’s a lot of muscle in that porker. And on the small farm or homestead, you can put it to work.
When it’s time to harvest our four-legged food storage, if we butcher at home we can use every part of the pig – like the old-timers used to say, ‘everything but the squeal’!
You can butcher a pig without specialty tools, using simple, hand-powered grinders and slicers, and only the weather for refrigeration. And some ambitious homesteaders now build walk-in coolers their small farms, allowing butchering whenever it suits them, in any season.
Taking responsibility for our own animal slaughter puts the power back with the small farmer and homesteader, where it belongs. No more wondering about the quality or availability of commercial meat. It’s time we brought our bacon-raising back to the farm.
We can take these valuable animals into partnership once again.
Our grandparents and great-grandparents raised pigs long before there were feed stores and confinement houses. And even if they didn’t leave us an instruction book, we can still figure out how they did it.
On our farm, the Sow’s Ear, we’ve spent over a decade researching these and related questions in old farm manuals and diaries. Even more importantly, we have the pig himself, sus scrofa domesticus, to show us what are his likes and dislikes.
Let’s put the pig back in his rightful place on the small family farm. Nature—and our animals—wait patiently to share their knowledge with us.
The first step to building a small-scale irrigation system is choosing the right-sized rain barrel. The most common household rain barrel is made from a 50-gallon drum. These can be purchased, pre-made, from a number of places.
Connect with your local garden clubs, nature conservancies and other similar organizations to inquire about where to purchase a rain barrel in your area.
You can also easily build you own from a repurposed 50-gallon barrel. But many situations may require a larger capacity catchment system for their water needs.
At Small House Farm, we use a 250-gallon IBC storage tote. Although this sized container will still fill with water rather quickly, it’s certainly more practical for our needs than a smaller, household-style rain barrel.
Once you have chosen your receptacle, you’ll need to decide where to place the barrel and where to run your gutters. The water pressure of a rain barrel is provided by gravity. So the container will need to be placed up off the ground.
Build a support system with cinder blocks, which will be able to support the weight of a full container. Remember, a barrel full of water is very heavy!
With your gutter in place, and the downspout run into the top of your container, you’ll be all set to capture the rainwater to store for later use.
Next, you’ll need to set up your drip line. You can certainly purchase soaker hose or drip line from a garden supply center.
But you may also consider making your own from old hoses. Simply lay the hose out along your garden row, then drill holes along the hose wherever the plants are located.
If you’re using a hose bib attachment of a 50-gallon rain barrel, just connect the hose and you’re ready to go. A larger IBC tote will require an adapter piece in order to attach the hose to the drain valve. But these can easily be found at a hardware store or online.
Once you have your system in place, you should mulch around your plants and over the drip line hose. This will help to reduce evaporation and retain soil moisture, which is very important during the hot summer weather.
And it’s just that easy! With a little bit of old gutter, a rain barrel and some repurposed garden hose, you can build an awesome drip line irrigation system for your garden or hobby farm. Check out the video above for step-by-step instructions.
What’s it like to go from knowing nothing about farming to traveling around the world as a consultant to farmers? In this episode, organic farmer and farm consultant Garth Kahl tells us how that path unfolded in his life, how he came to love working with livestock and why he still believes the USDA organic label is the best baseline standard for responsible farm production. Learn how to help get your organic inspection and other vital farm projects paid for with FSA and NRCS funds! Get Garth’s best advice for bringing cattle to your farm or homestead—hint: they’re easier than goats. And hear about why intensive rotational grazing is vital to the health of his Western Oregon farm, in ways that you may not have previously considered.
Garth and show host Lisa Munniksma also talk about water rights in the western US; Garth’s favorite farm meal, which involves growing hundreds of row feet of basil; and how to balance the demands of farming with an off-farm job that involves travel.
Although climate change means hard days ahead for many industries, it can feel especially unfair to those trying to run a farm. Learning the ins and outs of your local weather patterns is already hard enough for farmers. A lifetime’s work, really.
So, what does climate change mean for the average small-scale farmer or homesteader? And what can you do now to start preparing your farm? Here are some suggestions for how to think about what climate change might mean for you and your farm.
Plan Ahead
As with any problem, preparedness begins by knowing what you’re up against. The impacts of climate change will be different across the country, so research what future weather patterns will look like in your area.
There are many climate change models out there, but the EPA’s Climate Resilience, Evaluation and Awareness Tool (CREAT) is one of the most intuitive. The tool allows you to look at different emissions scenarios and their impacts on things like extreme heat, precipitation and storms.
Once you have a sense of what the impacts are expected to be, start to plan for how you’ll adjust to them.
Is severe rainfall and flooding going to become more common? Maybe now’s the time to start thinking about how to improve drainage around your fields.
Are droughts predicted to become more frequent? There’s no time like the present to start researching irrigation options.
Beyond developing your own ideas for how to adapt your farm, working collaboratively with other local growers can help to generate more ideas.
Maybe your local growers association is hosting a panel discussion or series of talks on the subject. If not, suggest that they put on one. Since the impacts of climate change are localized, the solutions will be as well.
Check for Funding
In many cases, adapting to changing weather patterns will require new infrastructure. And infrastructure is never cheap.
You might, for instance, need to run electricity to a high tunnel so that you can ventilate it during a heat wave. Or, maybe you’ll need to build hoophouses to protect more of your crops from severe weather events.
There are a variety of sources that will fund climate adaptation for farmers. Some states have programs to fund agricultural adaptations, and a variety of private foundationsoffer funding as well. Research what’s available in your area.
With weather patterns already changing, one of the best ways to start adapting your farm is by experimenting with different ideas. Try to find crops or varieties that will be better adapted to your new growing conditions. Or, maybe you have some ideas about how to keep portions of your fields cool during the height of the heat (like planting hedgerows or installing overhead irrigation).
As you begin to experiment, take it slow and make sure not to overcommit. Grow modest amounts of new varieties to test their viability, and set aside small plots to experiment with new techniques.
Remember, experimenting now allows you to lower the stakes.
Climate change is already posing challenges for growers across the country. And with more changes expected, now’s the time to take adaptation seriously on your farm.
This pasta dish is one of the first things I made with milkweed, and a good example of how even the tough leaves can be put to work. Here the leaves are used to color the pasta dough, while the buds are tossed in at the end with a few scrapes of lemon zest and a good knob of butter. It’s a great way to enjoy the buds by themselves and celebrate the season.
2–3 ounces (55–85 g) small, firm milkweed buds
5 tablespoons unsalted butter, divided
4 tablespoons shallots, in 1/4-inch (6 mm) dice
Kosher salt, to taste
1/2 cup (135 ml) chicken or vegetable stock
1 recipe Milkweed Leaf Pasta Dough (follows)
1/8 cup (30 ml) water from the pasta pot
2 teaspoons fresh-grated lemon zest
4 tablespoons Parmigiano Reggiano, or other domestic Parmesan, plus more for serving
Bring a pot of lightly salted water to a boil. Blanch the milkweed buds in the boiling water for a minute, then refresh in cold water. Drain the milkweed buds thoroughly and reserve.
In a large sauté pan, melt half of the butter and add the diced shallots. Cook the shallots on medium until they are translucent and soft, about 2 to 3 minutes, then season with a good pinch of salt. Add the stock and cook until reduced by half, then turn off the heat.
Make the pasta, then add half the recipe (8 ounces / 225 g) of it to the boiling water and cook until done, about 1 minute. Drain, reserving 1/8 cup of the cooking liquid. Add the cooked pasta to the pan with the stock and shallots, then add the cooking liquid, the reserved milkweed buds, the remaining butter, and the lemon zest. Cook for another minute or two, swirling the pan until the liquid is thickened slightly and creamy. Add 4 tablespoons of Parmesan and toss to coat, then divide the pasta among four heated bowls and serve immediately. Pass additional Parmesan at the table.
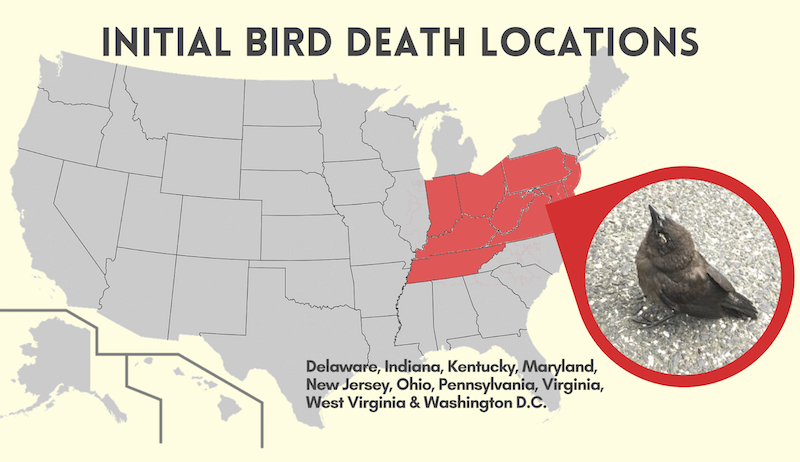
Something’s going wrong with robins, cardinals, blue jays, European starlings and similar birds in several U.S. states. Hundreds of adults and fledglings have died mysteriously since late spring. Unfortunately, wildlife authorities aren’t sure why.
Affected birds may have swollen, crusty eyes. They may also exhibit neurological symptoms like trembling and an inability to balance themselves.
According to an interagency statement from the U.S. Geological Survey and partner organizations, people began reporting the trouble in late May. Since then, residents in Delaware, Indiana, Kentucky, Maryland, New Jersey, Ohio, Pennsylvania, Virginia, West Virginia, and Washington D.C. have discovered sick and dead birds.
Researchers have tested specimens for various parasites, avian influenza and West Nile virus. They’ve also looked for Newcastle disease and other paramyxoviruses, herpesviruses and poxviruses. Ditto for bacterial pathogens like Salmonella and Chlamydia.
So far? They’ve come up empty.
“Transmission electron microscopy and additional diagnostic tests, including microbiology, virology, parasitology and toxicology are ongoing,” notes Kate Slankard. She is an avian biologist with the Kentucky Department of Fish and Wildlife.
“The labs, veterinarians and bird biologists involved are still working hard on this to understand the problem,” Slankard adds.
A Cicada Connection?
There could be a connection to the recent cicada binge that birds in parts of the U.S. recently enjoyed. “Some people have speculated that it might be linked to that fungus—the so-called zombie fungus,” says Dr. Keith Clay.
Clay is a professor and chair of the Department of Ecology and Evolutionary Biology at Tulane University.
“It infects some cicadas,” he continues. “Neurological and behavioral [symptoms] like difficulty maintaining balance would all be consistent with the chemistry that this fungus produces inside the cicadas.”
Dawn Hewitt is editor of Bird Watcher’s Digest and Watching Backyard Birds. She thinks that both pesticides and cicadas could play a role.
“My own speculation is that the cicadas have been poisoned by pesticides,” she says. “They’re soft and juicy when they emerge. I think that parent birds shoved toxic cicadas down their babies’ throats.
“And that’s why fledglings were often the birds … found to be dying.”
Hewitt credits naturalist Julie Zickefoose with originally suggesting the link between cicadas and bird deaths. She particularly notes the fledgling angle.
“We don’t have Brood X here in Marietta, [Ohio]. But the west side of Columbus does,” Hewitt says. “People [in Marietta] have not reported dead and dying birds.”
But people living in other regions of Ohio have reported many bird deaths. Still, correlation isn’t causation. States with Brood X cicadas included:
Connecticut
Delaware
Georgia
Illinois
Indiana
Maryland
Michigan
New Jersey
North Carolina
Ohio
Pennsylvania
Tennessee
Virginia
Washington D.C.
West Virginia
Susan Brackney
Unanswered Questions
“A question I would have is whether these deaths are concentrated in certain species and in certain regions,” Clay says. “Another kind of evidence would be if there are birds that are continuing to die of similar symptoms even though most of the cicadas have disappeared.”
While Clay thinks the cicada link is a plausible idea, he adds, “The main alternate hypothesis that has to be tested is whether there’s some kind of bacterial or viral infection that is killing them.”
“We are recommending that people follow the guidelines from their state wildlife authorities,” Hewitt says. “For instance, Massachusetts recently issued an advisory recommending that people stop feeding birds and take down bird feeders. And that is in spite of the fact that there have been no reports of dead or dying birds found in Massachusetts.
“They’re trying to pre-empt the problem.”
If you’re in one of the affected by bird deaths and you’ve been feeding birds this summer, you should stop. Take down feeders, clean well and store until the danger for birds has passed. Additionally, check with your state’s conservation agency, which should have announcements and recommendations regarding bird die-offs where you live.
And if you happen to find a dead bird? Fit a plastic bag over your hand, pick up the animal, then turn the bag inside-out to contain the bird. (For added protection, also wear disposable gloves when collecting the bird.)
Next, report your find to your state’s Department of Natural Resources or Wildlife Conservation Office. The authorities might want to test your specimen. And, if not, they can recommend methods for its safe disposal.