Categories
Animals Health & Nutrition Poultry Poultry Equipment

Watch For These Conditions In Incubated Chicks

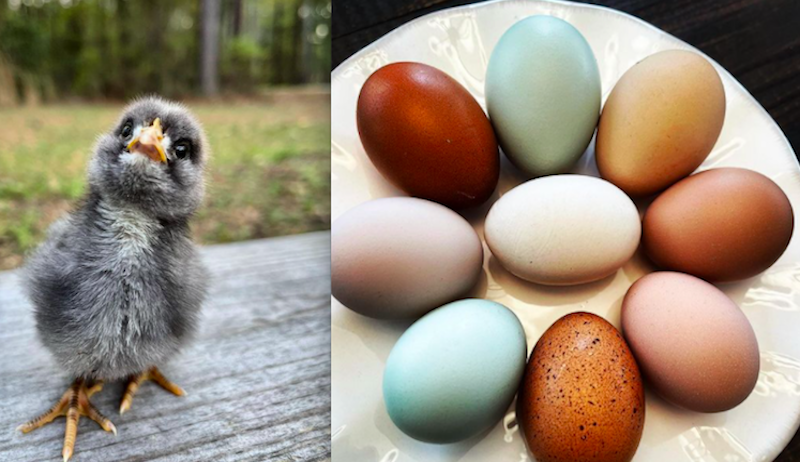
There’s nothing like the feeling you get when you look in the incubator and see the first pip of an egg. After 21 days of care, your chicks are about to come into the world. You can take a second to relax knowing you did everything right to get them to hatch. But there are quite a few reasons to stay on your toes.

You know you’ll need to keep the chicks fed, warm and safe while they grow. However, even the most diligent chicken-keepers can run into a few problems with their newly hatched babies. Keep this reference list of common conditions close at hand when your chicks are about to hatch. You’ll be ready for any issues that may come up!

Respiratory Illness

Your chicks are running around, eating, drinking and look healthy. Then you notice one seems to be quieter and is breathing with its beak open. If you look closely, you may notice that chick has runny eyes.

If you observe long enough, you might hear a cough or sneeze. Can chicks catch a cold?

Respiratory issues are one of the most common issues you may see after hatch. And much like our own common cold, your chicks could suffer from symptoms that range from a runny nose, coughing, clicking when breathing, lethargy and swollen eyes.

If your chicks are suffering from what appears to be a cold, your first step is to check the conditions in your brooder.


Read more: Infectious bronchitis is a serious virus that can affect your birds.


Bedding

Dust can be created from bedding. If you’ve been using sand, cedar chips or sawdust, you should make a quick switch. Pine chips or newspaper shavings are less irritating, and switching bedding may decrease symptoms in your chicks.

Housekeeping

Keep your brooder clean. To keep your chicks healthy, you’ll need to clean your brooder every day.

While you might be tempted to give it a good spritz and scrub with bleach, that type of cleaning solution should be avoided. Bleach can mix with the ammonia in chick droppings and create a toxic atmosphere.

Instead of bleach, opt to clean your brooder with vinegar and water.

Don’t Get Damp

Stay on top of damp conditions, as chicks are tiny toddlers, and they can swiftly upend their water dishes and make a mess in a clean brooder. If they frequently dump their water, they’ll have wet shavings. And wet shavings can cause respiratory illness.

Always keep shavings dry. If chicks frequently dump their water, switch to a poultry nipple system instead of a water trough.

If you have removed all possible irritants from the brooder, your chick is still sick and other chicks are showing signs of illness, you may have a more serious respiratory illness on your hands.

At that point, contact your vet. He or she will help you take steps to source out the nature of the illness. 
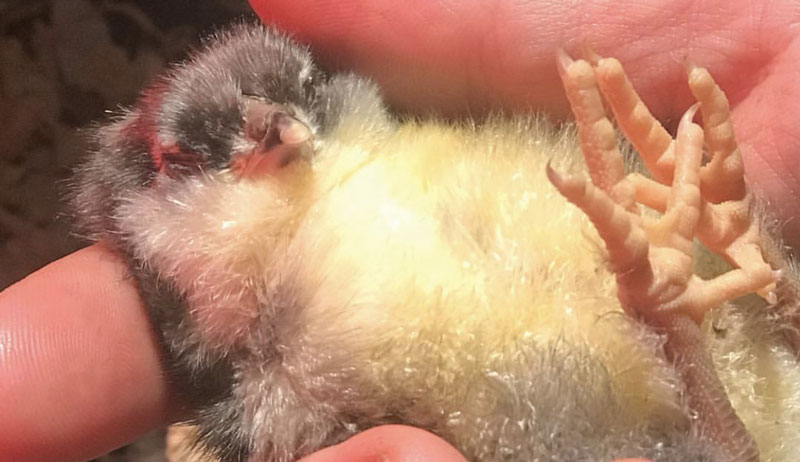
chick chicks conditions condition
Shelly Wutke

Pasty Butt

Pasty butt is exactly what it sounds like: a build-up of fecal matter over the vent hole of a chick. The chick’s stool has stuck to its body and built up a plug, and that plug will stop your chick from going to the bathroom normally.

When your chick can’t remove waste from its system, it backs up, and poison can be sent through their body. Left unchecked, this condition could result in death.

There are quite a few reasons why chicks develop pasty butt. Stress, lack of space, and chilly or too hot conditions can cause this issue in chicks. The key to helping your chicks stay healthy is spotting it quickly and removing the plug before illness sets in.

You can remove the plug over your chick’s vent hole yourself. Wear rubber gloves and gently run warm water over the plug. Once you’ve softened the plug, attempt to gently pull it off with a soft cloth, cotton ball or paper towel.

After it has been removed, you can use the low setting on a hair dryer to dry the area. If it appears red and sore, apply a lubricant such as petroleum jelly to prevent further build up.

Pasty butt can happen to the same chick over and over again, so keep an eye on chicks that struggle with this condition.


Read more: Bringing home chicks rather than hatching? Look out for these issues.


Spraddle Leg

Also known as splay leg, spraddle leg is a concern for all chicken-keepers. Your chick may hatch and not be able to get up, leaving the chick splayed out on its stomach, legs stretched out in a split position. It won’t be able to stand on its own, and it won’t be able to access food and water. 

Fluctuating temperatures in the incubator during hatching may cause this condition. It can also happen when the chick developed in a position that injured the tendons in its feet or legs. A slippery incubator floor can also be the culprit.

Whatever the reason your chick has spraddle leg, you’ll need to intervene in order to help it recover. There are many different ways to treat spraddle leg. Some keepers recommend using a section of a Popsicle stick or adding a small section of wrap to each leg for support.

You’ll need to check on your chick frequently and change the bandage every day until you’re sure it can support its weight on its own. You’ll also want to ensure your chick is eating and drinking properly until it can move around normally. 

Scissor Beak

This isn’t one of the more common conditions, but scissor beak can appear after hatching or as chicks grow older. It will look as though the chick’s beak doesn’t line up properly, creating a scissorlike appearance. This condition may be caused by improper incubator temperatures, the way the chick is positioned in the egg or poor genetics.

You’ll likely never know the reason why your chick has scissor beak, and there is no cure for this condition.

It’s possible for a chick with scissor beak to have a happy and healthy life, but you’ll have to make a few adjustments to how it eats and drinks and watch over it as it grows. You’ll want to put feed in a deep bowl or trough and not have it laid out thinly in a pan. Your chick will learn to use their beak as a sort of shovel to dig in and scoop food out.

A chick with scissor beak will also have an easier time drinking water if you use poultry nipples instead of a water trough.

chick chicks conditions condition
Shelly Wutke

Yolk Sac Infection

Also called mushy chick disease, yolk sac infection is a common cause of chick death. It’s thought to be the result of bacteria present during incubation. The bacteria can enter the egg due to an unsanitized incubator, unclean thermometers or lack of hand washing before egg candling.

Yolk sac infection is one of the reasons why it’s so important to have a clean, sanitized incubator before you place your eggs inside and to always wear rubber gloves when candling eggs. 

Yolk sac infection appears as a mass outside of your chick’s body. This mass is unabsorbed egg yolk. Your chick needed to absorb the yolk for normal development. Because they could not absorb it before they hatched, it will be more susceptible to illness and may be smaller and weaker than other chicks. 

Unfortunately, your correction options are limited to wait and see. Most will die within 24 hours of hatching. If your chick does live longer, it may be a sickly and more prone to developing different illnesses as it grows older.

Sudden Chick Death

If you’ve hatched your chicks, and they all look healthy and happy, without any eating or drinking conditions, why would one suddenly die? Sudden chick death can happen for a variety of reasons, including the following.

Overcrowding & Cold

Chicks like to huddle to stay warm, and you’ll find they gather in a spot under or near your heat lamp. If your brooder isn’t warm enough, they may pile up in one spot. That piling on to stay warm can lead to chick suffocation for any little ones in the bottom of the pile.

Make sure the heat in your brooder is sufficient so they don’t crowd in a corner.

Dehydration

When a chick is raised by a broody hen, she’ll keep them warm, protect them, and show them how to eat and drink. If you’ve hatched your own chicks and are raising them in a brooder, you are officially the mother hen.

You’ll need to teach them to drink by dipping their beaks in water and show them how to eat by tapping their beaks in your food bowl. Otherwise, you may find you have chicks dying suddenly from dehydration.

Cocci

Coccidiosis is a parasite that lives in the intestinal tract of chicks and thrives in warm, damp conditions. It can easily spread from one to another if bedding is damp or droppings are present in drinking water.

Chicks with cocci may appear tired and thin and will be reluctant to eat or drink.

Cocci can be treated by adding an antibiotic to drinking water. But left unchecked, it can spread and result in the death of some or all of your chicks. 

Preparation is key to your success rate when incubating eggs, and it’s also key to raising chicks. Knowing what could happen after the hatch will help you keep a watchful eye on your new babies. And that can help them grow up to healthy hens and roosters.


Sidebar: Star Gazing

Upon observing your newly hatched chicks, you notice one chick can’t seem to hold up its head. It may be rolling all the way back or hanging limply off to one side. The chick may also be walking backward.

This condition is known as stargazing, and it may be caused by a vitamin B1 or thiamine deficiency.

While it can be disturbing to see in the brooder, stargazing is treatable with intervention. Ask your local farm-supply supplier if they have access to a multivitamin for chicks or brewer’s yeast. You’ll just sprinkle either of these on your chick’s feed to add thiamine.

If caught early and the illness is due to a lack of thiamine, the addition of this vitamin should cause your chick’s condition to clear up.

This article originally appeared in the May/June 2021 issue of Chickens magazine.

Categories
Chickens 101 Flock Talk Poultry

When Neighbors Say “Nay” To Your Backyard Chickens

In a perfect world, we and our neighbors (and our chickens) would be the best of friends. We’d get together every weekend for potlucks or backyard barbecues. Our children would play outdoors together, and we’d have joint garage sales, card games, and outings to the beach or amusement park.

Many of us may have grown up in exactly these circumstances. I’m actually Facebook friends with nine of my childhood neighbors and had an hourlong phone call with one just last week.

Times have changed, however. These days, we’re lucky if we even know our neighbors’ names. Everyone seems insular, existing in their own little fiefdom. Because of this, disagreements easily arise which, decades ago, would’ve been settled much more amicably.

Everything from mowing along the property line to burning leaves seems to draw a new battle line. And now you want to add chickens to the fray.

Unfortunately, if you live in a municipality where permission from your neighbors is required, you may find yourself out of luck when it comes to raising chickens. If you can keep chickens without the need for permits and permission, however, you’ll still need to deal with displeased, if not irate, neighbors.

Here are four ways to manage chicken-keeping in a hostile environment.

Open a Dialogue

It’s time to open up communications with your neighbors, even if you’ve never done anything beyond waving hello. Dress tidily—remember those first impressions!—then head over in person to introduce yourself and gently let them know that you are adding a poultry flock to your property.

Stand firm when you say this. It needs to be a statement of fact, versus something they might be able to talk you out of doing.

Reassure them that you will be doing everything possible to ensure that your flock does not disturb them, then give them your contact information so they can reach you should they have any questions or concerns.

Be aware, however, that your reception may be a chilly one. Your neighbors may be self isolating because of the pandemic and may not even open their door to you. They may be very private and may find your approaching them an intrusion.

They may even have guard dogs on their premises.

As much as opening communications with your neighbors is important, keeping yourself safe is even more important.


Read more: Here are some tips for getting your neighbors on board with your chickens!


Close Yourself In

To prevent any issues with your flock destroying your neighbors’ gardens or flower beds, nesting under their decks, or pooping on their patio, you’ll need to enclose your flock in a sturdy run. Give your birds plenty of room to roam around while enclosed.

Typically, 10 square feet per bird is recommended, but I suggest at least 15 square feet per bird … or per the size of flock you plan on ultimately keeping.

Bury the bottom 12 to 18 inches of the run fence well into the ground to prevent your hens from exposing the edge through their dustbathing. Burying the bottom fence edge will also help keep digging predators out.

Make certain that your fence is also at least five feet tall if not taller. Believe me, I’ve had hens and roosters jump out of enclosed runs that had 4-foot fences. You’ll want that height!

If you have your heart set on free ranging your birds, I strongly recommend fencing your yard in. You’ll need to check your local ordinances to see what permits are required to erect a yard fence. You’ll also need to let your neighbors know that you are putting up a fence for your chickens, which may lead to squabbles over property lines, overhanging tree limbs and fence maintenance.

To avoid adding fuel to the fire, a fenced chicken run is your best solution.


Read more: Here’s a breakdown of chickens’ space requirements.


Keep a Log

I cannot stress how crucial it is to keep a log of any incidents that may occur from the moment you start keeping chickens. Your hens escape into your neighbor’s yard? Note the date, time and the location in their yard that you found your hens.

Your next-door neighbor’s dog came into your property and harassed your flock? Note the date, time and how long it took for your neighbor to retrieve their pet.

The neighbor kids came over to play with the chickens without asking? Note that as well.

Any phone call, email, text message or in-person visit from a neighbor, complaining that your chickens are in their yard or are being noisy needs to be logged. Documenting these interactions and incidents will protect you should your neighbor lodge a complaint with your municipality. It will also serve as evidence should problems such as a nuisance dog recur.

I recommend also keeping track of such information as when and how frequently your neighbors apply pesticide or herbicide to their yards, especially if you let your chickens roam free. These toxins can poison and kill your chickens.


Read more: Here are some additional things you can do when neighbors complain about your birds.


Learn Your Ordinances

Be prepared for any issue a neighbor may raise by thoroughly familiarizing yourself with your local ordinances. Most municipalities publish their ordinances on their web sites. You can also request a PDF copy or a printed version, although there may be a fee for printing.

Read up on every ordinance that directly impacts you and your flock. These should include regulations for the keeping of poultry or livestock, including:

  • how many maximum
  • whether roosters are allowed
  • permitted size of a coop and run
  • the location of a coop and run in reference to property lines and your home
  • storage of chicken feed and supplements
  • the disposal of manure and corpses
  • slaughtering of meat birds
  • sale of eggs

Learn these all, and follow them to the letter. Do not give an irate neighbor an opening that could lead to the end of your chicken-keeping.

Also familiarize yourself with the ordinances regarding yard fences, trespass and nuisance dogs. You never know when you will need this knowledge. Most municipalities side in favor of the chicken-keeper should a neighbor’s dog harass, attack, stress or kill any of your birds, with the penalties ranging from fines and compensation to the euthanization of the dog.

Hopefully this will never come up, but it never hurts to have this knowledge at hand.

Stand up for Yourself

Should you learn that a neighbor has indeed filed a complaint against you or has gone so far as to demand that you cease keeping chickens immediately, be prepared to fight for your right to farm.

Contact your ordinance director or your town council about the complaint and request a hearing. Your log and your knowledge of your local ordinances will come into play here.

You can also opt to contact your state’s Department of Agriculture and request to be granted Right to Farm status. There will be forms to complete, plus an interview and inspection by a state representative. But, should you be granted Right to Farm status, your state’s protection of your farming rights trumps whatever complaint your neighbors may lodge locally.

You may forever alienate your neighbors by speaking out for yourself and your chickens at a local hearing or by obtaining Right to Farm status. But if you did not have a relationship with them to start, the loss is minimal. And you’ll be cleared to keep your chickens with your government’s backing.

The Good…

Naturally, it’s best to keep the peace with your neighbors. Our former neighbors to the south adored our chickens. They would feed them scraps of bread whenever any of those naughty little chickens crossed the property line to pay them a visit.

Our new neighbors to the north actually came over to introduce themselves. They let us know they were installing an invisible pet fence to keep our birds safe from their dogs, two fabulously trained German Shepherds.

Our across-the-street neighbors actually keep chickens and have bought several from us.

And the Bad

However, it hasn’t been all flowers and friendship. Our previous neighbors to the north—city folk who built a suburban-style home next door to our poultry farm—lodged a complaint about our poultry operations with our ordinance director. This led to our Right to Farm status (they soon afterwards moved away and were replaced by our wonderful, dog-owning neighbors).

Our neighbor to the east never informs us when he’s spraying pesticide or herbicide. We sadly have lost numerous hens due to these toxins.

But we do the best we can and are grateful to have several neighbors who appreciate us and our birds and who, like us, strive for peace and harmony out in the country.

Categories
Equipment Farm & Garden

Hand Tools Get The Job Done Around The Farm

Have you ever noticed that old tools don’t really become obsolete? Sure, there may be a newer or faster type of power tool or machine to be had for a particular job. But this doesn’t mean that the original, older solution is any less effective than it was back in the day.

A tool doesn’t stop doing its job just because there is an alternative solution. Years ago, farmers didn’t necessarily have electricity and gasoline at their disposal. And yet, the work still got done. So here is an overview of 13 great hand- and human-powered tools that have stood the test of time. Any of them would find use on any modern homestead.

Now we aren’t suggesting you abandoned modern machines and tools. On the contrary, these modern marvels have their place and make it possible for one or two people to do work that might have taken a crew (or large family!) in the distant past. But farm hand tools are effective, efficient and generally easy to use.

In many cases, especially for small jobs, you can get farm jobs done faster by grabbing a simple hand tool than by taking the time to prepare a machine. Plus, there’s something to be said for the satisfaction and exercise of manual work. 

Pitchfork

I’ll go out on a limb and say that you probably don’t put up loose hay like they did in the old days. That’s no matter. You still need a pitchfork or two around your place.

Regardless of what type of hay bales you do use—small squares, large squares, round bales—there is always chaff and remnants left behind. Sometimes it’s out in the pasture where the cows have trampled hay into the ground. Sometimes it’s at the bottom of the stack inside the barn. 

Either way, a good pitchfork can help you make short work of the cleanup. Likewise, they’ll work equally well on similar materials such as straw or grass clippings. One will also turn the compost pile.

In a pinch, a pitchfork can also double as a garden fork. 

Wheelbarrow

Small carts pulled by UTVs or small tractors have their uses. So do tractor front-end loaders. But it’s hard to beat the simplicity and portability of a basic wheelbarrow. It’s small and maneuverable.

You can squeeze into a tight spot in the garden or down the barn aisle with ease. 

farm hand tools
Daniel Johnson

Rocks, sand, bedding, old hay, compost, mulch—wheelbarrows can handle it all and more. Again, it’s a matter of convenience. For many jobs, a wheelbarrow will work just fine. 

For serious farming tasks, contractor-grade two-wheeled wheelbarrows are an excellent option. They’re sturdier and less prone to tipping under heavy loads. Plus, you can maneuver them one-handed—a surprisingly useful time-saving function.

On the other hand, single-wheeled wheelbarrows might be more popular for people looking for something lighter and smaller.

Locking Pliers

Every farm needs several pairs of these indispensable hand tools. The name “locking pliers” is the generic name. The more familiar term in the U.S. is the brand name “Vise-Grip.” 

Regardless of the name, there are a few reasons why these tools are handy on the farm. They grip objects just like a regular pair of pliers. But they feature an extra-tension system that forces additional pressure onto the handles. It holds them without any other assistance.

This is incredibly useful for worn, rusty or otherwise stuck nuts—a scenario that is bound to occur on most farms. 

While not a replacement for your regular wrenches and pliers, locking pliers are handy for gripping, bending, twisting, removing and otherwise manipulating stuck nails, screws, metal and other materials. Use with care though. It’s actually possible to accidentally damage the item you’re trying to grip. 


Read more: Take care of your garden tools and they’ll take care of you.


Stirrup Hoe

Weeds beware! Unlike a traditional hoe—which you also probably need—a stirrup hoe features a sharp horizontal blade for slicing off weeds very close to the surface.

This is handy because it allows you to do some fast weeding of a large area in a short amount of time. Also, it doesn’t disturb the soil or crops very much. 

Ax

A basic ax—and the skills to use it safely and effectively—is another example of a situation where you can save time on small jobs.

You’re probably not going to split an entire winter’s worth of wood with an ax if you have a pneumatic splitter (though you could). But let’s say a single small tree or possibly a large branch falls in the pasture, on a fence or near the barn.

An ax might be just the tool to quickly trim branches, buck the log into a few manageable pieces and even split those logs into firewood, if needed.

Handsaw

“Hand” in hand with the ax should be a simple handsaw—something short, around 15 inches.

Provided it’s sharp (admittedly, they don’t last forever), this is a tool that is so simple, so lightweight and so efficient that you’ll find yourself saving time over and over if you keep one on hand. 

For small jobs and quick repairs, a good handsaw will cut through a 2-by-4, zip through fallen branches and even shorten a fence post quicker than you can say, “Put some gas in the chainsaw.”

Post Driver

No matter what kind of farming, gardening or homesteading you might do, odds are that sooner or later you’ll find a need for some T-posts. These incredibly handy steel fence posts are lightweight and come in various lengths from about 5 to 8 feet. They’re useful for constructing all sorts of temporary and permanent fencing. 

Post drivers can be used to build garden fencing, snow fencing to prevent unwanted winter drifts and certain types of animal fencing.

While gas-powered options for driving the posts into the ground exist, a hand-powered T-post driver is fairly easy to use as long as the soil isn’t super compacted. They are durable tools without any moving parts that should last many years.


Read more: Keep things secure with these farm fencing fundamentals.


Posthole Diggers

Manual, arm-powered posthole diggers are very useful farm hand tools. While you could put up an entire fence this way, powering through each hole by hand in a self-sufficient way, most folks turn to a 3-point tractor attachment or other machine for this job.

farm hand tools
Daniel Johnson

But for doing just a handful of posts, you almost can’t beat a hand digger.

Perhaps you have a couple posts that need replacing, or you have some kind of utilitarian or decorative project that only requires a handful of holes. Or maybe you have limited space around your project and need a fence hole in a tight spot that is impossible to reach with a tractor. 

Handheld posthole diggers are lightweight, simple and easy to use. One will get the job done very quickly. Sure, digging holes this way can be a real workout, but it’s still valuable if you don’t have dozens or hundreds of holes to dig.

Digging Bar

Make no mistake about this one. Whether you’re a fan of hand tools or typically opt for the machines, you need a digging bar around the farm. These are typically fairly heavy steel bars about 6 feet long, with a narrow blade (kind of like a large flat screwdriver) on one end and a tamping head on the other. 

Digging bars are easy to use and perfect for prying large rocks out of the garden or posthole that you’re digging, or tamping down the soil after replacing a fence post. You’ll find them useful during the winter for breaking up ice blocks or densely packed snow.

farm hand tools
J. Keeler Johnson

If your property has a history and was once an old-time homestead, you might even find a few hand-forged digging bars around the place. They’re useful and historic. Just be sure to wear goggles when using one.

Scoop Shovel

Looking a little like something off of an 1880s steam locomotive, scoop shovels are useful for much more than shoveling coal. Besides keeping one of these farm hand tools handy in the cattle or dairy barn for manure cleanup and bedding removal, you’ll likely want to keep another (read: clean!) scoop shovel around for various other tasks. 

Available in aluminum or durable plastic, scoop shovels are ideal for shoveling grain and moving around loose sand or similar materials. Besides that, scoop shovels make dandy snow shovels. They’re especially good at moving those thick, heavy, wet snows at the end of winter.

A scoop shovel can take big bites of snow, and then slide the load along the ground to a different spot, saving your back some effort. They’re useful for shoveling roofs, too!


Read more: A good shovel is key to good growing. Here are some tips for picking the right tool.


Garden Fork

And speaking of garden forks: When it’s time to get the garden ready in the spring and turn over the soil, you might initially think to choose a rototiller, maybe a stand-alone gas-powered model or a 3-point attachment for a small tractor. But don’t overlook the possibility of utilizing a garden fork instead and trying a no-till technique. 

There are plenty of potential advantages to a no-till garden. But you’ll still need to work the upper soil a bit to prepare it for planting. This is where your garden fork comes into play.

Additionally, garden forks are generally useful to have around the garden, ready to pick up piles of weeds or scoop up old plant material (such as all those spent tomato vines!) in the fall.

Cargo Sled

If your climate receives any amount of serious snow in the winter, invest in a cargo sled. Also called utility sleds, these robust, durable tools are perfect for moving bulky and heavy loads around the farm. On those deep cold winter days, after the trails and driveways around your barnyard have been freshly plowed, a cargo sled will easily haul loose materials such as straw and sand as well as things such as feed bags, small hay bales, bedding and more.

And after you catch up on the farm chores and are ready for some fun, cargo sleds are popular for carrying gear out onto the lake while ice fishing. 

You can pull cargo sleds with ATVs/UTVs and snowmobiles of course. But they’re pretty useful when pulled by hand, too. Just like a wheelbarrow, a cargo sled is maneuverable when used by hand and can fit into some tight locations.

Are you ready to get to work? You’ll be amazed at how much you can accomplish with these inexpensive farm hand tools. 

This article originally appeared in the May/June 2021 issue of Hobby Farms magazine.

Categories
Equipment

4 Measurements To Know When Choosing A Hitch Ball

If you’re a hobby farmer, you probably have a utility trailer (or two) around your farm. They’re useful in endless ways, from hauling supplies to transporting machinery and fetching/delivering hay.

Typically, a utility trailer is attached to a vehicle using a ball hitch, an ingenious invention both simple and effective in design.

A hitch ball (literally a round, metal ball on the end of shaft) is installed on the hitch of the vehicle. The tongue of the trailer fits snugly over this ball and locks into place.

Quick and easy? You bet.

I recently needed to purchase a hitch ball so I could tow my utility trailer around my farm with a garden tractor. But determining which one to buy is easier said than done, because there are many sizes to consider.

Indeed, there are four main measurements to consider when shopping for a hitch ball:

The Ball Diameter

While all the measurements are important, the diameter of the ball is where it all begins. Hitch balls come in several different diameters—1 7/8 inches, 2 inches and 2 5/16 inches are three standard sizes.

For safety reasons, you should never use an incorrectly sized ball. If your trailer requires a 2-inch ball, don’t try making do with a 1 7/8-inch model instead.


Read more: Choose the right vehicle to meet your towing needs, too!


The Shank Diameter

Shank diameter is also important to measure precisely. The shank, in case you were wondering, is the threaded bolt extending down from underneath the ball. The nut is threaded on this to secure it to the hitch.

Suppose you’re planning to mount the hitch ball on a tractor, and the opening for the shank measures 3/4 inches across. Make sure the shank of your ball is also 3/4 inches. A shank too wide won’t fit, and a shank too narrow will allow the ball to wiggle around and potentially cause issues.

The Shank Length

Don’t forget to consider the length of the shank!

You want to purchase a hitch ball with a long enough shank to thread through the hitch and still provide enough length for securely tightening the nut and locking washer. Measure your hitch to determine how long a shank you need.


Read more: Here are 4 tractor types to consider for your farm.


The Weight Capacity

You might assume any hitch ball that fits your trailer is suitable for use. But that’s not necessarily true.

Hitch balls have rated weight capacities that should not be exceeded. A light-duty 1 7/8-inch ball might be rated to tow 2,000 pounds. As balls increase in size, their weight capacities understandably increase as well.

Some of the toughest can handle 30,000 pounds.

When analyzing weight capacities, you should also consider the rating of your trailer (can it carry the amount you have planned?) and the hitch of your vehicle (can it tow the weight your ball is rated to handle?)

A hitch ball rated for 12,000 pounds isn’t much use if your vehicle’s hitch can only handle 5,000.

As you can see, choosing the right hitch ball requires some careful thought and consideration, as well as some checking of vehicle and trailer documentation. But finding the right size is well worth the effort. A sturdy hitch ball is an investment built to last.

Categories
Animals Large Animals

Alternative Therapies Can Help Farm Animals Live Better Lives

A decade ago, the mere mention of alternative therapies was enough to make most animal owners—and many veterinarians—roll their eyes with skepticism. Believed to offer most animals no true benefit, the conversation around acupuncture and chiropractic care generally stopped before it ever got going. And massage, laser and pulsed electromagnetic field (PEMF) machines barely even got a mention. 

Thankfully, these modalities, and many more, have become more mainstream. Today’s farm owners seek nonmedication means to help their horses, cows, dogs, cats and other barnyard beasts remain comfortable. 

Many of the modalities listed in this article are considered complementary. That means they’re often used in conjunction with Western medical practices, which treat symptoms and any problem as isolated from the rest of the body.

Alternative therapies take a whole-body approach in an effort to heal the whole person (or animal) instead of simply treating symptoms. 

Chiropractic Care

Chiropractic manipulation on horses—and any other vertebrate species—addresses problems in the back, neck and pelvis. Keepers can use chiropractic care to treat injuries, restore mobility and relieve pain in a plethora of animals, including horses and dogs.

A chiropractor will complete a hands-on exam looking for soreness, restricted motion and tight muscles. Once the provider locates problem areas, they apply controlled force to release the restriction or soreness. This restores range of motion, alleviating inflammation and pressure on nerves. 

Chiropractic care often helps in animals with biomechanical or neurologic issues. Dogs with hip dysplasia, neck pain, urinary and fecal incontinence often see improvement. Chiropractors can also help with muscle weakness, and chronic neck and back pain.

In horses, chiropractors often assist with back and neck pain. They also help with joint stiffness and gait abnormalities that aren’t associated with an obvious lameness and poor performance. You’ll often see results immediately.


Read more: Can farmers use CBD to help their livestock? We take a look.


Acupuncture

Acupuncture originated in China more than 3,000 years ago. It promotes healing by triggering specific points on the skin with thin, flexible needles. The needles produce tiny injuries that stimulate the body to respond. This influences tissues, organs, glands and body functions.

In traditional dry needling, the acupuncturist inserts thin, flexible needles into specific points on the body that correspond with issues such as allergies to osteoarthritis to chronic pain and everything in between. These needles enhance circulation to the area and increase the release of pain-relieving and anti-inflammatory substances in the body.

This especially benefits animals receiving pain medication, which can have unwanted side effects. Acupuncture can reduce the amount of medication needed to control the pain. 

In addition to pain relief, equine acupuncture can also address:

  • back soreness
  • lameness
  • nerve paralysis
  • colic
  • ulcers
  • heaves
  • anhidrosis (the inability to sweat)
  • infertility
  • osteoarthritis

Though it can help with many things, acupuncture can’t assist with healing open wounds, fractures or infectious conditions. 

Acupuncture can help dogs and cats with everything from allergies to degenerative joint disease. It also helps in treating asthma, allergies and kidney and liver problems, as well as easing the effects of cancer treatment.

Most farm animals become more relaxed through­out the course of the treatment. Acute conditions generally see relief with three to five acupuncture sessions. However, degenerative conditions may require acupuncture treatment at regular intervals. 

There are additional methods of acupuncture: 

  • electroacupuncture, where a mild electrical current passes through the needles
  • moxibustion, where a spongy herb called mugwort is burned to the needles
  • aqua-acupuncture, where a liquid (typically a B12 solution) is injected into the acupuncture points

Read more: Want more like this delivered to your inbox? Subscribe to our newsletter!


PEMF

If you’ve ever seen a MagnaWave or a Pulse machine, it’s easy to understand why there was so much suspicion surrounding its use. The machine uses long, flexible tubes to deliver a noninvasive, pulsed electromagnetic field to the treated animal.

animals alternative therapies therapy
Sarah E. Coleman

As unusual as it may look, science does back the modality. NASA actually uses PEMF to help astronauts stay healthy while in space. 

PEMF stimulates cell repair. It interacts with body tissues to speed up regeneration—particularly helpful after an injury. PEMF also increases bone density and speeds healing, as well as decreases pain and inflammation.

Approved by the U.S. Food and Drug Administration in 1979, it was first used by veterinarians on fractures in race­horses. PEMF is now used for a variety of reasons. It has helped horses with arthritis, kissing spine, suspensory tears, hoof injuries and open wounds. It can also benefit dogs with hip dysplasia. 

There are no adverse effects to using PEMF. You’ll see benefits immediately, but lasting effects depend on the frequency of sessions administered (i.e., the more sessions given in the beginning, the fewer treatments needed later). Furthermore, acute issues do best with multiple sessions per week for a few weeks, then re-evaluated.

It’s important to note that no modality should replace recommended veterinary care. Additionally, not every veterinarian possesses skills with alternative therapies.

If you use a person other than the animal’s primary veterinarian to administer alternative therapies, you should give all findings to the treating veterinarian as well. Our animals benefit when everyone works together as a team. 

This article originally appeared in the May/June 2021 issue of Hobby Farms magazine.

Categories
Animals Large Animals

The Joys & Sorrows Of Raising Lambs

Life is settling down with the new lambs, which really aren’t so new anymore! They’ve all had their first dose of CDT vaccine and are eating grain and hay like pros.

We did have one sad event, though. One of the lambs died just this week, very unexpectedly. This little ewe had had some problems almost from day one, such as pink eye that affected both eyes that may have impaired her vision in one eye.

We had taken her to our large-animal vet for that. But so when she began walking unsteadily and falling down this week, we took her in again.

Best Efforts

The vet was as perplexed as we were, especially when we found her temperature was 105 degrees F! (That is very, very high. Normal is 102 to 103 degrees F). The lamb was given two strong antibiotics, some pain reliever and a shot of vitamin B12.

I asked the vet what the B12 was for. She explained that she suspected that the lamb had neurological problems that had been present from birth. She explained that the B12 might help improve the lamb’s inability to stand well, as well as some shaking symptoms.

The vet also said the lamb’s weight was good and she didn’t seem to have any other issues. So we went home with a bag full of syringes of vitamin B12 and pain reliever. We also got instructions on how often to administer the shots.


Read more: Read about one shepherd’s experience with first-time lambing.


Dealing with Death

Sadly, she died the next day. When you have livestock, dying animals are something you inevitably have to deal with, even when you do your best.

We separated the lamb’s mother and put her in with a small group of yearling ewes that are only on pasture and hay right now. Previously, we had fed her and all the ewes producing milk grain each morning. The grain helps to maintain the ewe’s milk supply, which is needed by hungry young lambs.

By feeding her only hay, the ewe’s milk supply should dry up fairly quickly. I have been out to check on her once a day just to make sure that is happening.

Of course, the lambs get grain as well. They also love hay and boy, do they love going out into the green pasture to nibble on grass with their moms!


Read more: Here’s an overview of what you need for lambing season.


Joys of Growing Lambs

It’s fun to watch the lambs gather together in the field and “hang out” with each other. It’s a lot like human children at a large gathering. They find the other young ones far more fascinating than the adults.

Except, of course, when it’s time to nurse. Then each of the lambs will run to its mother and stick close for a bit.

Our one bottle lamb is nearly weaned. She is about a month and a half old, which is the age at which you are supposed to wean them from the bottle. Most of the information I have read says the lambs should be 20 to 30 pounds or between 30 to 45 days old.

I have not weighed her, but I am guessing she is close to 20 or 25 pounds.

At any rate, the amount of milk I offer has been drastically reduced … but that has not reduced her enthusiasm for seeing me and a bottle in my hand! She is quite noisy when she thinks it is time for a bottle, even if it is not due for an hour or two!

All in all, our lambs are growing well and are starting to look more like the adult sheep they will soon become.

Categories
Beginning Farmers Equipment Farm & Garden Farm Management

How To Easily Unwind A Drip Irrigation Line

When it comes to being a great grower, there is so much to know. And sometimes we can get caught up in the big stuff, from infrastructure to proper crop rotation. 

Yet, it is often the small things that make a real difference. Little techniques and tips, like how to hold a collinear hoe or fix a garden hose, are nuggets of wisdom that, when woven together, make a strong summer of great growing!

These tips on how to unroll pipe—from drip tape to heavy-duty drip line to even large diameter poly transport pipe—will hopefully help you  perform one of these little tasks a little easier!

Unwinding Drip Irrigation  

One of the most important jobs on a farm is proper irrigation management. But within this domain one has to learn to avoid kinking rolls of drip line when laying it down in a garden bed. 

It is a small detail, but often one that can cause much frustration—especially when you are doing it for the first time and the transplants are parched in the field. 

There are unwinders you can make and buy to help you. But you can easily do this job by hand. Indeed, it is not very difficult if done right. 

Essentially, drip irrigation comes in long rolls wound tightly. This can present a problem when unwinding if it isn’t done right. 

You’ll find two major types of drip irrigation:

  • lighter duty “drip tape” for vegetables
  • heavier-duty line (such as Blueline) for perennials

Read more: Do you have a farm water backup plan?


Lighter Duty

The lighter duty drip irrigation comes on a spool, and you can simply put rebar or pipe through it. One person (wearing gloves) can hold each end of the rebar and the other person can run it down the length of the bed, stopping at the end.

The holder can then cut the piece at the correct length. 

You can easily modify this to a one-person job by turning a wheel barrow upside down and setting the spool between the legs as the “holder.”


Read more:With dry farming, you can grow vegetables with almost no irrigation!


Heavier-Duty

The second type of drip line often comes without a spool. It is much thicker poly used for orchards and vineyards and landscaping. 

Because this drip irrigation line is so thick, there is much less in a roll and it doesn’t unwind as easily. If you kink it, or even worse kink the line multiple times, you can find yourself in a mess of a job unkinking the line or worse having to cut it and reconnect it with couplers. 

unroll unrolling drip irrigation line
courtesy of Zach Loeks

Unwind Right

However, I actually find this type of irrigation line is very easy to unwind by hand with two people performing a few simple steps. 

  1. Person one holds the roll perpendicular to the length of the garden bed. The circle shape should face down the garden beds, so you can actually “look through it and see the length of the garden bed. This may seem counter intuitive, but it is often where growers might make a mistake, lining it up as if it were on a spool. 
  2. Person two—the puller—walks down the length of the garden bed, holding the end of the drip tape.
  3. Person one keeps their left arm inside the roll to support it. Their right hand helps each successive coil come off the roll as it is pulled.
  4. Persons one and two mind the magic ingredient: pace. If the puller moves at a constant pace—not necessarily slowly, but at the same pace as the drip irrigation line unravels from the roll—the line will uncoil. Those coils will bounce along the ground like a sideways slinky as they progressively pull out into a straight line. This will prevent the blueline from kinking, so long as the puller doesn’t go too fast. 

You can use this same technique for larger rolls of 1-inch poly pipe. Indeed, on one project, we unrolled thousands of feet of 3-inch poly pipe using the same method.

The holder, however, was a tractor’s pallet fork. And the puller was a chain hooked into a drilled hole at the other end. Which reminds me of the beauty that any good idea can be scaled up or down!

Hope this helps lay your irrigation line!  

Grow on!

Zach

Categories
Podcast

Episode 8: Bonnetta Adeeb

This episode’s guest, Bonnetta Adeeb, calls herself “an extended mom” as the advisor for youth programs and farmer support programs. As the director of Steam Onward and the Ujamaa Cooperative Farming Alliance, she fosters the idea that anything you want to do in life, you can do through agriculture. Hear about how the youth in these programs are empowered to brainstorm (that’s “brain barf”) and put into practice solutions to real-world problems and how one particular brain-barf session led to the gardening and food sovereignty programs central to their work today.

Bonnetta also talks about the organizations’ role in supporting hundreds of farmers and gardeners as a seed hub since the start of the COVID-19 pandemic, why they’re focusing on seed saving, and how they developed their catalog of heritage and heirloom seeds. Perhaps most importantly, you’ll hear about how to learn your own seed story and the imperative to understand your family’s culturally appropriate seeds. Be sure to listen to the end for Bonnetta’s seed-saving advice, which she calls yucky but fun, and for info about how you can become a seed producer with the Ujamaa Cooperative Farming Alliance.

Steam Onward

Ujamaa Cooperative Farming Alliance

Categories
Food Recipes

Recipe: A Refreshing Strawberry Ginger Switchel

We have been experiencing an unusually hot and dry spring here in Minnesota, with record-breaking temperatures left and right. Working in the gardens, even briefly, leaves me dripping in sweat. I know much of the country is in the same boat. So this week I’ll share a delicious, refreshing switchel recipe with you! 

Switchel is a drink best known as a thirst quencher for the early American farmer. The roots of switchel, however, date back several hundreds of years, with links to England and the Caribbean.

The potassium-dense ingredients of switchel offer electrolytes, which makes this a perfect hot-weather drink for these steamy days.

Yield: 1 quart of switchel

Strawberry Switchel Ingredients 

  • 1.5 cups strawberries
  • 1 tbsp. fresh ginger root, peeled (about 1 inch whole)
  • 1 tbsp. organic apple cider vinegar, raw and unfiltered (with the mother)
  • 2-3 cups water, as needed
  • 1 tbsp. raw honey (or maple syrup)

Read more: Try this rhubarb shrub recipe for a refreshing, garden-grown beverage!


Directions

Wash and prep ingredients. Remove stems from strawberries and slice in half.

In a blender, add strawberries, ginger, honey and one cup of water. Then blend until the berries are completely broken down. Next, transfer the berry mixture into a clean quart canning jar, add the apple cider vinegar, and fill with cool water, leaving 1 inch of headspace.

Use a spoon to thoroughly stir together the ingredients.

Next, wipe the rim of the jar with a clean dampened towel. Apply the canning jar lid and tightly screw on the ring. Store the jar at room temperature, out of direct sunlight, for 24-48 hours.

After complete, transfer the jar of switchel to the fridge and enjoy within 2 weeks.


Read more: Make some homemade soda for a warm-weather treat!


To Serve

Pour switchel over ice and enjoy! If you are not a fan of the solids in your drink, use a fine mesh sieve to strain them out before consuming.

Switchel also makes a fantastic cocktail mixer. Just add a shot of your favorite liquor, mix and serve.

Side Notes

You can use frozen or fresh strawberries for this switchel recipe, though you do need fresh ginger.

Consider muddling in basil or other herbs to change the flavor of your switchel.

For a more prominent ginger flavor, add an additional tablespoon of ginger.

This recipe was adapted from WECK Small-Batch Preserving (2018) with permission from Skyhorse Publishing, Inc.

Categories
Animals Beekeeping Beginning Farmers Farm & Garden Flock Talk Poultry

Crested Cream Legbars Bring Perspective At Birchie’s Hobby Farm

“I think for me the desire to have a hobby farm stemmed from two places,” says Christie Birchfield from Birchie’s Hobby Farm in Georgia. “First, I love animals, and getting to combine that love with farm animals that are also beneficial to my family just made sense. My grandmother and an aunt had amazingly green thumbs, and I think that is the second place my desire to have a hobby farm grew from.”

Since starting her hobby farm, Birchfield’s lot has grown to include 29 chickens, bees and a productive garden that produces corn, pumpkins and beans. The flock of chickens also includes some particularly eye-catching Crested Cream Legbars.

We spoke to Birchfield about the daily joy of running a hobby farm and learning from bee behavior. We also got the details on the venture’s resident star goat, Poppy.

Starting with One Cucumber

Birchfield says that the gardening aspect of her hobby farm sprouted from a sole cucumber.

“I grew one cucumber, but my husband still believed that I could become a gardener and build me a large, gated, raised bed garden,” she explains. “We now have lots of things growing this year: tomatoes, eggplant, beans, cucumbers, zucchini, squash, melons, carrots, pumpkins and corn.”


Read more: Early July is a great time to plant cucumbers!


Modeling Human Behavior on Bees

“I am absolutely fascinated by the bees and learning so much by watching them and reading everything I can,” says Birchfield, talking about the decision to add bees to her hobby farm.

“I think the most fascinating thing that I’ve noticed about their behavior is just how harmoniously they work as one hive, each doing what they are built to do and completely focused on their common goal,” she adds.

“Apart from our hobby farm, I have a career in human resources. I’ve been helping build teams, coach teams and mediate conversations during times of conflict for almost 30 years. I think we could all learn a lot about team functions if we modeled the bees’ focus and ethic.”

Getting to Know Poppy the Goat

One of the stars of Birchie’s Hobby Farm is a young goat named Poppy.

“She is the social butterfly,” says Birchfield. “Poppy is very talkative and attentive. She is especially bonded to my husband but follows the rest of us around, too. She yells when she sees you and will keep talking until you have acknowledged her and given her head and ear scratches.”


Read more: Thinking about getting goats? There are a lot of reasons to add some to your farm!


Spotlighting the Crested Cream Legbars

“Truthfully, we added Crested Cream Legbars to the farm this past fall because I wanted a true blue egg layer, and they lay beautiful blue eggs,” says Birchfield of the chickens on her hobby farm. “Crested Cream Legbars are friendly, easygoing and easy to handle.”

“Our one adult rooster is also a Crested Cream Legbar and he is a beauty,” she adds. “He has proven to be a watchful and very attentive rooster for the flock.”

Gaining a Sense of Perspective

Birchfield says that she appreciates the way that running a hobby farm has given her the opportunity to learn new life lessons.

“Farm life isn’t all baby animals and picture-worthy staged shots,” she explains. “It’s hard work and can often be devastating work.” She adds that she went through a heartbreaking experience when one of her original flock hens, Brigitta, passed away last year.

“Running a hobby farm has helped me have perspective on things that I thought were tough before,” she says. “I realize that I can—we all can—do really hard things and let them grow us in the process.”

Follow Birchie’s Hobby Farm on Instagram.