If you plan to forage for wild mushrooms—and even if you’re growing your own mushrooms outdoors—making spore prints is an important skill to master. Fortunately, you don’t need much equipment to make mushroom spore prints. And they can afford valuable clues to help you get closer to identifying different mushroom species.
While plants produce seeds, mushrooms—the fruiting bodies of a fungal mycelium—produce spores. A single mushroom can release hundreds of thousands of spores.
As with plant seeds, mushroom spores differ in color, shape and size. You need a microscope to really study their shape and size. But you easily can determine their color by making spore prints.
Discerning a particular mushroom’s spore color can help narrow down an identification. This is particularly helpful for ruling out lookalike species.
To make mushroom spore prints, you need scissors, a small cup or bowl, and heavy paper or card stock in both light and dark colors. That’s because spore colors range widely. (For instance, if you want to confirm that you have a specific type of oyster mushroom like the ones I found in this video, you’d want to use dark-colored paper, because oyster mushroom spores are often white to pale lilac.)
So, whitish spores show up best on dark backgrounds. And spores in dark browns and black are easiest to see on light backgrounds. (Alternatively, you can make temporary spore prints on a pane of clear glass and then place the glass on either a light- or dark-colored background as needed.)
To start, cut the mushroom’s stem away from the cap, so that the cap will lie flat against your paper. Place the cap with its spore-releasing gills facing down. Next, cover the mushroom cap with the cup. Don’t jostle or disturb the print-in-progress for the next several hours.
When it’s time to peek at your mushroom spore prints, remove the cup and gently lift the mushroom cap from the surface of the paper. You should be left with a clear outline of the mushroom’s gills and other internal structures—made up of its own colorful spores.
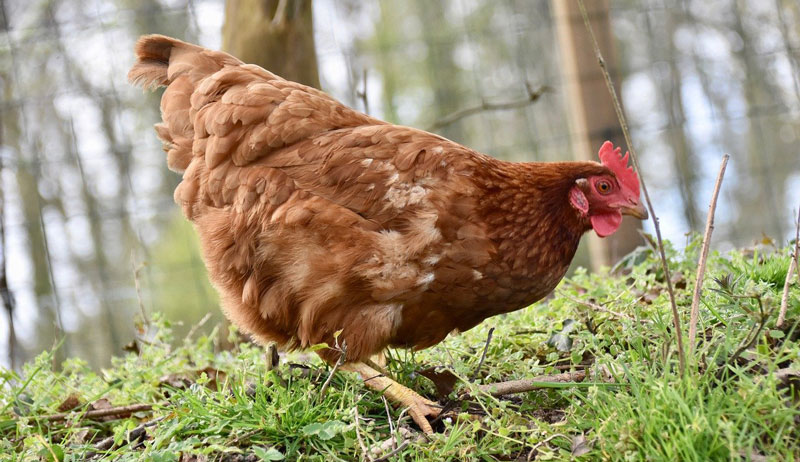
Whether your flock roams a pocket-sized suburban backyard or a pristine stretch of land multiple acres in size, there’s no doubt that free-ranging chickens experience plenty of healthful benefits. Exploring the grounds, pursuing butterflies, chasing chipmunks and other distractions all keep your hens active and exercised.
Not only is your property their playground, it’s also their smorgasbord, with a seemingly unlimited variety of insects, fresh berries and tender greens to snack on.
Their scratching naturally unearths tiny pebbles and grit necessary for digestion and endless options exist when it comes time to dust bathe or snooze in the sun. From your chickens’ perspective, free ranging may be the next best thing to heaven.
But even paradise has its problems. And your girls might encounter dangers where and when they are least expected. Keep an eye out for these four threats to foragers.
Predators
Being away from the shelter of a coop or the protection of a run paints a target on the back of a foraging chicken. While most predators are nocturnal, some—such as hawks, foxes and weasels—operate during daylight hours.
Furthermore, nighttime hunters such as coyotes, bobcats and raccoons are becoming increasingly diurnal. And they are doing so in urban and suburban areas as they adapt to vanishing habitat.
Dogs and cats (especially feral felines) also pose a danger to free-ranging chickens.
To minimize the threat posed by wild animals—and by neighborhood pets—meticulously maintain your property. Mow and weed-whack frequently. This not only allows you to keep your birds in sight, it also removes the tall grasses in which predators conceal themselves.
Remove any cover that provides predators a place to perch and dispose of accumulated yard junk under which hungry hunters can hide. Fence your property in if you can. If not, create a chicken run large enough to allow your flock to roam freely within while still safely enclosed.
The ability to forage freely is one of the key benefits to free-ranging your flock of chickens. They are able to feast on fresh dandelion greens, clover, nettles and chickweed to their heart’s content.
Chickens aren’t the most discerning eaters, however, and they can and will get into plants that can hurt them.
I had to give away my beloved irises because our Orpingtons would constantly dig up my front garden to get to the bulbs, which are poisonous to poultry. Azaleas, begonias, daffodils, lupines and tulips all adversely affect chickens, causing vomiting, disorientation, weakness, labored breathing and more.
Other popular garden and landscaping plants that can be—or are—lethal to chickens include:
To protect your flock from ingesting a potentially toxic plant, enclose your vegetable garden and install ornamental (and practical) fencing around your decorative landscaping to keep ranging chickens out.
Recognize and remove dangerous wild plants from your yard by hand. (Using herbicides simply replaces one poison for another.)
At least once a month, I drive by the sad remains of a chicken that failed to cross the road to get to the other side. In our rural residential zone, many of the poultry-keeping residents allow their birds to range unchecked. And, for reasons that have stumped joke-tellers for decades, roads seem to attract curious chooks.
I cringe each time I head into town or to the nearby nature preserve, knowing full well that a chicken might dash out in front of my car at any moment. Driveways can be just as perilous to roaming birds, especially if you don’t check your rearview mirror to make sure the coast is clear before pulling out of the garage.
As if cars and trucks weren’t enough, our silly birds are just as likely to run right in front of a lawn mower, tractor and brush hogger.
The only measure that has succeeded in preventing poultry-vehicular accidents is keeping the chickens contained. In areas where there is a lot of road traffic, this may be the only option to keep your hens safe.
People
Not all neighbors are nice. You may love your chickens with all your heart and never suspect that your neighbor has absolutely had it with egg songs and clucking.
One flock-keeping friend lost a hen every couple of weeks a few years back. He thought that perhaps his girls were being picked off by coyotes. Nope.
It was the little old lady next door, who was sick and tired of seeing free-ranging chickens in the field next to her house (which belonged to him). She had her adult children do away with the hens.
We experienced something similar with a former neighbor, a city-dweller who chose to move near our poultry farm. One day he decided he’d had enough of our quacking ducks and gobbling turkeys.
If communication fails to resolve issues between yourself and an angry neighbor, be prepared to fight for your right to farm. Contact your state’s Department of Agriculture to learn the requirements for a Right to Farm determination. This status overrides any municipal regulations and protects you—and your birds—should you choose to involve the authorities.
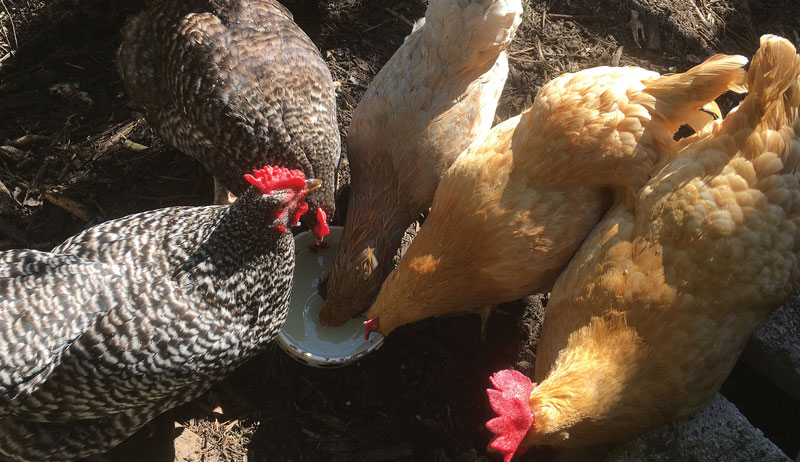
Chicken-keeping can be fun and easy if you have the right equipment. But choosing the perfect products is essential to enjoying your poultry, especially when dealing with everyday items, such as feeders and waterers. When selecting them, it’s important to pick models with convenient features appropriate for your chickens and location. Other factors to consider include types of poultry waterers or feeders, construction material and cost.
Any equipment you acquire should have a minimum capacity of feeding and watering your flock for an entire day. Poultry feeders or waterers should also:
keep the water and food clean and free of droppings
not leak, drip or clog
be easy to clean and refill
Although larger capacity feeders and waterers cost more, the benefits of not needing to maintain them daily are enormous. So, keep in mind that flocks tend to grow, and consider purchasing higher capacity models.
Capacity Requirements
Chickens are made up of about 50 percent water, and eggs are about 65 to 75 percent, so a continuous supply of fresh, clean water is critical to chicken health. Depending on your birds’ size, they’ll drink one to two cups of water per day and can drink double that during hot weather.
That means that a 5-gallon poultry waterer might provide water for 10 average-size chickens for about four days.
2 cups x 10 chickens x 4 days = 80; 80/16 cups per gallon = 5 gallons
If you are located in a region with cold winters, the best poultry waterers are those that automatically prevent freezing. If you are located in a warmer climate, heated waterers aren’t necessary, but your chickens may drink double the amount that chickens in cooler conditions do.
An average-size chicken eats about 4 ounces of feed per day. So the example of a 10-bird flock would need a minimum of 2½ pounds of food per day. A feeder with 10-pound capacity would last them about four days.
4 ounces x 10 chickens = 40 ounces; 40 ounces/16 ounces per pound = 2½ pounds; 2½ pounds x 4 days = 10 pounds per day
Obviously, chicks or bantams require less food and water, while larger birds use more. And flocks with more than 10 birds should have multiple poultry waterers and feeders so all the chickens have easy access. Size your equipment for the number and size of your chickens as well as your desired refilling frequency.
Lesa Wilkes
Construction Material
Poultry feeders and waterers are typically made of either plastic or galvanized steel.
Plastic
Plastic models generally cost less and are easier to clean but can crack if dropped or exposed frequently to freezing conditions.
Metal
Metal models are sturdier, last for many years and don’t crack like plastic. However, they’re also heavier to clean and refill.
Galvanized
Galvanized waterers shouldn’t be used if you intend to put apple cider vinegar in your chickens’ water. (The acidic vinegar may cause toxic residue to leach into the water.)
Chicken waterers come in three basic varieties. The simplest are just buckets, bowls or water troughs. But, because chickens tend to roost on these and put their droppings in the water, none of them made this list of recommended waterers.
The other two types of poultry waterers are those with a gravity-fed, self-contained reservoir and those that automatically refill.
Chickens don’t drink water at night when they’re roosting, so it’s not essential that waterers be placed in the coop. However, they do need water right away in the morning when they wake. Remember to place or hang waterers at a height that is convenient for your chickens.
Gravity Fed
Mason Jar
These are simply mason jars screwed onto a metal or plastic base and are great waterers for chicks, as tiny chicks can drown in waterers intended for adults. However, they shouldn’t be used for mature chickens because they don’t hold enough water and can easily tip over.
These are generally affordable, easy to clean and refill, and come in many sizes. They can be hung or set on the ground and allow you to see the water level. Multiple chickens can drink from the basin created between the base rim and the water reservoir above.
The Harris Farms Hanging Poultry Drinker, 5 Quart or 3.5 Gallon, is a reasonably priced model that also has a domed shape to prevent chickens from roosting.
Galvanized Steel
These operate and come in sizes similar to plastic poultry waterers, but they’re heavier and you can’t see the water level inside. They tend to be a bit more expensive but last longer and are rust-resistant.
Because they’re heavier than the plastic models, they’re more difficult to knock over if you’re setting them out rather than hanging them. The Harris Farms Double Wall Poultry Drinker, 2 Gallon or 5 Gallon, is made of heavy-gauge galvanized steel.
Heated
If you live in an area that has freezing weather, a heated waterer is highly recommended. However, they do require electricity.
Another option for creating a heated waterer is to set a metal poultry waterer on a heated base. The Farm Innovators Model HP-125 Heated Base For Metal Poultry Waterers, 125-Watt is a heated base that is thermostatically controlled to operate only when temperatures fall below 35 degrees Fahrenheit.
Automatic
Nipple
These are plastic buckets fit with nipples along the bottom that the chickens drink from. They’re usually easy to refill, you can see the water level and they keep the water cleaner than a plastic or steel poultry waterer. They also tend to keep the coop drier if using them inside.
Nipple waterers can be more difficult to clean, and there is a learning curve for the chickens to adjust to them. The RentACoop 5 Gallon Poultry Nipple Waterer is constructed of 100 percent food-grade and BPA-free plastic. It has four nipples to accommodate four birds at a time and comes in either a center- or corner-placement configuration.
Its cone lid prevents chickens from roosting.
Drinker Cup
These automatically fill small cups from a bucket reservoir above. The water entering the cups is typically very clean because the reservoir is sealed. However, the cups do tend to collect dirt and can be difficult to clean.
The RentACoop 5 Gallon/4 Automatic Water Cup Chicken Waterer accommodates four birds at a time. It comes in center- or corner-placement configuration and has a cone lid to prevent chickens from roosting.
Hose Attached
The Auto Poultry Waterer with Cover from Stromberg’s Chicks & Game Birds includes a 3⁄4-inch hose that attaches to a standard garden hose for a continuous flow of fresh water for your poultry.
Automatic float controls the water level so there is no spilling or overflow. An oversized cover extends beyond the edge of the bowl to prevent roosting and keep debris out of the water.
Feeder Types
Poultry feeders come in two basic varieties—free standing or hanging. When selecting feeders, choose models that are rodentproof and prevent chickens from wasting feed (by billing or scratching it out).
When hanging feeders, hang them at a height convenient for your chickens (about chicken back-height).
Free-Standing
Mason Jar
Like mason jar poultry waterers, these feeders are created by screwing a mason jar into a metal or plastic base. They are only intended for chicks because they don’t hold enough food for adults, and mature birds tip them over easily.
These feeders are designed so that the birds must stand on the treadle to open the food trough. That makes it nearly impossible for the chickens to waste feed, and they’re generally weather- and rodentproof. However, they cost more than other feeder types and aren’t suitable for chicks.
The RentACoop Treadle Feeder 40 LBS is a secure, high-capacity, galvanized feeder. The treadle can be adjusted to accommodate lighter or heavier breeds, and feeder extensions can be purchased to expand the capacity up to 70 pounds.
This style forces birds to reach into the feeder to get food thereby minimizing waste. The covered design allows for inside or outside use. The RentACoop 2 Port Chicken Feeder is made of food-grade and BPA-free plastic and comes fully assembled and in center- or corner-placement configurations.
A cone cap prevents chickens from roosting, holds 20 pounds of food, can accommodate four to six chickens at a time and is generally rodentproof. It’s only for chickens older than 12 weeks as younger birds could become trapped inside.
Lesa Wilke
Plastic Feeders
Plastic hanging feeders cost less and are easy to use. The Harris Farms 1000297 Free Range Hanging Poultry Feeder is a basic feeder that is easy to assemble, clean and fill. It should be used indoors since it’s open on the top. It has a 7-pound capacity and has spokes at the base to prevent chickens from billing out the food. The transparent plastic makes it easy to monitor how full the feeder is.
Stromberg’s Chicks & Game Birds’ Feed Saving Plastic Hanging Feeder is a medium-sized hanging feeder with a built-in, feed-saving grill and trough lip. The grill helps prevent feed waste by reducing the back-and-forth head action that birds use to sweep feed out of feeders. The cylinder has a capacity of up to 20 pounds.
Galvanized Steel Feeders
These are similar to plastic hanging feeders but are made from galvanized steel, making them heavier and sturdier. The Harris Farms 1000293 Galvanized Hanging Poultry Feeder has three adjustments to accommodate different size birds. Its capacity is 15 pounds.
The waterers and feeders described in this article are just the tip of the iceberg. Shop around before you decide. Consider variables such as capacity, cost and desired convenience level to identify the models perfect for keeping you and your flock healthy and happy.
Sidebar: Homemade Suet Cakes
It’s easy to make homemade suet cakes, and your flock will love them. You can make these whenever you have leftover grease (from cooked meat such as hamburger, steak or pork) that you would normally throw out. Ingredient proportions vary depending on how much grease you have on hand.
Ingredients
unsalted nuts (peanuts are particularly good), sunflower seeds, cracked corn, raisins, dried cranberries or other dried fruit (You can also start with high-quality wild-bird food containing these)
grease (It’s best to avoid grease from bacon containing nitrites or nitrates)
Preparation
Chop the nuts and put them in a small freezer-safe container. (I use plastic freezer storage containers.) Add the sunflower seed, cracked corn and dried fruit.
Add the slightly cooled grease (if your grease is already solidified, just microwave for a few seconds), and stir to blend the mixture. After mixing, store the suet in the freezer.
You can add additional layers of suet as time goes on until you are ready to feed the chickens. When ready to serve, remove the suet cake from the container and place it in a metal suet feeder in the chicken coop.
This article originally appeared in the May/June 2021 issue of Hobby Farms magazine.
When my wife (aka our livestock manager) Chris and I first became acquainted, she told me that she had previously been a vegetarian for a number of years. I asked her why she had come back to the dark side of eating meat (but not our chickens).
She said there were two reasons. First, socializing had been difficult. Some dinner party hosts thought she would be happy with a minimalist salad. Second, potlucks were unlucky affairs.
This was decades ago, a time when general knowledge about vegetarianism was limited. During those old, backward days, I told my sister over the phone, that my girlfriend-at-the-time was a vegetarian. She paused, and I’m sure she was trying to imagine what she would serve us for dinner when we visited. Then she asked, “Can she eat rice?”
Meat & Veg
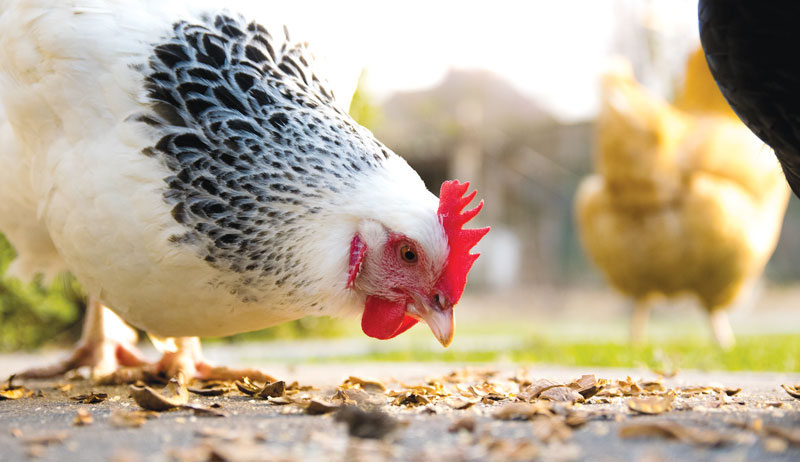
Knowledge and acceptance of vegetarianism has grown at a similar pace to the adoption of backyard chicken-keeping since then. And somewhere along the way, it seems that some chicken-keepers have conflated the two things a little bit and believe that chickens also have a culture of vegetarianism.
I mean, the ingredients on the bags of some organic chicken feed don’t list any animal products, right?
Granted, everyone knows that chickens eat bugs in addition to seeds, fruits and greens. But I believe that most people don’t think of bugs as meat. And therefore, the notion of our sweet little hens as being essentially peace-loving vegetarians has become commonplace in some circles.
But chickens are really just pocket-sized dinosaurs, descended as they are from mouthy beasts such as Tyrannosaurus rex. Have you ever seen a chicken chase, catch and eat a little toad or a mouse? If so, you might think that the chicken’s Latin name should be Tyrannosaurus pecks.
If your yard sees few toads or mice, your hens can also get their chase-thrills met with a bag of live crickets bought from the pet-supply store or a bait shop for a backyard cricket rodeo.
Poultry Pyramid
A colleague of mine described what he thought of as a four-layered food pyramid for chickens.
Starting at the top is their favorite: bugs
Then: fruit
Next: seeds
At the wide bottom of the pyramid: greens
But I think that’s incomplete. It makes more sense to think of our hens’ food pyramid as having five levels. At the top is: meat.
And to meet their desire for meat, my wife and I let our chickens pick clean bones of lamb, pork and beef. We don’t give them poultry bones. That would be weird.
They also get in a tizzy for shrimp shells, lobster shells and fish skins. We haven’t noticed those aromatic scraps messing up the eggs’ flavors at all.
Frank Hyman
Bacon Bits
Another reason my wife gave up vegetarianism? She missed bacon. And, it appears, so do our chickens. Whenever I cook up a mess of bacon (I’m a Southerner, and I need my daily dose of pork products), I pour the hot, liquid bacon fat into two small bowls. This goes into the fridge to solidify.
We keep one bowl to cook with, and we give the other to our chickens. We’ve even trained some of our neighbors to bring bacon fat to the chickens in exchange for a few eggs.
I’m sure some readers cringed at the mention of bacon fat. My Yankee wife didn’t want it in the house. But she came around when I pointed out how many of the chefs she admires cook with it.
Bacon fat that doesn’t get repurposed for cooking in American kitchens or fed to animals either goes down the drain or ends up in the landfill. Did you know that fat from food companies and restaurants often gets added to animal feed?
Fat poured down kitchen drains creates what are called “fatbergs,” congealed fat blobs that cause wastewater to back up in the sewer pipes. That’s just as yucky as it sounds. I recommend that you don’t look online for photos of fatbergs. You can’t unsee those images.
Fat and other organic matter in the landfill isn’t much better. It turns into methane gas that escapes into the atmosphere. Methane is even worse than carbon dioxide from your car at causing the climate disruption that melts ice caps and inflames other environmental disasters such as hurricanes, wildfires and tornadoes.
So not only is re-purposing bacon fat a tasty option, but it’s an ecological imperative that we turn excess bacon fat (and other cooking fats) into delicious fresh eggs … if you ask me.
I’m not worried that our birds will get too much salt from these drippings. They pace themselves. That little bowl of fat lasts two or three days. As omnivores, chickens like to switch things up. After a few sticky mouthfuls of bacon fat, they scratch for some bugs or scavenge other vegetable scraps from our kitchen or beak-tap the vermin-proof, 5-gallon bucket “vending machine” for some organic layer pellets.
Ivan Protsiuk/Shutterstock
Meating Their Needs
Historically, chickens were never vegetarians. Even as Southeast Asian jungle birds millennia ago, they were opportunistic omnivores, like us. And their food decisions only had to meet four opportunistic criteria.
Can I catch it?
Can I fit it in my mouth?
Having answered question Nos. 1 and 2 in the affirmative, does the taste or smell indicate that I’ll barf my guts out if I swallow this item?
If the answer to question No. 3 is “inconclusive,” swallow it anyway, because if I spit it out, someone else will eat it and then I’ll feel like a fool.
And chickens’ diverse dietary tastes aren’t unique. Surprisingly, the division between herbivores and omnivores in the natural world isn’t as clear-cut as we once thought. It’s more of a spectrum than a yes-or-no option.
You can find videos online of these healthy herbivores eating scavenged meat: deer, antelope, cows, horses, hippos, orangutans, chimps, gorillas, squirrels, elephants, manatees, kangaroos, goats, giraffes and, yes, even rabbits have been caught on film eating fish, birds and mammals.
Evolution has always favored animals that are opportunists over the picky eaters. Two of the most endangered animals on earth are koalas and panda bears. The first only eats a few species of eucalyptus leaves. And the second is mostly jonesing for a few species of bamboo shoots and leaves.
Critters with the widest interest in types of foods are more likely to survive the erratic seasons and changing conditions that existed even before we humans skewed the climate.
So, for backyard chickens to eat meat isn’t some urban anomaly. It’s how they roll.
I’m not saying that if your household is vegetarian, you have to feed meat to your chickens. I’m just saying your chickens would welcome the sort of nonjudgmental inclusiveness that permits your neighbors to earn a few eggs and help save the planet by recycling their meat scraps in your hen pen.
This article originally appeared in the May/June 2021 issue of Chickens magazine.
It might be too early to claim a complete and total victory—there are probably a couple more isolated “battles” left to fight. And I know the opposition may never completely surrender.
But that’s okay. Because on the whole, I think my fencing has finally allowed me to win the war against deer in my orchard.
Initial Invasion
The process began in 2018, when I planted a bevy of young plum and apple trees to serve as the foundation of a new orchard. The chosen locale was at the top of a sunny hill, in an open field surrounded on three sides by forest.
It’s here where the snow first melts in the spring. The ground warms quicker here than the surrounding lowlands. And I often see deer here, sometimes in herds of 20 or 30, grazing on the brown turf as winter transitions into spring.
Deer have roamed in large numbers across my farm for years. They make themselves at home in my gardens and orchards.
In the past, the luckiest fruit trees have survived their annual winter prunings from the teeth of the neighborhood ruminants. But others just gave up the fight, either from over consumption or from antlers scraping off bark.
Suffice to say, I wasn’t about to let my new orchard become a preferred stomping grounds for the local deer population. The first year, I put up temporary fences around every tree, using T-posts and welded wire to do the job.
The results pleased me. Deer still roamed between the trees, but they couldn’t actually reach them to inflict damage.
During the second year, I continued to build temporary fencing around each new tree. I also began work on a formidable perimeter fence to enclose the entire orchard. Across the front of the orchard field, I used wooden posts and welded wire to create an attractive entrance.
Then I ran black plastic deer fencing through the three woodland sides of the orchard. I used trees as fence posts in order to reduce costs.
My perimeter fencing performed reasonably well during its first winter. But an ice storm caused some damage, and a deer did get in at one point—I found the tracks.
So in year three, I threw my full attention into improving and strengthening the perimeter fence. In any location where the fence sagged or suffered damage during the winter, I added T-posts. I reinforced the black plastic with welded wire and made sure everything was as strong and tight as it could be.
And I also took a gamble. I planted over a dozen new trees during the third year, but I didn’t erect temporary fencing around them. I decided to trust my improved perimeter fence to protect them over the winter, when deer seem most likely to start munching fruit trees.
Success!
Fortunately, my efforts paid off. My perimeter fence performed beautifully. It remains in perfect shape this spring.
No deer have visited my orchard through the first five months of year four. I’ve happily taken down all the temporary fences around my trees, unquestionably enhancing the aesthetics of the young orchard. Best of all, I can now use the pieces from my temporary fences to reinforce the perimeter fence and elevate its durability to another level.
Hobby farmers, this calls for celebration! Sometimes, the battle to protect our gardens and orchards from animal and insect pests can be overwhelming. But as my successful defense demonstrates, it’s possible—with enough time, effort and investment—to score an occasional victory.
The first things everybody gets when they move to a homestead or small farm are chickens! Small, easily moved and confined, chickens seem as though they should be the easiest, simplest—and cheapest—livestock to start with on a small farm.
Or so we thought when we began our farm, the Sow’s Ear, 20 odd years ago. But like so many other folks, we quickly discovered that it wasn’t that simple!
Farming for Feed
It has never made sense to us that a farm—the place where food comes from—should have to go to the store to feed its animals—or its people! And yet how often is the feed bill the downfall of a beginning homesteader?
Since those early days when our chickens plowed their way through tons of grower ration and laying mash, finding ways to ease our reliance on the feed-supply store has been one of the guiding efforts at the Sow’s Ear.
Chicken feed was an issue from the beginning.When we added up the costs of our first two years of raising chickens, we were amazed at how feed costs raised the price of our “free” homegrown eggs.
Other problems existed, too, such as unwanted chemicals and genetically questionable food sources. Unless we bought more expensive organic feed, our chickens were almost certainly eating genetically modified corn and soy, soaked in herbicides.
If they were eating undesirable ingredients, then so were we. We knew we’d have to find an alternative.
Almost 25 years later, our chicken-feeding regime has changed a lot! Today, we feed our flocks of laying hens, pullets and meat chickens an inexpensive diet of homegrown or locally-grown grains supplemented with high-protein, vitamin-rich additions sourced from right here on our farm.
This menu keeps our birds healthy and active, while laying lots of natural and chemical-free and GMO-free eggs for just a few cents a dozen. And eggs grown without GMOs—and with no corn or soy—command a really special price in the local egg market.
blessingscaptured/Shutterstock
Pasture Makes Perfect
The first step to feeding our chickens a healthy, cheap and farm-produced diet was right outside the door. We mean pasture, of course!
While birds that live in confinement depend on us for their every need, if we give them access to their natural habitat, they can do a good bit of scrounging for themselves. Leaves, seeds, bugs and worms make a significant contribution to the dietary needs of our laying hens and broilers.
Pen Pals
We don’t just turn our birds loose, though. We find that mobile, bottomless pens give our birds the best of both worlds. Moved once a day, these chicken tractors provide fresh pasture and a clean floor every 24 hours.
While fully free-range poultry do have a wider area in which to search for food, chickens in movable coops are protected from predators. Plus, they never hide their eggs where we can’t find them!
Furthermore, chicken tractors let us direct our chickens’ efforts where they will be the most beneficial for the whole farm, such as on empty garden beds. We often graze our chickens on cover crops and green manures that double as nutrient-rich chicken feed.
Chickens love buckwheat, a high-protein grain alternative, and will harvest it for themselves. Just pull their tractor pen forward on a fresh patch every day. And while you can use your tiller to incorporate a spring green manure of oats and Canadian peas into the soil, it’s much easier to let the poultry take care of that chore while they harvest a good proportion of their dinners at the same time.
Pasture is the first step toward noncommercial chicken nutrition. Leaves and seeds—not to mention bugs and worms—are a great start to a good chicken diet. But if we want to be sure our birds are getting enough nutrition to grow (and to lay eggs), we’ll need to offer something more.
Beth Dougherty
Good Grains
Everybody needs energy! And energy comes from carbohydrates, foods such as grains and starches. Grains are the traditional source of energy for poultry. In commercial feeds this is usually genetically modified corn.
Needless to say, we were looking for something different. Non-GM corn can be hard to come by. Even heritage varieties readily cross-pollinate with their genetically modified neighbors.
Luckily, other grains—such as oats, wheat and barley—and pseudo-grains such as buckwheat—are just as good for chicken food. Some are even better. And all four can be grown in zone 6 climate in central Appalachia where we live.
In the summer, we grow a lot of buckwheat for the chickens to self-harvest. But wheat is our go-to for the bulk of our poultry grains. This is because wheat has a higher protein profile than most conventional grains: 11 to 14 percent, rather than 9 to 11 percent.
And, just as importantly, commercial wheat isn’t genetically modified.
Because it hasn’t been gene-spliced to withstand herbicides, wheat is more likely to be grown without toxins. That makes wheat a winner with us. What we don’t grow ourselves, we buy directly from local farmers at the commodity price. That’s just a few dollars per 60-pound bushel.
Eggs and feathers are made of protein. While a chicken diet of grains and pasture can be adequate for a hen’s maintenance, we want to feed her some extra protein if she is going to lay us a generous number of eggs.
For good laying, 16 percent protein is generally considered adequate. More protein means more eggs. Fortunately, a homestead grows lots of spare protein, if we know where to look.
First, there’s milk. At the Sow’s Ear, we’ve kept goats and cows from the very beginning. After all, these animals eat for free! And anyone who milks knows that where there is a dairy animal, there is almost always extra milk.
It turns out that chickens love milk. Historic farm texts all consider milk a must in the chicken pen. Fresh, sour or clabbered, all milk is welcome. And its high-quality proteins are exactly what a hen needs for egg-laying. It’s even probiotic!
Any kind of meat—except poultry—makes a good offering in the chicken house. Whenever we butcher a hog, sheep or steer, the organs we don’t want for our own consumption are ground or chopped and fed to the chickens. Often there is so much that we freeze it in fist-sized lumps so we can use it over a long period.
Leftover meat from our own table is just as appropriate. Aand a little goes a long way. Our chickens go into a feeding frenzy when there is meat on the menu.
andrekoehn/Shutterstock
Seed Savings
Then, to fill out the protein requirements of our birds when milk and meat scraps aren’t available, we use high-protein seeds such as sunflower (20 percent) and squash or pumpkin (30 percent).
They’re easy to grow and harvest, and store passively. We hang sunflower heads from the rafters of an outbuilding, and store pumpkins and winter squash in a cool room in the basement. They keep through the winter.
Feeding them out is simple, too. Sunflower heads can be stuck through the chicken wire walls of our poultry tractors. They’ll hang there while the birds peck the seeds out for themselves—protein and exercise in one step.
Split a squash or pumpkin and offer the whole thing. Or just scoop out the seeds and put them in the feeder.
Farm-raised protein is a game-changer. With so many ways of providing protein from the farm itself, we never need to purchase expensive or questionable chicken treats. And we never have to worry that an interruption to delivery will leave our chickens hungry.
The Daily Routine
Of course, wet feeds such as soaked grain, clabbered milk and squash seeds aren’t going to work well in those fill-it-and-forget-it commercial feeders that you may have used for dry crumbles or pellets. When we switched to whole grains and farm-raised proteins, it meant that we began to carry feed to the poultry by hand, twice a day.
If that sounds like more work than just filling a feeder, it is. And the rewards are many.
Regular, attentive trips to the pen at feeding time mean we notice the behavior of individuals.
Is every bird getting her share of the feed?
Are all the animals active and alert?
Did the chickens clean up the feed from the previous meal?
What feeds are their favorites?
All these questions and many more find answers when the chicken-keeper is there at feeding time. And there is a distinct advantage in the waste avoided when birds are hand-fed. You serve only what your animals will eat, with no free meal available 24/7 to the barnyard rodents and sparrows.
A single bird’s daily ration of commercial feed is usually 1⁄4 pound, and that quantity is about right for any grain-based feed. But since our chickens are also enjoying high-protein supplements, their feed ration can vary a little from day-to-day.
Still, the 1⁄4 -pound recommendation is a good rule of thumb, with half offered morning and half in the evening. We offer their protein with the morning’s grain. The evening feeding is grain alone.
This means our girls go to roost with their crops full of slow-digesting grain. Their stomachs stay full during the night.
Extraordinary Eggs
Natural foods like these really seem to bring out the best in our birds. Our chickens, ducks and turkeys gobble up their morning and evening feed with real delight.
At the Sow’s Ear, natural conditions are important to us. We aren’t looking to break commercial records. But we do want to see good utilization of feed and to get a return on our labor. And this diet delivers.
Like the best preindustrial, naturally-raised farm poultry, our birds lay about 200 eggs a year for three or four years at least. (Commercial birds today are expected to lay more than 300 eggs, but only for one year. They’re then sent to the soup cannery.)
With feed costs as low as ours, that means we might have 50 cents in a dozen eggs. And that comes with free tilling, manuring and bug-eating services!
Easy Marketing
Marketing our soy/corn/GMO-free eggs is easy. Although we place a substantial price tag on our exceptional eggs, we don’t have a problem finding folks who want to buy them. A sign by the road and an ad online bring us all the customers we need.
All sorts of people seek (and seldom find) eggs like ours, including:
People on restricted diets
Folks who struggle with autoimmune conditions
Parents of children with allergies
Health-conscious eaters
They are happy to pay two or three times the usual price for ordinary farm eggs to get food they know is natural and uncompromised.
At that price, we don’t need to sell many eggs to make a good profit. So we aren’t tempted to overproduce or cut corners. When it comes to keeping things natural, smaller really is better.
That’s all there is to it! Poultry-keeping doesn’t have to be complicated, and it doesn’t have to break the bank. What it does take is attention, daily commitment and respect for how nature is designed.
The rewards are tremendous for the whole farm.
Sidebar: Cold Storage
Even in cold weather, we can offer our birds fresh pasture. We winterize their tractor homes with plastic sheeting so they can graze frost-resilient beds of green wheat and turnips.
When no other fresh food is available, we hang whole plants of kale, mangel-wurzel or daikon radish in the pens. The birds tear them up! The bright orange yolks in our breakfast eggs show us how much good we are doing!
Sidebar: Fermented Foods
Chickens are happy to eat dry grains. But soaking, sprouting and fermenting all increase available nutrients and aid digestibility.
To prepare our chicken ration, we soak grain for two to five days, allowing the bran to soften and activating the germ. Plain water works just fine for fermenting grains. But we often add whey or a little raw vinegar as well.
Some salt, dried kelp or a mixed livestock mineral is also nice to boost micronutrient content.
Five-gallon plastic buckets are ideal for soaking about a third of a bushel of grain at a time. It only takes a day or two. We know grain is ready to be fed out when it gets a good, sour, yeasty smell.
Often, the tiny white radicle—the baby root—appears.
Fermented grain stays good for at least a week, even in hot weather. But we generally only soak as much as we can use in four or five days.
This article originally appeared in the May/June 2021 issue of Chickens magazine.
This month we conclude our two-part series on livestock teeth. Last month we started with the normal findings in your farm animals’ mouths. This month, let’s take a look at some common abnormal dental issues in ruminants and horses.
The Horse’s Mouth
We mentioned last time that horses’ teeth continuously grow—or, more accurately, emerge from below the gums—over the course of their lives. This constant tooth growth can create instances of uneven wear. In turn, sharp points can develop in the horse’s mouth, leading to cheek or tongue ulcerations.
If you’ve ever had a cold sore on your lip, you have some understanding of this discomfort. And you can likely see how this would lead to the dropping of food from the mouth (called quidding) and weight loss.
Uneven tooth wear can also result in the development of an irregular molar grinding surface. Sometimes one side of the mouth may slope downwards (called ramp mouth) or resemble small hills, called wave mouth. Both of these conditions lead to inefficient grinding. Again, this can lead to quidding, weight loss and sometimes even chronic pain in the jaw joint itself.
For these reasons, livestock (and especially horses) should have their teeth checked by a veterinarian at least once a year. Usually, a horse requires some filing down of sharp edges that have developed.
This is called floating. A veterinarian will use a long, hand-held rasp (called a float) to wear down sharp edges. With the horse under light sedation, the procedure doesn’t cause any pain.
Other livestock, notably cattle, don’t typically have the uneven wear issues with their teeth like horses do. Why? Most cattle housing allows them to maintain a diet of constant grazing. (Many horses are not allowed to graze as often as they should.)
Instead, cattle suffer from various bacterial mouth issues. These stem mostly from the fact that around the barn and in large feeding bunks lie sharp, pointy objects. Undiscerning cattle can slurp those objects up with the rest of the hay or grain.
Lumpy jaw is the common name for a specific bacterial infection from the Actinomyces genus. It typically occurs in cattle and hogs and creates large, firm masses in the mandible. These bacteria commonly live in the mouth.
They will also, however, opportunistically infect bone if the inside of the mouth is damaged from the animal eating coarse and pokey hay or other roughage.
Infection takes the form of chronic and slow growing masses on the jaw—hence this disease’s name. The bone masses may become large enough to interfere with eating or even breathing, depending on their location.
The treatment of choice in cattle for lumpy jaw is multiple IV injections of sodium iodide. Unfortunately, this infection in swine is not as responsive to this therapy. Avoid feeding your livestock overly coarse or stemmy feedstuffs to prevent this condition.
Wooden tongue is another bacterial infection seen in the mouths of livestock. As the name suggests, infection results in a swollen, infected tongue that becomes firm and difficult to move.
Caused by the bacteria Actinobacillus lignieresii, this infection mostly occurs in cattle. It can also occur in sheep, horses, pigs and dogs.
The bacteria normally inhabits the upper gastrointestinal tract. But it can invade the mouth via oral abrasions, again mostly through eating rough forage. It can (though rarely does) also travel through the lymphatic system and infect other organs.
A vet will treat this similarly to lumpy jaw: multiple administrations of sodium iodide. In both diseases, a vet will also give secondary antibiotics.
Multifunctionality—whether in tools, equipment or supplies, or even crops, soil and water resources—is always foremost in my mind.From my own farm to my edible landscaping business, I constantly look for ways to get more use out of my investments.
When we put on our multifunctional thinking caps, we, as growers on all scales, begin to innovate. We create new and exciting frontiers for productive agriculture, homesteading and community landscaping.
When it comes to my walking tractor attachments, the rotary plow is one of the most multifunctional tools I own. This implement can be used for important jobs on the farm or homestead in spring, summer and fall. And its utility extends far beyond the typical application of forming raised garden beds.
Zach Loeks
Breaking up Sod with a Rotary Plow
First, a rotary plow is extremely effective at turning new sod into garden space. After all, the rotary plow is a “plow”—though it can be helpful to think of it as more of a micro-plow.
To help visualize this process consider starting at one side of your future garden plot (say side A) and traveling with the tractor and rotary plow to side B and back. This distance is usually 25, 50 or 100 feet. However, I have made beds as long as 300 feet.
Plowing a field is a process of going between A and B in a systematic way with a number of “passes” to turn over your future garden plot. Here are the steps for breaking up sod to create growing space.
First, make a trench in the fresh ground with one pass. By doing this, you mark the mid-line. If the ground is very hard you may need to adjust the depth of the rotary plow and make a shallow trench. Then deepen it with a repeat of pass No. 1.
Now do a second return pass (No. 2) to fill in this trench with the same earth that was pulled out by straddling the long mound. This makes your plowed (but now flat again) mid-line. And this is now the start and center of a new plowed garden plot. Pass one and two make sure the center of your plot isn’t unplowed ground. The rest of your passes work around this mid-line.
With the center line established, we will now work around it in a long, rectangular plowing pattern. To start, make your third pass by driving the tractor just to the left of this turned and filled mid-line. The rotary plow will dig into the unplowed soil just adjacent and mound soil onto the mid-line to the right.
At the end of the plot, make a right-hand u-turn. Proceed with your fourth pass on the opposite side. Remember to disengage the rotary plows and lift the handle by raising the back-end of the tractor via the handlebars when making your u-turn.
Zach Loeks
After the fourth pass, there will be trenches where the plowed soil has been removed by the rotary plow to make the mid-ridge on each side of the ridge.
From this point on, each pass with your rotary plow will throw soil onto an ever-widening center strip of plowed land. Simply place your right tire into this trench, allowing your rotary plow to dig deeply into the unplowed soil to the left (always on the left) of the ridge. Make continuous passes on each side of the mid-ridge by making u-turns when reaching both side A and B in continuous operation of the walking tractor and rotary plow. This grows the space between as completely plowed land.
Unlike the initial passes to set up your mid-ridge, successive passes with the tractor must have the right-hand wheel in the plowed trench (not on flat land). This makes your plowing deeper, more consistent and straight.
(Keep posted for a future article looking at when and why you might want a swivel rotary plow. There are many reasons why one or the other of these plows could be better for your land and your projects.)
Of course, if your plot has already been in garden, you won’t need to break soil. You can go ahead and organize your soil into Permabeds—unless it is highly compacted. Then I would recommend a primary plowing before bed forming.
I use the rotary plow on my BCS 739 to make Permabeds. The screw-like motion of a rotary plow, able to sink 6 to 12 inches into the ground and jettison cultivated soil out the right-hand side of the implement, is the perfect action for preliminary bed formation.
One pass with a rotary plow attachment has the effective result of making a mounded ridge. I can then soften this ridge with a power harrow, rotary tiller or rake to form a raised garden bed.
Zach Loeks
I orient the tractor to the left of a future bed’s center line—usually marked with a string between two stakes or marked directly in the soil by rolling a push seeder (without seed) into the plowed garden soil. Then I give it a returning pass, making sure to keep the line to the operator’s right.
If this bed is never moved or destroyed, and it’s used to effectively crop rotate using guild design, we can then refer to it as a Permabed.
Trenching
A third use for a rotary plow is to create a half-trench as it turns the soil and spits it out to the right side of the implement. This creates a very effective trench for planting and managing multiple acres of potatoes or other crops that need to be deeply planted and hilled.
To perform a partial trenching, simply run the rotary plow along the desired line.
To form a full trench (much wider, useful for tree planting), perform the partial trench. Then turn the tractor around at the end of the row. Place the left tire into the new trench (as opposed to the right tire that was there just moments before) to widen and distinguish a full, deeper and wider trench. I use this for planting orchards, reforestation, edible hedges and other landscaping.
This action helps distinguish paths between raised beds.
Finally, you can use a rotary plow to turn compost.
The tool can, of course, turn green manure into the garden to help build soil fertility. But you can also micro-turn windrowed compost piles to aerate the compost. Just turn it over so your debris decomposes much quicker.
No matter how you slice it, the rotary plow helps you easily transform and manage your soil numerous ways.
Hear from Dig This! radio show host and book author Monica Clark about her work to dispel the myths surrounding food access. Monica speaks honestly about her experience of job loss and homelessness in Seattle and how growing her own food in a community garden sustained her during this time. Listen to an excerpt from Monica’s book, “Mentor the Garden Mentor: A 12-Month Gardening Curriculum for Low-Income/Ethnic/Marginalized Communities and the Organizations the Serve Them.”
Monica also tells us about using her own experience of shopping for food with SNAP/EBT (formerly known as food stamps) to help farmers accept SNAP dollars, the same as they would a credit card or debit card. Hear about the nonprofit Cooperative Gardens Commission’s founding during the pandemic and the work they’ve done to help people get started gardening, including establishing and supporting more than 250 seed hubs!
Be sure to listen to the end of the podcast for the No. 1, most important gardening advice Monica can offer, which she’s polished through decades of experience in gardening across the US.
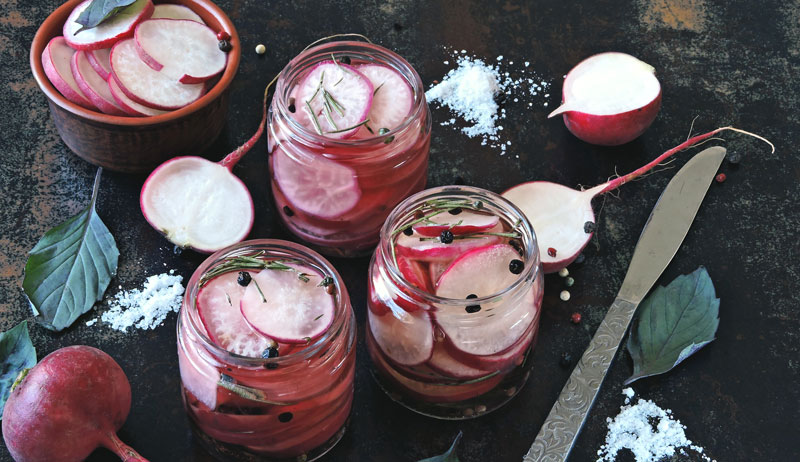
Radishes are abundant this time of year! Besides roasting them, sautéing them or eating them raw, be sure to try fermenting a jar. If you aren’t a fan of the sharpness of a raw radish, a fermented radish may be just what you are looking for.
Fermentation dials back the sharpness, resulting in a delish pickle that tastes great on sandwiches, mixed into salads or eaten as a simple side to a meal. This recipe will take just a few minutes to put together and will preserve your radishes for months to come (if you can resist not gobbling them up within a few days).
If you like radishes, be sure to check out the delicious radish salsa recipe I shared a couple months ago.
Yield:1 pint jar
Ingredients
Main
2 cups radishes, sliced into coins about 1/8-1/4 inch thick
1 garlic clove, crushed
Optional: Add some fresh herbs, such as dill or rosemary, for different flavor outcomes
Brine
2 tsp. kosher salt dissolved in 1 cup of water
Preparation
Wash and prepare the radishes by trimming off the ends before slicing. Add garlic to the bottom of a clean pint-sized canning jar (and additional herbs if you are adding any), then fill with the sliced radishes.
Pack them in tightly without crushing or breaking the slices. Leave 1.5-2 inches of headspace (room from the top of the radishes to the rim of the jar).
Mix together the brine and pour it over the radishes until they are completely submerged by at least 1/4 inch of brine. Reserve at least 1 inch of headspace in the jar.
If you have a small fermentation jar weight, add it to the jar to hold down the produce under the brine.
Remove any small pieces of food that float up to the top of the brine. Produce above the brine will increase the risk of the ferment spoiling.
Wipe off the rim of the jar with a clean dampened towel. Add the canning jar lid, and tightly screw on the ring.
Fermentation
This fermented radish pickles recipe is a five to seven-day ferment. Ferment at room temperature, ideally between 60-75 degrees F (15-23 degrees C) and keep out of direct sunlight.
Check on the ferment daily to make sure the brine covers all the produce. If the produce has floated above the brine level, use a clean utensil to push it back below the brine.
Burp the jar daily—unscrew the lid briefly and tighten it back on to allow any built-up gas to release (and avoid possible jar breakage or the ferment from overflowing).
Once fermentation is complete, transfer the jar into the refrigerator, with the brine and all.
Fermentation does not stop once the ferment is transferred to the refrigerator. However, it does slow the process way down. The taste and texture will continue to change, therefore this ferment is best enjoyed within six months.
Side Notes
If you do not have a glass jar weight, you can improvise by using an easily removable small food-grade glass dish that fits inside the jar. Or, if you have a smaller glass canning jar that can fit into the mouth of the jar you are fermenting with, you can use that to keep the produce pushed under the brine.
Unsure if your water is safe for fermentation? You can boil and allow it to cool to room temperature before stirring in the salt to make your brine.
You may substitute fine sea salt instead of coarse kosher salt if you prefer. The measurement will remain the same for this recipe.
Through fermentation, the brine will become cloudy and pink (depending on the color of radishes you are fermenting with). This is a normal part of the process for fermented radish pickles.