Spring is in full motion and our gardens are beginning to flourish with cold-hardy veggies and perennials. One sought-after sign of spring for us Minnesotans is the first glimpse of rhubarb beginning to peak from the soil. At this point in the season, though, many of you non-Minnesotans are already harvesting rhubarb and wondering how to use the abundance.
You could, of course, simmer it into a delicious jam or bake a mouthwatering pie. But have you considered making a batch or two of rhubarb shrub (essentially a flavored drinking vinegar)?
There are multiple methods for making shrub. I, however, prefer this no-heat “slow method,” as it retains the fresh fruit flavor and, in my opinion, tastes best.
Yield: 2-3 cups finished shrub
Rhubarb Shrub Ingredients
1.5 cups rhubarb, chopped (fresh or frozen) (Discard the green leaves. They are poisonous!)
1.5 cups white granulated sugar
Days later: 1.5 cups organic apple cider vinegar (or other drinking vinegar of choice)
Scrub rhubarb clean, then chop and combine with sugar in a clean pint canning jar. Shake jar to mix sugar and rhubarb well.
Wipe the rim of the jar with a clean, dampened towel and apply the canning jar lid. Tightly screw on the ring.
Store the jar of rhubarb shrub at room temperature, out of direct sunlight. Allow the mixture to macerate over a couple days, until you have a thick syrup. A few times per day, vigorously shake the mixture to speed up the process. (Or you can use a clean spoon to stir well.)
After two to three days, once the sugar has dissolved and a syrup is made, use a fine mesh strainer to strain out the solids, reserving the syrup in a measuring cup. Use the back of a spoon to push out any excess syrup.
Once strained, measure the amount of syrup that was collected and add that same amount of vinegar to the syrup (it will be 1-1.5 cups of vinegar). Stir well to mix.
Store in a clean, airtight jar and refrigerate. Enjoy your rhubarb shrub within a few months for best flavor.
To Serve
Mix about a shot of the rhubarb shrub mixture with water or carbonated water. Then just serve over ice.
Shrubs also make delicious and unique cocktail mixers.
The oldest method of mushroom cultivation has stood the test of time and is still the first method many cultivators attempt. However, some people try and fail, or give up hope before their logs have had a chance to fruit. Success with log culture depends on timing, wood selection, spawn quality, and maintaining good conditions for mycelial growth and mushroom development.
Begin by selecting and harvesting good wood. As with sawdust, most wood-loving mushrooms prefer hardwoods without strong antifungal properties. Cut logs from live trees in winter to early spring when the sap has begun to flow and before the leaves unfurl; this is when the wood has the highest level of sugars and bark is tightest. Wood cut at other times will work but will yield fewer mushrooms.
The ideal size for production logs is 4 to 6 inches by 4 feet, though other sizes can work. It’s said that shiitake logs can produce for as many years as the log has inches of diameter. Cut cleanly and avoid decayed wood, abundant branch stubs or damaged bark. Store logs out of direct ground contact. Inoculate logs as soon as possible or up to eight weeks after harvest before other fungi get a head start on the wood.
Inoculation
Two methods predominate for log inoculation.
Plug spawn is tapped into holes with a mallet, or
Sawdust spawn is inserted into holes with a funnel and dowel or with a palm inoculator (a specialized tool similar to a potato gun, available from mushroom cultivation suppliers). The palm inoculator is stabbed into the sawdust spawn to fill the chamber then plunged into the holes.
Plugs are more convenient, but I prefer the higher inoculation rates and cheaper materials of the sawdust spawn method.
Drill holes 1 1⁄2 inches deep in a 4-inch diagonal grid pattern over the wood, approximately 4 to 6 staggered rows of 8 to 12 holes. For plugs, use a 5⁄15-inch bit, and for palm or funnel inoculation, use a bit with the same diameter as your tool; mine is 1⁄2 inch. Larger holes are not recommended because spawn may fall out. If you’re going to do a lot of logs, consider buying an auger bit for an angle grinder, which bores holes way faster and easier than a drill. Sanitize hands and tools with alcohol, then get the spawn into the holes, making it flush with the surface of the bark.
Seal the inoculation holes with hot molten beeswax or cheese wax applied with a paintbrush or turkey baster. Sealing keeps out contaminants and fungus-eating invertebrates, and keeps in moisture. Some people wax the cut ends of the logs, too, but this is optional and uses a lot of wax. I use a small slow cooker to melt my wax, though a double boiler or a dedicated pot or tin can on a burner work as well. Logs are labeled with species, strain and inoculation date inscribed on tags that are cut from an aluminum can and tacked on with small nails.
Spawn Run
Stack logs tightly in a shady place out of direct ground contact, such as on a pallet. The close quarters promote mycelial growth as well as competitor growth, so after a month or two, restack more openly like a log cabin (crib stack), A-frame, or lean-to to reduce competitor pressure. Monthly watering (or soaking for two hours or less) is beneficial in very hot, dry summers. Sufficient myceliation to support fruitings typically takes six months to two years, depending on spawning rate, species and strain, temperatures, wood type and log size. Mycelium and wood degradation may be visible at the ends. Logs may be a bit lighter than at inoculation.
Judging when logs are ready to fruit usually takes experience, but there are a couple of ways to test.
A drop in pH from 5.5-to-6 to 3.8-to-4 indicates readiness (put 10 grams interior wood into 100 milliliters distilled water and measure pH). One may cut a thin round from the end of a log, moisten it with distilled water and place in a plastic bag. Mycelial growth should be visible within a week if it’s ready to fruit. If climactic conditions are conducive and logs are ready, spontaneous fruitings will let you know.
Fruiting
When left to the weather, myceliated logs will usually give one or two flushes per year. To induce fruiting during warmer months (May to August), logs are soaked in water for 24 hours and restacked upside-down from how they were previously stacked. The inundation of water expels CO2 that has built up in the wood and provides the moisture for mushroom formation. Shiitake logs are further stimulated by a physical shock, like being slammed on the ground just be careful not to overly damage the bark. Logs should be allowed to rest and dry out for about seven weeks after a flush is harvested but can be encouraged to fruit up to three times per warm season.
Growing Mushrooms on Stumps
Stump cultivation is a great laissez-faire approach. Because stumps are still connected to the tree’s roots, they wick moisture up from the ground. Stumps are best inoculated when freshly cut, before a wild mushroom flush in the area sends spores galore onto the cut face.
Stumps are inoculated in the same way as logs, though the cut face is also inoculated, mostly in the nutritious sapwood close to the bark. Gashes or grooves may also be cut into a stump with a (chain) saw and packed with sawdust spawn.
Species particularly suited to stumps include pioppino, nameko, oysters, enoki, maitake, reishi, cauliflower mushroom, chicken of the woods and turkey tail. Shiitake is not recommended for stumps.
If growing gilled mushrooms on logs or stumps, be sure of your identification in case poisonous lookalikes grow spontaneously. Inoculated logs can be sunken into sand in pots or into ground like posts, imitating a stump-like condition.
New Society Publishers
The preceding article on mushroom cultivation was excerpted from DIY Mushroom Cultivation: Growing Mushrooms at Home for Food Medicine and Soil by Willoughby Arevalo from New Society Publishers.
“Sourdough slows me down,” says Shannon Peckford, the founder of Sourdough School House in the Okanagan Valley of British Columbia. “Life is so busy and you’re constantly moving at a thousand miles an hour and you’re multi-tasking. But with sourdough I always say it’s a little bit of work over a long period of time—and in that moment, you’re really focused on that one thing.”
At Sourdough School House, Peckford teaches workshops in the art of mastering sourdough. After originally hosting classes in her home kitchen, Peckford came to realize that pivoting to online sessions would be a natural progression that allowed a greater number of students to benefit.
“Now we have students in over 15 different countries,” says Peckford. “It’s like-minded people baking the same things and connecting with live calls.”
Taking a moment out from planning classes, we spoke to Peckford about learning to love sourdough and improving dough scoring technique. We also touched on the joy of sharing bread with other people.
“My husband and I were on a paleo diet for about five years and were learning about the health benefits of fermentation,” says Peckford, pinpointing the moment when she began exploring sourdough.
“I loved the process when I started working with it,” she explains. “It’s probably the calmest I ever am when working with dough and baking. You can transform it by shape and do different things to get different outcomes. I found it very inspiring and creative. I’ve basically tried to convert everything to sourdough ever since!”
After attending a couples class with her husband at a cooking school in Vancouver for their 17th wedding anniversary, Peckford became inspired to pursue the idea of teaching similar classes based around sourdough.
“It was such a great way to revolve around food,” she recalls.
Addressing entry level sourdough tips, Peckford says that her students often feel overawed by the sheer amount of information about sourdough that’s available.
“There is not just one way to do sourdough,” she explains. “You’re going to make changes for different doughs. But I teach one method that takes you through seven steps. Once you understand those seven steps, you have more freedom and don’t feel so overwhelmed.”
When it comes to adding eye-catching designs to the top of a loaf of sourdough, Peckford teaches that there are two fundamental ways to approach scoring patterns.
“There are the light intricate patterns that give you the details,” she explains, “and then there are slashes that are designed to give you that big open ear, so you go a lot deeper.”
Peckford adds that it’s easier to score cold dough that’s been in the refrigerator for a while. Also, adding a little water to your bread lame or cutting tool can help slide through the dough.
“I would say sourdough is a journey. Be kind to yourself in the process, and practice, practice, practice,” she adds. “If you don’t get the design you want this time, remember it’s an edible canvas so try it again!”
“I’m always astounded at the joy people get from baking,” sums up Peckford when talking about the rewarding nature of teaching people to bake sourdough. “Making something from scratch is so satisfying. It’s amazing the joy that presenting someone with a loaf of bread brings to both parties.”
Getting backyard chickens is trendy and a good idea if you want to be in control of your food. It’s as simple as grabbing a few chicks from the feed-supply store or filling out some information online from a hatchery. Right?
Not so fast! If you’re a first-time or novice chicken owner, newbie mistakes can be costly. Learn how to avoid these mistakes to have a healthy and productive backyard flock.
Know Your Local Zoning Laws
Zoning laws can seem boring and tedious. But many a keeper of backyard chickens has found out the hard way that these laws will govern every step of their chicken-keeping adventure. If you run afoul of the law, you may be forced to rehome your chickens or try to change the laws.
Megan Betteridge/Shutterstock
The best advice? Don’t pick your chickens then look at local laws. Look first.
Zoning laws actually start at the feed-supply store when you buy day-old chicks. In my state, most feed-supply stores must enforce a six-bird minimum purchase. If your local zoning laws allow you to keep chickens, check to see your maximum bird limit.
So if your maximum bird limit is three but your feed-supply store can only sell six, you’re already over what the legal limit. Buying chickens from a swap meet or hatching eggs? The same maximum applies.
On a personal note, the six-chick minimum purchase is my most hated chicken law.
I understand the need, but I have to consider this when adding birds to my flock of backyard chickens. If you don’t mind purchasing by mail or live near a hatchery, you can check with them before heading to the store. Some hatcheries will sell/ship a minimum of three birds.
Zoning laws will also dictate if you can have roosters or just hens. I follow a lot of chicken social media sites and I always see someone looking to rehome an illegal rooster.
Even if you are careful, unwanted roosters happen. I know. It happened to me … twice! Here are a few tips to help decrease your chances of getting a rooster.
Know Your Terminology
Pullets are young hens (females). Cockerels are young roosters (males). Straight run means the chicks are not sexed, so there are pullets and cockerels in the group.
Order from a Hatchery
With a direct order, hatcheries tend to be careful about fulfilling that order correctly.
Don’t Hatch Chicks
When you hatch, you’re essentially populating the straight-run brooder. The percentage of pullets-to-cockerels in a hatch is about 50/50.
In theory, you can eat any chicken you raise. In reality, some provide better meat ratios than others. If you’re looking to raise chickens for meat and eggs, you can purchase dual-purpose birds (birds that can be raised for meat and eggs) that are straight-run, knowing you’ll eat the roosters and keep the hens. Or you can purchase meat chickens solely for that purpose.
But what if you don’t want to eat your backyard chickens? Just because a chicken is dual-purpose doesn’t mean it has to be used for both.
Many of the most popular laying breeds are technically dual-purpose. But be careful because there are chickens that are bred only for meat.
These chickens have different names at different hatcheries. In general, though, they are called Cornish Crosses. They grow quickly and don’t have long lifespans. And they are subject to numerous maladies including heart attacks and broken legs.
If you get meat chickens by accident and fall in love with them, it can be heartbreaking. Be sure you know what breed you are getting so you can avoid this problem.
Don’t Get Too Many Roosters
This might not be an option if you have backyard chickens, but if you’re able to keep roosters in your area, they can be an asset. A rooster first and foremost is needed if you want to expand your flock by hatching chicks. He can also provide predator protection and keep order by keeping flock squabbles to a minimum.
But keeping lots of roosters together in one flock can be a problem.
The best ratio of roosters to hens is one rooster for every 10 to 12 hens. Why? A rooster’s sole job in life is to reproduce. Everything he does is to ensure his reproductive success.
During mating season, a rooster will mate with every hen in his flock many times. If you have enough hens, the rooster has lots of mating choices. This helps to prevent overmating damage to the hens because it reduces the number of times each hen is mated.
This isn’t to say roosters don’t have their favorites. They do. But it does help to blunt the effects.
Roosters also don’t like competition for producing offspring. Other roosters can be competition. Fighting off competitor roosters can cause harm to the roosters themselves and any hens caught in the uproar.
What’s the solution if you end up with too many roosters? There are a few possibilities.
Identify the best flock leader and eat the others.
Get more hens.
Separate your birds into multiple flocks, each with its own rooster with separate housing and areas to roam.
Keep your roosters in a bachelor pad away from your hens so the roosters don’t compete for reproductive rights.
Chicks can’t maintain their body temperature and rely on their mother or you to keep them warm. The ideal brooder temperature for the first week of life is 90 to 95 degrees with a 5-degree temperature decrease each following week.
Cat Hammond/Shutterstock
The temperature should be measured where the chicks live. Keep a thermometer at the brooder floor so you measure what the chicks are feeling.
Beyond the thermometer, watch chick behavior. They’ll let you know if everything is right in the brooder. If they’re lightly clucking to themselves and spread out eating, drinking and scratching, things are probably right. But if they’re frantically and loudly peeping in distress and huddled under the heat lamp, your brooder is likely too cold.
And if they’re panting with their wings spread, aren’t chirping happily and are as far away from the heat lamp as possible, it’s too hot.
If you are using a heat lamp, adjust the temperature of the brooder by moving the lamp up or down. Heat lamps can be a fire hazard, so make sure you are careful and safe.
Know Chicken Breeds
You don’t have to memorize the American Poultry Association’sStandard of Perfection for chicken breeds, but it’s good to know a few basics about the backyard chickens you’re picking. Everyone has different needs and wants for a backyard flock.
Pick the wrong breed and you may not fulfill those needs and wants.
galitsin/Shutterstock
For instance, do you want enough eggs to supply your family and have some left over to sell? You’ll want to choose a prolific egg-
laying breed such as a Leghorn or Wyandotte.
Do you have harsh extremes in winter and/or summer? You’ll want a cold-hardy breed such as a Buckeye or a heat-tolerant breed such as a Leghorn.
Do you want colored eggs? Easter Eggers will provide pastels while Marans will provide dark chocolate brown.
Looking for family-friendly birds? Try Orpingtons or Cochins.
The good news is that hatcheries are good at providing breed information, and there are hundreds of breeds to choose from. So there are chickens to fit everyone’s backyard!
Sidebar: Location, Location, Location
Be sure to check your local zoning laws before you put up your coop (and definitely before you get backyard chickens). They can be a limiting factor.
Depending on what you build, some coops can be considered as outbuildings. You may need a permit the same as if you put up a garden shed.
Some communities also have zoning laws that dictate how far away from a property line a coop must be located. Others have size and color requirements.
Beyond meeting the law, there are considerations for your coop.
The first is size. How many chickens can your coop comfortably support? On this issue, most chicken-keepers use the bigger is better rule. This gives you room to expand your flock without adding another coop. This also gives your flock more room if they have to stay in their coop and run more than planned.
Once you’ve picked your size, consider the elements and access. Is your coop going to bake in the hot summer sun or is there some shade during the hottest part of the day? This is especially important if your birds are confined during the day.
Will you have to climb a hill to get to your coop? That could make carrying heavy items to the coop a challenge, not to mention being muddy and slippery during the rain or snow.
How does the rain typically blow across your property? You may not want to have your coop’s door facing into the rain.
Sidebar: Temperature Control
On a personal note, I used a heat lamp in many of my brooders. I eventually moved away from a heat lamp and started using a heating plate made specifically for brooding chicks. I did this after watching my broody hen care for her clutch.
The baby chicks would huddle under her for heat, then run out to eat, drink and scratch in the chips.
I brood my baby chicks in my house where the air temperature is always 71 degrees or so. The baby chicks go underneath the heater plate for warmth when they need it. They come out when they want.
This way I know my chicks have access to the proper temperature. I also worry less, since the plate heaters are much less of a fire hazard.
I also don’t have to worry about lighting—red versus clear versus being on all day and night. Instead, my chickens have the same lighting as we have in the house and adjust to the natural rhythms of light and dark.
Had I known these benefits all along, I would have never used a heat lamp. My heat plate investment was well worth it!
This article originally appeared in the March/April 2021 issue of Chickens magazine.
With your pullets laying regularly, you’ve decided to share the wealth—and earn some spare change—and sell your girls’ delicious eggs. You’ve checked with your town’s ordinance director or home owner’s association (HOA) to see what restrictions, if any, are in place regarding the sale of backyard-flock eggs. You’ve also reviewed your state’s cottage-food laws and Department of Agriculture regulations regarding the sale of shell eggs.
Armed with plenty of product and a newfound familiarity for egg-sale laws, you’re ready to to start selling.
Almost. A key point to bear in mind while preparing your eggs for sale is who your customers will be.
While some of your prospective buyers may look forward to the full farm-fresh experience, the majority most likely will be accustomed to the perfectly oval, perfectly clean egg. Your hands may be tied by guidelines specifying whether—and how—your eggs must be cleaned. But it’s up to you to choose which of your eggs you sell.
Follow these four guidelines for sorting your eggs successfully for sale.
No customer wants to open a carton of eggs to see 10 lovely, large ovals and two teenie-weenie ones. They’ll feel cheated, even if the peewee pair are the tastiest eggs ever laid.
Keep your buyers smiling by offering matched sets of eggs, all similar in size.
Fortunately, sorting eggs by size is an easy task—just eyeball them as you pack them up. If you keep only one breed of chicken, sorting will go quickly. If you keep a variety of breeds, you’ll end up with an array of egg sizes that will require a more intensive review.
Our Orpingtons lay large eggs, while our Ameraucanas lay comparatively small eggs … but not as small as the eggs laid by our Silkies. We keep the Silkie eggs for our own consumption, as very few of our customers desire bantam eggs.
If you choose to sell mixed sizes, make sure you convey this clearly so that nobody opens their cartons to find one or more unexpected surprises.
Shape
In a perfect world, every egg would be perfectly rounded on one side and perfectly tapered on the other. Our world, however, is far from perfect. And the eggs that our girls lay are anything but uniform in shape.
Some do approach that coveted eggy oval. But most are somewhere between that and the elongated torpedo that pullets tend to lay. Then there are the geometric oddities: the eggs that taper on both ends, the eggs that are perfectly golf-ball round, the eggs that resemble Frankenstein’s head.
While all of these eggs may yield identical yolks and whites once cracked, their misshapen appearances might be off-putting. Reserve the golf balls, the torpedoes and the freeform eggs for your own personal use. Then offer the ovals to your customer base.
Perhaps the biggest surprise I’ve experienced as an egg farmer—other than the triple-yolk egg our Buff Orpington, Edna, once laid—is that people don’t understand eggshell color.
Many supermarkets now sell brown eggs. But most city dwellers and suburbanites grew up on and still purchase white market eggs. They are uncertain about brown, blue and other colors.
I’ve had customers wonder if brown eggs are simply dirty white eggs. I’ve had others ask if supermarkets bleach brown farm eggs to turn them white. I still remember the time a customer called me to vent about the rotten eggs I’d included in the dozen I sold her. I had to explain that no, those were actually blue eggs laid by our Ameraucana flock.
When packing your eggs, make absolutely certain that you clearly label their color, then let people choose which eggs they want. Curiosity usually leads our customers to peek at the different colors we offer, then ask if we can substitute in a few of the differently colored eggs.
You may wish to consider offering a mixed-color dozen for curious customers and for those who admire the variety of egg colors.
Shell Irregularities
Just like we get freckles and moles, eggs can also have complexion irregularities. Some brown-egg layers occasionally produce eggs with a smattering of freckle-like spots due to inconsistencies in how pigment is added to the shell.
Our customers don’t seem to mind speckled eggs. But they do mind eggshells with calcium deposits.
These deposits, which result from excess calcium in a layer’s diet, resemble warty growths on the outside of the eggshell. While they don’t affect the egg itself, deposits detract from an egg’s aesthetic. Buyers tend to find them unappealing.
The same holds true for eggs with naturally occurring stains and waves or ridges in the shell. Always remember that customers often judge egg quality by appearance. Keep any irregular eggs for yourself and pack up only the best for sale.
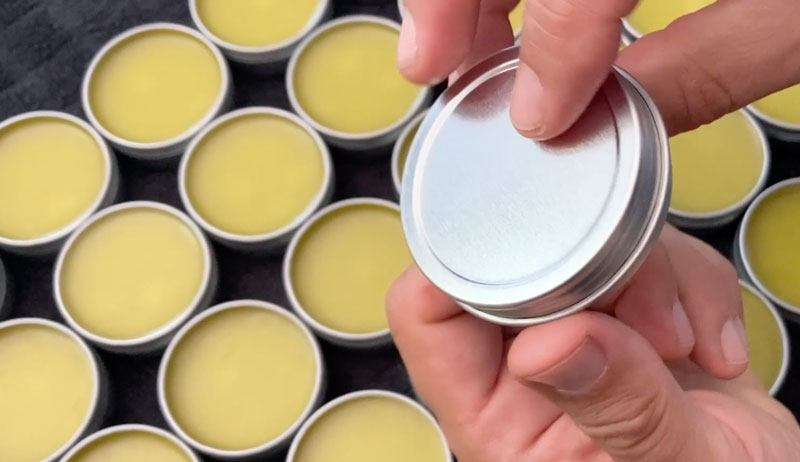
Crafting herbal salves is an easy and rewarding way to use the herbs that are already growing in your gardens. You can make health, wellness and beauty products for yourself, your family and your community.
Identify & Gather
The first step to crafting an herbal salve is to identify and gather the ingredients. Depending upon your recipe you may be gathering leaves, bark, roots or flowers. Properly identifying plants gathered from the wild is very important. But herbs from your garden or even your spice rack are all useful for crafting topical salves.
You will also need beeswax and oil to make your salve. Beeswax is available online or at your local co-op or health food store, but I recommend seeking out your local beekeeper and asking to purchase beeswax directly from them.
Once you have gathered your ingredients, fill a jar or other container with your chosen herbs. Use dried herbs whenever possible, as this will extend the shelf life of your final product.
Next, cover the herbs with the oil of your choice, until the plant material is completely submerged. This is important to avoid any spoilage that might occur otherwise. Using a chopstick (or similar item), poke and gently stir the herbs to release any air that may have been trapped under the oil.
Tightly cap the container and label the jar with the types of herbs and oil being used as well as the date. Place the jar into a cool, dark location such as a cupboard or pantry and let infuse anywhere from four to six weeks.
Alternatively, herbal oils can be infused utilizing a crockpot or slow cooker. Simply fill the crockpot with your ingredients, cover and set on the lowest temperature. Allow the herbs to infuse for three to five days.
Once your oils are infused, strain out the plant material using a funnel, screen, coffee filter or similar tool. Be sure to squeeze all of the oil out of the herbs to avoid wasting any! Now your herbal oil is ready.
It’s time to make the salve.
Simply add the oil and a proper amount of beeswax into a double boiler and place on the stove to warm up. A good starting ratio is 1 1/4 ounce of beeswax by weight for every 16 ounces of oil by volume.
Feel free to adjust this formula to fit your preference. More wax will lead to a stiffer product while less wax will make softer herbal salves.
Once the beeswax has completely melted into the oil, stir the mixture. Ensure it is well blended, then carefully pour the warm oil into your container.
Any container will work: specialty tins from a supplier, reused baby food jars, or whatever else you have available. Try to avoid using soft plastic, since the oil you’ll pour into the container will be hot.
As the oil mixture cools, it will solidify. Once the herbal salve is ready, be sure to label the container!
When stormy weather strikes, trees are often the casualties. Thunderstorms, hurricanes, even winter ice storms—each and every storm can exert a damaging influence on deciduous and coniferous trees alike.
It’s important to clean up storm damage as quickly as possible—the longer you leave it, the more problematic it becomes. These eight tools and machines will help speed up and simplify the process so it’s a minimal interruption to your normal farm work.
Hands down, the first tool you need is a chainsaw. For slicing through thick branches and cutting logs into sections, a chainsaw will significantly reduce the time and effort you spend compared to other options.
Just be sure to wear all appropriate safety gear.
2. Pruning Loppers
Pruning loppers are useful for cutting smaller branches into manageable pieces.
The canopy of a large tree can be quite a tangle. Rather than fight your way through with a chainsaw, pruning loppers can be a simpler option.
3. Wood Chipper
What to do with the many small branches that blow down even during light storms? You could haul them to a brush pile, or you could run them through a wood chipper.
If you have fruit trees in need of mulch, wood chips can be a valuable commodity.
4. Tractor with Attachments
A well-equipped tractor will make a huge difference in how easily (and quickly) you can clean up a fallen tree.
A forklift attachment is a must-have tool for handling logs. And a grapple makes a big difference when handling branches.
If you want to turn trunk sections and large branches into firewood, a log splitter will save you the trouble of splitting them with an axe.
Tow your log splitter out with your tractor. Then put it to work right where the tree fell.
6. Bow Rake & Shovel
Even after you clean up the bulkiest debris from fallen trees, there’s bound to be many twigs, pieces of bark and leaves/needles the storm spread across the area.
A simple bow rake, paired with a large shovel, will go a long way toward gathering and scooping up the mess.
7. Wagon or Trailer
Whether you’re hauling the entire tree to a brush pile or just carting away the leftovers, a wagon or trailer will do the job. Plus, it’s a convenient way to carry your chainsaw, pruning loppers, bow rake and shovel.
8. Sawmill
If you find yourself with a few large logs, why not turn them into lumber? A portable or semi-portable sawmill lets you put the logs to good use without ever leaving your farm.
Have all of these tools and machines on hand, and you’ll make quick work of any storm damage that affects the trees on your farm. But of course, here’s hoping they spend more time in your toolshed than not!
New shepherds look forward to lambing season like kids look forward to birthday parties. But instead of waiting to receive presents, you get to deliver them. As a new sheep farmer, you will help with some magical moments soon.
And they are, by far, the cutest, softest and sweetest moments of any hobby farmer’s experience! Getting prepared for your first lambing season isn’t hard, but it does require some time and resources readied ahead of time.
Happy Birthday!
Lambing Jugs
The list of supplies are easy to collect. Most importantly, you should have your lambing jugs set up.
Jugs are small pens for inexperienced ewes and their new lambs to help with bonding, feeding and general safety.They protect the fragile lambs from the elements and keep them in a place so you can monitor and attend to their growing needs.
These lamb jugs do not have to be expensive or specially made. You can use some cattle panels or even cleverly connected wood pallets to make an impermanent pen for the little ones and new mothers.
Some shepherds prefer to have rubber bands for tail docking, and tetanus and CDT injections on hand for instant shots. (I personally wait a few days for this and tail docking.) If you have all of these supplies at the ready, you are almost prepared!
Mentorship Matters
Out of everything you prepare for on your farm, the most invaluable and important preparation you can make is having a mentor on call or on farm during your first lambing. A mentor can help make a smooth lambing go perfectly—and a rough one go safely.
Mentors are worth their weight in gold. Find someone who raises sheep in your area to help lead you through these beginning stages.
As a new shepherd, you can belong to a dozen online forums and read books for days on end. But having someone there to physically reach inside and reposition a breached lamb is something you can’t order on Amazon.
Most ewes do not need much assistance with the actual birthing. This is especially true of heritage breeds, which were selectively bred by farmers long before us to have ease with lambing and naturally fantastic mothering skills.
If you are working with more modern commercial breeds, there is a possibility something could go wrong (there is always this possibility regardless of breed!) So have a vet’s number saved to your phone just in case.
Most issues with lambing aren’t super serious, but you may need to re-position the lamb or help extract it. Always be ready to act. It can save a small life.
Once the first lambs arrive, your days and nights will become fairly hectic, depending on the amount you are expecting.
Since my own ewes don’t have a barn, lambs were born in the field. I brought the mothers and their new charges lambing jugs built inside field shelters. This meant walking by lantern light several times on cold March nights, exhausted and eager, looking for signs of new life.
They are memories I will never forget and hope to create again.
Always remember that nobody is perfect and mistakes will be made. But by taking the time to be ready for the worst, you are ensuring your new livestock is set up for the best. I wish you luck with your first lambing season and many woolly returns to come!
For home gardeners interested in making their growing practices more regenerative, The Ecological Gardener promises to be an indispensable resource. Although there are now numerous books on the market about regenerative practices for small-scale farmers, most of them describe machinery or techniques that can’t be scaled down to fit a home garden.
The Ecological Gardener fills this void.
Gardens & the Natural World
Unlike most gardening books I’ve read, The Ecological Gardner doesn’t deal much with planting dates, seeding strategies or pest mitigation. Rather, the essence of the book is about integrating gardens into the natural world that surrounds them.
Throughout the book Rees-Warren argues that making your garden part of the local landscape is a kind of win-win. Improving habitat within your garden helps local mammals, birds and pollinators. And in turn, your garden becomes more diverse, resilient and healthy.
Rees-Warren provides numerous examples of what this integration can look like, including inviting wildlife into the garden, turning lawns into wildflower gardens and planting as many native species as possible.
(A quick note to U.S. readers: Rees-Warren is British, so many of the species he mentions are particular to the U.K. The same principles obviously apply anywhere, though).
In many ways, Rees-Warren is advocating for a kind of new understanding of what a garden is. As he observes at one point, many public gardens and parks contain few (if any) native species.
With the average home gardener drawing inspiration from these places, it’s no wonder that so many gardens contain no native species.
According to Rees-Warren, however, a garden should be more than a collection of plants with no connection to the natural world that surrounds it. Rather, by blending the garden with the local landscape, both can be strengthened.
To this end, Rees-Warren advocates for a redefinition of what weeds are. Invasive plants should be treated as weeds, and native plants should be seen as wildflowers.
A Practical Guide
Although The Ecological Gardener does spend time considering philosophical questions about things like the nature of gardening, it is also deeply practical. Throughout the book there are numerous one- or two-page instructionals on how to perform various practical tasks like taking a soil test or laying a hedgerow. These instructions are simple and concise, providing new gardeners with a valuable blueprint to follow.
The “Soil” chapter of the book is especially laden with helpful advice, including instructions on how to set up a bokashi bin, brew compost tea and make biochar.
In short, The Ecological Gardener is equal parts philosophical treatise and how-to manual. And these two elements work well together to create a gardening book that is new, important and educational.
The book is sure to inspire both novice and experienced gardeners to commit to growing in a more ecological way. And with more ecological and integrated gardens out there in the world, we’ll all be better off.
Comfrey is an herb worthy of consideration in gardens of all sizes. Its usefulness in the apothecary, in the compost or as a fertilizer makes this herb one of the most valuable plants that any gardener could grow.
The common comfrey, Symphytum officinale, is a perennial plant in the borage family, native to Europe but now widely naturalized throughout western Asia as well as most of North America. Spread by seed, it can quickly overtake an area, especially if not harvested or properly managed.
A hybrid, Sympytum x uplandicum, or Russian comfrey, has gained in popularity amongst gardeners and permaculturists alike. It’s a sterile plant that does not produce seeds, so you propagate this Russian variety through root division or by stem cuttings.
Using Comfrey in the Garden
Even just a handful of plants will provide the gardener with endless value. Rich in silica, nitrogen, magnesium, calcium, potassium and iron, add comfrey leaves to compost bins as a natural activator. Or you can shred them and utilize as a nutrient-dense mulch around fruit trees, tomatoes and other garden crops.
The long, dark taproots dig deep into the soil. They extract nutrients inaccessible to many other garden crops.
You can also brew the leaves into a potent liquid fertilizer often referred to by gardeners as simply “comfrey tea,” which is easy to make!
Harvest comfrey leaves until you have enough to fill a 5-gallon bucket.
Allow the leaves to wilt in the sun for one or two hours, then pack them into the bucket.
Fill the bucket with water and loosely cover.
Allow to ferment for several weeks, stirring every few days.
Strain out the plant material and dilute the ‘tea’ with water at a 10:1 ratio.
Herbalists have made use of comfrey for centuries, prescribing the herb for a wide range of ailments.
Modern practitioners avoid internal use due to the herb’s high pyrrolizidine alkaloid content. (The compound which is considered toxic and potentially damaging to the liver.) But topical applications are still commonly used.
You can craft a simple herbal salve from comfrey leaves to treat all manner of external ailments, including:
cuts
scrapes
insect bites
bruises
sore joints
You can easily make this product by infusing dried comfrey leaves in olive or sunflower oil. Then just blend the herbal oil with melted beeswax. (If you’d like to go deeper into herbal salves, I provide more detailed information in my book The Artisan Herbalist.)
Comfrey is easy to grow and very vigorous. It does well in full sun or partial shade. Once established, in fact, you might struggle to fully remove it!
Even the smallest piece of root left behind will quickly become an established plant.
Growing comfrey from seed can take some time. The seeds first need to be stratified, or exposed to a period of cold temperatures, and then planted in warm soil. This process could take up to two months or longer. For this reason, comfrey is most commonly propagated by root division.
As long as the plants will have time to get established before frost sets in, you can plant your comfrey roots any time of year, although spring and fall plantings are recommended. Plants will reach anywhere from 2 to 5 feet in height, and healthy plants can be lightly harvested from as early as their first year.
The blue-purple, bell-shaped flowers attract a variety of pollinators and predatory insects as well, which just another great reason to grow comfrey, the all-purpose powerhouse herb of the garden!