Following Kacie Scherler-Abney’s diagnosis for a rare autoimmune disease known as MOG Antibody, her search for an effective treatment led to the autoimmune protocol diet. With clean protein playing a pivotal part of the diet, Kacie and her husband Zach decided to take matters into their own hands and embrace regenerative farming methods.
“We couldn’t find anything that met our standards locally,” recalls Zach. “So, we decided to raise what we needed ourselves!”
So began Re:Farm, in south west Oklahoma. The venture draws inspiration from other regenerative farmers, including Richard Perkins, Joel Salatin and Greg Judy. “We’re grateful for all of their willingness to share their knowledge,” says Zach.
Zach took a moment out from farm duties to chat about striving to become carbon negative. He also discussed the mischievous nature of pigs and joys of watching cow herds move.
According to Zach, Re:Farm runs on the basis of five soil health principles that determine the venture’s grazing plans.
The principles include making sure to “leave ground cover or soil armor at all times. No tillage. Plant diversity is necessary for ecosystem health. Continual live roots maintain soil microbial life. And livestock integration enables the regeneration of the plant and nutrient cycle.”
When it comes to implementing Re:Farm’s five golden principles in a bid to reach a carbon negative state, Zach says that “even when we don’t get it perfect, Mother Nature is generally pretty forgiving as long as you genuinely attempt to work alongside her rhythms and seasons.”
Zach adds that over the three years that Re:Farm has operated, he and Kacie noticed an increase in plant diversity and insect life. “We hope that our soil tests moving forward continue to display that regenerative agriculture is capable of improving the land,” he explains.
Pigs form a key part of life at Re:Farm. “Our pigs are by far the most personable animals,” says Zach.
“They’re very easy to anthropomorphize. And each one has its own unique vibe. Some are friendly and curious. Some are talkative. and some have a little mischievous streak (they’ve been known to steal my shiny silver pliers out of my pocket). But all of them are kind and enjoyable to be around.”
Re:Farm hosts a small vegetable garden that mainly produces salad greens and herbs. Zach says that one of their favorite meals right now is Thai pork lettuce wraps. The recipe calls on romaine lettuce and Berkshire ground pork, seasoned with ginger, garlic, red onion and lime. Coconut aminos serve as a substitution for soy sauce.
“Eating a meal grown on your own land by your own hands is a special experience that we’re very grateful to be able to partake in,” says Zach.
Asked about some of the daily rewards that come with running a farm, Zach says “watching the cow herd move to fresh grass every evening never gets old and has been a daily reward for us.”
He adds that witnessing the herd’s movement acts as a respite from the stresses of owning and operating a farm.
“Watching the cows move to fresh grass as the sun starts to set is always a rewarding reminder of the beauty of farming—and the importance of the role we have as caretakers of the land we manage.”
Sporting a soft yellow background and centuries-old illustrations, the cover looks largely the same from year to year. Still, don’t let that fool you. “The goal of every issue of The Old Farmer’s Almanac is to be as modern as the moment,” explains editor Janice Stillman.
Stillman has shepherded The Old Farmer’s Almanac since 2000. She’s the publication’s first female editor—and its 13th editor to date.
“When I was hired, Judson ‘Jud’ Hale, who is the editor emeritus, had said to me, ‘If you have any fear of the number 13, I can hire somebody for a couple of weeks, they can come in and be 13, and you can come back and be 14th,’” she laughs.
But her stint has been plenty lucky. “It’s really been an honor to be the editor of this American icon and the oldest continuously published periodical in North America,” she says.
With its first issue released in 1793, the almanac certainly is old.
In the Beginning
Robert B. Thomas—born on April 24, 1766—originally founded what he dubbed “The Farmer’s Almanac” in 1792. The regional publication included this lengthy subtitle: “Calculated on a New and Improved Plan, for the Year of Our Lord, 1793…. Fitted to the Town of Boston, But Will Serve for Any of the Adjoining States. Containing, Besides the Large Number of Astronomical Calculations and Farmer’s Calendar for Every Month in the Year, as Great a Variety as are to be Found in Any Other Almanac, of New, Useful, and Entertaining Matter.”
“It was a bit of a calculator in the early days, and even its own kind of computer,” Stillman says. “It’s always been a reference book. It’s something people turn to for advice and insight and information.
“And, true to Robert B. Thomas, maybe a bit of a giggle or smile.”
Since its inception, the almanac was intended to be a “calendar of the heavens.” As such, you’ll find a year’s worth of rising and setting suns and moons, day lengths and conjunctions of planets and stars. You’ll also see a good dollop of astrology, weather predictions and more.
“There’s a certain formula to the content,” Stillman notes. “The whole book is about the natural world and the world around us.”
She continues, “It really speaks to the year in so many different ways, whether it be the gardening, the weather, the home remedies, the recipes, the anniversaries, information on pets and general themes.”
Old Meets New
In its way, 2021’s Old Farmer’s Almanac reflects current challenges we face, including climate change. “We are trying to put that in perspective for folks a little bit,” Stillman says.
To that end, the issue features an article on rising ocean levels penned by Brian M. Fagan. (Fagan is the author of several books, including The Attacking Ocean: The Past, Present, and Future of Rising Sea Levels.) “We had not covered it, and it seemed like a good thing to speak to, because it was more in the headlines than it had been before,” Stillman says.
The almanac’s resident weather forecaster also has his finger on the pulse of climate change. “Our forecasts are made with three scientific disciplines. That sets it apart from just about everybody else out there,” she says.
Those disciplines include climatology, meteorology and solar science—the study of sunspots and other solar activity.
“The activity on the sun has been very quiet—actually quieter than in more than 100 years—and we state this in the general weather forecast,” Stillman says. “Historically, that has meant cooler-than-normal temperatures on Earth. However, the belief is that there is so much greenhouse gas in the atmosphere that it could be having an influence.”
There are a couple of items dating back to the earliest issues that you won’t find these days. “At the time, it was only distributed through southern New England. So, you had the vacation dates for Harvard University and Dartmouth University, because folks needed to call the kids back from school to work on the farm,” Stillman reports.
It also included distances between specific places, because maps and odometers weren’t yet commonplace.
Among the almanac’s recent additions? Features on farmers from the U.S. and Canada. “The profiles of farmers are really our salute to the people who grow our food,” Stillman explains. “We wanted to recognize the younger farmers coming on and the older folks who’ve been feeding us during their lifetimes.”
As for something Robert B. Thomas likely never could’ve imagined? You can also find related, expanded content online via www.almanac.com.
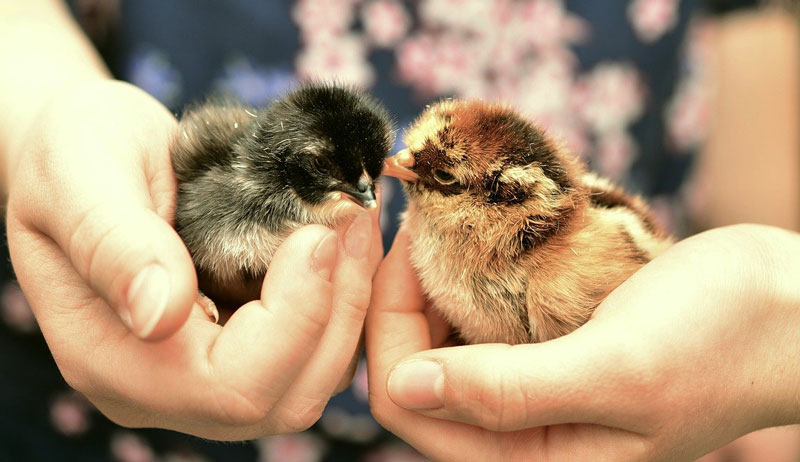
When you walk into your local feed mill or farm-supply store during the spring, you’ll likely hear the cheep, cheep, cheep of baby chicks. Those little balls of fluff are adorable! But it’s important to resist the cute factor and focus on health to ensure your new flock or additional flock mates survive.
Picking healthy chicks isn’t difficult when you know what to look for—from their peepers to their feet.
Background Checks
Normally, once you buy and remove a chick from a store or breeder’s facility, you won’t be able to return them. If a chick has any health issues, you’ll have to deal with them.
That makes it important to know more about a chick’s background.
“Make sure you obtain chicks from a reputable breeder, preferably part of the NPIP [National Poultry Improvement Plan],” says Poultry Science columnist Maurice Pitesky. Pitesky is a doctor of veterinary medicine at the University of California, Davis.
“Find out what NPIP clean or monitored testing they do and for what diseases. Make sure it’s from a closed flock and that the breeder works with a vet.”
When asked about purchasing from local feed mills or farm-supply stores, Pitesky says reputation matters. “See if they get chicks that are part of NPIP and what biosecurity practices they use,” he says.
Amber Baum, a Louisiana backyard chicken-keeper, confidently recommends her local farm-supply store for purchasing chicks. She bought all 12 of her chicks for her first flock there. They’re all alive and doing well.
“I only intended to get 10 females altogether,” Baum says. “I wanted five Barred Rocks and five Golden Comets. It worked out pretty well for the GCs since there were only five of them left.
“As they got my BRs, I realized there would be just two left alone. Since everyone says you should get a couple ‘just in case’ chicks—because inevitably one or more chicks usually don’t survive for one reason or another—I took the remaining two Barred Rock chicks.
“I still have a flock of 12. Apparently, I had a healthy batch of babies and absolutely no need for any ‘just in case’ extras!”
Moira K. McGhee
Hatching Your Own
If your chicks are coming from a clutch of eggs that you’re hatching yourself, you’ll already have the background information. However, there are steps you should take to ensure you hatch healthy chicks.
“Hatching eggs from younger breeding birds usually produce healthier chicks,” Pitesky says. “Make sure the breeding birds are healthy. This includes having a good appetite and being alert and responsive. Ideally, all fertile eggs that fail to hatch should be examined to detect patterns of mortality.”
Many people have success purchasing their chicks from a professional hatchery. Unless the hatchery is close to your home, they’ll be delivered through the mail. The downside is you won’t be able to pick and choose the chicks that appear healthiest.
However, professional hatcheries typically comply with strict state and federal regulations and inspections. Like buying from breeders, check to see if they have NPIP certification. This further proves a commitment to operating a high-quality facility that produces healthy stock.
Watch forEarly Warning Signs
Healthy chicks are alert and active, but new hatchlings will sleep quite a bit the first days.
“They will spend a lot of time running around the brooder pecking at their new surroundings but will pause to take several small power naps throughout the day,” according to Meyer Hatchery.
While babies sleep more than adults and may completely sprawl out when they’re catching a good nap, they should wake up relatively quickly when they’re disturbed.
Lethargy is an obvious early warning sign there’s something potentially wrong with a chick. This is especially true if a chick can’t stay awake, including when it’s standing up. If you touch a sleeping or lethargic chick and it barely responds, or doesn’t respond at all, it’s probably not healthy.
“If you’re buying chicks, a chick that’s lethargic, laying down and allowing itself to be trampled by other chicks should be avoided,” Baum says. “Something is almost certainly wrong with a chick that can’t even get up to get out of the way of its brooder mates.”
Melissa Rice, a backyard hobbyist with a small backyard flock in Edgewood, Kentucky, said that besides lethargy, you should also avoid chicks that “aren’t eating or drinking well. Combs and wattles may be too pale in appearance, which also can be an early sign.”
Other chicks may avoid a sick one, so a chick that’s isolated from the others may be unwell. You may also notice this chick swaying with its eyes closed, which is another bad sign.
When choosing chicks, take your time and observe their behavior. Any prolonged inactivity or unchick-like behavior should be suspect.
Starting with the beak, look closely to see if it’s broken or crossed over. Chicks with beak issues may have problems eating and drinking. This can hamper their survival.
However, don’t be surprised if the tip of the beak is missing. Hatcheries will often snip off the tips to prevent chicks from peaking at and potentially harming each other.
Also, some chicks suffer from crossed or scissor beak. This beak deformity prohibits the bird from closing its mouth properly and makes it difficult to eat and drink.
“The beak should be well matched with the top and bottom,” Rice says. “You don’t want an overbite appearance.”
Looking beyond the beak, a chick’s eyes should be bright, not cloudy or dull, and it should be well aware of its surroundings. If it has droopy or sleeping looking eyes or its eyes are crusted over or closed all the time, then something is probably wrong.
Feather Inspection
Traveling over the chick’s body, take note of its feathers. Only older chickens during molt should be missing feathers. Chicks shouldn’t be missing any feathers.
A dehydrated or malnourished chicken or chick will have feather loss and/or dry-looking feathers.
“Feathers should be in a rowed appearance, lying flush to the body with a healthy sheen,” Rice says. “Tail feathers should point up. There shouldn’t be any bare spots or damaged feathers showing.
“Chicks should be happy, fuzzy little cuties!”
Moira K. McGhee
Look at the Legs
Finally, a chick’s feet and legs should be straight, allowing it to stand tall. While splayed legs or crooked toes don’t necessarily mean the chick is unhealthy, it could indicate an underlying problem that may or may not be fixable.
Some deformities may be corrected with special attention, so it’s up to you whether you want to take a chance on a chick with irregular feet or legs.
“Legs and feet should be of normal color with no redness or swelling,” Rice says. “There also shouldn’t be any scaling evident, as this could be a sign of mites. Legs and feet should be smooth and shiny in appearance.”
Naval Gazing
Pitesky reminds potential chick parents not to overlook the navel. He advises to look for any evidence of an infection of the navel, which can be associated with failure to absorb the yolk sac and yolk sac infections. Omphalitis is a noncontagious infection of the navel and/or yolk sac in young poultry.
Chicks with an unabsorbed yolk sac can have enlarged doughy abdomens.
It’s not unusual to see a string attached to a chick’s “belly button,” especially in the first 24 hours of life. Leave it alone and never pull it, or you risk pulling out the chick’s intestines.
This string will eventually dry up and fall off.
Know What theHuddle Is About
Huddling is frequently just a sign that chicks are cold, but sometimes it can be a sign of sickness. Pay attention if a chick stays under the heat lamp continuously, while other chicks run around, routinely moving to and from the heat lamp.
“Chicks huddle for warmth or comfort,” Rice says. “Chicks that are healthy will alternate periods of huddling under heat lamps with periods where they seek play or investigate their surroundings.
“Too much huddling, ruffled feathers and not getting out and about can indicate illness.”
Check Its Backside
Chicks have a vent, which is a small opening on their fuzzy butts. The vent acts as the exit point for bird poop. Eventually eggs come out of this opening, too.
Vents should be clean. But a condition called pasty butt causes droppings to stick to the vent area and prevent the bird from pooping. Pasty butt is common in new chicks, especially because of stress from shipment or fluctuating brooder temperatures.
However, left untreated, pasty butt can lead to death.
“A normal vent is flush to the body with no redness, swelling, protrusion or irritation,” Rice says. “There shouldn’t be any sign of manure stuck to it, indicating pasty butt, or any sign of infestations, such as lice or mites.”
PCHT/Shutterstock
Extra Pointers
Most chicks that don’t survive due to stress, dehydration or injury during transport typically die within the first 24 to 48 hours. This can include traveling between a hatchery and a local feed or farm-supply store, from a local store to your home or through the mail.
When contemplating a chick purchase at a local store, ask the clerk in charge of the chicks when they received them. Besides travel-related issues, there are other reasons a store-bought or home-hatched chick might die in the first 24 to 48 hours.
Rice says some of the top reasons include:
Marek’s disease
coccidiosis
splayed leg
cross beak
wry neck
pasty butt
They can also pass from poor thermoregulation due to over or under heating the environment of the brooder after hatch.
Temperature and stress play a big role in the very beginning. Chicks aren’t fully feathered, and they can’t regulate their body temperatures.
If the brooder isn’t warm enough, the chicks will get too cold and die.
A vaccine is recommended on the first day of a chick’s life to prevent Marek’s. However, the vaccine takes about four to seven days for it to start protecting them. Chicks are still vulnerable if exposed.
Marek’s is highly contagious and often fatal, so always confirm any chicks you purchase have been properly vaccinated. Many hatcheries recommend and offer the Marek’s vaccine because the disease is easily spread.
Rice recommends the Merck Manual as a good recourse for chicken ailments, prevention and management. If you’re concerned about the health of a newly acquired chick, have it checked out by a vet familiar with fowl if you don’t already have one you use.
This article originally appeared in the March/April 2021 issue of Chickens magazine.
Over the past two months, we’ve covered an in-depth assortment of subjects geared to help the new chicken owner—and those thinking about keeping chickens—successfully prepare and raise baby chicks from brooder to coop.
Being the first-time owner of baby chicks once myself, I fully understand that the more you learn, the more questions you may have. Here are the answers for the three questions most commonly asked on my farm’s social media.
Why Do Some of My Chicks Have Really Long Legs?
Like baby humans, baby chicks can grow at different rates. This is especially true if your infant flock consists of different breeds or a mix of bantams and standards.
This being said, some chicks just seem to sprout stilts while their broodermates totter around on tiny toothpick legs.
A popular belief amongst poultry farmers is that long legs indicate a chick is a cockerel. I specifically remember my grandmother explaining this rule of thumb as we collected eggs from her hens when I was a little girl. Because of this, my husband and I separated out all the long-legged chicks in our brooder the first year we hatched our own.
Good thing nobody was interested in buying our “boys.” They became Flapjack, Buttercup and Goldie, three of the best Buff Orpington layers we’ve ever had. Sometimes long legs are simply that: long legs.
The key factor indicating your chicks’ readiness for life outside is their fully feathered state. Once your juveniles have replaced their baby fluff with actual feathers, they can handle the elements outdoors. Then they can move from their indoor brooder to their coop.
Many of us may miss observing the antics of our baby chicks at close range. But we may also be tired of the dust, noise and smell emanating from the brooder. (Especially as they intensify as our chicks grow older.)
Over the years, I’ve had more than a dozen new chicken owners beseechingly ask me when they could finally move their birds outside.
So, when are they fully feathered? It depends on the breed. But most will be fully feathered between five to 10 weeks.
The arrival of spring each year is heralded by Chick Days at many feed shops and farm-supply stores around the country. It’s also when most hatcheries send out their catalogs and prepare for thousands of visitors to their web sites.
The timing of this annual chickcentric event is not coincidental. And it has nothing to do with how cute spring baby chicks are.
Pullets typically reach point-of-lay—when they lay their first egg—between 4 to 6 months of age. Pullets born (and bought) in March and April should reach point-of-lay by September and October. That’s just as daylight hours begin to shorten.
In order to have eggs the same year you purchase your chicks, make sure you buy your babies as early as possible come spring.
A majority of our planting doesn’t take place until after the threat of frost has passed. But there are a number of cold-hardy crops that we can plant early to get a jump on the growing season.
Some can even be planted as early as six weeks before the last frost date!
Peas & Wheat
Crops like garden peas and spring wheat can be planted as soon as the soil can be worked in the spring.
Try soaking your pea seeds overnight before planting to speed up germination.
Radishes & Beets
Radishes and beets can be planted four to six weeks before your last frost date. Spring radishes are a fast-growing crop that can produce a tasty harvest in as little as 21 days.
Be sure to leave plenty of space between your beet plants so that bulbous roots have room to properly form.
Of course, beets produce more than just a tasty root. You can also harvest the delicious leaves and enjoy them as you would Swiss chard.
If fact, chard and beets are the same species. And they are grown in practically the same ways.
Spinach is another spring crop that can be planted very early in the season. In fact, spinach will bolt and go to seed when weather gets too warm.
Be sure to plant your seeds early. Leave at least six weeks of growing time before the heat of summer causes them to flower.
Carrots
Carrots are an easy-to-grow, cold-hardy vegetable. But the seeds need to keep moist until they have time to germinate, which could take up to two weeks after planting.
Grow radishes in your carrot row to mark the area. You’ll also get a bonus harvest of radishes right as your tiny carrot sprouts get started!
Kale is certainly a cool weather veggie. It can be planted in the garden as early as four weeks before the last frost date in your area.
Sprinkle the seeds on the surface of the soil and lightly cover. Or, plant them indoors when your start your pepper plants under lights (around six to eight weeks before last frost).
Transplant the young kale seedlings into the garden to get an early harvest of these nutrient-dense leaves.
Lettuce
Don’t forget to plant lettuce in the spring either! Similar to spinach, lettuce thrives in cool temperature. But it will bolt under the summer sun.
Start your lettuce seeds in the garden approximately two weeks before your last frost date. Surface plant the seeds, and keep the soil moist until seedlings are established.
Including cold-hardy crops like these in your garden plans will not only give you a head start on your growing season but will also provide you and your family bountiful harvests of tasty veggies to enjoy throughout the spring.
Wooden fence posts don’t last forever. It would be nice if they did, but wear and tear from animals and the elements takes a toll. Eventually, posts become too rotten or damaged to safely perform their job, and that’s when it’s time to replace them.
Replacing wooden fence posts is an ongoing project on any farm with a lot of fence mileage. I’ve lost count of how many posts I’ve replaced through the years. Along the way, I’ve learned a few lessons to make the job easier.
If you’re familiar with the rigmarole of replacing wooden fence posts, then I’m sure you’ll enjoy laughing along as I (humorously) share these five valuable lessons.
Don’t assume, “This job will be easy. I only need a few tools!” Even if you’re able to remove a post from the ground easily enough (which isn’t guaranteed—see lesson No. 2), you’re bound to encounter other unforeseen obstacles:
“Wait—why did I nail these electric wire insulators in place. And why didn’t I bring a hammer to remove them??”
“This hole should really be deeper. Did my neighbor ever return my post-hole digger??”
In the long run, you’ll save yourself a lot of trips back and forth fetching forgotten tools.
Can’t Get the Post Out? Try a Tractor
Some posts won’t give up their duty without a fight. They might be damaged or broken aboveground. But underground can be another story.
Particularly if they’ve been installed with concrete (see lesson No. 4), some posts can be a nightmare to remove from the ground.
This is when you bring in the heavy artillery—a tractor. Attaching the post to the front-end loader or three-point hitch allows you to harness the power of your tractor’s hydraulics to hoist stubborn posts from the ground.
Just proceed with care and caution. If the post absolutely refuses to budge, you might find the tractor’s front or rear wheels rising up instead of the post.
Sometimes you have to make an existing hole deeper, or even dig a new hole from scratch. (Yep—sometimes it’s easier to cut the old post off at ground level and start a fresh hole alongside.)
Now, I’m all for using tried-and-true hand tools, and I’ve installed many posts using the manual power of a post-hole digger. But digging a deep hole can be backbreaking work if the soil is hard and/or compacted.
For example, the clay soils found on my farm make digging down more than 2 feet a tough task. And even if you don’t break your back, you might break the post-hole digger. There’s a reason why one handle on my post-hole digger is a few inches shorter than the other….
If you’re going to be digging a lot of holes, and if you can afford a handheld or tractor-mounted auger, go for it. They’ll do a better job and save you a lot of time and effort.
Concrete can be a good way to lock posts securely into the ground. But it can also be problematic when you need to replace a post.
Depending on the style of fencing you’ve installed, concrete can be worth the trouble at corners (which bear the brunt of tension from electric wire fences), or any other location where the posts will face tension or pressure.
But some posts (including line posts for electric fences) don’t benefit as much from concrete. If you can safely get away without it, I encourage you to favor gravel or good old-fashioned dirt over concrete.
When it comes time to uproot the post, you’ll have a much easier time—no breaking up chunks of concrete required!
Don’t Bother Replacing Posts in Wet Weather
Please—don’t try replacing posts after a heavy rain! I can only speak from my experience with clay soils, but if there’s standing water aboveground, there’s no point in removing posts or digging holes.
Any hole you open up will flood with water before you know it. And any attempt to pack dirt around a new post will turn into an amusing (but ultimately frustrating) game of playing with mud.
If a post gives out during a rainy spell, I suggest concocting a temporary (but safe) repair and waiting until a drier spell to actually replace the post.
So there you have it—five lessons I’ve learned from replacing wooden fence posts. I’m passing on my knowledge so you can skip the stage where you try to remove a concrete-encrusted fence post … from clay soil … during monsoon season… using nothing but a shovel.
Show host Lisa Munniksma talks with Olga Tzogas, a forager, mushroom grower and educator in Rochester, New York. Olga’s Smugtown Mushrooms has provided mushroom-cultivation supplies and education since 2014. Hear about the foraging trips Olga leads in her family’s home country of Greece, learn of the downside to the current foraging craze, and get excited about the return of Olga’s passion projects, the New Moon Mycology Summit and The Mycelium Underground. And near the end of the podcast, hear Olga’s recommendations for must-have (and money-saving) mushroom-cultivation info sources!
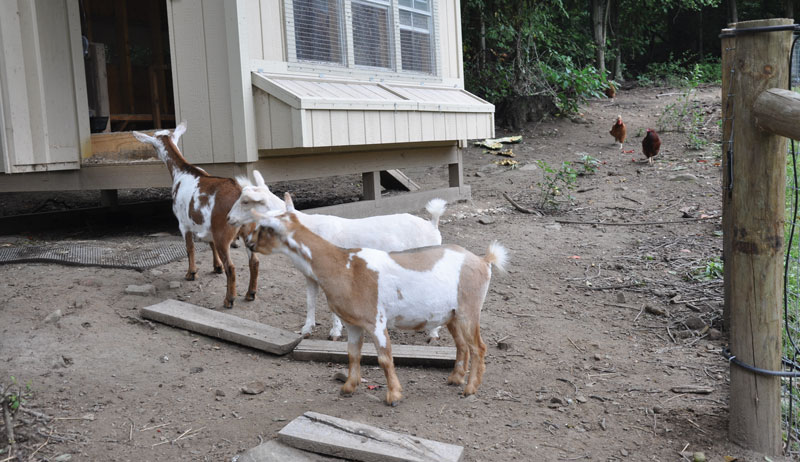
Today, a common hobby farm goal is increased self-sufficiency and decreased reliance on traditional food sources like grocery stores. One popular method of achieving this is to add productive livestock such as goats and chickens for their milk, eggs and meat.
Space limitations, however, sometimes restrict the types of animals that can be supported on a farm.
Fortunately, goats and chickens are two species that can successfully pasture together to conserve space, so long as you take the proper precautions. Things to consider when planning to jointly pasture goats and chickens include the benefits, disease transmission, pasture size and plants, housing and fencing.
Benefits of Pasturing Together
Putting goats and chickens together in a single pasture does take some additional planning, work and effort. So, you need to decide whether the benefits are worthwhile.
The potential advantages of pasturing chickens and goats jointly include:
It’s generally less costly to fence one pasture area as opposed to two.
Pasture access should reduce the amount of hay and grain concentrate needed for feeding.
The exercise that livestock get foraging is good for them and helps keep them healthy.
Pasturing chickens improves the flavor and nutritional content of chicken meat and eggs.
Pastured chickens help control flies, ticks and goat parasites on the farm.
A common concern when pasturing chickens and goats together is disease transmission. But, in reality, it’s seldom an issue.
Goats and chickens are susceptible to coccidiosis, a disease of the intestinal tract caused by the parasite coccidia. But coccidia are species-specific and not transmitted between goats and chickens.
However, Melissa Holahan, a veterinarian as well as the creator of Goat Melk Soap Co. and owner of Chubb E. Acres Farm, does caution that chickens may shed the bacteria salmonella in their droppings.
“Although rare, they could transfer to the goats—mostly from the goats laying in soiled bedding,” she says. “This could have the potential to get on the udder, causing transfer to the goat kids or milk for human consumption.”
Adult goats or chickens usually have sufficiently robust immune systems to resist serious sickness from coccidia or salmonella. But young or sick chickens and goats are susceptible to developing parasite or bacteria overload and disease. The main indicator is diarrhea, which is followed by dehydration, weakness and death in serious cases.
To avoid these diseases, prevent overcrowding and keep your livestock areas clean. If your chickens or goats show signs of diarrhea or illness, immediately quarantine them and call a veterinarian.
The faster they get treatment, the more likely they are to survive.
Pasture Size
The number of chickens and goats that can successfully pasture together in a given area depends primarily on the breed sizes that you intend to keep. If larger breeds are kept, then fewer livestock can be accommodated.
Also, you should always plan on at least two goats because they are herd creatures and need a goat companion to be happy. The examples below assume 5-pound hens, 75-pound Nigerian Dwarf does and 135-pound Nubian does.
Stocking Rates
The general rule-of-thumb for pasturing chickens is no more than 50 to 80 chickens per acre. At any higher stocking densities, the chickens eventually completely denude the pasture and add too much manure for the pasture to regrow.
This stocking density assumes that the chickens have continuous access to a nutritionally complete chicken feed. That’s because you can’t rely on the pasture to supply balanced levels of nutrients for that many chickens year-round.
Noemi S Rivera/Shutterstock
When you add goats, the number of chickens per acre needs to be reduced. For example, if two Nigerian Dwarf does were added, then about 30 fewer chickens could be accommodated.
Each goat would replace about 15 chickens (75 pounds/5 pounds = 15). So, using the more conservative 50 chickens per acre rule-of-thumb, a 1-acre pasture could sustainably accommodate about two Nigerian Dwarf goats and 20 chickens:
75/5 = 15; 15 x 2 = 30; 50-30 = 20
Alternately, using 80 chickens per acre as the starting point, four Nigerian Dwarf does and 20 chickens could be accommodated:
75/5 = 15; 15×4 = 60; 80-60 = 20
Or, if adding larger Nubian does, it would drop to two does and 26 chickens:
135/5 = 27; 27×2 = 54; 80-54 = 26
Again, this stocking density assumes that the goats have access to a nutritionally balanced diet in addition to pasture forage.
Conditions vary significantly from farm to farm. So does the optimum stocking density, but the previous examples provide a starting range. In general, it’s better to plan on lower densities because overcrowding increases the risk for disease and parasites.
On our farm, we found that around 12 to 15 Nigerian Dwarf goats and 20 to 25 chickens co-exist well on about 4 fenced acres.
Chickens aren’t picky about pasture conditions. Even with continuous access to chicken feed, chickens do a lot of foraging. They’ll scratch and eat the nutritious vegetation down at ground level, while avoiding questionable or poisonous plants.
Goats, however, prefer to reach up to browse rather than down to graze like sheep or cattle. That means areas with woody underbrush make excellent goat pastures.
Making goats reach down to graze on a grassy pasture isn’t ideal. This forces the goats to eat where intestinal parasites (spread via manure) thrive and increases the likelihood of internal parasite problems.
Goats are happy to eat things that we consider weeds such as poison ivy and multiflora rose. There are, however, plants that are extremely toxic to goats. These plants should be eradicated from pastures before allowing goats to browse.
Azalea, hemlock, mountain laurel, rhododendron, rhubarb and wild cherry are all plants that are highly poisonous to goats and should be removed from their pastures.
Cornell University maintains a reference list of plants toxic to goats. It would, however, be impractical to remove every plant on its list. Fortunately, if goats have access to sufficient quantities of nonpoisonous plants, they’ll usually avoid or only nibble those that are mildly toxic to them.
Housing
Although it’s feasible to jointly pasture chickens and goats, it’s not a good idea to house them together. That’s because goats are finicky and chickens put droppings everywhere.
If a chicken puts droppings in a goat hay feeder, then the goats won’t eat it. You’ll have wasted hay. Or if the chicken puts droppings in the water bucket, the goats won’t drink it.
Because goats need plenty of water to produce milk, housing chickens with goats means frequently cleaning and refreshing water buckets.
Lesa Wilke
In addition to the dropping problems, access to chicken feed is an issue for goats. Goats love chicken feed and will go to great lengths to get it. But once they start eating, they don’t know when to quit and will gorge on it. This leads to bloat which can easily be fatal.
Finally, even if the chickens have nice, safe nest boxes, for some reason, they love to lay eggs in the goats’ hay.
Keep ‘Em Seperated
In order to prevent these problems, it’s best to house, feed and water chickens in their own separate coop and goats in the barn. I
t’s generally easy to keep goats out of a coop simply by making the chicken access door too small for the goats. Then you can provide the chickens with free-choice feed and water inside the coop without worrying about goats getting in.
Keeping goat kids out may be a bigger problem.
“It amazes me that goat kids can squeeze through literally the smallest doors!” Holahan says. “The only chicken door design that seemed to defy the goat kids was making a pop hole just wide enough for one chicken at a time and elevating it.”
It can also be difficult to keep chickens out of the goats’ pens. Unless you turn your goats out to pasture and shut the barn doors, the chickens are likely to eventually get in. We minimized this problem by placing livestock access to the chicken coop and goat pens on opposite sides of the barn. That way, most of the chickens never found the goat pen entrance doors.
But, there’s always a rogue bird that figures it out and starts teaching other chickens. In that case, we isolated that bird for a few days and it would forget how to get to the goat pens. If a few birds do get into the goats’ quarters and eat a bit of hay or grain, it’s generally not detrimental to the birds. It’s just the issues with chicken droppings and eggs.
Fencing a pasture is a long-term investment. It pays to make sure it’s done correctly.
Many predators think pastured animals look particularly tasty. So give consideration to keeping predators out, as well as keeping in livestock. There are several different materials that can be used for fencing, but for goats and chickens, the fence should be at least 4 feet high.
Woven wire fencing and cattle panels are two popular options.
Cattle panels are 16 feet long and can be configured in many ways. They can also be cut into smaller sections.
Kim De Sutter/Shutterstock
Woven wire fencing is a common choice, but it should be supported with sturdy posts set relatively close together (10 feet or less) for stability and to prevent sagging. If using cattle panels or woven wire to create pastures intended for chickens or dwarf goats, it’s important to use a smaller 2-by-4-inch mesh size (at least near the bottom) rather than the standard 4-by-4-inch mesh to keep the chickens and goat kids from slipping out.
Electric fencing can also be used to contain goats and chickens, but the strands need to be spaced fairly close together to keep them in. Alternatively, electric fencing can be used in conjunction with other fencing types to prevent predators from getting in and discourage any goats or chickens from getting out.
This is generally accomplished by installing electric fencing along the top and near the bottom on the outside of cattle panel or woven wire fencing. Welded wire fencing is not recommended for goats because they rub and stand on the fence. This will break the welds and eventually destroy the fence.
Some keepers use chain-link fencing, but it’s expensive—especially when fencing large areas.
Farmers have pastured livestock species together for centuries. With a proper setup, it’s fairly easy to successfully pasture chickens and goats together. As long as you prepare for a few special needs, they happily co-exist and provide delicious eggs, milk and meat for your farm.
Sidebar: Garden Treats
Garden greens can be great treats for chickens and goats. Keep yours happy by feeding them greens from the following vegetable families.
Cucurbitaceae Family
These vegetables are all great sources of nutrition and are also considered to be natural dewormers.
pumpkins
squash
zucchini
cucumbers
melons
Leguminosae Family
Fresh beans (avoid uncooked dried beans) and peas as well as the plants make nutritious, high-protein treats.
beans
peas
Gramineae Family
The original food used for chicken scratch, corn is best fed in moderation because it’s low in protein and nutritional value as well as high in carbohydrates. The entire plant is edible, take care when feeding the stalks and leaves, as too much can cause problems in both chicken crops (stringy leaves can cause impacted crops) and goat rumens.
corn
Compositae Family
All of these plants make great additions to their diets, and sunflowers can be dried to feed during the winter.
lettuce
Jerusalem artichokes
sunflowers
Umbelliferae family
Chickens and goats tend to love the plants from this family. The tops and roots can be fed and are nutritious for them.
Lisa Munniksma sits down with horticulturalist Jessica Walliser to talk about growing plants, appreciating bugs, writing (and editing) about gardening and more. As a writer, editor and co-founder of Savvy Gardening, Walliser is a leading voice in modern gardening, and she shares with us the chilling tale that led her to organic-only growing methods in this episode of “Hobby Farms Presents: Growing Good.” Make sure you stick around to hear her favorite from-the-garden meal!
Fungi are fundamental to life. As decomposers, they are critical to the formation and sustenance of soils and ecosystems. As endlessly innovative chemists, they devise and secrete enzymes that can break down a vast variety of materials, mitigate bacterial and viral infections, and interact—for better or worse—with the bodies and brains of animals that consume their fruiting bodies, commonly called mushrooms.
In In Search of Mycotopia, Doug Bierend introduces readers to an incredible and oft-overlooked kingdom of life and the potential it holds for our future, by way of the weird and wonderful communities of citizen scientists and microbe devotees working on the fungal frontier.
The following is an excerpt from In Search of Mycotopia by Doug Bierend. It has been adapted for the web.
Cheslea Green
Fungi: Around and Among Us
Earth teems with fungi. Throughout forests, jungles, grasslands, and deserts; in puddles, at lakeshores, and on the ocean floor; between cracks in stone and on the peaks of mountains; in all climates and on every continent. Fungi can be found as easily during a walk in rain-soaked woods as in the produce aisle, or simply by jabbing a finger into healthy soil. They are essential and ubiquitous. Turn over a rock, dig under the roots of a tree, scoop up a handful of water, open your mouth: there be the fungi. Stop reading for a moment and take a deep breath—you’ve just inhaled their spores.
Whether we know it or not, our daily life is rife with fungal encounters: in the beer and wine we drink; the bread, cheese, yogurt, tempeh, and soy sauce we eat; thousands of the medicines and chemicals on which we rely; and the fuzzy splotches that turn our tomatoes to mush.1 But more than providing conveniences, inconveniences, or culinary experiences, in a meaningful, even literal sense, quietly and largely unseen, fungi bind the living world together. Their exquisitely fine fibers aerate soils, enhancing water retention and bracing against erosion.2Meanwhile, fungi churn endlessly underfoot, mobilizing the makings of new life. They are called primary decomposers because they’re often first in line to dine on dead or dying trees, leaf litter, and other organic detritus, unlocking nutrients and kicking off the chains of succession that power our planet’s ecosystems.3
Mycological innovator Tradd Cotter uses the term molecular keys to describe their ability to unlock a wide range of chemical bonds, such as those that constitute plants, bugs, bacteria, and anything else that lands on a mushroom’s menu.4
In these capacities, fungi connect all living things in essential relational webs; without them, entire ecosystems would collapse.
And yet, while fundamental, fungi are not at the center of things; rather, they exemplify the interconnectedness and interdependence of all life. Our own health relies on dizzyingly diverse communities of microscopic organisms, in what we have come to call our micro- and mycobiomes. Scientists have found that only 43 percent of the cells that make up our corporeal form are actually human; the majority of what counts as “us” comprises bacteria, fungi, and other microbes.5 For every human gene in our bodies, there are 360 microbial genes.6 It’s enough to inspire an identity crisis.7 As professor Ruth Ley, director of Microbiome Science at the Max Planck Institute for Developmental Biology, put it, “Your body isn’t just you.”8
Even as microbes have gained prominence in science’s view of the world, fungi have remained marginal figures. Fungi were regarded as a funky subset of plants until the latter half of the twentieth century; not until 1969 were they formally recognized as a completely distinct kingdom of life, on par with any other—animals, plants, bacteria—in terms of their scale, variety, and ecological importance. The point is often made that animals, amoeba, and fungi are more closely related to one another than to plants, which may explain something of why they can seem at once strange and uncannily familiar. Many do look like something squarely between animal and vegetable, with an ostensibly rootlike structure underground and mushrooms above that are often described as “fleshy.” Some even protect themselves with melanin; leave a shiitake mushroom out in the sun for a while, and its flesh will surge with vitamin D.9
The oldest confirmed fungal fossil is dated at about 800 million years old,10 though it’s possible that fungi—and if not fungi, then something quite similar—were found in fossils from 2.4 billion years ago.11 Regardless, most current views of the evolutionary tree show animals separating from fungi at around a billion years ago.12 That’s around the time when life on earth was still confined to the oceans, and indeed, fungi were at the fore in the move to shore, intimately tied up with the lives of the earliest land plants, in symbiotic relationships that persist to this day.13 Fossils in Quebec and elsewhere paint the picture of a 400-million-year-old world in which the largest things living on land were the prototaxites, twenty-five-foot-tall spires of what appear to have been a kind of lichen—themselves entanglements of fungi and photosynthesizing algae—that loomed over Ordovician landscapes like blind watchtowers.14
Doug Bierend
Nowadays, plants are the biomass heavyweights of the world, but fungi remain deeply enmeshed with them and their environments, moving nutrients and transmitting chemical information, a sort of circulatory and nervous system in one.15
As old hands at symbiosis, fungi form networks in a literal sense, as weblike beings below the soil and inside other organisms, and also in a relational sense, serving as interfaces among organisms. All species of plants have been found to harbor what are called endophytic fungi, which live as hidden threads woven in and among their cells—in the roots, stems, leaves, flowers, fruits—serving to metabolize nutrients or dissuade foraging, essentially acting as adopted organs to their host, and vice versa.16Meanwhile, the vast majority of plants—some 92 percent of known species—extend their roots’ reach thanks to intimate entanglement with mycorrhizae. Literally “root fungi,” mycorrhizae solubilize minerals from the soil in exchange for plant sugars produced by photosynthesis.17
Yet despite fungi’s ubiquity and importance, many people lack even a fundamental understanding of what they are or how they live. As mammals we can’t help but have an intuitive sense for what animals are and what’s required for our survival: water, food, oxygen, temperatures within certain ranges. Even without any botanical background, many will be familiar with the basics of plants: they soak up water and minerals from the soil through roots, convert sunlight into energy through photosynthesis, “breathe” in carbon dioxide, “exhale” oxygen, and cast cooling shade. These are the barest basics, but it’s more than many people know about fungi. Ask someone what a fungus eats and perhaps they’ll guess manure, or rotting fruit, or houses, each of which counts as a correct answer. Considering what a vast variety of things fungi consume, though, or can consume, it’s difficult to guess wrong; cigarette butts and cicada butts would be equally correct guesses. But ask a stranger how fungi eat, and it’s a good bet you’ll stump them. (Stumps, by the way, are also fixtures of the fungal diet.)
The average person can be forgiven for a lack of fungal literacy. After centuries preoccupied with plants and animals, the institutions of natural science have been slow to prioritize fungi, and few of us receive even a basic education in their biology or ecology. Nevertheless, a great deal is now known, thanks largely to the efforts of passionate mycologists both inside and outside those institutions. Yet many details of fungal biology, their evolutionary history, and their ecological roles in soils, among plants, and in human culture remain cloaked in mystery. For the curious, it offers a lifetime of inquiry and many opportunities to contribute to our understanding of a vital dimension of nature. Luckily for the nonscientists among us, it doesn’t require a biology degree to learn about, or from, fungi.
Notes
1. Sixty percent of the enzymes used in industry come from fungi, 70 percent of which come from just seven species; see Willis, State of the World’s Fungi 2018.
3. Peter McCoy, Radical Mycology: A Treatise on Seeing and Working with Fungi (Portland, OR: Chthaeus Press, 2016), 53–55.
4. Tradd Cotter, Organic Mushroom Farming and Mycoremediation: Simple to Advanced and Experimental Techniques for Indoor and Outdoor Cultivation (White River Junction, VT: Chelsea Green, 2014), 3.
7. From a genetic perspective, the twenty thousand or so genes at the heart of our cells share our bodies with between two and twenty million microbial genes. Humans even share a fair amount of genetic code with fungi, perhaps due in part to our common heritage. In 2015, researchers at the University of Texas at Austin tested a yeast that could survive after any of its 176 genes was replaced with a human analogue. For an account of that discovery, see Marc Airhart, “Partly Human Yeast Show a Common Ancestor’s Lasting Legacy,” UT Research Showcase, The University of Texas at Austin, May 21, 2015.
8. Gallagher, “More Than Half Your Body.”
9. Glenn Cardwell et al., “A Review of Mushrooms as a Potential Source of Dietary Vitamin D,” Nutrients 10, no. 10, (October 2018): 1498.