When it comes time to dig around the farm, you need to know the location of potential lines. It’s worth noting right at the top, though, that you should always contact the local locator service when it’s a question of power or gas lines.
But for private water lines on your property? You don’t want to encounter these while digging and either have to change your plans or, in the worst case, bust your pipes.
Water witching (or dowsing) is commonly used to locate water for a well. But you can also use this ancient (and, to some, of dubious scientific repute) method to locate water lines before digging.
So how does water witching work? Well … nobody’s really sure about that.
But the method by which witching does work is as follows. First, you need two “divining rods.” These don’t need to be anything fancy, and many people (including me in this video) just cut and bend two metal clothes hangers into L shapes.
The technique for using these rods is simple, too. Loosely hold the rods parallel to each other in your firsts. They should move around freely—you’re not gripping them or anything.
Then you just walk around the area you suspect contains a water line. When you’re above the water line, the rods will “sense” the metal or water, move toward each other and cross.
Put a flag into the ground at this point, then keep walking around the area. When the rods cross again, place another flag. Once you’ve got a few of these points marked, you’ll have a good idea of where the water line runs underneath the ground.
You can call it what you want. I’ve heard witching called everything from pseudoscience to hogwash to dark magic. And while I can’t say what exactly is happening when I’m dousing for water, there’s one thing I know for sure—it works for me, and knowing where my water lines are saves me when I want to safely dig on my land!
As every farmer knows, a pickup truck is one of (if not the) most important tools around the acreage. So, it’s worth making sure that your truck is ready for everything you’ll ask of it. Small improvements like installing a trailer hitch or headache rack will make your truck a much more versatile farm vehicle.
Before investing in any particular upgrades, make sure you have a good idea what you’ll be using your pickup truck for. And, make sure to take some time to get to know your truck before adding on too many improvements.
Here are some of the modifications to help get your truck ready for its best life on the farm.
Trailer Hitch
Odds are at some point you’ll find yourself needing to tow something, whether it’s a livestock trailer to take your animals off the farm or a utility trailer to haul hay. So, if your truck doesn’t already have a trailer hitch, consider investing in one.
You might also consider purchasing a tri-ball mount to go with your hitch. Being able to attach to all of the common ball sizes will give you the flexibility to help out a neighbor or easily haul a rental trailer if you need to.
If you anticipate using your truck to help with on-farm projects, consider mounting a toolbox in your bed.
I also recommend outfitting your toolbox with all of the basic hand tools you might need while you’re fixing a fence post or patching an irrigation leak. Nothing’s worse than having to drive (or walk) all the way back to the shop to get a screwdriver that you forgot.
Skid Plate
If you plan on using your truck to frequent your farm’s backwoods, consider installing an “off-road” skid plate. Pretty much all trucks are equipped with a skid plate to protect your radiator, oil-pan and everything else underneath your engine block. But, in most cases, these skid plates are made of plastic and don’t do much more than prevent mud splatter.
If you plan on taking your truck up into the woods to load it up with firewood, for instance, consider upgrading your skid plate to a steel model.
Headache Rack
For those who don’t know, a “headache rack” is designed to protect you from the headache (or much worse) of having the cargo in your bed come smashing through the cab window after a sudden stop.
They’re not all that expensive. They’re also well worth the money if you plan on filling up your truck bed with some frequency. Consider it a recommended safety feature.
If you plan on using your truck to haul larger materials around your farm with some frequency, consider buying (or building) a bed rack. Bed racks are especially helpful for carrying anything that’s too long to safely fit in your truck’s bed.
Do you anticipate needing to move many fence posts, pieces of lumber or PVC pipes? If so, a bed rack might come in handy.
What you need from your truck will become apparent over time, so don’t feel like you need to make too many changes all at once. Just enjoy getting to use your truck for what it was meant to do.
And, most importantly, don’t be afraid to get it dirty and a bit dented.
This creamy sun-dried tomato chicken dish has bold Italian flavors. Sun-dried tomatoes pair so well with the creamy sauce and flavors from the fresh herbs. One of the reasons I love this recipe is because it speaks to my Italian heritage.
I actually developed this chicken recipe because I had homemade sun-dried tomatoes from my mother that I needed to use. Because the Italian in our family comes from her side, I thought it would be the perfect tribute to that heritage!
Yield: 4 to 6 servings
Ingredients
1 1⁄2 cups chicken broth
4 ounces oil-packed sun-dried tomatoes, drained and minced
1⁄2 teaspoon salt
1⁄4 teaspoon pepper
1 clove garlic, minced
1 cup heavy cream
4 chicken breasts, boneless and skinless, halved lengthwise
1 cup fresh spinach, chopped or whole
1⁄4 cup plus 2 tablespoons Parmesan cheese, shredded, divided
2 tablespoons fresh basil, chopped, for garnish
1 tablespoons fresh parsley, chopped, for garnish
1 pound cooked pasta, for serving (I prefer fettuccine)
In the slow cooker, combine the broth, tomatoes, salt, pepper and garlic. Nestle the chicken breasts into the mixture. Turn the slow cooker on high for 2 hours or low for 4 hours.
Add the heavy cream, spinach and 1⁄4 cup Parmesan cheese and replace the lid. Let it cook for about 30 minutes on low, or until the spinach is wilted and the cheese is melted through. Garnish with the remaining 2 tablespoons Parmesan cheese, basil and parsley, and serve your sun-dried tomato chicken with the pasta.
This recipe originally appeared in the March/April 2021 issue of Chickens magazine. Author Alli Kelley is a frequent contributor to Hobby Farms magazine. For more great slow-cooker recipes, check out her new book, Rustic Farmhouse Slow Cooker. For more recipes on the site, click here to see what we’ve collected!
The hard-shelled bushel gourds I grew last season had been hanging up in my garage for several months before I noticed any significant changes. Then, practically overnight, they’d become lighter and covered with molds in shades of pink, gray, tan and black.
While this stage doesn’t look very appealing, the molds actually help to degrade and soften my gourds’ outer skins. This process makes removing that outer epidermis much easier.
And once I slough off that mess? I expose the gourd’s hard, golden shell—complete with intricate blotches and circular patterns the molds left behind.
“A [cleaned] gourd is very similar to basswood,” says TeriLu Adler. An Indiana Artisan and owner of Purple Pig Studios Creative Arts, Adler has been working with gourds for more than 20 years. Once cleaned, gourds provide artists like Adler with hard, impermeable canvases.
She continues, “Because you don’t have to deal with [wood] grain and sap, gourds are perfect for things like wood-burning and cutting.”
Although not every crafter removes their gourds’ exterior skin, Adler thinks they should. “If you don’t [remove the epidermidis], it can slide off on its own in the future, and all your artwork would be lost.”
‘Gourd Flu’?
Exterior cleaning, interior preparation and even some gourd crafting techniques can pose health risks, if you aren’t careful. “Many people are very sensitive to that mold [on the gourd epidermis],” Adler notes. “That is one version of ‘gourd flu.’ They inhale that mold and it creates a respiratory issue for them.”
To mitigate your risk, wear a respirator or N95 mask while cleaning gourds and clean them outdoors. You might also want to wear goggles and gloves.
“I’m not that sensitive to gourds, but I do clean them underwater,” Adler says. “I bring them into the house and soak them in my kitchen sink. Some people will add bleach, but I’ve never thought I needed to.”
A dash of soap, a metal scrubby—and some degree of patience—are usually all it takes. (I scrubbed my gourds clean using small, circular motions.)
Original works by TeriLu Adler. (Courtesy photos.)
Other Methods
There are less labor-intensive ways to expose your gourds’ hard shells. For instance, Adler continues, “Some people bury them in potting soil and let them sit.”
She has been known to put her gourds and some water in black trash bags and place those on an asphalt driveway. “I’d let them bake for a day or two,” Adler says. “The point is just to get that skin to loosen, because sometimes it’s just almost impossible to remove.”
How easily the epidermis comes loose depends in part on the type of gourd you have. The way you store your drying gourds is another factor. “When I’ve grown them, I leave mine outside through the winter, because that freeze-and-thaw [cycle] loosens that epidermis and makes it easier to remove,” Adler says.
Adler has also tried “greenscraping” with mixed success. “Once their gourds are ripe, some people—instead of letting them sit outside all winter—they’ll take a butter knife and literally scrape that epidermis off,” she explains.
The benefit? Without that outer skin, the gourd won’t mold. “That’s how they have gourds that have no blemishes on them,” she continues. “I personally kind of like the mold patterns.”
Still, greenscaping can be risky. Greenscraped gourds can shrivel, crack or even collapse—particularly if they weren’t completely ripe or if they dry too quickly.
On the Inside
Planning to make baskets or bowls out of your gourds? That means cutting them open—and creating fine dust in the process. “That is the second kind of ‘gourd flu,’” Adler says. “People inhale that dust just like a woodworker, so they should always wear a respirator when cutting.”
Exposing a gourd’s dried seeds and pulp can further trigger respiratory responses. So can scraping and sanding the inside of the gourd. In addition to wearing protective gear, consider taking these activities outdoors.
Of course, unless you’re saving seed, it isn’t always necessary to remove your gourds’ guts. “A lot of people make them into birdhouses, and I can tell you from experience that birds don’t care what’s inside,” Adler says.
“So, I usually just cut a hole out for the birdhouse and let the birds clean up what they don’t want.”
Long-Term Storage
Adler stored her cleaned gourds in airtight, plastic bins. “If your gourds are thin, the mice will go after them,” she warns.
But, if you can keep the mice away? Finished pieces—especially thick-walled, hard-shelled gourds—can last for decades.
After watching the news of COVID-19 in other countries in late winter of 2020 of what was possibly about to happen in the United States, my family decided to raise some chickens. Let me start by saying I have always wanted chickens.
We are fortunate to have bought one of the few remaining larger lots overlooking Lake Travis in central Texas. My wonderful husband built me a dream art studio on our land (I’m an art educator), which I share with our community for camps, workshops and, now, chickens.
However, after watching the news of what was slowly unfolding in other countries across the world, I realized we were in it for a long run of sheltering in place.
Amber Gordon
Getting Cooped Up
I wanted a family project to create with my twin boys (Adrien and Julien) during this time. So the Thursday of spring break, I preordered a chicken coop. That Friday, after I left school, Adrien, Julien and I went to the farm-supply store and purchased some baby chicks.
We drove home listening to the beautiful chirping of the sweet chicks now in our care. I told my boys that Daddy might not be happy with this, but he loves us and will get over it!
Needless to say, my loving and supportive husband quickly got over his initial apprehension. He soon accepted our new flock of friends. He even helped us in assembling the coop and fencing in the chicken run area, installing an automatic door and creating a few sturdy bench swings and roosting areas.
His research and support created a safe environment of enjoyment for our chickens.
As an art educator, I love rainbows and color, and our area for chickens was no exception.
With the inspiration of my students and the stay-at-home orders, the kids were busy sharing the creations they were making at their homes via emails and such. Thus, we decided on the idea of the rainbow stained-glass-looking backdrop.
The art students that came to our art camp over the summer found more than art to relax them. They enjoyed a flock of feathery friends to catch and adore!
One of the pleasures of being around children is hearing their laughter as find their happy place with their creations and watch them chase and catch chickens.
I thoroughly enjoy sitting on one of the swinging benches and watching the chickens’ personalities. However, I have come to realize that my chicken therapy is also therapy for children, as well. Several parents have messaged me asking if they can swing by to let their child visit our chickens.
We even had a family chicken-sit for us!
Amber Gordon
Adrien and Julien have named all our chickens, and with the help of my art students some have been renamed. St Patty, Lucky, Strawberry, Raspberry, Blue, Blueberry, Owl, Hedgy, Blackberry, King Boss and First Mate. I thoroughly love what I do, creating art with others and chicken therapy!
Amber Gordon is the owner of ArtBarnATX. She teaches art at Laura Welch Bush Elementary in Austin, Texas. This article originally appeared in the March/April 2021 issue of Chickens magazine.
We Want To Hear From You
Tell us your story, and we may choose it to run in our regular “Chicken Chat” column! Email the story of your chickens in about 750 words to chickens@chickensmagazine.com(subject line: Chicken Chat). Be sure to include high-resolution images or photos of yourself, your chickens and/or your coop. The author of each issue’s published essay will receive a special farm sign and T-shirt from Stromberg’s Chickens and Game Birds Unlimited (800-720-1134; www.strombergschickens.com), which offers a selection of birds, books, supplies and equipment for the breeding, rearing and management of poultry, ducks, guineas, waterfowl, game birds, peafowl, pheasants, quail and doves!
The past three months have been memorable ones, full of discovery, growth, and—if you’re like me—dozens (hundreds?) of photos of your baby chicks as they transformed from fluffy infants to gawky juveniles. You’ve had to move your growing flock to a larger brooder one or more times.The day has finally come for one more move—into the coop.
That’s right, it’s time for your birds to move into their permanent home. You’re taking them to the coop you lovingly and painstakingly prepared for them a while back.
Before you transport your birds to their new digs, however, you’ll want to review these four suggestions to make the transition go as smoothly as possible.
Final Walk-Through
If you’ve had your coop equipped and ready to go for months, you’ll want to thoroughly inspect it prior to moving your birds in. Check the interior—floors, walls and ceiling—for condensation, water streaks or any kind of moisture.
These are signs that your coop roof might be leaking or that the coop’s joints, windows or doors are not weather tight.
Carefully inspect your roof for minute openings. Add caulking, weatherstripping or sealants along gaps in the framing and walls.
Be sure to thoroughly dry the coop’s interior. Replace any moist bedding.
Let the sealants dry at least 24 hours and, preferably, wait until it rains again to check if your repairs held up against the weather.
It’s quite possible that, in the time since you set up your coop, some squatters may have moved in and made themselves at home. Wild animals always seek shelter. An unoccupied outbuilding like a henhouse provides a perfect home for a variety of critters.
Check under eaves and in interior upper corners for wasps’ nests. Remember not to use insecticide to remove these. The chemicals can be toxic to your birds.
If you have an elevated coop, peek underneath to make sure no one claimed that space as a den. If you have a natural floor, examine it carefully for signs of digging, tunneling or burrowing. These can indicate anything from snakes and skunks to rats and raccoons.
Be sure to look for ants, earwigs and other local insects that may have set up house in your henhouse. If your henhouse has high rafters, you may want to also check for bats.
If your coop has become a wildlife residence, you may wish to consider calling a wildlife control expert. Then thoroughly inspect your coop to discover how these creatures got in to prevent their return once your flock takes residence.
Chill Out
Even though your chicks are fully feathered, this doesn’t mean you can plunk them into their coop and leave them to the mercy of the elements. This is especially true if you live in a northern or southern state where weather extremes are common.
A week before you plan on moving your juveniles out, take a temperature reading inside the coop. A well-built henhouse—especially one that’s insulated—should have a comfortable temperature within.
If it is too warm inside, consider opening windows or adding cross ventilation to create a breeze and get the air circulating. Ensure your windows are securely screened and that any vent holes you cut are covered with quarter-inch hardware mesh to keep predators out.
If the temperature is too cold, look for and seal drafts. And if your coop is equipped with electricity, consider mounting ceramic heating panels on the walls to add some safe heating elements.
Recheck the interior temperature a couple of days later to make sure it’s closer to what your youngsters are used to before they move in.
One mistake that those new to poultry-keeping commonly make when setting up their coop is equipment placement. Feeders and waterers tend to be secured at heights appropriate for adult birds rather than for juveniles.
Moving to a new home is confusing enough for your little ones. Make sure they can easily access what is already familiar to them.
Bring raised feeders and waterers down to your coop floor. Then adjust their height using bricks as your birds grow. If your coop’s roost is not adjustable, consider purchasing—or building—a stand-alone perch you can easily remove once your juveniles can jump up to their grown-up sleep spot.
We have kept chickens for five years in a small urban town in Rhode Island. Our inspiration? A visit to Hawaii, where we enjoyed fresh eggs every day.
We started with buying a used coop in preparation of getting chicks the next spring. But to our surprise, the coop came with a hen named Sunshine. And our flock of chickens (not to mention our coop and technology) has only grown since then!
We had two hens for a few years, then added to our family. This also started the coop development for the girls.
The expansion included three coops, a covered run and a chunnel through our greenhouse to a recreational area for the girls to forage during the day. Even though we are surrounded by concrete on three sides of our property, we have experienced many predator attacks, therefore they aren’t able to free-range through the yard anymore.
Andrea & David Rollin
We have a flock of Mille Fleur d’Uccle, Polish Frizzle, Blue Cochin, Ameraucana, Cream Legbar, Plymouth Rock, Brahma, French Copper Marans and a Silkie. They provide a variety of eggs (when they want to): blue, chocolate, white and brown.
Our chickens are very friendly and have even visited after-school programs in the past.
We utilize technology to care for our chickens. Wyze cameras show us their activity, and we share the links with friends to see them. Amazon’s Alexa plays music for them and also turns on the greenhouse lights.
A Wi-Fi enabled door is going in the chunnel that will close off the recreational area each night to keep the girls safe.
It’s not all technology here, though, and our chickens enjoy plenty of nature. We reside along the Pawtuxet River with a tree-lined view that overlooks a waterfall. We keep the girls entertained with Japanese knotweed, hanging lettuce and a chicken swing.
The coop has been repurposed with various materials and retrofitted with Brazilian cherry walls, French doors and teal blue accents. An old sink makes it easy to wash our hands when we’re finished playing with the chickens.
Andrea & David Rollin
The hens have been a great addition to our urban homestead, where we grow our vegetables, plant 250 garlic bulbs a year and have more than 100 different variety of plants! — Andrea & David Rollin, West Warwick, Rhode Island
This article originally appeared in the March/April 2021 issue of Chickens magazine.
Have you ever wondered why we paint farm buildings? Some folks might assume that exterior paints serve a primarily aesthetic purpose. A farm isn’t truly a farm unless it has a red barn (or at least a red shed), right?
And don’t the windows look better with their trim painted white?
Granted, aesthetics are a viable reason to paint farm buildings. And the more artistic among us can get very creative with hues and color schemes. But painting also serves a critically important practical purpose: to protect buildings from the elements, and prolong their existence as a result.
Consider a classic wooden barn. Wood is a natural product that doesn’t last forever. Left unprotected, it will eventually rot.
No one wants their barn to come crashing down as the wood degrades.
Some types of wood are more resilient than others. And treated lumber will resist degradation even better. But painting the wood adds another layer of protection, sealing out moisture and blocking harmful ultraviolet rays.
Basically, a coat (or two) of paint is a straightforward way to help your farm buildings stand strong for decades.
Paint’s Impermanence
There’s only one problem. Paint doesn’t last forever, either. It can chip. It can peel. And eventually, your bright barn will look decidedly less cheerful, with spots of bare wood showing through wherever the paint has lost its frontline battle with the elements.
So when you paint your barn and farm buildings, it isn’t a one-and-done deal. It’s an ongoing process, resumed whenever the current coats start showing their age.
You might be able to get away with touching up spots that have weathered prematurely. For example, a farmhouse porch might start to lose its paint between the door and the walkway, an area that sees heavy foot traffic. But once exterior walls start losing paint, you may have no choice but to remove the remaining paint (a pressure washer can do the trick) and start from scratch.
Spring is a good time to evaluate your farm buildings and determine if your barn and outbuildings might need a fresh coat of paint. Not only does a spring review give you a chance to analyze how winter weather affected your buildings, it also leaves you with plenty of time through the spring and summer to repaint as necessary.
If you’ve been on the ball with painting, you might find every building is in perfect shape, and none require any attention. In that case, good work and congratulations!
But if paint is peeling and you have a round of revisions on the horizon, consider this an opportunity to follow all the right recommendations. Maximize the time until the next paint job.
For starters, the type of paint you use is important. Latex paints are frequently recommended for exterior surfaces. But it’s equally important to paint in the right weather conditions.
The temperature should generally be above 50 degrees F. But don’t assume hot weather is better than mild weather. Hot weather can cause latex paint to dry faster than ideal, preventing it from adhering like it should.
And it goes without saying that you should avoid rainy weather, both before and after your targeted painting days.
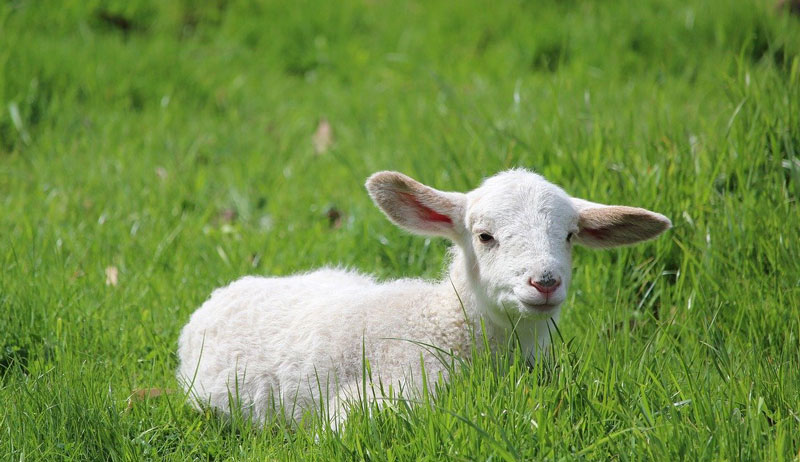
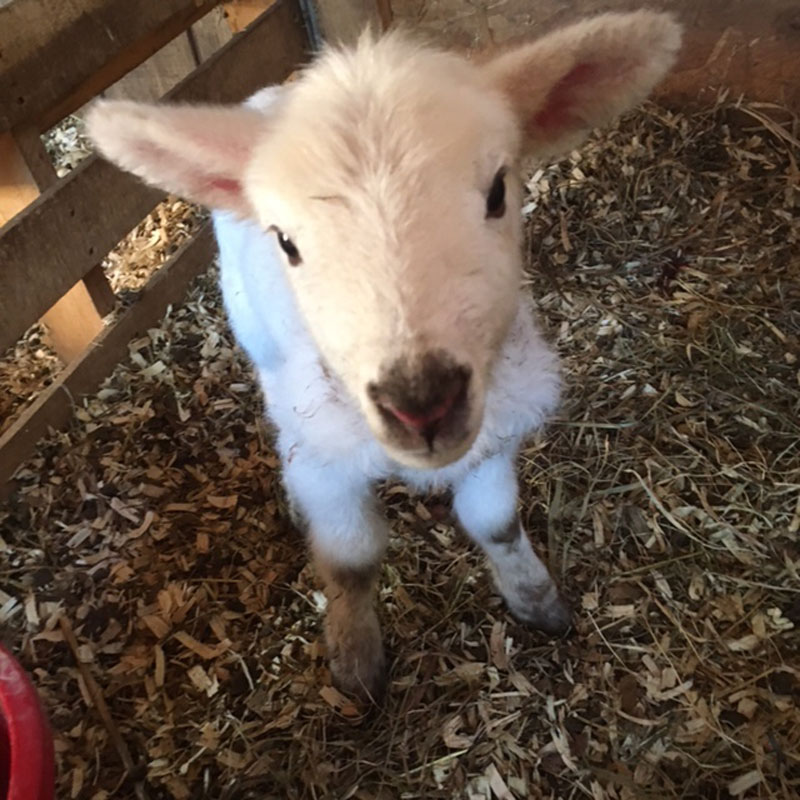
I have been waiting for early April like a kid anticipating Christmas. For me, though, the presents are baby lambs during our first lambing season!
We put our newly purchased ram in a field with nine ewes back in early November of 2020. Ewes, as it turns out, come into heat every 16 to 17 days until they are bred. Gestation for sheep varies slightly among breeds but averages out to about 147 days.
And so, I figured, it was possible the first birth could be Thursday, April 8. This wasn’t too far off. Our first lambs born were twins that made their appearance about noon on April 9!
Book Smart
I prepared as much as I could over the winter by reading about lambing. Also I participated in webinars given by experts who talked about what things to look out for. They covered dealing with problems at birth and what supplies to have on hand.
My kit of needed supplies was purchased and ready to go. I went out to inspect the ewes often, noting that several of them were developing large udders, especially the older ewes that had lambed before.
In fact, maybe I went out a little too many times. Our ewes would just look at me with a patient “What?”
Finally, about noon on Friday, my husband came into the house and asked me “to come out and help him with something.” As we walked toward the pasture where the ewes were, I noticed a small, light body standing by one of the ewes.
A lamb! At last!
As we got closer, though, I saw another small, slightly moving body lying down next to the ewe. Twins! My husband was also surprised, as he had only seen one when he came into the house.
This second lamb was still very, very wet. It was alive but not moving very much.
In spite of all my great preparations, I didn’t go get my bucket of birthing emergency supplies. Instead, I called my sheep mentor, who lives about two hours away. I told her about this second lamb who was not getting up but was obviously alive and looking around.
She chuckled and said to give it about 30 minutes. Was the ewe paying attention to the newest lamb? she asked. I replied that she was beginning to lick her off a bit, but then would go back to the lively oldest lamb.
She said as long as the new lamb stayed near the ewe, I should just remain patient. We hung up.
Jana Wilson
The Waiting Game
With rain threatening and sprinkles starting, I sat down on a stump and waited. My husband and son, who came out with me, left with promises to return the minute I needed them.
After 30 minutes I noticed the ewe spending more time with her wet, quiet lamb. She licked the lamb regularly, who struggled to get up. And just as I reached to call my mentor back again after 45 minutes, the newest lamb tried one last time–and stood up!
I pumped my fist in the air! My husband saw that and came over to the pasture. He is as new as I am to lambing, so when he asked, “What is that red ball coming out of the back of the ewe,” I panicked!
What? It looked ominous to me and I called my mentor back. I had heard of vaginal prolapse after birth. After a quick Google search on my phone right there, I was convinced that is what it was.
(A side note: Don’t rely on Google searches on a small iPhone in the middle of a field during lambing).
My mentor, as usual, was calm. “Well,” she said. “If you are sure it’s a vaginal prolapse, you’ll need to get her into the barn, clean it off and push it back in.” She explained that I would need gloves and lubricant to do that.
And, if it did not stay in, I would need to call our vet.
Well, finally, I had a need for all those supplies. We picked up each of the two lambs and lured the ewe to the barn. I had warm water, towels, gloves and lubricant. I was ready.
I cleaned off the back end of the ewe and pushed the red bag bag inside of her. But wait, there were two bags? And neither of them would stay in as liquid gushed out of the bags.
Identification Is Key
I called my mentor once again (she is infinitely patient) and she said, “Are you sure it’s not afterbirth? It sounds an awful lot like that.”
Oh boy. She was right. I had tried to push the afterbirth back inside the ewe. This is definitely not a good idea. I felt like an idiot!
Honestly, I could have done some real damage. I have read that you should never pull the afterbirth out for fear of tearing and infection.
After checking the ewe’s teats to make sure milk was coming out of both sides, I left the ewe and her new twins alone. I returned a few hours later to find the afterbirth had expelled itself.
Jana Wilson
Learning from Mistakes
You can never plan for everything, and learning from mistakes is inevitable. I’m just lucky things turned out so well with our first lambing and we have our first two lambs of 2021.
Afterword: Monday, April 12: I went out this morning before finishing this blog to check on my ewes and found two new sets of twins in the barn! All look healthy and happy and I’ll get everyone settled in a stall to bond for a day or two.
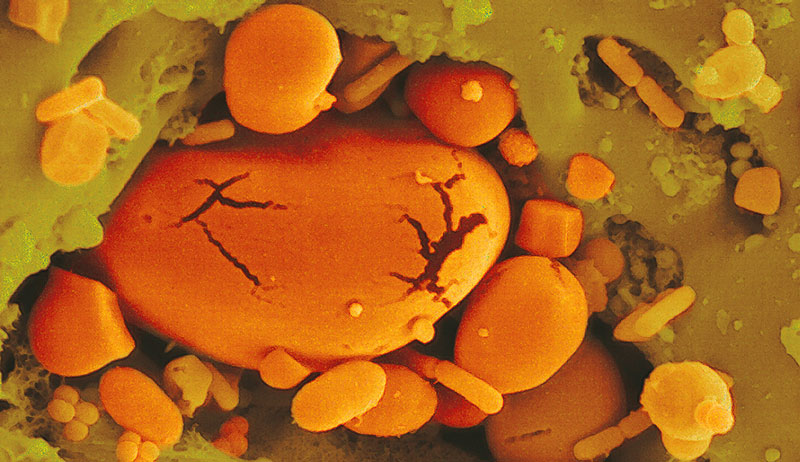
The following excerpt is from Sandor Ellix Katz’s new book, Fermentation as Metaphor (Chelsea Green Publishing, October 2020), and is reprinted with permission from the publisher.
We need the bubbling transformative power of fermentation.
These are very scary and uncertain times. The specter of climate change alone calls everything we have known into question: rising temperatures; melting glaciers; rising seas and shifting currents; more extreme weather patterns, with bigger, more dangerous storms, displacing growing numbers of people; less predictable agriculture with resulting crop failures; new vulnerabilities to pests and diseases; and a cascade of effects as yet unrecognized or unimagined.
Mass extinctions are already occurring, and ecological balances are destabilized. Our insatiable appetite for resources not only accelerates climate change but also leads to deeper and more destructive extraction practices. Income inequality grows ever starker as technology and cheaper globalized labor replace workers. Racism and sexism persist, both in systemic structures, and spread and exploited by a growing politics of resentment.
Magnified sourdough culture (Sandor Ellix Katz)
The shocking jolt of the COVID-19 pandemic on all social, public, and economic life illustrates just how vulnerable our entire mass society is to disruption. In this case it was a virus that sent shock waves that have been felt everywhere, most acutely in densely populated cities. Sometimes society is disrupted by more localized phenomena, such as wildfires, floods, tornadoes, or earthquakes. Not to mention war, going on somewhere always, and in some places for protracted periods.
For all these reasons and more, humanity is desperate for transformation. Our way of life is proving to be unsustainable. We need to reimagine how we live our lives. Now more than ever, we need the bubbling transformative power of fermentation.
I definitely do not wish to suggest that the simple act of fermenting in your kitchen will save the world. I wrote in Wild Fermentation of fermentation as “a form of activism.” I stand by this notion, but not because there is anything inherently political about fermentation.
People can be narrow in their focus, and often the reasons people ferment are specific, for example preservation of garden vegetables, or a desire to improve health, or the pursuit of compelling flavors.
Magnified moldy cooked millet (Sandor Ellix Katz)
The only thing that makes do-it-yourself fermentation radical is context: our contemporary system of food mass production, which is unsustainable in so many ways. Our dominant food system is polluting, resource-depleting, and wasteful, and what it produces is nutritionally diminished, causing widespread disease. Perhaps even more profoundly, it deskills and disempowers people, distancing us from the natural world and making us completely dependent on systems of mass production and distribution—which are fine as long as they function, but are vulnerable to many potential disruptions, from viral pandemics to fuel shortages or price spikes to war and natural disasters. Expanding local and regional food production, and in the process transforming the economy that goes along with it, is the only real food security.
Food and food production are quite profound as we try to shift our relationships to the Earth and to one another. Food can be a means of building and strengthening community. Producing food is a very ethical way to channel one’s energy. You’re doing something productive and creating some sustenance for yourself and other people. Localizing food production stimulates local economies more broadly, by recirculating resources rather than extracting them. Getting involved in food production can also help us feel empowered and more connected to the world around us.
We must find ways to reorganize our society, to move from being driven by resource extraction toward a dedication to regeneration. I do not mean to sound preachy, here. I’m not entirely living what I advocate, so I can be viewed as a hypocrite. I mean, I fly more than almost anyone else I know in my fervor to share fermentation. And in my home life in a rural area, I drive almost everywhere I go. I greatly admire people who live their ethos and entirely eschew planes, or all fossil-fuel-driven transportation, but in my life I have defaulted to the path of mobility, like most.
We, including me, definitely need to slow down our mobility and along with it our expectations of growth. What we need is con- traction: each of us leaving a much lighter footprint, with more equitable distribution of resources. We also need to shift from our focus on individualism to more cooperative, collaborative models for working together and mutual aid. I have no grand plan, and in our current corporate-dominated political system I’ve become skeptical of grand plans. But moving in this direction definitely involves getting more people plugged into the earth and life around us, the plants and animals and fungi and even the bacteria. This is what food production forces us to do—to be more tuned into our environment. Certainly this is true of fermentation.