The growing season can be a busy time. There is seemingly always more to do. In light of this, opting for more permanence in our garden (or gardens) is great strategy for staying on top of essential garden tasks.
A couple of ways to establish permanence include mindful construction of garden beds and crop rotation management philosophies. And of course, permanence in the garden involves …
Building Permabeds
Permabeds are an underlining design maxim in our farm and garden designs. They save time and money, and improve yield.
When we commit to a permanent location for our garden beds, we can begin to invest in the soil health. We minimize disturbance and maximize localized soil ecosystem regeneration. This permanence allows growers to organize production around the unique environments of each garden bed.
For example, we can learn which numbered Permabeds hold moisture longer into summer. These, we reserve for water-loving melons.
In a similar manner, we can understand that beds adjacent to laneways should grow broadleaved crops. We know they compete well against encroaching grasses without hampering traffic. And because we have Permabeds, we can integrate perennials seamlessly and put a bed of Rhubarb there.
Yet, this sense of permanence within the garden can also extend to how we manage our supplies and equipment on the farm.
Say I always use the same wrenches to shift the cultivators on my Farmall 100 between three-row weeding and one row hilling. I can opt to duplicate those wrenches, color-code them with red duct tape, and always keep them in the tractor tool box. If the job is always done with the same wrenches, then I can rely on this permanence and plan around it.
It’s like having plenty of shear bolts on hand, since you know they tend to break.
Zach Loeks
On a similar note, what if we zipper two pieces of weed barrier to make a seam in the center row between two Permabeds for planting tomatoes?Because we have chosen to zipper the weed barrier together instead of burning holes in it, we can opt to use this weed barrier for completely different jobs in the future.
This way, it remains permanently useful, not requiring “spacing of the moment” modification.
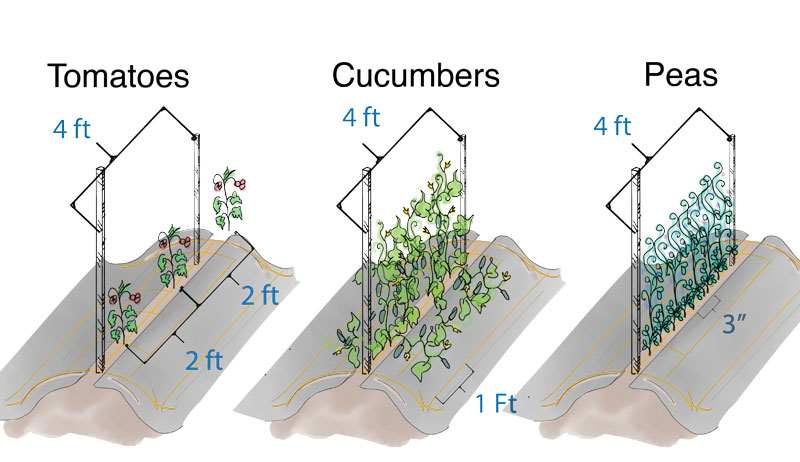
Or consider designing several beds in the garden for trellis crops, such as peas, tomatoes or cucumbers. You can simply rotate these three key trellis crops between permanent trellis beds! Just move the T-bar, rebar, or wooden trellis stakes with them each season.
When we begin to think about permanence in our garden, our view of growing starts to change.
We find the idea of planting a micro fruit forest along the northern laneway for a long-term crop of cherries, plums and currants isn’t too difficult to manage for a vegetable gardeners. And we come to view running back to the barn for the right wrench as a permanent waste of time.
By minding permanence in our garden we find novel solutions for the many routine obstacles, while also managing a more sustainable garden ecosystem.
Fermented asparagus pickles are a tasty snack straight from the jar. They also make a delicious substitute for a dill pickle spear on the side of a sandwich.
Fermenting the stalks is a great way to extend the harvest. And they are a surprisingly scrumptious addition to a relish platter as well.
Yield: 1 quart jar
Ingredients
1.5 lb. asparagus, uniform in size if possible (the thicker the stalk, the tougher it will be)
2 sprigs fresh dill
2 garlic cloves, smashed
1 bay leaf
2 slices of lemon, thinly sliced (optional)
Brine
1 tbsp coarse kosher salt dissolved in 2 cups of water
Preparing Fermented Asparagus Pickles
Clean the asparagus spears thoroughly and trim the woody tough ends off. They should fit into a quart jar, with about 1.5 inches of headspace (from top of asparagus spears to the rim of the jar).
Add the dill and garlic to the bottom of the jar and gently pack the jar with asparagus spears. Fit them in snugly. It helps to hold the jar horizontally while filling so you can easily stack the spears in.
Tuck the bay leaf and lemon slices (optional) in the side of the jar. Be mindful not to bruise, crush or break the spears while filling the jar.
Once the jar is filled, mix up the brine. Pour the brine over the asparagus spears until they are completely submerged by at least 1/4 inch of brine. If you have a small fermentation jar weight, add it to the jar to hold down the asparagus under the brine.
Remove any small pieces of food that float up to the top of the brine. Produce above the brine will increase the risk of the ferment spoiling. Wipe off the rim of the jar with a clean dampened towel. Add the Mason jar canning lid and tightly screw on the ring.
This is a 7-to-10-day ferment. Ferment at room temperature, ideally between 60-75°F (15-23°C) and keep out of direct sunlight.
Check on the ferment daily to make sure the brine is covering all the produce. If the produce has floated above the brine level, use a clean utensil to push it back below the brine.
Burp the jar daily. Unscrew the lid briefly and tighten it back on to allow any built-up gas to release (and avoid possible jar breakage or the ferment from overflowing).
After one week of fermentation, taste test an asparagus spear and see if it has the garlicky, dilly flavor that it should have once fermented. If it tastes too much like asparagus in the raw form, replace the lid and ring and allow it to ferment another few days and taste test again.
Once the ferment has reached your ideal flavor, transfer the jar into the refrigerator, with the brine and all.
Fermentation does not stop once the ferment is transferred to the refrigerator. However it does slow the process way down. The taste and texture will continue to change, so this ferment is best enjoyed within six months.
Side Notes
If you do not have a glass jar weight, you can improvise by using an easily removable small food-grade glass dish that fits inside the jar. Or, if you have a smaller glass canning jar that can fit into the mouth of the jar you are fermenting with, you can use that to keep the produce pushed under the brine.
If you are unsure if your water is safe for fermentation, you can boil it. Allow it to cool to room temperature before stirring in the salt to make your brine.
You may use fine sea salt instead of coarse kosher salt if you prefer. Simply adjust the recipe to 1 1/4 tbsp. fine sea salt.
This recipe has been adapted from WECK Home Preserving with permission from Skyhorse Publishing, Inc.
“I didn’t realize I was going to be so passionate about goats!” says June Small, the owner of The Small Farm, an 8-acre enterprise situated just outside of Texas city limits that she runs with her husband.
Goats play a starring role at The Small Farm—and their milk makes its way into a range of handcrafted beauty products that Small offers for sale. “There’s wonderful skin benefits to using goats milk,” she explains.
Taking time out from daily farm duties, we spoke to Small about the charms of Nubian goats and the virtues of ruminant poop. We also got the details about moving an entire hobby farm from Colorado to Texas.
Small says that both she and her husband grew up with grandparents that practiced homesteading—an experience that eventually drew them both toward the lifestyle.
After leaving the suburbs in 2012, they bought property in Colorado before deciding to move to Texas four years later to be closer to family.
“It was crazy,” says Small of the logistics of the move. “We had to do three different trips, and each was 1,000 miles. The first was a tractor on a flatbed trailer along with horses, the second was all my goats and more farm equipment and then the third was finally our stuff!”
Back in 2012, Small hadn’t even been close to a goat, but she did hear that the animals “were good for weed control and that their poop is great fertilizer.”
Suitably inspired, Small secured a couple of goats and fell in love with the Nubian goat breed.
These days, the original two incumbents have bloomed into a trip of 20 goats.
“Goats are so sweet, and they’re very kind,” says Small when asked what it’s like to be around the animals all day.
“A lot of people get nervous around goats if they haven’t been around them before, but goats are prey, not predators, and they can be scared easily,” she adds. “But for the most part they’re really gentle and sweet animals that just want to eat grass all day.”
The goats at The Small Farm also contribute to the beauty line that Small produces.
“I put goat’s milk in a lot of our products along with our beeswax,” she explains. “I originally got started using goat’s milk to make soap and lotion for friends. Now I get a lot of great feedback from people struggling with eczema and dry skin, so there’s clearly some good things in there.”
When it comes to the joys of a farming lifestyle, Small says that she “loves what it’s doing for our kids” most of all.
“I love that they’re learning that it takes a lot of work to run it,” she explains. “We’re busy all the time with it, but there’s a great deal of rewarding feeling seeing your animals grow and improve year over year.”
Once soil temperatures reach 64 degrees F, folks living in several U.S. states will be in for a treat—or a horror show depending on their point of view. It’s nearly time for “Brood X” periodical cicadas (Magicicada septendecim) to emerge en masse throughout Indiana and in parts of Illinois, Ohio, Michigan, Tennessee, Georgia, North Carolina, Virginia, West Virginia, Maryland, Washington D.C., Delaware, New Jersey, Pennsylvania and Connecticut.
The last time they made an appearance was a whopping 17 years ago. Based in Bloomington, Indiana, at the time, Keith Clay experienced “Brood X” for himself in 2004 and 1987.
“Ninety-nine percent of the lifecycle is below ground where you don’t see them. But when they come out of the ground it’s pretty amazing,” he says.
Clay is an Indiana University Department of Biology distinguished professor emeritus. He has since moved to New Orleans to chair the Department of Ecology and Evolutionary Biology at Tulane University.
The 17-year cicadas will number in the billions—and they’ll make a real racket. “If you heard it in 2004, it’s kind of a science fiction-y, alien-sounding thing,” Clay describes. “It ebbs and flows and can get louder and louder. It’s incredibly intense and then it dies down and then it starts up again.”
They’ll make an impression in other ways during the few weeks that they spend above ground. “We had a dog that just stopped eating his food because he was eating so many cicadas,” Clay recalls.
Illustrations from Images from Insects: Their Ways and Means of Living by Robert E. Snodgrass, U.S. Bureau of Entomology (Smithsonian Scientific Series, 1930)
Dogs, cats, chickens, turkeys and other livestock positively love chowing down on the edible periodical cicada. So do people with relatively adventurous palates. (Some say cicadas taste like asparagus. Others suggest they’re more like seafood.)
There are some caveats though. People and pets with shellfish allergies might have adverse reactions. The large, rough insects could be a choking hazard, too.
Wild animals also eat their share. If you live in a Brood X state and you’ve noticed more mole activity lately than you’re used to, 17-year cicadas may be just under the surface.
“One of the early warning signals [for cicada emergence] is mole activity in lawns,” Clay explains. “You can see these mole hills where the soil is piled up and they form these underground runways. The moles are gorging on these cicada nymphs below ground…. It is a lot of food for animals that forage below ground like moles do.”
Because there are simply so many 17-year cicadas, widespread predation doesn’t seem to slow the species down. Still, if you have young trees, you just might wish that something could stop the insects.
“They’re basically parasites on trees,” Clay notes. “They spend 16 years and 11 months feeding off of the root systems of trees.”
And after they emerge? “They climb up something and molt to the adult stage,” he continues. Adult males then head for treetops to call to and subsequently attract potential mates. And, for their part, adult females lay their eggs inside small tree branches.
Usually, they choose twigs that are about the size of a pencil. They’ll puncture these with their ovipositors and leave behind rows of eggs. Upon hatching, the young cicadas will burrow deep into the soil for the next 17 years.
As Author Robert E. Snodgrass described in his 1930 work, Insects: Their Ways and Means of Living, “Soon the twigs of trees and shrubs are everywhere scarred with slits and punctures where the eggs have been inserted. In a few weeks the noisy multitude is gone, but for the rest of the season the trees bear witness to the busy throng that so briefly inhabited them by a spotting of their foliage with masses of brown and dying leaves where the punctured stems have broken in the wind.”
Limiting the Damage
If you have very young trees you hope to protect, you might want to shield them using large tomato cages covered with very fine netting or floating row cover. Use landscape staples to secure the material over the tomato cage and into the ground.
Overlap separate pieces of fabric as needed. Look carefully for any unprotected areas that a cicada might be able to sneak through.
Finally, if you had planned to install some new shrubs or saplings this spring, you might want to keep them potted up and stored safely indoors until the 17-year cicadas have gone for good.
“By the end of June, it will be pretty much over,” Clay says. Until 2038, that is.
Your brooder stands ready, heated at 95 degrees and awaiting the chicks that your hatchery or breeder of choice shipped out to you yesterday. You try not to pace, waiting for the phone to ring.
Finally, the call comes in. Your chicks have arrived at the post office! You hightail your way there and the clerks are all smiles … until you identify yourself.
Suddenly, the smiles vanish and the clerks exchange concerned looks. One goes back to retrieve your shipment, returning with a sturdy ventilated carton. “I’m sorry,” she says. “All the other boxes are peeping. You’ll need to open this here so you can file a claim.”
It’s heartbreaking to be the recipient of this kind of news—and of this kind of shipment, especially when you can clearly hear other boxes of chicks peeping loudly somewhere in the back of the post office.
Unfortunately, sometimes things go wrong when live chicks are shipped. Loss can stem from such factors as:
Exposures to heat or cold
Delays in transit
Blocked breathing holes during shipment
Mishandling
Should this occur to you, here’s what you need to do.
Filing a Claim for Loss with the Post Office
The U.S. Post Office (USPS) accepts very few live animals for shipment and only if certain specific conditions are met. Likewise, if certain conditions are met, the USPS will accept an indemnity claim for the loss or partial loss of your chicks. This conditions are death resulting from handling errors, from damage to the shipping carton during transit, and from loss or delays in transit.
You must open the carton at the post office and file the claim immediately on site. Ask to speak to the postmaster about filing a claim. He or she will provide you with the form to complete. Most likely, they will also photograph your deceased chicks to accompany the claim.
Filing a Claim for Loss with the Hatchery or Breeder
The postmaster may conclude, upon inspecting your chicks, that the fault does not lie with the USPS but with the hatchery or breeder.
This might also be glaringly obvious. The shipping carton may not have been sturdy enough for shipping live chicks or may not had enough—or any—ventilation holes.
Too few chicks may have been packed in the carton, causing hypothermia. There may have not been enough bedding to cushion the chicks.
Bantam chicks may have been packed with larger chicks, which inadvertently crushed the smaller birds. The same can happen if too many chicks are shipped together. Sadly, too many causes exist that can lead to the death of shipped chicks.
Even if the USPS is not at fault, request a statement from the postmaster testifying that the chicks arrived dead. (This is another reason that it is crucial that you open your shipment immediately at the post office.)
Next, call the hatchery or breeder, preferably from the post office in case they wish to speak to the postmaster. Most hatcheries have some sort of shipping guarantee for baby chicks: some have a 100 percent guarantee, while others require you to notify them within a certain timeframe from when the shipment was received.
Private breeders may or may not have a guarantee for shipped chicks, so be prepared in case your breeder does not offer to replace the lost chicks. If possible, inform the hatchery or breeder of what seems to have caused the chicks’ demise so that this can be addressed prior to sending out replacement chicks.
Sometimes, there’s still hope: one or more chicks are still alive, but in desperate need of help. Get these chicks home as quickly as possible. Put them right in your brooder so that they can start returning to their proper body temperature.
Stay with them and gently stroke their bodies to help stimulate responses.
Once the chicks begin to react, it is crucial to offer them some form of rescue nutrients. Chick electrolytes and chick gel both come in powdered form for convenient storage. Mix chick gel with water to become a hydrating, easily swallowed and digested gel that contains essential nutrients. It can help revive shipped chicks.
Chick electrolytes mix into the chicks’ drinking water to help stressed birds. If the chicks do not notice the waterer or gel, gently dip the chick’s beak in so it gets a taste. Wait a bit, then repeat. Do this with all the surviving chicks.
You’ll need to keep careful watch over your baby poultry for the next 24 hours. Keep offering them gel and electrolyte water. Stroke them from time to time to help stimulate response.
Keep in mind that your chicks will be exhausted from their double ordeal—shipping and a near-death experience. They need to sleep a lot. A comfortable sleep, however, is a sure sign that they are on the road to recovery and a full life ahead.
My wife, Chris, and I’s Easter Egger hen, Frittata, just could not bear to have Carbonara anywhere near her. This was strange because Frittata is the smallest of our hens and had always seemed at the bottom of the pecking order. Plus, they had been hatchlings together and gotten along fine for a couple years.
But something had changed.
We assumed this was just an attempt by little Frittata to move up the pecking order and things would settle down once the new arrangement was accepted. Hens will do this from time to time as they get bigger or feel bolder or as a higher-up gets older and loses stamina.
The higher up one is on the pecking order, the sooner it gets to eat and drink. And it gets more of any limited amounts of food, such as treats. It also can claim better spots on the roost.
So there’s plenty of incentive to promote oneself.
But after a couple weeks, Frittata was still pecking Carbonara, who made no moves to defend herself. She was willing to acquiesce to demotion.
For Frittata, though, this still seemed personal. She was being a bully. So we sequestered her in the folding dog crate with food, water and shade just to separate the two for a few days. She and the crate were inside the pen, so she was safe from predators and close to her sisters.
The Plot Thickens
But with Frittata out of the picture, Gelato took over her job and chased Carbonara around the pen. We noticed that to catch a break, Carbonara, the younger of our two Buff Orpingtons, started spending her days mostly in a nesting box … everyone’s favorite nesting box.
We moved the wooden egg to another box, but everyone still seemed peeved about the whole thing. Carbonara even slept there at night instead of joining her sisters on the roost.
So, we furloughed Frittata, scooped up Carbonara and put her in the crate so she would be out of everyone’s way. Everyone stayed calm, so after a week we returned her to the general population and things were fine again. While sitting in our Adirondack chairs for our nightly “chicken television,” we watched Gelato and Frittata pal around with Carbonara as if nothing had ever been awry.
That is, until Frittata looked up at Carbonara. We could really read her change of heart on her face: “I remember who you are now. And I suddenly can’t stand you again.” Pecking, chasing and harsh squawking ensued. Carbonara retreated again to “her” nest box.
Chris and I checked through our chicken books. We compared notes on what we’d each seen in our chicken habitat. We made a significant effort looking for a way to solve this problem and remove reasons for conflict.
plenty of food or water: check!
plenty of roosting space: check!
sufficient outdoor space (only six hens in a space built to house as many as 10): check!
no bleeding or deformities in any way that would attract “beaky” attention: check!
The only questionable thing we saw was that she did like to climb on top of the waterer—which was difficult to do—and sort of crow for an extended period once a day at least. She was not crowing like a rooster, more like the crowing that happens when one chicken has laid an egg and a general celebration goes up.
They all did that briefly at appropriate times.
Frank Hyman
But this crowing was very lengthy and not related to egg-laying. And it didn’t seem to be that she was suffering from testosterone poisoning either. We live in town, so we don’t have a rooster.
She wasn’t challenging our oldest, dominant hen, Buttercup, for position. And she didn’t fight back against Frittata or any of the four others when the rest of the flock decided they wanted to do the popular thing, too, and lay into Carbonara and be part of the general, noisy, stressful mayhem.
Try, Try Again
We put Carbonara back in the dog crate and things went back to normal. The other hens ignored her, and she didn’t crow. Since leaving her for one week the first time helped for a while, we decided to sequester her for two weeks and see what happened.
We released her. Everyone got along. For about twice as long as the last time. Then, everyone suddenly remembered what they didn’t like about Carbonara. The pecking order tipped back, and it was like watching that movie Mean Girls.
We never saw any blood, but the amount of noise was constant unless Carbonara was in her nest box. We worried that she would not get enough to eat or drink under these circumstances.
As a general rule, when the pecking order stops being a source of productive harmony for chickens, it’s because the other hens sense some kind of threat from another chicken and want to exclude her from all their reindeer games for their own safety.
We wondered if Carbonara’s pointless crowing could be a form of mental illness. And perhaps the other chickens saw her behavior as some kind of threat.
Did they worry that she would attract predators perhaps? Did we need to dose Carbonara with something like poultry Prozac?
Neither medication nor talk therapy seemed like a viable option. Yet here we were watching Mean Girls 2: The Sequel. But it was in our own backyard and not make-believe.
Something had changed in the pecking order. Carbonara couldn’t do anything right. The others were henpecking her in an effort to restore the harmony of the flock. But she somehow wasn’t complying with protocols.
She didn’t fight back. So she didn’t seem to be disputing her position in the basement of the pecking order.
It seemed that the hens had an unresolvable problem. And neither our efforts to sequester the victim or the main bully resolved the problem. We were stumped.
Frank Hyman
We put Carbonara back in the crate a third time just to have some quiet and to make sure she would get enough to eat and drink.
Resolution
In my main business, designing and installing plants and garden structures, I sometimes advise clients that we first have to engage in a practice that we professionals call “landscaping by subtraction.”
Your yard may have some perfectly good plants that are just not a good fit for your future garden for any number of reasons: too big, too weedy, stinky flowers (yes, some flowers prefer flies over bees as pollinators).
It can be sad to remove plants sometimes. But they often may find a home somewhere else, and the opportunities revealed by their absence always make up for that.
We realized we had to engage in a bit of “hen-keeping by subtraction” for the good of our flock. Because we thought Carbonara’s behavior was provoking conflict with what had been a peaceful flock for seven years, we couldn’t in good conscience give her to another chicken-keeper.
And because our chickens are our egg-providing pets, we literally couldn’t stomach the idea of slaughtering her for our own consumption.
I asked one of my rural colleagues if he would be interested in a free hen for his table. His eyes brightened, and he said his sister could make a very good soup. So, we had a few kind, last words with Carbonara.
She had been a good, beautiful and productive hen for a couple years. For some reason, she had started annoying her sisters, and consequently, she wasn’t happy either. We gently put her in a pet carrier and gave her to my colleague who was respectful and whispered to her as he put her in his truck.
Chris and I both let out deep breaths as he drove away. We sat outside to watch some more “chicken television.” The pecking order was stable. The hens cooed as they foraged.
It was a pleasant relief that Mean Girls was not playing on any of the channels.
This article originally appeared in the March/April 2021 issue of Chickens magazine.
We asked veterinarian Jan Pol, the star of Nat Geo WILD’s “The Incredible Dr. Pol,” what are five tips he would give to backyard chicken-keepers.
1. Keep It Clean
First, of course, is start with clean, healthy pullets. Get them from a reputable hatchery or store. Don’t put them in a dirty pen, even if it has been empty for a couple years.
2. Set Things Up
Make sure pullets are warm (but not hot) and have clean water and food. Put [feeders and waterer] on a board or something higher than the floor. Otherwise, [they] will be full of bedding in no time.
When the chicks get bigger, make sure the area gets bigger, too, and that they have roosting spaces enough for all the chickens. Once the chickens start laying eggs, there should be enough nest boxes, and they should be clean and kept clean.
4. Lighten Up
In the winter, there should be a light in the coop to give them daylight for about 16 hours per day [if you want to keep up laying production].
If there are not enough chickens to keep the coop warm, then you also need a heat lamp. Many other heat sources get so dusty that they stop working. Even the heat lamp needs to be dusted off regularly.
And last of all, chickens are on the bottom of the food chain. Everybody and everything eats chicken! So make sure the fences are varmint-proof because many animals will get in a coop and just kill chickens for fun.
If you have a chicken die, don’t panic. However, if you have more than one die in a short time, let a veterinarian do an autopsy. It is easier that way to make a diagnosis than on a healthy live bird.
I hope some of these points will help you keep a healthy backyard flock!
To learn more about Dr. Pol, please visit his website: www.thedrpol.com. This article originally appeared in the March/April 2021 issue of Chickens magazine.
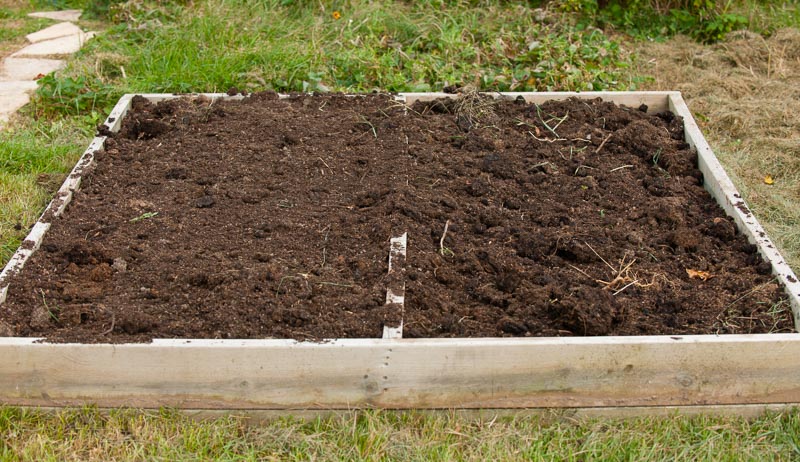
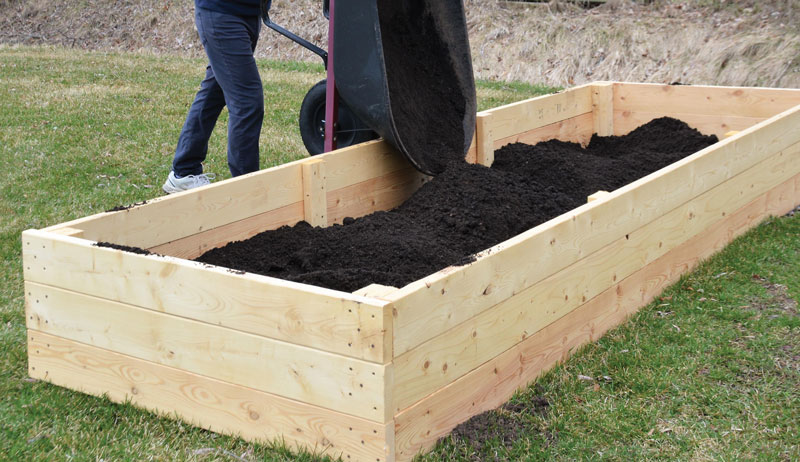
Spring is underway, and chances are you’re busy preparing your garden for planting season. If you’re keen to expand this year and grow more of your own food, you’re probably thinking about building raised garden beds. But building beds is only half the battle—the next step is to fill them with quality soil.
Whether you’re pulling the soil from your own compost pile or sourcing it from another location, you’ll need to calculate the volume of soil you need. This goes double if you plan to add amendments to the soil.
To make sure you don’t apply too much (or too little), you need to determine the volume of soil and distribute the amendment accordingly.
Fortunately, it’s easy to calculate how much soil you need to fill a raised bed. Yes, it involves a little algebra, but there’s no need to run screaming in another direction! This isn’t the imposingly complicated and theoretical algebra you learned in high school.
Here’s the magic formula you need to calculate soil volume in raised garden beds:
W x L x D = Vft3
Confused? There’s no need to be—this is really just a straightforward multiplication problem. It only looks complicated because we haven’t punched in the real numbers yet.
Break It Down
Let’s explain the variables in the equation:
W = the width of your garden bed, in feet
L = the length of your garden bed, in feet
D = the depth of your garden bed, in fee.
V = the volume, in cubic feet, of soil you will need to fill the bed
Now, let’s replace the variables with numbers. Suppose your garden bed measures 3 feet wide by 8 feet long, and you want to fill the bed 12 inches (1 foot) deep. Suddenly, the equation looks more like a real math problem:
3 x 8 x 1 = 24ft3
If you want to fill the bed 2 feet deep, you’ll need twice as much soil. This is reflected in the updated equation:
Now let’s change up the numbers significantly. Suppose your bed measures 4 feet wide by 10 feet long, but you only wish to fill it 8 inches (0.67 feet) deep. So long as you remember to convert inches into feet, the formula continues to work just fine.
4 x 10 x 0.67 = 26.8ft3
If you would like to measure using a unit other than feet, feel free to do so! Inches, yards, centimeters, meters—all can be used with accurate results, so long as you don’t mix and match different units of measurement:
Meters: 1 x 3 x 0.5 = 1.5m3
Inches: 12 x 36 x 6 = 2,592in3
This same formula can be used to calculate the carrying capacity of a wagon or trailer. Suppose you plan to haul compost to your garden in a wagon measuring 4 feet wide by 9 feet long and 2 feet deep. If you fill this wagon to the brim (and level off the compost so it’s not heaping above the sides of the wagon), you’ll be hauling exactly 72ft3 of soil—enough to fill three beds measuring 3 feet wide by 8 feet long and 1 foot deep (containing 24ft3 of soil).
Congratulations! You have successfully calculated how much soil you need to fill your raised garden beds. Happy growing season!
Small farming, whether in the country or the suburbs, is a year-round adventure. There’s lots to do, from planting crops to building a compost pile to feeding the small flock of chickens in the backyard.
Use these tips and tricks to get the most out of your garden in each season.
Spring Suggestions
There’s more to this season than just planting a garden.
Herbs
Most gardeners cut back perennial garden plants in the winter season. Don’t do that with culinary herbs. You could kill them.
Rather, cut them back in mid-spring. Most culinary herbs evolved in the Mediterranean region, where the mild winters didn’t teach them how to go dormant. Cutting them in fall or winter could provoke them to make new growth during warm spells.
The new growth can then get killed by a cold snap.
Wait for winter to pass, then give them an herbal ’aircut. Culinary herbs from the Mediterranean include bay, sage, rosemary, lavender, thyme, oregano, marjoram, parsley, cilantro and chives.
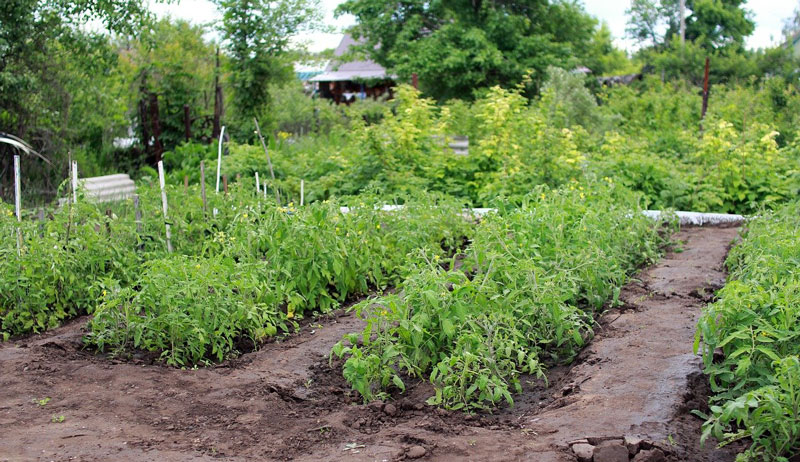
Tomatoes
Tomatoes need attendants in the form of a trellis. For Roma tomatoes and other determinate, short varieties, I use 6-foot lengths of rebar as stakes set in line between each plant. I then make sort of a cat’s cradle of jute string to hold them up.
When the plants are about 1 foot tall, tie the string to the first stake about 8 inches above the ground. Then loop it around each stake as you go up the row.
At the far stake, come back down the other side of the row, looping around each stake. Then tie the string off at the same stake where you began. The string will hold the plant up.
As it gets taller, run another line of string to hold it up every five days or so. You’ll have a sturdy trellis that doesn’t impede harvesting.
For indeterminate tomatoes, you’ll need a different system. I buy a roll of concrete reinforcing wire mesh from a building-supply business. This I roll out on my driveway and cut out 5 1⁄2-foot sections with a bolt cutter.
I roll it up into a tube and fold over the cut ends of the mesh to hold its form. This creates a tomato cage 18 inches in diameter and 5 feet in height. Attach it to a stake so it doesn’t blow over and you’ve got a good-looking trellis that can store outdoors with 6-by-6-inch openings for pulling tomatoes.
One roll of this mesh is very heavy and makes about 25 trellises. So this may be a good group project for a community garden.
If you’re a market gardener, you may want to sell a bunch in the spring. I normally sell about 100 cages each year, many to previous customers.
Spring is weed season in the garden. But wait! A lot of those weeds are tasty, wild, edible vegetables. Keep an eye out for:
chickweed
sour grass
onion grass
burdock
dandelion
lamb’s-quarter
pokeweed
purslane
sheep sorrel
Even if you did get your mulch spread over the winter, some of these will come up in paths, lawns, vegetable beds and other unmulched places. When you pick and prepare them, they are tasty and more nutritious than many cultivated vegetables.
Many people use chickweed as a winter substitute for basil in pesto. Purslane makes great pickles. Sour grass and sheep sorrel add the taste of lemon to sandwiches and salads.
Pick up a copy of Scout’s Guide to Wild Edibles, Backyard Forager or anything by Sam Thayer to get up to speed on all the free gourmet food you’ve been tossing in the compost or feeding to the chickens.
Syrup
Have you ever wished you could tap some sugar maples for sap and cook it down to delicious syrup? You can tap sap, and you don’t need to be in New England or the upper Midwest. You don’t need sugar maples either!
If you have any tree in the maple family or a native nut tree, you can tap them in winter for sap. Tappable trees include:
red maple
silver maple
big-leaf maple
box elder
black walnut
hickory
pecan
The reason you haven’t heard of people tapping these trees is that these species don’t produce a commercially viable sap.
However, they’re plenty good as a backyard sugar bush using the same tools and techniques. The farther south you go, the timing becomes trickier. So you may have to engage in trial and error on several trees at different times to understand your local conditions.
Summer Solutions
The sun is shining, and no cold snaps are on the horizon. This is the season to get to work in the garden!
Raised Beds
The concept of using raised beds for growing vegetables developed in northern European regions with high rainfall in spring. Raised beds drain faster, and baby vegetables get more oxygen from the soil than plants in ground-level beds.
But there’s a trade-off in summer.
Raised beds in dry areas or in the dry season (such as summer) can leave your garden vegetables feeling very thirsty. So invest in mulch, soaker hoses and a timer to make sure that your summer vegetable garden is growing every day.
I recommend a 2-inch layer of mulch in perennial beds. But for annual vegetable beds that will get turned over, 1 inch is plenty.
Vintagepix/Shutterstock
Use shredded leaves, fine pine bark or coffee chaff (free from local coffee roasters). A good rule of thumb is that a raised bed in summer will need about 1 gallon of water per square foot per week if it doesn’t rain. So, a 4-by-12-foot raised bed will need about 48 gallons per week.
That’s about the same amount as a 50-gallon rain barrel will provide at one go.
Rain Barrels
Many people use repurposed plastic pickle barrels as rain barrels.
They’re the best option, in my opinion. I use a 300-gallon horse trough or a 275-gallon plastic international beverage container that has held food-grade liquids and can be found online (e.g., craigslist.com).
Connect either one to a downspout diverter from Gardener’s Supply. You’ll have lots of water for your raised beds in summer.
Bonus: The horse trough also serves as an aboveground water garden with mosquito-eating goldfish and aquatic plants (and marginal aquatic plants such as cardinal flower) that also attract hummingbirds and singing tree frogs.
Fruit
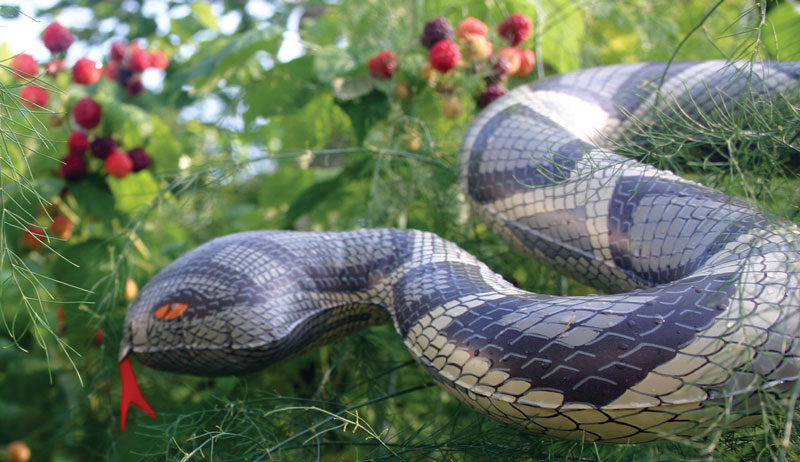
We all love fruit trees in summer. And birds love fruit especially. But resist the temptation to use netting to dissuade the birds. The stuff is a pain to work around when you want to harvest fruit every other day.
Plus, birds have a bad habit of getting their feet caught in them and then dying of thirst, which is not pretty.
It’s better to use inflatable snakes to deter birds. These are about 3-foot long, curly enough to hang on limbs and lifelike enough to deter birds. The key is to only put them out once the fruit is ripe. And then to move them every other day (the same ideal schedule for harvesting tree fruit) so the birds don’t start to think they are dead.
Frank Hyman
If you have a big tree, you’ll need more than one snake.
In my experience, snakes work great with all fruits except blueberries. For those, drive a few pieces of rebar into the ground that are taller than the shrubs. Then tie off and twist some Mylar ribbons over the blueberries. The flashing of light reminds birds of light flashing off the eyes of predator birds such as hawks.
Compost
You can have prime compost with no smells, no turning and no mess. And you just need a few simple things:
two well-made compost bins
a piece of hardware cloth to put under each one to keep out critters
a dry supply of brown material nearby (tree leaves or coffee chaff work best; keep it in a repurposed garbage can with a short-handled shovel inside)
a small nursery pot nearby with a trowel and dark-brown garden soil or compost as a source of microbes to add periodically to the bin
Dump kitchen scraps and garden scraps in the first bin. Sprinkle a bit of soil to add microbes, and cover lightly with brown material. Repeat until fall. Then do the same process with the second bin.
By the spring season, the first bin will have composted without needing to be turned, so just spread it in the garden and start dumping scraps there. By the fall season, the second bin will be ready to empty onto the garden.
Don’t bag up all your lawn clippings. Leaving grass clippings on the lawn feeds the soil microbes and fertilizes the lawn. It doesn’t promote thatch or anything else bad.
But I do always fill up one bag with clippings and dump it in the pen for my hens. They love fresh greens. Plus, some bugs and seeds will likely be in there for them to find.
Fall Crops
The time to plant fall crops is actually at the end of summer. If you wait until fall, it will be too cool, and your vegetables won’t have enough warmth to put on size before it gets cold and they stop growing almost entirely.
Plants are sort of like cold-blooded animals. Their metabolisms can only grow at the speed of temperature of the air and soil.
In zone 7 of North Carolina where I live, we plant fall crops around Labor Day, at the tail end of our hot summers. They need that last month of warm weather to grow quickly. We get broccoli by Christmas or New Year’s Day when we plant them soon enough.
If we waited any later, we may not harvest any heads until Groundhog Day!
Autumn Answers
During fall, there’s still much to do, include more planting, gathering compost material and more.
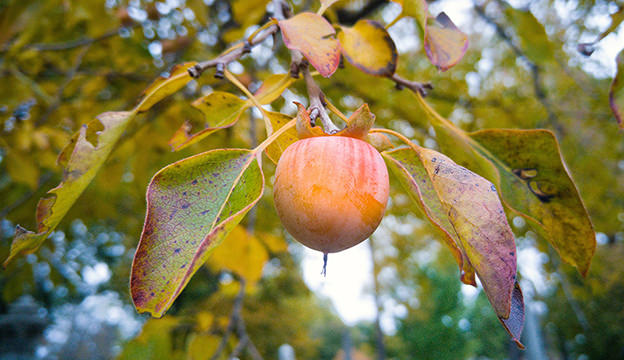
Persimmons
The native persimmon is a favorite, but you need to get acquainted with its ways. Just because the fruit has fallen doesn’t mean it’s ripe enough to eat. If the skin looks tight and smooth, they’re still unripe and will cause your mouth to pucker up severely if you take a bite.
Will Pollard/Flickr
Persimmons are ripe when they look like an overripe fruit that you would never buy if you saw it at the grocery store: wrinkled and soft. That’s what a delicious, sweet persimmon looks like.
Perennials
Fall is a great season for planting perennial garden vegetables, perennial flowers, shrubs and fruit trees. Even with cold weather coming, the ground will be warmer than the air. So roots can actively grow while it’s nearly freezing aboveground.
Planting after summer passes means that the roots have all fall, winter and spring to grow before they have to contend with the heat and dryness of summer.
Leaves
Fallen leaves are a great resource for the thoughtful gardener.
I really don’t know why so many folks invest so much time and money in bagging them up, sending them off to the landfill and then buying expensive mulch.
Leaves on the lawn can be shredded and bagged with a mower and spread at the base of trees or in perennial beds or vegetable beds for mulch. They’re also valuable for adding to compost or using as free bedding in the chicken coop.
Leaves that fall into a perennial bed can be lightly covered with a thin layer of pine needles. They look better and keep leaves from blowing around.
Splitting Perennials
Lots of perennials will be setting seed. Now is a good time to gather them and toss them where you want more plants. These are some of the perennials that I spread around the garden and share with friends:
Formosa lily
Lenten rose
blackberry lily
poet’s laurel
poppies
love-in-a-mist
parsley
cilantro
cleome
columbine
Frost
I think most gardeners worry too much about potential damage from a first frost. It’s the second frost a few weeks later that will be a killing frost.
But there is something easy you can do to protect plants from frost. Just water them.
If there’s plenty of moisture in the garden soil, the roots will stay warmer. And if your plants can absorb plenty of water, they can use it to make their own natural antifreeze to protect themselves from frost.
Cold weather, snow, ice, etc. don’t shut down a farm. There is still so much you can do to improve and enhance your homestead.
Mulch
Mulch is like birth control for weeds, which means it works best when used consistently and at the right time. Most weeds generate seeds in the summer and fall, and most of those weeds are tiny.
That means they needs sunlight to germinate.
Two inches of mulch will block that light and keep them dormant—a barrier method, if you will.
A brick is 2-inch thick and will serve as a handy gauge. In my zone 7 garden, I spread mulch between Christmas and Valentine’s Day, after herbaceous plants have gone dormant and before most bulbs come up. It leaving lots of elbow room for working.
In snowbound regions, spread mulch at the end of fall or the beginning of spring.
Prune Trees
Prune fruit trees during cold months. Learn to cut branches back to what’s called the branch collar, so they heal over well.
Bypass-style pruners and loppers will give you the cleanest cuts. And a folding pruning saw to help cut limbs to length.
If you heat with wood, save the trimmings for next year’s kindling.
Wood Ash
If you do heat with wood, don’t throw wood ash away. Some parts of the garden benefit from annual applications of wood ash to keep the pH high: culinary herb gardens, asparagus beds, vegetable gardens and Mediterranean fruit trees such as figs.
Ash can even be spread over the snow so that it sifts into the soil. Wood ash is only a third as strong as lime, so it’s unlikely you’ll apply too much.
Leftover Bulbs
Do you still have fall bulbs left over that didn’t make their way into the ground? Winter isn’t too late for planting bulbs.
If they get enough cold exposure, they’ll still flower in spring. If not, they’ll wait patiently for next year.
All bulbs want to be planted at a depth of about three times their width (same as with seeds). With a shovel, I dig one hole the right depth. Then, from a standing position, I toss in two to five bulbs and cover them up. I don’t worry about whether they are right side up or not.
When they come out of dormancy, they’ll be aware of gravity and send their shoots and roots in the exact right direction even if they are upside down. Nature is sturdy.
Cutbacks
Before the end of winter, cut back any ornamental grasses and other dormant herbaceous plants that you didn’t cut back earlier. Some grasses look fine with last year’s leaves in place, but some look better with the old grass removed. That’s mostly an aesthetic choice.
With ornamental grasses I use a hedge clipper and start snipping away a couple inches at the top and work my way down. That way, the clippings are small and can rest on the ground to decompose and I don’t have to haul them away.
You can also do this at the end of fall before spreading mulch.
Plant Early
Some spring vegetables do best when planted before spring actually begins: peas, potatoes, greens and all the cole crops (broccoli, cauliflower, brussels sprouts, cabbage). Your local garden center will know the best weeks in the season for early plantings for your region.
Potatoes will sprout sooner and with less effort if you use whole potatoes that are about the size of a chicken egg rather than quartering large potatoes and waiting for their skin to heal over.
Peas will produce their own fertilizer if you inoculate them with bacteria that draws nitrogen from the air.
This article appeared in Hobby Farm‘s Urban Farm 2021 annual, a specialty publication produced by the editors and writers of Hobby Farms magazine. You can purchase this volume, Hobby Farms back issues as well as special editions such asBest of Hobby Farms and Living off the Grid by following this link.
Today’s post is the last in a three-part series on veterinary medications on the farm. Since January, we’ve discussed injectable drugs and oral and topical products. Today, we’ll take a closer look at the vital information that’s on a drug’s label and the importance of withdrawal times.
What to Look For
The label of a drug should provide you with the following information:
what animal species the drug is intended for
what the drug is supposed to do
doses to give and how frequently
the concentration
ingredients
any warnings about the drug
Depending on the size of the product, there may be more than one label, such as the sticker directly on the bottle and also the box it came in. A leaflet/insert is sometimes in the box.
Not all information may be located directly on the bottle due to size limitations. Full drug information may only be on the leaflet or box.
When using a new product, don’t throw away the packaging before you’ve read all the pieces.
A Warning About Warnings
Not all drugs are intended for all farm animal species or age of animal. This is why it’s important to carefully observe any warnings on the label.
For example, copper-containing products should not be used in sheep. They are extremely sensitive to that mineral. Ionophores to treat coccidiosis in cattle such as monensin should never be given to horses, as they are fatal to equines.
Perhaps the most vital piece of information on a drug label for farm animals is the withdrawal time. A withdrawal time is for meat and/or milk. This period of time can range from zero to several weeks and represents the amount of time required for the animal to metabolize the drug so that no drug residues will be present in the meat/milk and consumed by a human.
A withdrawal time represents the period of time the farmer must wait before sending the animal to slaughter (or putting milk in the bulk tank) after being treated with the drug.
Example Time
Let’s look at an example. Say you have a litter of growing hogs with a respiratory infection and they all need an antibiotic.Your veterinarian comes out, prescribes Drug X and says to give this drug once daily for five days and that it has a seven-day meat withdrawal time (sometimes called a slaughter withdrawal or hold time).
On Monday you start your hogs on Drug X. On Friday, the five-day drug regimen finishes.
Now, starting on Friday, you must hang onto your hogs for another seven days until they can go to slaughter, if your plan was to send them after they recovered from the infection. This same concept applies to a milk withdrawal time for dairy animals. No milk goes in the bulk tank until the withdrawal time has passed.
All animals that provide food for human consumption are subject to withdrawal times to protect the human consumer—even honey bees. Various mite treatments and the few antibiotics that are available for foul brood diseases all have withdrawal times for honey.
If in Doubt, Ask
Maybe the most important aspect about farm medication and withdrawal times is that if you ever have any questions, don’t hesitate to ask your veterinarian.
Use her as a resource, along with your local agricultural extension agent. That’s what they are there for.
Education is key in making safe, healthy decisions for the animals on your farm.