All terrestrial ecosystems are deeply connected to their soil. And this soil is alive!
When designing an ecosystem-inspired growing space, we strive for what’s called holistic soil. The term holistic soil refers to a soil that has a balance of mineral material, organic matter and pore space for air and water.
Indeed, an ideal soil composition is about 45 percent mineral and 5 percent organic matter, then 25 percent air and 25 percent water.This means 50 percent of the soil is pore space—air and water openings in the soil.
These macro pores and micro pores (as they can be classified) help to keep the soil hydrated and aerated. This, of course, helps plants survive, providing drainage in major storms and oxygen for decomposition of organic matter.
However, and of the upmost importance, is the fact that a holistic, well-balanced soil helps sustain soil life.
Within the soil, there exists a whole micro ecosystem of organisms. You can find everything from bacteria that fix nitrogen from the atmosphere to mycorrhizal fungi that share resources with plants. You can even spot arthropods that help shred and decompose organic leaf litter into more soluble and plant-available nutrients.
Soil is like a city with many pathways of transport, communication, plumbing and electricity. You can extend the metaphor to spot houses and places of work!
We can support a healthy structure to the soil in our garden with a few tried-and-true practices:
avoid compaction
provide protection over the winter through cover cropping
regularly add organic matter
When we perform these simple steps, our “soil society” thrives and provides support for the plants we want to grow. Natural ecosystems have thriving soil life. Our garden should also contain this life!
When we use apply sustainable garden practices in our gardens and yards, we maximize the benefits of wild ecosystems. Our soil health improves dramatically, as does its ability to fix, store, cycle and release nutrients and water to our garden plants.
This creates gardens that are more drought resistant and better able to self-regulate for improved fertility.This also creates healthier, more pest-resistant plants.
(Fun fact: A plant that is healthy and can easily acquire the nutrients it needs to grow vigorously will more quickly develop strong shields made of lipids in their leaves. This adds defense against chewing insects like flea beetles.)
Ecosystems are biodiverse and full of site-suitable plants. Their layered forms constantly build overall potential, such as dynamic holistic soil rich in organic matter and teaming with life.
Ecosystem design, and all the benefits it provides now and into the future, can start with simply integrating layered diversity into our yards and protecting and enhancing the soil.
No matter the scale, Ecosystem Design brings modern garden and property management and natural ecological principles together.
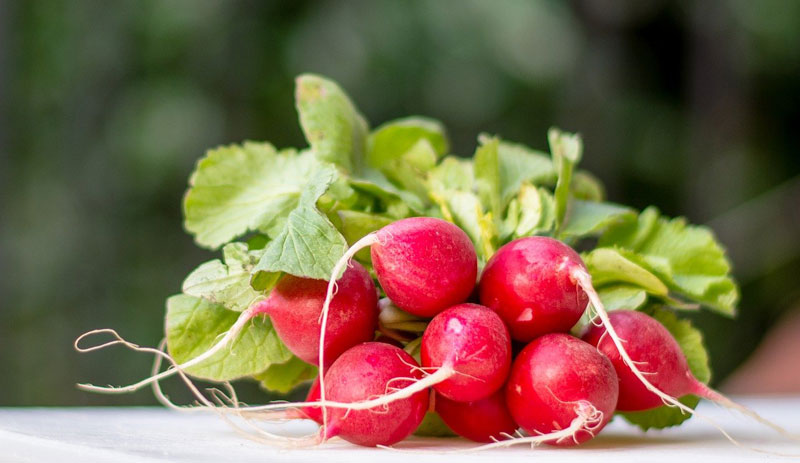
This fermented radish salsa is delicious immediately after it’s put together. But through the process of fermentation, the flavors transform and meld together. The salsa turns into a beautiful springy shade of pink.
Many that are not fond of radishes in the raw form do indeed enjoy them fermented. The sharp flavor dulls somewhat.
I urge you to try this salsa, even if radishes aren’t on the top of your favorites list. Use this salsa as you would any other salsa—over eggs, with corn chips, over tacos, etc.
Yield: 1 Pint
Ingredients
1 bundle red radishes, chopped (about 1.5 cups prepared)
1/4 cup scallions – white and green sections, thinly sliced (about 2 scallions)
1/4 cup fresh cilantro, chopped
1/2 jalapeno, finely diced
1 tsp. coarse kosher salt
Dash black pepper (optional)
Stephanie Thurow
Directions
Wash and prepare all ingredients, then mix them together with the salt in a large glass or nonreactive bowl. Once thoroughly mixed, pack the mixture into a clean canning jar.
Use a spatula to scrape any remaining liquid or salt from the bowl.
Wipe the rim of the jar with a dampened paper towel or lint-free towel and apply the Mason jar canning lid. Tightly screw on the ring.
It may take until the next day for the ferment to produce enough brine to submerge the radishes, so don’t be alarmed if initially they aren’t submerged. Check the following day and use a spoon to push the produce under the brine.
“Burp” the jar daily. Unscrew the lid briefly and tighten it back down to allow any built-up gas to release. (You’ll also avoid possible jar breakage and overflow due to fermentation.)
Ferment at room temperature, ideally between 60-75 degrees F (15 to 23 degrees C) and keep out of direct sunlight. Though the salsa is delicious immediately after mixing together (give it a taste!), this recipe will ferment five to seven days.
One sign that the ferment is “done” is when the brine becomes pink.
Taste test after day 5 and see if the flavors have melded together. If not, ferment one or two more days and taste test again. Once the ideal flavor is reached, transfer the jar to the refrigerator with the brine.
This ferment will last nearly indefinitely, though the texture and flavors will continue to change. Fermentation does not stop once refrigerated. Rather, chilling slows the process way down. The taste and texture will continue to change over time.
Serving Suggestion
In my household, we enjoy this lacto-fermented salsa on pretty much everything. You’ll be surprised at all the recipes you can fit it into.
But this fermented radish salsa, generously spooned over steak tacos, with some crumbled queso fresco and fresh lime, is our absolute favorite. Yum!
This recipe has been adapted from WECK Home Preserving (2019) with permission from Skyhorse Publishing, Inc.
Founded in 2013, Arrowood Farms strives to produce beer from the ground up. Situated in New York’s Hudson Valley, the venture takes a seasonal approach to letting the terroir drive the taste and tenor of its brews.
“The farm came first, in 2013, just shortly after New York State passed its farm brewery legislation,” says co-founder and managing partner Jacob Meglio. “After our first season of growing, it felt natural for us to start brewing beer with our hops. We drafted a business plan in 2014 and built the brewery and tasting room in 2015.”
Taking a moment out from brewing duties, we spoke to Meglio about integrating chaga mushrooms into the beer process and the importance of partnering with other local farms. We also discovered which of the farm’s resident animals are most partial to a brew.
Meglio says that the idea of linking the farm and the brewery was inspired by “nature, tradition and logic.” He explains that Arrowood Farms has been able to tap into a number of “old dairy farms that have been struggling to find a new feasible business model” and integrate them into the brewing cycle.
“We have been able to partner with these farms and give them a new revenue stream while giving us access to wonderful rare varieties of grains to use in our recipes,” he explains.
“This is how beer was traditionally made. And it’s true to the ethos of terroir. When you are enjoying an Arrowood beer or one of our spirits, you are experiencing the land it comes from. You are connecting to the farmers that grow it, the brewers that brew it and the distillers that distill it.”
When it comes to integrating the farm’s terroir into their beers, Meglio says that it’s paramount to “trust the ingredients.” Instead of attempting to “force a brew into becoming what we want it to be,” he explains that the ethos behind Arrowood Farms means that the farm’s freshest and most interesting crops are given the freedom to “take the form they want to.”
Arrowood Farms’ Trickster is a dark seasonal lager that incorporates chaga mushrooms. “Chaga is a slightly rare mushroom that grows on birch trees,” says Meglio. “As far as I know it is not possible to cultivate chaga. It can only be foraged.”
After coming across a large piece of a chaga mushroom while on a hike, the team at Arrowood Farms brewed an experimental mushroom tea. Picking up on how the drink shared similarities to coffee, they realized it would prove a complimentary fit for dark malts.
“The chaga gives the beer a slightly earthy and roasted flavor,” says Meglio.
Spotlighting one of Arrowood Farms’s signature brews, Melgio explains how their Farmhouse Table Beer is “fermented using a mixed culture from our bees, which results in a slightly tart brew.”
Meglio adds that the ale is aged for nine months in an old Hungarian oak chardonnay wine barrel. The process, which helps “really showcase how yeast (and particularly wild yeast), can add some wonderful flavors to beer.”
“Pigs like beer,” says Meglio when asked if any of the animals at Arrowood Farms have ever tried to sneak in a sip of any of their beers. “Goats will sometimes like beer (although it’s not good for them). Chickens and ducks not so much. I don’t think I ever tried with the sheep.”
Then he adds, “I can say after years of data collection that no animal likes beer more than humans!”
It’s hard to believe that something as large as a dried bushel gourd starts with a seed as small as a fingernail. Sometimes called “bushel basket” gourds or just “basket” gourds, they’re surprisingly easy to grow. Best of all, once dried, they’re as sturdy and long-lasting as wood—and they can be fashioned into all kinds of useful objects.
Unlike the thin-skinned luffas I usually grow, bushel gourds have thicker walls and contain more water. Of course, that also means they take several more months to dry.
Still, if you’ve been curious to give hard-shelled gourds a try in your own garden, it’s not too late.
Hard shells like the bushel gourd take their sweet time to mature. So, you’re best off starting their seeds indoors in a sunny spot or under grow lights.
(And even if you have a long growing season, you still might want to start these seeds early to give them as much growing time as possible.)
To soften up their tough coats, soak the gourd seeds in water for about 12 hours before you plant. Use peat pots or make your own pots, so that when it is time to plant seedlings outside, you’ll be able to pop the whole thing in the ground. (This enables you to plant your seedlings without disturbing their delicate root systems.)
Planting Time
After the danger of frost has passed and soil temperatures are in the 65- to 70-degree range, you can safely plant your gourd seedlings. Choose a spot that gets at least six hours of full sun per day. For best results, your soil should be rich and well-draining.
(Since mine’s not the best, I like to mix in a few shovelfuls of finished compost and worm castings before I plant. This adds nutrients, mitigates pH problems, and improves my soil texture, too.)
Remove any weeds by hand and then mound up the soil where you intend to plant. Include no more than two to three seedlings per mound.
I also surround the gourd section of my garden with marigolds. These naturally deter some insect pests while attracting beneficial insects and all-important pollinators.
If your garden isn’t already fenced in, you’ll want to add a little protective fencing around your squash plants—especially while they’re still young and becoming established. And, unless you have lots of room for them to run, you may also want to install some trellising so that your vines will have something sturdy to latch onto.
Make sure your plants get at least an inch of water per week. To help stave off disease, don’t water your plants’ leaves. I water each of my planted gourd mounds by hand, pouring water directly around the vines at the soil level—and well below the leaves.
Despite these precautions, you still may have problems with powdery mildew, bacterial wilt and other diseases. Insect infestations and poor air circulation around your plants can make these problems worse. That’s why it’s important to examine your vines every day for signs of squash vine borers, cucumber beetles and their eggs.
I remove any I see by hand and peek under leaves for their eggs while I’m at it.
Also, at the first sign of disease, you may be able to salvage the situation by removing any affected leaves before the problem spreads. (Although I had some powdery mildew on last year’s crop, I cut away bad leaves and let conditions dry a bit before watering again. That helped.)
Girl Power
One of the most important tasks to complete? When your plants’ primary vines reach the eight- to 10-foot mark, snip off their ends. This causes them put on lateral branches—and female flowers. Once pollinated, these female flowers set fruit. These tiny fruits, ultimately, become big bushel gourds.
Factors like soil quality, weather conditions and season length will influence the finished size and weight of your gourds. And the kind and amount of support your gourds get can affect their final shape.
For instance, a bushel gourd growing directly on the ground can develop a flat spot, while another, suspended from a trellis, may turn out nearly round. As your gourds grow larger, you can provide extra support with scraps of old T-shirt or pantyhose as needed.
Once vines have died back, either leave your gourds in the field to dry over the winter or hang them inside a barn or other outbuilding. We’ll show you how to clean up dried bushel gourds in a future post.
What is an Araucana chicken? Any chicken that lays a blue egg, right? No exactly, it turns out. The Araucana is a distinct breed, with a set of breed identifiers that determine what is (and is not) a member of this class of birds.
Looks Matter
This unusual breed sports ear tufts and no tail. Officially, those in the know refer to this trait as “rumpless.” Tufts are a feather or group of feathers coming out of the sides of the bird’s face around the ear area. They can be one-sided or bilateral (which is preferred).
The Araucana chicken breed also lacks a tailbone and oil (or preen) gland.
The breed, considered rare in the U.S., originated in Chile.
So if they’re rare, why do you see them for sale in some hatchery catalogs? Decades ago, anything laying a blue or green egg was called an “Araucana.” But this original layer of blue eggs gave way to other blue-egg-laying breeds such as Ameraucanas and Easter Eggers in recent years.
Today, some hatcheries still call their colored-egg layers “Araucanas.” It’s a misnomer, though. You can only purchase true Araucanas through independent breeders.
The American Poultry Association approves five colors:
Black
White
Golden Duckwing
Silver Duckwing
Black Breasted Red
Aracaunas can also be found in other “unapproved” colors such as blue, mottled and cuckoo. A bantam size also exists, with hens weighing 1.5 to 1.75 pounds, and roosters topping out just under 2 pounds.
Araucanas tolerate confinement well, making them ideal for small homesteads. They are also good foragers and fliers and are predator-savvy, making them fine free-range birds.
Hens make dedicated mothers. Roosters are generally nonaggressive, but good flock protectors, and generally assist in the raising of the chicks.
As a farm market-seller, I have met many people looking for duck eggs because they can’t eat/digest chicken eggs. This lack of digestibility is because of the protein makeup of the chicken egg. Chicken eggs contain enzymes to which people are allergic that often aren’t present in duck eggs.
(Different people can be allergic to different enzymes, so it isn’t necessarily true.)
Duck eggs are also desirable for those who don’t eat them out of necessity. They have a somewhat larger yolk-to-white ratio and are nutritionally denser than chicken eggs.
Many people put duck eggs in baked goods. This yields a higher moisture content and adds richness to baked items.
They aren’t generally suggested for any use that requires separating yolk and white. Their firmer texture can make this difficult. Also, overcooking can make duck eggs rubbery, but when overcooking is avoided, they are quite wonderful. The first duck eggs I ever ate were deviled eggs at a potluck, and they were impressive to see. They tasted great, too.
The most surprising quality of duck eggs is that they are alkaline-producing in the body. Human bodies have an ideal pH of 7.4 (slightly basic). Dietary factors—including the overconsumption of sugar and trans-fatty acids—will lead to a pH that is too acidic and a body that can no longer function properly.
The human body will correct its pH through mechanisms like pulling calcium from its bones. This will re-alkalize the body and correct the pH, at the same time contributing to bone loss.
An acidic body, a very common condition in Western society, can contribute to the occurrence of many ailments. These include fatigue, joint pain, poor circulation, chronic colds, even cancer. In addition to abstaining from or reducing the consumption of acid-producing foods, you can avoid this condition by eating alkalizing foods. This includes many vegetables, spices and, yes, duck eggs.
Still, why are the alkalizing effects of duck eggs surprising? It’s because chicken eggs are acidifying. Talk about incredible!
Before you can get that first coveted duck egg, you need to choose your breed. Different breeds have different looks and different advantages. Note that ducks are referred to in terms of breed and variety. (Variety essentially means color.)
A single breed (Indian Runner, for example) comes in any of several varieties, such as White Penciled, White and Fawn. There can be differences between the different varieties of a single breed beyond color, as well as specific attributes maintained within a breeding line. So the source of your flock is important.
Make sure you want eggs, too. If you want a meaty fowl, there are breeds specially for that. But if you are certain you want deliciously rich eggs, “get female White Golden or Golden 300,” says Marc Metzer. He’s the general manager at Metzer Farms in Gonzales, California, a waterfowl hatchery business started by his grand-father in 1972.
The business includes 19 breeds of ducks and 16 breeds of geese. “We bred these strains for maximum egg production.”
Want to grow and process for meat with maximum efficiency? There is no better strain of duck than the Pekin, according to Metzer.
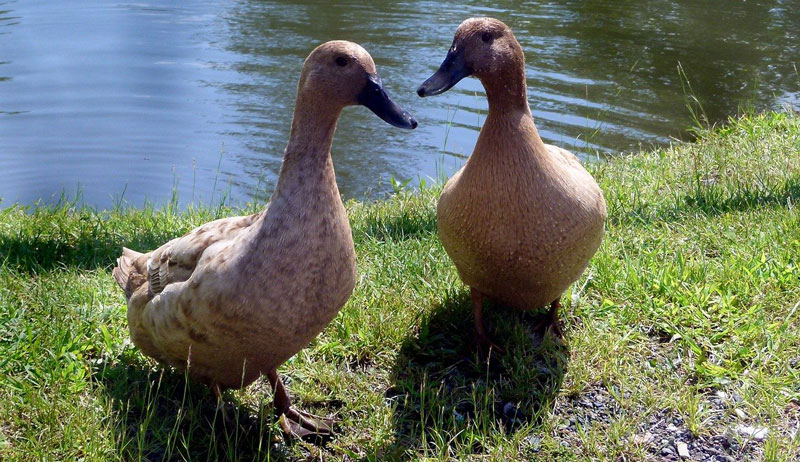
“Males and females grow quickly and healthy to a processing age at 7 to 8 weeks,” he says. Personally, Metzer enjoys the beauty of Buff ducks.
“Not only do they have a beautiful golden sheen to them, but they are hardy, calm and have good egg production,” he says.
In the breed descriptions in this article, I describe egg quantities and colors. Also, I’ve included general appearance notes, as well as average weights. (Ducks are at the lower end of the weight spectrum, and drakes—aka males—at the upper.)
kie-ker/Pixabay
Heritage Breeds
The five breeds in the main text that follows (as well as the dual-purpose breeds listed separately, below) are heritage breeds and are listed more or less consistently as being in need of breed conservation. These two designations are important.
By and large, heritage breeds were bred on and for homestead settings. These breeds tend to have docile natures that help maintain a happy farmyard.
They also actively forage pests and weeds, which helps to control these perennial problems and supplements their own feeding program.
And, of course, breed conservation is important because the work and care that produced these animals shouldn’t be lost. If we don’t help these breeds to survive now, they won’t be around to help us in the future.
Lastly, keep in mind that the egg quantity numbers listed in this article represent “potential” yield. The realized rate of laying (as well as the seasonality) depends on the duck breed, yes, as well as:
weather conditions
the specific strain of the breed
age of each bird
diet
general care (including shelter and artificial lighting) of the flock
Here are five good beginner breeds for small farms and homesteads.
Ancona
This breed averages 200 to 275 eggs annually, with shells that are blue, green, white, cream or spotted. Their feather design is irregular color patches on white, typically black but there are also varieties with blue, chocolate, lavender and silver patches. Small (5 to 6 1⁄2 pounds), hardy, active and with a mellow temperament, Anconas forage well and provide good weed control.
Campbell
Ducks of this breed average 300 to 325 eggs annually, large in size and creamy white in color. Though this breed does have rarely seen dark and white varieties, the Khaki is by far the most prevalent with its complete khaki coloration. (Drakes have darkened heads, typically olive green.)
Perkons/Pixabay
A small breed (4 to 41⁄2 pounds) with good pest-foraging skills, a hardiness in cold weather and generally quiet disposition, the Campbell doesn’t make a particularly broody breed.
Cayuga
Layers average 100 to 175 eggs annually, mostly light blue or gray in color.
Active and very interested in foraging for weeds and insects, the Cayuga bests the Campbell by being very cold-tolerant, quiet and docile. Unlike some ducks, Cayugas don’t wander off, and they’re also inclined to broodiness.
One of the few duck breeds developed in America, it’s named after Lake Cayuga, New York. Though their average weight of 6 to 8 pounds is on par with some ducks raised for meat (which Cayugas are by some people), their black/iridescent-green feathers mean they have a dark carcass that some find unappetizing.
Indian Runner
These ducks average 275 to 350 eggs annually, large in size and largely green or blue-white in color. Nicknamed the “penguin” or “bowling pin” duck, this breed is incredibly distinct in its erect body, almost perpendicular to the ground. This carriage is also why it lacks the typical duck waddle and, instead, has the rapid gait for which it is named.
The Indian Runner comes in a number of varieties, including:
White
White Penciled
Fawn-and-White
Black
Blue
Chocolate
Very light weight (3 to 5 pounds), its active nature, good foraging instinct, rapid speed and enhanced reach upward all combine to make the Indian Runner extraordinary at pest control. It also has a very good feed-consumption-to-egg-production ratio. IRs tend to lack broodiness and make poor mothers—bad news if you wish to hatch your own.
Welsh Harlequin
These gals average 300 eggs annually, which can be white, cream or tinted in color. Active yet calm and weighing around 5 pounds, the ducks of this breed tend toward a broody disposition and are good setters and ultimately make good mothers.
This breed strongly resembles Mallard coloration but with frosted white touches. It’s another good forager.
Contrasts, Parallels & Comparisons
Though the preceding descriptions might at times seem repetitious, the duck breeds are themselves quite distinct. Campbells, Indian Runners and Welsh Harlequins are the champion egg layers, occasionally known to lay eggs nearly year-around.
The Anconas and Cayugas top the list for pleasant dispositions, being particularly calm and quiet. These same two breeds, though no comparison with strictly meat breeds, are also the two that can provide a suitable carcass for the table. Cayuga eggs, though the scarcest, have the most reliably colorful shells.
All ducks love hunting the mud for bug larvae and will eat worms, slugs, grubs and beetles. But amongst these five foraging breeds, the Indian Runner really is the top performer.
And let us not forget the chickens! As they are in the business of producing eggs, comparisons also need to be made between ducks and chickens. The ducks do rather well.
Ducks don’t have the chickens’ hesitance about snow on the ground come cold weather, nor do they have combs or wattles that run the risk of being frostbit in extreme cold.
Adult ducks acclimate to northern and southern climates very well, according to Metzer. “For example, they will find the unfrozen part of a pond just to get their feet wet,” he says.
Ducklings do require warm and dry shelter for their first three weeks. After this, says Metzer, they can be slowly transitioned to the outdoors, though it’s wise to have nightly shelter to protect them from predators.
Ducks’ susceptibility to parasites such as mites and lice is much lower as compared to chickens due to all of the time they spend in the water. Though some breeds are rowdier than others, many duck breeds are very quiet (not so with chickens).
Lastly, while chickens can also aid in weed seed and insect pest control, we all know how closely they much be watched and moved to prevent damage to garden crops. As long as plants have passed the seedling stage, ducks won’t destroy the garden they are foraging in.
Poultry Preparations
By now, you might already be convinced that you should be acquiring ducks for your homestead, but questions linger about what they’ll require. You will be pleased to know that their needs are straightforward.
Firstly, ducks need balanced rations and clean drinking water. Even ducks with ample foraging space should be offered dry feed, though they’ll likely consume less.
Also, the precise formula of the feed will vary depending on if you are raising ducks simply for eggs and/or meat production, or if you intend to allow them to hatch a clutch of eggs.
Water that is intended for drinking must be in a container that ducks can’t attempt to swim in. Also, though food and water should be available at the same time and share the same proximity, they shouldn’t be so close that water gets into the feed. This could cause mold to grow.
Ducks need shelter and fencing as protection from weather extremes, predators and the danger of wandering off! Shelter that keeps ducks warmer in winter will result in more eggs being laid, as will supplemental lighting. Closing ducks inside at night will help to protect them from predators and make your job of gathering eggs easier.
Ducks tend to lay their eggs first thing in the morning, and inviting nesting areas in their shelter means no hunting for you.
Lastly, fencing helps to keep unwanted animals out and your ducks penned in when they need to be. A pair of ducks require a 13-square-foot pen area. They would prefer more space to forage in, and if they spend most of their time out of the pen itself, it need not be quite so large.
But what about the pond? At the very least, ducks need to be able to submerge their heads in water to clean their eyes and nostrils and to submerge their bodies to facilitate preening. At the very best, they need a pond to be overly healthy, productive and happy.
Ducks do enjoy bathing, but it’s not a daily requirement.
“There are varying amounts of water access you can give your ducks. You choose your preference,” Metzer says. “Nipple drinkers, head-dunking water, kiddie pools and open ponds are different options.”
Warning: Ducks are fascinating. “They are energetic, have personality and are enjoyable to watch,” Metzer says. “Once you go quack, you won’t go back!”
Sidebar: Twice as Nice
Life is about compromise. That is true with ducks as well. You won’t get top egg production from a duck that will also produce a nice body of meat. But you can get a decent amount of eggs from a number of breeds that can also adorn your table.
Have a look at the following dual-purpose duck breeds.
Orpingtons
Orpingtons average 235 white eggs annually, and weigh 7 to 8 pounds. Though Blond and Brown varieties exsist, the buff-colored plumage is so dominant that this duck is often called simply the Buff.
Orpingtons are an amiable breed with nonbroody ducks.
Saxony
Saxony ducks average 90 white eggs annually, and weigh 7 to 9 pounds (including prominent breast). Ducks and drakes have roughly the same patterning as their Mallard counterparts, but their general coloration is buff/blue.
Saxonies are all very active foragers, and the ducks are broody.
Silver Appleyards
Silver Appleyards average 235 white eggs annually, and weighing 7 to 9 pounds (including prominent breast). This breed is said to have some of the most flavorful duck meat there is. Appearance is similar to the Welsh Harlequins.
Silver Appleyards have calm dispositions and are very active foragers.
Swedish
Swedish ducks average 125 white or tinted eggs annually, and weigh 6 to 8 pounds. Blue and Black are the most prevalent varieties. Their respective plumage colorations are fairly uniform (drakes are darker), plus a white bib.
This breed is a good insect-eater and forager, and ducks make good mothers.
Muscovy
Muscovies average 150 large, white eggs annually, though laying is increased in warm climates. Ducks weigh roughly 7 pounds while drakes come in at a whopping 10 to 15 pounds. Though often grouped with ducks in discussion, the Muscovy is not descended from Mallards like all other domestic duck breeds and is in actuality a perching waterfowl.
Plumage is typically white with portions of dark brown or black (iridescent in males), though there are rarer varieties whose colors are white with chocolate, bronze or green. There is also an all-white.
The Muscovy has a distinct appearance due to pink-to-red caruncles (wattles) on its face, and it’s renowned for its tender meat that is tasty and lean (more flavorful and lower in fat than other duck meat).
This article originally appeared in the March/April 2021 issue of Chickens magazine.
Spring is a wet time of year, particularly in regions where snowmelt unleashes a large amount of moisture at once. The ground can quickly become saturated with water. And when the ground is soft and wet, it’s easily rutted by farm machinery.
Ruts can be problematic on many levels. They disturb vegetation and increase the likelihood of erosion. This is a particular problem on sloping ground where water can flow through the ruts and wash soil away.
When ruts dry in place, they create uneven ground, becoming problematic for mowing grass or cutting hay. And of course, machines can get stuck in soft ground, creating even bigger ruts as their tires struggle to gain traction.
But some farm chores and projects can’t wait for the ground to dry. You need to perform them regardless of whether conditions are ideal.
If you want to minimize the damage caused by farm machinery in the spring (or any time when the ground is wet), these five tips can help you avoid rutting your farmland.
Avoid Wet Ground When Possible
The best solution is to avoid driving over wet ground entirely. Consider planning your routes to favor high ground and skirt around low spots.
For example, on my farm there are multiple routes I can use to access the brush pile I have tucked away in the woods on the back of the property. The shortest route involves crossing a low spot that tends to hold water in the spring and after heavy rain showers.
But when the ground is wet, I can follow a longer, more circuitous route that sticks to high ground. I’m less likely to rut this way. Sure, I lose a little time, but it isn’t much. And minimizing ruts is worth the added time.
Suppose you’re hauling a wagonload of firewood out of your woodlot, or carting manure to a compost pile, or transporting a load of debris to a brush pile. If crossing a wet area is unavoidable, you can lessen the risk of significant rutting by reducing the weight of the materials you’re transporting.
When traveling across dry ground in the summer, you can probably fill your wagon and never worry about the weight. But if you’re concerned about soft ground, consider shifting to half loads, or even quarter loads.
You’ll significantly reduce the weight of your wagon and reduce the risk of creating ruts (and getting stuck).
Drive Lightweight Vehicles
Lightening loads isn’t the only option for reducing the impact of “heavy traffic.” Driving lighter vehicles is another option to consider.
Your 75HP utility tractor with its air-conditioned cab might be great most of the time. But it’s going to be a lot heavier (and a lot more damaging on soft ground) than a 20HP garden tractor or ATV.
If you can accomplish any given job with a lighter vehicle, go for it.
The type of tires installed on your equipment can also make a difference. Tractors equipped with yard-friendly “R3” turf tires are less likely to cause damage than those using traction-oriented “R1” agricultural tires.
The shallow tread depths and closely spaced lugs on R3 tires are designed to distribute the weight of a tractor across a wider surface area, minimizing damage. Inflating tires to the proper PSI level can also help prevent rutting.
Consider Draining Problematic Wet Areas
If one low spot in particular stays wet for much of the year and becomes problematic with rutting and erosion, you can take steps to address the root of the issue by draining the area. Digging drainage ditches or installing underground drainage tiles can be time-consuming and expensive. You might need an expert to help plan your strategy and consider any consequences of rerouting the water.
But if you can successfully drain the lowland section of an important farm road, it might be worth the investment.
What strategies do you employ to avoid creating ruts in the spring?
This weekend was an event on my calendar: Vaccinate pregnant ewes with CD&T.
What that means is that there is about one month until my ewes begin to have lambs. The recommendation is that you vaccinate your pregnant ewes about four to six weeks before they lamb. This provides some protection for the newborns.
My lambs aren’t due until mid-April, which may seem late to some. In the past, many farmers chose to have their lambs born during winter months. This was, lambing didn’t interfere with their farming schedule.
They were left with more time to devote to ensuring everyone got off to a good start.
Time to Lamb
I’m not a farmer, though. So I decided I wanted to have my lambing season when the weather was a little warmer.
This is also my first year of lambing–on purpose, anyway! In early 2020 we purchased three Shetland ewes that–unbeknownst to the previous owner–had been bred. The appearance of three healthy Shetland lambs born on pasture was both a surprise and a delight during the dark, early days of the coronavirus pandemic last March.
This year, however, we planned and purchased a North Country Cheviot ram to breed with our NC Cheviot ewes. In early November, we put the ram in with nine ewes. I’ve counted 150 days forward … which means our lambs should be born mid-April.
In addition to CD&T vaccines, we also sheared the back end of the pregnant ewes.We cut away any wool around the nipples and bag area so that newborn lambs don’t try to suck on wool by mistake.
I would have preferred to have the whole ewe shorn before birth. However, because we shear our own sheep, we knew it would take us too long and cause too much stress on the pregnant ewe. (A professional sheep shearer would shear our ewes in a far faster time and cause less stress.)
We will plan on shearing our mama ewes a little later in the spring when things have settled down. Next up will be for us to trim the ewes’ hooves. We will do this in the next week or so, before they give birth.
Feed & Shelter
It’s really important in the last few months of the ewes’ pregnancy to ensure they have top-notch grain and hay. Ewes just don’t have a whole lot of room inside, and they need every bite to count.
I offer a substantial amount of high-quality feed and hay mixed with alfalfa to ensure their protein and calcium needs are met. Of course, you don’t want to forget to always have a steady supply of fresh, clean water as well!
I also began to do a deep clean of our small barn, shoveling out several inches of dirt and manure under the bedding. I laid down clean pine shavings over the floor and will plan on keeping that clean. Then I will add a layer of clean straw for the new babies.
You can use other material, such as newspaper or old towels, as a place for your new lambs as well.
We divide our barn with wood dividers to have a place where the moms and new lambs can bond for 48 to 72 hours after birth. After that, we let them out in a small paddock with shelter, water and a creep feeder for the lambs to get into when they are ready to start eating some grain.
Following recommendations from some of my sheep mentors, I’ve put together a bucket with lamb feeding tubes, a nipple and clean empty soda bottle. I have powdered colostrum and milk replacer in case we need to supplement or totally bottle feed any of the lambs.
I also have a rectal thermometer and several clean towels as well. Finally, I put in some betadine, exam gloves, a flashlight and the emergency number of our vet!
I’ll report back on how everything goes next month. I’m hoping for a healthy group of new lambs and moms, so wish me luck! And of course, there will be pictures!
April showers bring May flowers and … the kick-off to kidding season. And we all know there’s nothing more rewarding than a cuddly baby goat.
But how will you know your doe is ready to kid?
In addition to behavioral changes induced by hormones, a few visuals signs offer clues. When the ligaments around the tail head will start relax and “sink,” they usually paw around in the bedding. At this point they might start leaking milk too.
These are all indications that delivery time is just around the corner.
Mother Nature is skilled at handling the process, but there are several steps you can take to make kidding season smoother on your farm.
Privacy, Please
Val Lavigne has 30 does preparing to deliver this spring on her family’s farm in Schaghticoke, New York. With the potential for twins and triplets, 30 to 65 kids may soon be arriving. As social as goats are, the does appreciate extra space in advance of delivering.
“We’ve learned over the years that trying to separate out the does that are close to kidding works well,” she said. “They like to have the privacy and extra attention that comes along with it.”
Create a space that is well ventilated and has enough room for adults and kids. Newborns require about 16 square feet and adults need a minimum of 20 to 25 square feet. Lavigne makes sure to use extra dry bedding in the spaces set aside for does ready to kid.
She also provides access to free choice loose minerals including salt, goat mineral and sodium bicarbonate.
Depending on timing and your location, you might need a heat lamp to help newborns keep warm. Installing a basic camera system can also give you a chance to check in on your goats without interrupting them. DIY security camera systems are widely available, making them cost effective and easy to set up.
There is a lot you can control before a kid arrives, but the timing of delivery is out of your control. Having the necessary supplies on hand and organized means you’ll be ready to respond whether it’s midnight or mid-day.
Lavigne recommends stocking up on these items:
Tube feeder
Kid start paste
Drench
Selenium gel
Gloves
Vitamins
Towels for drying the kids
Iodine for navels
Pocket knife
Scissors
Thermometer
Powdered or frozen colostrum (in case the doe doesn’t have any to provide)
The Lead-up to Delivery
Good nutrition throughout the pregnancy (especially in the last few months) is the foundation for a healthy delivery process. Dairy goat owners should plan to stop milking a doe the last two months of pregnancy if she is still lactating.
Milk production requires extra energy, so stopping before kidding allows her to build up a reserve before kidding begins.
Sanitation is critical to keeping does and newborns healthy throughout the delivery process. Keeping stalls clean is part of the equation. Trimming around the tail and udder area about a week before a doe’s due date helps her stay cleaner during and after birthing. Some goats have hairy udders, so a trim clears the way for a nursing kid.
Most of the time, delivery and the first few hours after goes smoothly. But kidding season can be unpredictable, and there’s always the chance that a doe or her kid(s) will need extra help. Chances are if your instinct says something is wrong, there’s a chance that it is.
“The does might have extra stress, or they may be pushing with no feet showing,” Lavigne said. “If there is no kid born within the hour of a doe’s water breaking, there is a problem. You know your goats better than anyone. If they are acting differently they are trying to tell you something.”
Spring is almost here, and it’s time to get started on farm tasks for a lot of us. I’ve got my tractor tuned up and ready for the season, and it’s time to take stock of my implements on hand to see what I can use for upcoming projects.
On my farm, we have a lot of common implements, which you can see and hear more about in the video. But let’s break down what these common tools can do around the hobby farm.
This implement won’t take the place of a finish mower, as it doesn’t produce the very cleanest cut. But a shredder will help you knock down growth around your farm fast.
Straight Blade
A straight blade will help you cut and maintain areas such as gravel ditches around roads and driveways. Why is this important? One word: irrigation.
Box Blade
This implement will help you out with a handful of tasks, including gravel road maintenance, smoothing out dirt for landscaping and planting, and even cleaning out ditches.
Single-shank Ripper
A single-shank ripper will help you cut ditches when you’re starting from scratch.
Pallet Forks
This implement gets a lot of work on the farm, as it’s an essential help for moving heavy materials, such as bags of animal feed. Just remove the bucket, attach this implement and easily move everything from trailers to other implements.
Tillage Tools
Disk Plow
The disk plow is a general purpose tillage tool that can help you break up clods and smooth out an area.
Cultivator
While not a heavy-duty tool, a cultivator will help you help you break up small areas.
Tiller
A tiller does what it says it will—it will till up an area into fine, usable soil. It’s not a fast tool, but essential and worth taking the time to use it. (Another good use: You can use it to ready ground for digging holes, such as small ponds.)