In our premiere episode of Hobby Farms Presents: Growing Good, host Lisa Munniksma sits down for a chat with Angela Wartes-Kahl of Oregon’s Common Treasury Farm. As the co-founder of Fibrevolution, Wartes-Kahl has plenty of insight into growing fiber crops on the farm, as well as plant fiber uses (did you know you carry around linen in your wallet?). And as an inspector member of the International Organic Inspectors Association, she sheds some light on what, exactly, is going on with organic certification of fiber these days (and how you can get involved).
Recently, more small seed companies with an emphasis on regional varieties have come to market. Although these companies don’t carry the same wide selection as larger operations, their local seeds also offer real advantages.
Here are some of the reasons you should consider purchasing seeds from a regional seed company this season.
Local Adaptation
Practically, this is probably the most convincing reason to buy local seeds. Even most mid-size companies contract with growers from various regions. So, the kale seed you’re buying might have been grown on the other side of the country.
Small seeds companies, on the other hand, tend to grow their seed locally. This means that the seeds you buy from a local company have a better chance of being adapted to your growing conditions.
Still, some small seed companies contract with other growers to produce a portion of their seed. So, if you have any questions about where a seed crop was grown, contact the company to find out.
Similar Growing Practices
For those using particular growing practices on their farms, it is increasingly possible to find seed companies that use similar methods. As you’d expect, seeds from similar conditions to those on your farm have a better chance of thriving in their new home.
So, if you’re a no-till farmer, seeds from a no-till environment might be the best match for you. Although it might take a while to find a seed company using similar practices, they are out there.
The Buffalo Seed Company, for instance, is a small, Midwestern company that uses low-till practices to grow their seeds. They explain on their website that unless otherwise noted, the seeds they sell“were grown in the greater Kansas City area for at least one season by us in soil tilled once, minimal organic chicken manure fertilizer, mulched 3 inches with straw, no chemicals, and unless specified, no irrigation.”
Genetic Diversity
Local seed companies also tend to carry unique varieties. Given the concerning loss of genetic diversity in vegetables, supporting the production of unique varieties is a small difference that all growers can make.
Finally, local seed companies sell mostly heirloomand open-pollinated varieties instead of hybrids. This is partially because of the extensive breeding that it takes to create and maintain hybrids.
Also, many small seed companies embrace the unique, place-based stories that heirloom varieties tell. The Hudson Valley Seed Company, for instance, sells a variety of heirloom seeds, many of which have some sort of connection to the Northeast. One of my favorites is Hank’s X-Tra Special Baking Bean, a regional heirloom from near where I grew up.
Growing varieties like this are a great way to establish a connection to your region’s agricultural history.
So, as you conclude your 2021 seed shopping, check out what your local seed companies have to offer.
“The initial inspiration behind starting Brick Street Farms is really a story about not being able to grow leafy greens in the Florida soil,” says Shannon O’Malley. She’s one of the founders and CEO of the St. Petersburg-based venture.
Having moved to Florida from Pittsburgh, O’Malley discovered “it was a whole different ballgame” when she attempted to grow leafy greens. After a raised bed garden didn’t work out, O’Malley and her husband, Brad, experimented with a home hydroponic kit.
The hydroponic kit worked and kick-started Brick Street Farms, which now encompasses the equivalent of 48 acres of farmland.
We spoke to O’Malley about the benefits of hydroponic gardening and how to overcome indoor growing challenges. We also talked about the importance of involvement in local agriculture.
After the early success of using an at-home hydroponic kit, O’Malley embarked on a period of research. Then, she and her husband “made our first move into the industry by purchasing an old junk yard that was for sale and cleaning it up.”
After installing an initial three vertical farms, the business successfully expanded. “Within a couple years we were basically selling to every restaurant, hotel and resort in the Tampa Bay area. We opened our own retail shop for community members to buy our fresh greens,” says O’Malley.
“Our main issues with growing indoors actually came from the original vertical farms that we purchased,” O’Malley explains.
In response, they set about designing and manufacturing their own containers, which they branded as Thrive Containers. They wanted to build a solution “by growers for growers.”
When it came to designing containers for hydroponic growing, O’Malley knew they wanted to prioritize the amount of greens they could produce, while also promoting a sense of sustainability.
They consulted with engineers and growers. Afterward, the pair developed a solution aimed at a two-percent waste number.
Talking about the grand goal of the operation, O’Malley says they always wanted to “bring food production to the point of consumption.”
She adds, “We want communities to understand that food grown locally is healthier for them, is better for the environment and can really help save the planet.”
To that end, the farm now grows the equivalent of 48 acres of farmland in about a third of a parking lot. “It’s incredible what urban agriculture can do and the positive effect it has on not just the community but the people within the community,” says O’Malley.
Edwin Remsberg/USDA Sustainable Agriculture Research and Educations (SARE) Program
Cover crops might not be top-of-mind for you during late winter or early spring. Still, depending on the state of your soil, you might want to try some even now.
“It’s been pretty recently that we’ve gone such long periods of time without having any cover to the soil at all,” Dozier notes. “During the past 100 years of industrial agriculture, that’s when that’s really come about. And cover crops are a pretty natural way to keep that soil covered year-round.”
Truly, cover crops provide loads of benefits. Such as? Breaking up compacted soils, scavenging hard-to-reach nutrients, preventing erosion, and even repelling insect pests.
Besides the usual vetches and ryes, there are several types of specially bred radishes that can work wonders under the right circumstances. Ditto for many other brassicas and old-fashioned varieties like rapeseed, too.
Dozier definitely knows his radishes, and, it turns out, agronomists have developed many different types of radishes with multiple goals in mind.
“One of the reasons the radish has risen to prominence above other varieties is you have that very natural shape to work with from the beginning,” Dozier explains. “Then, people have taken that and bred varieties that are very specific toward an application of cover crops.”
Although folks usually plant a radish cover crop in the fall, radishes can still do some good in spring. The crop’s natural drill-like shape can loosen and aerate compacted soils, but that’s not all.
Radishes are powerful biofumigants. In other words? They produce biochemical agents which naturally repel insect pests.
“The radish doesn’t have a monopoly on that,” Dozier continues. “Canola is also a biofumigator.” So is the more old-fashioned crop, rapeseed. Japanese beetles detest its high acid content.
Caveats
“Nature doesn’t always draw the same lines that we do as humans,” Dozier warns. “Let’s say you were in a home garden environment and you are looking for a really good biofumigator, but your neighbor has a really nice pollinator habitat. Or maybe your local farmer has planted a monarch sanctuary [nearby.]”
In those cases? The biofumigant properties of your radish cover crop could clash with efforts to attract beneficial insects. You can lessen the blow by mixing in additional cover crops. Some options include cool-season annuals like oats, peas and clover.
Planting radishes in waterlogged soils or sowing them too thickly can have other consequences. “I know some folks who planted radishes once and they never will again,” Dozier recalls. “Because when radishes die—and that whole field had decomposing radishes in it—it was not pleasant!”
He continues, “Part of the reason they got so nasty was that the water level was always so high. The radishes didn’t grow so well and they were rotting while they were still in the ground.”
One of the most common misconceptions about cover crops? “People view cover crops as a very binary practice,” Dozier says.
“It’s like, I either did cover crops or I didn’t do cover crops. And there’s not as much thought given to, ‘Well, what species did I plant? When did I plant it? How early did I get it in there? How did I terminate them?’”
But how well your cover crops will perform—and whether or not you accomplish your particular goals—depends on each of these considerations. Dozier recommends growers ask themselves, Is this the right cover crop—or mixture of cover crops—for my soil conditions? And, also, Is this the right time and place to plant this cover crop?
Experiment!
You can keep your soil microbiome active by experimenting with a mix of cover crops. “Why stop at one?” Dozier asks. “Especially if there are multiple benefits that you’re looking to get.
“You can throw in a little bit of brassica, a little bit of legume, and a little bit of grass and hit all of the major categories. [That provides] a more general mix, if you don’t have one specific, premier purpose in mind.”
“Not only does nature prefer to have plants growing in the soil, but nature also prefers a polyculture,” he continues.
Whatever you choose, knock it back before it has a chance to go to seed or compete with the food crops you want to grow in the coming months.
For small areas? Chop down cover crops with a sharp hoe. In larger sections? You may need a mechanical roller or mower to do them in.
Before the first seed is even tucked into the soil, a gardener’s work has already begun. A successful garden harvest in the fall begins with proper planning in the spring.
Browsing seed catalogs is a fun way to start planning the garden season. There are so many beautiful fruits and vegetables to dream about growing!
You’ll surely choose a good selection of your favorite tried and true varieties. But don’t be afraid to experiment with some new and exciting crops as well.
Spatial Awareness
Being aware of your available growing space will help you not get too carried away with your seed shopping. Whether you’re growing in raised beds or a large garden, knowing how many square feet of space you have will allow proper planning of your garden for the greatest success.
The back of your seed packet is a great place to find much of the information you will need for accurate garden planning. This includes how deep to plant the seeds, proper spacing between plants and days to maturity.
Additionally, knowing your last potential frost date in the spring as well as the first frost date of the fall will help you determine how many growing days you need available for each of your crops.
Some of our garden favorites can be direct-sown, or planted directly into the garden. But others need a longer warm season than many locations can offer. These plants will need to be started indoors before being transplanted out into the garden at a later date.
Crops such as tomatoes, peppers and eggplants all benefit from this early start. Indoor seed starters will need some additional equipment such as heat mats for warming the soil to encourage germination as well as lighting for the young plants.
Most garden supply centers offer seed-starting trays that include a clear plastic lid. This is ideal for creating a warm, humid greenhouse environment—perfect for sprouting seeds.
Consider making a list or diagram of your garden plans to help you organize your information. This is a great tool to help you visualize your potential garden. You can easily edit and adjust when necessary.
It’s important to stay flexible with your garden planning. And never take on more than you can handle in one season. Remember, the most important part of planning and planting your garden is to have fun!
One of the most common situations new flock owners find themselves in—and one of the most preventable — is bringing their new chicken flock home without having yet set up their coop. This oversight is easily understandable.
Once you’ve set your heart on having those little fluffs home with you, it’s inordinately difficult to resist ordering them immediately. (Same goes for bringing them home after a visit to the farm-supply store.)
This doesn’t become an immediate issue—baby chicks live in a brooder for the first few months of their lives. But time slips away swiftly. You don’t want to be caught with a half dozen or more half-grown hens crowded into a plastic tote in your office, mud room, or garage because you don’t have their coop ready.
If you’ve already placed your hatchery order—or if your peeps are currently contentedly sleeping in a chick heap in the next room—don’t fret.
These five factors will help you determine which coop you’ll be constructing.
Chicken Coop Size
You’ve researched your local ordinances. So you are already aware of where on your property you can place your coop and how large it can be.
You’ll want to provide each of your birds with a minimum of 4 square feet of indoor space. This way, they’ll have room on those days that the weather makes even us want to stay inside.
Compare the total square footage you’ll need for your flock with what your ordinance allows. You may be well within the local limits. But if your required space exceeds the stated maximum, you’ll need to cut back your flock.
In addition to your coop’s overall square footage, you will also need at least one 13-square-inch nest box per four hens. I recommend one nest box per two hens to give your girls a choice and prevent hen pile-ups and smashed eggs.
Regardless of size and design, every coop features three types of functional doors that provide complete access.
First and foremost is the pop door, the small rectangular opening used by your birds. Pop doors typically swing outward on hinges. They latch open and shut with hooks or carabiners to allow your chickens to come and go as they please.
A different style of pop door snaps into a track. The door panel then slides up and down by pulling on a chain or string, which winds or clips into place to keep the entrance open.
This latter type of pop door can be automated with an electronic device that operates according to your settings (most feature built-in light detectors that allow your door to open at sunrise and close at sunset).
As with anything, there are pros and cons with each style. A hinged pop door is typically sturdier and provides better defense against predator infiltration. Its heaviness, however, can knock a chicken into next Wednesday if it slips out of your hand while your birds are exiting out the opening.
Because a sliding pop door must be light and thin to operate smoothly within its track, cunning predators can figure out how to slip their claws beneath the door and lift it open. They can also use their body mass to bash the slender door inwards, climbing through the gaps to get inside.
My husband Jae nicknamed the sliding style of pop door “the guillotine” for obvious reasons. Fortunately, we never lost a hen to an accidental release of a sliding door.
The Human-Access Door
The second type of functional door allows for human access. You need this to clean and repair the coop interior, fill feeders and waterers, and reach ailing birds who’ve sought shelter indoors.
More than the pop door, the human-access door heavily influences the design of your coop. If you want to walk around inside, your coop must have the height to accommodate both a full door and you.
Smaller coops feature back or side wall panels that hinge, allowing you to reach within and, if necessary, climb inside to clean, retrieve errantly laid eggs, and clean clogged pop-door tracks.
Some smaller henhouses feature roofs that hinge open for human access. For these, it’s absolutely vital to incorporate some sort of support to keep the roof secured open while you perform your chores. The last thing you want is a heavy coop roof to come crashing down on your head, causing a concussion.
After this happened to me—twice—Jae modified the design of our smaller coops. Now we access the interior through a side panel.
Following ages of reaching in and scrambling around inside either in a squat or on hands and knees, we have decided all future coops will feature full human-sized access.
Frank Hyman
The Nest-Box Door
The final type of door your coop requires is a nest-box door, which allows you to easily retrieve eggs. The most common type is a rugged roof that lifts on a hinge.
Other styles includeback panels that swing or slide open to allow for individual nest-box access. Whichever style door you choose for your nest boxes, make certain it opens easily enough for you—or your child—to collect eggs but still locks securely to prevent predators from doing the same.
Chicken Coop Roosts
Every coop must include a roost, or perch, that accommodates your birds when they sleep. Some flock keepers use a sturdy branch cut to size. Most use a 2×2 or 2×4 with surfaces roughened by sandpaper to prevent chicken feet from slipping.
A chicken’s natural instinct is to roost high above the ground to keep out of the reach of predators. When deciding where to install your perch, provide enough clearance so your girls can both hop up without hitting their heads on the ceiling and perch comfortably without crouching.
Your perch must provide at least 10 inches of space per bird. If it is too short, birds will squabble for space and end up sleeping on the floor or in the nest box. Neither is a sanitary option.
You may wish to consider a stepped roost, which provides a series of spaced perches from just above floor level to just below the ceiling. While stepped roosts take up much more coop space than one individual perch, they do accommodate more birds and allow heavy breeds and aging chickens to perch closer to the ground.
Coop Floors
Our coops have featured a variety of different floors throughout the years. Our earliest simply used the ground as a natural floor.
This is the most inexpensive option, yet it requires the most maintenance. Chickens tend to dig at the floor, either for bugs or to create dustbath pockets. An uneven floor is more difficult to keep clean and can cause medical conditions like bumblefoot to affect your hens.
Natural floors also more readily retain moisture, especially if you live in a rainy region. Predators can also tunnel under your coop walls and maraud your flock.
The Mesh Option
We also experimented with a fine hardware-mesh floor. This successfully kept opossums, raccoons and other digging carnivores out.
Unfortunately, to say our hens disliked the feel of the mesh on their feet would be a gross understatement. Every morning, we’d watch the girls try everything from flying directly from their perch to the pop door to tiptoeing, touching only the floor’s wooden framing, to avoid coming into contact with the mesh.
Wood You?
Wooden floors are a more practical option. They provide surface space for your birds and block predator access from below.
Exposure over the years to the corrosive ammonia and urea in chicken droppings will cause wooden floors to weaken and rot, so you’ll need to keep up on coop-floor maintenance. Our current coops feature wooden floors covered with linoleum flooring purchased from our local home-improvement center.
The linoleum protects the wood floor base. It makes spills and regular coop maintenance a breeze.
If you are leaning toward a wooden or linoleum-covered floor, one final consideration is whether or not you’d like to elevate your coop. An elevated coop provides your birds with shade as well as shelter from both inclement weather and aerial predators.
Coops can be elevated on concrete stanchions. But it is better to select a coop whose blueprints already include corner and center posts via which the structure is elevated.
Proper ventilation is necessary to dissipate gases and to mitigate moisture found within the chicken coop. Without adequate ventilation, gases released from decomposing litter, feed and droppings will accumulate inside. This will toxically affect your flock.
The moisture from spilled water, droppings and condensation from your chickens’ breathing will remain inside, accelerating litter decomposition and causing other ill effects.
Proper ventilation—preferably in the form of at least two openings on opposite sides of the chicken coop—will correct these issues and provide your girls with fresh air year round.
Your vents can be as simple as two 5-by-5-inch openings cut high into opposing walls. They be also more complex, such as windows that slide open and lock shut.
Whatever form of ventilation you choose, make certain the openings are completely covered with fine hardware mesh. Even a one-inch gap is big enough to allow for predator access. (We learned this lesson the hard way our first year in business.)
Let’s Go Shopping
When you’ve determined exactly how you want these elements incorporated into your coop, it’s time to go shopping. Your first stop? Your local farm-supply store.
More than likely, they may stock ready-to-assemble kits for customers keeping a backyard micro flock of three to four birds. They may have catalogs you can browse featuring different chicken coop designs you can special order.
Other resources are your home-improvement store, lumber yard or shed sales store.
Many flock owners start out by buying a garden or storage shed, then customizing it to meet their chicken coop needs. If you are an architect—or know one—you can design your own coop, then hire a contractor to build it … or build it yourself.
Finally, you can search the internet for chicken coop blueprints or custom-built coops to find the henhouse of your dreams (or at least one that will be ready in time for your half-grown flock to move in).
What about a run for your flock? We’ll discuss that topic next!
It’s always something. It could be flea beetles on the broccoli. Or blossom end rot on the tomatoes. Or powdery mildew blanketing the pumpkin patch. (Maybe all of the above!) Gardeners have long taken these—and plenty of other—challenges in stride.
But, with increased temperatures and more frequent and extreme weather events, gardeners everywhere are facing some altogether new challenges.
Even the tried-and-true U.S. Department of Agriculture’s Plant Hardiness Zone map has gotten out of whack. After examining data from 5,000 National Climatic Data Center cooperative stations throughout the U.S., the Arbor Day Foundation released a new Plant Zone Hardiness map in 2015. Originally based on the USDA’s 1990 Plant Hardiness Zone map, the new version revealed that many of the country’s climate zones have moved.
Farming Concerns
Of course, some shifting over a period of decades isn’t unusual. But as for these changes? “It’s very difficult for farmers to react to climate right now, because the pace that it is happening is so much faster than what people had anticipated. It’s happening really quickly,” says Fan-Li Chou.
Chou is vice president of scientific affairs and policy for the American Seed Trade Association, which includes conventional GM seed purveyors, as well as organic, conservation and wildflower seed companies, among others.
And, ready or not, growing conditions are expected to continue to change. “As far as temperatures go, over the shorter term—say the next 20 or 30 years—the scientific consensus … is that the average temperatures are going to continue to rise,” says David Hollinger, director of the USDA’s Northeast Regional Climate Hub.
What’s more, Hollinger notes, “In a lot of places over the last few years, warmer wintertime temperatures and very early springs are causing plants to start breaking dormancy early. But the timing of the freezes and the cold snaps hasn’t changed as much. So you are having plants becoming more vulnerable and getting damaged by the normal springtime cold or frost, because they’re losing that dormancy.”
No matter where you garden, you already may have noticed some crops are trickier to grow than they used to be.
“This whole thing is pretty complex, because climate change has different effects in different regions,” says Jim Myers, a professor of vegetable breeding and genetics at Oregon State University. “It might be a longer season or higher temperatures or more extremes—more rainfall or humongous storms in certain areas. Those require different adaptations in different crops.”
According to climate scientist Richard Seager, a Palisades Geophysical Institute/Lamont research professor at Columbia University, the West Coast’s historically warm, dry Mediterranean climate is heading northward. The east coast’s subtropical climate is also shifting north of the coast.
“The more subarctic climates in eastern Canada are moving northward as well,” Seager says.
“There are also going to be shifts in precipitation,” he says. “Much of the United States is projected to receive more precipitation with the exception of the Southwest, which is expected to get drier. So, wherever your garden is, you can be thinking about plants that [do] better in a warmer climate.
“If you are in New Jersey, you might think the plants that will be growing well there in the coming decade or two might be ones that currently are more suited to growing in Virginia, for example.”
Kathleen Phillips, Texas A&M Agrilife Extension Service
New Seed Solutions
Plant breeders are combining new technologies with time-tested practices to develop staple crop varieties that can better withstand the current—and continued—climate changes.
“What the breeders are trying to catch up with is, ‘How do you develop a new variety that can be grown where you’ve always grown it—even under new climate conditions?’” Chou says.
“There are a lot of people working on drought-resistant wheat and drought-resistant rice, because those are the major food crops. But I think fruits and vegetables are much harder. In the U.S. right now, many of the plant breeders are working on how to grow more vegetables [that require] less water.”
Looking Local
Often, such vegetable- and fruit-breeding programs operate under the auspices of public sector universities.
“One thing that large seed companies do, in particular, is breed for broad adaptation,” Myers says. “They’re not trying to adapt to specific regions necessarily.… That’s where some small breeding programs can have an advantage, if they’re targeting these regional adaptations.”
Focusing on such regional needs, Allen Van Deynze works at the University of California, Davis’s College of Agricultural and Environmental Sciences as director of research at the Seed Biotechnology Center.
“[Plant breeders] look for stuff in places where you think [environmental] stress might be,” he says. “For example, we do a lot of breeding for resistance to disease, so that we don’t have to control it in another way. We always try to find plants growing in areas where that disease is prominent.
“And we hope to find those that are resistant and then put those in varieties that would be locally adapted.”
“The difficulty in plant breeding is that it takes so long to get to a variety that you can actually put in a seed packet to sell to a home gardener or even to a major producer,” Chou says. “It takes 10-plus years to get there.”
Just what’s a gardener to do in the meantime? “Everything is changing so much that it’s a good idea to have a number of different varieties in the field just to make sure that you capture something this year that is going to work well,” Van Deynze says.
“And what works well this year may not be what worked well last year.”
Besides planting many different varieties of a particular crop, don’t be afraid to wander outside of your historic plant hardiness zone. Consider several new-to-you vegetable varieties that usually would flourish to the south or southwest of your current location.
You might also contact any nearby universities or seed companies to determine whether they’ve recently bred specific crop varieties that might thrive in your area. And, when searching online for new seeds to consider, use multiple keywords, including “climate-resistant,” “climate-resilient,” “drought-tolerant,” “heat-tolerant,” “flooding-tolerant,” “stable” and “robust.”
You might also look for organic seed varieties.
“In organic environments, the inputs and the conditions that they are grown under are often quite variable,” Myers says. “Varieties that do best in organic systems are those that have a lot of environmental buffering. In general terms, [these] varieties … might be a little more stable and productive for growers.
“There aren’t a lot of varieties like that out there. But there are starting to be some in some catalogs that work in this area.”
Seed Success Stories
In some cases, breeders have already developed more heat- and drought-tolerant veggies—largely for use in the southern and southwestern U.S.
“I know the breeder who developed a snap bean variety called Sahara,” Myers says. “He did it by selecting under extreme heat conditions down in Texas. That’s a variety that I’ve seen be a very stable performer over the years.”
As for strong broccoli contenders? “Arcadia is a hybrid that’s probably 20 or 30 years old,” Myers says, “and it’s very stable. Sakata has a broccoli hybrid called Eastern Crown which they bred specifically for the East Coast, and it seems to be pretty robust.”
Myers also mentioned the work of his predecessor, Jim Baggett. Hoping to develop tomatoes well suited to western Oregon’s cold springs and summers, Baggett combined early bush habit tomatoes with seedless tomato varieties. The result was several tomato varieties, such as Gold Nugget, Siletz, Santiam, Legend, and Oregon Spring that will set fruit in cold conditions.
But that’s not all.
“It’s interesting, because not only do these tomatoes set fruit under cool temperatures, but they also set fruit under extreme heat,” Myers says. “I used to get someone once a year contacting me from Phoenix, Arizona, saying Oregon Spring was the only tomato that would set fruit throughout the summer in Phoenix.”
“Those are examples of traits that can be used to extend the range of a crop when the climate is throwing things at you that are too extreme for a normal variety,” Myers says.
Looking Ahead
Despite the climate complexities ahead, Hollinger remains optimistic. He’s sure there’s a solution to plant hardiness zone challenges.
“There have been lots of other environmental problems that people have basically solved,” he says. “Whether it’s acid rain or it’s the ozone hole, DDT, leaded gasoline. All of these things, once upon a time, were really serious problems. And all of those are measurably better now….
“I think we can be confident that we can do that with climate. It’s probably the biggest issue that any of us have to face, so it may be more difficult. But it’s not impossible.”
Chou is optimistic, too. “Think about Kansas and the Dust Bowl,” she says. “We developed a variety of wheat that can grow there. There is so, so much science—and investment in science—and knowledge in a teeny, tiny little seed.
“That, to me, is super powerful.”
This article originally appeared in the January/February 2021 issue of Hobby Farms magazine.
Spring is rapidly approaching, which means it’s time to start thinking about pruning fruit trees.
Corrective pruning is best done right away in the spring, before the trees awaken. The goal is to train young trees to grow with an open shape, avoiding tangled branches and weak crotches. Benefits are numerous, from reducing disease to promoting the growth of large fruit easily reachable for picking.
Even older trees can benefit from the occasional pruning.
There are seemingly countless theories on the best way to prune fruit trees for maximum health and productivity. The exact approach you employ depends on many factors, including the types of trees you’re growing. But the tools you need for pruning are the same regardless of how you put them to use.
Here are six tools you may need for pruning fruit trees this spring:
Pruning Shears
Pruning shears are perfect for trimming thin branches, which will be your primary focus for corrective pruning of young trees. They fit in the palm of one hand, freeing up your other hand to hold the branch you’re pruning steady, or to push other branches out of the way.
Pruning Loppers
If you need to prune thicker branches, pruning loppers can handle the job. Though similar in design to pruning shears, they’re larger (with wider jaws) and require two hands to operate.
Their long handles give you more leverage for cutting through branches up to two inches thick. If you stay on top of corrective pruning each spring, though, hopefully you’ll have dealt with problematic branches before they grow to such a large size!
Pruning Saw
For removing large limbs (perhaps dead or damaged ones) too thick for pruning loppers to handle, a pruning saw is the tool to use. Like most hand saws, they come in a variety of sizes, with fine teeth for delicate cuts and course teeth for large branches.
But the blades are generally short and curved, and not as tall vertically as the blades of other saws. This allows pruning saws to squeeze into narrow places and still do their job.
Sometimes you need to prune branches that are out of reach. Rather than use a ladder (which requires constant repositioning), why not consider telescoping pruning tools?
Similar to apple pickers, pole saws and telescoping pruners are adjustable in length and allow you to reach high above your head for corrective pruning. Just be careful where you let the branches fall!
Wound Sealer
A corrective pruning cut on a small branch usually heals by itself, but if you’re removing larger branches—perhaps an inch or two thick—you might consider sealing the wound to keep out rot and disease.
Many varieties of wound sealers are available. See if your local nursery has any recommendations.
Not all corrective pruning requires cutting branches. Sometimes, you just need to spread branches apart so they won’t grow with narrow crotches prone to breaking.
Limb spreaders can be installed to widen the space between branches. After a couple of years, the branches will have grown accustomed to their new positions, and you can remove the spreaders for reuse elsewhere.
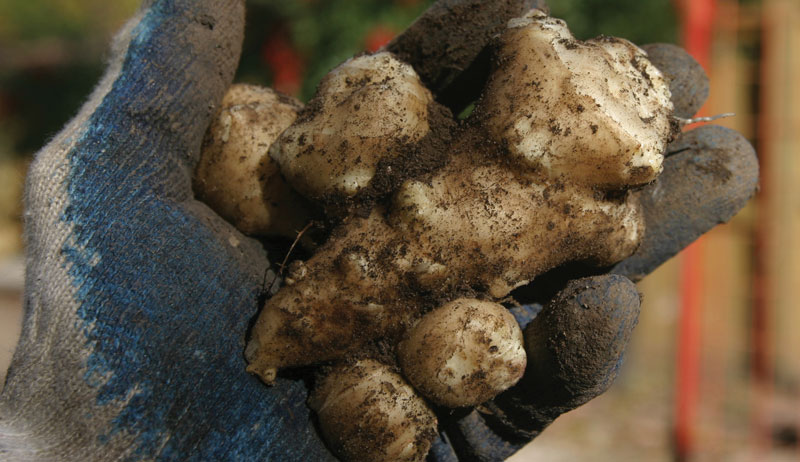
A wild, edible North American plant that most people know as Jerusalem artichoke is not an artichoke at all. And it didn’t come from Jerusalem. The odd name comes from a story of miscommunication that’s too long and boring to relate here.
To get around that silly name some foodie came up “sunchoke” because the plant is in the sunflower family. It still begs the question: Why would any sane person christen any food with the name “choke?”
Professional forager Sam Thayer prefers the name sunroot. And given that the Latin name is Helianthus tuberosus, which means “tuberous sunflower,” sunroot seems like the right way to go so I’ll stick with that. Mostly.
Nonetheless, sunchoke, as a name, is still much better than the undeserved middle-school-mentality name of “fartichoke.” If you harvest the tubers of this plant too early, yes, you’ll get gas—enough perhaps to make others choke!
But a smart forager will wait for frost to thoroughly kill the top of the sunchoke plant to avoid that flatulent faux pas. If you harvest the tubers after that severe change in the weather, you won’t be digging up fartichokes. Instead you’ll be digging up a paleo crop that provided much of the healthy carbohydrates for those original locavores, the Native Americans.
Interestingly, sunroot starch has a sweet flavor, yet evolved in a form that diabetics can safely eat. The tubers are delicious raw and are crispy as water chestnuts.
Frank Hyman
Don’t make the mistake of preparing them like potatoes as some recommend. They make a good pickle or can be steamed or roasted whole and sliced to serve as a side dish. If you don’t have a root cellar, the tubers can stay in the ground through winter or you can store them in a plastic bag in the fridge for several months.
Sunroots’ striking yellow flowers bloom in early fall on 8- to 10-foot tall, hairy stems. You’ll find them growing wild in sunny fields and at the edge of forests where they spread and shade out other plants.
Be aware that other similar but inedible wild perennial sunflower species finish blooming in late summer before sunroots have begun. They also all have smooth stems as opposed to the sunroots’ hairy ones.
Take note of the location while the sunroots are blooming and then come back after a hard frost has killed the tops. The sandpapery hairs on the stems will still be there to reveal this plant’s secret identity.
Bring a shovel to dig them and a bucket to carry them in. The tubers will be plentiful.
Foraging isn’t the only way to gather sunroots. We can do as the Native Americans did and plant them as a crop. Oikos Tree Nursery sells cultivated varieties of sunroots and other fascinating native crops online.
But since they spread, I contain my sunroots in large plastic nursery containers (10- to 20-gallon pots) scavenged from landscapers. Fill them with garden soil but no fertilizer. Mulch the pot and keep it watered during dry spells.
To keep these top-heavy plants from tipping over their pot in a strong wind, I snip a few inches off the top when they’re a foot tall to force them into a shorter, bushier shape.
After the stems of the plant have been killed by a hard frost (which is not necessarily the first frost) cut your sunroots to the ground. Then dump out the entire pot onto a tarp.
Gather all the sunchoke tubers except for one or two that get tossed back in with all the soil to grow next year’s crop.
This article originally appeared in the January/February 2021 issue of Hobby Farms magazine.
Extending your seasons is a great way to get a jump on spring and farm later into fall. One way to do this is by using materials on both ends of the seasons. This allows you to either plant earlier or continue growing later than would otherwise be possible due to cold or frost. You can also grow varieties you might not generally be able to in a colder region.
As well, depending on your locale, some of these materials can be used to overwinter crops.
One of the largest categories of season extension materials is termed “row covers.” Search “row covers” (aka “Reemay”) online or in garden catalogs and you’ll find a long list of brands and types, raising questions such as:
What’s the difference between Typar and Agribon?
Ag-15 versus Ag-30 versus Ag-50?
What size do you need?
Floating row covers or supported?
This stuff isn’t cheap, and the well being of your crop depends on it. So it’s a good idea to know which products will meet your needs.
Season extension works for the smallest home garden to large market grower fields, with products and sizes to suit. It can help a grower in northern Vermont protect their tender annual veggies against an early fall frost. But also, a Georgia grower can keep plants producing throughout the entire winter.
Follow along while we take a closer look at what’s out there.
Row covers are generally made of a spunbonded polypropylene material and found in many “weights.” Weights range from insect-protection only to heavy row covers used to overwinter certain crops.
Depending on their grade and manufacturer, they exhibit specific levels of light transmission and frost protection, rated by degrees of frost protection.
Row covers designed specifically for protection of crops from insects (flea or cucumber beetles, etc.) are designated as lightweight insect barrier. Common products include Ag-15 and Proteknet insect netting.
While an excellent product, these don’t provide frost protection. They should only be used to protect crops from insect damage or to deter grazing of crops by deer and other wildlife.
The next level up provides some frost protection. A commonly used product is Ag-19, which provides between 2 to 4 degrees Fahrenheit of frost protection, protecting the crop down to 28 degrees or so. This product is also often used at the beginning of the season to cover heat-loving crops that could use the added warmth. These crops include:
eggplants
peppers
melons
squash
beans
Ag-19 permits 85 percent of light to pass through, known as light transmission. Some rain also permeates the cover.
I formerly used Ag-19 a lot. But just this year, I switched to trying out Covertan Pro 19. This row cover provides the same amount of frost protection but allows more light transmission (approximately 90 percent) and rain through. Plus, it’s stronger than Ag-19.
I’ll switch over to Covertran as my Ag-19 wears out.
In either case, whether you use one or the other, buying the correct width and length is important as is installation. The information that follows is valid for either brand as well as any others of similar weight/frost protection rating.
Know Your Dimensions
In general, you’ll achieve cost savings by buying longer lengths of row covers rather than the short pieces commonly sold at garden centers. There is one caveat, though. The longer the row cover, the more likely you are to incur higher shipping charges.
A 50-foot length of Ag-19 might not trigger extra shipping charges. But a 250-foot length almost certainly will. You need to weigh the cost/foot including shipping charges to figure out the best deal.
Width Matters
As well, how big an area do you need to cover? I only buy longer lengths of row covers and store the extra. The row cover needs to solidly connect with the ground and stay anchored to it without gaps in order to be most effective.
When in doubt, go for wider.
Remember that your plants will grow considerably over the season. If you wish to use row covers to protect tomatoes that are tied to stakes or in wire tomato supports, you will need a wide row cover. Measure from the ground, allowing a generous amount to anchor to the soil, up the side of the supports, over and down again.
Floating vs. Supports
What about floating row covers versus supports? It depends on the crop in need of protection. In general, crops do better if the row cover (used for frost protection) doesn’t come in contact with the foliage or fruit.
As well, crops that have sharp pointy parts such as peppers and eggplants will often tear holes in row covers unless hoops support them. I tend to use hoops to protect crops such as peppers, eggplant and beans while using floating row covers on those such as melons, squash, cukes and strawberries.
In the spring, I often start out using hoops to protect the cucurbits. By later in the season, though, when they’ve gotten large, I switch to floating row covers.
Some people construct homemade hoops out of PVC pipes. Others use small short stakes to support the row cover. But I prefer to use standard wire support hoops.
These are generally made of a No. 9- or 10-gauge metal. I purchase them in large quantities, storing for later what I don’t need at the moment. The shipping charges for precut wires are high due to their length. But they’ll last for many years if well cared for.
I tried buying some coils of wire online to cut my own, but this was a failed endeavor. The wire that was sent to me wasn’t usable to make hoops. I’ll use it to trellis grapes or for fencing at some point.
They often come in several lengths, but I prefer 76 inches. Better to have excess wire than for it to be too short!
There are many methods of anchoring row covers so they’re sealed to the ground and don’t fly away.Some of it depends on how often you wish to open up the row covers.
Do you plan on allowing the row covers to stay in place for some time? Anchor them to the ground by shoveling soil over their edges. This method is often used for anchoring insect-grade row covers securely to the ground to keep out insects.
Some people use rocks to hold down the row covers. But it seems there are never enough rocks around when you need them! Others fill small bags with sand or soil, which they use to secure the row covers.
I tend to use a combination of rocks and earth staples. These are U-shaped metal pins, found in lengths between 3 to 6 inches. I prefer to use the 6-inch lengths for better anchoring strength. You can buy them in small packages or in boxes of 500 or so online (how I purchase them).
Again, they can be reused from season to season. And if you store them properly, you’ll have them for years to come. Ordinary clothespins are also handy in helping anchor fabric to hoops or to join lengths (or widths) of fabric if needed.
A technique I sometimes use is to double up my hoops so that I insert two wires into the ground, immediately adjacent to each other. Then I weave the row cover under and over each time I come to a set of wires. This helps anchor the fabric even more and can allow me to easily just push up one side to weed, allow for pollination, ventilation, harvest, etc. instead of removing the entire row cover.
Sever180/Shutterstock
Overwintering
Row covers are available for overwintering of specialty nursery crops, strawberries or greens. The heavier the weight, the less light transmission occurs and the more they cost. I used a row cover comparable to Ag-30 to cover my strawberry planting for the winter when I was farming in central Vermont.
This was in lieu of covering with straw. It worked quite well and the plants did fine.
This Year
For my small home garden strawberry planting, I plan to use Ag-19 or Covertan-19. I’ll use it as a floating row cover, placed directly over the plants. I’ll pull the row cover off in the spring to weed and fertilize and pull it off for good once flowering starts. This will give my plants a head start.
Estimates claim that one layer of row cover moves you one USDA ag zone warmer. So this will make my barely zone 4a feel more like a “balmy” 5a to my strawberry plants.
With just over a 90-day frost-free growing period here in my location, I’m also playing around with tricks to improve the yields of heat-lovers such as melons, eggplants and peppers. Using row covers such as Covertan-19 in the spring and removing it only once the plants are in bloom helps.
Next Season
Next season, I’m going to try removing the row cover from the melons only long enough to get a certain number of flowers pollinated and then recover them until it’s time to harvest. This should push the plants to develop what is already pollinated instead of continuing to produce fruit, which won’t have time to ripen.
Heavy covers—such as Ag-50 and Ag-70, as well as Typar, which makes a good row cover, too (the row cover material, not building wrap!)—are used to provide between 5 to 8 degrees of frost protection.
One use for this is to overwinter nursery plants in containers. Another is to cover greens or carrots during the winter.
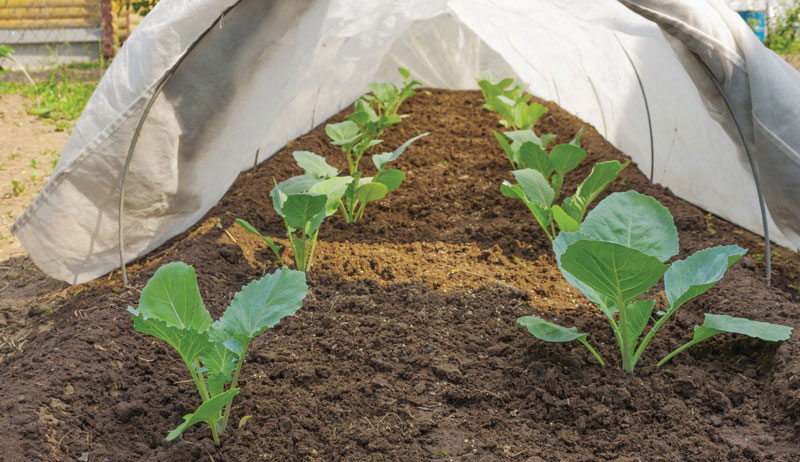
In some climates further south, growers only need this to keep things growing and to be able to harvest crops even in the winter months. In cold climates, this can allow a young leafy green crop such as spinach or kale to remain in the ground and resume growing in the spring, way before a seeded crop.
Layered Support
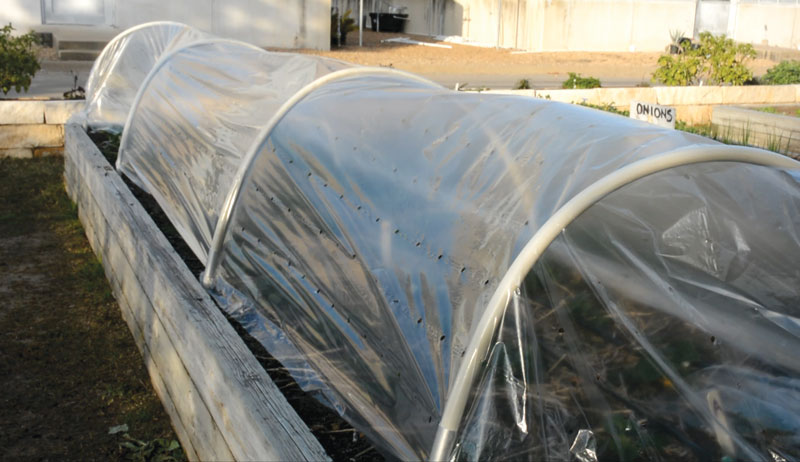
Sometimes row covers are used along with other methods of crop protection such as cold tunnels or cold frames. A low or high tunnel, covered in plastic, can shelter a crop such as leafy greens during the winter months.
If you use row covers in conjunction with this (sometimes several layers), this increases the ability of the crops to withstand cold weather.
Homemade cold frames are another method of season extension, with or without the addition of row covers. There are plans online and in books for constructing these, often made out of scrap windows.
A simple one utilizes a framed garden bed and a stick to keep the hinged glass panel open for venting on a warmer sunny day. (One caution: Make sure you don’t use windows painted with lead paint.)
If you cover the crops inside of the cold frame with row covers, this will increase the protection on cold nights.
Other materials include slitted or solid plastic row covers. The idea behind slitted plastic row covers is that heat buildup on sunny days will be dissipated via slits in the fabric while creating a sort of mini-greenhouse. It allows near 100 percent light penetration and total visibility of the crop at all times to assess flowering or weeds.
I’ve used these in the past but prefer good polypropylene row covers myself.
Tips for Trying
If you’re interested in trying this, buy a small amount, and try it out on a heat-loving crop such as peppers or eggplant, especially if you’re in the North. Although it’s supposed to provide a few degrees of frost protection, I don’t trust it as much as I do spunbonded row cover. Your mileage may vary though so experiment if you’re adventurous.
I don’t like the idea of putting solid plastic material being used over hoops as the heat could build up rapidly in the sun, it won’t provide as much frost protection as spunbonded row covers, nor will it allow rain to penetrate.
If you use plastic row covers, anchor the edges with soil and not metal staples.
Once you’ve tried using good professional row cover materials though, you won’t want to find yourself scrambling to raid the linen closet anymore of all of the sheets and blankets you own!
This article originally appeared in the January/February 2021 issue of Hobby Farms magazine.