Since the Fermented Cauliflower with Turmeric recipe that we shared last month was such a hit, we are taking it one step further this month with a fermented Giardiniera recipe. This spicy medley of veggies is traditionally preserved with vinegar, or oil and vinegar.
This fermented cauliflower recipe, however, is preserved with just salt and water. It provides a surprisingly delicious alternative to the classic Italian relish.e
Once fermented, this spicy relish is great as a sandwich topper or spooned over chili or eggs. And it’s delicious mixed into pasta or spread over a slice of pizza. Consider even setting out a small dish on your next charcuterie platter.
1/2 cup serrano peppers, sliced into 1/2-inch pieces
1/2 cup small cauliflower florets, uniform in size
1/4 cup red bell pepper, diced (optional)
1 fresh pesticide-free grape leaf or raspberry leaf (optional)
Brine
1 tbsp. kosher salt dissolved in 2 cups of water
Directions
Wash and chop all vegetables, mix together and transfer to a quart jar. Pack ingredients down well into jar. Carefully push them down with your fist, leaving 1 to 2 inches of headspace.
Mix together the brine and pour the brine over the produce until everything is completely submerged. Leave at least 1 inch of headspace from the brine level to the rim of the jar.
If you have a small fermentation jar weight, add it to the jar to keep the ingredients completely submerged under the brine. Remove any small pieces of food that float up to the top of the brine. Produce above the brine will increase the risk of the ferment spoiling.
Wipe off the rim of the jar with a clean dampened towel. Add the Mason jar canning lid and tightly screw on the ring.
Stephanie Thurow
Fermentation
This is a seven-day ferment. Ferment at room temperature, ideally between 60-75 degrees F (15-23 degrees C), and keep out of direct sunlight.
Check on the ferment daily to make sure that the brine covers all the produce. If the produce has floated above the brine level, use a clean utensil to push it back below the brine.
Burp the jar daily—unscrew the lid briefly and tighten it back on to allow any built-up gas to release (and avoid possible jar breakage or the ferment from overflowing).
This is an active ferment. Foam-like bubbling after a day or two of fermentation is totally normal and a sign that things are fermenting along, just as they should be.
After one week of fermentation, taste test a spoonful to determine if the relish has the spicy, sour and tangy flavor you desire. If it still has the flavor of the vegetables in the raw form, allow it to ferment another day or two and taste again.
Once the fermented cauliflower recipe has reached your ideal flavor, transfer the jar into the refrigerator, with the brine and all.
Fermentation does not stop once the ferment is transferred to the refrigerator. However it does slow the process way down. The taste and texture will continue to change, therefore this ferment is best enjoyed within six months.
If you do not have a glass jar weight, you can improvise by using an easily removable small food-grade glass dish that fits inside the jar. Or, if you have a smaller glass canning jar that can fit into the mouth of the jar you are fermenting with, use that to keep the produce pushed under the brine.
Stephanie Thurow
The addition of the grape or raspberry leaf to the ferment is to help the vegetables stay crunchy. Grape and raspberry leaves contain naturally occurring tannins that help fermented vegetables, such as cauliflower, keep their crunch. However the ferment will be delicious without them. (I know many people around the country won’t find these easily this time of year.)
Adding two bay leaves is another alternative. However the addition of bay leaves will change the overall flavor of the ferment. Make sure you use pesticide-free leaves.
If you are unsure if your water is safe for fermentation, you can boil it and allow it to cool to room temperature before stirring in the salt to make your brine.
You may use fine sea salt instead of coarse kosher salt if you prefer. Just adjust the recipe to 1 1/4 tbsp. fine sea salt.
This recipe has been adapted from Can It & Ferment It (2017) with permission from Skyhorse Publishing, Inc.
In my last article, we looked at some general principles and benefits of ecosystem design in the garden. Now, let’s dig further into ecosystem garden design by looking at some benefits.
Ecosystems Form
In all ecosystems you see that life has different form.
We often refer to the form of plant canopies and relative size—the distinct shapes of linear or broad leaf plants and the obvious layering and vertical stacking of their canopies.For instance, in a mature forest you see larger trees, medium trees, shrubs, bushes, herbs, ground covers and vines.
Even in a grassland ecosystem, there is similar layering. (The plants don’t grow as tall, of course.)
For instance, look at the native prairie grasslands that once stretched across North America, providing habitat for bison. These areas had many different grasses, forbs, herbs and flowering plants occupying different layers. This cover ranged from 6 to 7 feet above the ground to only 3 to 6 inches off the soil.
We can apply this natural phenomenon in our yards, too, by designing food forests with layered diversity.Fruit trees can reach up high. Shade-tolerant berries can grow underneath, and herbs and ground covers can abound still further down.
This design maximizes the photosynthesis per square foot of garden or yard.
In other words, more of the sunlight that enters the footprint of your yard will be taken up by plants and transformed into useful fruit, berries and herbs. But you’re also lighting new-soil organic matter, pollinator habitat and nitrogen-fixing legumes.
All wild ecosystems have plants and animals that serve different functions and benefit the ecosystem as a whole. These “services” result in companionship between plants and,sometimes and actual evolved relationship between organisms, called symbiosis.
One common examples is the relationship between mycorrhizal fungi and trees. The trees provide sugars from photosynthesis to the fungi, and the fungi supply water and nutrients more easily to the tree through the roots.
Other times, though, plant relationships aren’t the result of symbiosis so much as a more coincidental companionship. For instance, a berry bush can protect a young fruit tree’s bark from sunscald in the winter. Although this is beneficial for the fruit tree, the berry bush didn’t evolve this specific function. Rather, it just happens.
In a similar fashion, when you plant taller trees, shrubs and creeping ground covers, you help prevent soil erosion for the whole garden ecosystem. When rain falls, it first hits the higher canopy, then trickles down to the forest floor below. There, groundcovers further protect the soil and hold it against erosion!In this case all the living plants help retain soil—to all of their benefit.
Ecosystems Create Potential
Another principle: Wild ecosystems build potential.When you have a field of corn, you start with a certain number of seeds. If you fertilize the field and have a successful year, you will get a good yield of corn cobs with much more seed than when you started. This is agriculture.
But if you don’t dry the seed, save it over the winter, prepare the land again and seed the corn again, the landscape will yield nothing the next year. Nothing of use to the farmer (or the community that eats the corn) will grow. You might see some random weeds, though.
On the other hand, an ecosystem garden builds potential.If you plant a diversified field—or a yard with fruits, nuts, berries and herbs—then leave it, it will continue to produce.In five years, you’ll see more fruits than you previously did. Plus, the soil will be richer for composted leaf fall and those soil organisms that access deeper nutrients in the soil and help fix nitrogen.
This is not just a difference between annual and perennial agriculture either.An orchard with only apples will be less resilient if there is a major pest outbreak than a diversified fruit forest with many different varieties.
Yes, perhaps some varieties in the fruit forest will fail due to pests. But others will fill in the gaps. The ecosystem will continue to build potential as a whole.
An ecosystem landscape designed using sustainable gardening principles will, in 15 years, yield a wealth of benefits and opportunities. The grower can harvest fruits, nuts or herbs; graft scion wood; and sell fruit trees. Furthermore, they can chip prunings for edible mushrooms and more.
The community will also offer increased wellness from beautiful and bountiful landscapes. The grower will harvest local nutrient-dense food while enjoying the health benefits of “forest bathing.”
As farmers, we know that the animals must come first. We get up early if the barn chores are waiting. We head to the chicken coop to feed the birds before we feed ourselves. It’s just part of the lifestyle, and it’s completely satisfying and understandable to those who live it.
So it should come as no surprise that farmers may also tend to spoil their animals when it comes to housing.
This actually makes a lot of sense when you think about it because well-designed and properly thought-out animal housing makes the farmer’s life better, too. The animals stay safe and are protected. And going the extra mile in design means that chores are more convenient, the work goes more efficiently and the entire process is more enjoyable.
To that end, let’s look at a few ways you can spoil your hens—and yourself!—by designing your ideal chicken coop. Of course, what’s ideal will vary from person to person, so we won’t dive into specific construction details. But think of this as an idea bank for your next design.
Let’s go!
Build from Experience
Sometimes a hobby farmer has experimented with keeping chickens on a very small scale and is now ready to upgrade. This is an excellent time to take the lessons you’ve learned from your first chicken coop and apply them to the new design.
Ask yourself these questions:
Was the coop door just too short?
Did the angle of the clean-out door make for aggravating or uncomfortable work conditions?
Were the nest boxes inconveniently located?
Did the whole structure lack adequate ventilation?
Was it built in a poor location for drainage, wind or sun exposure?
All of this experience can be very beneficial in moving forward on your new coop design. Choose the right location, far enough away from the house to control odors but not too far away from a water source.
Include enough ventilation—a square foot per chicken or at least 1⁄5 the coop’s wall space—to prevent excess ammonia smells and other unwanted gases. Make the coop comfortable to work in.
All things being equal, a coop with more square footage is probably nicer! And if the goal is really to build your ideal coop, explore designs with larger footprints. Keep in mind that more square footage is more space to clean. But that may not be a large concern.
If you’re building a new coop because you’d like to increase the size of your flock, figure that each bird should generally have about 3 to 4 square feet of interior space. But bigger is always better (within reason).
Figure on even more square footage for regions with hard winters where the chickens might spend more time indoors.
Hardware Cloth
Experienced chicken owners probably already know this, but chicken wire—that familiar, flexible, hexagonal, woven wire—isn’t a very strong barrier. Determined predators can tear it down, so another method is needed.
Popular alternatives include hardware cloth, which is a similar idea but constructed out of a much stronger wire. You’ll find this in 1/2- or 1⁄4-inch sizes, either of which could function well for a chicken coop.
Those extra (and now unused!) rolls of chicken wire you have stashed away can be better put to use as a way to control the movement of—or confine —chickens within the safety of an already secure area.
You can isolate a broody hen or otherwise limit interactions between members of the flock, both inside the coop or outside in the run.
Roosts Aren’t Just for Roosters
Regardless of whether your flock contains just hens or includes a rooster or two, you’ll want to make sure that your coop has enough roost space.
Paulette Johnson
A few dos and don’ts regarding roosts include:
Do provide your hens with enough roosting space. Figure on 12 inches per bird.
Don’t build the roosts over the nest boxes!
Do provide wooden, somewhat rounded roosts that are at least 2 inches wide.
Don’t use metal roosts (frostbite potential!).
Do stagger the roosts to gain extra height and space.
Electricity
Of course, if you’re really serious about creating an ideal coop, consider adding electricity to it. You have a couple of different options here. While running a buried power line from the house or barn to the coop is certainly doable, this might be more effort or expense than you’re willing to invest even in an ideal coop.
Extension cords running across the top of the ground aren’t ideal or particularly safe. Happily, technology has made it easier (and less expensive) than ever to supply electrical conveniences to an “off the grid” coop—even if it’s only a couple hundred feet off the grid.
Modern small solar panels are capable of powering:
Lights
LED lights are energy-efficient, so they’re useful in a solar-powered coop setting. They’re also purportedly effective in cold weather, so that’s a plus, too.
Not only are lights useful for when you’re working in the coop after-hours, they may be a necessity if you’re trying to extend your hens’ laying season. (Egg production and hours of daylight go hand-in-hand.)
You might also want to install some outdoor lights for dawn or dusk work.
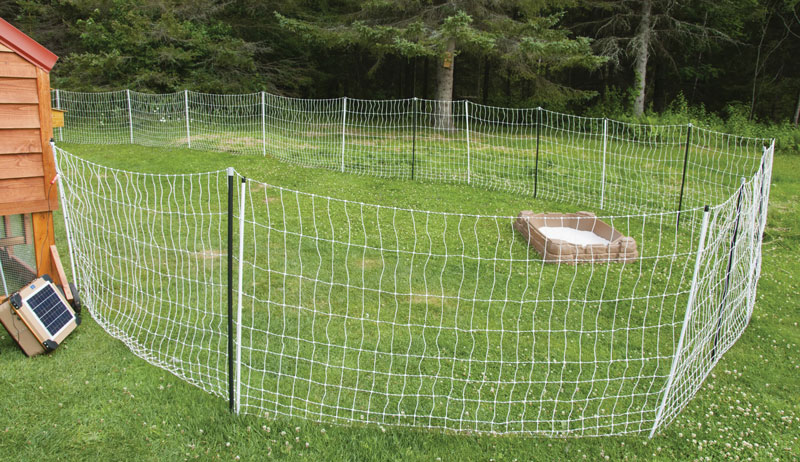
Electric Fencing
Solar-powered fence chargers are more than capable of providing power for a basic (and fairly large) chicken-safe electric fence run for daytime use.
Daniel Johnson
Electric fencing can also act as a helpful deterrent for keeping snooping predators away from the chicken coop.
Timers
Want your flock safely inside the coop at night, but don’t necessarily want to wake up early every morning to let them out? Install an electric timer on a chicken door to easily let the hens out each morning.
For all their benefits, there are some things that solar panels just won’t have enough electricity to power. A major one of these is heat, which uses up a consider amount of electricity. If you live in a region with considerably harsh and cold winters, you may need to consider heating your chicken’s water source. For that, you’ll probably want your coop connected to the grid.
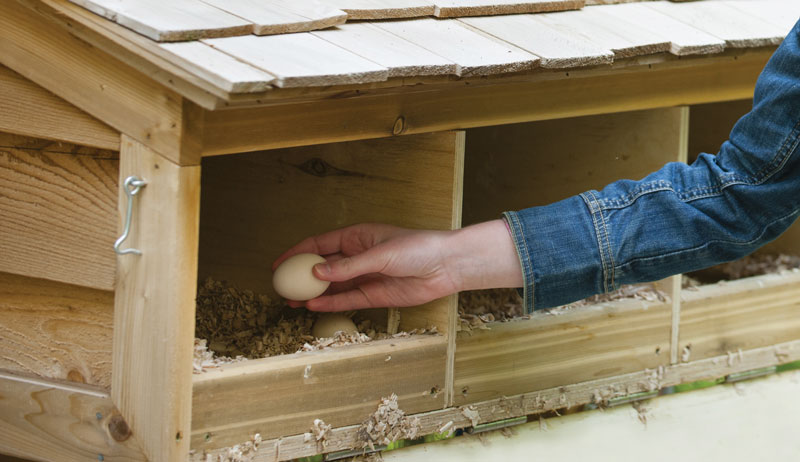
Nest Boxes
Picture this: It’s a cold, wet, muddy spring day, and you’re on your way to the coop for the morning’s egg collection. Do you really want to juggle your egg basket and your muck boots while opening the door, trying to keep all your hens from getting out while you enter the coop to get the eggs?
No way!
A much more convenient plan is to construct nesting boxes that can be accessed from the outside of the coop. A simple (yet weatherproof) access door is all that you’ll need to be able to collect eggs from the outside.
If you’d like more square footage inside the coop for the birds, you could build the nest boxes in their own section that juts out from the main body of the coop. But, again, this will need to be carefully weatherproofed.
Nest boxes are really the key to keeping your eggs clean and safe. They encourage the hens to nest in the designated location and not somewhere else—such as the coop floor! Nest boxes should be about 1 cubic foot of space—maybe a little taller.
And remember that not all the hens need a specific nest box. They’ll share, and you only need one nest box per three to four hens.
Just as outside access makes it easy to collect eggs, outside access is also important for efficient coop clean up. Poultry are … well, messy, and with dribbled bits of feed, loose feathers, used bedding and manure, cleaning out the coop regularly is a necessity.
Planning ahead during the construction process and designing the coop so that it is easy to clean saves time and effort later.
Figure on including an outside access door that will allow for at least basic daily clean-outs, and perhaps an additional, larger access door that provides admission for “ big-time, all-out, hose-it-down-and-remove-everything” cleaning days.
Some folks like to include a linoleum floor for easy clean up.
Roofing 101
Looking for a roof that won’t tax your carpentry skills? Figure on building a shed roof.
Daniel Johnson
Want something that can hold up to a higher snow load and offers some additional ventilation options? Consider a gable roof.
Either style can be effective, as can the choice of a metal roof versus shingles. Metal roofs last, look good and shed snow loads effectively. They can also be noisy during heavy rainfalls.
Shingles look good but might not be quite as durable in the long run.
Enjoy the Process
Make your coop designing and building process fun! Instead of a bare-bones design, splurge on your ideal coop in ways that won’t significantly add to the cost.
Attractive painting on the trim or siding doesn’t cost much except your time to do it, but it can significantly add to the long-term aesthetic appeal of your coop.
Even for a large chicken coop, the actual square footage of the walls isn’t too much. You could try siding it with cedar shakes or another type of siding that you find appealing. (How about a log-siding “cabin” coop?!). Add some decorative touches!
Most of all, enjoy the process.
Sidebar: Permits for Poultry
Research ahead of time whether or not you’ll need to apply for a building permit before you begin constructing a chicken coop.
The answer is always dependent on your specific location and town/city ordinances. But it’s possible that the small footprint of your coop will be enough to keep it under the dimensions that require a permit.
Also, it might be possible that a coop without a true foundation will be exempt from the permitting process. On the other hand, if a permit is required, keep in mind that there may be certain parameters required regarding size, height, windows, placement on the property and more.
While you’re at it, make sure no specific ordinances exist about keeping chickens to begin with! This is probably more of a concern in a more urban-farming situation where there might be local concerns about noise from roosters or the size of the chicken flock.
Still further, you might discover local ordinances detailing storage of chicken feed sources, how to control chicken manure, etc.
Hopefully, you live in location where chicken-keeping is welcome, and, permit or not, you have a positive coop-building experience.
This article originally appeared in the January/February 2021 issue of Chickens magazine.
Sweet Serendipity Tiny Farm was built on heartbreak.
When founder Shar Hinson’s father passed away, she found herself feeling “this hole in my heart that needed to be mended.” As a form of healing and catharsis, Hinson came to realize that she had to “fix it the only way I knew how for my mom and me—which was through animals.”
So was born Sweet Serendipity Tiny Farm. The Hesperia, California-based venture calls on Hinson’s expertise studying agricultural science education and animal science at her “dream school” of California Polytechnic University Pomona.
We spoke to Hinson about why chickens play such a focal role on her farm and her most in demand color of eggs. We also got into the case of her pigs trying to steal duck eggs.
“It started off with my boyfriend buying me two goats and four ducks. And that turned into 12 chickens and 14 ducks,” recalls Hinson when she recaps the roots of Sweet Serendipity Tiny Farm. “Now four years later, there’s six goats, 30 ducks, 30 chickens, 14 quail, two pigs and six geese.”
When it came time to officially name her tiny farm, Hinson says she knew she wanted to chose a title with deep personal significance.
“Serendipity is a word that means so much to me,” she explains. “I believe in life we all take paths and make choices. But there is always a hint of serendipity in everything. Anyone who knows me knows that serendipity means so much to me—so I had to make it a part of this adventure in my life.”
Chickens are an integral part of Sweet Serendipity Tiny Farm. Hinson says they “became the focus of the farm just out of chasing the rainbow eggs.”
She adds, “A lot of people don’t realize where their food comes from. Discovering that eggs can be blue, green, burgundy, pink and all other colors makes people excited and supportive of homesteaders and farmers.”
It also “gets people engaged” when they realize that the farm’s food can “differ in colors than just the norm at the grocery stores.”
When it comes to favorite egg colors, Hinson says it’s either a case of “olive eggs all the way” or “a heavy-bloomed Maran where the deep brown egg looks purple or pink.”
Selecting her chickens of choice, Hinson picks Olive Eggers. “From breeding different generations of Olive Eggers, you can get really light olive-colored eggs to deep forest green eggs and also some grey and rust colors.”
She also mentions how “they look so striking in an egg carton for people to enjoy.”
Along with the roaming poultry, farm is home to some Kunekune pigs. It turns out the the pigs are entrusted to Hinson’s four-year-old niece, who’s also become an official “farm helper.”
Talking about the relationship between the various animals, Hinson recalls how “when we first got the pigs they were raised with the ducks and loved it until we noticed they were stealing the eggs.”
The chickens, Hinson adds, are especially partial to “going into their pen to scratch around and for the occasional naps on the pigs’ backs.”
Need a few egg cartons? A bag of flaked pine shavings? Gear to equip an entire coop? You’ll soon find your local feed shop or farm-supply indispensable to you as a new backyard flock owner.
It is indeed possible to purchase items online, either directly from the manufacturers or from Amazon and other mega-sites. But buying locally helps contribute to your town’s economy. And local purchases also provide you with an incomparable resource right in your community.
Our farm is located in one of Lower Michigan’s major rural zones. We are fortunate to have not only a national farm-supply franchise a short drive away but also four family-run feed shopswithin a 15-minute drive.
Over the years, we’ve developed a symbiotic relationship with several of these. We find ourselves stopping on almost every errand trip. They call us for help with injured or ailing Chick Days chicks and with customer questions.
My husband has even befriended a veteran who works at one of the stores. The two talk about farming, Army life and military hats every time they meet up.
You may not be looking to establish new friendships during the initial steps of your chicken-rearing journey. You will, however, want to establish your local feed shop or farm store as a resource to which you’ll refer frequently.
Many of the employees at your local farm shop are or have been farmers themselves. Likewise for the shop owners.
These people possess a wealth of knowledge regarding farming tips and techniques that they will happily share with you. Just ask and they’ll be able to recommend one feeder over another and explain why, show you what they believe to be the most effective fencing in stock, and demonstrate exactly why you need a nippler water system.
It’s like going to the library … except poultry supplies are the items you plan to check out and the librarians are old farm hands, eager to help someone who’s just starting out.
Homegrown Goods
One of our local feed shops has its very own feed mill, producing top-quality, certified-organic poultry feeds. Another stocks poultry grit and crushed poultry limestone from a local quarry, plus egg cartons manufactured just miles away.
A third showcases a variety of chicken coops constructed by local craftsmen.
While it’s not necessary to use homegrown poultry goods versus those produced on a national scale, supporting regional ventures such as these does strengthen your connection to the local poultry industry.
Plunk a first-time visitor in the center of my local farm-supply store and I could quickly and correctly guide them to every aisle they need to shop. I’d be a cinch to win a supermarket-sweep style challenge at the store. Over the years, I’ve learned where every poultry product is positioned on the premises.
If I so desire—and, on a few occasions during the pandemic, I have—I could be in and out of the store with everything I need within a matter of minutes. Knowing where everything you need for your flock is located saves you time when you’re in a hurry.
Or it can give you extra time to socialize and “talk shop” with the staff and owners.
Support
Familiarity with your local feed shop saves you time and strengthens your ties with the local farming community. It also provides you with a precious resource should you ever need any kind of assistance with your flock.
As noted previously, I receive calls from the staff of one of our local shops, asking for assistance on behalf of other chicken keepers. They’ve sent customers our way who seek farm-fresh eggs, hatching eggs and chicks in the breeds we raise.
The support and assistance go both ways. When we need a specific medicine or vaccine, they swiftly order it. And when we were experiencing issues with a common local predator, they coached us through this pesky problem using their own expertise.
We aren’t just shoppers. We’re part of the area’s farming family, and family helps each other—regardless of how new to the family you are.
The Rodale Institute has partnered with the Organic Farmers Association to offer a new “micro-grant” for small-scale, U.S.-based, BIPOC farmers. Potential awardees are Black, indigenous or people of color who are current or aspiring organic farmers.
Also eligible for a micro-grant are BIPOC students, interns and apprentices who work in some way with an organic operation.
Awarded BIPOC Farmer Micro-grants will range from $500 to $2,000 each for winning projects. However, applicants may include multiple budget years in their applications. (Rodale will fund up to $18,000 for some projects.)
All applications are due by the end of March.
“As social justice and environmental justice have really made it into the public’s consciousness more so than it has before, it’s a really good time to recognize the fact that—especially in organic [farming]—Black, indigenous and farmers of color are really the minority,” explains Margaret Wilson, content creation and media relations specialist for The Rodale Institute.
“In 2012, only 116 of 33,000 Black-owned farms were [certified] organic. That’s less than .05 percent.”
More ‘Organic Acres’
“Our goal is really to increase organic acres throughout the country and the world,” Wilson continues. “One of the most effective ways to do that is to empower farmers to farm organically and regeneratively, and give them the tools they need for success.”
Some BIPOC farmers may already be practicing organic or regenerative growing techniques. Still, they might not have gone through official certification. Micro-grant awardees could use their funding to help offset costs associated with organic or regenerative certification. That might mean getting help with the associated paperwork or preparing for farm inspections.
“These are small grants, but we just wanted to help that group of farmers who want to [become] organic to do so in whatever way we can,” she says.
Pointing to groups like Soul Fire Farm in Petersburg, New York, the Ontario, Canada-based Sundance Harvest, the Southeastern African American Farmers’ Organic Network (SAAFON), and the Black Farmers Network, Wilson notes, “There are a lot of groups out there working on these issues as well.”
She adds, “We don’t think that we are going to solve all of agriculture’s problems with this micro-grant, but we just hope to help a little bit alongside people like Naima Penniman [of Soul Fire Farm] and other Black-led organizations that are really doing a lot of great work in this space.”
What other projects could the BIPOC micro-grant fund? Some sample ideas include facility upgrades like raised bed and cold frame construction, generating marketing materials, or purchasing new signage.
“This could help them to jumpstart a [new] farm, get them a little bit more training, whether it is through our consulting services or through other opportunities,” she says. “We’re just trying to move the needle on making a more equitable food system.”
And they hope to do so for years to come. “This is our first year [to offer the micro-grant], and I think the hope is to make it an annual thing and to just keep going as long as we have the funds for it which, hopefully, will be quite a long time,” Wilson says.
For Veterans, Healthcare Workers
The Rodale Instutute also has a Veteran Farmer Training Program which is specifically geared toward military veterans who are thinking about careers in organic agriculture. “We have a lot of [veterans] who come,” Wilson says. “They say, ‘We just didn’t know what our next step was and thought we would give this a shot.’”
The immersive program runs from two to four months at one of Rodale’s three Pennsylvania training sites. Participants earn pay and also get a housing stipend.
Rodale also now offers a Health From the Soil Up Fellowship, open to various healthcare professionals. These include “physicians, advanced practice health practitioners, nutritionists, dentists, health researchers, public health experts, health administrators and policy makers.”
“Health from the Soil Up is a fellowship that we’re doing in collaboration with Dr. Daphne Miller who wrote the book, Farmacology,” Wilson explains. “It’s a special training program in collaboration with some medical schools and other public health organizations.
“It’ll be a long-term educational opportunity for them to learn about soil health and how it affects human health, the gut microbiome, and the relationship between that and the food that we eat.”
And to help participants better understand how organic agriculture works in practice? The fellowship also will include two two-week, hands-on sessions at The Rodale Institute’s certified organic farm headquarters.
Upsizing, downsizing, relocating, combining households and shifting to a different farm enterprise entirely: These are legitimate reasons you may want to sell your small farm. Regardless of your reasons, you may have conflicting feelings about putting your farm up for sale, and no doubt you’re receiving conflicting advice.
Even in this article, the words of one real estate agent may not apply to your property. No two farms are alike. Additionally, real estate laws vary from state to state.
Despite—or maybe because of—global uncertainties, the U.S. real estate market is strong nearly across the board. This is especially true for those who sell small farm properties.
“The increase in inquiries and sales definitely coordinates with the onset of COVID-19. I think that the pandemic has made a lot
of people seek less dense populations and room to ‘spread their arms’ a bit,” says Jim Elliott, a real estate agent with Hayden Outdoors, licensed in Kansas and Nebraska.
Rural real estate investors, low interest rates and subdivision developments are making small farms more expensive and harder to come by. This is good news, of course, if you think you might sell your farm.
When you’ve made the decision to sell your farm, you start the process by listing it for sale. You can either enlist the help of a real estate agent or do so independently. (Read more about choosing a real estate agent in “Special Agent,” below.)
From here, it can take a few days to two weeks to have your property listed for sale.
“I always like to start with an introductory meeting and discuss the options and find the best path for the specific seller,” says Elliott, who also happens to be a Class A Member of the Professional Golfers Association of America.
You’ll disclose property highlights, known defects, easements, water and mineral rights, and other property details. A real estate agent will do a comparative analysis of sales prices from similar properties.
Is there something unique about your farm? Are you listing for sale by owner? An appraiser can help determine an asking price.
“Once the seller is comfortable with the marketing plan, initial asking price and any listing-contract specifics, we sign all the required documentation, including the listing agreement and a property disclosure form,” Elliott says.
When you sell your farm, it is a paperwork-heavy proposition. Most of this, however, can be done virtually.
Your real estate agent will order photography and write a catchy description of your property. With your approval and the click of a few buttons, they upload your property onto their brokerage’s website and affiliate websites.
From here, your real estate agent may use social media, their own marketing tools and networking to spread the word about your property.
“Real estate markets are local. In central Kentucky right now, a reasonably priced small farm will generally be under contract in less than 30 days,” says Housman, who also holds a green designation from the National Association of Realtors.
Sell in Good Time
You may have heard that the best time to sell a home is during the summer, while school is out. But the timing of a farm sale in a hot real estate market is less essential than in a dull market. And is summer really the best time for a farmer to move?
“If you’re a major garlic grower and busy harvesting garlic in July, I would not list your farm for sale then. I would choose a time of year when it’s going to look its best,” Housman says.
Mr. Tobin/Shutterstock
Also consider where you’re moving when you sell your farm, and try to time your sale accordingly.
“I am a planner by nature, so I personally would need to know where I was going if my home sold tomorrow. But there is no requirement to have a new place identified,” Elliott says.
Housman points out that if your farm menagerie comprises just a few horses and your buddy is willing to board them for a few months, you have the flexibility of shopping around for the right property after you sell your farm. On the other hand, if you have many animals, it would be stressful to sell your property without an exit plan.
Make a Plan
We each have our quirks, and our farms do, as well. Contingency plans are written into sales contracts to address these.
Back to the garlic that you planted. Will you be prepared to leave your crop behind if you have to move in December?
“If you just put in all your garlic, you can write into the contract that the crop is yours to harvest,” Housman says. “Even if there’s a farmer that has rented the property from you, you can negotiate for the harvest of their crops. It’s one of those things that would get negotiated during the offer process.
“More than likely, that contingency would be accepted. But the buyers may have other plans.”
“With some farms having varying land uses, we can get pretty specific about the possession dates of the different areas on a farm or ranch,” Elliot says. “But in the end, the contract can be written to explain whatever the two parties agree to do.”
Contingencies can apply to the purchase terms, as well.
“A lot of times, I see sellers identify a new farm and put in a purchase contract … with a contingency of the sale of their current farm,” Elliott says. “This can really help if you are planning on completing a 1031 exchange, too, in an effort to mitigate or defer capital gains tax.”
(A tax or real estate attorney can answer capital gains questions specific to your situation.)
When you sell a farm, it is just like selling a residential property, only harder. You have more area and outbuildings to polish and probably more animals and equipment, too. “Staging” your property—touching it up to showcase its best assets—applies across the farm.
Typically, your real estate agent will offer a list of things you should do to make your place more appealing for potential buyers. Most of these will be inexpensive fixes.
Tohuwabohu1976/Shutterstock
“Tidy and picked up are the most important things,” Elliott says. “If there is a home or outbuilding, I think it helps to have the it mowed and trimmed and any unusable equipment removed.”
Housman’s pre-showing checklist includes ensuring barn doors easily open and close and securing farm dogs during showings to give property viewers full access.
Her No. 1 staging tip is obvious but often overlooked. “Make sure the entryway to your home, in particular, looks really nice. That’s where potential buyers will stand while they’re waiting for their realtor to arrive.”
Offer relevant information to your buyers, too. Do you have a market garden or livestock fields? “I would write out the history of your fields,” Housman suggests. “That might open you up to people who are interested in growing organic, if you’ve followed those practices.
“Get a soil test and have a soil map available. I would mark the property lines so anyone who sees the property knows exactly where they are.”
Real estate sales can move fast, so be prepared before listing. In a busy market, your property could have a dozen showings in a matter of days. It takes just one buyer to mark your farm sold.
“Once someone has a contract to buy your place, typically you have about 45 days from that date to the sale closing,” Housman says. “Unless you’ve negotiated otherwise, you turn over the keys to your farm on the day that you close.”
Your farm has brought you years of growth—literally and figuratively. Moving on might not be easy. Whatever your reasons for parting, know you’re not the first to go through this. And in a market like 2021’s, you won’t be the last.
Sidebar: Special Agent
Depending on your level of legal knowhow and the amount of time and money you can invest in marketing, it’s possible to DIY a farm sale. Items you’ll handle on your own without a real estate agent include determining fair market value, professional photography, staging, marketing online and elsewhere, and legal issues surrounding farm sales.
If it’s worth it to you to pay a professional a small amount (usually 5 or 6 percent of the sale price) to handle those items, be sure to find the right agent for your team.
First order of business: Find a real estate agent who knows something about farms!
Ask folks you know for referrals, and don’t be afraid to vet real estate agents yourself. “Check out a few farms for sale, and call the agent,” says Heather Housman, a realtor in Kentucky. See what marketing materials they have on the property. Use that as a gauge for how responsive they are to potential buyers.”
Look for the characteristics you want in any business partner. “The individual agent must be honest, trustworthy, hard working, organized and personable. Being a great communicator is key for any agent,” say Jim Elliott, who works in real estate in Kansas and Nebraska.
Consider the agent who will represent your property as well
as the brokerage firm the agent is affiliated with.“The brokerage provides the marketing plan and typically is invested in various platforms used by the agents,” Elliott says. “These platforms provide continual, passive marketing, and the more investment in those platforms, the more reach and higher visibility your property will have on the internet and social media, for example.“I think sellers are often surprised to see the reach of the internet and a successful marketing plan. It is always fun for me to see how far away buyers are willing to come from.”
Sidebar: 10 Tips for Buying a Farm
cdrin/Shutterstock
The flip side to selling your farm is buying one. Whether you’re looking for your first farm or going for a change of scenery, keep a few things in mind when looking at properties:
Know your wants and needs, and set priorities before you view a farm. It’s easy to fall in love with the forested hills in front of you, forgetting you need flat land for market crops.
Have a real estate agent on your team. With farm properties so in demand, some are sold without being listed. An agent in the know can plug you in to these before-market sales.
“Talking to a lender first is really helpful, because then you know what’s possible for you financially,” says Heather Housman, a realtor in Kentucky. You may qualify for properties of a higher sales price—or a lower one—than you thought possible. A buyer pre-approved for a mortgage is more attractive to sellers, as well. Certain properties allow for U.S. Department of Agriculture and other special financing, and a lender can explain those.
Know your rights: especially water rights and mineral rights; especially in the Western U.S.
Understand easements. Housman suggests asking about conservation easements, which may dictate building sites and property uses, as well as right-of-way easements, which could allow neighbors and utility companies access to areas of the property.
Ask about leases. These might cover hunting, farming, a home or an outbuilding on the property.
Ask about the land’s previous uses. You may want a soil test, just as you’d get a home inspection.
Look into the uses of neighboring properties, and consider your best neighbors.
Check on infrastructure, especially for rural properties. If you work from home, high-speed internet may be a must-have. Understand septic systems and lagoons common to rural land. If the property has a well, ensure its water quality and reliability.
Be patient. It can take years for the right property to come about.
This article originally appeared in the January/February 2021 issue of Hobby Farms magazine.
If you keep livestock on your farm—say, horses or cattle—you know manure can be a challenge to deal with. But if you’re willing to compost the manure, you can transform a nuisance into a commodity.
Turning manure into compost is a win-win situation. Compost is a valuable fertilizer for gardens and fields, supplying nutrients (particularly nitrogen) to help plants grow.
And even if you’re unable to use all the compost you create, you can always sell compost and generate a new revenue stream—a positive for any hobby farm.
There’s no shortage of approaches and techniques for turning manure into compost. Dig into the details, and you’ll soon be exploring the pros and cons of piles vs. bins, the nuances of mixing “green” and “brown” materials, the temperatures and time required to achieve quality compost, and more.
There are many articles exploring the best ways to turn manure into compost, but it’s less common to see a breakdown of the equipment you need to efficiently and effectively tackle the job.
Here a few of the tools and machines you’ll ideally have on hand.
Whether you’re dealing with fresh manure, the finished compost or some stage in between, various hand tools for scooping, flipping and shoveling are a must.
Pitchforks, stall forks and various types and sizes of shovels should be at the top of your tool checklist.
Wheelbarrow
Arguably the second-most important tool you need is a wheelbarrow.
They come in handy at two important stages. A wheelbarrow can be brought into your barn (and into individual stalls) to carry fresh manure out. You can also fill it with finished compost for easy dispersal in garden beds.
Tractor with Front-End Loader
A tractor, preferably one with a front-end loader, is one of the most critical tools when working with large amounts of manure and compost. In addition to pulling wagons and powering manure spreaders, a tractor equipped with a front-end loader can be used to turn, mix and aerate large compost piles, as well as transport the finished compost to your garden.
For spreading compost across larger area (like open fields), a manure spreader will save a ton of time and effort while simultaneously dispensing a large volume of material at one time.
Wagon
Compost piles aren’t always located close to the stables where manure originates.
Does your farm produce a lot of manure? You can reduce the number of trips you make to a distant pile by loading everything into a wagon. Then haul it away by tractor once per day.
Compost Aerator
For small compost piles, particularly those stored in bins, a handheld compost aerator can be used to turn, mix and aerate the pile for improved composting.
Bow Rake
Once the compost is finished and ready for application, a bow rake is useful for breaking up chunks and spreading it evenly throughout garden beds.
Which tools do you use for handling manure and compost?
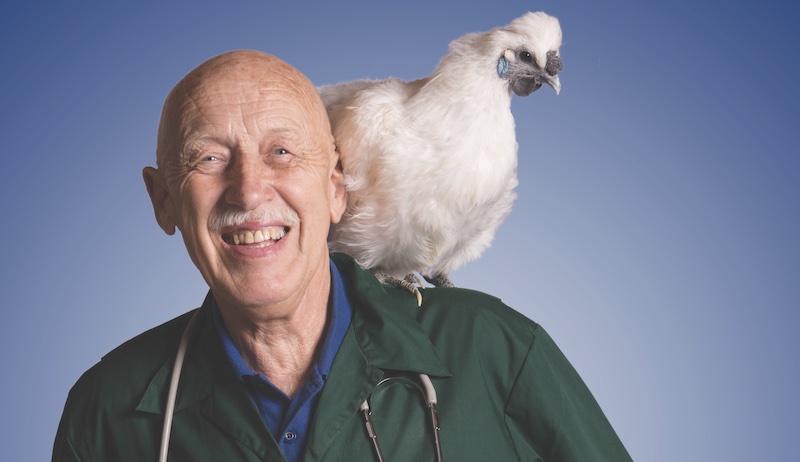
We asked veterinarian Jan Pol, the star of Nat Geo WILD’s “The Incredible Dr. Pol,” what are five tips he would give to hobby farmers:
First of all, make sure your pets are wormed and vaccinated regularly. Especially keep the rabies vaccinations current for your dogs, cats and also horses. Tetanus vaccinations for horses and goats are also very important. The animals are very easily infected with the lockjaw bacteria.
If you have pet sheep or goats, go very stingy on the grain. And keep the grain in a locked place or container. All farm animals will overeat on grain until they die. But wethers can get crystals in the urine that plug the urethra and will cause severe health complications.
If you want cows, either for your own milk or beef or as pets, you may get away without vaccinations if you have a closed herd. This means no animals are brought into the herd. So if you have your neighbors’ bull come over to breed your cows, they had better be vaccinated for shipping fever (IBR), bovine viral diarrhea (BVD) and leptospirosis.
Leptospirosis is a very insidious disease that is carried by rodents, deer and other animals. It will affect all your animals on your farm.
Finally, keep everything clean. Cleanliness is next to godliness, especially to prevent worms and coccidiosis. Clean out the pen and spread lime on the floor before putting new bedding down. Rotate pastures and cut the grass before letting the animals back in.
This article originally appeared in the January/February 2021 issue of Hobby Farms magazine.
Cannibidiol, more commonly known as CBD, is just one of more than a hundred chemical compounds, collectively known as cannabinoids, extracted from the cannabis plant.
A simple internet search can make it seem as though CBD is something of a cure-all. Claims range from anti-inflammatory to antidepressant and beyond.
However, the fact is that most of these claims are unsubstantiated by rigorous scientific testing, on the human medical and veterinary sides, despite the growing popularity of CBD.
Promising Uses
Research on the use of CBD in dogs is steadily growing. There are currently no FDA-approved CBD products on the market for any animals (and only one approved for use in humans). But some veterinarians find that certain canine patients respond to the compound when other traditional therapies fail.
Conditions that respond include chronic pain and anxiety. This leads us then to wonder if this chemical could have any positive impact in our farm animal species.
Currently, research into the use of CBD in livestock is sporadic. For example, there is only one research paper in the scientific literature regarding the use of CBD in horses. (A 2019 case study describes the use of CBD in a single horse for a rare skin disorder.)
The conclusion of this paper was that CBD did seem to result in recovery. But a single study in one animal for an unusual condition is not robust enough evidence to yet convince veterinarians or horse owners that CBD effectively treats their animals.
For our food-producing species, such as pigs and cattle, the byproducts of industrial hemp have been looked at as a source of livestock feed. There are also a handful of studies that suggest CBD may be implicated in responses such as increasing appetite in livestock (resulting in weight gain) and promoting fertility in female cattle.
But nothing definitive has been repeatedly demonstrated.
An additional layer of caution applies to our food-producing species: Does their consumption of CBD-containing products have any impact on meat from animals that will then be consumed by humans?
A 2020 article in the scientific journal Nature examined some initial metabolism data in cattle. This suggests that a lot of work remains to better understand the absorption, break down and excretion of this compound not only for the therapeutic effects of the animal, but also for the potential safety impacts on the human consumer.
Another challenge with CBD (as with any unapproved medical compound): unregulated manufacturing. Also, differing companies can require different considerations. We don’t know what a so-called therapeutic dose of CBD for livestock would entail. Same with what constitutes a toxic dose.
A large array of vital questions remain unanswered when it comes to CBD’s potential use in livestock, such as:
Could sheep or goats be more sensitive to it?
Does the age of the animal have an impact on its safety?
What about its safety in pregnant animals?
Larger animals presumably require larger doses. So the challenges of obtaining, purifying and otherwise manufacturing CBD may be variable for livestock feeds or medications. The cost could be prohibitive without sound science to support claims of benefits for on-the-farm use.
Given these considerations, it may be a long time before hobby farmers see any CBD-based feeds or therapies at the local feed-supply store or through prescription from your veterinarian, if at all.
This article originally appeared in the January/February 2021 issue of Hobby Farms magazine.