Categories
Crops & Gardening Farm & Garden Urban Farming

Grow This Unusual Host Plant To Attract Pipevine Swallowtails

Monarchs aren’t the only butterflies with very specific needs. Just as monarch caterpillars depend solely on milkweed to survive, the larvae of pipevine swallowtail butterflies munch away on—you guessed it—pipevines.

Unfortunately, according to the North American Butterfly Association, “There are many locations where the local pipevine population has dropped so low that the pipevine swallowtail is no longer sighted.”

For his part, Biologist Timothy Wong noticed an absence of California pipevine swallowtail (Battus philenor hirsuta) butterflies in his San Francisco neighborhood. So, over the last several years, he’s planted hundreds of California pipevines (Aristolochia californica) in his yard to help reintroduce the breathtaking butterflies.

So far, it’s working.


Read more: Plant milkweed in your yard to benefit pollinators.


Natural Range

Also known as the hairy pipevine swallowtail, the California pipevine swallowtail is native to California. But it’s not the only pipevine swallowtail around. It’s actually a subspecies of Battus philenor—a group of pipevine swallowtails with a wider range.

In the U.S., the Battus philenor species inhabits the southern states as well as much of the East Coast and the Midwest.

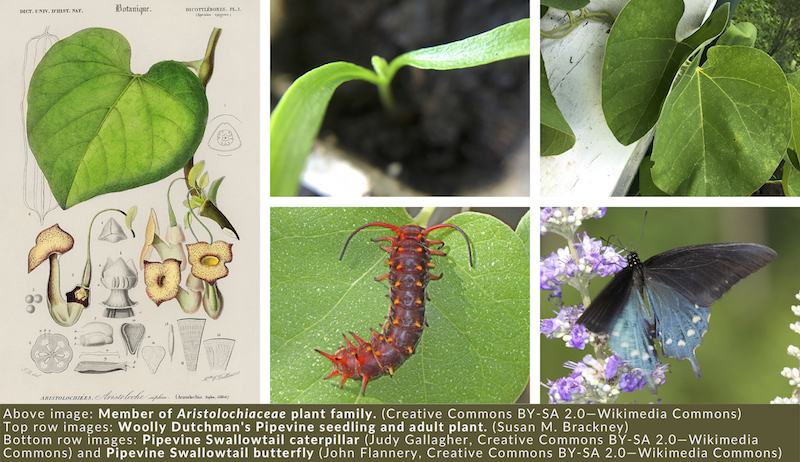
Adult female pipevine swallowtails lay clutches of striped, orange eggs on specific types of pipevine plants native to the areas they frequent. Then, their eggs hatch, letting loose a slew of hungry—and visually striking!—caterpillars.

These caterpillars eat nothing but pipevine leaves.

The plants themselves contain poisonous compounds, which confer protection to the caterpillars. As a result, most potential predators know to pass on these creatures as well as the adult butterflies they’ll become.

Picking Plants

There are several pipevine plant species. Matching the right native pipevine for your particular portion of the pipevine swallowtail’s range is key.

The most common plants include Woolly Dutchman’s Pipevine (Aristolochia tomentosa), which grows well in the South and Midwest, and Dutchman’s Pipevine (Aristolochia macrophylla), which thrives in the eastern and southeastern states.

Both Aristolochia tomentosa and Aristolochia macrophylla are woody perennials that will tolerate some shade. And both thrive in soil that’s rich and well draining—but not dry.

Aristolochia tomentosa is suitable for Plant Hardiness Zones 5 through 8. A. macrophylla does well in Zones 4 through 8. And Aristolochia californica prefers Zones 8 to 10.

Not sure which pipevine plants might be most appropriate for your spot? Consult your nearest native plant nursery for guidance. And once you do settle on a variety, be sure to plant plenty of it.

“Caterpillars of pipevine swallowtails feed in large groups from the moment they hatch and can eat a very impressive amount of foliage in a short period of time,” Wong notes.

Getting Started

Although pipevines are fast-growing climbers, it can take two to three years for them to really take off. It can take just as long—or longer—for swallowtails to find your new pipevine plants.

“Pipevine swallowtails are specialists and are localized wherever their host plants grow, but [they] may be virtually absent in areas,” Wong says. “If gardeners are planting a new vine, it may take time for the butterflies to find it on their own—and that is okay!”

Eager to speed things up? You might want to purchase pipevine plant starts, rather than seed. (Of course, you’ll likely get more bang for your buck with seed.)

Dutchman’s pipevine seeds are flat, woody and triangular—and they can be a bit difficult to start. For best results, cold-stratify your seed for a couple of months first.

Pre-soaking seeds in warm water for several hours ahead of planting can help, too. (This will soften up their tough exteriors.)

Keeping seed flats in a warm spot—or using a seedling heat mat—should further boost your germination rates. But most important of all? Keep the soil moist (but not water-logged) and be patient.

(My own Aristolochia tomentosa seeds took several weeks to sprout.)


Read more: Consider leaving the leaves for wildlife when cleaning up the garden.


Extra Tips

You may be feeding pipevine swallowtail caterpillars, but what about adult swallowtails?

“[Planting] … a collection of abundant, diverse nectar plants that bloom all season long make a garden habitat more favorable and attractive to adult butterflies,” Wong says.

To ensure that you’ll have something to offer from early spring into fall, mix nectar-rich, native perennials with annuals and flowering bulbs. (Because you’re trying to give butterflies a boost, avoid using insecticides while you’re at it.)

Also, Wong cautions, “Since many swallowtail butterflies such as pipevine swallowtails … overwinter as [chrysalises] on sticks, buildings and other structural elements in the garden, cleanup and removal during these times of the year should be done carefully so that dormant butterflies aren’t being removed from the garden or tossed in the compost.”

Categories
Animals Poultry

Control Chicken Ectoparasites For A Healthy Flock

Nobody likes finding creepy crawlies such as lice, mites or fleas on their chickens. It can quickly turn a chicken hug into your worst nightmare! These ectoparasites can feed on the blood of their host (for example, your chicken).

But other ectoparasites can also feed on chicken feathers, skin and even scales.

Moreover, severe infestations can lead to poor health and welfare. Therefore, even though they are small and may not seem to bother your chickens at the moment, it’s important to regularly check and control for ectoparasites before they get out of hand.

In this column, we’ll provide information on how to get rid of some of the most common ectoparasites of backyard chickens. Aand, more importantly, we’ll cover preventing them from invading your coop in the first place.

Hosting Duties

Your goal is to use the best tools and strategies against your specific ectoparasite. This way, you’ll ensure your time and efforts don’t go to waste.

In order to do this, figure out what ectoparasite you’re dealing with and learn more about them. For example, learning about their hiding spots and their favorite feeding locations can help you create an elimination plan that is more effective.

There are many great books, articles and websites available to help you identify chicken ectoparasites. But identifying ectoparasites can be tricky.

Luckily, there are extension professionals with a focus on veterinary entomology available to help you across the United States and Canada.

To see if there is one in your region, check out the Veterinary Entomology website, a pest management and education resource for animal owners and producers, extension agents, veterinarians, wildlife professionals and the public. Once you have identified the culprit, you can begin to answer important questions, including the following.


Read more: Internal parasites? Here’s how to keep your flock’s insides clear.


On Host or Off?

Ectoparasites by definition live on the surface of a host—in this case a chicken. However, not all critters read the rulebook.

Interestingly, some go rogue and hide in the chicken coop after feeding on your chicken. These are known as “off-host” ectoparasites. It’s sneaky, right?

Others can be sneakier. Ectoparasites such as the chicken mite will hide in the coop during the day and then climb on your chicken at night for a late-night snack.

Your chicken may seem ectoparasite-free. But really the ectoparasites may just be hiding in crevices or cracks and only come out at night. This means that ectoparasite monitoring and control goes beyond your chicken.

You also need to check and regularly clean your coop and yard. Keep in mind that crevices and cracks are their favorite hiding spots, as they don’t like to be out in the open. Examples of off-host ectoparasites include red mites and bed bugs.

(Yep, the same bugs that can be found on our beds can also be found on your chickens!)

chicken ecoparasite dust bath
Protasov AN/Shutterstock

Chicken Parts

Ectoparasites that live and feed on chickens all their lives (a/k/a “on-host” ectoparasites) may sound simple to find. However, they can also be difficult to notice.

In fact, some lice and mites can be found on specific regions of the body, such as the head, wing, body or tail exclusively. Therefore, when you are examining your birds, examine them thoroughly from head to tail. Just checking the head or tail can be misleading.

Examples of on-host ectoparasites include northern fowl mites and scaly leg mites.

Severe northern fowl mite infestations can cause anemia, decrease egg production and may even cause death in severe cases. Moreover, mite bites can be irritating and itchy to humans.

In poultry, scaly leg mites go underneath scales located at the feet and, at times, around the nostrils. The mites can cause so much damage that the feet and shanks begin to look flaky, powdery and, in severe cases, deformed.

If too severe, scaly leg mite infestations can cause painful injuries and deformations. Therefore, as mentioned before, it is important to monitor and control for ectoparasites before they become too severe. If you suspect your bird has scaly leg mites, reach out to your veterinarian (who treats poultry) or to a diagnostic laboratory

Examining Your Birds

While using examination gloves, check the head, wing, vent, breast, thigh and tail regions by spreading the feathers until you can see the skin where lice and mites or their eggs can be observed.

Check all of your birds. It’s common for only a couple of birds to be carriers as opposed to the entire flock.

If you find infected birds, make sure to separate them from the rest of the flock to keep the rest of the birds healthy.

Coop Cleaning

As mentioned previously, just getting rid of ectoparasites that are on your bird is sometimes not enough. Ectoparasites such as red chicken mites, fowl ticks and bed bugs may hide in cracks, crevices and roosts during the day and feed at night.

Additionally, while adult sticktight fleas typically embed in the face, wattle or comb, sticktight larvae can live in poultry bedding. As if things were not complicated enough!

Therefore, it’s a good idea to regularly check and clean your coop and yard for ectoparasites especially the areas that your chickens like to hang out in.

Check for lice twice a month at least. And fill in cracks and crevices. These are both good interventions to keep in mind.


Read more: Here’s the dirt on diatomaceous earth.


Death by Desiccation

As you have probably noticed already, chickens love to dust-bathe. Well, it turns out that dust-bathing in dirt or sandlike material is great for ectoparasite control.

According to research from the University of California Riverside, providing a kiddie pool, cat litter box or similar plastic container, with a 1:4 ratio of food-grade diatomaceous earth to play sand can help fight lice and mites infestations.

When lice and mites come in contact with diatomaceous earth, it’s thought that they die from desiccation as the oils in the outer shell become absorbed by the diatomaceous earth. Because diatomaceous earth needs to come into direct contact with the ectoparasite, it’s important to use appropriate material such as sand in combination with diatomaceous earth.

Diatomaceous earth by itself or with hay may not work as effectively if at all. Please note that when mixing the diatomaceous earth with play sand, you should follow the handling instructions carefully and wear a dust mask. Diatomaceous earth can be irritating to humans.

Essential Oils

There is a growing body of literature regarding use of essential oils for ectoparasite control. While some, such as cade and thyme, seem promising for the control of northern fowl mites, further studies are needed.

At the moment, results are inconsistent. Most likely, this is due to differences in plant variety, growing conditions and processing among other things. In addition, we need more studies that test at what dose they are safe to use on chickens.

Therefore, stay cautious when trying out different essential oils. Remember that pure essential oils need to be diluted in carrier oils such as sunflower oil before applying to birds directly.

Prevention Pointers

Unfortunately, there is no silver bullet when it comes to ectoparasite control. However, establishing a biosecurity plan, which is a set of management practices designed to prevent the spread of disease or ectoparasites onto and between premises, can go a long way.

Here are some good tips to keep in mind:

  • Certain ectoparasites such as the northern fowl mite can infest domestic as well as wild birds and other wildlife. Therefore, it’s important to prevent your chickens from interacting with wild birds, their nests and rodents. Try to use netting and reflective material around your coop to keep them at a distance.
  • Quarantine and check new birds for ectoparasites. This will prevent new birds from introducing bugs to your flock and coop.
  • Avoid visiting other coops and then entering your own coop. But if it’s unavoidable, you should change into clean clothes before entering your coop and wash your old clothes with hot water and dry them with high heat. Similarly, before placing items into your coop, you should inspect and clean them thoroughly.

While biosecurity can help reduce the risk of ectoparasites invading your coop, you won’t eliminate risk completely. You really need to use a combination of husbandry and biosecurity practices to prevent the spread of ectoparasites.

Fortunately, the same biosecurity practices you use to help prevent the spread of ectoparasites can also help prevent spread of disease.

This article, which appeared in the May/June 2020 issue of Chickens magazine, was written by Myrna Cadena (a Ph.D. student in the Animal Biology Graduate Group at UC Davis) and Dr. Maurice Pitesky from the UC Davis School of Veterinary Medicine-Cooperative Extension.

Categories
Food Recipes

Get Things Rolling With This Homemade Dinner Roll Recipe!

When I asked my wife if she wouldn’t mind sharing her wonderful homemade dinner roll recipe for this issue, she agreed. I imagined she would have to dig through all her worn-out, hand-me-down cookbooks and search a flour-dusted page with the instructions.

Instead she texted me a link to the King Arthur Baking Co.’s website.

OK, so it’s not my family’s secret recipe, but I challenge you to find an easier, better tasting recipe! Thank you to the King Arthur Baking Co. for giving us permission to reprint its simply delicious recipe.

Make some for your family! They will make lovely additions to your breadbasket and great sandwiches, too.

Ingredients

  • 2 1⁄2 teaspoons instant yeast or active dry yeast
  • 7⁄8 to 1 1⁄8 cups (198 to 255 grams) lukewarm water*
  • 3 cups (361grams) King Arthur Unbleached All-Purpose Flour
  • 1 1⁄4 teaspoons salt
  • 3 tablespoons (35 grams) sugar
  • 6 tablespoons (85 grams) unsalted butter, at room temperature
  • 1⁄4 cup (28 grams) Baker’s Special Dry Milk or nonfat dry milk
  • 1⁄2 cup (39 grams) instant mashed potato flakes

*Use the lesser amount in summer (or in a humid environment), the greater amount in winter (or in a dry climate), and somewhere in between the rest of the year (or if your house is climate controlled).


Read more: These delicious recipes for garden-grown collard greens go great with homemade rolls!


Instructions

  1. Combine the all of the ingredients and mix and knead—by hand, mixer or bread machine set on the dough cycle—until you’ve made a smooth dough.

    If you’re kneading in a stand mixer, it should take 5 to 7 minutes at second speed, and the dough should barely clean the sides of the bowl, perhaps sticking a bit at the bottom. In a bread machine (or by hand), it should form a smooth ball.

  2. Place the dough in a lightly greased bowl. Cover the bowl, and allow the dough to rise, at room temperature, until it’s nearly doubled in bulk, about 1 hour. Rising may take longer, especially if you’ve kneaded by hand. Give it enough time to become quite puffy.
  3. While the dough is rising, lightly grease two 9-inch round cake pans, or a 9-by-13-inch pan.
  4. Gently deflate the dough, and transfer it to a lightly greased work surface. Divide it into 16 pieces.
  5. Shape each piece into a rough ball by pulling the dough into a very small knot at the bottom, then rolling it under the palm of your hand into a smooth ball.
  6. Place eight rolls in each of the round cake pans (or all 16 rolls in the 9-by-13-inch pan), spacing them evenly; they won’t touch one another.
  7. Cover the pan(s) with lightly greased plastic wrap, and allow the rolls to rise till they’re very puffy, and have reached out and touched one another, about 1 hour. While the rolls are rising, preheat the oven to 350 degrees F.
  8. Bake the rolls until they’re a deep golden brown on top, and lighter on the sides, about 25 minutes.
  9. Remove the rolls from the oven, and after 2 or 3 minutes, carefully transfer them to a rack. They’ll be hot and delicate, so be careful. Serve warm, or at room temperature.

Sidebar: Baker Tips

  • Brush hot-from-the-oven rolls with melted butter, if desired, for a soft, buttery crust.
  • For snowflake rolls, gently shake flour from a sieve atop the warm rolls.
  • When making yeast rolls or bread, let the dough rise to the point the recipe says it should, e.g., “Let the dough rise until it’s doubled in bulk.” Rising times are only a guide; there are so many variables in yeast baking that it’s impossible to say that bread dough will always double in bulk in a specific amount of time.

This dinner roll recipe, provided by the King Arthur Baking Co., originally appeared in the November/December 2020 issue of Hobby Farms magazine.

Categories
Beginning Farmers Crops & Gardening Farm & Garden

Materials For Mulching (From “The First-Time Gardener: Growing Vegetables”)

Excerpted from “The First-Time Gardener: Growing Vegetables” by Jessica Sowards of Roots and Refuge Farm. Available March 2, 2o21, from QuartoKnows.

The First-Time Gardener
QuartoKnows

What you decide to use to mulch your garden will likely be influenced by your region, budget and the availability of materials.

Here are some common options used to cover garden soil:

Wood Chips

There are entire gardening methods developed around mulching with woods chips. Wood chips are often an economical choice because they can be obtained for free from tree services that will dump a pile of freshly shredded trees at your house. They take at least a season to break down to the point of being usable and are very labor-intensive to move into place. They do add a tremendous amount of nitrogen to the soil as they   deteriorate   and   provide   a   very solid covering but should be used with awareness and education. Putting wood chips on the garden   before   they   are   broken   down, especially mixing them into the soil, can cause severe imbalances in the soil and cause plants to suffer.

Leaf Mulch

Fallen leaves can be raked into compost piles in the fall and used to mulch the gar-den in the spring. They are best used as mulch once they have be-gun to break down, or once they have been shredded. When used whole and freshly fallen, they can provide too much of a barrier, blocking the soil from receiving the moisture it needs. They have the benefit of adding nu-trients to the soil as they decompose.

Compost

Compost is a fantastic covering for the organic garden. Spreading a 2- to 3-inch (5 to 7.6 cm) layer of compost will help build soil structure, hold moisture, and feed the soil with organic nutrients. Because compost can be loose, you may want to add a thin layer of straw or wood chips on top of the compost for weed suppression. Compost can be made at home or purchased.

Straw

Straw is the by-product of processing cereal grains like barley, rye, or wheat. Removing the grain and chaff leaves behind the hollow stalks of the grain stem—the straw. Straw is typically sold as animal bedding because it has no nutritional value. Mulching with straw doesn’t add much organic material back to the garden, making it a good option to mulch on top of compost or with some other organic matter. It’s slower to break down and is a fantastic insulator. Due to its hollow nature, it helps protect the soil from temperature extremes and is a good option for fall and winter gardening or gardening in very warm climates.

The First-Time Gardener mulch garden
Makenzie Evans Photography

Hay

A thick layer of hay mulch can do a lot for a garden. Hay is a grass, legume, or other herbaceous plant that has been cut and dried for animal fodder. Not to be mistaken for hol-low straw, hay is a whole plant and adds a lot of nutrition to your soil as it breaks down. It will compact quicker and break down faster than straw. The downside of hay is that it often has a lot of grass seeds in it. This means that it may bring weeds into the garden, though hay will be very shallowly rooted and is easy to pull, as it grows in the mulch, not the soil. Hay is a good option for very dry areas, as it holds a lot of water.

Woven Ground Cover

This specialty garden product can be found anywhere greenhouses and greenhouse supplies are sold. It is a woven material that is rolled out over the prepared soil and fastened with yard stakes. It is water permeable but blocks the light and, therefore, suppresses weeds. Holes can be measured and cut in whatever spacing is necessary for the crop being grown.

Note: Woven ground cover is popular among market growers and in some situations can be a worthy investment. It is expensive, however, and weeds will grow through the holes. It does not lend to mixing up your garden layout. I use this product and I do like it, but I wouldn’t suggest it for a brand-new gardener.

What Not to Use for Mulch

There are some mulch products available for purchase that are not intended for vegeta-ble gardens.

Rubber

Rubber mulch, which is designed for playgrounds or commercial landscaping, is not a safe product to have at the base of your food plants. It is usually made of recycled tires and will leach toxic chemicals into soil.

Dyed Wood

Dyed wood, often used in commercial landscaping, is coated to actually pre-vent breakdown, meaning it will do the opposite of what you want in your vegetable garden. It will leach possible contaminants into your garden soil, and because it won’t break down, it can kill beneficial soil bacteria and the life in your soil.

Jessica Sowards is a native Arkansan who is homesteading, gardening, and sharing her journey through social media. She and her husband, Jeremiah, are raising their six children on a small hobby farm in the Central Arkansas region. They share their lives on their YouTube channel, Roots and Refuge Farm. Jessica is passionate about gardening, growing food and equipping others to do the same. 

Categories
Equipment

5 Winter Farm Tasks To Tackle With Your Tractor

Generally speaking, tractors don’t have to work as hard during the winter as they do during the other three seasons. You won’t be plowing fields, baling hay or adding compost to your garden beds when it’s 0 degrees F outside and there’s a foot of snow on the ground.

But that doesn’t mean your tractor has to spend the winter slumbering away in a garage.

To the contrary, there are many winter tasks tractors can accomplish, especially when they’ve been properly prepared for handling winter conditions. Put in some winter oil, add tire chains and weights, and take care of the battery during cold weather. Your tractor will be ready for anything.

Need some ideas? Here are five winter farm tasks you can tackle with your tractor.


Read more: These 4 tips will help you start your tractor easier in cold weather.


Plowing and Removing Snow

Armed with a plow, rear blade or even just a front-end loader, tractors can make quick work of heavy snow.

Have you ever experienced one of those crazy Midwest snowstorms where 2 feet of snow falls in 48 hours? A little self-powered snowblower is bound to struggle under such testing conditions.

But a tractor—with its greater strength and larger implements—can handle virtually any volume of snow.

Snowblowing

If you want to up your snow removal game to the highest level, a snowblower attachment will significantly speed up the process while capitalizing on the strength and power of your tractor.

Large utility tractors can handle snowblowers 6, 8 or even 10 feet wide, allowing you to quickly clear impressive swaths of snow with ease.

Just be careful where you drive!

Hauling Supplies

It’s easy to traverse all corners of your farm when the ground is dry. You wouldn’t think twice about driving a carload of horse feed across your yard to the barn.

But even the regular routes around your farm can become tough to negotiate in the winter, making your tractor a critical tool for transporting supplies across the snowy landscapes of your farm.


Read more: Winter is the perfect time for some light logging. Here’s why.


Logging Your Woodlot

Have you given thought to logging during the winter? There are many advantages to harvesting logs and firewood when there’s snow on the ground. But you won’t want to tackle the job without a strong utility tractor.

Tractors are perfect for negotiating uneven terrain and hauling your harvest out of the woods. They can even be used to pull and power a portable log splitter, allowing you to turn trees to firewood right on the spot.

Making Maple Syrup

If you’re fortunate enough to have a stand of sugar maple trees for producing maple syrup, your tractor will be your best friend when it comes time to tap the trees and gather sap.

Sure, you could trek out on snowshoes, struggling to pull a sled full of buckets behind you. Or you could let the tractor do the work. Certainly you’ll want the tractor involved when it comes time to haul back the gallons (and gallons and gallons!) of sap you’ve collected for boiling.

How do you put your tractor to use during the winter?

Categories
Animals Large Animals

A Border Collie Is A Farmhand For The Small Sheep Flock

I cannot praise my Border Collies enough. As a small farmer, a single woman in the country and a keeper of sheep over the past decade—I credit these dogs with making every aspect of farm life easier.

They are amazing and clever companions, as well as expert problem solvers and hard workers. They are vigilant guard dogs, always ready to announce a person at the door or a stray animal in the pasture.

And above all, they make managing a shepherd’s flock, regardless of size, easier.

A Starter Dog

When I started raising sheep a decade ago, I did so with a Border Collie pup by my side.

Gibson came from an Idaho sheepdog trainer and trial competitor. This trainer’s dogs were bred for their ability to herd. That is what I wanted above any other trait in a dog.

Being new to all aspects of farming, I looked to the wisdom of the sheep and sheepdog training community. When I had my pup, we took regular herding lessons and learned the basics. It’s something I suggest to every shepherd with a herding dog on their payroll.

That summer of driving teo hours (one way) to learn from a qualified herding instructor changed my entire life with my farm dog. Turning him from a sometimes-useful pet to a key part that supports everyday work.


Read more: Make sure you feed your farm dogs right so they get the proper nutrition.


An Excellent Shepherd

My dog learned to gather and return stray sheep back to me from acres away. He was able to hold sheep back when I was serving grain. He helped me find lambs born in a cold winter field.

If a sheep was down or sick, he let me know instantly. I know that a Border Collie isn’t a necessity for everyone out there raising sheep, but I can not imagine homesteading without them.

Easy to train, happy to please, and willing to put in the kind of effort most human farmers could only dream of, they are a joy and a gift.

A Quick Caveat

That said, they are not the best dogs for every farm, even ones that raise sheep. Border Collies do need a job to remain stimulated and content. But in my opinion they need their farmer even more.

I suspect that a Border Collie would be happier in a one-room studio apartment with a freelancer that is home all day beside them and takes them on a 5k run every morning than a farmer that leaves for work for 10 hours a day and keeps them locked indoors.

In the latter scenario (or similar situations), a less-intense breed of herding dog or an outdoor livestock guardian may be a better choice.


Read more: Not a dog person? Try a guard peacock!


Satisfying Moments Ahead

But if you are a person ready for a partnership, an intense bond and a commitment to this breed, then you are in for so many satisfying moments on your farm.

And the community of people that breed, raise and train these dogs is amazing! I have never come across a sheep dog trial that wasn’t a place of warm camaraderie.

Even if competing is the last thing you want to do, a well-trained and hardworking collie is a reward in itself. Farming is easier, the livestock is better managed, and you—the small farmer—get to take part in a special bit of agricultural history.

Enjoy every moment of it together!

Categories
Animals Large Animals

A First-Aid Kit Checklist To Keep Sheep In Tip-Top Shape

It’s inevitable. When you have a flock of sheep, there will be illness and there will be injuries.

So, knowing that, I have found it’s best to be prepared with some basic materials that may help you treat your sheep or at least keep them stable until a vet can take care of anything more serious.

I recently watched a wonderful webinar hosted by Purdue University that dealt with first aid for sheep and goats. I have gathered some of the items over the past couple of years as I have learned–often the hard way–about various sheep illnesses and injuries.

But I appreciated listening to Illinois veterinarian Dr. Kirk Hubbard tell the audience what he thought were the most important items to have on hand to keep your sheep healthy–or to get them back to health.


Read more: Got goats? Here are 7 medicines to keep in the first-aid kit.


Sheep First-Aid Checklist

Below are some of the things you should absolutely have around to deal with both emergencies and the regular maintenance you need to do to keep your sheep in good shape

Rectal Thermometer

Of everything you might have in your sheep first-aid kit, this is probably the most important. You need to know whether your sheep has a fever, and I can guarantee you a vet will ask you what the animal’s temperature is if you have to call in.

The Merck Veterinary Manual says a normal temperature for sheep is 100.9 to 103.8.  But a temperature on the higher end of this is something you will want to be careful about.

Baking Soda

You use baking soda for bloat. But Dr. Hubbard recommended offering baking soda free choice all the time to help with animals’ digestion.

Dressings

I keep non-adherent gauze dressing and a roll of bandaging tape to dress potential wounds.

Honey

Dr. Hubbard recommended using honey as protective covering after the wound has been treated. The honey helps with healing.

Betadine

Use this for cleaning wounds, as well as navels on new lambs.

Clean Towels

For just about everything, clean towels are great to have on hand.

Triple antibiotic ointment

A tube of this can also help for use after treating a minor wound or scrape.

Epsom Salts

Use epsom salts for foot rot and abscesses.

Bandage scissors and hoof trimmers

It pays to get a really good set of hoof trimmers. When you need them, you need them to work well.

We trim our sheep’s hooves when they need it. But if one has a sore foot and you need to trim, the sheep most likely will not be really happy to hold still for long!

Dewormer

There is more than one type of dewormer out there, and I encourage you to talk to your vet or an experienced sheep producer to find out what works best in your part of the country.

But whatever type you use, make sure you are doing it on a regular basis. Also, know the signs if your sheep has a parasitic overload.

Syringes and needles

Keep these on hand in case you need to give an antibiotic or oral medication.

A Few More Things

A few other things that I keep around are Hoof ‘n Heel® for hoof rot and Blu-Kote spray dressing (though be careful about spraying this on yourself, as it will stain your skin and clothing).

A number of really good university extension websites provide lots of great information on how to deal with animal illness or injury.  One that I like is the Purdue University Extension’s Common Diseases and Health Problems in Sheep and Goats.

If you want to have something more visual to look at and possibly print out, the University of Georgia has a really nice first-aid checklist for sheep and goats.

Putting a sheep first-aid kit together for yourself? I also recommend including a working flashlight and the name and phone number of your vet. Because, as we all know, emergencies rarely happen in the middle of a sunny day!!

Next time I will continue talking about sheep health and discuss some of the ways you can keep your sheep healthy so–if you are lucky–you won’t have much need of that vitally important first-aid kit!

Categories
Beginning Farmers Crops & Gardening Farm & Garden Farm Management Homesteading

A Holistic Goal Allows Your Farm (Or Garden) To Work For Your Vision

As winter wraps our land in a cold blanket, and the new year brings in a feeling of what comes next, we need to look inward and find the core of our vision for our properties.

Having a vision for your property is so important. There is nothing like knowing where you want to go to ensure you actually get there!

Although you will change your mind and your goals along the way, you will always have a vision to bounce new ideas against and to help inform your decision-making.

A vision with a plan—a holistic goal—is like a foundation for a house. Because you really can’t build without the strong roots of a plan for where you want to go.

Holistic Goal

First, let’s define a holistic goal.  Start by asking yourself:

  • Can you discover weak links in your vision?
  • What are the strong points of your plan?

A holistic goal is a series of statements that you brainstorm, write down and revise. Eventually, you’ll also want to type them up, print your list out and put it on your fridge. These statements should be specific and help you, as a grower, connect yourself, your land and community into a long-term plan.

The following questions can help get your mind working on a solid vision for your property.


Read more: These 5 farm resolutions will help you start strong in 2021.


1. What is the life I want to live?

We all have different visions for our property. So go ahead and define yours clearly now.

Write a clear statement of the life you want to live in conjunction to your land. Consider the following:

  • Do you want an extra garden income?
  • Are abundant, year-round blooms important to you?
  • Do you want food security?

It is important to make clear statements about the life you want to live and be detailed. A holistic goal includes these clear statements and also helps ground your entire vision.

Here are a few example statements to to use as a jumping-off point.

  • “I want to live surrounded by fruit, berries and herbs and be able to enjoy the bounty in-season. But I also want to be free in the winter to travel, so I don’t plan on having livestock.”
  • “I want to live surrounded by fruit, berries and herbs and be able to enjoy the bounty in season. But I want to be free in the winter to travel, so I will find a friend or hired hand to care for the livestock I would like to eventually include in my plan.”

2. How does my land support this?

Be site-suitable, and brainstorm how your designs and plan work on your piece of land.

We should not force unsuitable projects or plants onto our land, our environment or our climate. Consider your environment, your hardiness zone, your urban or rural context when you build your vision.

Saying you will grow all your own food on a small urban lot isn’t practical. Furthermore, assuming your soil is suitable to every vegetable is an uphill battle not worth fighting. So focus and succeed with site-suitable planting.

Key questions include:

  • What is your hardiness zone?
  • Do you know your soil type?
  • What is your sun access?
  • Is there a prevalent pest issue?
  • What is your most pervasive weed?

3. How does my community support this?

Be aware of your social capital and social obstacles.

Your community is all around you, and your projects and production should harmonize with your community. If you plan on having a garden business, find out what people want to eat and buy.

If you are considering chickens, bees or composting, consider your neighbors, by-laws and willingness to make a stand (or fly under the radar). We must always consider our community in our vision and plan. So look for both the positives and the ways your community could present obstacles to your goals.

Key questions include:

  • Who are your neighbors?
  • How do they feel about gardens, chickens or bees?
  • Who are your allies and potential trade partners? (Ideally, you won’t need to grow everything but can access good local foods and be part of a food secure community.)
  • What is your municipal zoning and restrictions?

Read more: Increase your community’s food security with these 6 key ideas.


Plan for Your Goals

A holistic goal can help growers find a balance between their personal goals, what their land is capable of, and how they can support and be supported by their community.

Goals serve as sounding blocks for decision making. They help you clarify exactly what life you want to live, site-suitable crops you can grow and potential community support.

You, your land and your community are the three pillars of success!

Grow On,

Zach

Categories
Crops & Gardening Farm & Garden

Produce Profile: Consider Cheery Chamomile

If you made it through the past year without feeling like you could use a cup of chamomile tea, you may be an outlier. Chamomile is known as an herb that may help us sleep, lift our moods and soothe our nervous digestive systems.

A cup of chamomile tea in the evening is a lovely thing, as is seeing its small, perky flowers in the garden. These flowers are a welcome sight to many beneficial insects, too, including pollinators.

How to Grow Chamomile

Whether growing German or Roman chamomile, garden prep and preferences are the same. The plant is an annual in Kentucky that frequently reseeds itself, so I plant it in my perennial bed and let it do its thing.

You might also put yours in a container or an ornamental bed nearer to your house. Chamomile is delicate looking and blooms all summer long. So it’s a nice plant to come home to.

To start, seed chamomile indoors a month and a half or two months before your last frost. It’s a tricky one to germinate—which makes little sense given its reseeding tendencies—so seed more than you think you need the first year.

The seeds are tiny and need light to germinate. You’ll press them into the soil rather than covering them.

Transplant chamomile seedlings after the threat of frost has passed. Try to time this so the plants aren’t too big, as transplant shock is common with this shallow-rooted plant.

Spacing chamomile plants in the garden is easy the first year. It’s harder in subsequent years, when it’s reseeding itself. Aim for 1-foot spacing between plants if you’re going for a packed look. Use 2-foot spacing if you want to give each plant room to bloom to its full potential.

Because chamomile has shallow roots, it doesn’t compete well with weeds. Consider mulching, even with something as simple as grass clippings, to reduce weed pressure. Use caution when weeding around plants, whether that’s by hand or using a cultivating hoe, as it’s easy to disturb their roots.

Ensure chamomile has adequate water—again, the roots are shallow—but don’t drown it. While the soil doesn’t need to be top notch, it should be well draining.


Read more: What are the differences between German and Roman varieties?


How to Harvest

The daisy-looking blooms are the part of the plant that you want to harvest. The stems have a more bitter flavor. Cut or pluck the flowers early in the day, when they’re just about open.

A regular harvest will keep the plant producing until frost. Don’t worry about the flowers you miss. Pollinators and other insects will appreciate them, and those flowers will allow the chamomile to reseed.


Read more: Grow and use these herbs to alleviate stress and anxiety.


How to Use Chamomile

Most of these Produce Profiles cover how to eat whatever plant we’re talking about. Chamomile is less about eating, more about drinking.

Tea is chamomile’s primary use­—or tisane, to be correct, as a tisane is an herbal infusion that doesn’t involve actual tea (Camellia sinensis) leaves. Chamomile tea can be consumed hot or cold. Either way, steep the blooms for no longer than five minutes, as they taste bitter if steeped for too long.

Blended with other herbs, chamomile adds a nice floral note to whatever you’re drinking. A favorite nighttime tea of mine is lavender, catnip and chamomile. Check in with a trusted herbalist for ratios and recipes.

Be fancy and make a tea latte or—I won’t stop you—the ultimate relaxation hot toddy.

As with most herbs, chamomile is a good one for simple syrup, which you can use to make homemade soda, to drizzle on plain yogurt and to add to cocktails.

Beside beverages, the fresh flowers are edible and make dainty decorations for your baked goods. (I don’t have this kind of patience, but I love seeing others’ beautiful, botanically decorated creations.)

The benefits of this bright spot in your garden are plenty: an opportunity for good rest for you, an attractant for good bugs for your other plants and a beautiful bunch of blooms for the whole season.

Raise a glass of chamomile tea for easy, beautiful garden herbs.

Categories
Crops & Gardening Farm & Garden Homesteading

Field Garlic & Wild Onions Are Flavorful Foraged Treats

We called this plant “onion grass” as kids. One can smell it while trimming the lawn at the end of mowing season.

We didn’t know we could eat it back then.

Field garlic (Allium vineale), wild onion (Allium canadense) and a few other less common species aren’t actually grasses but are bulbs in the vast family of Alliums. These include leeks, chives, ramps, onions and garlic.

It may help to start off by saying that any plant with vertical leaves that smell like onion or garlic is in the Allium family and will be safe to eat, making this a great plant for novice foragers to learn.

wild garlic onion field
Frank Hyman

Finders, Keepers

You can find them growing in lawns or on the edge of woods under deciduous trees. They send their leaves up in the cool weather of fall, grow through the winter, flower in spring and go dormant by summer to avoid dry weather and competition from tree roots.

The leaves can be harvested any time they are visible. The bulbs can be harvested year-round with a trowel or shovel.

The flowers are edible, too.

The leaves may be 8 inches to 2 feet tall, depending on the species. The wild onions will have round, hollow leaves like chives. The field garlics will have flattish, hollow leaves, similar to garlic but much smaller. Fortunately, field garlic is in season when cultivated fresh garlic is unavailable.


Read more: Why start foraging? It provides a link to ancient ancestors, for starters.


A Tasty Treat

You can use the leaves and bulbs any way you would use cultivated onions or garlic. The flavors, however, taste stronger. Be judicious and try some yourself before sharing with others so you don’t overdo the flavor.

Leaves tender enough to be snipped off with your thumbnail can be chopped and sprinkled on a dish, as you would use chives. The sturdier base of the leaves can be cleaned and added to stock for flavor.

Snip the roots from the bulbs, remove the skin, wash well and chop or mash in a garlic press to use in a stir-fry.

Foraging for Foragers

Euell Gibbon’s loving mother insisted he leave home during the Great Depression because she only had enough money to feed his younger siblings. He was 16 years old.

Gibbon joined the hobos on the freight trains headed for California, and they taught him the wild foods they knew. Along with what he had learned from his mother and grandmother while growing up in east Texas, Gibbon became accomplished at living off the land.

Thirty years later, in 1962, he wrote his first book: Stalking the Wild Asparagus. He followed up that success with Stalking the Blue-eyed Scallop, Stalking the Healthful Herbs, The Beachcomber’s Handbook, Feast on a Diabetic Diet and Stalking the Good Life.

Euell Gibbon’s books are no longer in print, but they all can be foraged at used bookstores. That makes them excellent holiday gifts.

AbeBooks.com is a clearing house for all the mom-and-pop bookstores in the English-speaking world, and you can certainly find Gibbon’s books there if your local used bookshop doesn’t carry them. You can also find some e-versions online at Google Books.

Gibbon’s books aren’t just valuable for their detailed information but also for his delicious writing. It’s like receiving a letter from a knowledgeable, dear friend.

I only have three of his books, so I’ll keep stalking them till I find them all.