Our chicken coop was designed and built by Kingfisher Craftsman, a company my mother, Chris Wallace, and my stepfather, Jeff Carson, own in Bellingham, Washington.
When my sibling and I decided to get chickens, we asked them to help us with a coop. We knew they could put something together by the time the chicks were ready to go outside.
Marla Grugett
It Started as a Joke…
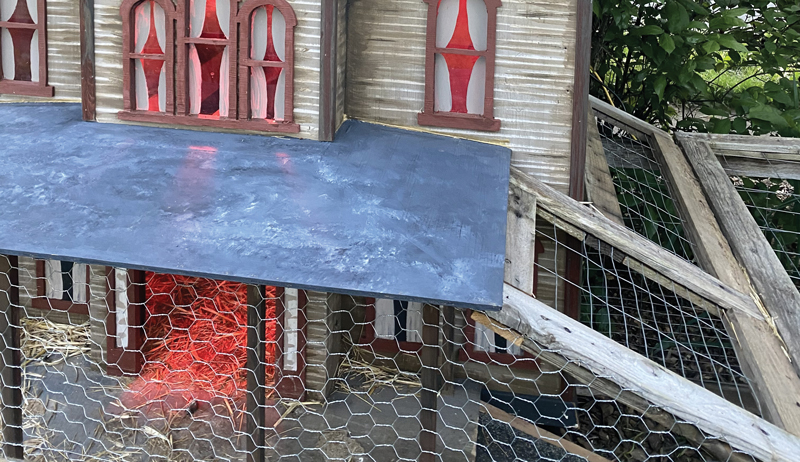
The theme started as a simple joke. Jeff had asked us what we were looking for, and we responded with “something Gothic.” We figured we would receive something akin to a standard coop with the size requirements we needed.
But Jeff took us seriously. And because Covid-19 had my parents quarantining in their workshop, they decided to pull out all the stops on a spooky coop.
Marla Grugett
Altogether Ooky
After much planning—unbeknown to us—they began trying to replicate The Addams Family home in coop form.
They both have an extensive background in set design. My mother is a painter. Jeff is a master carpenter.
Several weeks after our request passed with no updates. Well, aside from the occasional “you are gonna love it.”
Then we received a photo of the finished product. The spooky coop is complete with windows you can see through and a front porch for lounging.
Marla Grugett
This coop is now the highlight of our block. Neighbors constantly stop by for photos. They ask questions and request to feed the flock.
Our animals (Jean Claude Bantam, Ramona, Beef, Lucille II, Dot and Elphaba) were ecstatic to move into the space and make the most of it daily. They have room to roam around and a swimming area for the ducks.
We are incredibly happy with how our spooky coop turned out, and we wanted to share it with the world! —Marla Grugett
This article originally appeared in the November/December 2020 issue of Chickens magazine.
I have been raising chickens in Michigan for 10 years. My adventure into poultry really began when I enrolled in the 4-H Poultry Project when I was 12 years old. Ever since then, I have been raising some kind of poultry each spring.
I enjoyed raising and showing poultry at my local county fair, and I now want to start a farm business.
Showtime!
I learned a lot about chickens through the 4-H Poultry Project. I was very nervous and intimated at first, but by the second year, I was hooked.
I would study my chicken-fact flashcards every day and document my chicks’ growth in my long-form record book. I attended every poultry showmanship clinic that I could and work with my show chicken as much as possible.
Every aspect of raising, prepping and working with my chickens for fair was so much fun. And it payed off! My first two years in the Poultry Project, I took home first place in my age category and was named Reserve Grand Champion.
For the five years afterward, I received first place and Grand Champion Showman.
One of my favorite experiences with the project was when I competed in the Michigan 4-H State Poultry Show held at the Michigan State Fair.
In the Breed Judging category that I competed in, I took first place. I qualified to participate in the National 4-H Poultry and Egg Conference in Louisville, Kentucky. I did some fundraising and was able to attend and compete in the National 4-H Poultry Judging Contest, where I took second place in the meat division.
Over the years, I have enjoyed experiencing many different chicken breeds. I have raised Black Australorps, Black Sex Links, Silver Leghorns, Speckled Sussex and Svart Hona for my 4-H Poultry Projects.
My favorite breed to work with for showing has been the Black Australorp and the Black Sex Link. I have also raised Indian Runner Ducks, pearl-helmeted guinea fowl, melanistic mutant pheasants and West of England Tumbler pigeons, as well.
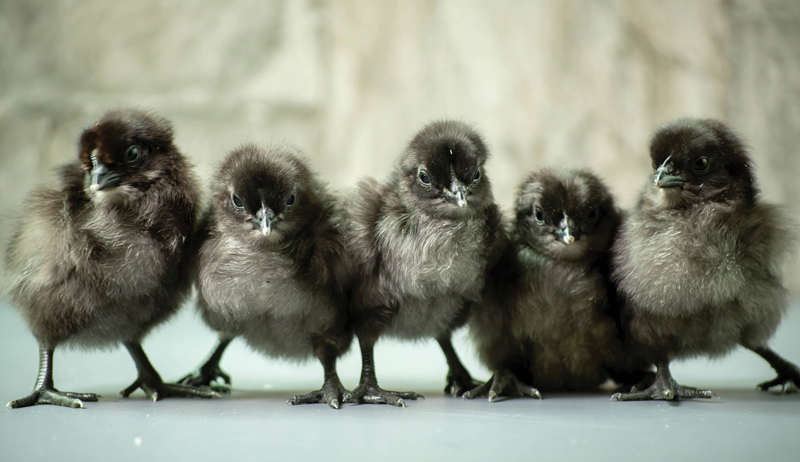
Of all the different breeds and species of poultry I have raised, I have a love and a passion for the rare Svart Hona. Svart Honas are one of the two chicken breeds that are completely black.
Everything about them is black—their meat, skin, face, feathers, everything!
I decided in 2016 to order some Svart Hona hatching eggs and try incubating eggs for the first time. My first experience didn’t turn out so good, and I ended up with a hen that thought she was a rooster. For the past six years, I have been working with the Svart Hona breed and acquiring stock from different breeders to try and get some quality birds.
Alexa Lehr
A Future in Fowl
Now that my years with the 4-H Poultry Project are over, I’m going full throttle into trying to create a farm business. I named my farm Black Feather Farm after the Svart Hona chickens that I so thoroughly enjoy raising.
This is my first year breeding and hatching Svart Honas to sell. I have definitely had challenges, but I have also learned a lot of valuable information about raising and hatching this rare breed of chicken.
I also own a blog called The Pioneer Chicks, where I share my knowledge of poultry. I love sharing what experiences I have had with raising chickens and helping others learn from my mistakes.
I try to raise my chickens as naturally as possible. Both my breeding flock of Svart Honas and my laying flock get crushed garlic in their water every week. I grow my own garlic as well as herbs such as parsley, spearmint, oregano, thyme and nasturtium. I put the herbs into fermented feed for my chickens and sprout lentils as a quality protein source for my Svart Honas.
My focus now is to build and grow Black Feather Farm. In the near future, I want to add some heritage, rare and designer breeds. I am also going to create some natural poultry products to sell as well. Meanwhile, I enjoy working with caring for my chickens every day and seeing what else I can learn about them! —Alexa Lehr
Alexa Lehr lives in central Michigan and has an associate degree in graphic design. She enjoys being outside, and her passions lie in photography, raising rare chickens naturally and building her farm, The Black Feather Farm.
This article originally appeared in the “Chicken Chat” column of the November/December 2020 issue of Chickens magazine.
I think most folks are happy to see 2021 arrive, given how 2020 was pretty much turned upside down by COVID-19. I, for one, am always glad to see what a new year has in store. And I’m already making plans for farming projects I intend to tackle in 2021.
I suppose you could call them New Year’s resolutions. But I think of my plans more as inspiration, both for myself and (hopefully) for readers.
The goal of this annual exercise isn’t to compile a list of resolutions that must be followed at all cost. COVID-19 has demonstrated how quickly plans can be turned upside down. But, rather, I wish to encourage proactive thinking about fun projects to accomplish during the coming year.
With this goal in mind, here are five of my 2021 New Year’s resolutions.
Plant Pumpkins and Watermelons
For me, one of the highlights of 2020 was growing pumpkins in my orchard. They thrived in the raised bed of compost I prepared. And at the end of summer, I harvested six basketball-sized pumpkins plus a couple dozen miniature decorative pumpkins.
Not bad for six plants!
The project was such a resounding success that I plan to expand my planting in 2021. I’ll definitely grow pumpkins again. But I’m also interested in trying watermelons.
The area I have in mind stays naturally damp through much of the year, so the roots won’t have to look far to find plenty of water.
During the spring, I spent a lot of time analyzing an old farm pond from every perspective, wondering why it suddenly stopped filling with water a few years back. I eventually realized the rear bank had been breached underground. This allowed water to drain into a rocky field behind the pond.
As much for curiosity as anything else, one of my goals for 2021 is to repair the damaged bank, plugging the hidden hole(s) so spring meltwater will have a chance to refill the pond.
I may have to clear out some of the water-loving cattails that have taken up residence in the pond basin. But with time and effort, I think I can restore the pond to its former glory.
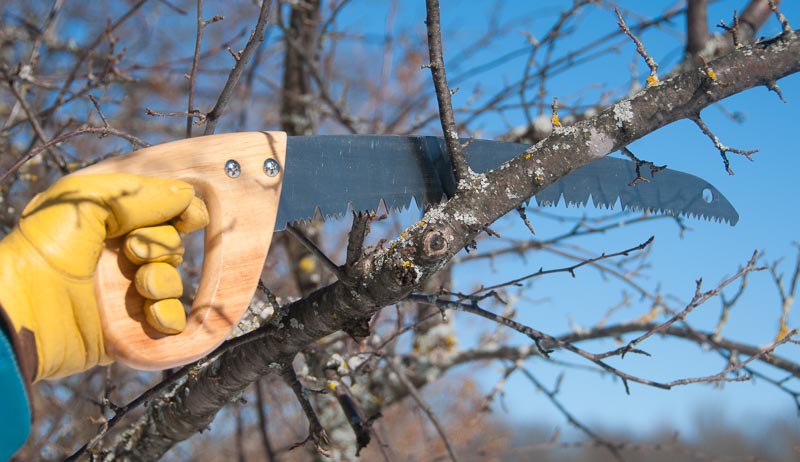
Prune Fruit Trees
In 2018, I started planting a new orchard of fruit trees. After a couple years of work, I’ve planted 35 trees. And now, the oldest ones in particular are due for some corrective pruning to guide their growth in ideal directions.
Corrective fruit tree pruning is best done in later winter, before the trees wake up. As soon as the snow starts to melt this spring, I’ll trek out to my orchard with pruning loppers and pruning saw in hand to start the ball rolling.
In the meantime, I’ll keep reading books and articles about the art of pruning to make sure I employ the most suitable strategy for each tree.
Good old “Little Mo,” my John Deere Model 40, began having issues starting this summer. This was unusual, since Little Mo has always been a picture of reliability and usually fires up at first asking.
But to avoid losing any more time fussing with the battery during a busy day of farming projects (been there, done that!), I intend to replace the clamps entirely in 2021, restoring Little Mo to maximum reliability for another year of work.
Sharpen and/or Replace Lawn Mower Blades
Little Mo isn’t the only tractor that could use a little maintenance on my farm. 2020 was a busy year, and I didn’t get around to sharpening the blades on my lawn mower as scheduled.
I don’t think they’re cutting quite as cleanly as they should, so I’ll plan on sharpening or replacing them this winter, before spring arrives and the grass starts growing faster than I can mow it.
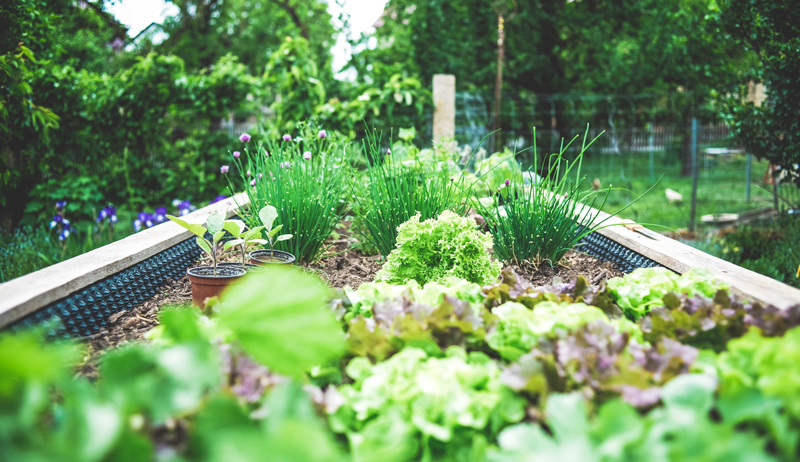
Last spring saw a massive uptick in vegetable gardening. While more gardens are certainly a plus, seed companies couldn’t keep up with the demand.
Gardeners chose from what seed was left or planted their gardens late in hopes that their favorites would become available.
Seed companies are readying for the 2021 spring rush, but will you be ready too? Here are some tips to help you while planning for a successful garden.
Phillip Kauth PhD, Director of Preservation at Seed Savers Exchange, says to look at gardens from different perspectives.
“Why do you want a garden?” he says. “Is it for food or aesthetics or both? If you want a garden for seed saving, that’s going to be different from just growing for food.”
So for example if you’re looking to grow an ornamental kitchen garden, consider colorful plants like Bright Lights Swiss chard and Scarlet runner bean.
If you’d like a garden that will draw in butterflies and hummingbirds, plant varieties that will attract them such as flowering herbs like borage and fennel, and edible flowers such as nasturtiums.
If you’d like a culinary garden, consider your taste. For instance, a soup bean may not be a good snap bean, and your family might not like eating kale.
Did you grow the right stuff?
If you’re anything like me, when the seed catalog comes in the mail, it’s almost easier to choose from what I don’t want to grow. But just because you want to grow the Hidatsa pole bean or Black Krim tomato, doesn’t mean you can or should.
It seems facile to say, “grow what you like to eat,” but it’s easy to end up with a variety that you won’t like.
“It’s hard to suggest a seed variety, because everyone has a different palate,” says Kauth.
For instance, tomato varieties span the flavor spectrum of sweet to smoky to salty. And varieties have different uses. A pasting tomato’s flavor and texture shines after cooking, and it’s a good choice for making pasta, pizza sauce and sundried tomatoes. An eating tomato is too watery to cook, but it’s perfect for fresh salads and juicing.
The variety you want may not work in your area. When I lived in England, my favorite beans were runner beans. But no matter what I do, runner beans will not thrive in my Indiana garden. The summers are too hot.
Kauth says the best way to find what works for you is to visit on-line seed catalogues and read the comments. There might be someone who lives in your area who has offered growing tips.
Also, your local garden shop will usually stock seeds that grow in your climate. When in doubt, ask the employees for advice.
Above all, prepare for the spring rush by ordering your seed now. You’ll be doing yourself and your favorite seed companies a favor.
A packet of tomato seeds can give you a range of 20 to 40 seeds, which have a 90 percent chance of germination. So keep in mind the space you have available. You may only need three or four tomato plants for your plot.
Either thin out the extra seedlings or grow them on to sell, trade, or donate.
Consider your space carefully when planning a garden. Some plants need infrastructure, such as cages, stakes and trellising to grow. Climbing plants only require vertical space and a few inches between them. Whereas plants like bush beans take up more space on the ground.
Some plants vine and sprawl everywhere, such as cucumbers, squash and melons. These plants can easily overwhelm a small garden.
Did you bite off more than you could chew?
(Apologies for the pun.)
We’ve all been guilty of planting gardens we can’t keep up with. Consider what was easy and what was hard in your prior garden.
If your water source was too far away and you had to lug watering cans back and forth, either grow more drought-proof varieties, set up some rain barrels under a garden shed, or see if planning your next garden in a more convenient area is possible.
You may have planted too much of one variety and not enough of another. For me, I always grow too many tomatoes, cramming the plants in wherever I can. So from August to October, tomatoes take over my kitchen.
Kauth says to consider your physical ability. “If you have bad knees, it will be hard to kneel down to harvest plants that fruit close to the ground, so bush beans might not be the best choice,” he says.
Those with bad backs will have issues leaning over to plant. So raised garden beds would be a better option.
Did you plan for pests?
Raccoons have always left my garden alone, but not this year.
They climbed the trellises that enclose my garden and ate all of my ripening corn. They made a hole in each watermelon and scooped out the insides with their clever little hands.
So next year, I’m planning to install a strand of electric wire along the top of my fence to protect my garden.
Did your garden meet your expectations?
Kitchen gardens don’t always measure up. Weeds, pests, vermin and failed plants are just parts of a gardener’s life. But it’s easy to lose heart when you’ve worked so hard. No matter how experienced you are, gardening is really a hit-or-miss experiment.
“Every year is different,” Kauth says. “Problems in one year may be totally different in another. Weather might not have been on your side.”
Take stock of what you loved most about last year’s garden. (A garden journal is a great way to map your progress from year to year.)
And try to remember the flavor of that heirloom tomato, and how delicious an ear of corn, shucked and cooked fresh off the plant, tasted. Take the good with the bad and don’t let your garden overwhelm you.
Very popular with homesteaders, Jerseys account for about 7 percent of all cows in the U.S.
This is a smaller-sized dairy breed. Most mature cows weigh about 900 pounds and stand around 4 feet tall at the withers.
Like the Guernseys, Jerseys come from an island, the Isle of Jersey, located in the English Channel between England and France. They were imported to the U.S. in the early 19th century.
Jerseys are respected for producing a fairly high quantity of milk relative to their size (about 16,000 pounds per year). This milk is particularly rich in butterfat (4.9 percent) and protein.
It’s true that their total production is lower than that of Holsteins. But their net return (or dollars of profit per cow per year) is higher thanks to their lower feed requirements and ability to stay productive for many years.
“Compared to average milk, a glass of Jersey milk has greater nutritional value: 15 to 20 percent more protein, 15 to 18 percent more calcium, and 10 to 12 percent more phosphorous, and also considerably higher levels of an essential vitamin, B12.”
Jersey milk has more protein, calcium and other nonfat solids compared to other breeds.
When a Jersey heifer matures earlier, she can be bred at a younger age and smaller size. Then she can enter the milking herd sooner. This makes Jerseys quicker to generate income for a dairy producer. Jersey cows are renowned for their ease of calving.
Farm Cottage Creamery
Color Wheel
Modern Jerseys may be of a wide range in color.
“There is little preference today between the solid and broken colors, although most breeders slightly prefer the cattle with an unbroken color pattern,” according to the Oklahoma State University Department of Animal Science.
“Most prefer the dark tongue and switch. But this is more a matter of an identification point than a point of discrimination. The color in Jerseys may vary from a very light gray or mouse color to a very dark fawn or a shade that is almost black.”
Overall, Jersey cows are sweet animals. But in spite of their doe-like eyes and small size, they can also be playful and rambunctious, sometimes to the point of being a nuisance.
This article originally appeared in the November/December 2020 issue of Hobby Farms magazine.
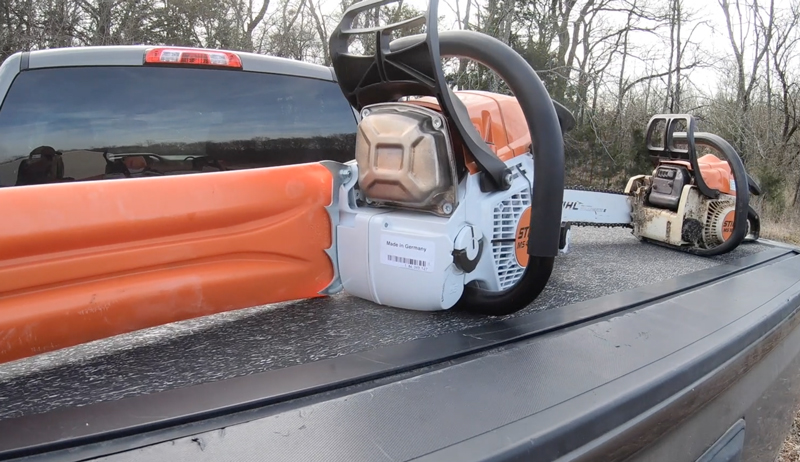
So you’re in the market for a chainsaw. We’re arguably living in the golden era of motorized sawing options. It’s great to have a wide selection of saws to choose between, but the array of chainsaw choices can be overwhelming to somebody looking to make their first (or first in a while) purchase.
There are a few factors to consider when buying a chainsaw, including:
In this video, we look at these questions and provide answers for a few different scenarios.
Chainsaw selection is the first step on the journey to becoming a proud and empowered equipment owner. With a bit of forethought and planning, you’ll be ready to cut down trees, break apart fallen lumber and produce your own firewood plugs for years to come.
In your time on the farm or the homestead, you’ve almost certainly broken some metal part that you haven’t been able to do much about.
Maybe you paid someone more than you would have liked to repair it. Or maybe the piece still needs to be fixed.
When you learn how to weld, you can start fixing your own machinery, and even custom fabricate equipment that you need around the farm.
Types of Welding
Without getting too far into the science (and there is a lot of science), welding is a process of joining two pieces of metal together using heat, frequently in the form of electricity.
There are a variety of different ways to fuse metal together. And each of the commonly used welding processes have their own benefits and drawbacks.
For repairs around the farm, most people prefer stick welding. It’s true that other welding processes can give cleaner and sometimes stronger welds. But stick welding can allow you to join together relatively dirty or rusty surfaces.
Think repairing a rusty gate that someone backed a trailer into.
Stick welding can also work on a variety of different metals–including iron, steel and aluminum–making it a versatile option around the farm.
Metal Inert Gas
If you anticipate doing a lot of fabrication, on the other hand, MIG (metal inert gas) welding might be a better fit. Unlike stick welding, MIG uses a “shielding gas” to protect the weld from contamination. This creates a generally cleaner and stronger weld.
Maybe, for instance, your farm truck needs a new roof rack to transport lengths of lumber or pipe around the property.
Learning multiple welding processes doesn’t necessarily mean that you have to purchase multiple welders. Some welders are “multi-process,” meaning that they will allow you to switch back and forth between various welding processes, including stick and MIG.
Select a Process
Begin by figuring out what kind of metalwork you anticipate needing to do around your farm.
Are you frequently breaking tractor implements, trailer hitches or gates? If so, leaning to stick weld would probably be the way to go.
Maybe, on the other hand you’ve always had ideas about how to modify or fabricate machinery but have never had a way to do so. If so, MIG might be a better match.
Once you’ve decided on a process, it’s time to buy the equipment and materials you’ll need.
Used welders (especially stick welders) pop up on Craigslist all the time, so make sure to look around for used options. Depending on the kind of welder you buy, you may need to purchase some gas canisters, electrodes or spools of wire to get your welder running.
Given the dangers of welding, it’s important to use safety equipment whenever you’re working. Invest in a good welding helmet, ear protection, fire-resistant clothing and heavy-duty welding gloves.
Given the kinds of metals you plan on welding, you may need to use a respirator as well.
Finally, you’ll need an angle grinder to cut and clean metal, some clamps to hold your projects in place and a welding hammer to chip away the slag from your welds.
Getting Started
Ready to learn how to weld?
Like any new skill, welding takes time to master. The best way to learn how to weld is with a friend or mentor who has been doing it for a while.
Find some scrap metal around the farm or from the local junk yard and start experimenting in your shop. You’ll have a lot of fun learning, and before you know it will be able to maintain your own machinery in a whole new way.
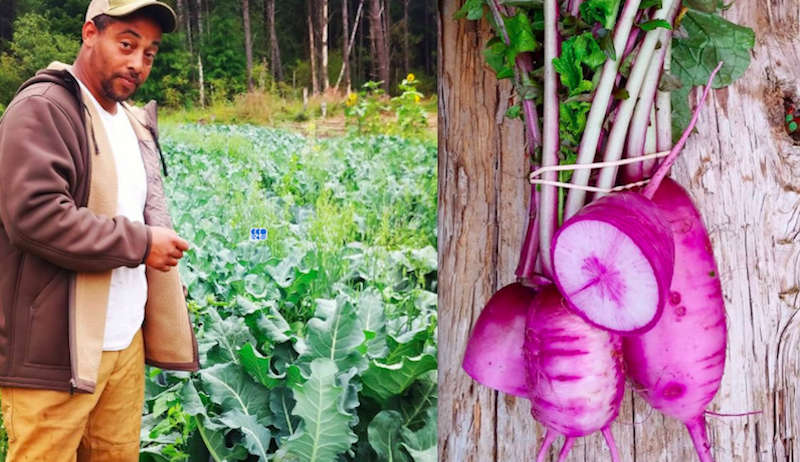
Katharine Harwell and Bil Thorn have shared an interest in farming since their late teens. These days they run the 15 acre Sky Island Farm in Humptulips, Washington, along with a little help from their two teenage children.
Situated on 15 acres of land, Sky Island Farm takes pride in growing over 50 varieties of vegetables, flowers, fruit and herbs. After the Covid-19 pandemic struck earlier in the year, Harwell and Thorn decided to focus their efforts on providing a Community Supported Agriculture (CSA) delivery service to local residents.
“It was a great decision,” says Harwell. “We felt good that we were able to grow this side of the business and serve so many people this year. People loved that they didn’t have to get their produce from the store and relied solely on the veggies we brought them.”
Taking time out from processing the last of the holiday wreath orders, we spoke to Harwell about sustainable farming methods and the joys of daikon radishes. We also got the scoop on a giant 5-foot Christmas wreath they’ve crafted.
“We have always embraced sustainable gardening and farming methods,” says Harwell when asked about Sky Island Farm’s growing practices. “[Sky Island uses] only Organic Materials Review Institute (OMRI)-listed amendments, and we never spray and focus big-time on plant health. We use methods like cover crops for fertility and weed control along with using black plastic to kill weeds so we do not have to use chemicals!
“Yes organic is intensive. And so much is done by hand. But it’s worth knowing you have clean and nutritious produce.”
Harwell says that heirloom tomatoes, purple daikon radishes and purple cauliflowers were this year’s big hits in the produce box. This was based on feedback from customers who signed up to Sky Island Farm’s CSA.
“Our favorite way to eat the tomatoes was to chop them up with cucumber. Or we’d eat them by themselves and add walnuts, feta cheese, olive oil and reduced balsamic vinegar,” explains Harwell. “Same goes with the daikon radish. But we also loved roasting the radishes too, which not too many people know about.”
If you scroll through Sky Island Farm’s Instagram account, you’ll notice a stream of eye-catching festive wreaths. Harwell says that producing the wreathes “is a great side gig for the downtime.”
She adds that all the materials that go into crafting the holiday decorations come from the farm. Any leftovers go to the goats and sheep or become compost.
Part of Sky Island Farm’s holiday season tasks include creating a giant 5-foot wreath for the town hall in nearby Seabrook, Washington.
“This wreath is made on a custom wood frame. It is made by hand because of its size,” explains Harwell. “They have to bring in lifts just to install it! [The town] gets super festive and we are fortunate enough to be able to help and keep it local.”
Looking back over 2020, Harwell says that she’s proud of how Sky Island Farm has been able to run a 160-family CSA for “people of all income levels” via a sliding scale scheme. The farm has also formed a relationship with the Coastal Harvest distribution network to work with local food banks.
In recognition of Sky Island Farm’s contributions, Harwell adds that recently Thorn was awarded the Farmer of the Year award from Washington State Tilth Alliance “for his efforts in growing organically and feeding his community and for being an inspiration.”
It may be too cold to garden, but it’s the perfect time to inoculate various types of woods with mushroom spawn. I recently acquired sections of sugar maple, hackberry and poplar from some trees that were felled for safety reasons.
Their leaves were long gone, but the trees were still alive. What’s more, the wood didn’t make prolonged contact with the ground. That meant fungi in the soil probably hadn’t had a chance to colonize the wood yet.
I inoculated some of the smaller logs with blue oyster and shiitake mushroom plugs. As for the larger pieces of sugar maple? They were well-suited to grow lion’s mane (Hericium erinaceus) mushrooms.
Research suggests lion’s mane mushrooms offer many potential health benefits. Lion’s mane also boasts a lobster-like texture and taste.
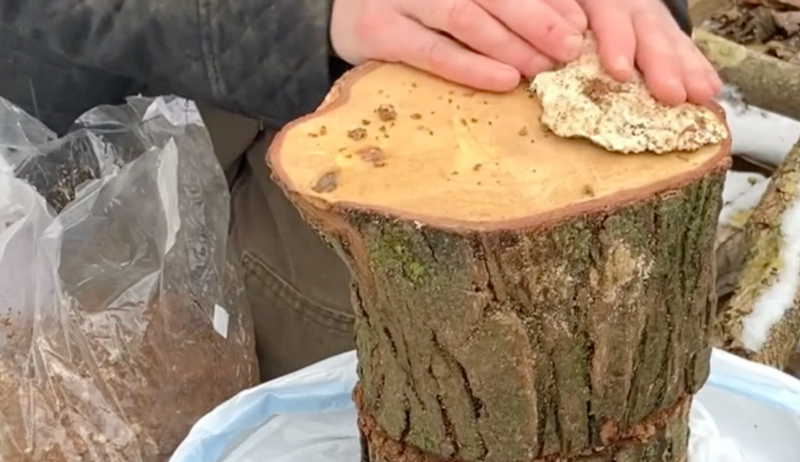
Still, they aren’t the easiest mushroom to cultivate. They seem to prefer sugar maple and beech to other woods. Lion’s mane spawn also performs best when introduced via the totem method (demonstrated here), rather than as plugs inserted into pre-drilled holes.
Step by Step
To start, I ordered my lion’s mane spawn—grown on a substrate of sawdust and millet—from an online retailer. While I waited for the spawn to arrive, I kept the logs moist and stored high off of the ground. (Ultimately, I’d place all of the plug-inoculated logs and finished totems on pallets in a shady spot outside.)
Once the spawn arrived, I cut each totem into three sections. Inoculating the totems one at a time, I placed the base section inside a white, plastic bag and applied about an inch of the lion’s mane spawn to the top of this section. Next, I pressed the middle section of the log firmly on top of the spawn. Then, I spread another inch of spawn on top of the middle section of the log. Finally, I put the log’s top section back in place over this second layer of spawn and loosely closed the plastic bag.
I’ll need to make sure the totems don’t get too dry, and, in eight to 12 months, the lion’s mane mycelia should colonize the logs. Once colonization has occurred, I can remove the plastic bags and I should have multiple flushes of mushrooms. As a general rule, you can usually expect one year of mushroom production per inch of log diameter, so (fingers crossed!) I’m hoping to enjoy fresh lion’s mane mushrooms for the next few years.
We all love our chickens! This includes backyard farmers, master gardeners and chicken-keepers who consider their birds more pets than stock.
Our poultry provide us with endless entertainment, emotional comfort and food. These birds are truly wonderful animals.
However, like all pets, we need to be aware of their quality of life and plan appropriately for the eventual end of that life.
With dogs, cats, horses, etc., we typically get advice from our veterinarians on when we need to consider euthanasia. This is often not the case with respect to our pet chickens.
This article addresses some of those issues and provides useful information about euthanasia for your backyard birds.
When to Say Goodbye
As veterinarians and pet owners, we use several criteria when considering euthanasia in our pets, including:
their overall quality of life
when the bad days outnumber the good days
when they struggle with the ability to eat, drink and go to the bathroom regularly
disease status of your chicken and the risk/reward of the outcome. (For example, an old animal with a terminal disease is a different calculation than a young animal with a curable disease.)
cost of treatment (Unfortunately, this is a reality of life, and often the price of treatment costs significantly more than what you paid for your bird.)
With food animals such as poultry, an additional consideration is the ability—or lack thereof—to produce food, such as eggs.
As noted, these types of conversations are common when dealing with dogs, cats, horses, pocket pets, etc., but this isn’t a normal conversation when dealing with chickens. With the overall prevalence of backyard poultry, though, it’s important to have an honest discussion about:
evaluating the overall health and well-being of your flock and chickens
understanding the options for humane euthanasia
Nosyrevy/Shutterstock
The Flock vs. The Bird
For many poultry diseases, cures or effective treatments exist. In addition, necropsy (aka an animal autopsy/euthanasia) presents the best chance for diagnosis. The idea here is that if we do a necropsy of one chicken, we can identify the disease present and better understand how to treat the rest of the flock.
This is based on the reality that when one chicken in a flock has a disease, it’s very likely that the entire flock has the same problem. They’re all eating and drinking the same food and water and exposed to the same environment.
For example, if one of your chickens has a vitamin deficiency or an infectious disease or is egg-bound, as diagnosed by necropsy, then it’s safe to assume that your entire flock has or will soon have that same problem.
So how do you make the best decision for individual birds and/or your flock?
Get a diagnosis (necropsy or a sample from a live bird if possible).
Talk to your veterinarian about the potential for a successful intervention at the bird and flock level.
This section will provide you with some background on how euthanasia of chickens is done with a focus on processes that your veterinarian or diagnostic lab may offer.
It’s important to know that euthanasia is different than processing a chicken to be turned into food. The end result (aka death) is, of course, the same, but the methods are different.
This article focuses on euthanasia and not processing. The two should not be conflated.
Here are three humane methods of euthanasia for backyard chickens.
Cervical Dislocation
If done properly, this form of chicken euthanasia is humane. However, this is often not done properly.
Cervical dislocation involves stretching the neck and dislocating the joint at the base of the skull. It causes the spinal cord and associated blood vessels to break.
This is accomplished by holding the chicken’s feet in one hand in a straight line from the head, which is held in the other hand. The head is advanced abruptly, smoothly and confidently forward. Part of the learning curve here involves using the appropriate strength so that the head doesn’t come clean off.
Alla – Din/Shutterstock
Carbon Dioxide
The use of carbon dioxide or another similar gas—such as argon—in a small space in the authors’ opinion is the most humane and practical way for backyard poultry enthusiasts to use. It’s technically easy to accomplish and also cost effective.
Ideally you would go to your veterinarian or to a diagnostic lab. (Often, this is done for free or for a nominal fee.) However, you can do this by yourself, if necessary.
First, purchase a rubber trashcan (~32 gallons), a rubber hose and a canister of carbon dioxide. Place the bird gently inside the trashcan (you can place two to three birds in a 32-gallon trashcan), and attach the carbon dioxide tank to the trashcan via a rubber hose. (Create a good seal at the attachment site between the trashcan and hose.)
Turn the carbon dioxide on, and wait approximately five minutes.
Note: You could practice cervical dislocation at this point to perfect this method without the welfare ramifications of practicing on a conscious chicken. There is a bit of a learning curve associated with cervical dislocation, so this would be an effective and humane approach toward perfecting this technique.
This has to be done by a veterinarian because the medication is considered a controlled drug by the Food and Drug Administration. The vet often uses a pink solution that is injected intravenously that essentially stops the chicken’s heart.
It’s not advisable to be present for bird euthanasia because, unlike dog or cat euthanasia, a catheter is not usually placed. This has the potential for a slower end result.
What isn’t considered humane/safe? Other methods including gunshots, decapitation, thoracic compression and blunt force trauma are not considered humane and/or safe for pet birds.
Other Information
When deciding whether or not to euthanize your pet chicken, the biggest thing that you aim to avoid is waiting too long and, by doing this, prolonging suffering. While there is not a right or a wrong time to do this—assuming that production and economics is not your primary focus—a common mistake is keeping our pets around for our benefit instead of theirs.
The other decision is what to do with the remains. Most veterinary hospitals would be able to cremate your chicken. You would have to decide whether or not you would like the ashes back.
These options carry different costs.
Many veterinarians won’t be familiar with chicken euthanasia. So it would make sense to go to a veterinarian who has experience with birds and/or backyard poultry. Another option is to take your chicken home for burial after the procedure.
Each city and state can have its own laws regarding whether or not this is legal and how deep the burial must be. So check your local regulations.
The Respectful Choice
The goal of chicken euthanasia is for you to be able to find solace in the fact that you did the right thing for your feathered friend. There are always ethical concerns associated with euthanasia, but the goal is to use a humane and legal method to help your chicken on its way out.
Regardless of whatever you do, in our opinions, treating your animals with respect in the decision-making and euthanasia process should be based on gaining as much information from experts as possible. Among other experts, reach out to your veterinarian and even local universities to gather the best information possible.