Categories
Animals Large Animals

Tips For Providing Your Goats The Shelter They Need

When Kathryn Spann started raising dairy goats in 2008, she thought wooden sheds built on skids would be the ideal housing for her herd. The shelters could be attached to a tractor and moved, ensuring the herd had a safe space to escape the elements and allowing Spann to practice pasture rotation without building individual shelters in each pasture.

The shelters worked when the herd was small. But as the goat population grew, Spann—who raises 90-plus dairy goats (including Alpine, LaMancha and Nubian crosses) with her husband, Dave, on Prodigal Farm in Rougemont, North Carolina—needed to search for a different option.

“We practice pasture rotation, and we wanted shelters that could move pretty easily,” Spann says. “We couldn’t make the shelters bigger because it would tear up the fields if we moved them.”

Get Setup

While there is no one-size-fits-all goat shelter—options range from doghouses and hoop houses to three-sided run-ins and barns—an ideal shelter has several important elements, including protection from drafts and exposure to elements like wind, rain and sun. The addition of running water, while not necessary, can make it easier to refill buckets, and electricity allows you to run clippers and disbudding irons and add heat lamps for newborn kids.

To decide on the right goat shelter for your farm, think about your setup:

  • If your goats rotate between pastures, can the shelter move, too?
  • Will the shelter be large enough to accommodate additional goats if the herd expands?
  • Is the location accessible in all kinds of weather?

Farms in northern climates need shelters that can withstand snow and ice (and possible flooding when it melts). A southern-facing shelter provides the best protection against wind.

The breed matters, too. Dairy goats have a lower body condition score than meat goats, because all of their energy goes into making milk, according to Morgan Watts, livestock extension agent with North Carolina State Extension. Meanwhile, meat goats build muscle, making them less susceptible to the elements and more apt to thrive with minimal shelter.

Your shelter doesn’t need to be a contender for design awards, but it does need to be available to the goats from the moment you bring them home.

“If you try to build a shed while the new goat is tied to the apple tree, you’re bound to have trouble,” says Jerry Belanger, homesteader and author of Storey’s Guide to Raising Dairy Goats.


Read more: These goat health basics will help you keep your goats kicking.


Function Over Form

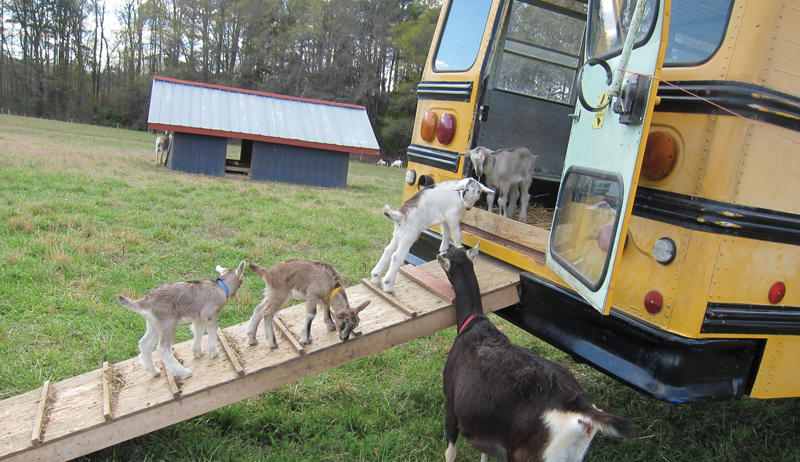
When the goats of Prodigal Farm outgrew the movable wooden sheds, Spann purchased several old school buses to serve as goat shelters. The buses were inexpensive and, with the seats removed, provided adequate protection from the sun and rain.

Windows could be closed for warmth in the winter and opened in the summer for cross-ventilation. And the buses could also be driven between pastures without putting too much pressure on the ground.

The goats loved them, and that proved to be a problem.

“The kids liked the ramps leading in and out of the bus for play. But they were so curious and were out there, under the buses, pulling wires and hoses,” she says. “The goats ended up tearing out so much of the mechanical equipment that we were towing them between pastures.”

goat shelter goats shelters
Prodigal Farm

Barn Building

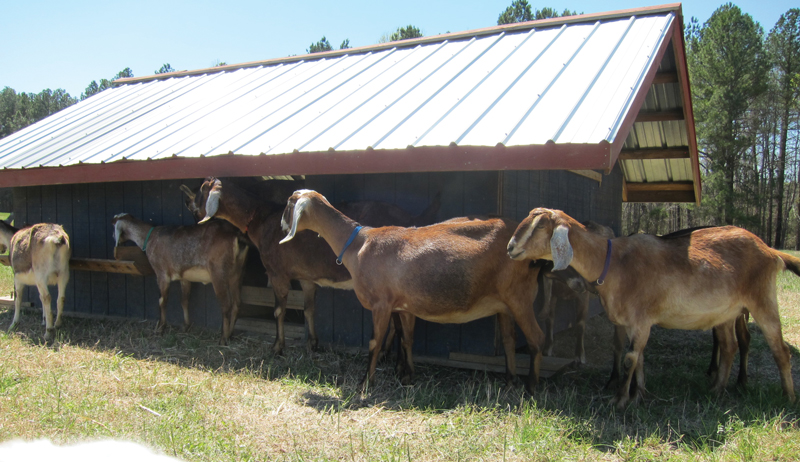
The goats of Prodigal Farm will soon have a new place to call home. Spann is in the process of building a 32-by-120-foot barn that, with a fabric roof and metal trusses, will house the goats all winter. The wooded areas around the perimeter of the pasture will provide protection from the elements in the summer.

Goats are curious creatures, which makes smart construction essential. Belanger suggests steering clear of plywood, plastic and unprotected insulation. Instead, opt for dirt, concrete, sand or gravel floors—but not wood, which will soak up urine and prove impossible to clean.

Ventilation is also essential. Without adequate airflow, Watts notes that ammonia can build up and cause respiratory issues.

Shelters should also be located on the farm’s high points to avoid pooled water when it rains. Permanent shelters, including barns, must be accessible during all kinds of weather for hauling grain and hay.

Most hobby farmers also want the shelter (and the goats) close enough to the house for added convenience.

If you’re bringing home goats for the first time, Belanger believes a smaller shelter is better, adding, “Start small, preferably with an already existing barn or shed of some kind. Gain some experience with the routine of running a home dairy, paying attention to workflow and efficiency. Then construct more permanent housing based on those experiences and observations.”

Size Matters

Starting small is a good idea, but avoid overcrowding. In open housing, North Carolina State Extension recommends that shelters have rear eave heights of 4 to 6 feet and front eave heights of 6 to 8 feet. Each goat should have between 8 and 10 square feet of floor space.

Belanger recommends 12 to 25 square feet per animal, which means a herd of 10 goats would need a shelter measuring between 120 and 250 square feet.

That range in shelter size recommendations reflects differences in climate.

“Goats will spend more time inside during a northern winter than in a milder location,” Belanger says. “Ditto for a rainy area versus a drier one. If a sizable yard or pasture is available, the goats will spend less time in the barn or shed and won’t require as much inside room.”

Certifications such as Animal Welfare Approved might also factor into the size of the shelter. AWA rules stipulate that dairy goats weighing up to 44 pounds have at least 4 square feet of space, while those weighing more than 176 pounds need at least 16 square feet of space. Spann follows AWA recommendations for the goats of Prodigal Farm.

With too little space, Watts worries smaller goats might be left vulnerable to the elements, explaining, “Some herds will have dominant goats that will push the smaller ones out if there is not sufficient room.”

A shorter shelter might also make it easier for goats to jump on the roof, which can cause damage and increase the risk of injured goats. Spann also fears that smaller shelters could speed the spread of parasites.

“We had more mite outbreaks when the goats were all snuggled up together on the bus,” she says. “It was a vector for parasite transmission.”

goat shelter goats shelters
Prodigal Farm

Keep It Clean

Smaller shelters, such as doghouses or run-ins with low ceilings, might also be harder to clean. Manure will pile up faster, requiring more frequent cleanings.

Spann used to park a tractor at the back door of the bus and shovel the bedding and manure straight into the bucket for disposal.

“A shorter roof height might seem like a good fit for the goats, but it’s not a good fit for the humans who have to clean the shelter,” Spann says. “If you can’t step inside comfortably, you’ll be less likely to get inside to clean.”

A clean shelter helps protect goats from diseases and is considered an essential element of biosecurity. The USDA Animal and Plant Health Inspection Service recommends cleaning and disinfecting housing on a regular basis, including removing manure and other contaminated materials such as soiled bedding.

Kidding Considerations

Belanger believes that one of the biggest mistakes new goat owners make is not preparing for the arrival of kids. “Goats are like potato chips,” he says. “You can’t have just one. Even if you don’t intend to keep [the kids], the herd has a way of growing.”

Pregnant does and newborn kids have specific shelter needs. You’ll need enough space to provide a clean, secluded pen that provides extra protection from the elements, including a secure outlet for a heating lamp.

Kids are especially vulnerable to cold, wet weather. Without adequate shelter, they could get respiratory infections and hypothermia. In extreme cases, exposure to the elements can cause death.

Watts suggests allocating at least 20 square feet for a “jug” where does can be separated from the herd for three to five days after kidding. The private space allows does to bond with their kids and provides enough space for farmers to assist with deliveries, if needed.


Read more: This guide to goat pregnancy makes having kids a lot easier!


Outfit with Essentials

The ideal shelter will do more than house your herd. Most shelters also act as storage buildings for hay, grain, equipment and supplies, which need to be in a spot that is inaccessible to curious goats. Goats will need access to feeders, free-choice minerals and water in their shelter, and space should be allocated to provide easy access to the entire herd. You may also want to outfit a shelter with extras such as a milking station.

Belanger also recommends providing separate shelter for goats over shared housing with other livestock.

“Poultry can be messy in goat quarters, especially when they get into the feed, and chicks get trampled,” he says. “Sheep and goats can get along, but when they don’t, their completely different methods of fighting put goats at a disadvantage.

“We won’t even mention hogs.”

You don’t need to break the bank when providing shelter for your goats, and aesthetic considerations are between you and your personal preferences. But following a few simple guidelines to meet your goats’ needs will keep you and your animals healthy and happy.


Sidebar: Before You Bring ‘Em Home

Bringing home goats is exciting and stressful. And the discovery that all of the local farm-supply stores are closed after realizing you forgot an important supply for your new goats will only add to the madness. A little advance preparation can help ensure a smooth transition to life on the farm.

In the workshops Kathryn Spann teaches on her Prodigal Farm, she suggests stocking up on everything you need to bring home a new goat.

Shelter

  • Secure fencing: Netting or wire both work, but it must be secure enough to keep the goats in and predators out. Consider electric fencing for added protection.
  • Hay manger
  • Hay
  • Water buckets
  • Salt (block or loose)
  • Goat minerals, offered free choice
  • Baking soda, offered free choice to prevent bloat and indigestion
  • Kelp (optional) for pregnant and lactating does. Look for ‘chelated mineral free’ varieties.

Medical Kit Essentials

  • Thermometer
  • Baking Soda
  • Pepto Bismol
  • Electrolytes (Gatorade) to treat dehydration
  • Probios probiotic to restore gut microbes after illness
  • Drench syringe for administering oral dosages
  • An aerosol, antiseptic bandage protector such as Blu-Kote/AluShield
  • Dewormer
  • First aid kit stocked with bandages, gauze, medical tape, alcohol swabs, iodine, hydrogen peroxide, Neosporin or other healing salve
  • High-Potency B Complex in case of goat polio
  • 6-cc syringes and needles

Additional Supplies

If you’re bringing home a kid that has not been weaned, you’ll need some additional supplies:

  • Milk replacer
  • Bottle (clean wine bottle or soda bottle)
  • Nipple(s)
  • Grain or alfalfa pellets to offer as a weaning adjustment supplement and to provide the nutrients to grow into healthy adults
  • Vaccinations: CD&T
  • Straw bedding

This article appeared in Hobby Farm‘s Best of Goats 101 2020 annual, a specialty publication produced by the editors and writers of Hobby Farms magazine. You can purchase this volume, Hobby Farms back issues as well as special editions such asBest of Hobby Farms and Living off the Grid by following this link.

Categories
Animals Large Animals

Building A Passive Solar Stock Tank For Sheep In Winter

As cold weather started to set in, we separated our flock into two pastures. The older ewes and a young ram are staying up near the house in hopes of a spring lambing season. They have a nice stock tank water heater that we could plug in when the weather starts freezing,

The 8-month-old lambs got moved to a pasture about an 1/8 of a mile from our house, just off our large field that we use for herding practice with our border collies. It’s got a farm pump right there, so water hasn’t been an issue … until now!

The problem? There is no electrical source in the far pasture. And it’s too far to run an extension cord. But the lambs need to have fresh water and I was not looking forward to hauling fresh water down to that pasture a couple of times a day if the temperatures got really cold.

If You Build It…

I challenged my son Ryan, a recently graduated engineering student, to see if he could figure something out that would not require electricity to keep the water from being frozen.

He took the challenge!

passive solar stock water tank
Jana Wilson

After doing a pretty thorough Google search, he found the same links I did–which are not many–about creating a solar-heated stock tank. I was surprised that you couldn’t buy something like this, but maybe I didn’t look hard enough,

At any rate, my son decided to follow plans for a solar stock tank from Mother Earth News. We had looked at that link before and honestly it seemed like the only one out there that would suit our needs.


Read more: Solar thermal systems heat your water with the sun.


Material Matters

Now one thing about our farm is that we use found materials whenever possible–rather than going out and buying new. So some of our projects look a little odd. But if they work, that’s great!

Ryan as well was determined to use materials only found at our place.

First of all, we collect wood pallets that others are going to throw out. So that seemed like the natural casing for our 40-gallon black rubber water tank.

Ryan also used a few pieces of foam insulation that we had available to go around the tank. But we didn’t have enough to complete the job.

Then I remembered that we had a couple of bags of extra wool we had stored from last spring’s shearing! What better way to insulate than with wool?

passive solar stock water tank
Jana Wilson

The insulation was finished off with plastic feed bags from sheep and chicken feed. Ryan stapled the bags along the outer edge of the pallet “tank holder” and filled it with the various types of insulation.

He and my husband then moved the tank in its casing to the south side of the lamb shed. There, it would be protected and get as much light as possible during the winter months.

So here’s the verdict:

The Downside

The tank ended up behind higher off the ground because he set it on a wood pallet. Not being a livestock owner, my son did not think about the fact that this flock is composed of half-grown lambs that might not be tall enough to reach the tank.

(I don’t think the full-size sheep would have a problem).

So using his engineering ingenuity, he added a stable log step at each end of the tank.

We have watched for a couple of days and the lambs are actually getting up on the log and drinking!


Read more: Sustainable farming and solar solutions power this Kentucky couple’s dreams.


The Upside

I went out yesterday morning, when the temperature was at about 24 degrees F, to check on both watering tanks. I first went down to the newly built passive solar stock tank (which we are also covering at night to keep any heat in) and found that there was a thin veneer of ice over the top that broke easily when I touched it.

Great news!

Then I came up to the pasture near our house that has an electric stock tank heater placed in the water tank. The electric stock tank heater was frozen into a couple of inches of solid ice that I couldn’t break up at all.

Hmm, I thought. Not good news.

So I followed the extension cord back to the plug and found that my husband had plugged in the wrong cord. I exchanged plugs and the water thawed within a few hours.

So we shall see how my passive solar water heating tank works throughout the winter. If anyone else has tried this and has had some success, I’d love to hear about it!

Categories
Crops & Gardening Farm & Garden

Why & How You Should Store Your Roots In A Root Cellar

This time of year, as we head inside and our gardens are covered in snow, we look for ways to keep enjoying fresh food.

Whether for commercial sale, home consumption or community food security, the root cellar is an important infrastructure for growers, especially for those in northern climates.

Because root cellars are so important, I’m going to dedicate my next few articles to looking at them. First up, let’s explore how root cellars work by examining what you should store in them.

Roots in a Root Cellar

There are different types of root cellars and scales to suite all farms, homesteads and landscapes.

Some root cellars can be built into your home or barn, while others will be stand-alone structures or built into the side of a hill.

However, in all cases the word root cellar should be properly associated with storing primarily root vegetables—hence the word ‘root’ in the title. (You can see my previous article about other types of winter food storage, including ‘leaf cellars,’ pantries and more.) That doesn’t mean we cannot use a root cellar to store apples or onions.

But these items require different design considerations.

You can store apples in similar conditions to carrots. But apples and carrots cannot occupy the same cellar. Why? The ethylene gas apples emit during storage will make the carrots go bitter.

Onions, on the other hand, need drier conditions or they will mold.

So, again, the starting point for a root cellar journey is understanding how to store root vegetables. This requires high humidity, cold and no light. The following details conditions needed for the main types of cold storage for popular vegetables.

Apples, Beets & Carrots

  • 32-40 F, 90-95 percent relative humidity (RH)
  • Similar storage to fruits, but roots and fruits should not be stored together

Onions & Garlic

  • 32-45 F, 50-60 percent RH
  • Much drier, but too dry will cause desiccation

Potatoes

  • 35-45 F, 90-95 percent RH
  • slightly warmer conditions

Read more: There are a variety of ways to keep your fruits and vegetables for winter enjoyment.


Root Dormancy

By using a root cellar that stores “roots,” we are essentially in the business of maintaining the conditions roots need to remain dormant. That’s right—dormant!

Many of our favorite root cellar vegetables, such as carrots, beets, potatoes and winter radish, are actually alive. They’re simply resting in a natural state until the conditions for breaking dormancy return … or until they are eaten.

I like to approach understanding the conditions (temperature, humidity, light) necessary for proper root cellaring through the lens of dormancy for two reasons.

First, it reminds us about a few important aspects of root cellaring as a food preservation technique. Namely, we stay aware that vegetables like carrots in a root cellar are living foods. Unlike the salad available in winter at a grocery store, they have the vitality and nutrition of a plant that is still alive.

Secondly, as a living food that is a biannual (a plant that takes two seasons to produce seed), carrots can increase community food security. How? They provide a source of future seed saving and re-localization of variety selection for regional differences in climate and demand.

If you don’t eat all your carrots in the root cellar, you can just plant them in the garden. They will flower and produce carrot seeds!


Read more: Grow some fall radishes for full flavor and easy storage.


Stable Conditions

There’s another reason I like to look at root cellar design by understanding dormancy, too. In many ways, we should give more attention to the critical importance of reducing fluctuations of storage conditions, which is a natural call to break dormancy.

Let’s understand carrots, beets and potatoes as “living entities.” In a cellar that mimics the natural conditions they might experience in a winter environment, they:

  • adapt to grow
  • build up a storage root
  • convert starch to sugars with autumn cold weather
  • go dormant over winter
  • break dormancy in spring and grow anew.

With this perspective, we can see that, in a natural environment there are little calls to wake up as winter turns to spring. So little fluctuations in temperature, light and humidity should be avoided to improve root cellar vegetable storage.

Better to store your carrots at a few degrees warmer than ideal than have them fluctuate within a more ideal range on a daily or weekly basis. For that reason, good root cellar design should maximize the stability of cellar conditions .

Next up, we’ll explore some of the different design options for root cellars.

Categories
Crops & Gardening Farm & Garden

Produce Profile: Keep Kohlrabi Weird (& Grow It Anyway)

If ever there were a more ridiculous-looking vegetable, I don’t know about it. But tasty, versatile and hardy, kohlrabi’s alien looks are redeemed by its other qualities.

Kohlrabi is in the brassica family, as cool-weather crops tend to be. It forms a bulb just above the ground—looks like a root vegetable growing above the soil—and has meaty stems growing from the bulb, ending in leaves that resemble small collards.

All of the above-ground parts are edible. The bulb—actually an enlarged stem—tastes like a cross between a cabbage and an apple, with a crisp, refreshing texture. The leaves taste a little like cabbage, a little like broccoli.

The word kohlrabi is German, meaning cabbage turnip. I see where they get that.

How to Grow Kohlrabi

You’ll find green varieties and purple varieties. I like to plant a few of each color, just because they’re beautiful together!

Start seeds early in the spring for late-spring/early summer harvest or late in the summer for fall/early winter harvest. Kohlrabi stores well with refrigeration, so don’t be afraid to plant extra for fall harvest.

Bulb development requires consistent moisture and cool temps.

In the spring, plant directly into the garden if you’re getting a late start, or seed into trays indoors and transplant when nighttime temps are above freezing. With a row cover, even small plants can handle a light frost.

In the summer, try giving your plant starts shade, whether that be by planting in the shade of something tall and full or with shade cloth.

Plant or thin to 5 inches in rows 1 foot apart. If thinning, those tiny kohlrabi plants make tender, succulent salad toppings.

Cover kohlrabi with row cover if flea beetles are a problem. They don’t have flowering parts that need pollination, so you can keep them covered if the weather isn’t hot.


Read more: Kohlrabi can be a difficult market veggie, but these tips will help you make the sale.


How to Harvest

Kohlrabi generally sizes up in two months or less. Left to grow too long, bulbs can become woody, particularly as warm weather sets in.

If you’re growing for a market, harvest when the bulb is a bit larger than a golf ball, and bunch two or three together. Mix up green and purple in your bunches for an eye-catching presentation!

Golf ball- to tennis ball-sized kohlrabi bulbs are a good harvest size. You might be able to get away with some the size of an orange or grapefruit in moist and cool seasons, but that’s pushing the boundaries of getting woody.

Using shears, cut the bulb from the root at soil level. Keep your shears out of the soil, otherwise you’ll smear dirt all over the cut end of the kohlrabi, and it’s a mess.

Discard damaged leaves in the garden. If storing the kohlrabi for future use, remove all of the leaves. If distributing in the next few days, leave the top few rows of leaves attached.

How to Eat Kohlrabi

My job was once to organize events for a farmers market, including food sampling. The day we offered free samples of raw kohlrabi, the farmers sold out of kohlrabi. That was a first. You gotta try it to believe it.

Peel larger bulbs, but don’t bother peeling smaller, more tender bulbs.

Raw, sliced kohlrabi is great for dipping in hummus or dressing or for a snack as-is. Try grating it and tossing with grated ginger, grated carrot, lemon juice and salt for a slaw-like salad.

The bulb roasts nicely—think baked kohlrabi fries—and is a star in stir fries.

Also try kohlrabi boiled then mashed with salt and butter. It’s similar to mashed turnips!

Use the leaves as you would any leafy greens.

Eat kohlrabi because it’s delicious and also good for you: 1 cup of raw kohlrabi contains nearly 100 percent of the daily requirement for vitamin C, plus it’s a good source of fiber, according to Michigan State University Extension.

Let the jokesters make their remarks, but don’ t let them dissuade you from growing kohlrabi in your spring and fall gardens! The taste, versatility, storage qualities and nutrition of this cole crop are serious.

Categories
Food Homesteading Recipes

Fermenting With Spice Blends (From “Wildcrafted Fermentation”)

This excerpt is from Pascal Baudar’s book Wildcrafted Fermentation: Exploring, Transforming, and Preserving the Wild Flavors of Your Local Terroir (Chelsea Green Publishing, March 2020) and is reprinted with permission from the publisher.

Wildcrafted Fermentation
Chelsea Greene Publishing

Fermenting with Spice Blends

A few years back I had no idea how to make my own spice blend. Like most people I would purchase my favorite ones at the store, but it never occurred to me that the process was quite simple.

I mean, it’s not that obvious: You basically purchase some colored powder or odd mix of herby bits and it makes food taste great. It’s quite magical! Somehow I had the (mis)conception that creating this magic powder was a very esoteric process requiring some sort of obscure knowledge, huge amounts of herbal enlightenment, possibly incantations and a master’s degree from the Hogwarts School of Witchcraft and Wizardry.

It wasn’t until I started researching and making my own spice blends using local wild herbs and aromatic seeds that I understood how simple the process can be. I also learned that, with a bit of practice and experimentation, you can create blends much more delicious than whatever you can purchase at the store. The reason is quite simple: By making your own blends, you can adjust the ingredients to your own taste buds, and with practice it becomes a highly intuitive endeavor based on your savory preferences.

I’m not saying that you must absolutely make your own blends. There are quite a few wonderful commercial blends out there! Some are so delicious that I’m still trying to deconstruct them, which isn’t always an easy task. (Maybe they do use incantations!)

Being active in several online fermenting groups, I think not enough fermenters are taking advantage of the possibilities. A good blend can really elevate your regular ferments to new levels—sauerkrauts, kimchis, or even mixed vegetables. It doesn’t have to be complicated at all: Last week I made a sort of kimchi using a barbecue spice blend as flavoring instead of the regular chili powder, garlic, and ginger. As a result the smoky/sweet flavors made the ferment incredibly tasty, and I’m not even sure if I can still call it a kimchi.

Mixing spice blends with fermented wild edibles is even more exciting. Not only are you experimenting with new savory ingredients in the first place, but by flavoring them with various blends, you can multiply the creative culinary possibilities indefinitely. A new world of tasty fermented condiments waits to be explored.

Don’t hesitate to experiment with regular ingredients. I could probably write a whole book on just fermenting cabbage with various spice blends and aromatic herbs.

But let’s start with a simple blend using spices that can already be found in your kitchen or the local supermarket. The method is really not elaborate, and in this case we’re not even using dried herbs, tough roots, or seeds. All the ingredients can be purchased in the form of powders or granules (sugar).

If you have to deal with ingredients requiring grinding, you can easily use a coffee grinder, a Vitamix (for larger quantities), or—like me—a stone grinder. There is something primal and feral in stone-ground spices; it seems to be ingrained in our DNA. I can imagine one of my ancestors doing exactly the same thing to flavor a dish thousands of years ago. Doing it by hand, you also have more control over the “roughness” of the final product.

Never take an existing recipe as the last word, by the way: A spice blend should be your own personal creation. You can move stuff around, find substitutes, and add other things that you like or think would work. If it wasn’t a good idea, you just learned something. Cherish the mistakes; with time and experience you can become a spice Jedi and—who knows?—maybe make a fortune selling your own “secret” blend.


Read more: Read our reviewer’s thoughts about Wildcrafted Fermentation.


Wild Food Kimchi

Well, sorta wild … basically I use locally foraged mustard and wild radish leaves fermented with chili flakes/powder and garlic, but you also use some regular sugary ingredients like bok choy, napa cabbage, or regular cabbage. In this version I also add some sliced wild turnip (a variant of Brassica rapa) roots.

Because of seasonality and location, you can’t really make the same recipe twice, so this is again a concept recipe. If I were in Belgium, I could do something similar, but with different wild plants. You are looking at a ratio of around 30 percent wildcrafted ingredients and 70 percent regular stuff. Of course, you can experiment and decide to use many more wild edibles.

Ingredients for a 1-quart jar (946 ml)

  • 12 ounces (300 g) bok choy leaves
  • 4 ounces (110 g) regular cabbage, shredded
  • Salt
  • 4 ounces (110 g) mustard and radish leaves
  • 1 ounce (30 g) curly dock leaves
  • 2 ounces (60 g) wild turnip roots
  • 6 garlic cloves
  • 2–4 tablespoons (15–30 g) mild chili flakes
  • 1 teaspoon (3 g) spicy chili flakes
  • ⅓ cup (78 ml) water

Procedure

The total weight ended up at a bit more than 1 pound 11 ounces (765 g). I used 3½ teaspoons (20 g) of salt.

  1. I use a method similar to that for making sauerkraut. First, I place the bok choy and cabbage in a bowl, add the salt, and massage the ingredients tenderly for 10 minutes. I let the contents rest for 10 minutes then repeat twice until it is tender. I end up with a decent amount of brine.
  2. Meanwhile I cut all my wild greens leaves in thin strips (chiffonade cut), thinly slice the turnip roots, mince the garlic, and get all my other ingredients ready.
  3. Place everything into the bowl including the spices, then add the water and with your hands (wear gloves) massage the contents one more time for 3 to 4 minutes until “juicy.”
  4. Transfer the “kimchi” to a jar to ferment for 3 to 4 days at room temperature. Burp as necessary and stir the contents at least once a day. Then place your jar in the fridge to age and continue fermenting slowly. It will last for months.


Serve it as a condiment or mixed in a wild food salad. Heck, I’ve been known to blend it into a paste and use it as a kind of hot sauce.

This recipe is super good for the environment, too, since all the wild plants I used are non-native and invasive.

Fermented Cattail Shoot Hearts in Spicy Sauce

I had the most interesting experience collecting cattail shoots. I didn’t know rattlesnakes could swim in shallow water. I was minding my own business standing in the water when I saw a beautiful snake coming down the stream toward me. There was no time to do anything, so I just froze. The snake passed by dangerously close without paying much attention. Scared the hell out of me, but it’s all good! The snake and I shook hands (metaphorically speaking) and we’re friends now.

That morning I collected around 12 young, tender cattail shoots in a pristine stream. Once home, I soaked them for an hour or so in two or three changes of water. (The original stream was pretty pure, but I’m a nut about food safety.) If you do this, you may need a weight to keep the shoots under the water, as they tend to float.

Next, remove the stringy outside layers to get to the tender heart. Cut them to a bit less than the height of a pint jar and set aside.

I like to ferment sizable shoots so I can cut them later on to whatever size I want; I use them with some of my wild food salads and various other dishes.

This time I fermented them in a very spicy hot sauce. To make the sauce, mix the ingredients in your blender. You can make a thin or rough paste.

Wildcrafted Fermentation
Pascal Baudar

Ingredients for a pint jar (475 ml)

  • 8–10 garlic cloves, chopped
  • 2–4 habanero peppers (4 if you like the heat)
  • 1 medium red bell pepper, chopped
  • ½ cup (118 ml) water
  • ½ teaspoon (1.5 g) minced shallot or red onion
  • About 12 cattail shoots
  • 2 tablespoons (12 g) mild red pepper powder
  • 1 teaspoon (2.5 g) smoked jalapeño powder (chile morita or chipotle)
  • ½ teaspoon (1 g) ginger powder
  • ½ teaspoon (1 g) curry powder or Curry Blend

Salt Procedure

Process the garlic, habaneros, bell pepper, water, and shallot in a blender. Remove the mixture to a bowl and mix with the cattail shoots. Add the spices, massage gently for a few seconds, then transfer everything into a pint jar. I ended up with 10 ounces (283 g) and used 2¼ teaspoons (12.5 g) of salt, so the end result was superhot and salty, too. The heat of the sauce will go down a bit with fermentation, but it will still hurt. If you really don’t like a sauce that’s too hot, just use 1 habanero.

The cattail shoots will be fairly loose in the jar and not under the brine. Close the lid but not too tight; you want fermentation gases to escape. Around three times a day, close the lid tight, shake the jar gently, then unscrew the lid a bit. Another option is to close the jar, shake daily, and burp as necessary. When the initial fermentation is complete (around 10 days), place the jar in the fridge for further aging.

This type of ferment and recipe can also be used with mustard stems, wild asparagus, ramps, stems, and tender roots as well as regular ingredients like carrot strips, daikon slices, cauliflower, and sliced beets.


Categories
Animals Homesteading Uncategorized

A Vintage Wood-Burning Stove Helps Fuel The Modern Day Settler

“I have always had a love for animals and have always had an interest in the self-sufficient lifestyle,” says Kate St.Cyr, who lives in an antique 1790s homestead in New England that houses a flock of eye-catching Icelandic sheep.

The goings-on at St.Cyr’s homestead are documented on her website and social media outlets, where she dubs herself the Modern Day Settler.

We spoke to St. Cyr about the charms of Icelandic sheep and the day-to-day challenges of living in a vintage home. We also got the story behind her magnificent wood-burning cast iron stove.

Getting Into Homesteading


St. Cyr says that food was a “big motivator” in her decision to embrace the homesteading lifestyle.

“We raise all of our own animals for our own consumption or the by-products like dairy,” she explains. “Wanting the best quality food in terms of nutrition and the quality of life for the animals themselves was definitely the initial driving force behind it.”

Restoring a Neglected Home

After St.Cyr moved to New England from Pennsylvania, she told her husband that she insisted they live in an old house. But after securing an appropriate property, they had to set about correcting years of neglect.

“The land had completely grown up,” she recalls. “What used to be pastures were thick, overgrown unhealthy woods. We weren’t just able to move here and put up fence and plop down animals. We truly had to beat back the brush and do so much selective clearing to regain use of the property.

“We’ve had to work for every square foot of grass we have.”


Read more: You can extend your grazing time by planting seasonal pastures.


Adding Multi-Purpose Icelandic Sheep

Icelandic sheep play a key and varied role at St.Cyr’s homestead. She says that originally it was the breed’s “absolutely beautiful” look that caught her eye. But after carrying out some research, she discovered a host of benefits.

“They have fantastic natural instincts, and they are slightly aloof and on the wild side because they haven’t really been ‘domesticated’ and really bred any differently than they were 1,000 years ago,” she explains. “I saw the difference in the meat and what I could do with the wool, and I’ve gotten into tanning hides. They just seemed like a fantastic, multipurpose breed for us.”

The Homestead’s Heart

A 122-year-old wood-burning stove forms part of the heart of the Modern Day Settler homestead. It turns out, the stove was “sitting in the garage and covered in dust and rust and had boxes on top of it” when she and her husband went to view the property before buying it.

“I told the realtor that has to stay,” she recalls. “It took me a couple of years to save, but then I had it completely restored. And that’s how it looks today.”


Read more: Want to start heating with firewood? Here’s everything you need to know.


Mastering A Wood-Burning Stove

When it comes to cooking with a wood-burning stove, St.Cyr believes that it’s all about mastering the learning curve.

“It’s not like you turn up a dial and get instant temperature increase or decrease,” she says. “You really need to learn to read the coals and read the fires and learn how to properly open up a draft and close one damper. You get a feel for the stove and every stove is different.

“There’s definitely a learning curve and a relationship that you form with the stove.”

Follow Kate St.Cyr at Instagram.

Categories
Animals Poultry

Choose The Right Coop & Run For Your Chickens

Whether you’re buying a ready-made coop, building one or reusing an existing structure, these tips can help you make good choices.

By Design

Know what you need before you begin. Things to consider include:

  • the type and number of chickens you’ll be housing
  • your climate
  • what sort of predators you may have to deal with
  • aesthetics
  • the amount of money you have to spend

If you live in the city or suburbs, ask for housing specifics when you apply for a permit. Where you place your coop and run, how tall it can be and what sort of fencing you can use are spelled out in most ordinances. So are how many hens you can keep and what sort of feed storage may be required .

Keep in mind that aesthetics are typically important to city and suburban neighbors, even if they aren’t to you.

According to Oregon State University Extension’s bulletin, “Backyard Chicken Coop Design,” you should provide at least 3 square feet of indoor living space per bird if you also provide an outdoor run, and 8 to 10 square feet per bird if you don’t. More room is better because crowding contributes to unwanted behaviors such as guarding resources, bullying and cannibalism.

Proper ventilation is important no matter what sort of structure houses your chickens. Without it, ammonia fumes, carbon dioxide and moisture can accumulate, potentially damaging your birds’ lungs.

There are two types of proper ventilation. Passive allows air to flow through windows or through vents in the eves or roof. And active  means fans move air on hot and humid days.

Farm-supply outlets carry brackets designed to hold box fans safely in livestock and poultry structures, and these can be a wise investment in sultry, sizzling climates.

If possible, allow enough interior height for a person to easily clean the coop, gather eggs and do routine maintenance. It isn’t essential, but it makes chicken-keeping a lot more pleasant.


Read more: Follow these tips for chooing the right chicken coop model for your home.


Alternative Means

If building or buying a standard coop seems daunting, keep in mind that folks keep chickens in an array of alternate structures. These include:

  • revamped storage buildings and garages
  • large dog houses and wooden shipping boxes
  • children’s playhouses
  • Quonset huts designed for pasturing pigs
  • old cars and vans

A friend made a charming coop for their chickens out of an old two-hole outhouse. Just about anything goes!

Cleanup and egg gathering can be challenging. But as long as coops are weatherproof, well-vented and securely fenced to exclude predators, they can work.

The same can be said for chicken runs. A popular alternative run is a trampoline with fencing around its circumference. Fenced-in satellite dishes work well, and swing-set frames are easily fenced as chicken runs.

Hoop-house-type runs made of bent-over fenced-in cattle panels are easy to build. The coop itself can be a hoop house, too.

Building Materials

It needn’t cost a mint to build a conventional-looking coop. Think: pallet wood. Run an online search for pallet chicken coop and pallet chicken run. You’ll be surprised!

Or look for old umber doors, windows, vents and so on salvaged from demolition projects. Well-built, nicely painted coops made of salvaged materials can be beautiful indeed.

Place your coop and run to minimize weather extremes. Combs and wattles freeze quickly in high winds but survive nicely at temperatures well below freezing when air is calm. Build your coop and run where buildings, trees or shrubs protect it from prevailing winter winds, with the coop’s exterior door on the downwind side.

Consider insulating the coop, especially the roof, in cold weather climates, keeping in mind that proper ventilation is necessary even in the coldest climates. An inexpensive way to insulate your coop: Pile snow deeply along the sides, especially the windward side, as high as you can pile it without obstructing vents and windows.

Or, if there are air leaks anywhere in the coop, wrap it in plastic tarps, again avoiding ventilation features. In the summer, shade keeps a coop and run cooler.

In hot, dry climates, set up a mister in the run or even inside the coop, making sure it doesn’t saturate the coop floor. Insulation in the roof helps, too.

If you live in a temperate climate, consider a portable arrangement you can move season by season.

chickens coop run
Jess Duncan/Shutterstock

Design Features

You’ll need a chicken-size door between your coop and run. Choose one that can be securely closed at night. A good size for standard-size chickens is about 10 to 12 inches wide and 10 to 13 inches high. It should be placed at least 6 inches up off of coop floor level inside the coop so that bedding doesn’t block the doorway.

Chickens appreciate an outdoor ramp if their coop is elevated off the ground. For heavy, awkward breeds, it’s essential.

There are wonderful automatic models available that run on batteries or solar power and that have programmable timers that open, close and lock the door whenever you choose.

If you make your own, design it so it swings outward and has a strong lock to keep predators at bay. Create an inexpensive and cute door by installing a toilet seat over a hole cut in the coop, with the hinged cover at the top, where it can be fastened open or shut with a sturdy hook and eye closure.


Read more: Good doors make good chicken-keeping when it comes to the coop and run.


A Good Night’s Sleep

Every coop needs places for chickens to roost and sleep. You’ll need about 5 to 10 inches of roosting space. But chickens love to flop their wings as they fly up to roost, so more space is even better.

A simple solution: Lean old wooden ladders against one wall so chickens can roost on the rungs. A bonus: They’re easily moved at cleanup time. Choose ladders with flat rungs. Using roosts that are too slick, too round or too small in diameter contribute to foot problems.

If making roosts, consider using small logs 2 to 4 inches in diameter. Compared to roosts made of shower rods, wooden doweling or PVC pipe, chickens appreciate logs’ rougher, natural textures.

Nest boxes are another consideration. You’ll need one box for every three or four hens. Ideally, a box should be about 12-by-12-by-12 inches if frequented by standard-size hens, preferably with a rounded top so chickens don’t roost on it.

Consider stacking milk crates with their tops open to the side, lidded plastic totes with an entrance cut in one end, round or square 5-gallon buckets placed on their sides and covered cat litter boxes.

Or buy some. That works, too.

chickens coop run
Szike/Shutterstock

Build a Bath

Build your chickens a dust bath, in the coop, outdoors in the run or in both places. Dust bathing helps chickens deal with external parasites such as lice and mites while keeping their feathers and skin in prime condition.

Plus, they love dust bathing.

Left to their own devices, they’ll create their own dust-bathing areas outdoors but possibly not where you want them. Instead, give them a container low enough that they can easily climb in and out of it but tall enough to contain bathing ingredients while they bathe.

A small-size, plastic kiddie pool is ideal. But sandboxes, old tires, shallow plastic bins or totes, litter boxes and the like work well, too.

All you really need to add is sand (if you don’t have sandy soil, try builders’ sand and sandbox sand), topsoil or peat moss, but additives such as wood ash and herbs can be welcome additions. If using ash, choose clean ash resulting from burning nontreated wood but not from coal, trash or charcoal fires with unburned particles in them.

A few handfuls of food-grade diatomaceous earth added to the mix helps keep bad bugs at bay, as do bug-repelling dried herbs such as lavender, lemon balm, mint, rosemary or sage.

If you can, make the bath big enough to accommodate more than one hen. Dust bathing is a social activity so it’s best shared with a friend.

Chicken palace or funky, alternative housing? You decide. But buy or build a coop and run that keeps your chickens comfy and productive. Your happy hens will love you for it.

Categories
Animals Equipment Poultry

Build This DIY Weasel Box To Keep Your Hens Safe

Few sounds are as upsetting as the frantic midnight call for help from the coop. Rudely roused to action, you rush barelegged and bleary eyed to your girls’ defense only to find a ruthless attacker has left a trail of carnage and sent your blood pressure sky-high.

Shaking your fists, you swear a blood oath in revenge on the culprit: the sneaky weasel!

DIY weasel box chicken tractor
Cary Rideout

Detective Work

After daylight breaks and your outrage cools, it’s time to implement what I call the “double A plan,” or “Access, then Act.”

First, check your flock’s condition, remove all casualties and attend to the injured.

Next, clean up any blood or bird remains and dispose of this far from the coop area. Don’t just toss the remains into the weeds, or you’ll have bigger problems.

Now, start to sleuth for the entry point. Check all the walls—high and low—looking for gaps. Go over the roof. Check for loose boards, tin or large knotholes. You wouldn’t believe the tiny gaps a hungry hunter can squeeze into.

If using a chicken tractor, go over the whole works plus the wire as well.

Lastly, spend some time quietly sitting with your flock. Your birds have endured a shock and will need to know they’re safe to go about their normal routines. With the poultry area tidied up, it’s time to go on the offense.

Of course, many livestock owners have dealt with marauders before with the tool of choice being a wire live trap. This old favorite is dandy for many wild-critter issues, but is it right for this weasel situation?

Unless the trap has a super-fine wire mesh, the attacker just might escape, and the trigger mechanism sometimes won’t trip with such a light weight. A wire live trap can also be problematic for the curious feathered folks that might trip the trap or get stuck in the entrance.


Read more: Check out these 10 tips for protecting chickens against predator attacks.


Weasel Box

In this situation, I turn to a tool from my grandmothers’ time: the weasel box. Simply put, it’s an enclosure with a single entrance and a baited rattrap inside to dispatch the offender.

And yes, I wrote dispatch, not capture. Understand: This device is intended for a lethal strike resulting in a dead weasel.

If this is more then you are comfortable with, that’s OK. But know that a livestock killer seldom quits. A weasel in the wild snoops every hole encountered, especially if it smells like lunch. So this box is just the ticket.

Best of all, it’s easy to assemble and safe from unwanted targets. An ordinary rattrap is more than enough tool for quickly closing the career of coop raiders, and all farm-supply stores stock them.

DIY weasel box
Cary Rideout

Wood-Working Class

For this poultry protection project, we turn to the scrap-wood pile. Most lumber will work, from old wood siding to weathered boards. But avoid pressed board or plywood.

Try to use 1-inch thickness if possible, or nail a couple thin pieces together. Light, flimsy stuff won’t stand up to rough use.

A jigsaw, measuring tape, some nails and a hammer, plus a hole saw for the power drill, will just about do it tool-wise. Most rattraps are 7 inches long by 3 to 4 inches wide, so use this for a yardstick.

Place the trap on your lumber, then measure slightly twice as long as the trap. Cut it, and this is your base. Don’t use too wide of a board. Make it a finger’s width on each side of the trap.

Now, lay the trap on the cut board at one end and raise the wire strike bale. Measure this carefully to get the correct height as it must be tall enough to work freely.

Then cut two side boards corresponding to this height. Next, cut out the top or lid. It’s OK if this is a little wider and hangs over the entrance hole a bit. Put all four boards together and lightly nail them together.

Now set the rattrap, and place it inside. Be cautious of the rattrap’s power as it can really crack a finger. (Believe me!) Reach in with a slender stick and trip it to see if it fires freely. If not, adjust your measurements.

Cut out two end pieces to fit the four walls, and make it tight so no other entrance is available to the quarry. Then, find the center of one end and mark it. Cut an entrance hole roughly 1 1⁄2 inches to 2 inches wide about 2 inches up from the base. Round is best but square will work.

Nail the base, two sides and ends together—except for the top board. Lay the top board on, and drill a hole through to the end boards. Then, drive a nail in, but leave it loose enough so the top can hinge freely. At the opposite end, use a nail to keep it closed.

Once you’re done, modify the design any way you see fit. And because the tools are out, build a few more. I like to have four or five weasel boxes on hand because once another coop owner sees it, he or she will likely ask to “borrow” yours!

No weasel is going to turn its nose up at your box, so don’t be embarrassed at your woodworking skills. Just be sure the trap fires smooth and that it only has one entrance.


Read more: Here are 5 suggestions for baiting your predator traps.


Tasty Temptations on Location

Baiting up your weasel box requires special attention as the trap pan area is so small. Gently warm 4 tablespoons of lard, and stir in the same amount of fresh blood making sure it all mixes well. Use liver or fresh thawed blood drippings of any beef, pork or poultry.

Pour the bait into a container, and once it cools, smear the V-shaped bait holder with a good large gob. Wild predators crave fats, and the added scent of blood is irresistible.

A few poultry feathers under the trap add attraction as well.
Place the boxes right in the attack area, along the coop walls and inside the pen area, too. Seal up tight any suspicious entry points, and set a box beside it.

Most attackers will return soon. If they don’t, remove all traps except for the ones inside to fowl any attempts at repeat intrusions.

Some people might be tempted to place the trap right at the entrance, but this can be problematic as the target could jump onto the trap resulting in a poor dispatch. When using lethal methods, we must be certain of a killing strike, and by placing the trap well back with the bait facing the entrance, this is about perfect.

Once the set connects, remove the varmint and bury it well away from the poultry yard.

In the country, we live with wild neighbors, and most never cause any mischief. If they behave themselves, a resident weasel is actually not bad to have on the property. All those tiny troublesome rodents are regular victims, and any reduction in grain grabbers is welcome.

But for the rascals that go outlaw, the weasel box is there to keep the girls safe. Just watch those fingers!

This article originally appeared in the November/December 2020 issue of Chickens magazine.

Categories
Beginning Farmers Equipment Farm & Garden News

6 Christmas Gift Ideas For Farmers In 2020

Thanksgiving has come and gone… Black Friday (which seems to last for weeks these days!) is over too … and now we’re in the thick of Cyber Monday.

All this can only mean one thing. It’s time to start thinking about Christmas shopping.

With many consumers shifting online due to COVID-19, shoppers have been advised to get an early start due to the possibility of shipping delays as Christmas draws closer.

This goes double when you’re shopping for a farmer. Let’s face it—farmers tend to buy exactly what they need, when they need it, and finding a farming-related gift they don’t already own can require some thinking outside the box.

To aid your shopping, here are six creative ideas to get your started.

Portable Radio

No farm is complete without a portable radio for use in the barn or out in the fields. Many are inexpensive, so you don’t have to worry about having them out and about in dirt and dust.

A portable radio is the perfect gift for providing quick, hands-off entertainment for busy farmers. It can deliver music, local news and talk shows with just a twirl of the tuning dial.


Read more: Here are 5 reasons you need a portable radio on your farm.


Noise-Cancelling Earmuffs

For the farmer who’s always out and about with a tractor, chainsaw, wood chipper, etc., a high-quality pair of noise-cancelling earmuffs can be the perfect gift.

Does the farmer on your list already owns a pair of passive noise-cancelling earmuffs? You can always splurge for an active pair more suitable for blocking out the sustained noise of an engine. Purchase a pair with built-in headphones, and the recipient will also be able to listen to music and podcasts while they work.

Now that’s a win-win situation!

Metal Detector

A metal detector isn’t just for treasure hunting. It’s very useful for finding nails, screws, washers, etc. when they disappear into the grass. Believe me, it happens more often than you think!

But for farmers with a knack for history, the gift of a metal detector can also provide hours of enjoyment scouring the farm for long-forgotten artifacts like horseshoes, old coins and more.

Wireless Weather Station

Sometimes, knowing the weather in your general area isn’t precise enough. For the farmer who prefers more localized data, a wireless weather station allows you to check the temperature, humidity and barometric pressure from any location where you have a wireless sensor installed.

If you’re worried about cold spring temperatures blanketing your garden with a damaging frost, the localized precision offered by a wireless weather station can help you plan an appropriate course of action.


Read more: Learn more about wireless weather stations.


Wildlife Camera

From identifying garden-raiding critters to keeping an eye out for trespassers on remote property boundaries, a wildlife camera can serve many practical purposes on a farm.

But even in the absence of a specific duty, wildlife cameras are still valuable.

It’s always a pleasure to install a camera on a wooded trail and record photos and videos of every visitor that passes by—deer, coyotes, black bears, raccoons, you name it. For the farmer with a love for wildlife, you can’t go wrong with a wildlife camera.

A Subscription to Hobby Farms Magazine

It’s the gift that keeps on giving! For inspiration, innovative ideas, equipment reviews, tips and tricks, farming news, instructional projects and much more, a gift subscription to Hobby Farms magazine will bring joy to hobby farmers all year long.

Merry Christmas!

Categories
Food Recipes

Recipe: Cinnamon & Sugar Brioche Is A Rich, Tender Treat

Brioche gets its richness from a combination of butter and egg yolks added to the dough. The addition results in a tender loaf that is ideal for a special brunch or holiday breakfast.

A little extra sugar and some cinnamon make this brioche recipe a true treat.

Slice and serve it fresh after baking, and keep any leftovers to make excellent toast or even bread pudding. This bread needs to rise three times so plan ahead. You can also leave the dough overnight and bake it first thing in the morning.

Servings: 8

Ingredients

  • 390 grams (31⁄4 cups) all-purpose flour
  • 2 1/4 teaspoons active dry yeast
  • 6 ounces warm water (105 to 110 degrees F)
  • 1/4 cup sugar
  • 1 1/2 teaspoons fine sea salt
  • 1 teaspoon ground cinnamon
  • 1 stick (8 ounces) unsalted butter, softened
  • 3 large egg yolks

topping

  • 2 tablespoons unsalted butter, melted
  • 1 tablespoon sugar
  • 1/4 teaspoon ground cinnamon

Read more: Check out this recipe for a delicious spiced pumpkin coconut custard!


Preparation

To the bowl of an electric mixer fitted with a dough hook attachment, add the flour and yeast. Turn to low speed, and add the water. Continue to mix on low, and add the sugar, salt and cinnamon.

Scrape sides of the bowl as needed. Add the butter and then the egg yolks. Turn the mixer to medium. Allow the dough to knead in the mixer for 10 minutes. Pause occasionally to scrape the sides of the bowl. The dough will be sticky but will begin to come together as it kneads.

Use floured hands to gently remove the sticky dough from the mixer and transfer to a flat surface sprinkled with flour. Knead into a ball, and place in a deep bowl that has been coated with butter. Cover with clean dish bowl. Let rise in a draft-free spot for 2 hours.

It will nearly double in size.

Punch down the dough. Knead back into a ball, and put back in the bowl. Cover and place in the refrigerator for 2 more hours. Alternatively, at this point you can leave the bread in the refrigerator longer, 8 hours or overnight, and then bake it in the morning.

Grease a deep 6-inch cake pan with butter. Divide the chilled dough into 3 equal pieces, and roll each piece into a thick log about 6 inches long. Braid the three logs. Form into a circle and tuck under the ends. Place the loaf in the prepared pan.

Top the loaf by brushing with the melted butter, and sprinkle with the cinnamon and sugar.

Let rise for 1 more hour.

Preheat the oven to 350 degrees Fahrenheit. Bake for 45 to 50 minutes, until the center reaches 187 to 190 degrees. After the loaf bakes for 20 to 30 minutes, gently place a tent of aluminum foil over the loaf to prevent overbrowning.

All the cinnamon and sugar brioche to rest until cool enough to handle, at least 30 minutes. Remove from pan, slice and serve warm or allow to cool to room temperature.

This article originally appeared in the November/December 2020 issue of Chickens magazine.