UGA College of Ag and Environmental Sciences/Flickr
Cover crops are a powerful ally for the farmer. Whether you are growing cash crops, market gardening or orcharding, cover crops help fill the gaps between when your primary crop is growing, leafing and producing.
Cover crops have a variety of uses, across different seasons, depending on your specific goals. Let look at a few cover crop options and how they can be used to boost your farm’s bottom line—healthy soil!
Seasonal Solutions
First of all, it is important to know the power of different cover crops in different seasons. A cover crop that is seeded late in the year can help stabilize the soil over the winter and prevent soil erosion in the spring.
These late-sown cover crops also protect soil life by giving subterranean organisms a protecting blanket against the winter cold. Also, the organic matter provides them with food and habitat.
There are two types of cover crops for fall seeding and overwinter management of your garden plot or field.
Winter-kill Crops
First, we have cover crops that winter-kill, such as a mix of oats and peas. This traditional cover crop mix will do well in the cooling and shortening days of fall if planted after a summer crop.
Frost in late autumn and early winter kills these crops, creating a protective mat, rich in organic matter, over the soil surface.
When you follow a winter-kill cover crop with an early crop in spring, the dead cover crop material easily incorporates into the garden plot, improving the soil.
The second fall/winter cover crop is one that overwinters (meaning it survives the winter), such as winter rye. Winter rye will not only grow in very cold conditions, but it will also begin to regrow again in springtime.
Overwintering cover crops will quickly scavenge nutrients in early spring, ensuring they aren’t lost from the soil in overland water runoff from spring snow melt and rains.
These cover crops work best in crop rotation before a late-planted crop, such as tomatoes or squash. That way, you can take your time to kill back the cover crop before planting.
Here’s a tip for working with winter rye: Roll the rye down, reform your Permabed over the top so the rye rots in the bed’s core, then simply roll out a weed barrier over the whole plot and plant your Zucchini, tomatoes or other warm-loving transplants right through the weed barrier.
Summer Crops
There are also cover crops that are great for summer production, such as buckwheat.
I love to use buckwheat to smother out weeds. Because buckwheat has a broadleaf and isn’t seeded until frost is gone, I can prepare the soil properly for a solid summer seeding to smother summer broadleaf weeds.
Buckwheat also adds nutrients to the soil that it mines during its growth. I put buckwheat into my crop rotation before late planted crops, such as garlic. The garlic loves the extra weed suppression because it is a narrow leaf crop.
I’ll also use it with a late planting of winter spinach.
There are many clovers, and each has a different role to be had. And in addition to being a great cover crop, clover provides habitat for bees and other beneficial insects.
As a legume, clover helps fix nitrogen into the soil. It is also a robust grower and can add organic matter to the soil.
I like to seed dwarf white clover in my orchard paths, where I can grow and mow the paths for management. I also like to under sow crops like squash to a clover and rye mix, allowing the clover and rye to take over after harvesting.
Because clover is a biannual, it will re-establish the next year. Let it grow and it will fix nitrogen for the entire summer the following year.
Red clovers are very tall and robust, with a tap root that can help loosen soil. In the earlier years of building new garden soil, it can serve well as an initial land improvement crop.
Crimson clovers do well with less direct sunlight. Under sow crimson clover for fast transitions from garden crop to cover crop field. It can also help out with orchard management.
There are a wide variety of cover crops available, with various benefits to your soil’s needs and uses. So, go ahead—try some cover crops in your growing space to improve your soil health.
I was in my 30s before I knew Brussels sprouts grew on stalks and could be cooked in a manner that didn’t render them slimy balls of mush. While I’m still a newbie at growing, I’m delighted to have quickly picked up on cooking and eating them.
The crop has only been commercially grown in the U.S. for about 100 years, according to FoodPrint, and it’s taken some time for us to figure out what do with them.
I think their moment is arriving.
How to Grow Brussels Sprouts
Brussels sprouts are a crop to teach patience. You’re looking at up to 180 days between putting the seed in soil and your first harvest.
Their reward is a homegrown vegetable to grace winter tables or to harvest in early spring, before much else is green.
There is some debate as to whether Brussels sprouts originated in Brussels, Belgium, or in Rome. In both places, winters are cold but generally not freezing; summers are on the cooler side. This pretty well describes Brussels sprouts’ growing preferences.
Plants do well in cool weather—they’re hardy into the low 20s—and should be harvested in cool weather.
You might start them indoors in mid-summer to harvest in early spring. Or you might start them indoors in early spring to harvest around the fall and winter holidays.
Growing through the winter means less of the insect and disease issues that all brassicas face but brings the risk of too-cold weather damaging plants.
When plants are several inches tall, transplant into the garden in full sun, 18 inches apart. Keep them covered with a lightweight row cover to ward off pests until the plants are strong enough to handle them, or use the row cover to buffer cold temps.
Consistent watering makes the tightest, best-tasting tiny cabbage-like Brussels sprouts heads.
Mulch will help retain soil moisture, cut down on weed pressure and keep the soil cool, all of which Brussels sprouts like.
Brussels sprouts’ leaves resemble collard greens, and they taste alike, too. The leaves are bonus to the Brussels sprouts themselves.
Some growers say to remove the leaves as the plant grows so the plant’s energy will go into the heads instead, though I’ve found the heads are subject to sun scald without the leaves to provide some shade.
You might experiment to see what works in your garden.
The Brussels sprouts you see in the grocery store tend to be huge—2 inches in diameter or more—though it’s likely that not all of yours will not reach that size. Depending on your level of patience and pest pressure, you might start harvesting when they first form tight heads, or allow them to continue growing.
Brussels sprouts heads mature starting at the bottom of the stalk. If you’re growing them for home use, you can harvest as needed, a few sprouts at a time.
If you’re growing for a market, a whole stalk full of sprouts makes a statement on your farmers market table (and is less effort than harvesting sprout by sprout).
When the sprouts at the bottom look the right size for harvest, cut off the top inch of the stalk. This will prevent the plant from growing taller. Instead, the rest of the Brussels sprouts on the stalk will size up faster.
Just before eating, peel off the outer layer of leaves and cut the very bottom off of the stem. This is a little labor intensive but no more so than snapping beans.
Brussels sprouts are best eaten any way other than boiled to death, which is how my grandmother would make them. Why anyone thought that was the best these delightful vegetables could do is beyond me.
Roast them! Whole or halved, tossed with olive oil and garlic—and chestnuts, if you can find them—roasted Brussels sprouts are one of my favorite vegetable dishes. Chop roasted Brussels sprouts and toss them with chopped apples, quinoa, feta and lemon juice for a delicious to-go lunch.
Sauté them with bacon and onions. Add potatoes and a fried egg to for a breakfast dish!
Eat them raw by thinly slicing and making into a slaw or salad.
If the mushy sprouts experience of your youth made you turn up your nose at the very idea of this article, I urge you to give them another try! They’ll build your patience in the garden and your adventurousness in the kitchen.
Renee Woods presides over a first-generation, female-run farm that’s situated at nearly 10,000 feet in the foothills of the Rocky Mountains in Colorado.
Named Mountain Woods Farm, the venture was started with a small number of chickens and has grown to house a mix of animals including Nigerian Dwarf Goats, Kunekune Pigs and a range of poultry. The animals are kept safe by the in-house livestock guardian dogs—and Woods now also consults and helps train on-site canines for other farmers.
We spoke to Woods about farming at altitude and the importance of livestock guardian dogs. We also got the scoop on a certain canine called Mae.
“Born and raised on the east coast, I’ve always loved animals and knew I wanted to dedicate my life to caring for them in some capacity,” says Woods when asked how her interest in farming began.
After snagging a job out of college at a reproduction veterinary clinic—”that’s right, my job was to make puppies!”—she traveled a path that took in general mixed animal medicine at an AAHA accredited veterinary hospital.
“Goats and cattle were my absolute favorite patients,” she recalls. “And I knew one day I would have my own pasture full!”
When an opportunity to relocate to Colorado came up, Woods “made my dream of starting a farm a reality.”
The placement of Woods’s farm at nearly 10,000 feet high affects the way she runs it. “Variables such as climate, slope and our terrain are unique compared to most other farms,” she explains. “Our winters are long [and] we normally see our first snowfall in October and our last snowfall well into June.”
Woods adds that boot spikes “are a must” when carrying essential items to the pastures, and that the land helped determine the sort of animals she wanted to raise.
“I had to select for cold hardiness, animals that were comfortable with an impressive slope and that thrived on our rocky terrain,” she says.
Woods adds that some benefits of farming at altitude include the lack of external parasites, the feeling of privacy and the “never ending fresh mountain air.”
“My livestock guardian dogs are the single most important and single most valuable part of my farm,” says Woods. “Without them, I simply could not raise livestock here with our predator load.”
Mae is one of the key livestock guardian dogs on Mountain Woods Farm. Woods says that, if Mae could write, she’d add “prefers to work with cattle” on her resume.
In particular, Mae has formed a strong bond with a heifer named Daphne. But, Woods adds, Mae will “fiercely protect any of her charges with the same drive and enthusiasm.”
“I honestly cannot imagine doing anything else,” says Woods, reflecting on her choice to run a farm.
“I wake up each day before sunrise excited to tend to the animals and the farm, and I go to bed exhausted and fulfilled every single evening. While many people would be intimidated by the amount of work, it motivates me.”
Think of it as the mother of all seed swaps. The Seed Savers Exchange—now in its 45th year—started with just 29 participants long before the internet even existed. These days it’s a robust, online community of gardeners sharing open-pollinated and heirloom seeds.
In 2020, more than 400 people contributed over 20,000 varieties of veggies, fruits and flowers.
Exchange participation used to be reserved for Seed Savers Exchange members, but it’s now open to the public. “Anyone and everyone can create an account, and it’s free,” says Kathryn Gilbery, Exchange and Outreach Coordinator for Seed Savers Exchange.
“We do have some things on the Exchange that aren’t offered anywhere else,” Gilbery says. “We have a woman in North Dakota who’s offering a pink morning glory. It was originally a blue morning glory and then her plant threw off a sport.”
She continues, “That doesn’t mean that the seed was crossed or that a mistake was made…. Somewhere hiding in the genes of the seeds, there was an attribute for pink. So, she had one pink flower one year.
“She saved seeds from that flower and has since re-generated them for about seven growing seasons. She has now stabilized it and has a brand new pink morning glory that isn’t available in any commercial catalog.”
The Exchange is home to many interesting open-pollinated and heirloom varieties—including some you might never have heard of. “We’ve had tubers from skirret, which is an old vegetable that was popular in Roman times,” Gilbery notes. “It has a parsnip flavor.”
The seed-sharing program makes a voluminous, printed catalog available, and folks offering seeds on the Exchange receive a complimentary copy. The print catalog is also available for sale.
The greater genetic diversity that seed-sharing provides can provide an edge for gardeners facing climate change, too. Case in point? There are multiple listings in the Exchange for certain varieties like the Black Krim tomato, but some of these might be better suited for you than others.
“Seeds grown by home gardeners are more genetically unique and more adapted to their regions,” Gilbery explains. “So, you could find somebody who is offering Black Krim that has the most similar growing region to you. Maybe that is somebody in Colorado who is growing it at high elevation. Or you might want to get [Black Krim] from somebody who’s growing it in a really hot climate like Alabama or Texas.
“That’s another benefit of requesting seeds from folks on the Exchange.”
Want to offer your own open-pollinated or heirloom seeds on the Exchange? You can sign up for a free, online account and do so anytime. However, if you want your contributions to be included in the print catalog, the clock’s ticking.
“November 27th is the deadline for us to compile the ’20-’21 [catalog], so it can go to print and get mailed in January,” Gilbery says. “But folks can list their seeds at any time of the year, and they’ll be visible online on the Exchange website.”
Dos and Don’ts
The Exchange doesn’t accept varieties that are patented, genetically engineered, crossed (or potentially crossed) or unstable. Other no-gos include F1 hybrids and poisonous, noxious, controlled or illegal varieties.
You also need to have grown out the seeds yourself before offering them on the Exchange.
And, whether you’re offering an heirloom bean that’s been in your family for generations or something more recent, provide details. “Document the source history as much as you can,” Gilbery recommends. “Let them know, ‘I got this from my barber,’ or ‘I got this from my neighbor….’”
No one wants to run afoul of seed-selling laws. That’s why Exchange listing prices solely cover shipping and handling associated with fulfilling seed requests. “If you’re asking to be compensated for the seeds themselves, that’s when those regulations kick in and you would need a germination test, licensing and things like that,” Gilbery says.
Not sure you have enough seeds to contribute to the cause? You’ll need to be able to provide at least 25 seeds per request that you receive from the Exchange. Having enough seed to fill at least five requests is a good start if you plan to be included in the print catalog.
If you have less than that, you can opt to list exclusively in the Exchange’s online catalog. Once you run out of seeds, you can simply remove the listing.
A poultry-keeping friend and I were messaging the other day about my recent columns on chicken nutrition. Doreen complimented me on covering what she felt were essentials that many new flock keepers simply didn’t know.
I thanked her, happy that someone besides myself felt that the information I covered was helpful. Doreen’s next message, however, gave me pause.
“When are you going to cover supplements?”
Now, I was pretty sure that I had touched upon how chicken feeds were complete feeds, providing all the nutrients required for proper growth and development. I could swear I had discussed how adding too much of an essential nutrient such as a protein or a fat could adversely affect a bird, especially excess calcium at the juvenile stage.
I sat there, wondering how to politely inquire if Doreen had actually read my columns. Then her next message popped up on my phone.
“You know, brewer’s yeast and apple cider vinegar and all that kind of stuff.”
Okay, she didn’t say “kind of stuff.” But this is a family-friendly magazine! You get the idea, however.
Doreen was wondering why I hadn’t covered the folk-type supplements handed down from neighbor to neighbor, from one flock keeper to another, for generations. Having never used these myself, I did some research and reached out to poultry scientists.
Here’s a summary of the three most popular supplements and their benefit to your flock.
When my husband, Jae, and I first began raising poultry, I was surprised by the number of backyard flock keepers who added a splash of apple cider vinegar to their waterers. It seemed as though every other post in online poultry groups discussed using apple cider vinegar for chickens.
I distinctly recall my grandmother scoffing at her neighbors’ use of vinegar. She commented that these people apparently wanted to start flavoring their birds extra early.
I never did speak to my grandmother’s neighbors, but I have read many pro-vinegar posts in which chicken owners swear that apple cider vinegar does everything from boosting health and energy to killing bacteria and worms.
“Apple cider vinegar does absolutely nothing to benefit chickens,” states Dr. Richard Fulton, DVM, PhD, a Diplomate of the American College of Poultry Veterinarians with more than 30 years’ experience in poultry pathology and medicine.
“It has no medicinal benefit whatsoever. It won’t hurt chickens, but it won’t help them, either. At the most, it serves as a flavoring for their water.”
I guess my grandmother was right!
Brewer’s Yeast
Brewer’s yeast is a powder commonly used to ferment beer. Consisting of the one-cell fungus, Saccharomyces cerevisiae, brewer’s yeast is rich in vitamins B1, B2, B3, B5, B6, B7 and B9. It also contains such minerals as selenium, potassium, chromium, iron, zinc and magnesium.
It is often used as a protein supplement, antioxidant, and immunity enhancer … in humans.
Well-meaning poultry farmers add brewer’s yeast to their poultry feed, believing it will help their birds develop stronger bones and improve growth. However, a 2019 research study determined that there was no difference in growth rate between chicks that were fed yeast and those that were not.
Additionally, since brewer’s yeast is not regulated by the Food and Drug Administration, manufacturers are not required to note the levels of non-protein nitrogen, including purines and pyrimidines, in their yeast. A high level of non-protein nitrogen causes digestive disorders in chicks and juveniles and can cause bloating and intestinal distress in adult birds.
The elevated nitrogen content excreted by chickens can in turn cause high build-ups of ammonia in coop litter. This can lead to other health risks for a flock.
Furthermore, a high level of purines and pyrimidines causes such adverse effects as:
thickened joints
swifter aging
rapidly worn-out plumage
cloacitis (vent gleet)
Probiotic Powder
Many poultry owners add a sprinkle of probiotic powder to their chicken feed to help their birds maintain a healthy digestive system. The probiotics contained in these powders—usually Bifidobacterium longum, Bifidobacterium breve, Bifidobacterium infantis, Lactobacillus helveticus and Lactobacillus rhamnosus—are believed to help in digestion and keep the level of bad bacteria under control.
However, most adult chickens normally maintain the proper level of healthy flora in their gut, according to Dr. Zachary Williams, a poultry-nutrition scientist at Michigan State University. Increasing the level of beneficial flora can disrupt a chicken’s intestinal balance, leading to digestive issues, infection and intestinal distress.
Additionally, some flock keepers offer their birds probiotic powder to reduce the yeast in their digestive system … while also offering them brewer’s yeast, which increases the level of yeast in their intestines.
Baby chick electrolytes often contain probiotics. At this early stage of life, an infant’s intestinal tract and its flora are not yet mature. Introducing a gentle level of probiotics can be beneficial.
But, for the most part, “Probiotics are iffy,” noted Dr. Williams.
In addition to apple cider vinegar, brewer’s yeast and probiotic powder, I also asked Dr. Williams about other popular supplements, including sea kelp and garlic powder. Dr. Williams pointed out that the vast majority of commercial feeds are scientifically formulated to provide chickens the exact amount of nutrients needed for proper development, without the addition of supplements like these, probiotic powder, apple cider vinegar and brewer’s yeast.
“All of this is nonsense,” he stated.” If everyone would just feed a medicated feed, chickens would need nothing else.”
Dr Fulton concurred. “Use a medicated feed for the first six weeks of life, then gradually change over to all nonmedicated feed.”
Bantams are breeds of chickens that are smaller than standard-sized birds. Some only weigh a few pounds.
There are “true bantams,” which are breeds only available in the bantam size. Then there are bantam varieties of standard-sized breeds.
The great thing about bantams is their tiny footprint (so to speak). They eat less, take up less space and cost less to care for. Their housing is smaller, so it costs less, too!
And yet they are just as easy to care for as a flock of standard hens might be. Here are some of the best bantam breeds for beginners, families, seasoned standard-breed chicken-keepers and everyone in between.
Jeramie and Natasha Coffelt/Flickr
Barred Plymouth Rock Bantams
Like their standard-sized counterparts, Barred Plymouth Rock bantams pack a punch of personality and make one of the most perfect backyard chicken breeds you could add to your flock.
The Barred Rock bantam is friendly and personable. Hens are great layers of brown eggs, and both sexes are great meat birds.
For a bantam, the breed is rather cold-hardy, so it’s a wonderful addition to a backyard flock in a colder climate. It would prefer to range freely, but it’ll take what it can get and tolerate confinement if that’s what is available.
Like the Barred Rock bantam, Brahma bantams are another wonderful small version of a full-sized breed. Like their standard-sized doppelgangers, the Brahma bantam is gentle and quiet, cold-hardy and makes a great overall pet.
Brahma bantam hens lay well and, like other breeds in this list, make excellent setters and mothers. The Buff Brahma bantam sports a bright-golden body with black tail feathers and black-laced hackles—quite a stunning bird!
Cochin Bantams
The Cochin bantam is an ornamental breed, prized for its calm disposition—which makes it an excellent breed choice for a family flock—and its fluffy appearance. Also called Pekin bantams, this breed originates from China, and when allowed to hatch eggs, the hens make wonderful mothers.
Like other ornamental breeds, bantam Cochins are not rock-star layers. But they require very little space, and their range of color varieties (buff; partridge; golden laced; barred; mottled; and black, white and red frizzle, to name a few) means you’ll always have some beautiful birds in your flock.
Normanack/Flickr
Mille Fleur d’Uccle Bantam
If you’re looking for a showy, eye-catching bird, the Mille Fleur d’Uccle bantam may be the gal for you. The name translates from French meaning “thousand flowers,” and indeed, the Mille Fleur’s plumage appears to bloom before your eyes, with the most beautiful feathers appearing after the bird’s first molt.
The breed has heavily feathered legs and a bushy beard, to boot.
The Mille Fleur is considered a true bantam, meaning there is no standard-sized counterpart, as the Barred Rock and Brahmas both have. As an ornamental breed, don’t expect an abundance of its tiny eggs to grace your nest box. But if you have an eager up-and-coming 4-H’er in your family, this bird might be a wonderful addition to your flock come showtime.
Ah, the sweet and silly-looking Silkie. The “lap dog” of the chicken world, as it’s affectionately known, is a petite bird that makes the perfect pet chicken. Indeed, I’d wager a bet that the Silkie is the most popular smaller-sized chicken breed among backyard keepers.
Given its gentle temperament, it’s an ideal companion for children, and its demure size and no-fuss attitude lends well to micro-flocks in either urban or suburban areas, where confinement is necessary for safety or to meet city or HOA regulations.
The Silkie is not considered a true bantam. It’s simply bred to be on the smaller side. Its fluffy appearance is attributed to its unique feathers: The barbs and shafts of the feathers don’t “lock” to create a stiff feather like other chicken breeds and birds. Instead, the feathers resemble the down of a young chick—in appearance and to the touch.
The Silkie is considered an ornamental breed, for this reason. However, it can certainly pull its weight around even the smallest homestead. Silkie hens are fairly good layers of cream-colored eggs, often go broody, and when allowed to hatch eggs, the hens make excellent mothers.
For some of the challenges and special considerations in keeping Silkies, their tolerance to heat is one of the best reasons that they’re worth the effort. Silkies thrive in warm climates where heavier breeds might suffer.
Whether your bantam is a great layer of tiny eggs, a wonderful mother hen, or simply a beautiful showboat in your backyard, there is a miniature chicken breed for everyone.
This article originally appeared in the September/October 2020 issue of Chickens magazine.
With the societal upheaval the COVID-19 pandemic has inflicted on the world, Americans are learning that a self-sufficient lifestyle is more important now than ever before.
Just look at what we learned about the meat supply. When things go wrong and grocery stores are overrun with panic shoppers, finding any meat to purchase to augment the protein in your diet can become quite difficult. And if you find meat available at a local grocery store, being able to afford it is a completely different problem when prices have risen dramatically.
Of course, the fact that you are reading Hobby Farms is already proof that you understand the concept of self-sufficiency. And it’s likely that many readers raise their own vegetables, meat chickens, layer hens and maybe even sheep or goats in an attempt to avoid reliance on the easily toppled supply chain for the provisions they need to survive and thrive.
Many owners of small tracts of land have a healthy, tasty supply of protein right in their backyards if they can only figure out how to utilize it.
Of course, I’m talking about white-tailed deer. It’s the most popular big-game animal in the U.S. While many people hunt deer for sport, some do it solely for the healthy protein deer provide through their lean, tasty flesh.
But some people live in areas where a municipality or other government entity has outlawed shooting guns. In those types of areas, many are forced to try to keep deer from eating their gardens and flowers, while not able to utilize them as a food source.
The solution to the problem is the age-old crossbow.
Crossbows Then & Now
Crossbows are more sophisticated and seem more modern than compound bows used by deer hunters today. But they are, in fact, quite ancient.
According to historians, the crossbow was invented in China during the Zhou Dynasty around the year 700 B.C. and was used for hunting meat and waging war. Some historical records indicate that the crossbow was such an advanced weapon for the time that around 200 B.C. a law was passed preventing people from taking crossbows out of China for fear that enemies would be able to copy the weapon.
Simply put, a crossbow is a horizontally mounted bow on top of a riflelike stock. It has a mechanism for drawing the string to stretch the bow and holding the string in place.
A trigger, much like that in a modern firearm, releases the string and propels the arrow toward the intended target, sometimes at extremely fast speeds.
Modern crossbows are true marvels of technology. They are available in either recurve or compound—which uses pulleys to make it easier to load and shoot faster—configurations. Most come with a rope or some kind of internal mechanism to make them easy to cock even for smaller hunters without a lot of upper body strength.
Carbon arrows are made with very tight tolerances so are very consistent in their accuracy. And modern hunting points (broadheads) are extremely lethal. Many companies make broadheads exclusively for crossbow hunting.
When I got my first crossbow about seven years ago, I was worried that it might be difficult to shoot accurately while hunting. My 13-year-old daughter quickly proved me wrong. She shot her first three arrows in a group about 2 inches in diameter from a rest at 20 yards.
Trust me: If you can accurately shoot a scoped rifle, you can be perfectly lethal with a crossbow out to about 50 yards if you have a decent rest.
To get started, you’ll need at least a crossbow, some arrows—or bolts, as many call them—and some good hunting broadheads (tips).
Other handy items include:
a scope (for accuracy at longer distances)
a quiver for storing arrows
a sling for carrying your crossbow over your shoulder if you plan to hike long distances with it.
If you plan to hunt from the ground, some kind of shooting rest is recommended for improved accuracy. You can get a decent bow on a budget (see “On a Budget,” below) or shoot for the stars and drop $2,000 or more.
Rifles typically kill deer by shock due to the high-energy impact that crushes tissue and bone. But archery equipment is lethal by a different means. Broadhead-tipped arrows hit with much less force and rely on cutting vital organs and arteries to kill the animal by hemorrhage.
Consequently, a well-placed shot is extremely important for crossbow hunters. We’ll explore that a little more in a minute.
A Tree Stand
Most deer killed with archery equipment are taken from a tree stand set within easy shooting distance—about 30 yards—of a well-used deer trail or food source. Good tree stands can be bought on a budget, or you can spend several hundred dollars on one.
I like ladder stands best as they are easy to hang and easy to climb into and out of safely. If you are going to hunt from a tree stand, use a safety harness. Falls are the deadliest kinds of hunting accidents.
If you know deer are coming to feed on your vegetable garden or flowers, you already know how they approach and exit the area. Set up a tree stand on the trail leading in and out. Or make plans to hide on the ground nearby and ambush your deer while it is feeding.
Don’t flinch at the thought of shooting a doe, by the way. Most states allow harvest of antlerless deer and even encourage it.
My home state of Oklahoma further liberalizes antlerless deer harvest nearly every year. Wildlife managers still can’t get as many does harvested as they would like in order to ensure a healthy herd.
If you don’t know deers’ exact schedule from living on their home turf, remember that the species is most active at dawn and dusk. If you’re going to hunt them in the morning, set up well before sunrise and be ready. In the evening, be prepared to stay in your stand until dark.
Also, be cognizant of the wind direction, as deer will spook if they smell you. If the wind is blowing directly from your stand to where you expect the deer to be, wait for another day with a favorable wind.
Note that it’s important to study your local hunting regulations concerning licenses, tags and orange clothing requirements. All state laws are different. Be sure you know how to stay legal before going after your deer.
Harvest & Butchering
When the moment of truth arrives and a relaxed deer is within your range is no time to begin considering where to place your arrow. You should have bought your crossbow well before this point and sighted it in using your hunting points.
After that, you need several practice sessions at various ranges before you’re ready to go hunting.
Crossbow arrows are heavy and slow compared to a bullet. Gravity will affect them much more and much more quickly than bullets. Consequently, knowing whether a deer is 15 or 35 yards from you is crucial.
If you’re not great at estimating distances, a laser rangefinder is a great investment that will quickly pay off with venison in the freezer.
On Shooting
The best shot to take on most deer is a slightly quartering away or broadside shot. Those angles reveal the vital areas the best.
Try to place your arrow right behind the front leg about halfway up the body. A shot that hits there will almost certainly penetrate both lungs and quite possibly the top of the heart.
When hit there, the deer will typically run away very quickly. But it will bed down within about 100 yards and quickly bleed out.
Trailing
Deer don’t die immediately, so hunters who shoot one with a crossbow should wait before trailing them. For a deer hit right through the lung and heart area, wait at least 30 minutes before taking up the trail.
If a deer might have been hit more marginally and not right through the vitals, you should wait longer.
For best results in trailing a crossbow-hit deer, once your wait time is over, go to the last place you saw the deer before it disappeared over the hill or into the woods. Mark that spot and look for blood drops.
Once you find a blood trail, follow it. Occasionally mark your path with a small piece of toilet paper or marking tape. That way, if you lose the trail, you can look back along your markers to get the general direction of travel.
Mark Chesnut
Processing
Once you’ve recovered your deer, the work begins.
The first order of business is rid it of all of its internal organs. In a nutshell, you slice its belly from stem to stern and remove everything. This includes the heart, lungs, liver, intestines and anything else you find in there.
Do this as soon as possible to ensure the meat stays fresh and delicious.
While many people send their deer to a processor for butchering, it’s really not very hard. I’ve butchered dozens and dozens of deer over the past 30 years and have found the easiest way is taking them apart muscle by muscle.
It would take too long to describe the exact method here. But if you’re uncomfortable with your first time gutting and/or butchering and don’t have an experienced hunter to show you, an internet search will reveal more videos on these topics than you’ll ever have time to watch.
Cooking Tips
There are plenty of venison cooking videos available online, so I won’t get into a bunch of recipes here.
However, there’s one important thing to remember. Most deer have very little fat, so it’s much better to cook steaks and other cuts a little than a lot. Once you get them much more done than medium rare, you’ll start getting tougher steaks.
Don’t let that easily harvested, tasty protein in the form of a deer or two eat up your garden and avoid residing in your freezer. If shooting a firearm is prohibited or not advised in your area, try crossbow hunting.
Every time you sit down to a grilled backstrap dinner, you’ll wonder why you waited so long to get started.
Sidebar: On a Budget
Buying a crossbow for hunting your own venison doesn’t have to be an expensive endeavor.
Sure there are some high-end bows that can set you back well north of $2,000. Ravin is a great example, with its powerful, accurate R29X crossbow carrying an MSRP of $2,624.99. If you have that kind of money to spend, it’s worth every penny.
At the other end of the spectrum, it’s possible to get a very good crossbow for deer hunting and stay in the $500 range. TenPoint is a well-known company that produces outstanding crossbows. Its budget line—Wicked Ridge—exhibits the same quality at a reasonable price.
Do a little shopping around and you should be able to find the company’s Invader crossbow with scope and quiver for right around $500. That setup will almost certainly meet your needs for years to come.
Sidebar: Of Broadheads & Such
Choosing broadheads for hunting is a highly personal decision.
In a nutshell there are two types of broadheads: fixed and mechanical.
Fixed broadheads look like the typical kind of arrow points you would see in magazines and catalogs. They generally have three or four razor-sharp blades and a cutting area of about 1 1/2 inches in diameter. They typically fly nice and straight if they are tuned well to your crossbow.
Mechanicals fold down into a package about the size of a normal practice or field point. But when they hit a deer, they open up two or three cutting blades, often to a very large cutting diameter of 2 1/2 inches or more.
One warning: If you choose to use a mechanical broadhead, get a model designed for crossbow use. Some mechanicals made for compound bows might open up in flight when shot out of a crossbow. This results in an inaccurate shot.
This article appeared in Living Off the Grid, a 2020 specialty publication produced by the editors and writers of Hobby Farms magazine. Living Off the Grid includes stories on permaculture, growing plants without seeds and long-term produce storage. You can purchase this volume, Hobby Farms back issues as well as special editions such asBest of Hobby Farms and Urban Farm by following this link.
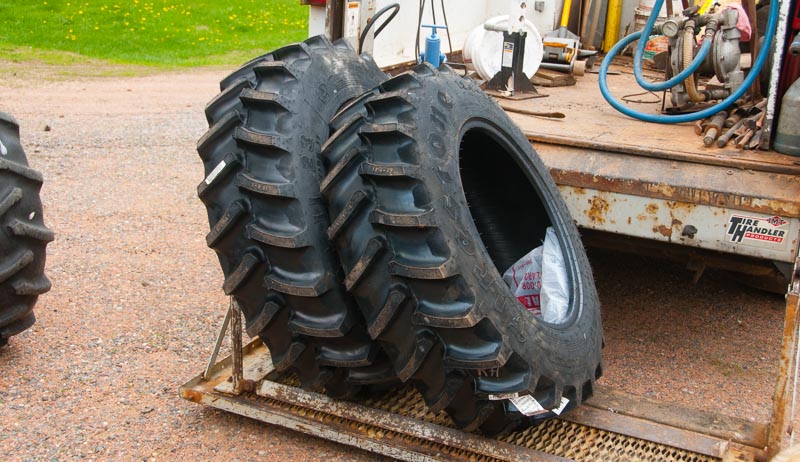
Tractor tires can be confusing when you’re shopping for them. Whether you’re choosing the best tires for a new tractor, or simply looking to replace worn-out tires on an older model, there are many factors to analyze.
Another factor to consider is the design of the tire tread, which can dramatically affect performance. Most tractor tires are sorted into three categories: R1, R3 and R4. Each is suitable for a different purpose.
Let’s cut through the letters and numbers to explore the advantages offered by each type of tire.
R1 tires, also known as agricultural or ag tires, are the standard workaholic tires used for farm tractors. Their treads feature large, widely-spaced lugs designed to generate maximum traction over challenging terrain (including mud and snow) without slipping or clogged.
R1 tires are narrower than other types of tires. This helps focus the weight of the tractor to increase traction. They’re primarily intended for off-road use.
A variation of the R1 tire, known as the R1W, is designed for use in especially wet and soggy conditions. The tread depth of an R1W generally runs about 20 percent deeper than on an R1 tire.
So although they perform similarly on dry ground, R1W tires offer better performance when the going gets tough.
R3: Turf Tire
R3 tires are known as turf tires for a reason. They’re wider than R1 or R2 tires, with shallower tread depths and closely-spaced lugs.
These factors combine to distribute the weight of the tractor across a wider surface area, creating a tire that’s very gentle on lawns. Whereas an R1 tire can be quite aggressive, gouging wet ground and leaving significant tracks behind, R3 tires are designed to minimize damage as much as possible.
For mowing grass and performing routine garden chores, R3 tires are the perfect choice. But they’re not as suitable for wet conditions (mud, snow, etc.). Their shallow treads can quickly clog and reduce traction, causing your tractor to spin its wheels.
R4 tires, also known as industrial tires, are wide and durable tires designed primarily for use on hard surfaces like pavement and gravel.
In terms of tread depth and lug spacing, they fall in between R1 and R3 tires. This blend of strengths results in a tread design that offers decent traction while shedding mud and snow.
True to their “jack of all trades” nature” nature, R4 tires aren’t quite as kind on grass as R3 tires. And they’re not quite as effective at traversing challenging terrain as R1 tires.
However, R4 tires shine when tasked with their intended purpose: carrying heavy loads over hard ground. They don’t wear down as quickly and feature tough sidewalls capable of supporting a lot of weight.
This makes R4 tires a great choice when performing work with a front-end loader or forklift attachment.
What About R2 Tires?
Although they don’t receive as much attention as R1, R3 and R4 tires, R2 tires do exist. With treads twice as deep as on R1 tires, R2 tires are geared for use in extremely wet conditions—standing water, for example, as found in rice paddies.
But the extreme design of R2 tires makes them less suitable for general use. Unless you’re farming in appropriately wet conditions, an R1 or R1W tire will provide better overall performance.
By exploring the various types of tires available before making a purchase, you’re more likely to achieve satisfactory performance from your tractor. Have fun shopping!
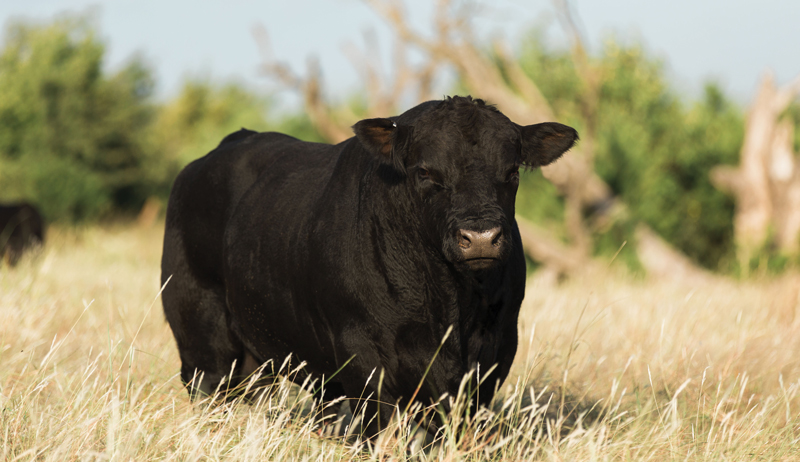
American Aberdeen cattle are best known for their easy-keeping, docile nature and moderate frame size. An ideal fit for ranches of any size or youth projects, Aberdeens do particularly well in grass-fed beef operations—whether for family beef or direct-to-market businesses.
Aberdeen beef tastes great, with an excellent texture and tenderness when properly finished on grass or grain.
The breed traces its roots back to 1929, when importers selected and brought championship Angus cattle to New South Wales, Australia. The breeders at the Trangie Research Centre identified the best-of-the-best genetics and selectively bred them to maintain high quality and moderate size.
The result was a pure line of black, polled (free of horns) and efficient cattle. The breed could thrive in harsh environments with minimal supplementation.
Cattle producers choose Aberdeen cattle foremost to reduce calving problems and improve livestock disposition. Also, the breed can increase:
beef quality
pounds and value of beef raised per acre
overall farm profitability
The average Aberdeen cow will weigh between 900 and 1,000 pounds when mature. They offer an exceptional rib eye per 100 pounds of body weight. This translates to high-yielding, high-quality and high-value carcasses.
By comparison, the average registered Angus cow weighs close to 1,500 pounds.
A 1,500-pound cow eats about 45 pounds of grass or hay every day. A 1,000-pound cow eats about 33 pounds of grass or hay each day. So whether you are trying to reduce your hay costs or increase the number of cattle you can have on your farm, Aberdeens have an advantage.
When evaluated on a per-acre unit of production, university studies from Texas to North Dakota have shown smaller cattle, primarily Aberdeens, have a 10 percent profit potential advantage over larger cattle.
At the ranch level, efficiency means the value of beef produced per acre, less operating costs—not the same as maximum individual weaning weights.
The American Aberdeen Association is headquartered in Parker, Colorado. But you can find the cattle across the U.S. and beyond.
Registered Aberdeen cattle can be full-bloods or percentage (crossbred). All full-bloods are certified through DNA analysis.
This article originally appeared in the March/April 2020 issue of Hobby Farms magazine.
In spite of the crazy up and down temperatures in October and early November this year, I’ve started preparing my livestock (and myself) for a plunge in temperatures as winter sets in.
I’ve learned through trial and error that it’s smart to clean out the barns and test stock tank heaters BEFORE you need them! There’s nothing worse than going out the first morning after you plug your tank heater in to find out that it’s frozen in 3 inches of ice.
In many ways, winter weather is not as hard on sheep as hot, humid summer days. Yet, many people worry about their livestock more as the weather cools down.
Granted, there are things you can and should do to ensure that your sheep stay healthy and happy over the winter. In my mind, the big three are shelter, water and food.
Shelter
Dry & Draft-Free
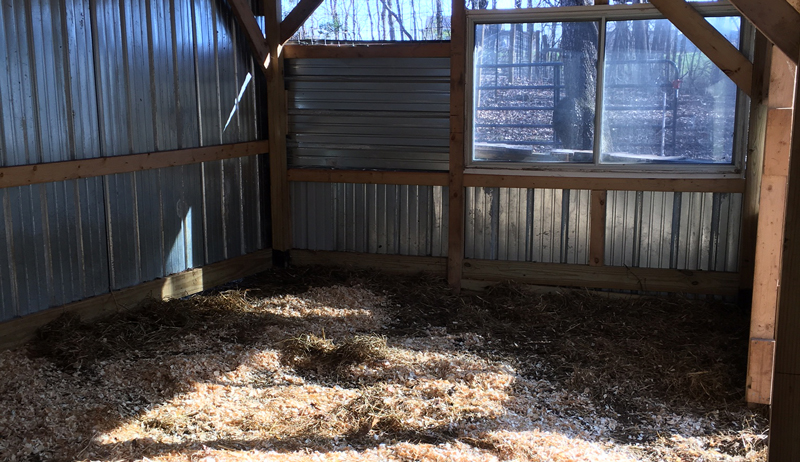
Sheep don’t need fancy or elaborate shelter in the winter. What they do need is a place to get out of the wind or rain or snow. Face your structure to the south if you can and block out the northerly winds.
The shelter can be a simple, three-sided shed or it can be a fully enclosed building. You can use an old chicken coop (we did when we only had five lambs) or any type of structure that gives the sheep some protection from the elements.
My husband built an adequate, dry, ventilated shed for our flock purely out of found materials, including some old windows that a neighbor was giving away.
Jana Wilson
If you do use a fully enclosed building, it’s important to make sure there is adequate ventilation so that humidity doesn’t build up when the sheep are inside. Moisture and ammonia can cause respiratory problems in sheep—think pneumonia and bronchitis.
And don’t even think about heating the building! Sheep—and even newborn lambs—are very cold tolerant s0 long as they have a dry, draft-free place to go.
Bedding is another issue. You need to make sure it offers some insulation if the sheep want it. You can use straw, hay, pine shavings, wood chips, peanut hulls or corn stalks.
One thing I don’t recommend for wool sheep is sawdust. The fine particles can get stuck in the wool and make a mess of a fleece if you shear for spinning.
My sheep are wool sheep, but we don’t shear for spinning, so I use a mixture of low-quality hay (cheaper than straw around here) and pine shavings. The pine shavings just smell better. Lambs do come running out in the morning with a few shavings on their wool, but they fall off before too long.
To me, one thing is clear: Always have a source of clean, unfrozen drinking water for your sheep. If the temperatures in your area go down to well below freezing, you may need to use a stock tank heater or some other way of keeping your water from turning to solid ice.
I’ve read that keeping milk jugs filled with salted water floating in the tank can keep it from freezing but have never tried that.
However, this year we have a pasture that is too far from an electrical source, so we will be trying a number of ways to keep water in our stock tank without electricity. We’re going to try building an insulated solar cover for our stock tank.
Last month I watched a webinar on managing winter housing for sheep and goats held by the Purdue University Extension. One fact I found interesting was that you don’t need to add extra feed or supplements until the temperature goes below what they called the “critical temperature” of 25 degrees F.
After that, they recommend adding a 1/4 pound of feed per sheep for every 10 degrees below 25.
Of course, you should always offer good quality hay and sheep minerals as well.
I’m feeling pretty good about winter plans for managing my flock. My one question will be how my water situation will work in a pasture far from my house—and electricity. I’ll let you know how my passive solar water tank project goes.
Given the uncertainty of the weather here in the Midwest, it will be an adventure of some kind!