Our landscape is a checkerboard of green space. From every corner of this country, and every corner of every country, there is a call to action. We need to make use of this space!
When we take the time to look around, we notice that there is actually open space everywhere. This space is uniform, organized and accessible for anyone, anywhere to do something more and to grow a bit of an edible Eden.
Moreover, these spaces—whether edges of yards, back acres or strips along public walkways—are woefully underutilized.
Maybe this unused land is in lawn. Perhaps it’s just dirt or broken pavement. You could also find it in a scattering of ornamentals or a single-crop, monoculture field.
In all cases, there is more to be had from these spots of land. Each holds potential to yield more in terms of food, of course. But these tracts of land could also provide a number of ecosystem services, like air and water purification, climate-change mitigation and community beautification.
With ecosystem design comes heightened yields provided by biodiverse management of land. But, alongside this critical benefit, it can also usher in the environmental, social and economic services ecosystems foster.
These services have always been critical to human success and prosperity. Increasingly, however, you’d struggle to locate them on land in and around where we live. And this land is where we need it most!
I find it fascinating that all the benefits of a large-landscape ecological system can exist within a 25-square-foot micro landscape. And many micro landscapes tended by many stewards make massive benefits for society and communities.
Food security, environmental sustainability, economic resilience and the overall health and well-being of people are all issues at the forefront of our national and global debates these days. So, it seems clear to me that the solution must include an ecosystem design approach to land management—especially when we have so much under-utilized land to transition to these immense benefits.
And that’s why I wrote my most recent book, The Edible Ecosystem Solution. I not only wanted to explore our untapped potential to change local land use, but provide a framework for change and actionable solutions that any of us can undertake in our own backyards and communities.
Below you’ll find information about the book, as well as links to learn more.
Grow On,
Zach
The Edible Ecosystem Solution
The Edible Ecosystem Solution, written by the author of this series of articles for Hobby Farm magazine, is hot off the press. The book offers step-by-step designs for transforming micro landscapes to to high-yielding gardens, edible landscape and ecosystems. The book also outlines a clear framework for how we can leverage our bits of land to create lasting change.
With over 300 designs, illustrations and photos by Zach Loeks, this book is an easy and enjoyable read. It was designed to serve as a practical, inspirational and essential tool in the kit of gardeners, designers and change-makers in our modern world.
“Resilience in an increasingly uncertain future demands that most of our food must be grown locally. Zach Loeks provides an approach that will be vital in a warming world.” —David Suzuki
“This richly illustrated book brings the permaculture vision of a recreated Garden of Eden to new audiences ready to dive into their own edible ecosystems.” —David Holmgren, Co-originator of permaculture
“Did you make any more of that tulsi hibiscus tea this year? My friend is crazy about it.”
My phone buzzed with that text message this morning. The sad answer is no, because my roselle hibiscus seed was old and didn’t germinate this year. (Tulsi, on the other hand, is not in short supply.)
This question reminded me of how I am also crazy about the tart, cranberry-like flavor of roselle hibiscus in tea and jelly and how much I enjoyed having the giant, beautiful plants in the garden last year. I’m now in full seed-catalog-exploring mode, just two weeks after our first frost of the season.
In the mallow family, roselle hibiscus (Hibiscus sabdariffa) is one of 300 hibiscus varieties and has a similar growth habit to okra. You can enjoy the blooms in late summer into fall and the vibrant-green leaves with burgundy stems throughout the growing season.
In Zone 8 and north, start your seeds indoors a month or more before the first frost. Start with fresh seed—learn from my mistake—for the best germination.
Plant the roselle hibiscus plants in full sunlight as soon as possible after the soil warms. You want to give your plants the longest time to produce calyces and seeds.
Give the plants more room than you think necessary—more than the seed packet says, even. These shrubs can grow 6 to 9 feet tall and 5 or 6 feet around! Next year, I will plant a row on the edge of the garden, 4 feet apart. According to Southern Exposure Seed Exchange, the farther your plants are spaced, the better the calyx and seed yield.
Hibiscus is native to Africa and is very hardy. It loves hot and humid weather and does OK in drought as well as with too much rain, though it prefers well-drained, moist soils, as most plants do.
Lisa Munniksma
How to Harvest Hibiscus
The fleshy, red calyx—the whorl of tender, petal-like sepals that encloses the seed—and the seed are the parts of the plant that you’re likely after. Harvest after the flower falls away, when the calyx is tender and filled out with a seed.
Use snips to cut off the calyx at the stem, or snap it off by hand if it’s tender enough. The lowest on the plant ripen first, like tomatoes, and you can harvest a little at a time.
Depending on your growing season, you could end up with 5 to 12 pounds of calyces and seeds per plant.
If you’re harvesting leaves, these are cut and come again and will regrow about once a month.
Harvest all parts of the plant before temps dip into the 30s. Cold weather can damage the calyces, and frost will kill the plant. Hibiscus can be grown as a perennial in Zone 9 and south.
Hibiscus is not so much a crop that you eat fresh, though I did read about—yet have no experience with—eating the young leaves as you would garden sorrel and more mature leaves in stir fries and stews.
One of the alternative names for roselle hibiscus is Jamaica sorrel—and if you’ve ever been to an authentic Mexican restaurant in America, you’ve probably seen jamaica iced tea. It’s refreshing, and it will make you want to grow this plant.
As far as small-scale farmers go, hibiscus is a value-added-products dream. My favorite use is to dry the calyces for tea. You might use them to flavor wine or kombucha. Bring out the sugar for making jelly—the calyces have a lot of natural pectin—or syrups.
Hibiscus calyces are good for you, with antioxidants, riboflavin, ascorbic acid, niacin, carotene, calcium and iron, according to the Southern University Agricultural Research and Extension Center. They may also have medicinal value.
I also know of folks in other countries roasting the seeds, grinding them, and using them as a high-protein coffee substitute.
I am grateful to my friend for sharing the herbs that I grew and for reminding me of the roselle hibiscus crop that I can look forward to next year. These cheery things give me a goal as I sit with the seed catalogs in the gray days of fall and winter.
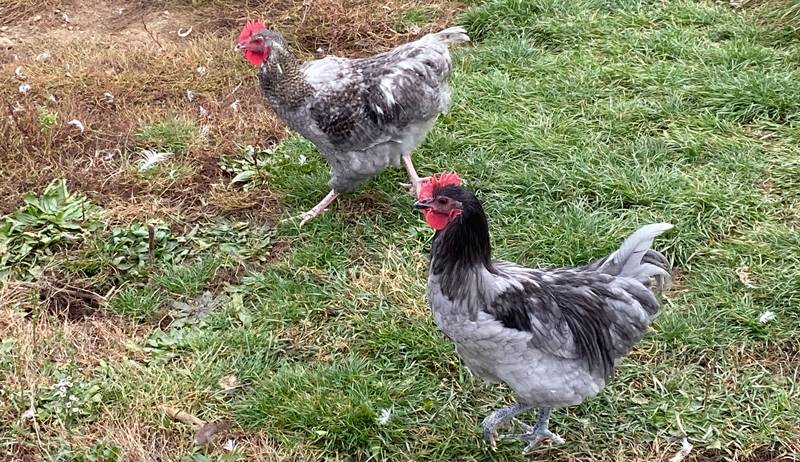
Courtney Kelly cares for a flock of 27 chickens at her homestead in western North Carolina. Naming the venture Courtney’s Chicken Charms, she says that she’s always felt the calling to become “a homesteader in my heart from the beginning of adulthood.”
Chickens have become a central part of Kelly’s hobby farm, which also strives to stay organic and sustainable. She repurposes her birds’ manure into the garden beds, also layering in fallen leaves to build soil. She uses well water on the land. And a cast iron stove inside the house keeps the family toasty during the winter months.
“All of these are a part of being a homestead and growing a homestead,” she says.
We spoke to Kelly about her love for chickens. She also told us how the birds interact with the four resident felines and a Great Pyrenees dog. We also got into the suspicion that her birds are hiding a secret nest out in the woods.
Kelly raises her chickens organically. And she originally fell in love with the animals while dwelling on the island of Kauai for around a decade.
“A long time of that was backpacking around the island, living on an organic farm and hearing the echoes of roosters crowing all through the valleys at night,” she recalls.”That sound is beautiful, peaceful. I love it so much.”
After settling in North Carolina, Kelly says that her new chicken goals include having “generations deep of them on my own farm.” She also wants to chase “the egg rainbow for more and more colors.”
Speaking about the rainbow eggs her chickens produce, Kelly says that she’s discovered that “out of all the chicken egg colors you will ever see, all the eggs’ genuine shell colors will either be a white or blue egg. The other colors are what is on top of that primary shell color being white or blue!”
Kelly finds eggs laid outside of the coop on occasion, which always makes her curious. “I never know if [my chickens] are hiding a secret nest around in the woods!” she wonders. “I generally talk myself up in my mind that they are laying out there but I just cannot seem to figure out where.”
Alongside the chickens, Courtney’s Chicken Charms also hosts four kitties and a Great Pyrenees dog. Taking on a role as a livestock guardian, the canine “runs the perimeter and barks at everything” in a bid to “keep my flock safe during the day and most of the night.”
When it comes to the finicky felines? Well, Kelly says that in general they “don’t bother with the chickens.”
(One of the younger cats does sometimes try to play with the chickens, though.)
“The surprising reward of raising chickens is how much you can fall in love with them,” says Kelly. “After leaving Kauai, I didn’t realize how much I missed having them around. They are smart and loving animals that show their love back to you. It is so very rewarding having them.”
Despite the shorter days and colder weather coming on, I’ve still had loads of lovely green tomatoes on my vines. I didn’t want them to go to waste, so I’ve been picking them and bringing them inside to ripen.
I’ve heard of other gardeners pulling their vines completely, cleaning the dirt off the roots, and then hanging them upside-down to ripen any remaining any late-season tomatoes. But I don’t have the space—or the patience—for that particular practice.
Instead, I decided to pick every last green tomato I had, pickle them, and can them. I figure jars of pickled green tomatoes might make an unusual addition to gift baskets for the holidays, and I can also keep a few jars for myself.
If you, likewise, are staring at a sizable pile of green tomatoes, you just might want to consider pickling yours, too.
I happened to have some quick process kosher dill pickle mix on hand, and, although these are generally intended for use with run-of-the-mill cucumbers, it works just as well with green tomatoes. My 6 1/2-ounce pouch of dill pickle mix would make seven quarts of pickles—provided I had nine to 11 pounds of produce.
Rather not rely on a pre-packaged pickling mix? My ancient copy of the Ball Blue Book Guide to Home Canning, Freezing and Dehydration includes the following recipe for “Dilled Green Tomatoes” which calls for:
5 pounds green tomatoes
1/2 cup pickling salt
3 1/2 cups white distilled vinegar
3 1/2 cups water
six or seven garlic cloves
1/4 cup dill seeds or six or seven sprigs of fresh fill
six or seven bay leaves
How-to
Whether you use a prepackaged mix or the classic Ball recipe, the steps you’ll take next are largely the same. As you sterilize your canning jars and lids, rinse and slice your tomatoes and set aside. (Now’s also the time to peel garlic cloves, set aside bay leaves, and rinse dill sprigs or measure out your dill seed.)
In a non-aluminum pan, add pickling salt, vinegar and water and bring to a low boil, stirring constantly until the salt has dissolved into the liquid. Next, lift out the hot, sterilized canning jars, empty out any water inside, then loosely pack with your sliced tomatoes. Leave 1/2 inch of headspace at the top. If you’ve chosen to include garlic and other extras, add one clove, one bay leaf and a spring of dill (or 2 teaspoons of dill seeds) to each jar.
Now ladle just enough of the hot, pickling liquid into each canning jar to cover the tomatoes. Again, be sure to leave 1/2 inch of headspace free at the top.
Once you’ve packed your jars, carefully wipe the lips of each with a clean, dry cloth. (This removes any debris that might otherwise get in the way of a tight seal between the top of the jar and the metal canning lid.) Seat a new, sterilized canning lid on top of each jar and then secure with a canning ring.
With your jar lifter, place jars into a boiling canning bath. If you live at an altitude of less than 1,000 feet, you only need to boil your packed jars from 10 to 15 minutes—10 minutes for pint-sized jars and 15 minutes for packed quarts. For altitudes of 1,000 feet or more, add one minute of additional processing time per 1,000 feet of altitude.
Once time’s up, remove jars with your jar lifter and set aside to cool. In time, you might hear the characteristic “thunk” sound that canning lids sometimes make as they completely seal. Upon inspection, the center of a properly sealed jar should be concave.
If it’s still popped up or if you can press on the lid’s center and feel it springing beneath your fingertip, then that jar is not properly sealed. Refrigerate any improperly sealed jars, and eat these pickled green tomatoes within the next week or so.
As for jars that are properly sealed, store them out of direct sunlight at temperatures between 50 and 70 degrees F and plan to use them up within the year.
I had to learn the hard way that allowing our chickens to free-range in the yard—as some experts advise—leads to my having to free-range the yard as well: removing poop from the patio, replacing mulch and replanting uprooted flowers.
Oh, you too?
So perhaps the term “free-range” overpromises just a bit. It’s not really free if you have to give up your free time to fix things. Maybe a term such as “home-range” would be more accurate—meaning that we give the chickens special places where they can feel like they’re home-on-the-range and we feel like we’re home free.
For my tiny homestead on a 1/4-acre in downtown Durham, North Carolina, my wife and I enclosed a small area under a cluster of shrubs to create a home-range we call the Corral or the Forest Grove for our half-dozen hens.
But that wouldn’t be adequate for chicken-keepers with more land and more chickens. Fortunately, my colleagues—Shawn Jadrnicek and his wife, Stephanie—have confronted the same issues and come up with the kind of low-cost, low-maintenance, high-success system I can appreciate.
Jadrnicek has a few acres in the country and decided he didn’t want to spend time mowing a lawn. But he did want chickens. And chickens want to eat. So why not kill two birds with one stone? Or to put it in less violent terms: Why not feed two or more birds with one great idea?
Instead of lawn, Jadrnicek plants poultry pastures that work on the same principle as rotational grazing for cattle. This provides about 30 percent of his chickens’ food supply. And it spares him the painful roar—and expense—of micromanaging a lawn mower.
He figures he only spends eight hours per year (per year!) mowing small areas the chickens didn’t trim thoroughly. As he wrote in his book, “… instead of spending time and money mowing a polluting lawn, our foraging chickens convert our lawn into food and money.”
And just like a pasture—or a lawn—he maintains it with proper liming for pH. The chickens meet most fertility needs. Additional species of plants can be sown either to enhance the chickens’ diet or to attract pollinators while the chickens are devouring other pastures.
In warm, wet, sunny South Carolina, Jadrnicek figures that each hen needs about 43 square feet of poultry pasture to sustain it for six to 12 days. That’s about the size of the footprint of one queen-size bed per chicken.
Another way to think about that is that the footprint of a mid-size pickup would be enough for two chickens.
So if, like Shawn, you need a setup for 40 chickens, picture each pasture as big enough for a pajama party with 40 beds or a salvage yard jammed with 20 pickups. If you’re not intimidated by math, each pasture for 40 birds for six to 12 days would need to cover about 1,700 square feet—about the size of a small three-bedroom house.
Shawn Jadrnicek
Timeouts?
The limits of six to 12 days depend on rainfall and season.
A poultry pasture might only have enough to eat for six days during winter or during a summer drought, or 12 days during the optimal weather of the spring and fall.
Depending on conditions, each pasture will need two or three months to recover—less when conditions are optimal. So identifying at least seven or eight discrete pasture areas would allow enough recovery time to get through a year without damaging your land.
Jadrnicek’s seven pastures for his 40 chickens covers in total a little over 1/4 acre and helps their 40 hens deliver about 150 eggs a week for home and market.
When first released to a pasture, they spend time scavenging for high-protein bugs (if it’s not winter) and any fallen fruit. Then they clip off any nutritious seed heads. Then they trim down leaves of clover, grasses and other plants.
What happens if you leave hens on pasture longer than the six to 12 days? If you haven’t moved them by then, their scratching will uproot small plants and leave bare earth exposed to drying from the sun and erosion from the rain, one of the cardinal sins of gardening.
In the worst-case scenario, you can still take advantage of the bare soil to plant annuals such as millet, buckwheat or rye. But you’ll save time and money if you take chickens off that pasture while the perennial plants still have enough leaves to recover in a couple months.
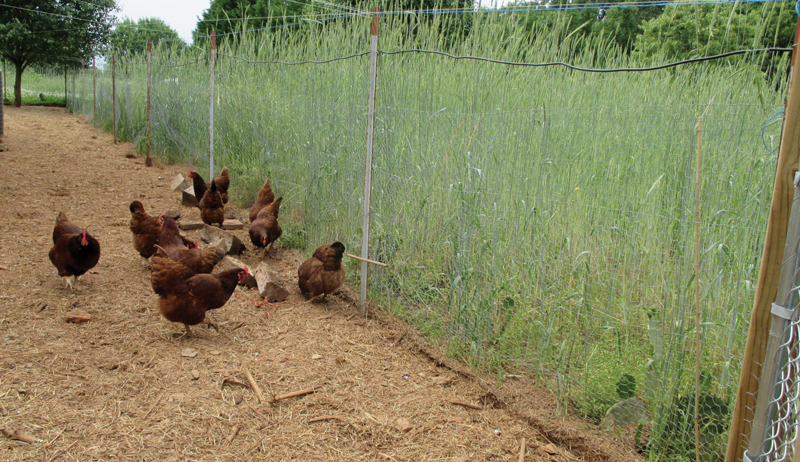
From overhead, Jadrnicek’s seven poultry pastures look like petals on a flower. At the center of the flower is the coop and pen. Shawn calls the pen an alley because from there chickens can be allowed access to each pasture.
Because the chickens rotate from pasture A to pasture B and then from B to C—until they get to pasture G and restart the cycle—Jadrnicek only needs enough fencing to enclose one pasture at a time:
A pasture covering about 1,700 square feet like his would need an electric fence at least 150 feet long to enclose 40 chickens.
A 100-foot long fence would enclose about 800 square feet. That’s enough for about 20 chickens.
A 50-foot length of electric fence would enclose about 200 square feet. That’s enough for about five chickens to forage for that six- to 12-day period. If you want to enclose bigger fields, you can string the fence sections together.
The Electric Slide
The fencing that makes this system work is called portable electric poultry netting. Installed and maintained correctly it has enough juice to keep the chickens inside and to keep coyotes, neighborhood dogs and other predators outside.
It only carries enough juice to scare the chickens, not to hurt them. But one little buzz provides a lifetime memory for both chickens and predators. Don’t use it with chicks. They are small enough to slip through the openings in the netting.
Depending on the brand and length, a roll with needed accessories will set you back something in the low to middle three-figures and should survive about 10 years of outdoor use. But it seems well worth the cost given that you could be cutting your chicken feed bill by up to a third as well as saving money on mowing costs.
And pollinators would certainly benefit from the flowering pasture plants.
But it isn’t the calendar that tells you when to move the chickens. You want to do it before the pasture the chickens are on looks like a battlefield in an interspecies war zone.
When that time comes and the chickens are in their coop—and you’ve turned the power off!—you only need to pick up one end of the fencing (on the east side of the pasture say) and walk it in a big loop around the fencing on the west side that stays in place.
Place the end that you’re carrying further west to enclose fresh pasture that should be 4 to 8 inches tall. So only a little more than half of the fence gets moved each time. That should take about 10 minutes or less.
To keep hawks at bay, Jadrnicek keeps the width of each pasture to 15 feet. When a small, nimble Cooper’s hawk took interest, he added a goose to the flock and that ended that.
Shawn Jadrnicek
Alley/Chunnel/Pasture
That sounds easy enough as far as that goes. But how do the chickens get from the alley to each pasture? Because the chickens spend almost all their time inside the predator-proof electric fencing, Jadrnicek doesn’t need a heavy-duty fence for the alley. He uses the alley just as a distribution tool.
So he built it with chicken wire hanging on posts and pinned to the ground.
To channel the chickens into a given pasture, he lifts the chicken wire enough to insert a bottomless 5-gallon bucket on its side, on the ground and under the fence to act as a chicken-sized tunnel: a chunnel! He pins the chicken wire fencing down around both sides of the bucket to keep the chickens from straying.
In anticipation of fresh bugs to chase, all the chickens pour through the chunnel like water in a fire hose, spraying themselves all over the pasture. When sleepy time calls, they stroll back again in the evening through the chunnel into the alley and then into their coop.
Before moving the electric fence to enclose fresh pasture, Jadrnicek removes the bucket. Then he puts it in a new spot after the fencing has been put in place for the next pasture.
Anti-Predator Power
Misconceptions abound when it comes to installing portable electric poultry netting. Frequently, this means that the netting doesn’t hold enough of a charge to persuade predators to salivate elsewhere.
Besides following the directions, Jadrnicek offers a few other installation tips:
Don’t mix metals, or they will corrode. Stick to the galvanized wire and ground rods. No copper.
Set three ground rods 6 feet deep and at least 10 feet apart.
Ground rods will give better results if set in moist ground.
The fence doesn’t need to make a loop to be effective. The juice goes from the charger to the netting to the offender to the soil to the ground rods. That orientation is what gives it bite.
Last, read the directions.
With this system in place, Jadrnicek went from spending more than 100 hours a year messing with the mower to only eight hours. He cut the cost of his chicken feed bill by about 30 percent. And his chickens get a lot of healthy outdoor time, exercise and a diversified diet while he’s busy with other tasks or enjoying some family time.
So he swapped out free-range for free time by putting his chickens on a home-range. With a little electric power, you can corral that kind of poultry power, too.
This article originally appeared in the September/October 2020 issue of Chickens magazine.
Bitter gusts are howling outside my window, a stark reminder that the weather here in Michigan has finally started its dreary descent into winter.
Yesterday, as flurries painted our deck an icy white, I was thankful that we had actually completed most of our seasonal prep work before the weather went south. Typically, we find ourselves scrambling in the waning daylight, our fingers raw and red from the cold. Not this year, however!
Perhaps it’s because we’re all home-based right now. Perhaps it’s because we need frequent breaks from our screens and are happy to get outside for some fresh air and activity.
Whatever the reason, our to-dos are pretty much complete, including this fall’s edition of Musical Coops.
Due to rooster deaths, family squabbles and age/gender issues, our birds’ living arrangements had not exactly been what I’d call ideal. During the summer, shuffling the housemates between coops was not a crucial consideration, since they all had plenty of space in which to range and roam.
Hunkered down together for the winter, however, was a totally different deal. One morning last week, I set out to shift our birds around into more suitable housing groups.
First on the list was uniting our older birds under one roof. For years, we had kept two Orpington flocks in separate coops, most recently headed by Thomas in the main coop and Claude in the New Orpington coop.
When Ginger Bean overthrew Claude, several of Thomas’ girls defected to the younger rooster.
Since Ginger Bean’s crew was now significantly larger than Thomas’ faithful three, we exchanged their coops. Thomas and his trio moved to the smaller New Orp coop, while Ginger Bean and his harem got the larger henhouse.
Fast forward to fall: With both Claude and Thomas gone, it was time to merge Thomas’ trio back into the main coop. The problem? Thomas’ trio included the very headstrong Alex Royal Palm.
At age 8, our sole-surviving turkey girl had been unwaveringly loyal to Thomas, worrying me that she would not take kindly to orders from Ginger Bean. I needn’t have worried. Like the Royal Palm that she is, Alex made herself right at home in the main coop … and made it clear that she, not Ginger Bean, ruled the roost.
Ginger Bean for once used his tiny bird brain. He did not challenge the much larger Alex for coop leadership.
Duckie Do-See-Do
Now that the Orps (plus Alex) were ensconced in the main coop, it was time to reunite the Ancona family.
Our Ancona duckling pair, Kiki and Butter Duck, had been continually bullied by their much-larger parents. Injured, stressed and underweight, the duckies needed out. So we moved them into our empty chicken tractor, where they had full access to food and could recuperate in peace.
By mid-August, however, I needed the tractor to introduce Mama Silkie Natalya and her chicks to the outdoors. Since I couldn’t put the duckies back with their elders just yet, they became temporary houseguests of our Ameraucana girls.
Now that they had fully recuperated, Kiki and Butter Duck switched coops to rejoin the duck flock. And, as the largest two ducks of the group, they showed their parents they were no pushovers.
Meanwhile, Natalya and her three babies were facing two separate challenges. First, CJ and Margie, as large-fowl Orpingtons, had spent the summer growing and growing. They left both Natalya and their dwarf Orpington sibling, TJ, well behind size-wise.
Keeping the big boys in our winter brooder together with their tiny mom and sister was not an option.
What to do? The boys were not quite 4 months old yet. The ducks would not tolerate two inquisitive young intruders and Ginger Bean even less so.
The Ameraucana girls, however, had room in their coop, especially now that Kiki and Butter Duck had moved out. In addition, since Claude’s death, the Ameraucana flock had been bereft of a protector.
It was the perfect match.
I brought the boys over, and they were thrilled with all the extra room to explore and new friends to make. The girls were not as excited about the two cockerels, however. They spent the entire first two days running away from the enthusiastic youngsters.
By day four, however, Dolly Ameraucana had taught the boys how to perch and where the best dust-bathing was to be had. CJ and Margie now follow the girls in at night and perch side by side with their new coopmates.
Winter Quarters
Natalya and TJ, however, would not be joining the boys in the Ameraucana coop.
For starters, we never let our Silkies winter outside. Their lack of hard feathering to protect them from Michigan’s often sub-freezing temperatures would quickly turn them into chicksickles.
TJ, on the other hand, was a fully feathered Orpington. Her issue was her size: Even the small-sized Ameraucanas were giants compared to TJ. She’d be smushed in no time flat.
I therefore decided to move the mom-and-daughter duo back into the winter brooder inside our pole barn. Without CJ and Margie, the brooder seemed positively spacious for the two tiny girls.
I still ferry them out to enjoy the few remaining sunny and relatively warm autumn days, but soon they’ll be hunkering down for the winter within their safe shelter, as will we all.
Sometimes summer just isn’t long enough to satisfy the urge to grow all things green. But with a little help from a cold frame, the growing season can be extended by several weeks in both directions.
Even better, with careful crop selection, cold frames enable the gardener to keep winter greens and other vegetables ready for harvest throughout the entire winter season in most regions.
And if that isn’t enough to convince you to dig into cold frames, these little gems can be inexpensive and simple to manage when just a few tips are kept in mind.
How Cold Frames Work
The purpose of cold frames is not to create summer-like conditions conducive to tomatoes and peppers. Sadly, those tasty treats require either a greenhouse or heated high tunnel. (Or you can just wait until summer rolls back around.)
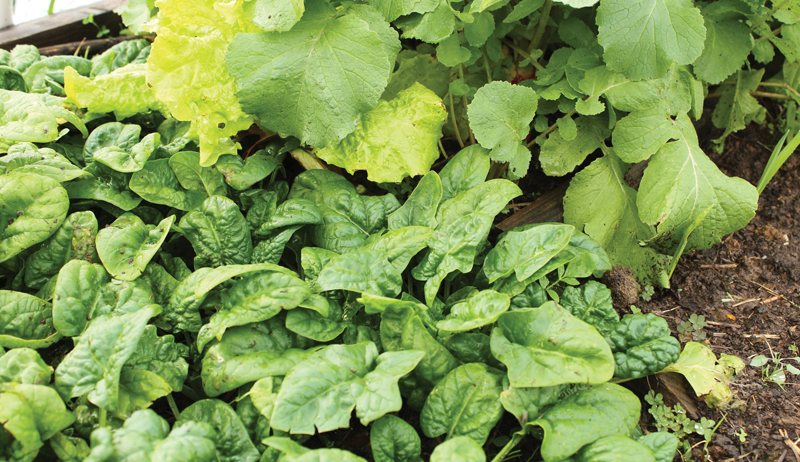
Instead, cold frames shine at prolonging the growing season of hardy crops by limiting the freeze/thaw cycles typical of most winters. Ideal crops include:
carrots
green onions
lettuces
spinach
corn salad
radishes
Through the collection of solar heat via a glass, plastic or other translucent covering, cold frames warm the soil while blocking chilling winds and soaking rains.
These traits work together to keep temperatures inside the cold frame around 10 to 20 degrees Fahrenheit above outside temperatures, depending on materials used.
Kristi Cook
What Grows in the Cold?
Nothing really grows in the cold.
There are, of course, a few exceptions such as mâche and snowmen. But other than that, you can’t grow much of anything when it’s cold outside.
So instead of trying to grow vegetables in the cold, you’ll grow cool-season crops close to harvest size during late summer and early fall before adding the cold frame.
Candidates should be cold-resistant and able to withstand cool, moist soil and include many varieties of:
lettuce
spinach
turnips
corn salad
beets
mustard greens
scallions
Swiss chard
mesclun
Experimentation is key to discovering what works best in your garden.
As an added bonus, the cut-and-come-again crops, such as Swiss chard and leaf lettuces, often reestablish themselves extra early in spring. This can provide another burst of enticing meals before it’s time to start the spring plantings.
The trick to a successful cold-frame season is proper timing. Yet, because hardiness zones and individual garden sites contain different climates and microclimates, the exact timing of planting will be a bit of trial and error.
The method I use in my Zone 7 garden any time I plant a new fall/winter crop is simple. Just add together the seed packet’s expected germination time and days to harvest. Then, calculate backward from your first frost date to get the date for the first sowing.
Each week for at least a month, sow a small row to get an idea of what works best for germination and quality of harvest for each cultivar you choose. As you make notes, jot down weather conditions as well, since this dramatically affects the results.
Unlike in summer , this form of succession planting doesn’t provide a maturing harvest supply over multiple weeks, since winter crops basically stop growth once shorter days hit. Rather, its purpose is to help you determine which growth stage you prefer each crop to be at once they go into this winter holding phase.
Then, because plants are basically hibernating, you can harvest all through winter or until it gets too cold.
This form of succession planting also gives a good indication as to which growth stage each cultivar lasts the best and the longest in throughout its winter hibernation. For example, in my garden, most carrot cultivars that do well in the winter need to reach a relatively large baby carrot stage prior to the first heavy frost in order to provide the sweetest carrots possible while still being large enough to handle slightly damper soil than typically used for carrots.
You will develop a sense of timing and preferences for your particular needs over time.
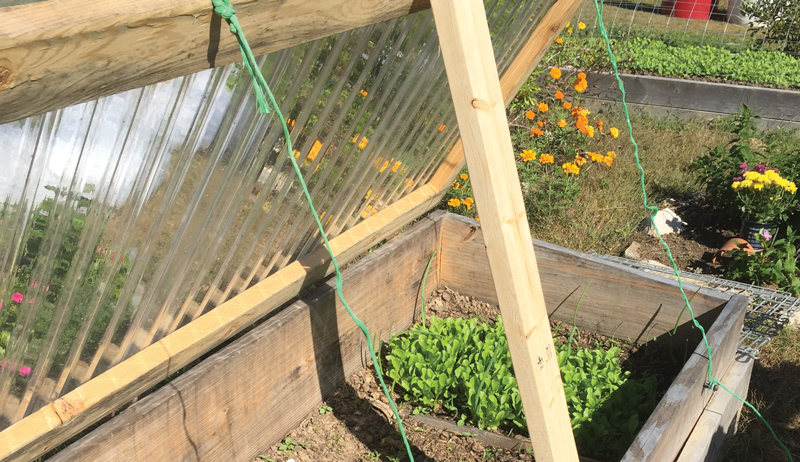
Construction Basics
Cold frames are simple to build. The goal is to create a bottomless box no higher than 12 to 18 inches in back and no lower than 8 inches in front. (Your needs will determine the length and width.)
Typical sizes range anywhere from a 3-by-3-foot cold frame to my personal favorite of 3-by-5-foot. However, it’s not uncommon to find cold frames with lengthier sides and up to 4 feet of depth. So while there’s no hard and fast rule on height and length, try to keep the dimensions on the lower side to best retain heat.
And while many construction plans recommend slanted tops to provide optimal solar heat acquisition, it’s not entirely necessary as long as placement is in full sun with a decent amount of wind protection during those cold, brisk winter winds.
As for materials, use what’s on hand to keep costs down. Scrap untreated lumber, bricks, masonry blocks or hay bales all work great. And only worry about slanting the top if you desire to do so.
To create the light—or lid—you need some type of translucent material to allow the sun’s rays to enter the box. The light may be made from repurposed storm doors or windows, shower doors, salvaged greenhouse panels, Lexan or some other clear material to further increase savings.
If none of these materials are available, use heavy-duty plastic sheeting instead. You can build a frame for the sheeting or simply drape it across the box and secure well with blocks, water jugs or other heavy items to prevent heat escaping.
Kristi Cook
Key Considerations
When considering which lighting material to use, keep the following in mind:
durability during heavy snow, ice or hail
the potential for little children or pets to jump onto the top during play
the amount of wind and rain/ice/snow the site receives during winter
ease of acquirement
Another consideration is the typical temperatures during the time you intend to keep crops living in the cold frame.
For instance, if winters are typically mild, you can easily opt for the lighter plastic sheeting for use as your lighting source. But colder, more extreme winters may require more durable storm window-type glass or even Plexiglas.
When I first started with cold frames, I opted for the less expensive greenhouse-type plastic and worked my way through the different options. Finally, I settled on Plexiglas and storm windows due to their durability and length of life.
But each garden and gardener is different, so don’t be afraid to try out a few to see what you like best, especially those options that you can find for free or at the local flea market.
Walk your garden, and select the sunniest spot available. Just keep in mind that during the winter months some areas will receive more or less light than during the summer months, due to the changing of the sun’s position in the sky and trees losing their summer foliage.
If time allows and your patience is strong enough, monitor a few spots during a full fall-to-spring cycle to ensure your chosen location will work well.
Also, check the site’s drainage capabilities. A low place that pools the cold winter rain under the frame will end your winter garden.
You also want to place the frame in an area with wind protection, such as near shrubs or other tall plantings provided they do not block valuable sunlight. However, stacking hay bales or other large items along the windward side of the frame in the event of especially cold and windy days can create temporary wind protection.
Kristi Cook
Ventilation Required
One often-overlooked aspect of cold frame usage is the inherent need to ventilate, sometimes every day, despite frigid winter weather. Because you’re growing cool-season crops, you need to keep the internal cold frame temperature on the cooler end of the heat spectrum—most commonly between 45 to 60 degrees — depending on the crop.
So keep a thermometer in the center of the bed and monitor throughout the day until you get a feel for when to vent.
In most cases, outside temps of 20 degrees and higher on a bright, sunny, windless day require venting for at least a few hours, sometimes with only a mere crack in the lid. Warmer weather calls for wider openings with some days, especially those nearing 35 degrees and up, requiring the lid to be fully opened.
You can incrementally prop up the lids with sticks, bricks, scrap lumber, even chains attached to an outside wall or post. Just stay constantly aware of the outside temps and vent as needed to avoid cooking your greens before you get them to the dinner table.
If you’re not keen on keeping constant watch on the cold frame temperatures (or if you’re away from home much of the day), you can install a simple self-ventilating arm that does the ventilation for you. While it is an added expense, they’re not too pricey if you shop around and are simple to install. So don’t let worries over ventilation keep you from trying out a cold frame!
However, you choose to ventilate, with a little patience and practice, knowing when to raise the lid will become second nature.
On the flip side of ventilation, you may need to occasionally provide additional insulation during extra frigid weather. When temps drop into the single digits or when conditions call for freezing winter winds, ice and/or snow, add extra insulation by placing one or more heavy blankets (or several inches of hay or straw) across the top and sides of the cold frame.
Blankets tend to fair windy weather better than hay and straw, as they don’t blow away as easily.
As for snow, remember that snow acts as an insulation blanket itself. So if all other factors don’t warrant extra insulation, snow may be just what the cold frame needs to withstand a short period of extra cold weather. Just remove any additional insulation or snow when temperatures begin to rise to avoid overheating your tender vegetables inside.
If you’re not quite ready for the end of the gardening season, then you’re a good candidate for cold-frame gardening. Both inexpensive and simple to manage, cold frames extend the season by several weeks. You can get tasty, fresh-from-the-garden meals even during the coldest of winters.
Now you don’t have to put up that trowel for the winter!
This article originally appeared in the September/October 2020 issue of Hobby Farms magazine.
The Galloway and Belted Galloway cattle breeds are essentially the same, with physical appearance being the primary distinction between the two. Aesthetics aside, though, both breeds—with gentle dispositions and distinctive beef flavor—are excellent animals to add to small farms.
Galloway
Galloways are an ideal breed for forage-based beef production. Efficient grazers and browsers, they readily consume and fully utilize brush and coarse grasses that most breeds spurn.
Galloway beef is flavorful. The breed is noted for producing well-marbled carcasses with large rib eyes and very little internal fat.
When Galloways shed their winter coats, their soft undercoat can be combed, blended with other fibers, and spun into yarn. And, due to their protective nature, a few Galloways in a pasture are as effective as donkeys or llamas for guarding sheep and goats from wandering dogs.
Origin Story
Galloway cattle originated in the Scottish Lowlands in the six shires that made up the Province of Galloway. Records indicate that most early Galloways were black. But red, browns and brindles, with or without white markings, were also fairly common.
Most were then as now naturally polled (hornless).
According to American Galloway Breeders Association registration rules, Galloway come in three patterns: solid, white park and belted. Solids are black, red or dun (in shades ranging from silver to brown).
What all three color phases have in common are depth, thickness, length of body, and intermediate size. Cows weigh 1,000 to 1,300 pounds and bulls 1,800 to 2,000 pounds. A hallmark of the breed is its handsome winter coat consisting of a layer of soft, insulating undercoat topped by a covering of coarse, wavy outer hair perfect for shedding wind and rain.
Calm Cattle
Galloways are friendly, docile cattle. Even bulls are noted for their calm demeanor. Cows are milky, maternal and long-lived, with a well-deserved reputation for getting in calf every year.
And, though Galloways are a quintessential hardy Northern breed, they adapt well to Southern climates, too.
Galloways are listed by The Livestock Conservancy under the Watch category (“Fewer than 2,500 annual registrations in the U.S. and a global population of less than 10,000”).
Belted Galloway
The unique appearance of Belted Galloway cattle inspires many questions about their origins. They can display a black, red or dun color sandwiched about a white middle.
The Belted Galloway’s first recorded history indicates that they developed during the 16th century in the former Galloway district of Scotland. In this rugged and hilly seacoast region, hardiness was necessary for survival.
The British Isles then and now raised solid-colored, polled, shaggy-coated Galloway, generally considered to have evolved from an early Celtic breed. Precisely when and where selective breeding of the Belted variety of Galloway began is shrouded in mystery.
Belted Galloway Society
Weights & Measures
Weights for mature Belted Galloways in North America vary in accordance with their environment. In general, the mature Belted Galloway bull at age 5 weighs within the 1,800 to 2,000-pound range.
The Belted Galloway heifer is generally bred at age 14 to 18 months. Many breeders, however, elect to breed at 700 to 800 pounds without regard to months of age.
The mature cow at age 3 or 4 averages 1,100 to 1,300 pounds. She can be expected to annually produce a healthy calf well into her teen years.
A Distinctive Meat
The Belted Galloway produces exceptionally lean and flavorful meat. Carcass-dressed weights generally sit well in excess of 60 percent of live weight.
A double coat of hair, rather than the layer of back fat most breeds require, provides winter warmth. Their heritage has conditioned them to survive in very harsh climates. Breeders, in turn, have discovered that the thrifty, medium-sized animals more than earn their way in any beef herd.
Small-Farm Favorites
Though the breed is not well-suited to feedlots, they are ideal animals for the small family farm and the lifestyle of country living. The breed’s moderate size, docile temperament, easy calving and good mothering are characteristics they value.
Those starting new herds often pay a premium for their breeding stock.
As breeders become more serious, they begin to recognize some of the unique characteristics that make Belties suited for direct marketing of beef in organic, grass-fed or grain-fed markets. Direct marketing has the greatest potential for profit to the small farm producer.
Many raise Belted Galloways just for the pleasure of it, but the popularity of the breed has spurred many small farms to raise the breed as a serious enterprise on their family farm. Find out more at the Belted Galloway Society website.
This article originally appeared in the September/October 2020 issue of Hobby Farms magazine.
Like peas, beans and lettuce, tomatoes are well suited for seed saving in the home garden. You can save excellent tomato seeds from a small number of plants with different varieties growing right next to each other.
In addition to being inbreeding self-pollinators, this is made possible by the fact that the male part of the flower covers the female part so completely that—if and when the flower is visited by a pollinator—all it does is knock the pollen directly from the male part right into the female part of the same flower.
It can’t even get to the female part. Cool, right? Like nearly everything in nature, however, there always needs to be an exception, and in this case, it’s the potato-leaf varieties of tomatoes.
Keep ‘Em Separated
The leaves of most tomato plants look kind of like oak leaves. There are a few, however, like Brandywine and Pruden’s Purple, that have more oval-shaped leaves. These look very much like the leaves of a potato plant (hence the name).
In addition to this unusual shape, these varieties have longer-than-usual female flower parts that stick out above the male parts. These promiscuous varieties face the risk of outside pollination. They require a little separation from other tomatoes.
This is just an issue for that tomato, though, not for the other ones. You could grow a Brandywine next to a Purple Cherokee and a Yellow Pear, and the latter two won’t have a problem.
Once you have a ripe tomato (this could be one that is vine-ripened, or one picked in that “almost ripe” state and allowed to ripen on the windowsill), the next step is to ferment the seed. This is not difficult at all, but it’s necessary when you save tomato seeds for two reasons.
First, you probably have noticed that the seeds in a tomato are surrounded by a little membrane that makes them look like a frog’s egg. This must be fermented off so that the seed can be properly stored.
Second, the fermentation prevents transmission of a number of tomato diseases. These include the much-feared late blight, among others.
To do the fermentation, squeeze some seeds along with some tomato juice into a small jar. For very dry past tomatoes, I sometimes add just a little bit of water.
Place the jar, uncovered, in a place out of direct sunlight where it won’t be disturbed. I like a north-east-facing window.
The next step I recommend is telling your spouse, partner or other housemate what you are up to. I’ve lost more than one jar of fermenting seed to the diligent kitchen cleaning of my wife. (How can I complain, really, when she’s the one that cleaned up dinner that night!)
Speaking of spouses, they are often the ones that will tell you when the fermentation is done because a green film will appear on the surface of the liquid and it will start to smell a little.
If you leave them in too long, the danger is that they can start to sprout. I’ve not had this issue leaving them there up to seven days. But if you have the time and the seeds are done, there’s no reason to wait.
To finish the job, take the jar of fermented seed, add a little water, and stir with a fork to make sure the seeds are well separated from the other material. (This is often unnecessary if the fermentation is complete.)
Then pour off most of the water. Most of the seeds will go to the bottom while the fermented solids can be poured off the top. You will pour out a few seeds, too. But like with lettuce seeds that we blow into the wind, these will generally not be the healthy, viable seeds that you want.
Add some more water to the mixture and repeat this three to four times until the water runs clear. Then pour off as much water as you can and pour the damp seeds off onto a plate to dry.
You’ll want to separate them while they are still damp. Once they dry, it’ll be very difficult to do so.
I just put them on a dinner plate on top of the fridge, and the next morning they are dry. You can dry them on paper towels or newspaper, too, but I find that they stick to those.
Once the tomato seeds are all dry, they’re ready to save in storage for next year!
This article originally appeared in the September/October 2020 issue of Hobby Farms magazine. It was excerpted with permission from Beginning Seed Saving for the Home Gardener by James Ulager, from New Society Publishers (2019).
Lobster mushrooms were the first fungus I learned to identify on a mushroom walk. Like a weed coming up through a crack in the sidewalk, they sprouted right in the middle of the footpath.
It’s a truism among foragers that the best mushrooms are rarely found along a path. You have to go cross-country for the best finds. But there are exceptions.
Lobster mushrooms (Hypomyces lactifluorum) can be found under oaks and even hemlocks in rich soil, yet they also like the compacted conditions of footpaths. But to be entirely accurate, lobsters aren’t the only mushrooms that we’re looking at.
You’re actually seeing two mushrooms: a host and a parasite. Slice one in half and you’ll see what I mean.
Lobster mushrooms have a thin, bright orangey-red coating on the outside and bright white flesh on the inside. The color pattern appears similar to the cooked crustaceans.
If you could sample the DNA you’d find that the white part is either a pepper milky (Lactarius piperatus) or a short-stemmed russula (Russula brevipes). Neither of these is poisonous, but neither one is tasty either, although some chefs do use the pepper milky as a spice.
But the reddish-orange coating is another fungus entirely—one that attacks, coats, contorts and consumes either of the first two, to the delight of foragers. Through fungal alchemy it transforms the flavor of unmarketable mushrooms into $15-a-pound gourmet gems.
Some foragers suggest the lobster might commit fraud by hiding the identity of a toxic mushroom and poisoning a gullible forager. But after hundreds of years of recorded eating, the number of instances of poisoning adds up to exactly zero.
I think some foragers can be like politicians in that they just like to tell scary stories, no matter how unfounded.
Looking for Lobsters
Lobster mushrooms are the product of rainy summer weather. They can show up from mid-summer to mid-fall. What characteristics should you look for?
reddish-orange cooked-lobster exterior
bright white interior
contorted into the look of a blown-out umbrella
granular red coating making the gills look congested almost to the point of disappearing
no spore print
no look-alikes
So why are they found more often in paths than many other species? I’m not aware of any studies being done. The mushroom industry doesn’t have the resources to invest as much money in research as the fruit, vegetable, dairy and meat industries.
But I’ll hazard a guess.
The underground mycelia of the white mushrooms that come up in a path are stressed from the scarcity of oxygen in the compacted soil. That stress makes them more susceptible to pirate spores from the lobster mushroom. They want to board those weakened, rising mushrooms and seize their treasure.
If we foragers are on the right path at the right time, thought, we can seize that treasure from the lobster pirates for ourselves.
To garden is to have weeds. And yet, if you’re an amateur forager, to have weeds is also to have nutrient-
dense and tasty crops growing in your yard.
But until you learn their secret identities, they will continue to masquerade as annoying weeds, demanding your time to wastefully yank out and toss them.
Once you do learn their hidden qualities, you’ll find that of all your crops, they need the least help from you in terms of watering, planting, mulching or worrying. They won’t, in fact, need any help at all. Gathering these feral crops gives a new, more positive meaning to “weeding.”
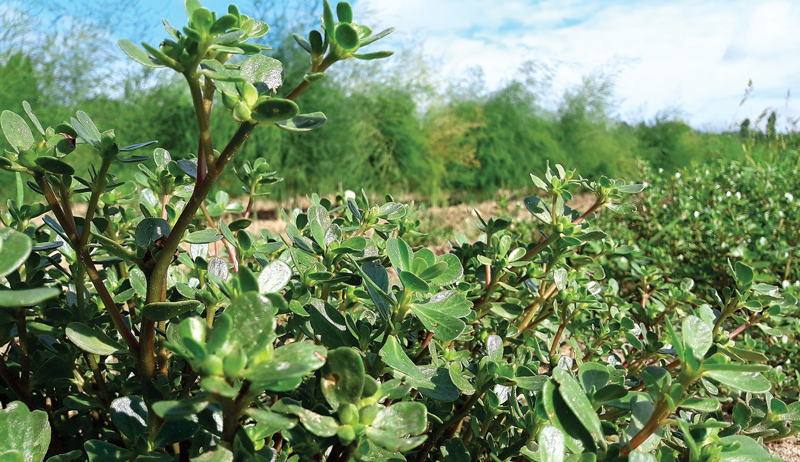
That’s especially true when one of the most common garden weeds is also a common food crop from south Asia. It has a spinachlike taste that has the most omega-3 fatty acids of any green. I’m talking about purslane (Portulaca oleracea).
This very drought-hardy succulent plant resembles its more cultivated cousin Portulaca grandiflora, or moss rose from South America. That portulaca is also called verdolago in Hispanic markets and can be eaten as well, with one small caveat. They both have calcium oxalates, so don’t eat mountains of these greens every day or you could find yourself expelling a kidney stone.
But eaten in quantities similar to the amount of spinach or arugula that the average person eats, there should be no problem.
“[Purslane] has omega-3 fatty acids and antioxidants as well as a Fourth of July parade of vitamins and minerals,” says forager and author Green Deane. “I think there’s even an anticancer color guard in there as well. According to experts at the University of Texas at San Antonio, purslane contains 10 to 20 times more melatonin, an antioxidant, than any other fruit or vegetable they tested.”
When young, purslane grows flat on the ground. As it gets old enough to flower it may develop into the shape and size of a mixing bowl. The succulent stems are reddish-brown and almost as wide as a pencil.
The thick, paddle-shaped leaves are bright green and about the size of an almond.
jnzlsphotos/Flickr
Pickled Purslane
They are tasty raw in salads or sandwiches. Ellen Zachos, in her book Backyard Forager, suggests a sauté with olive oil, feta, garlic, oregano and tomatoes as a side dish.
Mike Krebill in his book, The Scout’s Guide to Wild Edibles, suggests pickling the stems and offers a simple recipe for small quantities:
3 cups of stems cut into 2- to 3-inch pieces
1/2 an onion thinly sliced
1 teaspoon salt
1/2 a cup of apple cider vinegar
1/2 a cup of white sugar
half a teaspoon mustard seeds
1/4 teaspoon of ground turmeric
1/4 teaspoon of celery seed
Mix everything in a covered microwaveable bowl and on put on high for 6 to 7 minutes in the microwave. Stir twice until purslane is tender and onion is translucent.
Store for up to three months in a sterilized jar. By which time there will be another crop of delicious weeds to harvest.
This article originally appeared in the September/October 2020 issue of Hobby Farms magazine.